Televes RSD - 7297 User manual

Receptor Satélite Digital Instrucciones de uso
Digital Satellite Receiver User manual
“RSD - 7297”
© Copyright, Televés, S.A.

User Manual
“
RSD - 7297”
31
ENGLISH
ÍNDEX . . . . . . . . . . . . . . . . . . . . . . . . . . . . . . . . . . . . . . . . . . . . . . . . . . . . . . . . . . . . . . . . . . . . . . . . . . . . . . . Pág.
1.- Safety measures . . . . . . . . . . . . . . . . . . . . . . . . . . . . . . . . . . . . . . . . . . . . . . . . . . . . . . . . . . . . . . . . . . . . . . . . . . . . . . 32
2.- Before beginning . . . . . . . . . . . . . . . . . . . . . . . . . . . . . . . . . . . . . . . . . . . . . . . . . . . . . . . . . . . . . . . . . . . . . . . . . . . . . . 33
2.1.- Preface . . . . . . . . . . . . . . . . . . . . . . . . . . . . . . . . . . . . . . . . . . . . . . . . . . . . . . . . . . . . . . . . . . . . . . . . . . . . . 33
2.2.- General specifications . . . . . . . . . . . . . . . . . . . . . . . . . . . . . . . . . . . . . . . . . . . . . . . . . . . . . . . . . . . . . . . . . . 33
2.3.- Equipment . . . . . . . . . . . . . . . . . . . . . . . . . . . . . . . . . . . . . . . . . . . . . . . . . . . . . . . . . . . . . . . . . . . . . . . . . . . 33
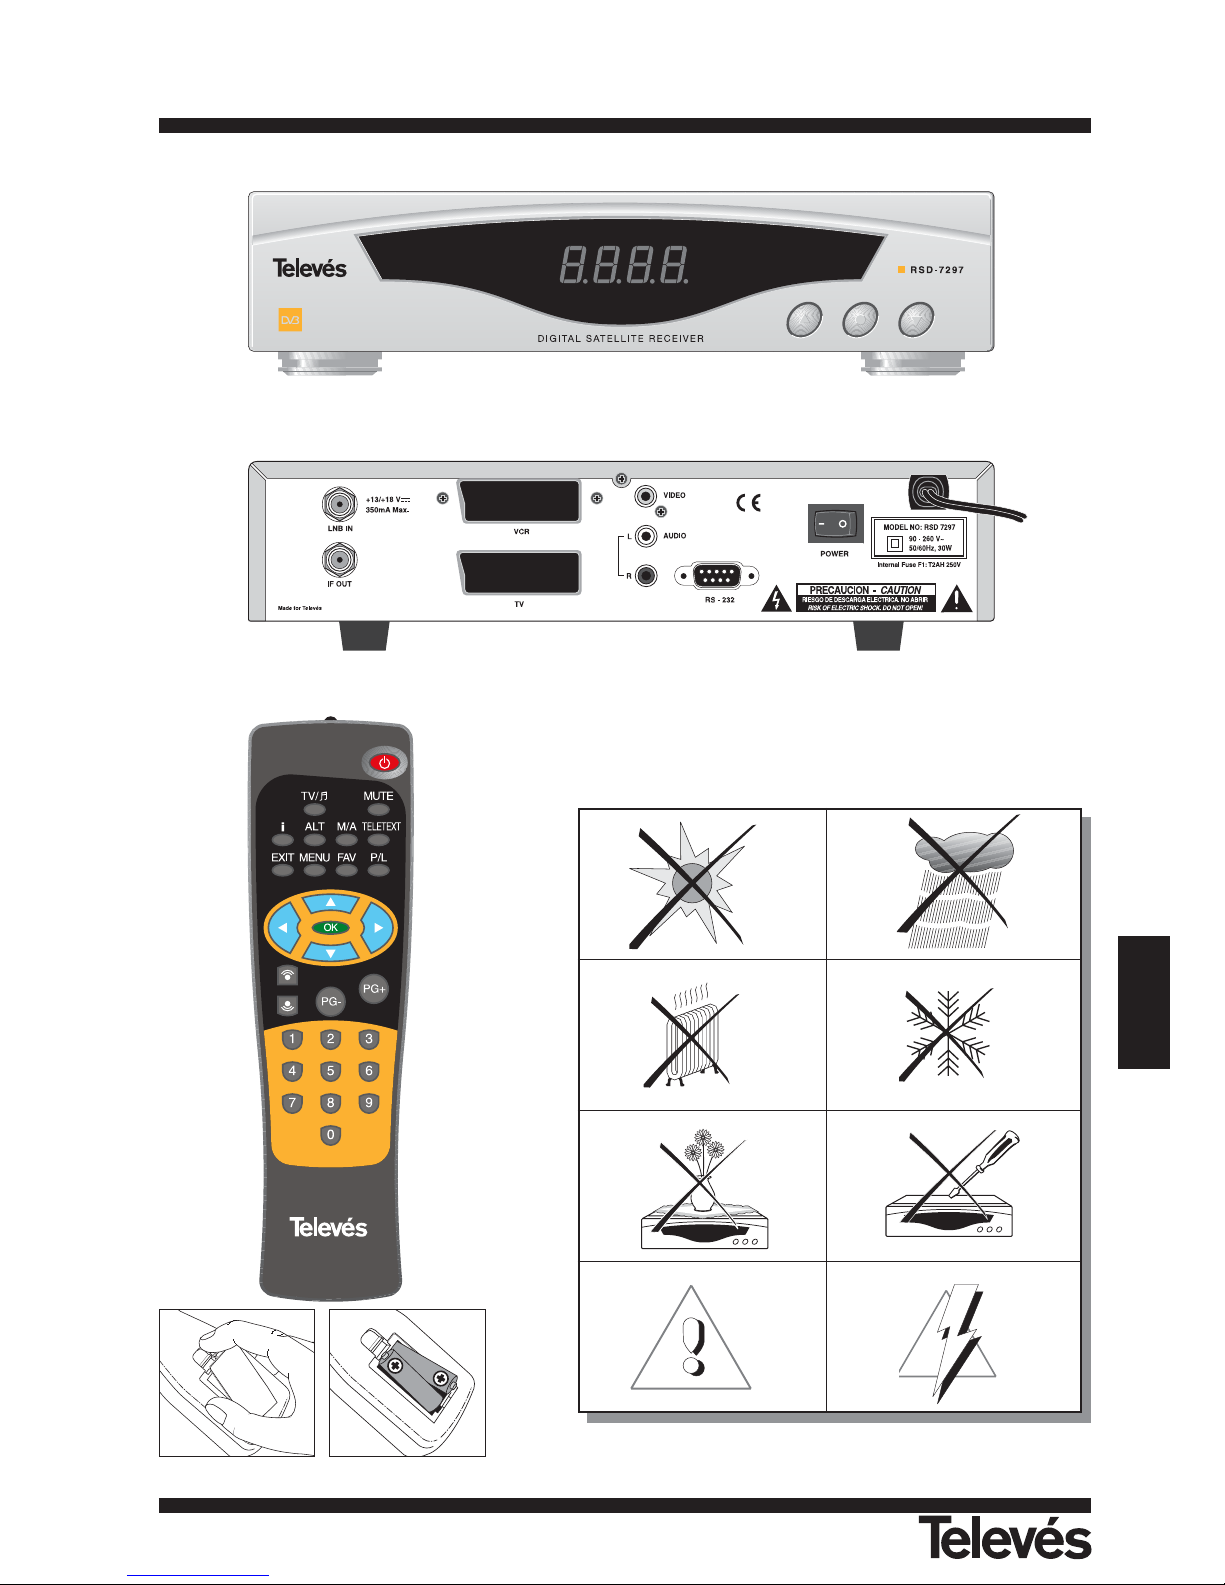
3.- Description of panels and connections . . . . . . . . . . . . . . . . . . . . . . . . . . . . . . . . . . . . . . . . . . . . . . . . . . . . . . . . . . . . . 34
4.- Installation of equipment . . . . . . . . . . . . . . . . . . . . . . . . . . . . . . . . . . . . . . . . . . . . . . . . . . . . . . . . . . . . . . . . . . . . . . . 36
4.1.- Connections . . . . . . . . . . . . . . . . . . . . . . . . . . . . . . . . . . . . . . . . . . . . . . . . . . . . . . . . . . . . . . . . . . . . . . . . . 36
5.- Ready to begin . . . . . . . . . . . . . . . . . . . . . . . . . . . . . . . . . . . . . . . . . . . . . . . . . . . . . . . . . . . . . . . . . . . . . . . . . . . . . . . . 37
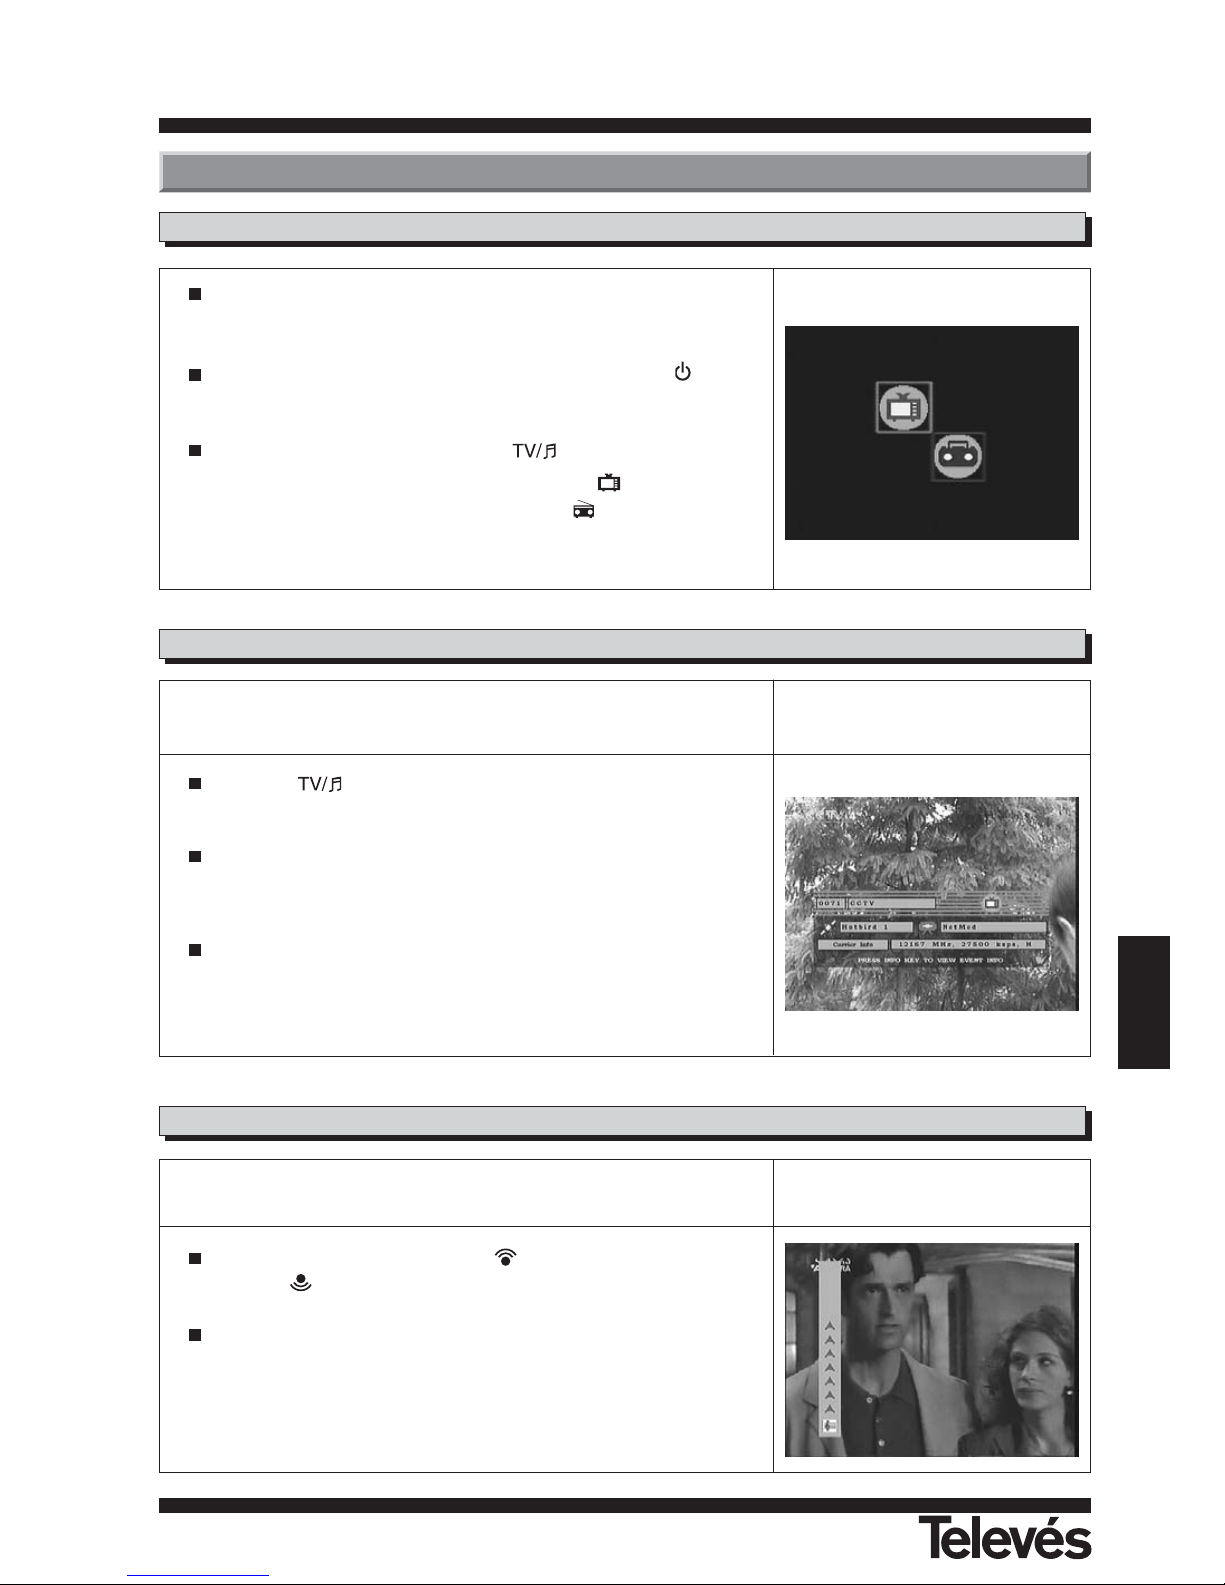
5.1.- How to start . . . . . . . . . . . . . . . . . . . . . . . . . . . . . . . . . . . . . . . . . . . . . . . . . . . . . . . . . . . . . . . . . . . . . . . . . . 37
5.2.- How to select TV or RADIO channels . . . . . . . . . . . . . . . . . . . . . . . . . . . . . . . . . . . . . . . . . . . . . . . . . . . . . . 37
5.3.- How to adjust the volume . . . . . . . . . . . . . . . . . . . . . . . . . . . . . . . . . . . . . . . . . . . . . . . . . . . . . . . . . . . . . . . 37
5.4.- Mute . . . . . . . . . . . . . . . . . . . . . . . . . . . . . . . . . . . . . . . . . . . . . . . . . . . . . . . . . . . . . . . . . . . . . . . . . . . . . . . 38
5.5.- Audio language . . . . . . . . . . . . . . . . . . . . . . . . . . . . . . . . . . . . . . . . . . . . . . . . . . . . . . . . . . . . . . . . . . . . . . . 38
5.6.- Recalling previous channel . . . . . . . . . . . . . . . . . . . . . . . . . . . . . . . . . . . . . . . . . . . . . . . . . . . . . . . . . . . . . . 38
5.7.- Recalling previous channel and auto-saving . . . . . . . . . . . . . . . . . . . . . . . . . . . . . . . . . . . . . . . . . . . . . . . . . 38
5.8.- Onscreen pause . . . . . . . . . . . . . . . . . . . . . . . . . . . . . . . . . . . . . . . . . . . . . . . . . . . . . . . . . . . . . . . . . . . . . . . 38
5.9.- Electronic Programming Guide (EPG) . . . . . . . . . . . . . . . . . . . . . . . . . . . . . . . . . . . . . . . . . . . . . . . . . . . . . . 39
5.10.- How to use the Favourite Channels List . . . . . . . . . . . . . . . . . . . . . . . . . . . . . . . . . . . . . . . . . . . . . . . . . . . 40
5.11.- Teletext function . . . . . . . . . . . . . . . . . . . . . . . . . . . . . . . . . . . . . . . . . . . . . . . . . . . . . . . . . . . . . . . . . . . . . 40
6.- Main Menu . . . . . . . . . . . . . . . . . . . . . . . . . . . . . . . . . . . . . . . . . . . . . . . . . . . . . . . . . . . . . . . . . . . . . . . . . . . . . . . . . . 41
7.- OSD menu language . . . . . . . . . . . . . . . . . . . . . . . . . . . . . . . . . . . . . . . . . . . . . . . . . . . . . . . . . . . . . . . . . . . . . . . . . . . 41
8.- Box Setup menu . . . . . . . . . . . . . . . . . . . . . . . . . . . . . . . . . . . . . . . . . . . . . . . . . . . . . . . . . . . . . . . . . . . . . . . . . . . . . . 42
8.1.- Channels setup . . . . . . . . . . . . . . . . . . . . . . . . . . . . . . . . . . . . . . . . . . . . . . . . . . . . . . . . . . . . . . . . . . . . . . . 42
8.2.- Changing the Password (PIN) . . . . . . . . . . . . . . . . . . . . . . . . . . . . . . . . . . . . . . . . . . . . . . . . . . . . . . . . . . . . 44
8.3.- Ajdusting the clock . . . . . . . . . . . . . . . . . . . . . . . . . . . . . . . . . . . . . . . . . . . . . . . . . . . . . . . . . . . . . . . . . . . . 44
8.4.- VCR timer . . . . . . . . . . . . . . . . . . . . . . . . . . . . . . . . . . . . . . . . . . . . . . . . . . . . . . . . . . . . . . . . . . . . . . . . . . . 45
8.5.- Factory values (Restore default values) . . . . . . . . . . . . . . . . . . . . . . . . . . . . . . . . . . . . . . . . . . . . . . . . . . . . . 46
8.6.- Audio selection . . . . . . . . . . . . . . . . . . . . . . . . . . . . . . . . . . . . . . . . . . . . . . . . . . . . . . . . . . . . . . . . . . . . . . . 46
8.7.- TV Format . . . . . . . . . . . . . . . . . . . . . . . . . . . . . . . . . . . . . . . . . . . . . . . . . . . . . . . . . . . . . . . . . . . . . . . . . . . 47
8.8.- Box Info . . . . . . . . . . . . . . . . . . . . . . . . . . . . . . . . . . . . . . . . . . . . . . . . . . . . . . . . . . . . . . . . . . . . . . . . . . . . . 47
9.- System Setup menu . . . . . . . . . . . . . . . . . . . . . . . . . . . . . . . . . . . . . . . . . . . . . . . . . . . . . . . . . . . . . . . . . . . . . . . . . . . . 48
9.1.- LNB Setup . . . . . . . . . . . . . . . . . . . . . . . . . . . . . . . . . . . . . . . . . . . . . . . . . . . . . . . . . . . . . . . . . . . . . . . . . . 48
9.2.- Dish Setup . . . . . . . . . . . . . . . . . . . . . . . . . . . . . . . . . . . . . . . . . . . . . . . . . . . . . . . . . . . . . . . . . . . . . . . . . . 49
9.3.- Satellite Setup . . . . . . . . . . . . . . . . . . . . . . . . . . . . . . . . . . . . . . . . . . . . . . . . . . . . . . . . . . . . . . . . . . . . . . . 50
9.4.- Transponder Setup . . . . . . . . . . . . . . . . . . . . . . . . . . . . . . . . . . . . . . . . . . . . . . . . . . . . . . . . . . . . . . . . . . . . 51
9.5.- DiSEqC 1.2 . . . . . . . . . . . . . . . . . . . . . . . . . . . . . . . . . . . . . . . . . . . . . . . . . . . . . . . . . . . . . . . . . . . . . . . . . . 52
9.6.- Code download (software) . . . . . . . . . . . . . . . . . . . . . . . . . . . . . . . . . . . . . . . . . . . . . . . . . . . . . . . . . . . . . . 54
10.- Automatic scan . . . . . . . . . . . . . . . . . . . . . . . . . . . . . . . . . . . . . . . . . . . . . . . . . . . . . . . . . . . . . . . . . . . . . . . . . . . . . . 55
Menu structure . . . . . . . . . . . . . . . . . . . . . . . . . . . . . . . . . . . . . . . . . . . . . . . . . . . . . . . . . . . . . . . . . . . . . . . . . . . . . . . . . . 56
Connector description . . . . . . . . . . . . . . . . . . . . . . . . . . . . . . . . . . . . . . . . . . . . . . . . . . . . . . . . . . . . . . . . . . . . . . . . . . . . 57
Technical specifications . . . . . . . . . . . . . . . . . . . . . . . . . . . . . . . . . . . . . . . . . . . . . . . . . . . . . . . . . . . . . . . . . . . . . . . . . . . 58
Guarantee . . . . . . . . . . . . . . . . . . . . . . . . . . . . . . . . . . . . . . . . . . . . . . . . . . . . . . . . . . . . . . . . . . . . . . . . . . . . . . . . . . 59

User Manual
“
RSD - 7297”
32
The Receiver you have just purchased has been manufactured to meet international safety standards.
We recommend that you carefully read the safety instructions below.
POWERING:
90 - 260 V~ 50/60 Hz.
OVERLOAD:
Do not overload the sockets, extenders or adapters to avoid a fire hazard or risk of electric shock.
LIQUIDS:
Take care not to spill any liquids over the Receiver, or splash it.
Avoid placing recipients or objects with liquids on or next to the Receiver.
SMALL OBJECTS:
Avoid placing small metallic objets close to the unit. These could accidentally enter through the ventilation slots and
cause serious damage.
CLEANLINESS:
Unplug the Receiver from the mains before cleaning it.
Use a slightly damp, soft cloth (no detergent) to clean the outside of the Receiver.
VENTILATION:
Place the Receiver in a well-ventilated area so that the slots are not blocked in any way.
Avoid exposure to the sun or to other sources of heat.
Do not place on top of other equipment.
CONNECTIONS:
Carry out the recommended connections only to avoid any possible damage.
LNB CONNECTIONS:
Switch the Receiver off before connecting or disconnecting the LNB.
IF YOU DO NOT DO THIS, YOU MAY DAMAGE THE LNB.
TV or VCR CONNECTIONS:
Switch the Receiver off before connecting or disconnecting the TV or VCR.
IF YOU DO NOT DO THIS, YOU MAY DAMAGE THE TV OR VCR.
LOCATION:
Place the Receiver inside where it is protected from the rain, lightning and direct sunlight.
Install the Receiver in a horizaontal position.
1.- Safety measures
WARNING
RISK ELECTRICAL SHOCK
DO NOT OPEN
TO REDUCE THE RISK OF ELECTRIC SHOCK, DO NOT TAKE THE COVER OFF.
NO PART OF THE RECEIVER CAN BE REPAIRED BY THE USER.
PLEASE CONSULT A QUALIFIED TECHNICIAN FOR ANY REPAIRS
This symbol indicates "dangerous voltage" - there is the risk of an electric shock.
This symbol indicates that there are some important instrutions for this particular
product.

User Manual
“
RSD - 7297”
33
ENGLISH
- High quality video and audio.
- User-friendly onscreen menu.
- Favourite channels list.
- Compatible DiSEqC 1.2 / USALS.
- Channel control via the “move”,
“lock”, “favourites”, "delete" and
“add”.
- Program information on the EPG
(Electronic Programming Guide).
- Teletext function
- Remote control.
- It offers various types of LNB swit-
ching, output modes and monitors.
- Transponders that have been pre-
programmed to various satellites.
- Displays the transponder informa-
tion.
- Scans for recently added transpon-
ders.
- Access control.
- Automatic support system
PAL/NTSC.
- Auto-saving of previous channel and
auto-return.
- 4 digit display.
- Timer.
- Software upgrade function.
- Clock.
A Digital Satellite Receiver is a product
that enables you to see a large variety
of channels that are supplied by a sate-
llite. This User manual explains everyt-
hing from how to install the Receiver to
the steps that need to be taken to
improve various different functions.
This manual also describes in detail a
series of functions that are only availa-
ble in this Receiver, so that you can use
them properly.
Please be sure to read this manual so
that the Receiver is installed and used
correctly, and make sure to keep it in a
safe place for future reference.
2.1.- Preface
2.2.- General specifications
Check that all of the parts are in the
box:
1 - Satellite Receiver RSD-7297
1 - Remote control
2 - “AAA”, “LR03” or “AM-4” batteries
- - User manuals
2.3.- Equipment
2.- Before beginning ...

User Manual
“
RSD - 7297”
34
Button Function
It switches from normal operational mode to standby.
Goes up through the channels.
Goes down through the channels.
Display In normal mode, this displays the channel number; in STANDBY mode it displays the time.
Button Function
Switches between normal operational mode and standby.
Switches between TV or RADIO channels. Switches between TV list and Radio list.
MUTE Switches the sound off.
Displays information on the channel that you are watching.
If you press it again, the Electronic Programming Guide appears onscreen.
ALT Returns to the previous channel.
M/A Selects the different types of audio.
TELETEXT Activate the Teletext menu, if this is emitted.
EXIT Returns to the previous menu within the larger menus.
MENU Displays the main menu onscreen.
FAV Activates the favourite channel list.
P/L Activates a list with all of the locked channels.
, , , The cursors to move through the menu options.
OK Executes the selected option in the menu and enters the value in any input mode or it displays the chan-
nel list while watching a program.
,Increases or decreases the volume.
PG-/PG+ Goes up or down through the channel numbers.
0 ... 9 Selection of a channel to watch. Direct input of data in the menu.
Name Function
LNB IN Satellite antenna’s signal input.
IF OUT Satellite signal output to connect to another receiver.
TV To connect to the TV via a SCART connector.
VCR To connect to a VCR via a SCART connector.
VIDEO Video signal output.
AUDIO R Audio output (Right channel).
AUDIO L Audio output (Left channel).
RS232 Connection to a serial port or another receiver to update the software.
POWER ON/OFF switch.
Fig. 3 - Remote control
Fig. 2 - Rear Panel
Fig. 1 - Front Panel
3.- Description of panels and connections

User Manual
“
RSD - 7297”
35
ENGLISH
< -5°C
> 95 %
> 50°C
Fig. -1-
Fig. -2-
Fig. -3-

User Manual
“
RSD - 7297”
36
This section explains how to install the
satellite receiver. Please consult the
manual that comes with the equipment
to carry out the installation of the out-
door equipment such as the antenna.
If you want to add extra equipment,
please make sure that you read the
section of this manual that deals with
this type of installation.
1- Install the antenna and fix it so that it
is facing directly towards the satelli-
te. After this, connect the antenna
cable to the satellite receiver.
2- Connect the satellite receiver tot he
TV and to the other equipment.
3- Set the receiver’s menu according to
the TV and the other equipment.
The receiver is now ready to use.
4.1.- Connections
Terrestrial reception
Satellite reception
VCR
RSD-7297
TV
4.- Installation of Equipment
(Recommended)
DO NOT PLUG THE
RECEIVER INTO THE
MAINS until all the
cables have been
correctly connected.
Note:
- All of the cables are
shielded.

User Manual
“
RSD - 7297”
37
ENGLISH
5.1.- How to start
5.- Ready to begin
Switch the TV on as well as all the additional equipment that may be
connected to the system.
Switch the satellite receiver on, by pressing the ON button ( ) on the
receiver or on the remote control.
Select the TV or Radio mode using the button.
The TV mode channels can be identified by the symbol and the
Radio mode channels can be identified by the button.
(The default mode is the TV mode).
The TV/Radio channels can be selected using both the remote control and
the buttons on the receiver.
Press the button to select the desired service mode (TV chan-
nels or radio channels).
When you can see the channel, press the PG+ button to select the follo-
wing channel, or the PG- button to select the previous channel.
The selected channels will appear straight away with the corresponding
information at the bottom of the screen.
By pressing the i button, a window appears on the screen with informa-
tion about the programme you are watching.
5.2.- How to select TV or RADIO channels
5.3.- How to adjust the volume
The volume can be adjusted using the remote control.
To increase the volume, press the button, and to decrease it,
press the button on thre remote control.
The volume levels can be seen on the indicator that appears
onscreen.

User Manual
“
RSD - 7297”
38
5.4.- Mute
Press the MUTE button to mute the sound.
To switch the sound back on again, pres the same button again.
The sound will return with the same volume as before.
To adjust the volume press the or buttons.
5.5.- Audio language
Some channels are transmitted in various audios. This depends on whether
this information is included in the signal that is sent to the Receiver.
In the case of TV channels, the different audios tend to correspond to the
different languages in which the channel is emited (for example, in the case
of “Euronews” - HOTBIRD, the Spanish language is received in the fifth
audio). As regards Radio programmes, each audio identifies a different radio
station (for example, the programme “Radio Esp” - ASTRA, contains 10
Spanish radio stations - 40 principales, M80, etc...-).
Press the M/A button to activate the menu that contains the different
transmission languages.
Select the desired audio from those available using the and
buttons and press OK.
To exit this menu, press EXIT.
If the flow of electricity is interrupted for any reason (the receiver is unplugged or the electricity supply interrupted),
when the receiver is connected once again to the current, the TV / RADIO channel that you were watching automa-
tically appears onscreen with the Audio that was selected without having to press any buttons.
5.7.- Recalling previous channel and auto-saving
If you want to watch the channel that you were just previously watching but you cannot remember the channel
number, simplly press ALT.
5.6.- Recalling previous channel
If you wish to pause the image onscreen while watching a programme, press the 0button. To return to the pro-
gramme, press 0again.
It is necessary to point out that when you pause an image onscreen, the programme that you were watching conti-
nues with its transmission as normal, so that during the time that the Pause is on, you will be missing the programme.
5.8.- Onscreen pause

User Manual
“
RSD - 7297”
39
ENGLISH
The RSD-7297 receives and stores information on the TV and Radio chan-
nels that are being watched. This includes detailed information on the time
schedule of the next programme. This guide is very easy to use, as it dis-
plays all the information in a single window onscreen.
The information provided by this guide consists of the channel number, the
channel name, the programme name and the date and time of emission
(when it starts and when it finishes).
Using the button you can change from the TV list to the Radio
list.
Press the ibutton while tuning the TV or Radio channels. The informa-
tion window will appear with info on the channel that is selected at that
moment. Press the ibutton again while the information window is visible
and you will see the Electronic Programming Guide (EPG).
The EPG has three main sections. One of these is a list of the number
and name of the channels. With the or buttons, you can move
from one channel to another.
Immediately to the right, there is a small screen where you can see the
channel that you have selected in the list.
Finally, a window appears where you can see information on the pro-
gramme that is on at the moment, as well as the starting and finishing
times.
By pressing the button, you can access a list with all of the program-
mes that are transmitted by that channel as well as their transmission
times. To move through them, use the or buttons. To return to the
channel list, press the button.
The information that appears in the guide comes with the signals trans-
mitted by the service supplier. If a channel does not have any data for
the EPG, a message will appear onscreen indicating this.
Press the EXIT button to exit the EPG and access the selected channel.
5.9.- Electronic Program Guide (EPG)
Note:
- To receive the programme schedule correctly, you must first adjust the LOCAL TIME to the GMT (Greenwich Mean Time).
- The time that appears onscreen is provided by the supplier, so this information may be incorrect in certain channels.

User Manual
“
RSD - 7297”
40
5.10.- How to use the Favourite Channels List
You can easily select your favourite TV or Radio channels using the
Favourite Channels List. This list only contains your personally selected
favourite TV or Radio channels.
Press the button to select the TV or Radio channels list.
While watching a TV channel or listening to a Radio channel, press the
OK button to see the General Channels List. Next press the FAV button
to access the Favourite Channels List.
Select any channel using the and buttons and press the OK
button to go to this channel.
If there are no channels in the Favourites List, the favourites menu will
not appear onscreen and instead, the message "No preferred channels"
will appear.
Press the EXIT button to exit the Favourite Channel List.
See point 8.1.- “Channel Setup” from section 8.- “Box Setup Menu” to
find out how to create the Favourite Channels List.
5.11.- Teletext function
Press the TELETEXT button on the remote control to activate the
Teletext menu.
In this menu you can select all of the teletext services that are supplied
by the service supplier.
The teletext service will be displayed as normal.
Even if your TV does not dispose of a Teletext decoder, you can still see
it onscreen, as the Receiver decodes it automatically.
If your TV already has a Teletext decoder, you can also see it using the
TV remote control.
To exit the "Teletext" menu, press the EXIT button.
NOTE: Not all service providers supply this type of information.

User Manual
“
RSD - 7297”
41
ENGLISH
Press the MENU button when watching a channel and the main menu
will appear onscreen.
Select one of the menu options and press OK to execute it.
Press the EXIT button to exit the main menu and return to the TV or
Radio channel you were watching.
6.- Main Menu
7.- OSD Menu language
In this menu you can choose the language of the onscreen menus.
The languages that are available are: English, German, French, Spanish,
Italian, Portuguese, Polish and Turkish.
Press the MENU button on the remote control to activate the main
menu.
The first menu option that appears selected by default is the -Language
Setup-.
You can see that a flag icon appears next to the chosen language.
If you want to change this language, press OK to access the languages.
With the or buttons, select the new language and press OK.
When you go through the different languages, the menu displays the
flag that corresponds to each one.

User Manual
“
RSD - 7297”
42
This menu lets you create / edit the favourite channels list, it can move,
lock, delete and add new channels to the list.
After editing, the remaining channels are organised automatically.
The channels with the symbol are scrambled.
Press the MENU button on the remote control to activate the main
menu.
With the or button, select the -Box Setup- option and press OK
to access this submenu. Select the -Channel Setup- option and press
OK. The menu “Channel Explorer” will appear, where you will see the
different editing options available and the list of all the channels that
have been stored in the receiver.
This menu is divided into two groups. To the left, -Channel Explorer-
where all of the channels that are available appear. To the right, -List-
where the options that you have are displayed. You can move from one
group to the other by pressing the and buttons.
If you are in either group, you can select the options within each group
by using the and buttons.
The options for editing the channels are:
- Favourite channels: With the cursor on this option, move to the group
on the left-hand side with the button.
To add a channel to the List, press the OK button over the new chan-
nel. The symbol which indicates Favourite, will appear. To remove it
from the list, press the OK button again over the channel name.
The symbol ( ) over a channel indicates that this channel belongs to
a favourite channels list.
All of the channels that you mark by pressing OK over them, will beco-
me part of the Favourite Channels List when you exit the menu.
To exit the menu, press EXIT.
- Lock channels: With the cursor on this option, move to the left using
the button.
To block a channel, press the OK button over the chosen channel. A
symbol will appear indicating this new status. If you wish to unblock it,
press OK again over the channel, and the symbol will disappear.
The symbol ( ) over a channel indicates that this channel is blocked.
The channels’ new status will come into effect when you exit this
menu.
To exit the menu, press EXIT.
To access any channel that is blocked, you must enter the password.
8.1.- Channels Setup
8.- Box Setup Menu

User Manual
“
RSD - 7297”
43
ENGLISH
- Delete channels: With the cursor over this option, move to the left by
pressing the button.
To erase a channel, press the OK button over the chosen channel. A
symbol will appear indicating its new status. You can select various
channels to erase in one go, by pressing OK over each one. By pres-
sing OK again over a channel that was already marked, you de-select
the channel and it will not be erased.
To erase all channels of one alone time, press ALT key and all channels
will be marked by the symbol ( ).
To erase channels that have been marked, press EXIT.
Whether you want to erase one channel, various channels or all of
them, a new window will appear asking for confirmation to erase them
(YES) or to exit the menu without carrying out any modifications (NO).
- Move channels: If you want to move a channel from its current posi-
tion in the general list, you must first select this channel in the list and
then go to the right-hand side by pressing the button.
Place the cursor on the “Move” option, enter the number of the new
position of the channel into the remote control. Press OK.
To exit the menu press the EXIT button.
- Edit the PID and PCR values: If you want to modify the Audio and
Video PID parameters or the PCR of a channel, you can do so using
this menu.
Place the cursor on the “Video”, “Audio” or “PCR” option and enter the
new values for these option in the remote control.
To exit the menu press the EXIT button.
- Add PID (Manual Scan): If you want add a new channel to the list of
channels but you do not want to carry out an automatic search, this
option allows you to do so. First, you must know the Video PID, Audio
PID and PCR values of the new channel as well as the frequency, sym-
bol rate and polarity.
Place the cursor on the -Add PID- option and press OK.
A new menu will appear where you will be able to enter the values
required in order to scan for the new channel.
To move through the options, use the and buttons. The
“Satellite name” and “Polarisation” values should be selected using
the and buttons.
Once all of the values have been introduced, press OK. The new chan-
nel will be added to the list.

User Manual
“
RSD - 7297”
44
8.2.- Changing the Password
The password consists of 4 numbers, which will never appear onscreen.
Instead, some yellow icons appear and each time you enter a number, this
will change to green.
When you select any of the options in the menu that imply theuse of the
secret code (access to blocked channels, changing the channel list, etc.)
the message “Enter Code” will appear onscreen, asking you to enter your
password.
If the password that is entered is incorrect, the message “Invalid code” will
appear onscreen, which denies access.
To change the current code, enter the current code using the numeric
buttons on the remote control in the field “Enter Old Code”. The factory-
set default value is “0 0 0 0”.
Enter the new password in the field “Enter New Code”.
Confirm the new password by entering it again in the field “Confirm New
Code”. If the two do not coincide, an error message will appear onscre-
en. If they do coincide however, the message “Password changed” will
appear.
From now on, you should always use the new code when this is required.
8.3.- Adjusting the clock
The receiver disposes of a Clock to indicate the time. This Clock adjusts
automatically to the information provided by the service supplier within the
actual satellite signal.
The service supplier sends two types of time information, one that is relativ
e to the current time (to be displayed by the Clock) and another that informs
the user of the time schedules of the different programmes (which is used
by the EPG).
Both types of information are sent in GMT format, so you must adjust the
Receiver by entering the time difference in your country.
By using the and buttons you can increase (+) or decrease (-) the
time as indicated in the “Hours” and “ Minutes” options as regards GMT.
The “Hours” option increases and decreases in one-hour steps, while
the “Minutes” option increase and decreases in thirty-minute steps.
Press OK button to store.
NOTE: Not all suppliers provide this type of information

User Manual
“
RSD - 7297”
45
ENGLISH
The receiver has a timer which can automatically switch the Receiver on
and off at a specified time. It has 8 positions, in which you can record the
same amount of programmes. You simply have to enter the following data.
This menu has two columns; the left-hand column -Service List- where the
list of all the available channels appears and the right-hand column -Timer
Settings - where you can enter the data that you wish.
By default, the cursor always appears on the channel list. First select the
channel that you want to see when you switch the receiver on. User the
or buttons to do this. Press OK over the selected channel. The cursor
will now automatically appear on the right-hand column to enter the data:
- Timer no..- Select one of the 8 available programmes by using the or
buttons.
- Timer Mode.- By default, this appear in “Once” mode (one time), but you
can select “Daily” (everyday), “Weekly” (once a week), “Monthly” (once a
month) or “Off” (de-activated). Select one of these options by using the
or buttons.
- Date.- By default the current day and month appear. You can change
this date by using the numeric buttons (0 .. 9) on the remote control.
- Start time.- Using the numeric buttons, enter the time that the pro-
gramme starts.
- Duration.- Using the numeric buttons, enter the estimated duration of
the programme.
Press OK to confirm all of the programme data. This will take you back to
the service list.
Repeat these same steps to record other programmes.
The “General List” / “Timer List” option lets you return to the general list
whenever you wish or else see a list of the timers set to record.
If you wish to eliminate any of these settings, you can do so by selecting it
from the programme list and pressing OK over the “Delete” option.
To exit this menu, press EXIT.
8.4.- VCR Timer

User Manual
“
RSD - 7297”
46
8.5.- Factory values (Restore default values)
This option will change all of the parameters that you have entered back to
those established by default at the factory.
The receiver will carry out the following changes when you press OK
over the “Factory Default”:
- All of the specifications entered for the transponders, will return
back to the default values set at the factory.
- All of the channels on the list will be erased and replaced by those
pre-set at the factory.
- All of the options installed by the user will be replaced by those
pre-set at the factory.
When you select this option, a warning message will appear onscreen
requesting confirmation.
8.6.- Audio selection
In this menu, you can select the type of audio used by the loudspeakers.
Select one of the three options; “Stereo”, “Left Audio” or “Right Audio”
by using the or buttons.
If you want the audio that you have chosen to be permanent, press OK.

User Manual
“
RSD - 7297”
47
ENGLISH
8.7.- TV Setup
In this menu, you can select the screen format.
The screen format can be "4 : 3" or "16 : 9".
If you select 4:3, all the channels will be displayed in this format.
If you select 16:9, the screen format will adjust automatically to the for-
mat of each individual channel.
8.8.- Box Info
This option opens an onscreen window with some basic information about
the receiver.
To activate this menu, press OK over the “Box Info” option in the
-Box Setup- menu.
Press the EXIT button to exit the menu.

User Manual
“
RSD - 7297”
48
User Manual
“
RSD - 7297”
This menu lets you enter the configuration parameters of the system.
Access the menu by pressing with the OK button over the “System Setup”
option of the main menu. You can assign satellites, LNBs and switches to
16 antennas in this menu.
You can save up to 16 types of configuration for the antenna.
Select the “LNB Setup” option in the -System Setup- menu by pressing
the OK button over it. Use the numberic buttons or the and but-
tons to select the total nº of LNBs that are available in your installation
and press the OK button again.
Assign the appropriate values to each of the following options, which
correspond to each LNB configuration:
- Type of LNB: Indicate if the LNB located on the antenna is universal or
not. If it is, the “High Frequency” and “Low Frequency” option remain
inactive.
- Lo. Freq. / Hi. Freq.: Enter the appropriate frequency for each of the
bands (high and low) if you are not using a universal LNB.
- DiSEqC: If in the -Number of LNB’s- option you have selected “1”, the
option appears as DiSEqC 1.2 by default, corresonding to a motorised
antenna and controlled by a compatible DiSEqC 1.2 motor. The
“< DiSEqC 1.2 disabled >” option will become active immediately.
If in the -Number of LNB’s- option you have selected “2”, you will dis-
pose of the “DiSEqC 1.0” or “Tone Burst” options, corresponding to a
fixed antenna and a multisatellite system; or else two fixed antennas
orientated towards different satellites.
Finally if in the -Number of LNB’s- option you have selected the LNB nº
> “3”, you will dispose of the “DiSEqC 1.0” or “DiSEqC 1.1” options,
corresponding to various antennas.
- Switch: With the -DiSEqC- option in “Tone Burst” mode you can select
one of the following options: “No”, “A” or “B”.
With the -DiSEqC- option in “DiSEqC 1.0” mode you can select one of
the following options “No”, “A”, “B”, “C” or “D”.
With the -DiSEqC- option in “DiSEqC 1.1” mode you can select one of
the following options “No”, “1”, “2”, ... “16”.
Regardless of the type of switch, each input corresponds to a specific
LNB.
Note: Default factory preset:
LNB1 => Satellite HOTBIRD => Port “A” of switch
LNB2 => Satellite ASTRA => Port “B” of switch
- Power: Select “On” or “Off” for the LNB powering.
9.- System Setup menu
9.1.- LNB Setup

User Manual
“
RSD - 7297”
49
ENGLISH
User Manual
“
RSD - 7297”
In this menu you can assign a satellite to a specific antenna position.
- Satellite: Select one of the satellites that have been pre-set in the
receiver by using the , buttons or pressing the OK button to acti-
vate the pop-up menu.
- Frequency: Enter the corresponding frequency using the numeric but-
tons.
- S/R: Enter the corresponding symbol rate using the numeric buttons.
- Polarisation: Indicates if it is horizontal (H) or vertical (V) polarisation.
The Signal Level window tells us the satellite signal level.
This is useful when installing an antenna, as it serves as a guide for
when we are pointing the antenna towards a satellite.
9.2.- Dish Setup
Table of contents
Other Televes Receiver manuals

Televes
Televes 237540 User manual

Televes
Televes 237330 Technical specifications

Televes
Televes 237520 User manual

Televes
Televes RSD-7255 User manual

Televes
Televes 231180 User manual

Televes
Televes 231201 User manual

Televes
Televes 7287 User manual

Televes
Televes RSD-7115 User manual

Televes
Televes 711701 User manual

Televes
Televes 237533 User manual

Televes
Televes 231020 User manual

Televes
Televes 716701 User manual

Televes
Televes zAshd User manual

Televes
Televes DVBS2-QAM HEXA User manual

Televes
Televes RSD - 711801 User manual

Televes
Televes 237550 User manual

Televes
Televes 237521 User manual

Televes
Televes 717402 User manual

Televes
Televes 7142 User manual

Televes
Televes 717402 User manual