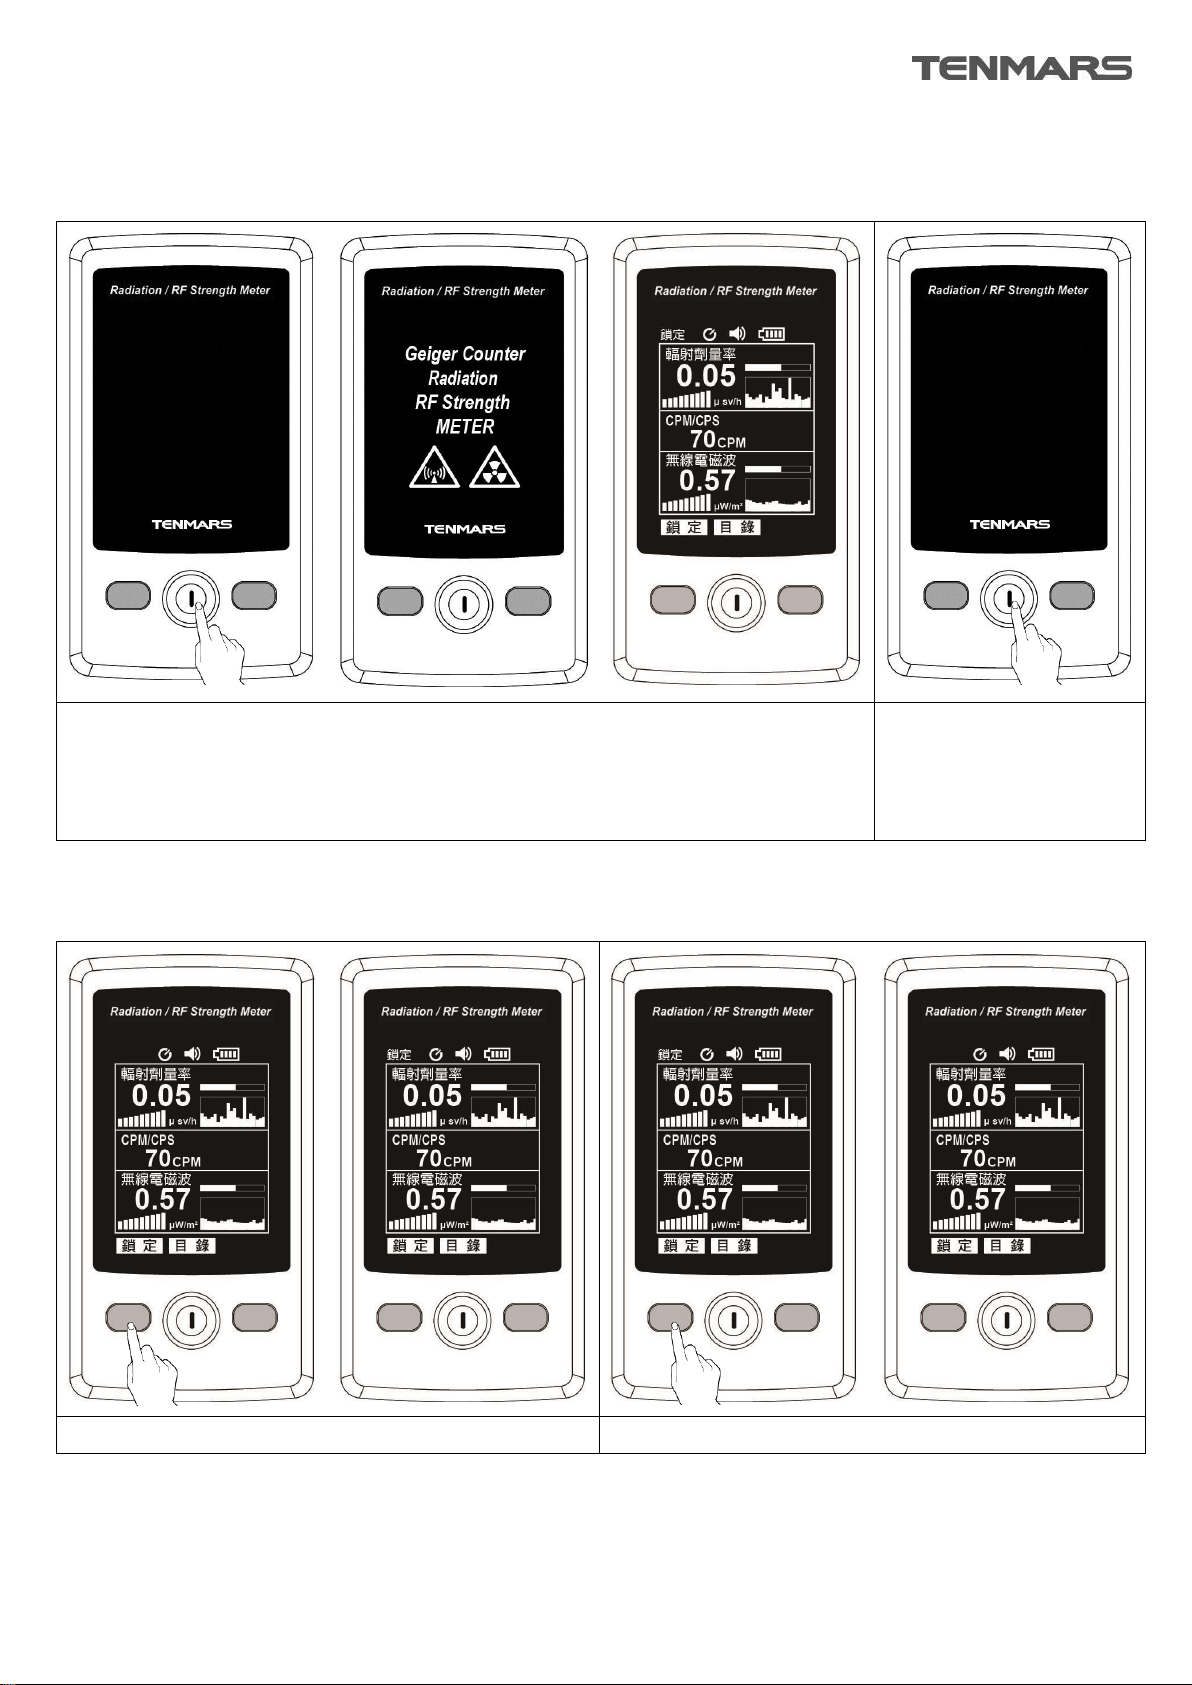
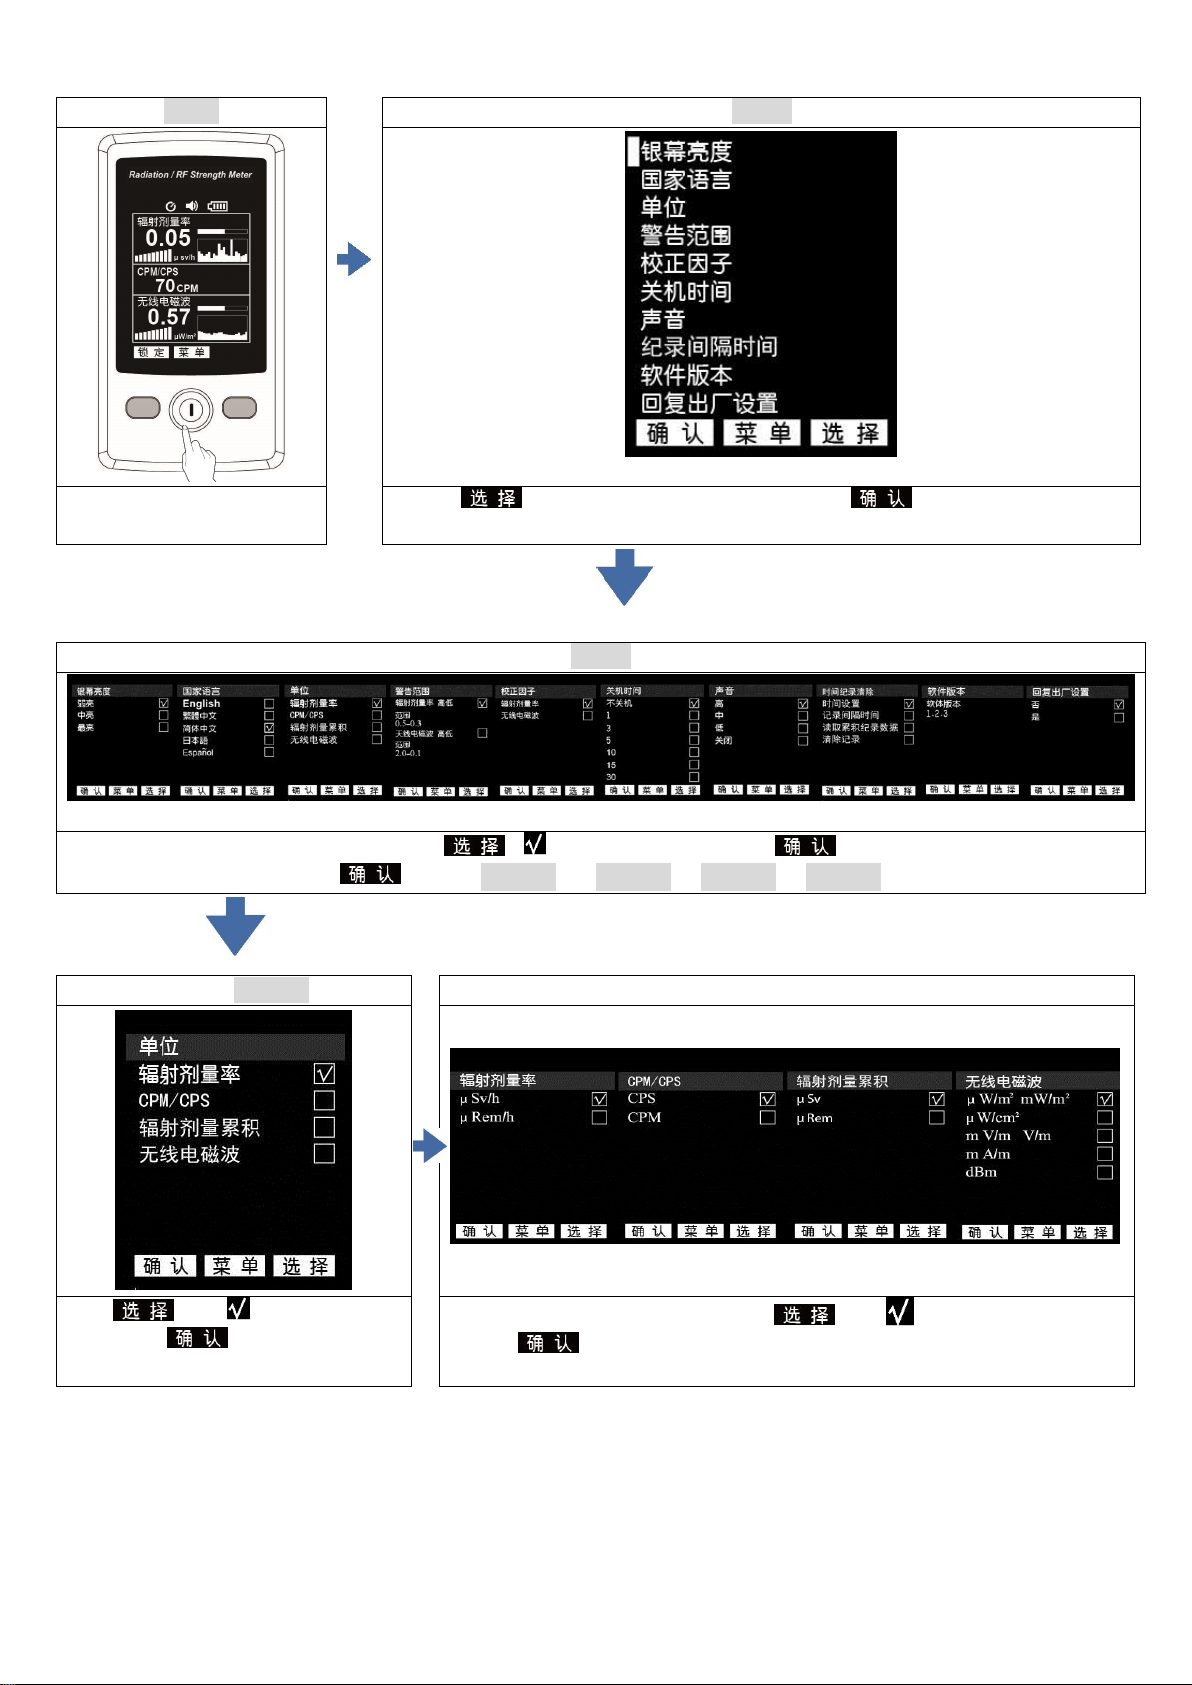
Tenmars TM-93 User manual

TM-93
簡易操作說明
简易操作说明
HB2TM9300010

TM-93 簡易操作說明
輻射/高頻電磁波測試器
快速測量模式操作:1.
按開關鍵(左圖)大於 1秒
顯示開機畫面
進入測量模式:
在此模式可同時測量
輻射劑量率
CPM/CPS
無線電磁波
長按開關鍵 3秒關機
資料鎖定:2.
在測量模式下,按此鍵
所有量測值及功能都鎖定
在鎖定狀況下,按此鍵
返回測量模式

設定操作:3.
步驟 1
步驟2
按此鍵"目錄”
進入設定模式或退出。
按 鍵,當游標移動到想要設定的功能,按 鍵進入步驟 3。
步驟3
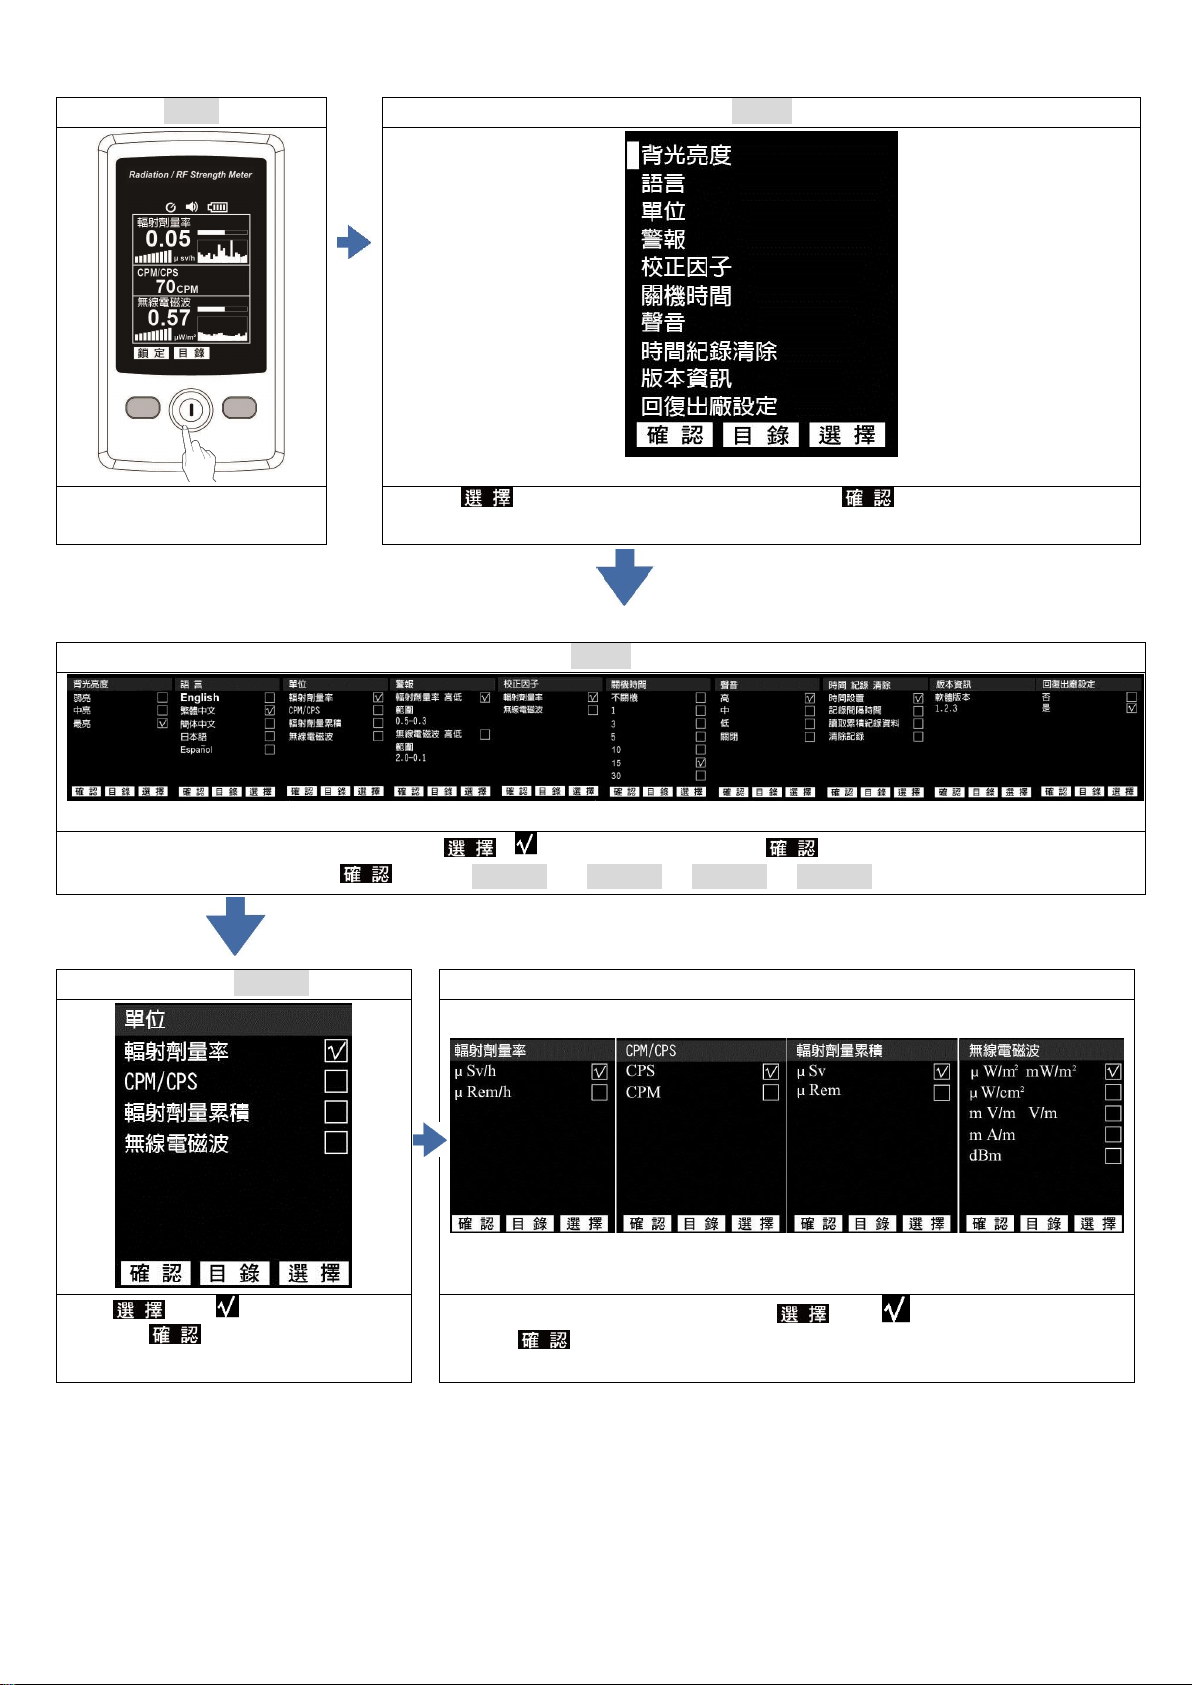
圖1 圖2 圖3 圖4 圖5 圖6 圖7 圖8 圖9 圖10
當選擇圖 1或2或6或7或9或10,按 鍵 移動到想要設定的功能,按 鍵完成設定,並跳回測量模式。
當選擇圖 3或4或5或8,按 鍵後跳到步驟 3-1 或步驟 3-2 或步驟 3-3 或步驟 3-4 。
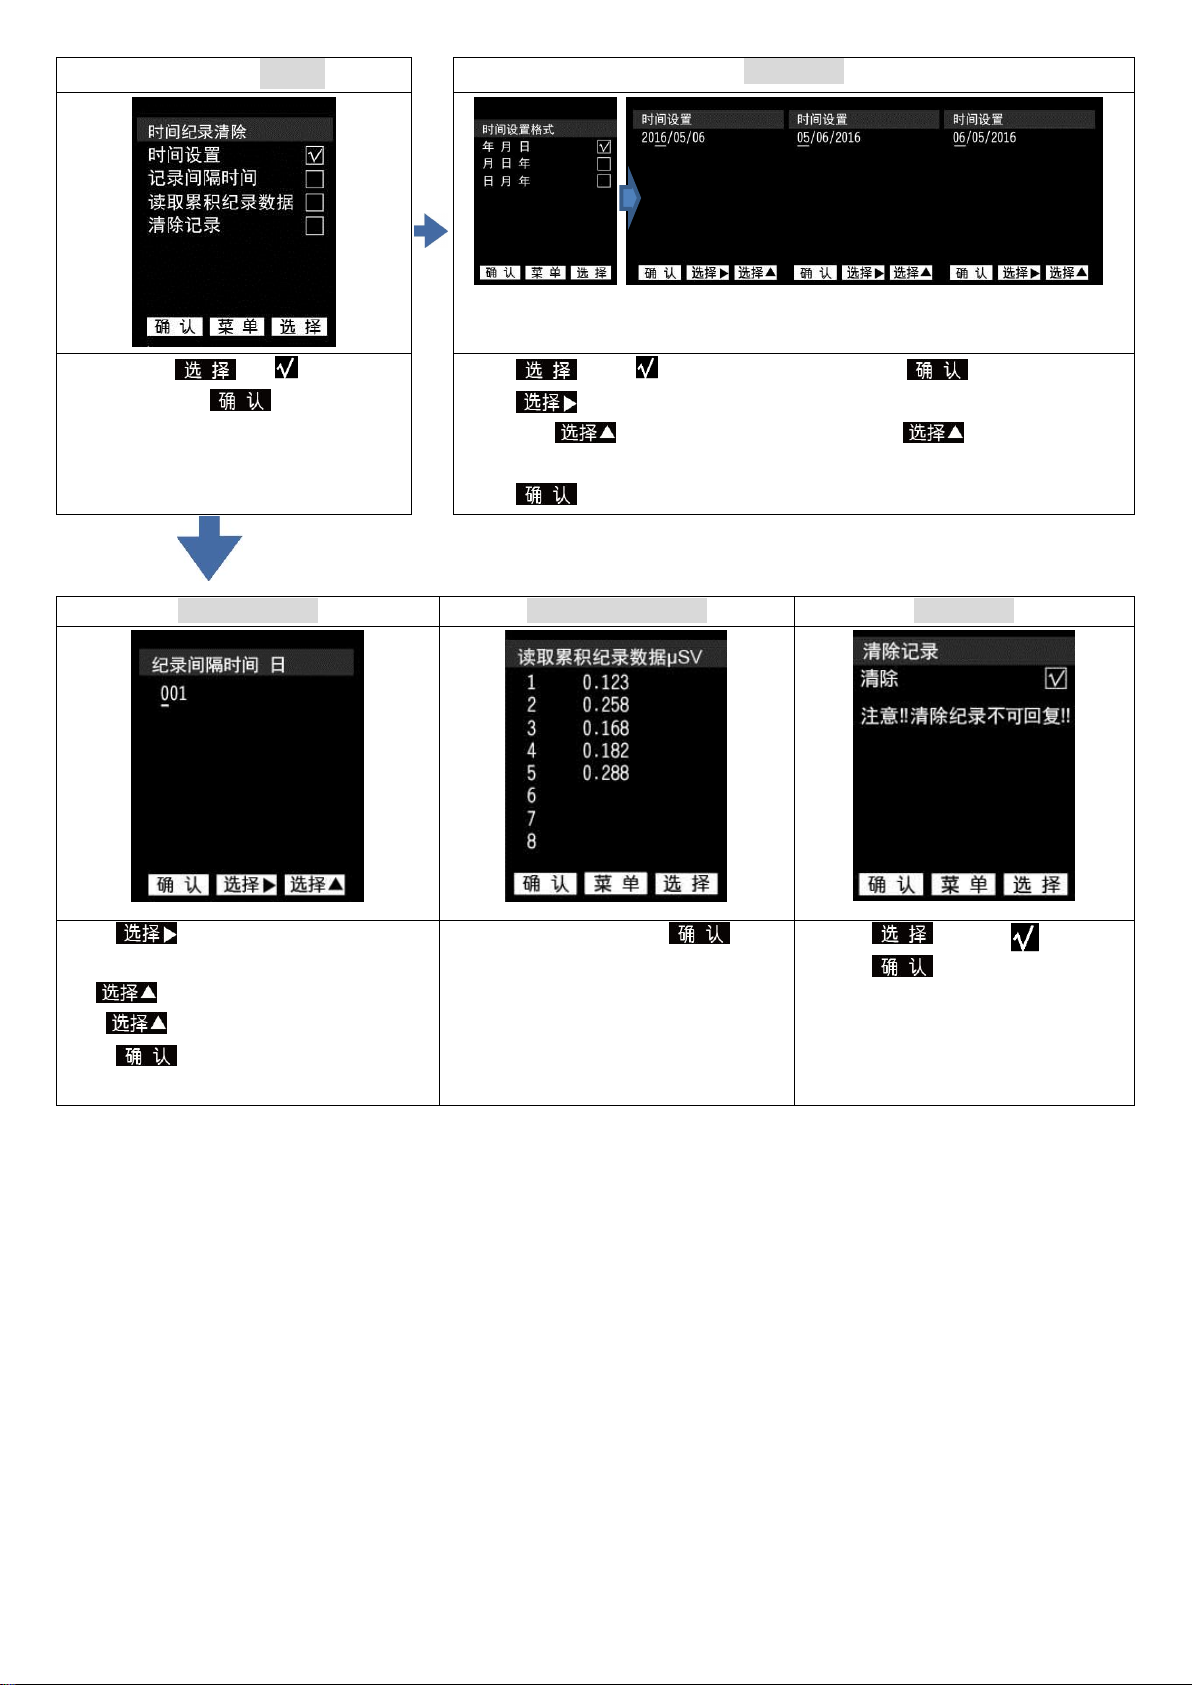
步驟 3-1(接圖 3)
單位設定
圖10 圖11 圖12 圖13
按 鍵,當 移動到想要設定的功
能,按 鍵進入單位設定。
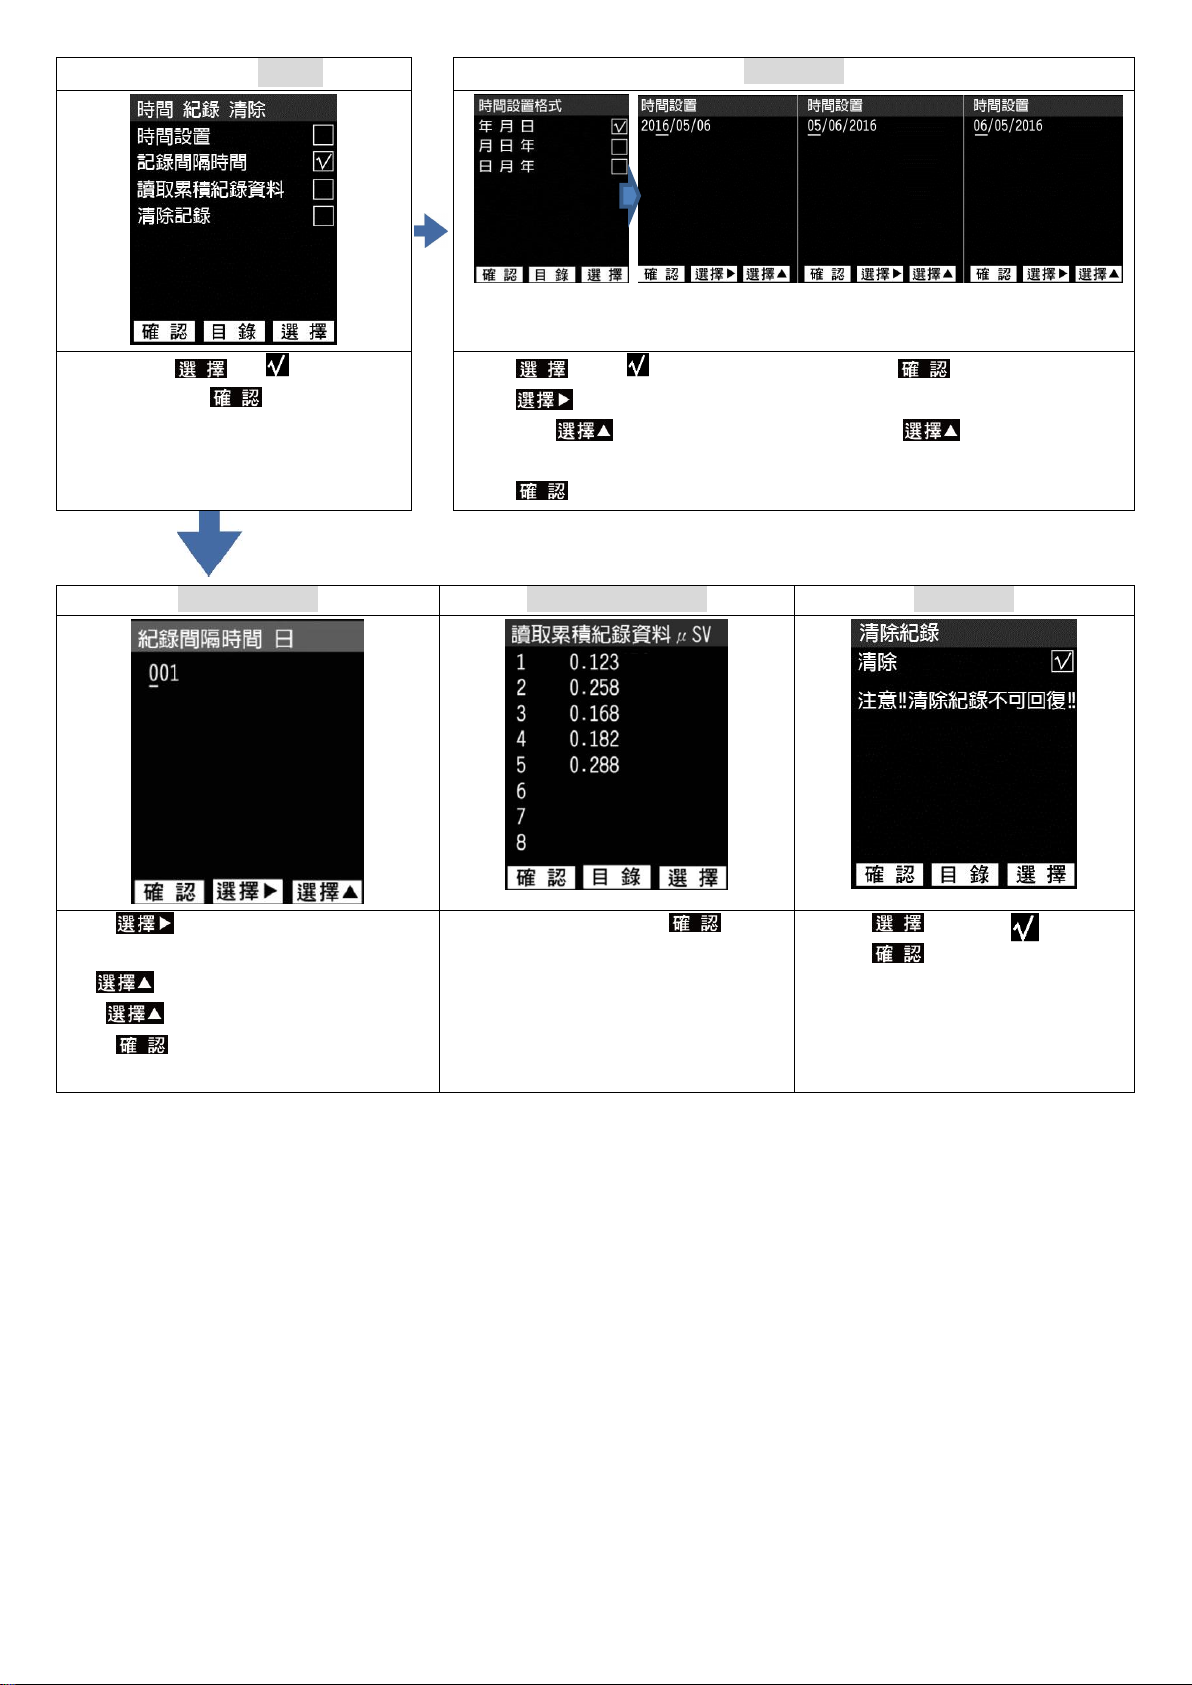
當選擇圖 10 或圖 11 或圖 13,按 鍵,當 移動到想要設定的功能,
按 鍵跳回測量模式。
當選擇圖 12 請接下一設定步驟輻射累積測量畫面。

接圖 12
輻射累積測量畫面(接圖 12)
在圖 12 按 鍵,當 移動到想
要設定的功能,按 鍵進入輻射
累積測量畫面。
按 鍵執行累積功能,當量測結束,按 鍵停止累積。
執行本功能需外接電源!!!若脫離連接外接電源將停止執行!!!
插入外接電源時自動關機取消,符號消失.
步驟 3-2 (接圖 4)
設定警報高低範圍
在圖 4按鍵,當 移動到想要
設定的功能,按 鍵進入設定警
報高低範圍。
按鍵,當 移動到想要設定的功能,按 鍵進入下一層.
按 鍵,每按一下, ▃游標 由左往右移動,當移動到想要設定
的位置,按 鍵數字增加,直到您所需數字。按 鍵來儲存設
定值,並跳回到量測畫面。
步驟 3-3 (接圖 5)
校正因子設定
在圖 5按鍵,當 移動到想要
設定的功能,按 鍵進入校正因
子設定。
按 鍵,每按一下, ▃游標 由左往右移動,當移動到想要設定
的位置,按 鍵數字增加,直到您所需數字,可調圍範:0.01~5.00。
按 鍵儲存設定值,並跳回到量測畫面。。

步驟 3-4(接圖 8)
A.時間設置
在圖 8按鍵, 移動 A 或B
或C或D,按 鍵進入設定。
按 鍵,當 移動到想要設定時間格式,按 鍵進入時間設置。
按 鍵,每按一下,▃ 游標 由左往右移動,當移動到想要設定的位
置,按 鍵數字增加,直到您所需數字。(按住數字自動增加
循環)
按 鍵來儲存設定值,並跳回到量測畫面。
B.紀錄間隔時間
C.讀取累積紀錄資料
D.清除記錄
按 ,每按一下,▃ 游標 由左往
右移動,當移動到想要設定的位置,按
鍵數字增加,直到您所需數字。
(按住數字自動增加循環)
按 鍵鍵來儲存設定值,並跳回到
量測畫面。
讀取 1~8 紀錄資料,按 鍵返回
測量模式。
按 ,按一下
按 鍵清除紀錄 返回測量
模式。
注意!!清除紀錄簿不可回復!!

TM-93 简易操作说明
辐射/高频电磁波测试器
快速测量模式操作:1.
按开关键(左图)大于 1秒
显示开机画面
进入测量模式:
在此模式可同时测量
辐射剂量率
CPM/CPS
无线电磁波
长按开关键 3秒关机
数据锁定:2.
在测量模式下,按此键
所有量测值及功能都锁定
在锁定状况下,按此键
返回测量模式

设定操作:3.
步骤 1
步骤2
按此键"目录”
进入设定模式或退出。
按 键,当光标移动到想要设定的功能,按 键进入步骤 3。
步骤3
图1 图2 图3 图4 图5 图6 图7 图8 图9 图10
当选择图 1或2或6或7或9或10,按 键 移动到想要设定的功能,按 键完成设定,并跳回测量模式。
当选择图 3或4或5或8,按 键后跳到步骤 3-1 或步骤 3-2 或步骤 3-3 或步骤 3-4 。
步骤 3-1(接图 3)
单位设定
图10 图11 图12 图13
按 键,当 移动到想要设定的
功能,按 键进入单位设定。
当选择图 10 或图 11 或图 13,按 键,当 移动到想要设定的功能,
按 键跳回测量模式。
当选择图 12 请接下一设定步骤辐射累积测量画面。

接图 12
辐射累积测量画面(接图 12)
在图 12 按 键,当 移动到想
要设定的功能,按 键进入辐
射累积测量画面。
按 键执行累积功能,当量测结束,按 键停止累积。
执行本功能需外接电源!!!若脱离连接外接电源将停止执行!!!
插入外接电源时自动关机取消,符号消失.
步骤 3-2 (接图 4)
设定警报高低范围
在图 4按 键,当 移动到想
要设定的功能,按 键进入设
定警报高低范围。
按 键,当 移动到想要设定的功能,按 键进入下一层.
按 键,每单击, ▃光标 由左往右移动,当移动到想要设定的
位置,按 键数字增加,直到您所需数字。按 键来储存设定
值,并跳回到量测画面。
步骤 3-3 (接图 5)
校正因子设定
在图 5按 键,当 移动到想
要设定的功能,按 键进入校
正因子设定。
按 键,每单击, ▃光标 由左往右移动,当移动到想要设定的
位置,按 键数字增加,直到您所需数字,可调围范:0.01~5.00。
按 键储存设定值,并跳回到量测画面。

步骤 3-4(接图 8)
A.时间设置
在图 8按键, 移动 A 或B
或C或D,按 键进入设定。
按 键,当 移动到想要设定时间格式,按 键进入时间设置。
按 键,每单击,▃ 光标 由左往右移动,当移动到想要设定的位
置,按 键数字增加,直到您所需数字。(按住数字自动增加
循环)
按 键来储存设定值,并跳回到量测画面。
B.纪录间隔时间
C.读取累积纪录数据
D.清除记录
按 ,每单击,▃ 光标 由左往右
移动,当移动到想要设定的位置,按
键数字增加,直到您所需数字。
(按住数字自动增加循环)
按 键键来储存设定值,并跳回到
量测画面。
读取 1~8 纪录数据,按 键返
回测量模式。
按 ,单击
按 键清除纪录 返回测
量模式。
注意!!清除纪录簿不可回复!!

TM-93
Quick Start Guide
クイックスタートガイド
Guía de Inicio Rápido
HB2TM9300010

TM-93 Quick Start Guide
Radiation/RF Strength
1. Quick Measurement Mode Operation:
Press the switch button
(left image) for more than
1 second
The startup screen appears
Access the measurement
mode:
Dose rate
CPM/CPS
RF Strength
can be measured
simultaneously in this
mode
Press and hold the middle
button for 3 seconds to turn
off the meter
2. Data Hold:
In the measurement mode,
press the left button
All measurement readings
and functions are locked
In the Data Hold mode,
press the left button
Return to the measurement
mode

3. Menu Settings:
Step1
Step2
Press this “Menu” button to
enter setting mode or exit.
Press the button; move the cursor onto the function to set and then
press the button to enter Step 3.
Step3
fig1 fig2 fig 3 fig 4 fig 5 fig 6 fig 7 fig 8 fig 9 fig 10
When Fig. 1, 2, 6, 7, 9 or 10 is selected, press the button then and move to the function to set, and then
press the button to complete the setting and return to measurement mode.
When Fig. 3, 4, 5 or 8 is selected, press the button and then skip to Step 3-1 or Step 3-2 or Step 3-3 or Step
3-4.
Step3-1 (Continuing from Fig. 3)
Unit
fig 10 fig 11 fig 12 fig 13
Press the button; when
moves to the function to set,
press the button to enter
the unit setting.
When Fig. 10, 11 or 13 is selected, press the button; when
moves to the function to set, press the button to return to
measurement mode.
When Fig. 12 is selected, please continue to the next setting step
Radiation Dose measurement screen.

Continuing from Fig. 12
Radiation Dose (Continuing from Fig. 12)
On the Fig. 12 screen, press the
button, and when moves
to the function to set, press the
button to enter the radiation
dose measurement screen.
Press the button to execute the dose function; when measurement
is complete, press the button to end the dose.
Connection to external power is required to execute this function!!! This
function will stop executing if the external power is disconnected!!!
When external power is inserted, automatic shutdown will be cancelled and
the symbol will disappear.
Step3-2 (Continuing from Fig. 4)
Set maximum and minimum warning range
On the Fig. 4 screen, press the
button, and when moves
to the function to set, press the
button to enter the setting for
maximum and minimum warning
range.
Press the button, and when the moves to the function to set,
press the button to enter the next layer.
Press the button; every time it is pressed, the ▃cursor will move
from left to right. When it reaches the position to set, press the
button to increase the number until it reaches the number you need. Press
the button to save the settings and return to the measurement
screen.
Step3-3 (Continuing from Fig. 5)
Calibration
On the Fig. 5 screen, press the
button, and when moves
to the function to set, press the
button to enter the factor
calibration setting.
Press the button; every time it is pressed, the ▃cursor will move
from left to right. When it reaches the position to set, press the
button to increase the number until it reaches the number you need. The
adjustable range is: 0.01~5.00.
Press the button to save the settings and return to the
measurement screen.

Step3-4 (Continuing from Fig. 8)
A.Time Settings
On the Fig. 8 screen, press the
button, will move to A
or B or C or D; press the
button to enter settings.
Press the button and when moves to the time format to
set, press the button to enter time settings.
Press the button; every time it is pressed, the ▃cursor will
move from left to right. When it reaches the position to set, press the
button to increase the number until it reaches the number you
need. (Holding will allow the number to automatically increase
and cycle).
Press the button to save the settings and return to the
measurement screen.
B.REC Interval Time
C.Read Accumulated Record Data
D.Memory Clear
Press the button; every time
it is pressed, the ▃cursor will move
from left to right. When it reaches the
position to set, press the
button to increase the number until it
reaches the number you need.
(Holding will allow the
number to automatically increase and
cycle).
Press the button to save the
settings and return to the
measurement screen.
Read recorded data 1~8; press
the button to return to
measurement mode.
Press and then press
Press the button to
clear the records and return to
measurement mode.
Note!!Cleared Records
Cannot be Restored!!

TM-93 クイックスタートガイド
放射/RF の強度
1. クイック測定モードの操作:
電源ボタン(左図)を約 1秒
間押します
起動画面が表示されます
下記測定モードにアクセス
します:
放射線量率
CPM/CPS
高周波
このモードで上記の
同時測定が可能です
メーターの電源を切るには、
中央ボタンを3秒間長押しし
ます
2. データホールド:
測定モードで、左ボタンを
押します
すべての測定値および機能
が
ロックされます
データホールドモードで、左
ボタンを押します
測定モードに戻ります

3. メニュー設定:
ステップ 1
ステップ 2
この「メニュー」ボタンを
押すと、設定画面に進んだ
り終了します。
ボタンを押して、カーソルを設定したい機能の横に移動させ、 ボ
タンを押してステップ 3に進みます。
ステップ 3
図1 図2 図3 図4 図5 図6 図7 図8 図9 図10
図1、2、6、7、9、10 を選んだ場合、 ボタンを押してから を設定したい機能に移動させ、 ボタンを押
すと設定は完了し、測定モードに戻ります。
図3、4、5、8を選んだ場合、 ボタンを押してから、ステップ 3-1、ステップ 3-2、ステップ 3-3、ス
テップ 3-4 にスキップします。
ステップ 3-1 (図3のつづき)
単位
図10 図11 図12 図13
ボタンを押して、 を設定
したい機能に移動させてから、
ボタンを押すと、単位設定
に進みます。
図10、11、13 を選んだ場合、 ボタンを押して、 を設定した
い単位に移動させてから、 ボタンを押すと測定モードに戻りま
す。
図12 を選んだ場合、次の設定ステップに進みます。累積的な放射線
量測定画面。

図12 のつづき
累積的な放射線量(図12 のつづき)
図12 で ボタンを押してか
ら、 を設定したい機能に移動さ
せ、 ボタンを押すと累積的
な放射線量測定画面に進みます。
ボタンを押すと累積機能が実行され、測定終了時に ボタ
ンを押すと累積が停止されます。
当機能の実行には外部電源が必要です!!!外部電源に接続されていな
いと、実行が中断されます!!!
外部電源に接続すると、自動オフはキャンセルされ、 マークが非
表示になります。
ステップ 3-2 (図4のつづき)
警報高低範囲の設定
図4で ボタンを押してか
ら、 を設定したい機能に移動さ
せ、 ボタンを押すと警報高
低範囲の設定画面に進みます。
ボタンを押してから、 を設定したい機能に移動させ、
ボタンを押すと、次のページに進みます。
ボタンを押す毎に、 ▃カーソルが左から右へ移動するので、
設定したい位置に移動させてから ボタンを押して必要な数値
まで增加させます。 ボタンを押すと設定値が保存され、測定モ
ードに戻ります。
ステップ 3-3 (図5のつづき)
構成
図5で ボタンを押してか
ら、 を設定したい機能に移動さ
せ、 ボタンを押すと構成因
子の設定に進みます。
ボタンを押す毎に、 ▃カーソルが左から右へ移動するので、
設定したい位置に移動させてから ボタンを押して必要な数値
まで增加させます。調整可能範囲:0.01~5.00。
ボタンを押すと設定値が保存され、測定モードに戻ります。

ステップ 3-4 (図8のつづき)
A. 時刻表示形式
図8で ボタンを押してか
ら、 を A、B、C、Dのいずれかに
移動させ、 ボタンを押すと
設定に進みます。
ボタンを押してから、 を設定したい時間形式に移動させ、
ボタンを押すと時間設定に進みます。
ボタンを押す毎に、▃ カーソルが左から右へ移動するので、設
定したい位置に移動させてから ボタンを押して必要な数値まで
增加させます。(を長押しすると数字が自動的に増加・繰り返す)
ボタンを押すと設定値が保存され、測定モードに戻ります。
B. 間隔時間の記録
C. 累積記録データを読む
D. メモリの 削除
ボタンを押す毎に、▃ カーソ
ルが左から右へ移動するので、設定し
たい位置に移動させてから ボ
タンを押して必要な数値まで增加さ
せます。(を長押しすると数字
が自動的に増加・繰り返す)
按 ボタンを押すと設定値が保
存され、測定モードに戻ります。
1~8 の記録データを読み取ってか
ら、 ボタンを押すと測定モ
ードに戻ります。
ボタンを押して、 を
表示させます。
ボタンを押すと記録は
消去され、測定モードに戻りま
す。
注意!!消去した記録は
復元できません!!

TM-93 Guía de Inicio Rápido
Intensidad de la radicación y de RF
1. Funcionamiento del modo de medición rápida:
Pulse el botón (imagen
izda.) durante más de 1
segundo
Aparece la pantalla de inicio
Acceda al modo de
medición:
Tasa dosis radiac
CPM/CPS
Intensidad de RF
se puede medir
simultáneamente en este
modo
Mantenga pulsado el botón
central durante 3 segundos
para apagar el medidor
2. Conservar Datos:
En el modo de medición,
pulse el botón izquierdo
Se bloquean todas las
funciones y lecturas de las
mediciones
En el modo Conservar
Datos, pulse el botón
izquierdo
Vuelva al modo de medición

3. Ajustes del Menú:
Paso 1
Paso 2
Pulse el botón “Menú” para
entrar o salir de la
configuración de modo
Pulse el botón y, cuando el cursor llegue a la función que se desea
configurar,pulse para entrar en el paso 3.
Paso 3
fig1 fig2 fig 3 fig 4 fig 5 fig 6 fig 7 fig 8 fig 9 fig 10
Cuando escoja las figuras 1, 2, 6, 7, 9 o 10, pulse el botón y el signo se moverá hasta la función que
desea configurar; pulse para completar la configuración y regrese al modo de medición.
Cuando escoja las figuras 3, 4, 5 u 8, pulse y a continuación vaya al paso 3-1, paso 3-2, paso 3-3 o paso 3-4.
Paso 3-1 (viene de la figura 3)
Unidad
fig 10 fig 11 fig 12 fig 13
Pulse el botón y, cuando
el signo se mueva hasta la
función que desee configurar,
pulse para entrar en la
configuración de la unidad.
Cuando escoja la figura 10, 11 o 13, pulse y, cuando el signo
se mueva hasta la función que desee configurar,pulse
para volver al modo de medición.
Cuando escoja la figura 12, continúe con el paso de configuración
siguientePantalla de dosis de radiación acumulada.
Other manuals for TM-93
1
Table of contents
Languages:
Other Tenmars Test Equipment manuals