TFA 35.1133 User manual

Bedienungsanleitung
Instruction manual
Mode d’emploi
Instrucciones de uso
Gebruiksaanwijzing
Istruzioni per l'uso
Kat. Nr. 35.1133
RoHS
TFA_No. 35.1133_Anleit_04_17 05.04.2017 14:28 Uhr Seite 1

32
Fig. 1Fig. 1
A 1
A 8
C 3
A 5
A 6
A 7
A 4
A 2 A 3
B 1
C 1
C 2
B 2
B 3
B 4
B 5
B 6
B 7
TFA_No. 35.1133_Anleit_04_17 05.04.2017 14:28 Uhr Seite 2

sonnig teilweise
bewölkt
bedeckt Regen
sunny partly
cloudy
cloudy rainy
ensoleillé légèrement
nuageux
couvert pluvieux
soleggiato parzialmente
nuvoloso
coperto piovoso
zonnig halfbewolkt bewolkt regen
soleado parcialmente
nubloso
cubierto lluvias
54
SUN - Funk-Wetterstation
Vielen Dank, dass Sie sich für dieses Gerät aus dem Hause TFA entschieden haben.
1. Bevor Sie mit dem Gerät arbeiten
•
Lesen Sie sich bitte die Bedienungsanleitung genau durch.
•
Durch die Beachtung der Bedienungsanleitung vermeiden Sie auch Beschädigun-
gen des Gerätes und die Gefährdung Ihrer gesetzlichen Mängelrechte durch Fehl-
gebrauch.
•
Für Schäden, die aus Nichtbeachtung dieser Bedienungsanleitung verursacht wer-
den, übernehmen wir keine Haftung. Ebenso haften wir nicht für inkorrekte Mess-
werte und Folgen, die sich aus solchen ergeben können.
•
Beachten Sie besonders die Sicherheitshinweise!
•
Bewahren Sie diese Bedienungsanleitung gut auf!
2. Zu Ihrer Sicherheit
•
Verwenden Sie das Produkt nicht anders, als in dieser Anleitung dargestellt wird.
•
Das eigenmächtige Reparieren, Umbauen oder Verändern des Gerätes ist nicht
gestattet.
Vorsicht!
Lebensgefahr durch Stromschlag!
•
Schließen Sie das Basisgerät nur an eine vorschriftsmäßig installierte Steckdose mit
einer Netzspannung von 230V an!
•
Die Steckdose muss nahe der Einrichtung angebracht und leicht zugänglich sein.
•
Die Basisstation und das Netzteil dürfen nicht mit Wasser oder Feuchtigkeit in Kon-
takt kommen. Nur für den Betrieb in trockenen Innenräumen geeignet.
•
Benutzen Sie das Gerät nicht, wenn Gehäuse oder Netzteil beschädigt sind.
•
Bewahren Sie das Gerät außerhalb der Reichweite von Personen (auch Kindern)
auf, die mögliche Gefahren im Umgang mit elektrischen Geräten nicht richtig ein-
schätzen können.
Fig. 3 -
Wettervorhersagesymbole / Weather forecast symbols / Symboles météo
Simboli meteorologici / Weersymbolen / Símbolos meteorológicos
TFA_No. 35.1133_Anleit_04_17 05.04.2017 14:28 Uhr Seite 3

1918
SUN - Wireless weather station
Caution!
Risk of injury:
•
Keep this instrument and the batteries out of the reach of children.
•
Batteries must not be thrown into a fire, short-circuited, taken apart or recharged.
Risk of explosion!
•
Batteries contain harmful acids. Low batteries should be changed as soon as possible
to prevent damage caused by leaking.
•
Never use a combination of old and new batteries together, nor batteries of different
types. Wear chemical-resistant protective gloves and safety glasses when handling
leaking batteries.
Important information on product safety!
•
Do not place your product near extreme temperatures, vibrations or shocks.
•
The outdoor transmitter is protected against splash water, but is not watertight.
Choose a shady and dry position for the outdoor transmitter.
•
Protect it from moisture.
3. Elements and buttons
3.1 Basic station
Display (Fig. 1)
A1: Weather forecast with weather symbols
A2: Outdoor temperature and reception symbol
A3: Maximum and minimum value for outdoor temperature
A4: Battery symbol for outdoor transmitter
A5: Indoor temperature and humidity
A6: Radio controlled clock with seconds, weekday and calendar
A7: Snooze and alarm symbol
A8: DCF reception symbol, DST and PM symbol
Thank you for choosing this instrument from TFA.
1. Before you start using it
•
Please make sure to read the instruction manual carefully.
•
Following and respecting the instructions in your manual will prevent damage to
your instrument and loss of your statutory rights arising from defects due to in-
correct use.
•
We shall not be liable for any damage occurring as a result of non following of
these instructions. Likewise, we take no responsibility for any incorrect readings
and for any consequences which may result from them.
•
Please take particular note of the safety advice!
•
Please keep this instruction manual for future reference.
2. For your safety
•
This product should only be used as described within these instructions.
•
Unauthorized repairs, modifications or changes to the product are prohibited.
Caution!
Risk of electrocution!
•
Plug the basic device only into a socket installed in regulation manner and with a
mains voltage of 230V!
• The mains socket must be installed near the equipment and it must be easily accessible.
•
The basic device and the mains adapter must not come into contact with water or
moisture. It should be operated in dry interiors.
•
Do not use the device if the housing or the mains adapter are damaged.
•
Keep the device out of reach of persons (including children) who cannot fully
appreciate the potential risks of handling electrical equipment.
•
Pull the plug out of the socket immediately if any fault occurs or if the unit is not
used for a long period of time.
•
Only use the supplied mains adapter.
TFA_No. 35.1133_Anleit_04_17 05.04.2017 14:28 Uhr Seite 10

2120
SUN - Wireless weather station
•
The indoor temperature will be displayed on the basic station and the basic station
will scan the outdoor temperature and the reception symbol will be flashing.
•
If the reception of the outdoor temperature fails, “- -” appears on the display.
Check if there is any source of interference. After the reception of the radio-con-
trolled time you can start the initialization for the outdoor transmitter manually.
Press and hold
▼
button for 3 seconds. The basic station will scan the outdoor tem-
perature.
4.1. Radio-controlled time reception
•
The clock will now scan the DCF frequency signal and the DCF symbol will be flash-
ing. When the time code is received successfully after 3-7 minutes, the radio-con-
trolled time and the DCF symbol are displayed steadily in the display. During the
DCF time reception period, no outdoor temperature will be transmitted.
•
If there is no reception possible, manual initialization can be helpful.
•
Press the WAVE button.
•
The DCF symbol will be flashing.
•
Interrupt the reception by pressing the WAVE button again. The DCF symbol disap-
pears.
•
The DCF reception always take place at 1:00 o'clock in the morning until 5.00
o'clock. If the reception is not successfully received at 5:00 o'clock, further attempts
will be made again at 1:00 clock in the morning.
•
If the clock cannot detect the DCF-signal (for example due to disturbances, trans-
mitting distance, etc.), the time can be set manually. The DCF symbol disappears
and the clock will then work as a normal quartz clock. (see: Manual setting of the
clock and calendar).
4.1.1 Note for radio-controlled time DCF
The time base for the radio-controlled time is a caesium atomic clock operated by the
Physikalisch Technische Bundesanstalt Braunschweig. It has a time deviation of less
than one second in one million years. The time is coded and transmitted from Main-
flingen near Frankfurt via frequency signal DCF-77 (77.5 kHz) and has a transmitting
Buttons front (Fig. 1)
B1: Light and snooze button
Buttons back (Fig. 2)
B2: MODE button
B3: ALARM button
B4: ▲button
B5: ▼button
B6: WAVE button
B7: LIGHT/SNZ button
Housing (Fig. 2)
C1: Battery compartment
C2: Connecting power supply
C3: Stand (fold out)
4. Getting started
•
Place the basic station and the outdoor transmitter on a desk with a distance of
approximately 1.5 meter. Avoid getting close to possible interference sources (Elec-
tronic devices and radio installations).
•
Open the battery compartment of the outdoor transmitter.
•
Insert two new batteries 1,5 V AAA into the battery compartment of the outdoor
transmitter. Make sure the polarities are correct.
•
Remove the protecting foil from the display of the basic station.
•
Connect the basic station to the attached power adapter. Insert the adapter into
the jack at the basic station and connect the power adapter to a wall socket. Impor-
tant! Make sure that your household voltage is 230V! Otherwise your device may
be damaged.
•
The device will alert you with a beep and all LCD segments will be displayed for a
short moment.
•
The backlight is activated permanently.
TFA_No. 35.1133_Anleit_04_17 05.04.2017 14:28 Uhr Seite 11

2322
SUN - Wireless weather station
•
During the operation, all successful settings will be confirmed by a brief beep tone.
•
The instrument will automatically quit the setting mode if no button is pressed for
a long period of time.
•
Press and hold
▲
or
▼
button in the setting mode for fast running.
5.1 Manual setting of the clock and calendar
•
Press and hold the MODE button to get into the setting mode.
•
The year indication (2014 default) will be flashing.
•
Press the
▲
or
▼
button to adjust the year.
•
Press the MODE button and the setting sequence is shown as follows: Month, day,
date, month/day sequence (American version) or day/month (European version), the
language for the weekday (GE - default), the time zone (00 - default), 12 (PM
appears on the display after 12 h) or 24 hours display (24 hr - default), hours and
minutes. Press the
▲
or
▼
button to adjust them.
•
The manually set time will be overwritten by the DCF time when the signal is
received successfully.
5.1.1 Setting of the time zone
•
In the setting mode you can make the time zone correction (-12/+12).
•
The time zone correction is needed for countries where the DCF signal can be
received but the time zone is different from the German time (e.g. +1=one hour
later).
•
Press the
▲
or
▼
button.
•
Confirm the setting with the button MODE.
5.1.2 Day-of-the week language
•
Day-of-the week language: German (GE - default), French (FR), Italian (IT), Spanish
(SP), Dutch (DU), Danish (DA) and English (EN).
range of approximately 1,500 km. Changeover from summer time or winter time is
automatic. In Daylight Saving Time “DST” is shown on the LCD. The quality of the
reception depends mainly on the geographic location. Normally there should be no
reception problems within a 1,500 km radius around Frankfurt.
Please take note of the following:
•
The recommended distance to any interfering sources like computer monitors or TV
sets is at least 1.5 - 2 meters.
•
Inside ferro-concrete rooms (basements, superstructures), the received signal is nat-
urally weakened. In extreme cases, please place the unit close to a window to
improve the reception.
•
During nighttime, the atmospheric interference is usually less severe and reception
is possible in most cases. A single daily reception is adequate to keep the accuracy
deviation under 1 second.
4.2 Inserting the batteries in the basic station
•
Open the battery compartment of the basic station.
•
Insert two new batteries 1,5 V AAA. Make sure the polarities are correct.
•
Close the battery compartment again.
•
For a permanent backlight and to conserve battery power, use the supplied power
adapter.
•
The batteries will operate as a backup power source in case of power failure.
4.3 Backlight
•
Attention: Backlight in continuous operation only works with power adapter.
•
To temporarily activate the backlight, press the light button on the front or the
LIGHT/SNZ button on the back.
5. Operation
•
Important: During the reception of the signal for the outdoor temperature and the
time the buttons will not function.
TFA_No. 35.1133_Anleit_04_17 05.04.2017 14:28 Uhr Seite 12

2524
SUN - Wireless weather station
5.4 Setting of the temperature unit
•
Press the
▼
button to change between °C (Celsius) or °F (Fahrenheit) as tempera-
ture unit.
5.5 Reset of the max-min values
•
The maximum and minimum values are automatically reset at midnight.
•
Press and hold the
▲
button for three seconds to reset the maximum and minimum
values to the current outdoor temperature manually.
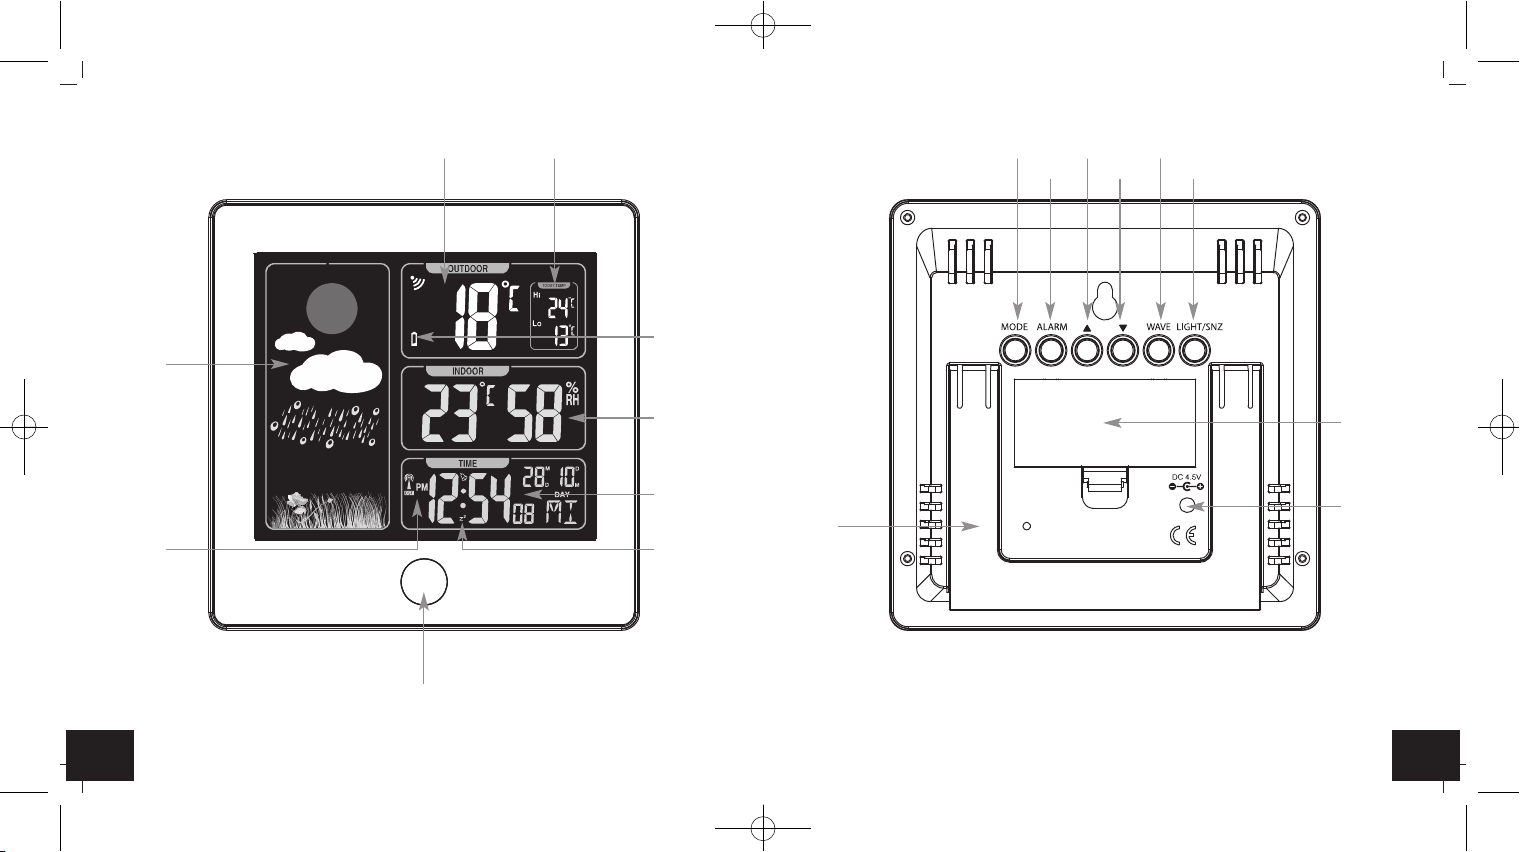
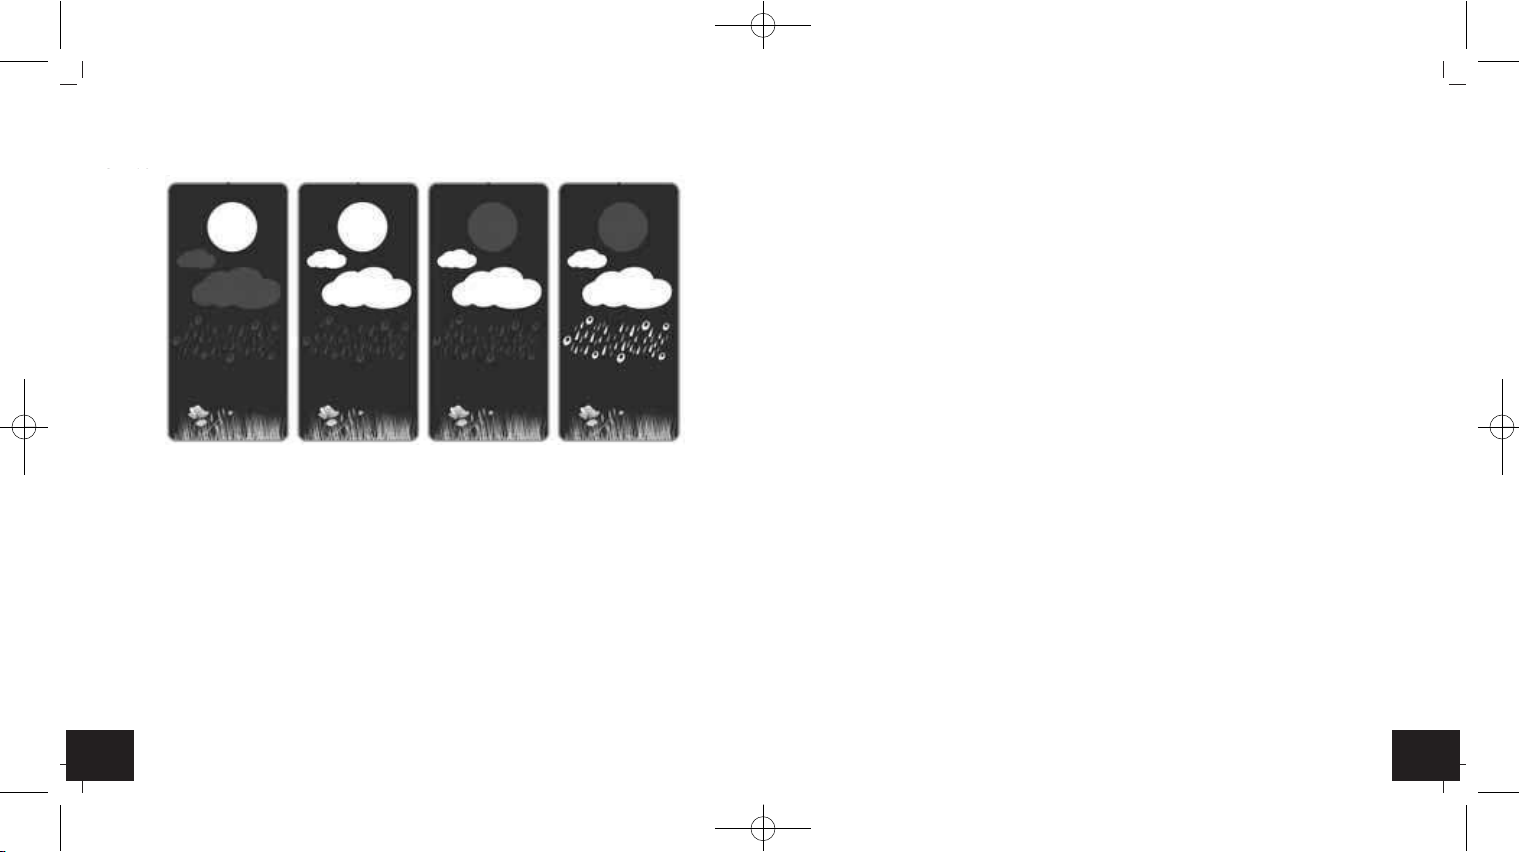
6. Weather forecast symbols (Fig. 3)
•
There are 4 different weather symbols (sunny, partly cloudy, cloudy, rainy)
•
The weather forecast relates to a range of 12 to 24 hours and indicates only a gen-
eral weather trend. For example, if the current weather is cloudy and the rain icon
is displayed, it does not mean the product is faulty because it is not raining. It sim-
ply means that the air pressure has dropped and the weather is expected to get
worse but not necessarily rainy.
•
The sun symbol also appears at night if there is a starry night.
7. Positioning and fixing of the basic station and the outdoor transmitter
•
Choose a shady and dry position for the outdoor transmitter. (Direct sunshine falsi-
fies the measurement and continuous humidity strains the electronic components
needlessly).
•
Place the basic station in the living room with the table stand (fold out). Avoid the
vicinity of any interfering field like computer monitors or TV sets and solid metal
objects.
•
Check the transmission of the signal from the outdoor transmitter to the basic
station (transmission range of up to 60 m free field). Within ferro-concrete rooms
(basements, superstructures), the received signal is naturally weakened.
•
If necessary choose another position for the outdoor transmitter and/or basic
station.
•
Is the transmission successful, you can wall mount the transmitter.
5.2 Setting of the alarm
•
Press and hold the ALARM button.
•
AL and 6:00 (default) appear on the display.
•
The hour digits will be flashing. Press the
▲
or
▼
button to adjust the hours.
•
Press the ALARM button again and you can adjust the minutes with the
▲
or
▼
but-
ton.
•
Confirm the setting with the ALARM button.
•
On the display the symbol for snooze and 10 (default) will be flashing.
•
Press the
▲
or
▼
button to adjust the minutes (1-60) for the snooze interval in the
same way.
•
Confirm the setting with the ALARM button.
•
The current time appears on the display.
•
Press the ALARM button again, to activate the alarm.
•
The alarm symbol appears on the display.
•
When the alarm time is reached, the alarm signal will sound.
•
The alarm symbol will be flashing.
•
Press any button to stop the alarm.
•
If the alarm is not stopped manually, the alarm will automatically turn off after one
minute and will be reactivated at the same time.
•
When the alarm signal sounds, press the light button on the front or the LIGHT/SNZ
button at the back and the snooze function will be activated.
•
Zz and the alarm symbol will be flashing on the display.
•
The alarm is interrupted for the duration of your set minutes for the snooze inter-
val.
•
Press the ALARM button and the snooze function is deactivated
•
Press the Alarm button again and the alarm function is deactivated.
5.3 Display
•
Press the MODE button, to show the alarm time.
TFA_No. 35.1133_Anleit_04_17 05.04.2017 14:28 Uhr Seite 13

2726
SUN - Wireless weather station
Change the batteries
No reception of the outdoor ➜ No outdoor transmitter is installed
transmitter Display “---” ➜ Check batteries of external transmitter
(do not use rechargeable batteries!)
➜Restart the outdoor transmitter and the basic
station according to the manual
➜Start the manual search for the outdoor trans-
mitter: Press and hold the ▼button
➜Choose another place for the outdoor trans-
mitter and/or the basic station
➜Reduce the distance between the outdoor
transmitter and the basic station
➜Check if there is any source of interference
No DCF reception ➜Press the WAVE button and start the initializa-
tion manually
➜Wait for attempted reception during the night
➜Choose another place for your product
➜Manual setting of the clock
➜Check if there is any source of interference.
➜Restart the device according to the manual
Incorrect indication ➜Change the batteries
10. Waste disposal
This product has been manufactured using high-grade materials and components
which can be recycled and reused.
•
The outdoor transmitter can be hung with the suspension at the back of the device
on a wall, or you can place the device on a flat surface.
8. Care and maintenance
•
Clean the devices with a soft damp cloth. Do not use solvents or scouring agents.
•
Remove the batteries and pull out the plug of the socket, if you do not use the
product for a long period of time.
•
Keep the devices in a dry place.
8.1 Battery replacement
•
As soon as the battery symbol appears on the display of the basic station beside the
outdoor temperature, change the batteries of the outdoor transmitter.
•
Open the battery compartment of the outdoor transmitter and pull the lid down.
•
Insert two new batteries 1,5 V AAA. Make sure the polarities are correct.
•
If you use the basic station only with batteries, change the batteries when the func-
tions of the basic station become weak.
•
Open the battery compartment of the basic station.
•
Insert two new batteries 1,5 V AAA. Make sure the polarities are correct.
•
Please note:
When the batteries are changed, the contact between outdoor transmitter and
basic station must be restored – so always insert new batteries into both devices or
start a manual transmitter search.
9. Troubleshooting
Problems Solution
No indication at the basic station ➜ By mains operation:
Connect the device to mains adapter
➜By battery operation:
Ensure that the batteries polarities are correct
TFA_No. 35.1133_Anleit_04_17 05.04.2017 14:28 Uhr Seite 14

2928
SUN - Wireless weather station
Outdoor transmitter
Measuring range outdoor
Temperature -20 °C… +60 °C (-4 °F …+140°F)
Resolution 1,0 °C
Indication HHH/LLL Outside measuring range
Range max. 60 m (free field)
Transmission frequency 433 MHz
Maximum radio-frequency power < 10mW
Power consumption Batteries 2 x 1,5 V AAA (not included)
Housing dimension 40 x 24 x 92 mm
Weight 29 g (instrument only)
No part of this manual may be reproduced without written consent of TFA Dostmann. The technical data
are correct at the time of going to print and may change without prior notice.
The latest technical data and information about your product can be found by entering your product num-
ber on our homepage.
EU DECLARATION OF CONFORMITY
Hereby, TFA Dostmann declares that the radio equipment type 35.1133 is in compliance with Directive
2014/53/EU.
The full text of the EU declaration of conformity is available at the following internet address:
www.tfa-dostmann.de
E-Mail: [email protected]
TFA Dostmann GmbH & Co.KG, Zum Ottersberg 12, D-97877 Wertheim 04/17
Never dispose of empty batteries and rechargeable batteries in household
waste.
As a consumer, you are legally required to take them to your retail store or
to an appropriate collection site depending on national or local regulations
in order to protect the environment.
The symbols for the heavy metals contained are:
Cd=cadmium, Hg = mercury; Pb=lead
This instrument is labelled in accordance with the EU Waste Electrical and
Electronic Equipment Directive (WEEE).
Please do not dispose of this instrument in household waste. The user is
obligated to take end-of-life devices to a designated collection point for
the disposal of electrical and electronic equipment, in order to ensure
environmentally-compatible disposal.
11. Specifications
Basic station
Measuring range indoor
Temperature 0 °C… +50 °C (+32 °F …+122 °F)
Resolution 1,0 °C
Humidity 20 %…95%
Resolution 1 %
Power consumption Power adapter: 230 V~ 50 Hz (inclusive)
Batteries 2 x 1,5 V AAA (not included)
Housing dimension 120 x 25 (70) x 120 mm
Weight 168 g (instrument only)
TFA_No. 35.1133_Anleit_04_17 05.04.2017 14:28 Uhr Seite 15
Other manuals for 35.1133
2
Table of contents
Other TFA Weather Station manuals
Popular Weather Station manuals by other brands

Ambient Weather
Ambient Weather WS-100 user manual

Ninglu
Ninglu AM706D Operation manual

La Crosse Technology
La Crosse Technology WS-1611T Operation manual

Auriol
Auriol 282650 Operation and safety notes

La Crosse Technology
La Crosse Technology WS-9153TWC-IT instruction manual

BIOS WEATHER
BIOS WEATHER 339BC manual

FuehlerSysteme
FuehlerSysteme FS6002 Instructions for use

Oregon Scientific
Oregon Scientific RMR132HG user manual

SOMFY
SOMFY 1870932 operating instructions

La Crosse Technology
La Crosse Technology WS-9410TWC manual

Airmar
Airmar PB100 WeatherStation owner's guide

Kestrel
Kestrel 5500 Quick guide to using