TFA 35.1136 User manual

Bedienungsanleitung
Instruction manual
Mode d’emploi
Instrucciones de uso
Gebruiksaanwijzing
Istruzioni per l'uso
Kat. Nr. 35.1136
RoHS
TFA_No. 35.1136_Anleitung_09_16 20.09.2016 10:12 Uhr Seite 1

RCC
RCC
32
Fig. 1 Fig. 2
A 1
A 5
C 1
A 4
C 4
C 5
A 7
C 3
A 6
A 2
C 1
C 2
C 3
A 3 B 1
B 1
B 2
B 3
B 4
B 5
B 6
B 7
B 8
B 9
TFA_No. 35.1136_Anleitung_09_16 20.09.2016 10:12 Uhr Seite 2

Fig. 3
D 1
E 1
E 2
D 2
54
PRIMAVERA - Funkwetterstation
Vielen Dank, dass Sie sich für dieses Gerät aus dem Hause TFA entschieden haben.
1. Bevor Sie mit dem Gerät arbeiten
•
Lesen Sie sich bitte die Bedienungsanleitung genau durch. So werden Sie mit Ihrem neuen Gerät vertraut,
lernen alle Funktionen und Bestandteile kennen, erfahren wichtige Details für die Inbetriebnahme und den
Umgang mit dem Gerät und erhalten Tipps für den Störungsfall.
•
Durch die Beachtung der Bedienungsanleitung vermeiden Sie auch Beschädigungen des Gerätes und die
Gefährdung Ihrer gesetzlichen Mängelrechte durch Fehlgebrauch.
•
Für Schäden, die aus Nichtbeachtung dieser Bedienungsanleitung verursacht werden, übernehmen wir
keine Haftung. Ebenso haften wir nicht für inkorrekte Messwerte und Folgen, die sich aus solchen ergeben
können.
•
Beachten Sie besonders die Sicherheitshinweise!
•
Bewahren Sie diese Bedienungsanleitung gut auf!
2. Lieferumfang
•
Funk-Wetterstation (Basisstation)
•
Netzteil
•
Außensender (Kat.-Nr.: 30.3215.02)
•
Bedienungsanleitung
3. Einsatzbereich und alle Vorteile Ihres neuen Gerätes auf einen Blick
•
Außentemperatur und Luftfeuchtigkeit über kabellosen Außensender (433 MHz), Reichweite bis 60 m (Frei-
feld)
•
Erweiterbar auf bis zu 3 Sender, auch zur Klimakontrolle von entfernten Räumen, z.B. Kinderzimmer, Wein-
keller
•
Innentemperatur und Luftfeuchtigkeit
•
Tägliche Höchst- und Tiefstwerte
•
Wettervorhersage mit Symbolen
•
Taupunkt und Hitzeindex
•
Funkuhr mit Wochentag und Datum
•
Alarm und Snooze-Funktion
•
Farbdisplay
4. Zu Ihrer Sicherheit
•
Das Produkt ist ausschließlich für den oben beschriebenen Einsatzbereich geeignet. Verwenden Sie das Pro-
dukt nicht anders, als in dieser Anleitung dargestellt wird.
•
Das eigenmächtige Reparieren, Umbauen oder Verändern des Gerätes ist nicht gestattet.
Vorsicht!
Lebensgefahr durch Stromschlag!
•
Schließen Sie das Basisgerät nur an eine vorschriftsmäßig installierte Steckdose mit einer Netzspannung von
230V an!
• Die Steckdose muss nahe der Einrichtung angebracht und leicht zugänglich sein.
•
Das Basisgerät und das Netzteil dürfen nicht mit Wasser oder Feuchtigkeit in Kontakt kommen. Nur für den
Betrieb in trockenen Innenräumen geeignet.
•
Benutzen Sie das Gerät nicht, wenn Gehäuse oder Netzteil beschädigt sind.
•
Bewahren Sie das Gerät außerhalb der Reichweite von Personen (auch Kindern) auf, die mögliche Gefahren
im Umgang mit elektrischen Geräten nicht richtig einschätzen können.
•
Ziehen Sie sofort den Stecker aus der Steckdose, wenn eine Störung auftritt oder das Gerät für längere Zeit
nicht benutzt wird.
•
Verwenden Sie ausschließlich das mitgelieferte Netzteil.
•
Verbinden Sie erst das Kabel mit dem Basisgerät und stecken Sie dann den Netzstecker in die Steckdose.
•
Ziehen Sie den Netzstecker nicht am Kabel aus der Steckdose.
•
Verlegen Sie das Netzkabel so, dass es nicht mit scharfkantigen oder heißen Gegenständen in Berührung
kommt.
TFA_No. 35.1136_Anleitung_09_16 20.09.2016 10:12 Uhr Seite 3

76
PRIMAVERA - Funkwetterstation
6. Inbetriebnahme
6.1 Anschließen der Basisstation an das Netzteil
•
Legen Sie die Geräte in einem Abstand von ca. 1,5 Metern voneinander auf einen Tisch. Vermeiden Sie die
Nähe zu möglichen Störquellen (elektronische Geräte und Funkanlagen).
•
Ziehen Sie die Schutzfolie vom Display der Basisstation.
•
Schließen Sie die Basisstation mit dem beigefügtem Netzadapter an. Stecken Sie den Anschlussstecker in den
Anschluss der Basisstation und schließen Sie das Gerät mit dem Netzstecker am Stromnetz an. Wichtig! Stel-
len Sie sicher, dass Ihre Netzspannung nicht mehr als 230 V beträgt! Andere Netzspannungen können zur
Beschädigung des Gerätes führen.
•
Ein kurzer Signalton ertönt und alle Segmente werden kurz angezeigt.
•
TIME und 0.00 (Voreinstellung) erscheinen im Display.
6.2 Einlegen der Batterien in den Außensender
•
Öffnen Sie das verschraubte Batteriefach des Außensenders.
•
Der Schiebeschalter zur Kanalauswahl steht auf der Position 1 (Voreinstellung).
•
Legen Sie zwei neue Batterien 1,5 V AAA polrichtig ein.
•
Schließen Sie das Batteriefach wieder.
6.2.1 Empfang der Außenwerte
•
Die Messdaten des Außensenders werden an die Basisstation übertragen. Die Anzeigen der Außenwerte „- -”
blinken.
•
Auf dem Display der Basisstation erscheinen die Kanalnummer, die Außenluftfeuchtigkeit und die Außen-
temperatur in °C (Voreinstellung).
•
Werden die Außenwerte nicht innerhalb drei Minuten empfangen, erscheint „- -” auf dem Display. Prüfen
Sie den Netzstecker und die Batterien im Sender und starten Sie einen weiteren Versuch. Beseitigen Sie even-
tuelle Störquellen.
•
Sie können die Außensendersuche zu einem späteren Zeitpunkt auch manuell starten (z.B. bei Verlust des
Außensenders oder Batteriewechsel).
•
Halten Sie die CH Taste auf der Basisstation für drei Sekunden gedrückt.
•
Auf dem Display erscheint „---”.
•
Drücken Sie die TX Taste im Batteriefach des Außensenders.
•
Ein Signalton ertönt und die Basisstation empfängt die Werte vom Außensender.
•
Nach erfolgreicher Inbetriebnahme des Außensenders schließen Sie den Batteriedeckel wieder sorgfältig.
6.3 Empfang der DCF-Funkzeit
•
Nach dem Empfang der Außenwerte versucht das Gerät nun, das Funkuhrsignal zu empfangen und das DCF-
Empfangssymbol blinkt.
•
Um Störungen zu vermeiden, schaltet sich die Hintergrundbeleuchtung (und der USB-Port) während des
Empfangs des Funkuhrsignals aus.
•
Wenn der Zeitcode nach 2-12 Minuten empfangen wurde, werden die funkgesteuerte Zeit und das DCF-
Empfangssymbol ständig im Display angezeigt. Die Hintergrundbeleuchtung ist dauerhaft aktiviert.
•
Sie können die Initialisierung auch manuell starten.
•
Drücken und halten Sie die +/RCC Taste.
•
Das DCF-Empfangssymbol blinkt.
•
Die dauerhafte Hintergrundbeleuchtung schaltet sich automatisch aus.
•
Unterbrechen Sie den Empfangsversuch, indem Sie die +/ RCC Taste noch einmal gedrückt halten. Das DCF-
Empfangssymbol verschwindet.
•
Der DCF-Signalempfang findet stündlich zwischen 2:00 und 5.00 Uhr morgens statt. Ist auch der Empfang um
5:00 Uhr nicht erfolgreich, so finden die nächsten Empfangsversuche wieder um 2.00 Uhr morgens statt.
Es gibt drei verschiedene Empfangssymbole:
blinkt - Empfang aktiv
bleibt stehen - Empfang erfolgreich
kein Symbol - kein Empfang / Uhrzeit manuell einstellen
Vorsicht!
Verletzungsgefahr:
•
Bewahren Sie die Batterien und die Geräte außerhalb der Reichweite von Kindern auf.
•
Batterien nicht ins Feuer werfen, kurzschließen, auseinander nehmen oder aufladen. Explosionsgefahr!
•
Batterien enthalten gesundheitsschädliche Säuren. Um ein Auslaufen der Batterien zu vermeiden, sollten
schwache Batterien möglichst schnell ausgetauscht werden. Verwenden Sie nie gleichzeitig alte und neue
Batterien oder Batterien unterschiedlichen Typs. Beim Hantieren mit ausgelaufenen Batterien chemikalien-
beständige Schutzhandschuhe und Schutzbrille tragen!
Wichtige Hinweise zur Produktsicherheit!
•
Setzen Sie das Gerät keinen extremen Temperaturen, Vibrationen und Erschütterungen aus.
•
Vor Feuchtigkeit schützen.
•
Der Außensender ist spritzwassergeschützt, aber nicht wasserdicht. Suchen Sie einen niederschlagsgeschütz-
ten Platz für den Außensender aus.
5. Bestandteile und Tasten
5.1 Basisstation (Empfänger)
Display-Anzeige (Fig. 1)
A1: Wettervorhersage mit Symbolen
A2: Außentemperatur und –luftfeuchtigkeit
A3: Außensendersymbol mit Kanalnummer
A4: Uhrzeit, Wochentag und Datum
A5: Alarmsymbol
A6: Symbol für Innen
A7: Innentemperatur und –luftfeuchtigkeit
Tasten (Fig. 2)
B1: SNOOZE/LIGHT Taste
B2: SET Taste
B3: MAX/MIN Taste
B4: ALARM Taste
B5: HEAT/DEW Taste
B6: +/RCC Taste
B7: CH Taste
B8: -/°C/°F Taste
B9: LIGHT HOLD ON/OFF Taste
Gehäuse (Fig. 1+2)
C1: Wandaufhängungen
C2: Batteriefach
C3: Ständer (ausklappbar)
C4: USB Ausgang
C5: Netzteilanschluss
5.2 Außensender (Fig. 3)
Tasten im Batteriefach
D1: TX Taste
D2: Schiebeschalter 1/2/3 zur Kanalauswahl
Gehäuse
E1: Wandaufhängung
E2: Batteriefach (verschraubt)
TFA_No. 35.1136_Anleitung_09_16 20.09.2016 10:12 Uhr Seite 4

98
PRIMAVERA - Funkwetterstation
7.1.2 Einstellung der 12- und 24-Stunden-Anzeige
•
Im Einstellungsmodus können Sie zwischen dem 12- und 24-Stunden-Anzeige auswählen.
•
Im 12-Stunden-Zeitsystem erscheint AM oder PM (nach 12 Uhr) auf dem Display.
7.2 Einstellung des Weckalarms
•
Drücken und halten Sie die ALARM Taste.
•
ALARM, das Alarmsymbol und 0:00 Uhr (Voreinstellung) oder die zuletzt eingestellte Alarmzeit erscheinen
auf dem Display.
•
Die Stundenanzeige blinkt im Display.
•
Sie können mit der +/RCC oder -/°C/°F Taste die Stunden einstellen.
•
Drücken Sie die ALARM Taste noch einmal und Sie können nun die Minuten mit der +/RCC oder -/°C/°F Taste
einstellen.
•
Bestätigen Sie die Eingabe mit der ALARM Taste.
•
Im Display erscheinen TIME, die aktuelle Uhrzeit und das Alarmsymbol. Die Alarmfunktion ist aktiviert.
•
Wenn die eingestellte Alarmzeit erreicht ist, beginnt der Wecker zu klingeln.
•
Das Alarmsymbol blinkt.
•
Drücken Sie auf eine beliebige Taste und der Alarm wird beendet.
•
Wird der Alarm nicht unterbrochen, schaltet sich der ansteigende Alarmton automatisch nach ein paar
Minuten aus und aktiviert sich erneut zur gleichen Alarmzeit wieder.
•
Wenn der Alarmton ertönt, drücken Sie die SNOOZE/LIGHT Taste, um die Snooze-Funktion zu aktivieren.
•
Ist die Snooze-Funktion aktiviert, blinkt Zz auf dem Display.
•
Der Alarm wird für die Dauer von 10 Minuten unterbrochen.
7.2.1 Aktivieren und Deaktivieren der Alarm-Funktion
•
Drücken Sie die ALARM Taste im Normalmodus.
•
ALARM und die eingestellte Alarmzeit erscheinen im Display.
•
Drücken Sie die ALARM Taste noch einmal, um die Alarm-Funktion zu deaktivieren oder aktivieren.
•
Das Alarmsymbol verschwindet oder erscheint.
•
Drücken Sie die SET Taste, um in den Normalmodus zurückzukehren.
•
TIME und die aktuelle Uhrzeit erscheinen im Display.
7.3 Hintergrundbeleuchtung
•
Achtung: Die Hintergrundbeleuchtung im Dauerbetrieb funktioniert nur mit Netzstecker.
•
Drücken und halten Sie die LIGHT HOLD ON/OFF Taste für drei Sekunden, bis ein Signalton zu hören ist, um
die Hintergrundbeleuchtung auszuschalten oder anzuschalten.
•
Drücken Sie die LIGHT HOLD ON/OFF Taste einmal, um die Hintergrundbeleuchtung zu dimmen.
•
Drücken Sie die SNOOZE/LIGHT oder eine beliebige Taste, um die Hintergrundbeleuchtung für ein paar
Sekunden zu aktivieren.
8. USB-Ausgang
•
Mit dem USB Ausgang können Sie Ihr Mobiltelefon oder andere USB taugliche Geräte aufladen. Die Ausgangs-
leistung beträgt 5 Volt …. 1 Ampere. Die Wetterstation kann nicht über den USB-Ausgang betrieben werden.
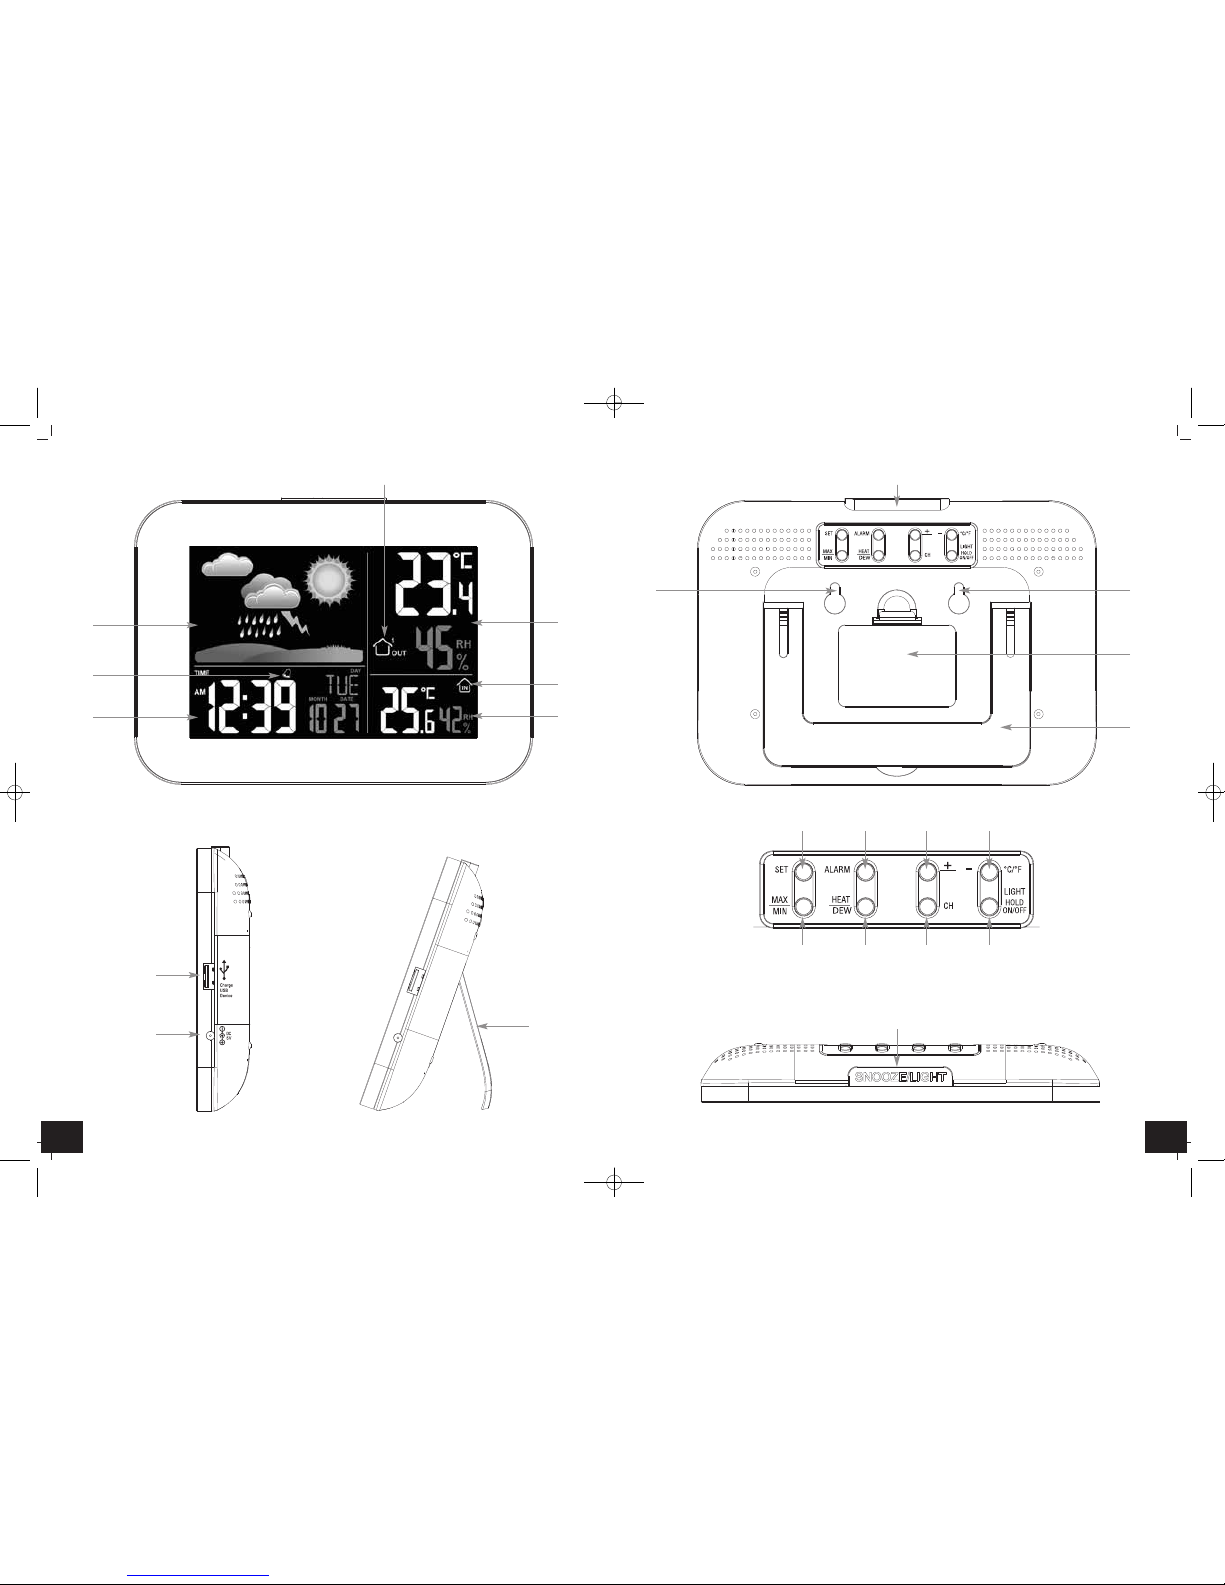
9. Wettervorhersage-Symbole (Fig. 4)
•
Die Wetterstation unterscheidet fünf unterschiedliche Wettersymbole (Sonnig, teilweise bewölkt, bedeckt,
regnerisch und stürmisch).
•
Die Vorhersage über die Symbolanzeige bezieht sich auf einen Zeitraum von 12 Stunden und gibt lediglich
einen Wettertrend an. Die Genauigkeit beträgt etwa 70 %.
•
Ist es zum Beispiel im Moment wolkig und es wird Regen angezeigt, deutet dies nicht auf eine Fehlfunktion
des Gerätes hin, sondern gibt an, dass der Luftdruck gesunken und eine Wetterverschlechterung zu erwarten
ist, wobei es sich aber nicht unbedingt um Regen handeln muss.
•
Das Sonnensymbol wird auch bei Nacht angezeigt, wenn es sich um eine sternenklare Nacht handelt.
•
Falls die Funkuhr kein DCF-Funksignal empfangen kann (z.B. wegen Störungen, Übertragungsdistanz, etc.),
kann die Zeit manuell eingestellt werden. Das DCF-Empfangszeichen verschwindet und die Uhr arbeitet
dann wie eine normale Quarz-Uhr (siehe „Manuelle Einstellungen”).
6.3.1 Empfang der DCF-Funkzeit
Die Zeitübertragung erfolgt von einer Cäsium Atom-Funkuhr, die von der Physikalisch Technischen Bundesan-
stalt in Braunschweig betrieben wird. Die Abweichung beträgt weniger als 1 Sekunde in einer Million Jahren.
Die Zeit ist kodiert und wird von Mainflingen in der Nähe von Frankfurt am Main durch ein DCF-77 (77.5 kHz)
Frequenzsignal übertragen mit einer Reichweite von ca. 1.500 km. Ihre Funkuhr empfängt das Signal, wandelt
es um und zeigt immer die exakte Zeit an. Auch die Umstellung von Sommer- und Winterzeit erfolgt auto-
matisch. Während der Sommerzeit erscheint auf dem Display DST. Der Empfang hängt hauptsächlich von der
geographischen Lage ab. Im Normalfall sollten innerhalb des Radius von 1.500 km ausgehend von Frankfurt bei
der Übertragung keine Probleme auftauchen.
Bitte beachten Sie folgende Hinweise:
•
Es wird empfohlen, einen Abstand von mindestens 1,5 – 2 Metern zu eventuell störenden Geräten wie Com-
puterbildschirmen und Fernsehgeräten einzuhalten.
•
In Stahlbetonbauten (Kellern, Aufbauten) ist das empfangene Signal natürlicherweise schwächer. In Extrem-
fällen wird empfohlen, das Gerät in Fensternähe zu platzieren und/oder durch Drehen das Funksignal besser
zu empfangen.
•
Nachts sind die atmosphärischen Störungen meist geringer und ein Empfang ist in den meisten Fällen mög-
lich. Ein einziger Empfang pro Tag genügt, um die Genauigkeit zu gewährleisten und Abweichungen unter 1
Sekunde zu halten.
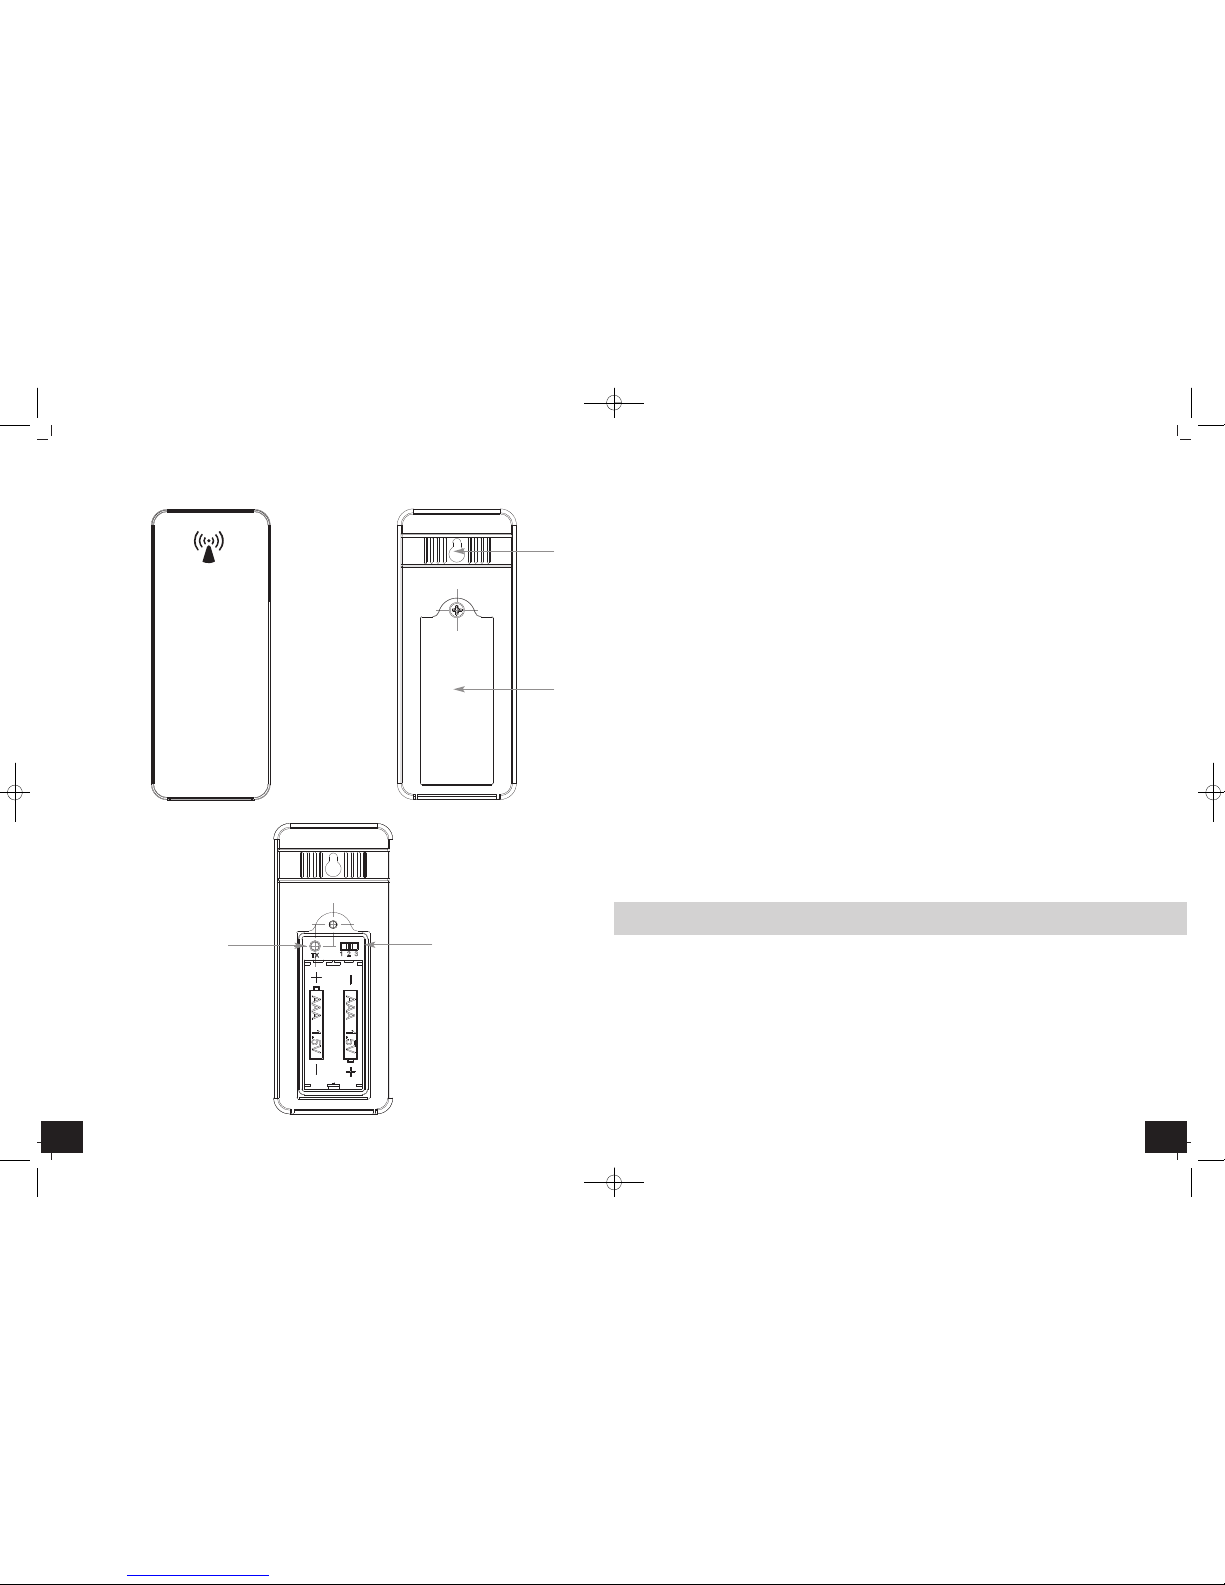
6.4 Einlegen der Batterien in die Basisstation
•
Die Batterien fungieren im Falle eines Stromausfalls als Backup-Batterien.
•
Für eine dauerhafte Hintergrundbeleuchtung benutzen Sie bitte den mitgelieferten Netzstecker.
•
Öffnen Sie das Batteriefach auf der Rückseite der Basisstation.
•
Legen Sie drei neue Batterien 1,5 V AAA polrichtig ein.
•
Schließen Sie das Batteriefach wieder.
7. Bedienung
•
Während der Bedienung werden alle erfolgreichen Eingaben mit einem kurzen Piepton quittiert.
•
Das Gerät verlässt automatisch den Einstellmodus, wenn für längere Zeit keine Taste gedrückt wird.
•
Halten Sie die +/RCC oder -/°C/°F Taste im Einstellmodus gedrückt, gelangen Sie in den Schnelllauf.
7.1 Manuelle Einstellungen
•
Halten Sie die SET Taste im Normalmodus für zwei Sekunden gedrückt, um in den Einstellmodus zu gelan-
gen.
•
Die dauerhafte Hintergrundbeleuchtung schaltet sich automatisch an.
•
TIME ZONE und 0 (Voreinstellung) blinken im Display.
•
Sie können mit der +/RCC oder -/°C/°F Taste die Zeitzonenkorrektur vornehmen.
•
Drücken Sie die SET Taste noch einmal.
•
TIME erscheint im Display.
•
Sie können nun nacheinander die 12- und 24 Stunden-Anzeige (24H - Voreinstellung), die Stunden, die
Minuten, das Jahr (YEAR erscheint im Display), den Monat und den Tag ansteuern und mit der +/RCC oder
-/°C/°F Taste einstellen.
•
Nach Einstellen des Datums wird Ihnen der Wochentag (MON, TUE, WED, THU, FRI, SAT oder SUN erscheint
auf dem Display) automatisch angezeigt.
•
Bestätigen Sie die Eingabe mit der SET Taste.
•
Bei erfolgreichem Empfang des DCF-Funkuhrsignals wird die manuell eingestellte Zeit überschrieben.
7.1.1 Einstellung der Zeitzone
•
Im Einstellungsmodus können Sie die Zeitzonenkorrektur (-12/+12) vornehmen.
•
Die Zeitzonenkorrektur wird benötigt, wenn das DCF Funkuhrsignal empfangen werden kann, die Zeitzone
sich aber von der DCF Funkzeit unterscheidet (z.B. +1=eine Stunde später).
TFA_No. 35.1136_Anleitung_09_16 20.09.2016 10:12 Uhr Seite 5

1110
PRIMAVERA - Funkwetterstation
•
Sie können auch einen automatischen Kanalwechsel einstellen. Nach Kanal 3 erscheint bei erneuter Bedie-
nung der CH Taste AUTO für automatischen Kanalwechsel.
•
Drücken Sie die CH Taste noch einmal, um den automatischen Kanalwechsel zu deaktivieren und dauerhaft
wieder den ersten Außensender anzeigen zu lassen.
•
Einmal registrierte Außensender (Kanäle), die nicht mehr benötigt werden, können Sie manuell löschen,
indem Sie die CH Taste für drei Sekunden gedrückt halten. Sobald ein neuer Außensender empfangen wird,
erfolgt eine erneute Anzeige.
12. Aufstellen der Basisstation und Befestigen des Außensenders
•
Mit dem ausklappbaren Ständer auf der Rückseite kann die Basisstation auf einer glatten Oberfläche auf-
gestellt werden oder mit den Aufhängeösen an der Wand im Wohnraum befestigt werden. Vermeiden Sie
die Nähe zu anderen elektrischen Geräten (Fernseher, Computer, Funktelefone) und massiven Metallgegen-
ständen.
•
Mit der Aufhängeöse auf der Rückseite des Außensenders kann der Außensender an der Wand befestigt
werden. Suchen Sie sich einen schattigen, niederschlagsgeschützten Platz für den Außensender aus. (Direkte
Sonneneinstrahlung verfälscht die Messwerte und ständige Nässe belastet die elektronischen Bauteile un-
nötig).
•
Prüfen Sie, ob eine Übertragung der Messwerte vom Außensender am gewünschten Aufstellort zur Basis-
station stattfindet (Reichweite Freifeld ca. 60 Meter), bei massiven Wänden, insbesondere mit Metallteilen
kann sich die Sendereichweite erheblich reduzieren.
•
Suchen Sie sich gegebenenfalls einen neuen Aufstellort für Außensender und/oder Empfänger.
13. Pflege und Wartung
•
Reinigen Sie die Geräte mit einem weichen, leicht feuchten Tuch. Keine Scheuer- oder Lösungsmittel verwen-
den!
•
Entfernen Sie die Batterien und ziehen Sie den Stecker, wenn Sie die Geräte längere Zeit nicht verwenden.
•
Bewahren Sie Ihre Geräte an einem trockenen Platz auf.
13.1 Batteriewechsel
•
Sobald das Batteriesymbol im Displayfenster der Außenwerte auf der Basisstation erscheint, wechseln Sie
bitte die Batterien im Außensender.
•
Sobald das Batteriesymbol im Displayfenster der Innenwerte erscheint, wechseln Sie bitte die Batterien in
der Basisstation.
•
Achtung:
Bei einem Batteriewechsel muss der Kontakt zwischen Außensender und Basisstation wieder hergestellt wer-
den – also immer beide Geräte neu in Betrieb nehmen oder manuelle Außensendersuche starten.
14. Fehlerbeseitigung
Problem Lösung
Keine Anzeige auf Basisstation ➜ Bei Netzbetrieb:
Basisstation mit Netzteil anschließen
Hintergrundbeleuchtung dauerhaft aktivieren
Netzteil überprüfen
➜Bei Batteriebetrieb:
Batterien polrichtig einlegen
Hintergrundbeleuchtung kurzzeitig aktivieren mit beliebiger Taste
Batterien wechseln
Kein DCF Empfang ➜+/RCC Taste für drei Sekunden gedrückt halten und Initialisierung starten
➜ Empfangsversuch in der Nacht abwarten
➜ Anderen Aufstellort für das Gerät wählen
➜ Uhrzeit manuell einstellen
Wichtiger Hinweis!
Bitte beachten Sie, dass die Symbolvorhersage sich im Laufe des Betriebs präzisiert. Die Symbolvorhersage ist
bereits ab der Inbetriebnahme aktiv, allerdings steigt die Zuverlässigkeit der Prognosen mit der Menge an
gesammelten Daten. Der Sensor muss sich zunächst auf das Referenzniveau am Standort einstellen.
10. Thermometer und Hygrometer
10.1 Maximum/Minimum-Funktion
•
Die Höchst- und Tiefstwerte werden automatisch um Mitternacht zurückgesetzt.
•
Drücken Sie die MAX/MIN Taste im Normalmodus.
•
MAX erscheint auf dem Display.
•
Die höchste Temperatur und Luftfeuchtigkeit für innen und außen seit der letzten Rückstellung werden
angezeigt.
•
Drücken Sie die MAX/MIN Taste noch einmal.
•
MIN erscheint auf dem Display.
•
Die niedrigste Temperatur und Luftfeuchtigkeit für innen und außen seit der letzten Rückstellung werden
angezeigt.
•
Um wieder die Anzeige mit den aktuellen Werten zu erhalten, drücken Sie die MAX/MIN Taste noch einmal.
•
Das Gerät verlässt auch automatisch den MAX/MIN-Modus, wenn keine Tasten gedrückt werden.
•
Halten Sie die MAX/MIN Taste für zwei Sekunden gedrückt, während auf dem Display die höchsten oder tief-
sten Werte angezeigt werden, um die Werte zu löschen.
10.2 Einstellung der Temperatureinheit
•
Im Normalmodus können Sie zwischen °C (Celsius) oder °F (Fahrenheit) als Temperatureinheit auswählen.
•
Drücken Sie die -/°C/°F Taste.
10.3 Hitzeindex-Anzeige
•
Der Hitzeindex bezeichnet das Temperaturempfinden in Verbindung mit Luftfeuchtigkeit.
•
Drücken Sie die HEAT/DEW Taste im Normalmodus, um die aktuelle Hitzeindex-Temperatur anzeigen zu las-
sen.
•
Auf dem Display erscheinen HEATINDEX und die Temperatur.
•
Die Luftfeuchtigkeitswerte für Innen und Außen verschwinden.
•
Das Display wechselt automatisch wieder zurück zur aktuellen Anzeige von Temperatur und Luftfeuchtig-
keit.
10.4 Taupunkt-Anzeige
•
Der Zusammenhang von Temperatur und relativer Luftfeuchte wird durch den Taupunkt ausgedrückt:
Wird Luft kontinuierlich abgekühlt, steigt bei gleich bleibender absoluter Luftfeuchtigkeit die relative Luft-
feuchtigkeit bis auf 100% an. Kühlt die Luft weiter ab, so wird der überschüssige Wasserdampf in Tröpfchen-
form ausgeschieden.
•
Drücken Sie die HEAT/DEW Taste im Normalmodus zweimal, um sich die aktuelle Taupunkt-Temperatur
anzeigen zu lassen.
•
Auf dem Display erscheinen DEWPOINT und die Temperatur.
•
Die Luftfeuchtigkeitswerte für Innen und Außen verschwinden.
•
Das Display wechselt automatisch wieder zurück zur aktuellen Anzeige von Temperatur und Luftfeuchtig-
keit.
11. Zusätzliche Außensender
•
Wenn Sie mehrere Außensender anschließen wollen, wählen Sie mit dem Schiebeschalter 1/2/3 im Batterie-
fach des Außensenders für jeden Außensender einen anderen Kanal aus. Der Empfang des neuen Außensen-
ders erfolgt automatisch durch die Basisstation. Drücken und halten Sie die CH Taste auf der Basisstation
oder starten Sie eine Neuinbetriebnahme der Basisstation laut Bedienungsanleitung.
•
Die Außenwerte werden auf dem Display der Basisstation angezeigt. Falls Sie mehr als einen Außensender
angeschlossen haben, können Sie mit der CH Taste auf der Basisstation zwischen den Kanälen 1 bis 3 wech-
seln.
TFA_No. 35.1136_Anleitung_09_16 20.09.2016 10:12 Uhr Seite 6

1312
PRIMAVERA - Funkwetterstation
Übertragungsfrequenz 433 MHz
Maximale Sendeleistung < 10mW
Übertragungszeit 50 Sekunden
Spannungsversorgung Batterien: 2 x 1,5 V AAA (nicht inklusive)
Gehäusemaße 45 x 20 x 108 mm
Gewicht 45 g (nur das Gerät)
Diese Anleitung oder Auszüge daraus dürfen nur mit Zustimmung von TFA Dostmann veröffentlicht werden. Die technischen Daten ent-
sprechen dem Stand bei Drucklegung und können ohne vorherige Benachrichtigung geändert werden.
Die neuesten technischen Daten und Informationen zu Ihrem Produkt finden Sie unter Eingabe der Artikel-Nummer auf unserer Homepage.
EU-KONFORMITÄTSERKLÄRUNG
Hiermit erklärt TFA Dostmann, dass der Funkanlagentyp 35.1136 der Richtlinie 2014/53/EU entspricht. Der vollständige Text der EU-Kon-
formitätserklärung ist unter der folgenden Internetadresse verfügbar:
www.tfa-dostmann.de
E-Mail: [email protected]
TFA Dostmann GmbH & Co.KG, Zum Ottersberg 12, D-97877 Wertheim, Deutschland 09/16
➜ Beseitigen der Störquellen
➜ Neuinbetriebnahme von der Basisstation gemäß Anleitung
Kein Außensenderempfang ➜ Kein Außensender installiert
Anzeige „---” ➜ Batterien des Außensenders prüfen (keine Akkus verwenden!)
für Kanal 1/2/3 ➜ Neuinbetriebnahme von Außensender und Basisstation gemäß Betriebs-
anleitung
➜ Manuelle Außensendersuche gemäß Betriebsanleitung starten
➜ Anderen Aufstellort für Außensender und/oder Basisstation wählen
➜ Abstand zwischen Außensender und Basisstation verringern
➜ Beseitigen der Störquellen
Unkorrekte Anzeige ➜Batterien wechseln
15. Entsorgung
Dieses Produkt wurde unter Verwendung hochwertiger Materialien und Bestandteile hergestellt, die recycelt
und wiederverwendet werden können.
Batterien und Akkus dürfen keinesfalls in den Hausmüll!
Als Verbraucher sind Sie gesetzlich verpflichtet, gebrauchte Batterien und Akkus zur umweltgerech-
ten Entsorgung beim Handel oder entsprechenden Sammelstellen gemäß nationaler oder lokaler
Bestimmungen abzugeben.
Die Bezeichnungen für enthaltene Schwermetalle sind:
Cd=Cadmium, Hg=Quecksilber, Pb=Blei
Dieses Gerät ist entsprechend der EU-Richtlinie über die Entsorgung von Elektro- und Elektronik-
Altgeräten (WEEE) gekennzeichnet.
Dieses Produkt darf nicht mit dem Hausmüll entsorgt werden. Der Nutzer ist verpflichtet, das Altge-
rät zur umweltgerechten Entsorgung bei einer ausgewiesenen Annahmestelle für die Entsorgung
von Elektro- und Elektronikgeräten abzugeben.
16. Technische Daten
Basisstation
Messbereich Innen
Temperatur 0 °C… +50 °C (+32 °F …+122 °F)
Luftfeuchtigkeit 1 … 99%
Spannungsversorgung Batterien: 3 x 1,5 V AAA (nicht inklusive)
Netzstecker: 230 V AC / 5.0 V DC (inklusive)
USB Ausgang 5 Volt … 1 Ampere
Gehäusemaße 175 x 26 (58) x 125 mm
Gewicht 290 g (nur das Gerät)
Außensender
Messbereich Außen
Temperatur -40 °C… +60 °C (-40 °F …+140°F)
Luftfeuchtigkeit 1 … 99%
Reichweite ca. 60 m (Freifeld)
TFA_No. 35.1136_Anleitung_09_16 20.09.2016 10:12 Uhr Seite 7

1514
PRIMAVERA - Wireless weather station
Caution!
Risk of injury:
•
Keep these instruments and the batteries out of the reach of children.
•
Batteries must not be thrown into a fire, short-circuited, taken apart or recharged. Risk of explosion!
•
Batteries contain harmful acids. Low batteries should be changed as soon as possible to prevent damage
caused by leaking.
•
Never use a combination of old and new batteries together, nor batteries of different types.
•
Wear chemical-resistant protective gloves and safety glasses when handling leaking batteries.
Important information on product safety!
•
Do not place your device near extreme temperatures, vibrations or shocks.
•
Protect it from moisture.
•
The outdoor transmitter is protected against splash water, but is not watertight. Choose a shady and dry
position for the outdoor transmitter.
5. Elements and buttons
5.1 Basic station (Receiver)
Display (Fig. 1)
A1: Weather forecast with symbols
A2: Outdoor temperature and humidity
A3: Symbol for outdoor transmitter with channel number
A4: Time, weekday and date
A5: Alarm symbol
A6: Symbol for indoors
A7: Indoor temperature and humidity
Tasten (Fig. 2)
B1: SNOOZE/LIGHT button
B2: SET button
B3: MAX/MIN button
B4: ALARM button
B5: HEAT/DEW button
B6: +/RCC button
B7: CH button
B8: -/C/°F button
B9: LIGHT HOLD ON/OFF button
Housing (Fig. 1+2)
C1: Wall mount holes
C2: Battery compartment
C3: Stand (fold out)
C4: USB output
C5: Power adaptor connector
5.2 Outdoor transmitter (Fig. 3)
Buttons in the battery compartment
D1: TX button
D2: Switch 1-2-3 for channel selection
Housing
E1: Wall mounting hole
E2: Battery compartment (screwed)
Thank you for choosing this instrument from TFA.
1. Before you start using it
•
Please make sure to read the instruction manual carefully.
This information will help you to familiarise yourself with your new device, to learn all of its functions and
parts, to find out important details about its first use and how to operate it and to get advice in the event of
a malfunction.
•
Following and respecting the instructions in your manual will prevent damage to your instrument and loss
of your statutory rights arising from defects due to incorrect use.
•
We shall not be liable for any damage occurring as a result of non following of these instructions. Likewise,
we take no responsibility for any incorrect readings and for any consequences which may result from them.
•
Please take particular note of the safety advice!
•
Please keep this instruction manual for future reference.
2. Delivery content
•
Wireless weather station (basic station)
•
AC/DC power adaptor
•
Outdoor transmitter (Cat.-No.: 30.3215.02)
•
Instruction manual
3. Field of operation and all the benefits of your new instrument at a glance
•
Outdoor temperature and humidity wireless (433 MHz), distance range of up to 60 m (free field)
•
Expandable up to 3 outdoor transmitters, also for the climate control of remote rooms, e.g. children’s room,
wine-cellar etc.
•
Indoor temperature and humidity
•
Daily maximum and minimum values
•
Weather forecast with symbols
•
Dew point and heat index
•
Radio-controlled clock with weekday and date
•
Alarm and snooze function
•
Colour display
4. For your safety
•
This product is exclusively intended for the field of application described above. It should only be used as
described within these instructions.
•
Unauthorized repairs, modifications or changes to the product are prohibited.
Caution!
Risk of electrocution!
•
Plug the basic station only into a socket installed in regulation manner and with a mains voltage of 230V!
•
The mains socket must be installed near the equipment and it must be easily accessible.
•
The basic station and the mains adapter must not come into contact with water or moisture. It should be
operated in dry interiors.
•
Do not use the device if the housing or the mains adapters are damaged.
•
Keep the device out of reach of persons (including children) who cannot fully appreciate the potential risks
of handling electrical equipment.
•
Pull out the plug of the socket immediately if any fault occurs or if the device is not used for a long period of
time.
•
Only use the supplied mains adapter.
•
First connect the lead to the basic station and then insert the mains adapter into the socket.
•
Do not pull the mains adapter out of the socket by its lead.
•
Route the mains lead so that it does not come into contact with sharp-edged or hot objects.
TFA_No. 35.1136_Anleitung_09_16 20.09.2016 10:12 Uhr Seite 8

1716
PRIMAVERA - Wireless weather station
•
If the clock cannot detect the DCF-signal (for example due to disturbances, transmitting distance, etc.), the
time can be set manually. The DCF symbol disappears and the clock will then work as a normal quartz clock.
(see: Manual settings).
6.3.1 Note for radio-controlled time DCF
The time base for the radio-controlled time is a caesium atomic clock operated by the Physikalisch Technische
Bundesanstalt Braunschweig. It has a time deviation of less than one second in one million years. The time is
coded and transmitted from Mainflingen near Frankfurt via frequency signal DCF-77 (77.5 kHz) and has a trans-
mitting range of approximately 1,500 km. Your radio-controlled clock receives this signal and converts it to
show the precise time. Changeover from summer time or winter time is automatic. In Daylight Saving Time
“DST” is shown on the LCD. The quality of the reception depends mainly on the geographic location. Normally
there should be no reception problems within a 1,500 km radius around Frankfurt.
Please take note of the following:
•
The recommended distance to any interfering sources like computer monitors or TV sets is at least 1.5 - 2
meters.
•
Inside ferro-concrete rooms (basements, superstructures), the received signal is naturally weakened. In
extreme cases, please place the unit close to a window to improve the reception.
•
During night-time, the atmospheric interference is usually less severe and reception is possible in most cases.
A single daily reception is adequate to keep the accuracy deviation under 1 second.
6.4 Inserting the batteries in the basic station
•
The batteries will operate as a backup power source in case of power failure.
•
For a permanent backlight use the supplied power adapter.
•
Open the battery compartment at the back of the basic station.
•
Insert two new batteries 1,5 V AAA into the battery compartment. Make sure the polarity is correct.
•
Close the battery compartment again.
7. Operation
•
During the operation, all successful settings will be confirmed by a brief beep tone.
•
The device will automatically quit the setting mode if no button is pressed for a long period of time.
•
Press and hold the +/RCC or -/°C/°F button in the setting mode for fast running.
7.1 Manual settings
•
Press and hold the SET button in normal mode for two seconds, to enter the setting mode.
•
The continuous backlight will turn on automatically.
•
TIME ZONE and 0 (default) will be flashing on the display.
•
Press the +/RCC or -/C/°F button to make the time zone correction.
•
Press the SET button again.
•
TIME appears on the display.
•
The setting sequence is shown as follows: 12 or 24 hours system (24H default), the hours, the minutes, the
year (YEAR appears on the display), the month and the day. Press the +/RCC or -/°C/°F to adjust it.
•
The weekday (MON, TUE, WED, THU, FRI, SAT or SUN appears on the display) will be calculated automatically
after setting the date.
•
Confirm the setting with the SET button.
•
The manually set time will be overwritten by the DCF time when the signal is received successfully.
7.1.1 Setting of the time zone
•
In the setting mode you can make the time zone correction (-12/+12).
•
The time zone correction is needed for countries where the DCF signal can be received but the time zone is
different from the German time (e.g. +1=one hour later).
7.1.2 Setting of the 12 and 24 hours display
•
In the setting mode you can choose between the 12 - and 24 hour system.
•
In the 12 HR system AM or PM (after 12 o'clock) appears on the display.
6. Getting started
6.1 Connecting the basic station to power adapter
•
Place both instruments on a desk with a distance of approximately 1.5 meter. Avoid getting close to possible
interference sources (Electronic devices and radio installations).
•
Remove the protective foil from the display of the basic station.
•
Connect the basic station to the attached power adapter. Insert the adapter into the jack at the basic station
and connect the power adapter to a wall socket. Important! Make sure that your household voltage is 230V!
Otherwise your device may be damaged.
•
The device will alert you with a beep and all LCD segments will be displayed for a short moment.
•
TIME and 0:00 (default) appear on the display.
6.2 Inserting the batteries in the outdoor transmitter
•
Open the screwed battery compartment of the outdoor transmitter.
•
The slide switch for channel selection is at position 1 (default).
•
Insert two new batteries 1,5 V AAA, polarity as illustrated.
•
Close the battery compartment again.
6.2.1 Reception of the outdoor values
•
The outdoor values of the outdoor transmitter will be transmitted to the basic station. The displays of the out-
door values are flashing “--.-”.
•
On the display of the basic station appear the channel number, the outdoor humidity and the outdoor temper-
ature in °C (default).
•
If the reception of the outdoor values fails within three minutes, “- -” appears on the display. Check the power
adapter and the batteries of the transmitter and try it again. Check if there is any source of interference.
•
You can also start the outdoor transmitter search manually later on (for example when the outdoor transmitter
is lost or the batteries are changed).
•
Hold the CH button on the basic station for three seconds.
•
“---” appears on the display.
•
Press the TX button in the battery compartment of the outdoor transmitter.
•
The device will alert you with a beep and the basic station receives the values from the outdoor transmitter.
•
After successful installation close the battery compartment of the outdoor transmitter carefully.
6.3 Reception of the DCF frequency signal
•
After the reception of the outdoor values, the device will now scan the DCF frequency signal and the DCF
symbol will be flashing on the display.
•
To avoid interference, the backlight (and the USB output) turns off during the reception of the radio con-
trolled clock.
•
When the time code is received successfully after 2-12 minutes, the radio-controlled time and the DCF sym-
bol are displayed steadily in the display. The backlight is activated permanently.
•
You can start the initialization manually.
•
Press and hold the +/RCC button.
•
The DCF symbol will be flashing.
•
The continuous backlight will turn off automatically.
•
Interrupt the reception by pressing the +/RCC button again for three seconds. The DCF symbol disappears.
•
The DCF reception always takes place hourly between 2:00 and 5:00 o'clock in the morning. If the reception
is not successfully received until 5:00 o'clock, the next receive operation is again at 2:00 o'clock in the morn-
ing.
There are three different reception symbols:
flashing - reception is active
stays - reception is very good
no symbol - no reception / time is manually set
TFA_No. 35.1136_Anleitung_09_16 20.09.2016 10:12 Uhr Seite 9

1918
PRIMAVERA - Wireless weather station
•
You can now get the highest values for the indoor and outdoor temperature and humidity since the last reset.
•
Press the MAX/MIN button again.
•
MIN appears on the display.
•
You can now get the lowest values for the indoor and outdoor temperature and humidity since the last reset.
•
Press the MAX/MIN button once more, to go back to the present values display.
•
The device will automatically quit the MAX/MIN mode if no button is pressed.
•
Press and hold the MAX/MIN button for two seconds while the maximum or minimum values are displayed
to clear the recorded readings.
10.2 Setting of the temperature unit
•
In the normal mode you can change between °C (Celsius) or °F (Fahrenheit) as temperature unit.
•
Press the -/°C/°F button.
10.3 Heat index
•
The heat index is the temperature perception in conjunction with humidity.
•
Press the HEAT/DEW button in normal mode, to show the current heat index temperature.
•
HEATINDEX and the temperature appear on the display.
•
The indoor and outdoor humidity values disappear.
•
The display automatically switches back to the current display of temperature and humidity.
10.4 Dew point
•
The interdependency of temperature and relative humidity is expressed by means of the dew-point:
If the air is cooled continuously at constant absolute humidity, then the relative humidity will steadily
increase up to a maximum of 100%. If the air is cooled further, then the excess water vapour is separated out
in the form of water droplets.
•
Press the HEAT/DEW button, to show the current dew point.
•
DEWPOINT and the temperature appear on the display.
•
The indoor and outdoor humidity values disappear.
•
The display automatically switches back to the current display of temperature and humidity.
11. Additional outdoor transmitters
•
For having more than one additional outdoor transmitter select with the 1/2/3 switch in the battery compart-
ment of the outdoor transmitter for each single outdoor transmitter a different channel. The reception of
the new transmitter will be transmitted automatically to the basic station. Press and hold the CH button on
the basic station or restart the basic station according to the manual.
•
The outdoor values will be shown on the display of the basic station. If you have installed more than one
outdoor transmitter, press the CH button on the basic station to change between the channels 1 to 3.
•
You can also choose an alternating channel display. After the third channel, press the CH button again,
AUTO appears for an alternating channel.
•
Press the CH button again to deactivate the alternating channel and the first outdoor transmitter will be
shown permanently.
•
Once registered outdoor transmitters (channels), which are no longer needed, can be deleted manually by
pressing the CH button for three seconds. Once a new outdoor transmitter is received, there will be another
indicator.
12. Positioning and fixing of basic station and the outdoor transmitter
•
With the foldable leg at the back of the basic station, the basic station can be placed onto any flat surface or
wall mounted at the respective location by the hanging holes at the back of the unit. Avoid the vicinity of
any interfering field like computer monitors or TV sets and solid metal objects.
•
With the hanging hole at the back of the outdoor transmitter, the transmitter can be wall mounted at the
respective location. Choose a shady and dry position for the outdoor transmitter. (Direct sunshine falsifies
the measurement and continuous humidity strains the electronic components needlessly).
•
Check the transmission of the signal from the outdoor transmitter to the basic station (transmission range of
up to 60 m free field). Within ferro-concrete rooms (basements, superstructures), the received signal is natu-
rally weakened.
•
If necessary choose another position for the outdoor transmitter and/or receiver.
7.2 Setting of the alarm time
•
Press and hold the ALARM button.
•
ALARM, the alarm symbol and 00:00 (default) or the last adjusted alarm time appear on the display.
•
The hour digit will be flashing.
•
Press the +/RCC or -/°C/°F button to adjust the hours.
•
Press the ALARM button again and you can adjust the minutes with the +/RCC or -/°C/°F button.
•
Confirm the setting with the ALARM button.
•
TIME, the current time and the alarm symbol appear on the display. The alarm function is activated.
•
When the adjusted alarm time is reached, the alarm will ring.
•
The alarm symbol will be flashing.
•
Press any button and the alarm will stop.
•
If the alarm is not stopped manually, the increasing alarm will automatically turn off after certain minutes
and will be reactivated at the same time.
•
When the alarm rings, press the SNOOZE/LIGHT button and the snooze function will be activated.
•
Once the snooze function is activated, Zz will be flashing on the display.
•
The alarm will be interrupted for 10 minutes.
7.2.1 Activate and deactivate the alarm function
•
Press the ALARM button in normal mode.
•
ALARM and the last adjusted alarm time appear on the display.
•
Press the ALARM button again, to deactivate or activate the alarm function.
•
The alarm symbol disappears or appears on the display.
•
Press the SET button to return to normal mode.
•
TIME and the current time appear on the display.
7.3 Backlight
•
Attention: Backlight in continuous operation only works with power adapter.
•
Press and hold the LIGHT HOLD ON/OFF button for three seconds until a beep tone is heard to deactivate or
activate the backlight.
•
Press the LIGHT HOLD ON/OFF button once to dim the backlight.
•
Press the SNOOZE/LIGHT button or any button to activate the backlight for a few seconds.
8. USB output
•
With the USB output you can charge your mobile phone or other USB enabled devices. The output power is 5
Volts - 1 Ampere. The weather station cannot be operated via the USB output.
9. Weather forecast symbols (Fig. 4)
•
The weather station has five different weather symbols (sunny, slightly cloudy, cloudy, rainy and stormy).
•
The weather forecast relates to a range of 12 hours and indicates only a general weather trend. The accuracy
is about 70 %.
•
For example, if the current weather is cloudy and the rain symbol is displayed, it does not mean the product
is faulty because it is not raining. It simply means that the air pressure has dropped and the weather is
expected to get worse but not necessarily rainy. The accuracy is about 70 to 75%.
•
The sun symbol also appears at night if there is a starry night.
Note:
Please note that the forecast symbol will become more defined in the course of operation. The forecast sym-
bol is active right from the start, however, the reliability of the forecasts increases with the amount of data
collected. The sensor must adapt initially to the reference level at the site.
10. Thermometer and hygrometer
10.1 Maximum/Minimum function
•
The maximum and minimum values are automatically reset at midnight.
•
Press the MAX/MIN button in normal mode.
•
MAX appears on the display.
TFA_No. 35.1136_Anleitung_09_16 20.09.2016 10:12 Uhr Seite 10

2120
PRIMAVERA - Wireless weather station
This instrument is labelled in accordance with the EU Waste Electrical and Electronic Equipment
Directive (WEEE).
Please do not dispose of this instrument in household waste. The user is obligated to take end-of-
life devices to a designated collection point for the disposal of electrical and electronic equipment,
in order to ensure environmentally-compatible disposal
16. Specifications
Basic station
Measuring range indoors
Temperature 0 °C… +50 °C (+32 °F …+122 °F)
Humidity 1 … 99%
Power consumption Batteries: 3 x 1,5 V AAA (not included)
Power adapter: 230 V AC / 5.0 V DC (included)
USB output 5 Volt … 1 Ampere
Dimensions 175 x 26 (58) x 125 mm
Weight 290 g (instrument only)
Outdoor transmitter
Measuring range outdoors
Temperature -40 °C… +60 °C (-40 °F …+140°F)
Humidity 1 … 99%
Range max. 60 m (free field)
Transmission frequency 433 MHz
Maximum radio-frequency power < 10mW
Transmission time 50 seconds
Power consumption Batteries: 2 x 1,5 V AAA (not included)
Dimensions 45 x 20 x 108 mm
Weight 45 g (instrument only)
No part of this manual may be reproduced without written consent of TFA Dostmann. The technical data are correct at the time of going
to print and may change without prior notice. The latest technical data and information about your product can be found by entering
your product number on our homepage.
EU declaration of conformity
Hereby, TFA Dostmann declares that the radio equipment type 35.1136 is in compliance with Directive 2014/53/EU. The full text of the EU
declaration of conformity is available at the following internet address:
www.tfa-dostmann.de
E-Mail: [email protected]
TFA Dostmann GmbH & Co.KG, Zum Ottersberg 12, D-97877 Wertheim, Germany 09/16
13. Care and maintenance
•
Clean the devices with a soft damp cloth. Do not use solvents or scouring agents.
•
Remove the batteries and pull out the power adapter of the socket, if you do not use the products for a long
period of time.
•
Keep the devices in a dry place.
13.1 Battery replacement
•
Change the batteries of the outdoor transmitter, when the battery symbol appears on the display of the out-
door values.
•
Change the batteries of the basic station, when the battery symbol appears on the display of the indoor values.
•
Please note: When the batteries are changed, the contact between outdoor transmitter and basic station
must be restored – so always insert new batteries into both devices or start a manual transmitter search.
14. Troubleshooting
Problems Solution
No indication at the basic station ➜ Operation with mains adapter:
Connect the basic station to mains adapter
Activate backlight permanently
Control the power adapter
➜Operation with batteries:
Ensure that the batteries polarity are correct
Press any button to activate the backlight briefly
Change the batteries
No DCF reception ➜Press and hold the +/RCC button for three seconds and start the initializa-
tion manually
➜Wait for attempted reception during the night
➜Choose another place for your product
➜Manual setting of the clock
➜Check if there is any source of interference
➜Restart the basic station according to the manual
No reception of the ➜ No outdoor transmitter is installed
outdoor transmitter ➜ Check batteries of external transmitter
Indication “---” (do not use rechargeable batteries!)
for channel 1/2/3 ➜ Restart the outdoor transmitter and the basic station according to the
manual
➜ Start the outdoor transmitter search manually according to the manual
➜ Choose another place for the outdoor transmitter and/or the basic station
➜ Reduce the distance between the outdoor transmitter and the basic station
➜ Check if there is any source of interference
Incorrect indication ➜Change the batteries
15. Waste disposal
This product has been manufactured using high-grade materials and components which can be recycled and
reused.
Never dispose of empty batteries and rechargeable batteries in household waste. As a consumer, you
are legally required to take them to your retail store or to an appropriate collection site depending
on national or local regulations in order to protect the environment.
The symbols for the heavy metals contained are: Cd=cadmium, Hg = mercury; Pb=lead
TFA_No. 35.1136_Anleitung_09_16 20.09.2016 10:12 Uhr Seite 11

2322
PRIMAVERA - Station météo radio-pilotée
Attention!
Danger de blessure:
•
Gardez vos appareils et les piles hors de la portée des enfants.
•
Ne jetez jamais de piles dans le feu, ne les court-circuitez pas, ne les démontez pas et ne les rechargez pas.
Risques d'explosion!
•
Les piles contiennent des acides nocifs pour la santé. Une pile faible doit être remplacée le plus rapidement
possible, afin d'éviter toute fuite. N'utilisez jamais simultanément des piles anciennes avec des piles neuves
ou bien encore des piles de types différents. Si vous manipulez des piles qui ont coulé, utilisez des gants de
protection chimique spécialement adaptés et portez des lunettes de protection !
Conseils importants de sécurité du produit!
•
Évitez d’exposer l’appareil à des températures extrêmes, à des vibrations ou à des chocs.
•
Protégez-le contre l'humidité.
•
L’émetteur extérieur est résistant aux éclaboussures d'eau mais il n'est pas étanche. Choisissez un emplace-
ment à l'ombre et protégé de la pluie pour votre émetteur extérieur.
5. Composants et touches
5.1 Station de base (récepteur)
Affichage (Fig. 1)
A1: Prévisions météo par symboles
A2: Température et humidité extérieures
A3: Symbole pour l'extérieur avec numéro de canal
A4: Horloge, jour de semaine et date
A5: Symbole d'alarme
A6: Symbole pour l'intérieur
A7: Température et humidité ambiantes
Touches (Fig. 2)
B1: Touche SNOOZE/LIGHT
B2: Touche SET
B3: Touche MAX/MIN
B4: Touche ALARM
B5: Touche HEAT/DEW
B6: Touche +/RCC
B7: Touche CH
B8: Touche -/°C/°F
B9: Touche LIGHT HOLD ON/OFF
Boîtier (Fig. 1+2)
C1: Œillet de suspension
C2: Compartiment à piles
C3: Support (dépliable)
C4: Sortie USB
C5: Connecteur d'alimentation
5.2 Émetteur extérieur (Fig. 3)
Touches dans le compartiment à piles
D1: Touche TX
D2: Interrupteur CH 1/2/3 pour la sélection du canal
Boîtier
E1: Œillet de suspension
E2: Compartiment à piles (vissé)
Nous vous remercions d'avoir choisi l'appareil de la Société TFA.
1. Avant d'utiliser votre appareil
•
Veuillez lire attentivement le mode d'emploi.
Vous vous familiariserez ainsi avec votre nouvel appareil, vous découvrirez toutes les fonctions et tous les
éléments qui le composent, vous noterez les détails importants relatifs à sa mise en service et vous lirez quel-
ques conseils en cas de disfonctionnement.
•
En respectant ce mode d'emploi, vous éviterez d'endommager votre appareil et de perdre vos droits résul-
tant d’un défaut utilisation non-conforme.
•
Nous n'assumons aucune responsabilité pour des dommages qui auraient été causés par le non-respect du
présent mode d'emploi. De même, nous n’assumons aucune responsabilité pour des relevés incorrects et les
conséquences qu’ils pourraient engendrer.
•
Suivez bien toutes les consignes de sécurité!
•
Conservez soigneusement le mode d'emploi!
2. Contenu de la livraison
•
Station météo radio-pilotée (station de base)
•
Adaptateur secteur
•
Émetteur extérieur (Kat.No.: 30.3215.02)
•
Mode d'emploi
3. Aperçu du domaine d'utilisation et de tous les avantages de votre nouvel appareil
•
Température et humidité extérieures sans fil (433 MHz), rayon d’action jusqu'à un max. de 60 mètres (champ
libre)
•
Peut être complété jusqu'à 3 émetteurs au maximum, également pour le contrôle du climat dans les espaces
éloignés, par exemple les chambres d´enfants, les caves à vin
•
Température et humidité intérieures
•
Valeurs maximales et minimales quotidiennes
•
Prévisions météo avec symboles
•
Point de rosée et indice de chaleur
•
Horloge radio-pilotée avec jour de la semaine et date
•
Réveil et fonction snooze
•
Ecran couleur
4. Pour votre sécurité
•
Le produit est destiné uniquement à l'utilisation décrite ci-dessus. N'utilisez jamais celui-ci à d'autres fins que
celles décrites dans le présent mode d'emploi.
•
Vous ne devez en aucun cas réparer, démonter ou modifier l'appareil par vous-même.
Attention!
Danger de choc électrique!
•
Branchez seulement l'appareil à une prise de courant réglementaire ayant une tension de secteur de 230V!
•
La prise de courant doit être installée à côté de l'équipement et doit être facilement accessible.
•
La station de base et l'adaptateur secteur ne doivent pas entrer en contact avec de l'eau ou de l'humidité. Ils
peuvent seulement être utilisés dans des locaux secs.
•
N'utilisez pas l'appareil si le boitier ou l'adaptateur secteur sont endommagés.
•
Conservez le produit hors de la portée de personnes (enfants compris) inaptes à évaluer les risques possibles
liés au maniement d'appareils électriques.
•
Retirez immédiatement la fiche de la prise en cas de défaut ou si l'appareil n'est pas utilisé pendant une lon-
gue période.
•
Utilisez uniquement l'adaptateur secteur fourni.
•
Commencez par brancher le câble à l'unité de base, branchez ensuite le cordon d'alimentation dans la prise.
•
Pour débrancher, tirez sur la fiche et non sur le cordon de la prise.
•
Placez le cordon d'alimentation de sorte qu'il n'entre pas en contact avec des objets tranchants ou chauds.
TFA_No. 35.1136_Anleitung_09_16 20.09.2016 10:12 Uhr Seite 12

2524
PRIMAVERA - Station météo radio-pilotée
•
Si votre horloge radio-pilotée ne peut pas recevoir le signal DCF (par exemple en cas de perturbations, d'une
distance de transmission excessive etc.), vous pouvez régler l'horaire manuellement. Le symbole de réception
DCF disparaît et l’horloge fonctionne comme une horloge à quartz normale (voir Réglages manuels).
6.3.1 Consignes pour la réception de l'heure radio
La transmission de l’heure radio-pilotée s’effectue via une horloge atomique au césium, exploitée par la Physi-
kalisch Technische Bundesanstalt de Braunschweig (Institut Fédéral Physico-Technique de Braunschweig).
L’écart de précision de cette horloge est d' 1 seconde pour un million d’années. L’heure est diffusée à partir de
Mainflingen, près de Francfort-sur-le-Main, grâce à un signal DCF-77 (77,5 kHz) d'une une portée d’environ
1500 km. L’orologio radiocontrollato riceve il segnale, lo converte per visualizzare l'ora precisa. Le passage de
l'heure d'hiver à l'heure d'été et vice-versa s'effectue également en mode automatique. Pendant l’heure d’été,
DST apparaît à l'écran. La réception dépend de votre position géographique. En règle générale, dans un rayon
de 1 500 km autour de Francfort, aucun problème de transmission ne devrait apparaître.
Nous vous prions de respecter les consignes suivantes:
•
Nous vous recommandons de respecter une distance de 1,5 - 2 m entre l'appareil et d’éventuelles sources de
signaux parasites, comme les écrans d'ordinateurs et les postes de télévision.
•
Dans les bâtiments en béton armé (caves, greniers aménagés), le signal reçu est affaibli. Dans les cas extrê-
mes, nous vous conseillons de placer l’appareil près d’une fenêtre de manière à améliorer la réception du
signal radio.
•
La nuit, les perturbations s’affaiblissent en règle générale et la réception est possible dans la plupart des cas.
Une seule réception par jour suffit pour garantir la précision de l’affichage de l’heure et pour maintenir
d’éventuels écarts en dessous d' 1 seconde.
6.4 Insertion des piles dans la station de base
•
Les piles servent de source de soutien en cas de panne d'électricité.
•
Pour prolonger un éclairage de fond en permanence utilisez l'adaptateur secteur compris.
•
Ouvrez le compartiment à piles au dos de la station de base.
•
Insérez trois piles neuves de type 1,5 V AAA et contrôlez la bonne polarité de ces dernières.
•
Refermez le compartiment à piles.
7. Utilisation
•
Pendant le réglage, toutes les entrées sont confirmées par une courte tonalité.
•
L'appareil quitte automatiquement le mode de réglage lorsqu’aucune touche n’est pressée pendant un cer-
tain temps.
•
Si vous maintenez la touche +/RCC ou -/°C/°F appuyée au cours d'un mode de réglage, vous parviendrez à
l'affichage rapide.
7.1 Réglages manuels
•
Maintenez la touche SET appuyée pendant deux secondes en mode normal pour accéder au mode de réglage.
•
L’éclairage de fond en permanence s’allume automatiquement.
•
TIME ZONE et 0 (par défaut) apparaissent sur l’écran.
•
Vous pouvez régler le fuseau horaire avec la touche -/°C/°F ou +/RCC.
•
Appuyez encore une fois sur la touche SET.
•
TIME apparaît sur l'écran.
•
Vous pouvez alors ajuster l'affichage 12 heures et 24 heures (24H - par défaut), les heures, les minutes, l'an-
née (YEAR apparaît sur l'écran), le mois et le jour et pouvez régler avec la touche +/RCC ou -/°C/°F.
•
Après le réglage de date sur l'écran apparaît automatiquement le jour de la semaine (MON, TUE, WED, THU,
FRI, SAT ou SUN apparaît sur l'écran).
•
Validez au moyen de la touche SET.
•
Lorsque la réception du signal DCF a abouti, l'heure ajustée manuellement sera remplacée par l'heure radio.
7.1.1 Réglage du fuseau horaire
•
En mode de réglage, vous pouvez régler la correction de fuseau horaire (-12/+12).
•
Vous avez la possibilité d'utiliser un autre fuseau horaire si votre réveil radio-piloté peut recevoir le signal DCF
mais l'heure de votre fuseau horaire sera différente de l’heure DCF (par exemple: +1 = une heure plus tard).
6. Mise en service
6.1 Raccordement de la station de base à l'alimentation
•
Déposez la station de base et l'émetteur extérieur sur une table à une distance d'environ 1,5 mètre l'un de
l'autre. Évitez la proximité de sources de parasitage (appareils électroniques ou appareils radio).
•
Enlevez le film de protection de l'affichage de la station de base.
•
Raccorder la station de base avec l’adaptateur secteur fourni. Branchez le connecteur sur la prise du réveil et
branchez-le au secteur avec l'adaptateur. Important! Une tension de réseau de plus de 230 V pourrait
endommager votre appareil. Une autre tension de réseau pourrait également endommager votre appareil.
•
Un signal sonore se fait entendre et tous les segments s'allument brièvement.
•
TIME et 0.00 (par défaut) apparaissent sur l’écran.
6.2 Insertion des piles dans l'émetteur extérieur
•
Ouvrez le compartiment à piles de l’émetteur extérieur (vissé).
•
L'interrupteur de sélection du canal est sur la position 1 (par défaut).
•
Insérez deux piles neuves de type 1,5 V AAA et contrôlez la bonne polarité de ces dernières.
•
Refermez le compartiment à piles.
6.2.1 Réception des valeurs extérieures
•
Les paramètres de mesure seront transférés de l'émetteur à la station de base. Les affichages de valeurs exté-
rieures «- -» clignotent.
•
Sur l'écran de la station de base apparaissent le numéro de canal, l'humidité relative extérieure et la tempéra-
ture extérieure en °C (par défaut).
•
Si les valeurs extérieures ne sont pas reçues, «- -.-» apparaît sur l'écran. Contrôlez l’adaptateur et les piles de
l’émetteur et effectuez une nouvelle tentative. Éliminez les éventuelles sources de parasitage.
•
Vous pouvez activer manuellement la réception ultérieurement (par exemple en cas de perte de l'émetteur ou
de remplacement des piles).
•
Maintenez la touche CH appuyée pendant trois secondes sur la station de base.
•
«---» apparaît sur l'écran.
•
Appuyez sur la touche TX dans le compartiment de la pile de l'émetteur extérieur.
•
Un signal sonore se fait entendre et la station de base reçoit les valeurs de l’émetteur extérieur.
•
Après la mise en service de l'émetteur extérieur, replacez soigneusement le couvercle du compartiment à piles.
6.3 Réception du signal DCF
•
Après la réception des valeurs extérieures, l'appareil cherche le signal radio et le symbole de réception DCF
clignote.
•
Pour éviter les interférences, l'éclairage de fond (et la sortie USB) s’éteignent pendant la réception de l'heu-
re radio.
•
En cas de réception correcte après 2-12 minutes, l’heure radio et le symbole de réception DCF apparaissent
en continu sur l'écran. L’éclairage de fond permanent s’allume automatiquement.
•
Vous pouvez également activer manuellement la réception.
•
Maintenez la touche +/RCC appuyée.
•
Le symbole de réception DCF clignote.
•
L’éclairage de fond permanent s'éteint automatiquement.
•
Interrompez la tentative de réception en maintenant encore une fois la touche +/RCC appuyée. Le symbole
de réception disparaît.
•
La réception du signal DCF se fait toutes les heures entre 2:00 et 5:00 h du matin. Si la réception à échoué à
5:00 du matin, la prochaine réception sera effectuée à 2:00 h le matin suivant.
Il y a trois symboles de réception différents:
clignote - réception en cours
reste allumé - la réception a abouti
aucun symbole - aucun réception / réglage manuel de l'heure
TFA_No. 35.1136_Anleitung_09_16 20.09.2016 10:12 Uhr Seite 13

2726
PRIMAVERA - Station météo radio-pilotée
Remarque!
Veuillez noter que le symbole de prévisions deviendra plus précis au cours de l’opération. Le symbole de prévi-
sions est actif dès le début, cependant, la fiabilité des prévisions augmente avec la quantité de données recueil-
lies. Initialement, le capteur doit être réglé à un niveau de référence sur le site.
10. Thermomètre et hygromètre
10.1 Fonction maximum/minimum
•
Les valeurs maximales et minimales sont automatiquement remises à zéro à minuit.
•
Appuyez sur la touche MAX/MIN en mode normal.
•
MAX apparaît sur l'écran.
•
La température et l'humidité maximales pour l’intérieur et l’extérieur depuis la dernière réactualisation
s'affichent
•
Appuyez encore une fois sur la touche MAX/MIN.
•
MIN apparaît sur l'écran.
•
La température et l'humidité minimales pour l’intérieur et l’extérieur depuis la dernière réactualisation
s'affichent
•
Appuyez encore une fois sur la touche MAX/MIN. Les valeurs actuelles apparaissent sur l'écran.
•
L'appareil quittera automatiquement le mode MAX/MIN si aucune touche n'est utilisée pendant un certain
temps.
•
Maintenez la touche MAX/MIN appuyée pendant deux secondes, en même temps que les valeurs maximales
ou minimales sont affichées, les valeurs seront effacées et remplacée par les valeurs actuelles.
10.2 Réglage de l'unité de température
•
En mode normal, vous pouvez régler la température en °C (Celsius) ou en °F (Fahrenheit).
•
Appuyez sur la touche -/°C/°F.
10.3 Indice de chaleur
•
L'indice de chaleur indique la température ressentie par rapport à l'humidité ambiante.
•
Appuyez sur la touche HEATDEW en mode normal. Vous pouvez alors voir l'indice de chaleur actuel.
•
HEATINDEX et la température apparaissent sur l'écran.
•
Les valeurs d'humidité pour intérieur et extérieur disparaissent.
•
L'affichage revient automatiquement à l'affichage actuel de la température et de l'humidité.
10.4 Affichage du point de rosée
•
L’action simultanée de la température et de l'humidité relative est exprimée par le point de rosée:
Si l'air se refroidit de manière continue, l'humidité absolue constante de même que l'humidité relative aug-
mentent jusqu'à un maximum de 100%. Si l'air continue à se refroidir, la vapeur d'eau en excès sera éliminée
sous forme de gouttelettes.
•
Appuyez deux fois sur la touche HEAT/DEW en mode normal, vous pouvez alors voir le point de rosée actuel.
•
DEWPOINT et la température apparaissent sur l'écran.
•
Les valeurs d'humidité pour intérieur et extérieur disparaissent.
•
L'affichage revient automatiquement à l'affichage actuel de la température et de l'humidité.
11. Émetteurs extérieurs supplémentaires
•
Si vous désirez raccorder plusieurs émetteurs, sélectionnez un canal différent pour l'interrupteur 1/2/3 dans
le compartiment à piles de l'émetteur. La réception des nouveaux émetteurs est prise en compte automa-
tiquement par la station de base. Maintenez la touche CH sur la station de base ou démarrez une nouvelle
installation de la station de base selon l'instruction.
•
Les valeurs extérieures apparaissent sur l'écran de la station de base. Si vous avez plus d'un émetteur, vous
pouvez appuyer sur la touche CH pour passer des canaux 1 à 3.
•
Il est possible également de régler un changement de canal automatique. Après l'enregistrement du dernier
émetteur, en tapant de nouveau sur la touche CH, le symbole circulaire de changement automatique de
canal AUTO apparaît.
7.1.2 Réglage de l'affichage 12 heures ou 24 heures
•
En mode de réglage, vous pouvez configurer le système horaire de 12 heures ou de 24 heures.
•
En système horaire de 12 heures AM (matin) ou PM (après-midi) apparaît sur l'écran.
7.2 Réglage du réveil
•
Maintenez la touche ALARM appuyée.
•
ALARM, le symbole d'alarme et 0:00 (par défaut) ou l'heure d'alarme réglée précédemment apparaissent sur
l'affichage.
•
L'indication de l'heure clignote.
•
Vous pouvez ajuster l'heure avec la touche +/RCC ou -/°C/°F.
•
Appuyez encore une fois sur la touche ALARM et vous pouvez ajuster les minutes avec la touche +/RCC ou
-/°C/°F.
•
Validez au moyen de la touche ALARM.
•
TIME, l'heure actuelle et le symbole d'alarme apparaissent sur l'affichage. La fonction de réveil est activée.
•
Lorsque l'heure de réveil fixée est atteinte, le réveil commence à sonner.
•
Le symbole d'alarme clignote.
•
Appuyez sur une touche de votre choix pour éteindre l’alarme.
•
Si l'alarme n'est pas coupée, elle s'arrêtera automatiquement après quelques minutes et sera de nouveau
active pour l'heure de réveil suivant.
•
Lorsque le réveil sonne, appuyez sur la touche SNOOZE/LIGHT pour activer la fonction snooze.
•
Si la fonction snooze est activée, Zz clignote.
•
L’alarme s'interrompt pendant 10 minutes.
7.2.1 Activer et désactiver l’alarme
•
Appuyez sur la touche ALARM en mode normal.
•
ALARM et la dernière heure d'alarme apparaissent sur l'affichage.
•
Appuyez encore une fois sur la touche ALARM pour désactiver ou activer la fonction d'alarme.
•
Le symbole d'alarme disparaît ou apparaît sur l'écran.
•
Appuyez sur la touche SET afin de retourner au mode normal.
•
TIME et l'heure actuelle apparaissent sur l'affichage.
7.3 Éclairage de fond
•
Attention: L'éclairage d'écran en permanence fonctionne seulement avec l’adaptateur.
•
Maintenez la touche LIGHT HOLD ON/OFF pendant trois secondes appuyée jusqu'à ce que vous entendiez un
bip pour désactiver ou activer l'éclairage de fond.
•
Appuyez encoure une fois sur la touche LIGHT HOLD ON/OFF pour assombrir l'éclairage de fond.
•
Appuyez sur la touche SNOOZE/LIGHT ou une touche de votre choix pour activer l'éclairage de fond pendant
quelques secondes.
8. Sortie USB
•
Le sortie USB vous permet de recharger votre téléphone cellulaire ou d'autres périphériques USB. La puissance
de sortie est de 5 volts - 1 ampère. La station météo ne peut pas être utilisée via la sortie USB.
9. Prévisions météo avec symboles (Fig. 4)
•
La station météo radio-pilotée a cinq différents symboles météo (ensoleillé, partiellement nuageux, nua-
geux, pluvieux et orageux).
•
Les prévisions de l'affichage par symboles couvrent une période de temps de 12 heures et proposent unique-
ment une tendance météorologique. La précision et d'environ 70%.
•
Par exemple, si le ciel est nuageux et le symbole de pluie s'affiche, cela ne signifie pas que l'appareil est en
panne, cela signifie simplement que la pression atmosphérique a baissé et qu'il faut s'attendre à une dégra-
dation du temps mais cela ne signifie pas forcément qu'il va pleuvoir.
•
Le symbole du soleil est affiché également la nuit s’il s'agit d'une nuit étoilée.
TFA_No. 35.1136_Anleitung_09_16 20.09.2016 10:12 Uhr Seite 14

2928
PRIMAVERA - Station météo radio-pilotée
Pas de réception de ➜ Aucun émetteur installé
l'émetteur extérieur «---» ➜ Vérifiez les piles de l'émetteur extérieur (n'utilisez pas d'accus)
pour les canaux 1/2/3 ➜ Remettez l'émetteur et la station de base en service, conformément aux
instructions
➜ Recherche de l'émetteur manuellement conformément aux instructions
➜ Sélectionnez une autre position pour l'émetteur et la station de base
➜ Modifiez la distance entre l'émetteur et la station de base
➜ Éliminez les sources de parasitage.
Indication incorrecte ➜Changez les piles
15. Traitement des déchets
Ce produit a été fabriqué avec des matériaux de haute qualité qui peuvent être recyclés et réutilisés.
Les piles et accus usagés ne peuvent en aucun cas être jetés dans les ordures ménagères !
En tant qu'utilisateur, vous avez l'obligation légale de rapporter les piles et accus usagés à votre
revendeur ou de les déposer dans une déchetterie proche de votre domicile conformément à la régle-
mentation nationale et locale.
Les métaux lourds sont désignés comme suit: Cd=cadmium, Hg=mercure, Pb=plomb
Cet appareil est conforme aux normes de l'UE relatives au traitement des déchets électriques et
électroniques (WEEE).
L'appareil usagé ne doit pas être jeté dans les ordures ménagères. L’utilisateur s’engage, pour le
respect de l’environnement, à déposer l’appareil usagé dans un centre de traitement agréé pour les
déchets électriques et électroniques.
16. Caractéristiques techniques
Station de base
Plage de mesure intérieure
Température 0 °C… +50 °C (+32 °F …+122 °F)
Humidité 1 … 99%
Alimentation Piles: 3 x 1,5 V AAA (non inclues)
Adaptateur secteur: 230 V AC / 5.0 V DC (inclu)
Sortie USB 5 Volt … 1 ampère
Mesure du boîtier 175 x 26 (58) x 125 mm
Poids 290 g (appareil seulement)
Émetteur extérieur
Plage de mesure extérieure
Température -40 °C… +60 °C (-40 °F …+140°F)
Humidité 1 … 99%
Rayon d’action env. 60 mètres (champ libre)
Fréquence de réception: 433 MHz
Puissance de radiofréquence
maximale transmise: < 10mW
•
Appuyez de nouveau sur la touche CH pour désactiver le changement de canal automatique et pour afficher
à nouveau de façon durable le premier émetteur extérieur.
•
Les émetteurs enregistrés (canaux) qui ne sont plus nécessaires peuvent être effacés manuellement en main-
tenant la touche CH appuyée pendant trois secondes. Dès qu'un nouvel émetteur est perçu, un nouvel affi-
chage se produit.
12. Placement ou accrochage au mur de la station de base et de l’émetteur extérieur
•
À l'aide du pied au dos de votre appareil, la station de base peut être mise en place sur une surface plate ou
encore être accrochée au mur à l'aide de l'œillet de suspension. Évitez une mise en place à proximité d'au-
tres appareils électriques (téléviseur, ordinateur, téléphone sans fil) ou d'objets métalliques.
•
Avec l'œillet à l'arrière de l'émetteur extérieur, celui-ci peut être monté sur le mur. Choisissez un emplace-
ment à l'ombre et protégé de la pluie pour votre émetteur extérieur. (Un ensoleillement direct fausse la
mesure et une humidité continue endommage les composants électroniques inutilement).
•
Vérifiez que les valeurs de mesure entre l'émetteur et la station de base (portée sur champ libre jusqu'à 60
mètres) sont bien transmises de l'endroit choisi. En cas de murs massifs, en particulier comportant des parties
métalliques, la portée d'émission peut se trouver réduite considérablement.
•
Si nécessaire, cherchez de nouveaux emplacements pour l'émetteur extérieur et/ou pour la station de base.
13. Entretien et maintenance
•
Pour le nettoyage de vos appareils, utilisez un chiffon doux et humide. N’utilisez pas de solvants ou d’agents
abrasifs!
•
Enlevez les piles et retirez la fiche de la prise si vous ne les utilisez pas pendant une durée prolongée.
•
Conservez vos appareils dans un endroit sec.
13.1 Remplacement des piles
•
Lorsque le symbole de pile apparaît sur l'écran des valeurs extérieures, changez les piles de l'émetteur exté-
rieur.
•
Lorsque le symbole de pile apparaît sur l'écran des valeurs intérieures, changez les piles de la station de base.
•
Attention:
Il faut rétablir le contact entre l'émetteur et le récepteur après le remplacement des piles - Il faut donc tou-
jours remplacer les piles dans les deux appareils ou bien lancer la recherche manuellement.
14. Dépannage
Problème Solution
Aucun affichage sur la station ➜ Fonctionnement avec adaptateur:
Raccordement de la station de base avec adaptateur
Activer l’éclairage de fond en permanence
Vérifiez l'adaptateur secteur
➜Fonctionnement avec piles:
Contrôlez la bonne polarité des piles
Activer l'éclairage de fond avec une touche de votre choix
Changez les piles
Pas de réception DCF ➜Maintenez la touche +/RCC appuyée pendant trois secondes et activez
manuellement la réception de l'heure radio
➜ Attendez la réception du signal de nuit
➜ Sélectionnez une autre position pour votre appareil
➜ Réglage de l'heure manuellement
➜ Éliminez les sources de parasitage
➜ Remettez la station de base en service, conformément aux instructions
TFA_No. 35.1136_Anleitung_09_16 20.09.2016 10:12 Uhr Seite 15

3130
PRIMAVERA - Station météo radio-pilotée de couleur
PRIMAVERA - Stazione meteorologica radiocontrollata
Vi ringraziamo per aver scelto l'apparecchio della TFA.
1. Prima di utilizzare l'apparecchio
•
Leggete attentamente le istruzioni per l'uso.
Avrete così modo di familiarizzare con il vostro nuovo apparecchio, di scoprirne tutte le funzioni e le compo-
nenti, di apprendere importanti dettagli sulla sua messa in funzione, di acquisire dimestichezza nel suo uti-
lizzo e di usufruire di alcuni validi consigli da seguire in caso di guasti.
•
Seguendo le istruzioni per l'uso, eviterete anche di danneggiare il dispositivo e di pregiudicare, a causa di
un utilizzo scorretto, i diritti del consumatore che vi spettano per legge.
•
Decliniamo ogni responsabilità per i danni derivanti dal mancato rispetto delle presenti istruzioni per l'uso.
Allo stesso modo, non siamo responsabili per eventuali misurazioni errate e per le conseguenze che ne pos-
sono derivare.
•
Prestate particolare attenzione alle misure di sicurezza!
•
Conservate con cura queste istruzioni per l'uso!
2. La consegna include
•
Stazione meteorologica (stazione base)
•
Alimentatore
•
Trasmettitore esterno (No. Cat. 30.3215.02)
•
Istruzioni per l'uso
3. Tutte le applicazioni e tutti i vantaggi del vostro nuovo apparecchio
•
Temperatura e umidità esterna trasmesse senza fili (433 MHz), raggio d'azione max: 60 metri (campo libero)
•
Espandibile fino ad un massimo di 3 trasmettitori, adatto per il controllo climatico della casa, es. stanza dei
bambini, cantina da vino
•
Temperatura e umidità interna
•
Valori giornalieri massimi e minimi
•
Previsione del tempo con simboli
•
Indicazione del punto di rugiada e dell'indice di calore
•
Orologio radiocontrollato con giorno della settimana e data
•
Allarme con funzione snooze
•
Display a colori
4. Per la vostra sicurezza
•
Il prodotto è adatto esclusivamente agli utilizzi di cui sopra. Non utilizzate il prodotto in maniera diversa da
quanto descritto in queste istruzioni.
•
Non sono consentite riparazioni, alterazioni o modifiche non autorizzate del dispositivo.
Attenzione!
Pericolo di morte per scossa elettrica!
•
Collegate la stazione base esclusivamente a una presa di corrente a norma che fornisca corrente a una ten-
sione di 230V!
•
La presa dell’alimentazione dovrebbe essere situata vicino al dispositivo e dovrebbe essere facilmente acces-
sibile.
•
La stazione base e l’alimentatore non devono venire a contatto con acqua o umidità. Adatto solo all'uso in
ambienti asciutti.
•
Non utilizzate il dispositivo qualora la struttura esterna o l’alimentatore risultino danneggiati.
•
Conservate il dispositivo fuori dalla portata di persone (per esempio i bambini) che potrebbero non ricono-
scere adeguatamente il rischio derivante dall’uso di apparecchi elettrici.
•
Estraete immediatamente la spina dalla presa di corrente qualora rileviate un guasto o nel caso in cui non
utilizziate il dispositivo per un periodo prolungato.
•
Utilizzate esclusivamente l'adattatore in dotazione.
•
Collegate prima il cavo alla stazione base e successivamente inserire la spina nella presa di corrente.
•
Quando estraete la spina dalla presa di corrente, non tiratela per il cavo.
•
Proteggete il cavo di alimentazione in modo che oggetti appuntiti o caldi non vi entrino in contatto.
Temps de transmission 50 secondes
Alimentation Piles: 2 x 1,5 V AAA (non inclues)
Mesure du boîtier 45 x 20 x 108 mm
Poids 45 g (appareil seulement)
La reproduction, même partielle du présent mode d'emploi est strictement interdite sans l'accord explicite de TFA Dostmann. Les spécifi-
cations techniques de ce produit ont été actualisées au moment de l'impression et peuvent être modifiées, sans avis préalable.
Les dernières données techniques et des informations concernant votre produit peuvent être trouvées en entrant le numéro de l'article
sur notre site.
Déclaration UE de conformité
Le soussigné, TFA Dostmann, déclare que l'équipement radioélectrique du type 35.1136 est conforme à la directive 2014/53/UE. Le texte
complet de la déclaration UE de conformité est disponible à l'adresse internet suivante:
www.tfa-dostmann.de
E-Mail: [email protected]
TFA Dostmann GmbH & Co.KG, Zum Ottersberg 12, D-97877 Wertheim, Allemagne 09/16
TFA_No. 35.1136_Anleitung_09_16 20.09.2016 10:12 Uhr Seite 16

3332
PRIMAVERA - Stazione meteorologica radiocontrollata
6. Messa in funzione
6.1 Collegare la stazione base all' alimentatore
•
Posizionare gli apparecchi su un tavolo ad una distanza di circa 1,5 metri l'uno dell'altro. Tenerli lontano da
eventuali fonti di interferenza (dispositivi elettronici e impianti radio).
•
Rimuovere il foglio protettivo dal display della stazione base.
•
Collegare la stazione base all'alimentatore fornito in dotazione. Inserire l'adattatore e collegarlo ad una presa
a terra. Avvertenza importante! Controllare che il voltaggio della vostra abitazione non sia maggiore di 230V,
perché il dispositivo potrebbe essere danneggiato. Tensioni diverse possono danneggiare il dispositivo.
•
Verrà emesso un breve segnale acustico e tutti i segmenti appariranno contemporaneamente.
•
Sul display vengono visualizzati TIME e 0:00 (predefinito).
6.2 Inserimento delle batterie nel trasmettitore
•
Aprire il vano batteria del trasmettitore.
•
L'interruttore per la selezione del canale è in posizione 1 (predefinita).
•
Inserire due batterie nuove tipo AAA da 1,5 V, rispettando le corrette polarità.
•
Richiudere di nuovo il vano batteria.
6.2.1 Ricezione di valori esterni
•
I dati di misurazione del trasmettitore vengono trasmessi alla stazione base. I display dei valori esterni “- -”
lampeggiano.
•
Sul display della stazione base vengono visualizzati il numero di canale, l'umidità dell'aria esterna e la tempera-
tura esterna in °C (predefinita).
•
Se i valori esterni non vengono ricevuti, dopo circa 3 minuti viene visualizzato “- -” sul display. Controllare la
spina e le batterie del trasmettitore e riprovare di nuovo. Rimuovere eventuali fonti di interferenza.
•
È successivamente possibile avviare anche manualmente la ricerca del segnale del trasmettitore (ad esempio in
caso di perdita del segnale o di sostituzione della batteria).
•
Tenere premuto il tasto CH della stazione base per tre secondi.
•
Sul display appare “---”.
•
Premere il tasto TX nel vano batteria del trasmettitore.
•
Viene emesso un segnale acustico e la stazione base riceve i valori del trasmettitore.
•
Dopo la corretta messa in funzione del trasmettitore esterno, chiudere il coperchio della batteria.
6.3 Ricezione del segnale radio DCF
•
Dopo la ricezione di valori esterni, l'apparecchio inizia a ricevere il segnale radio; il simbolo della ricezione
del segnale DCF inizia a lampeggiare.
•
Per evitare interferenze, la retroilluminazione (e la porta USB) si spegne durante la ricezione della radio sve-
glia.
•
Se il codice dell'ora è stato ricevuto entro 2-12 minuti, viene visualizzata l'ora radiocontrollata e apparirà il
simbolo della ricezione del segnale DCF. La retroilluminazione è attivata in modo permanente.
•
È possibile avviare l'inizializzazione manualmente.
•
Tenere premuto il tasto +/RCC.
•
Il simbolo della ricezione del segnale DCF lampeggia.
•
La retroilluminazione continua si spegne automaticamente.
•
Interrompere l'operazione di ricezione tenendo premuto il tasto +/RCC per tre secondi. Il simbolo della rice-
zione del segnale DCF scompare.
•
La ricezione del segnale DCF avviene ogni ora dalle 02:00 fino alle 05:00. Se la ricezione non è avvenuta con
successo entro le 05:00, la ricezione successiva è di nuovo alle 02:00.
Ci sono tre differenti simboli di ricezione:
lampeggiante - Ricezione attiva
Simbolo acceso - Ricezione molto buona
Nessun simbolo - nessuna ricezione / impostare l'ora in modo manuale
Attenzione!
Pericolo di lesioni:
•
Tenete i dispositivi e le batterie lontano dalla portata dei bambini.
•
Non gettare le batterie nel fuoco, non polarizzarle in maniera scorretta, non smontarle e non cercare di rica-
ricarle. Pericolo di esplosione!
•
Le batterie contengono acidi nocivi per la salute. Sostituite quanto prima le batterie quasi scariche, in modo
da evitare che si scarichino completamente. Non utilizzate mai contemporaneamente batterie usate e batte-
rie nuove né batterie di tipi diversi. Quando si maneggiano batterie esaurite indossare sempre guanti resi-
stenti alle sostanze chimiche e occhiali di protezione.
Avvertenze sulla sicurezza del prodotto!
•
Non esporre l'apparecchio a temperature estreme, vibrazioni e urti.
•
Proteggere dall’umidità.
•
Il trasmettitore è resistente agli spruzzi d'acqua, ma non impermeabile. Cercare un luogo ombreggiato e al
riparo dalla pioggia per il trasmettitore.
5. Componenti e tasti
5.1 Stazione base (ricevitore)
Display (Fig. 1)
A1: Previsioni del tempo con simboli
A2: Temperatura e umidità esterna
A3: Simbolo del trasmettitore con numero di canale
A4: Orologio, giorno della settimana e data
A5: Simbolo dell'allarme
A6: Simbolo per valori interni
A7: Temperatura e umidità interna
Tasti (Fig. 2)
B1: Tasto SNOOZE/LIGHT
B2: Tasto SET
B3: Tasto MAX/MIN
B4: Tasto ALARM
B5: Tasto HEAT/DEW
B6: Tasto +/RCC
B7: Tasto CH
B8: Tasto -/°C/°F
B9: Tasto LIGHT HOLD ON/OFF
Struttura esterna (Fig. 1+2)
C1: Fori per sospensione alla parete
C2: Vano batteria
C3: Supporto (pieghevole)
C4: Uscita USB
C5: Connettore di alimentazione
5.2 Trasmettitore esterno (Fig. 3)
Tasti nel vano batteria
D1: Tasto TX
D2: Interruttore a scorrimento CH 1/2/3
Struttura esterna
E1: Foro per sospensione alla parete
E2: Vano batteria (fissato con vite)
TFA_No. 35.1136_Anleitung_09_16 20.09.2016 10:12 Uhr Seite 17

3534
PRIMAVERA - Stazione meteorologica radiocontrollata
7.1.2 Impostazione del display 12 o 24 ore
•
In modalità impostazione è possibile impostare il sistema orario di 12 o 24 ore.
•
Nel formato 12 ore compaiono sul display AM o PM (dopo mezzogiorno).
7.2 Impostazione della sveglia
•
Tenere premuto il tasto ALARM.
•
ALARM, il simbolo della sveglia e 0:00 (predefinito) o l'ultima ora della sveglia impostata vengono visualizzati
sul display.
•
L’indicazione dell’ora lampeggia.
•
È possibile impostare le ore con il tasto +/RCC o -/°C/°F.
•
Premere nuovamente il tasto ALARM ed impostare i minuti con il tasto +/RCC o -/°C/°F.
•
Confermare con il tasto ALARM.
•
Sul display vengono visualizzati TIME, l'ora attuale e il simbolo della sveglia. La funzione sveglia è attivata.
•
Quando l'orario di allarme inserito viene raggiunto, la sveglia comincia a suonare.
•
Il simbolo della sveglia lampeggia.
•
Premere un tasto a piacere, per arrestare l’allarme.
•
Se non viene interrotto, il segnale si disattiva automaticamente dopo pochi minuti e si riattiva nuovamente
alla stessa ora di sveglia.
•
Quando suona la sveglia innestare la funzione snooze con il tasto SNOOZE/LIGHT.
•
Quando la funzione snooze è attivata, Zz lampeggia.
•
Il suono della sveglia verrà interrotto per 10 minuti.
7.2.1 Attivare e disattivare la funzione sveglia
•
Premere il tasto ALARM nella modalità normale.
•
Sul display vengono visualizzati ALARM e l'ora della sveglia.
•
Premere nuovamente il tasto ALARM per disattivare o attivare la funzione sveglia.
•
Il simbolo della sveglia scompare o appare.
•
Premere il tasto SET, per tornare alla visualizzazione in modalità normale
•
TIME e l'ora attuale vengono visualizzati sul display.
7.3 Retroilluminazione
•
Attenzione: La retroilluminazione permanente del display funziona solo con l'alimentatore collegato.
•
Tenere premuto il tasto LIGHT HOLD ON/OFF per tre secondi fino all'emissione di un segnale acustico per disat-
tivare o attivare la retroilluminazione.
•
Premere il tasto LIGHT HOLD ON/OFF una volta per abbassare la retroilluminazione.
•
Premere il tasto SNOOZE/LIGHT o un tasto a piacere per attivare la retroilluminazione dopo pochi secondi.
8. Uscita USB
•
La porta USB consente di ricaricare il vostro telefono cellulare o altri dispositivi abilitati USB. La potenza di usci-
ta è di 5 volt - 1 Ampere. La stazione meteorologica non può essere azionata tramite la porta USB.
9. Previsioni del tempo (Fig. 4)
•
La stazione meteorologica visualizza cinque simboli meteo diversi (soleggiato, parzialmente nuvoloso, coper-
to, piovoso e tempestoso).
•
La previsione tramite l'indicazione del simbolo si riferisce ad un periodo di tempo di 12 ore e indica solo una
tendenza atmosferica. La precisione è circa del 70%.
•
Se ad esempio in questo momento è nuvoloso e viene segnalata pioggia, non si tratta di un funzionamento
difettoso dell'apparecchio, bensì di una indicazione che la pressione dell'aria è scesa e c'è da aspettarsi un
peggioramento del tempo, anche se non necessariamente la pioggia.
•
Il simbolo del sole viene visualizzato durante la notte se vi è una notte stellata.
Suggerimento !
Si prega di notare che il simbolo della previsione diviene più preciso con l'uso. Il simbolo della previsione è
attivo sin dall'inizio, ma l'affidabilità delle previsioni aumenta con la quantità dei dati raccolti. Il sensore deve
inizialmente essere impostato sul livello di riferimento del luogo.
•
Nel caso in cui l’orologio non riesca a ricevere il segnale DCF (a causa di guasti, della distanza di trasmissione,
ecc.), l'ora può essere impostata manualmente. L'orologio funziona come un normale orologio al quarzo
(vedi: Impostazioni manuali).
6.3.1 Indicazione per la ricezione dell'ora radiocontrollata
L'ora viene trasmessa da un orologio atomico al cesio gestito dal Physikalisch Technische Bundesanstalt di
Braunschweig. La deviazione è inferiore a 1 secondo in un milione di anni. L'ora è codificata e trasmessa da
Mainflingen vicino Francoforte con un segnale a frequenza DCF - 77 (77,5 kHz) entro un raggio di 1.500 km.
L’orologio radiocontrollato riceve il segnale e lo converte per visualizzare l'ora precisa. Anche il passaggio tra
ora solare e ora legale è automatico. Durante il periodo estivo DST appare sul display. La qualità della ricezione
dipende molto dalla posizione geografica. In circostanze normali e in assenza di problemi di ricezione dovreb-
be avvenire entro il raggio di 1.500 km da Francoforte.
Rispettate le norme elencate qui di seguito:
•
La distanza raccomandata da qualsiasi fonte di interferenza come monitor di computer o televisori deve
essere di almeno 1.5 - 2m.
•
All'interno di strutture in cemento armato (seminterrati, sovrastrutture) la ricezione del segnale è natural-
mente più debole. In casi estremi si consiglia di sistemare l'unità vicino ad una finestra per ottenere una
migliore ricezione del segnale.
•
Durante le ore notturne, le interferenze dovute ad agenti atmosferici sono normalmente meno influenti e la
ricezione è possibile nella maggior parte dei casi. Una singola ricezione giornaliera è sufficiente a garantire
la precisione e a mantenere la deviazione al di sotto di un secondo.
6.4 Inserimento delle batterie nella stazione base
•
Le batterie agiscono come alimentazione di supporto nel caso in cui manchi la corrente.
•
Per una retroilluminazione permanente utilizzare l'alimentatore incluso.
•
Aprire il vano batteria della stazione base sul retro.
•
Inserire tre batterie nuove tipo AAA da 1,5 V. Accertarsi di aver rispettato la corretta polarità.
•
Richiudere di nuovo il vano batteria.
7. Uso
•
Tutti gli inserimenti corretti vengono confermati con un bip.
•
L'apparecchio esce automaticamente dalla modalità impostazione se non si preme alcun tasto per un perio-
do prolungato.
•
Tenere premuto il tasto +/RCC o -/°C/°F in modalità impostazione per procedere velocemente.
7.1 Impostazioni manuali
•
Tenere premuto il tasto SET nella modalità normale per due secondi per entrare alla modalità di impostazione.
•
La retroilluminazione continua si spegne automaticamente.
•
Sul display vengono visualizzati TIME e 0 (predefinito).
•
Effettuare con il tasto +/RCC o -/°C/°F la correzione del fuso orario.
•
Premere nuovamente il tasto SET.
•
Sul display appare TIME.
•
È possibile modificare uno dopo l'altro le impostazioni del sistema orario 12/24 (24H predefinito), dell'ora,
dei minuti, dell'anno (YEAR appare sul display), del mese e del giorno. Impostare i valori desiderati con il
tasto +/RCC o -/°C/°F.
•
Dopo aver impostato la data sul display appare automaticamente il giorno della settimana (MON, TUE, WED,
THU, FRI, SAT o SUN).
•
Confermare con il tasto SET.
•
In caso di corretta ricezione, l'ora impostata in modalità manuale viene sostituita.
7.1.1 Impostazione del fuso orario
•
In modalità impostazione è possibile effettuare la correzione del fuso orario (-12/+12).
•
La correzione del fuso orario è attiva dove è possibile ricevere il segnale DCF ma il fuso orario differisce da
quello tedesco (ad esempio, +1 = un'ora dopo).
TFA_No. 35.1136_Anleitung_09_16 20.09.2016 10:12 Uhr Seite 18

3736
PRIMAVERA - Stazione meteorologica radiocontrollata
12. Posizionamento della stazione base e fissaggio del trasmettitore
•
Con il supporto pieghevole situato nella parte posteriore è possibile disporre la stazione base in posizione
verticale oppure fissarla a parete con i fori di sospensione. Evitare l’installazione in prossimità di altri appa-
recchi elettrici (televisori, computer, cellulari) e oggetti metallici pesanti.
•
Con le alette di fissaggio sul retro della trasmettitore essere fissati alla parete. Cercare un luogo ombreggia-
to e al riparo dalla pioggia per il trasmettitore. (La luce diretta del sole falsifica la misurazione e l'umidità
costante sforza inutilmente le componenti elettroniche).
•
Verificare se il trasferimento dei valori di misura alla stazione base da parte del trasmettitore situato nel
luogo cui esso è destinato ha luogo correttamente (raggio d’azione in campo libero circa 60 metri), in caso di
pareti spesse, in particolare con parti metalliche, il raggio d’azione del trasmettitore potrà ridursi notevol-
mente.
•
Se necessario, cercate nuove posizioni per il trasmettitore e/o il ricevitore.
13. Cura e manutenzione
•
Per pulire i dispositivi utilizzare solo un panno morbido leggermente inumidito. Non usare solventi o abrasivi.
•
Rimuovete le batterie e estraete la spina dalla presa se non si utilizzano i dispositivi per un periodo prolun-
gato.
•
Collocare i dispositivi in un luogo asciutto.
13.1 Sostituzione delle batterie
•
Cambiare le batterie del trasmettitore se il simbolo della batteria appare sul display dei valori esterni della
stazione base.
•
Cambiare le batterie della stazione base, se il simbolo della batteria appare sul display dei valori interni.
•
Attenzione:
Dopo aver sostituito le batterie è necessario ristabilire il contatto tra il trasmettitore e la stazione base, per-
tanto cambiate sempre le batterie contemporaneamente ad entrambi i dispositivi oppure avviate manual-
mente la ricerca del trasmettitore.
14. Guasti
Problema Risoluzione del problema
Nessuna indicazione sul display ➜ Funzionamento tramite alimentazione:
della stazione base Collegare la stazione base con l'alimentatore.
Attivare la retroilluminazione permanentemente
Controllare l'alimentatore
➜Funzionamento a batteria:
Inserire le batterie rispettando le corrette polarità
Premere un tasto qualsiasi per attivare la retroilluminazione
Sostituire le batterie
Nessuna ricezione DCF ➜Tenendo premuto per tre secondi il tasto +/RCC è possibile avviare
l'inizializzazione manuale
➜ Attendere il tentativo notturno di ricezione
➜ Cercare nuove posizioni per il dispositivo
➜ Inserire l'orologio manualmente
➜ Eliminare fonti di interferenza
➜ Riavviate la stazione base secondo le istruzioni
Nessuna ricezione ➜ Nessun trasmettitore installato
del trasmettitore ➜
Controllare le batterie del trasmettitore (non utilizzare batterie ricaricabili!)
Indicazione “---” ➜Riavviate il trasmettitore e la stazione base secondo le istruzioni
per il canale 1/2/3 ➜ Avviate il trasmettitore manuale secondo le istruzioni
➜ Cercate nuove posizioni per il trasmettitore e/o la stazione base
10. Termometro e igrometro
10.1 Funzione massima/minima
•
I valori massimi e minimi verranno memorizzati e a mezzanotte vengono resettati automaticamente.
•
Premere il tasto MAX/MIN nella modalità normale.
•
Sul display appare MAX.
•
Vengono visualizzate la temperatura massima e l'umidità massima dell'aria esterne e interne, raggiunte
dopo l'ultimo azzeramento.
•
Premere nuovamente il tasto MAX/MIN.
•
Sul display appare MIN.
•
Vengono visualizzate la temperatura minima e l'umidità minima dell'aria, esterne e interne, raggiunta dopo
l´ultimo azzeramento.
•
Per tornare alla visualizzazione dei valori attuali, premere ancora una volta il tasto MAX/MIN.
•
L'apparecchio esce automaticamente dalla modalità MAX/MIN se non si preme alcun tasto.
•
Tenere premuto il tasto MAX/MIN per due secondi durante la visualizzazione dei valori massimi per cancel-
larli.
•
Tenere premuto il tasto MAX/MIN per due secondi durante la visualizzazione dei valori massimi o minimi per
cancellarli.
10.2 Impostazione della visualizzazione della temperatura
•
Nella modalità normale è possibile scegliere fra la visualizzazione della temperatura in °C (gradi Celsius) o °F
(gradi Fahrenheit).
•
Premere il tasto -/°C/°F.
10.3 Indicazione dell'indice di calore
•
L'indice di calore si riferisce alla temperatura percepita combinata con l'umidità.
•
Premere il tasto HEAT/DEW in modalità normale per visualizzare l'indice di calore attuale.
•
Sul display vengono visualizzati HEATINDEX e la temperatura.
•
I valori di umidità per interno ed esterno scompaiono.
•
Il display cambia automaticamente alla visualizzazione corrente di temperatura e umidità.
10.4 Indicazione punto di rugiada
• La correlazione fra temperatura e umidità relativa viene espressa dal punto di rugiada:
Se l’aria viene raffreddata in modo continuo, al permanere costante dell’umidità assoluta, l’umidità relativa
aumenta fino al 100%. Se l’aria si raffredda ulteriormente, il vapore acqueo in eccesso viene espulso sotto
forma di gocce.
•
Premendo due volte il tasto HEAT/DEW nella modalità normale è possibile visualizzare il punto di rugiada
attuale.
•
Sul display vengono visualizzati DEWPOINT e la temperatura.
•
I valori di umidità per interno ed esterno scompaiono.
•
Il display cambia automaticamente alla visualizzazione corrente di temperatura e umidità.
11. Trasmettitori esterni addizionali
•
Se si desidera collegare più trasmettitori, scegliere un diverso canale per ciascun trasmettitore con l'interrut-
tore a scorrimento CH1/2/3 presente nel vano batteria del trasmettitore. Il nuovo trasmettitore viene ricevu-
to automaticamente dalla stazione base. Tenere premuto il tasto CH della stazione base o riavviare la stazio-
ne base secondo le istruzioni.
•
I valori esterni vengono visualizzati nella stazione base. Se si dispone di più di un trasmettitore collegato, è
possibile passare da un canale (1-3) all'altro con il tasto CH della stazione base.
•
È possibile impostare anche un cambio canale automatico. Dopo "canale 3”, in caso di ulteriore pressione del
tasto CH, viene visualizzato AUTO per il cambio automatico di canale.
•
Premere di nuovo il tasto CH per disattivare la commutazione automatica dei canali, e tenerlo premuto per
visualizzare di nuovo il primo trasmettitore.
•
Una volta registrato, è possibile eliminare manualmente il trasmettitore (canali) che non è più necessario
tenendo premuto il tasto CH per tre secondi. Non appena viene ricevuto un nuovo trasmettitore, ha luogo
una nuova visualizzazione.
TFA_No. 35.1136_Anleitung_09_16 20.09.2016 10:12 Uhr Seite 19

3938
PRIMAVERA - Stazione meteorologica radiocontrollata
È vietata la pubblicazione delle presenti istruzioni o di parti di esse senza una precedente autorizzazione della TFA Dostmann. I dati tecni-
ci corrispondono allo stato del prodotto al momento della stampa e possono cambiare senza preavviso.
È possibile trovare dati tecnici e informazioni aggiornate sul prodotto inserendo il numero di articolo sul nostro sito.
Dichiarazione di conformità UE
Il fabbricante, TFA Dostmann, dichiara che il tipo di apparecchiatura radio 35.1136 è conforme alla direttiva 2014/53/UE. Il testo completo
della dichiarazione di conformità UE è disponibile al seguente indirizzo Internet:
www.tfa-dostmann.de
E-Mail: [email protected]
TFA Dostmann GmbH & Co.KG, Zum Ottersberg 12, D-97877 Wertheim, Germania 09/16
➜ Diminuite la distanza tra il trasmettitore e la stazione base
➜ Eliminare fonti di interferenza
Indicazione non corretta ➜Sostituire le batterie
15. Smaltimento
Questo prodotto è stato realizzato utilizzando materiali e componenti di alta qualità che possono essere rici-
clati e riutilizzati.
È assolutamente vietato gettate le batterie tra i rifiuti domestici.
In qualità di consumatori, siete tenuti per legge a consegnare le batterie usate al negoziante o ad
altri enti preposti al riciclaggio in conformità alle vigenti disposizioni nazionali o locali, ai fini di uno
smaltimento ecologico
Le sigle dei metalli pesanti contenuti sono: Cd=cadmio, Hg=mercurio, Pb=piombo
Questo apparecchio è etichettato in conformità alla Direttiva UE sullo smaltimento delle apparec-
chiature elettriche ed elettroniche (WEEE).
Questo prodotto non deve essere smaltito insieme ai rifiuti domestici. Il consumatore è tenuto a
consegnare il vecchio apparecchio presso un punto di raccolta per lo smaltimento di apparecchiatu-
re elettriche ed elettroniche ai fini di uno smaltimento ecologico.
16. Dati tecnici
Stazione base
Campo di misura interna
Temperatura 0 °C… +50 °C (+32 °F …+122 °F)
Umidità 1 … 99%
Alimentazione Batterie: 3 x 1,5 V AAA (non fornite)
Alimentatore: 230 V C / 5.0 V DC (fornito)
Uscita USB 5 Volt … 1 Ampere
Dimensioni esterne 175 x 26 (58) x 125 mm
Peso 290 g (solo apparecchio)
Trasmettitore esterno
Campo di misura esterno
Temperatura -40 °C… +60 °C (-40 °F …+140°F)
Umidità 1 … 99%
Raggio d'azione ca. 60 metri al massimo
Frequenza di trasmissione 433 MHz
Massima potenza a
radiofrequenza trasmessa < 10mW
Tempo di trasmissione 50 Secondi
Alimentazione Batterie: 2 x 1,5 V AAA (non fornite)
Dimensioni esterne 45 x 20 x 108 mm
Peso 45 g (solo apparecchio)
TFA_No. 35.1136_Anleitung_09_16 20.09.2016 10:12 Uhr Seite 20
Table of contents
Languages:
Other TFA Weather Station manuals
Popular Weather Station manuals by other brands

La Crosse Technology
La Crosse Technology C83100 user manual

GARNI
GARNI WS6650 instruction manual

La Crosse Technology
La Crosse Technology 308-1414MB instruction manual

Ambient Weather
Ambient Weather WS-2700 user manual

Weinberger
Weinberger 40139 instruction manual

ACU-RITE
ACU-RITE OO592W instruction manual