TFA AMBIENTE 35.1057 User manual

Wireless WeatherStation AMBIENTE 35.1057
Instruction Manual
1. Installation
1.1 Introduction
You have been purchasinga wireless weather station. You can control your room
climate (temperature/humidity), measure the outdoor temperature and inform
yourself about the local weather trend. The set contents a receiver (displayunit)
and a transmitter, which are batteryoperated.
The outdoor data will be transmitted wireless using433 Mhz up to 30 meters in
open space. You can install up to three transmitters and receive temperature
information from other rooms (like childrens room, green house, wine cellar,
storage rooms…)
To get started you need:
Receiver (Displayunit)
Transmitter
Batteries 2 x1.5 V AAfor receiver and 2 x1.5 V AAfor transmitter (included)
Small screwdriver (not included)
Please read this instruction manual carefully and keep it!
1.2 Features:
This weather station has the followingfunctions
- Radio controlled time with manual settingoption
- Weather forecast with 5weather symbols
- Wireless transmission of outdoor temperature 433MHz (up to 3 sensors)
- Measuringrange:
Indoor temperature: 0°C ~ +50°C
Indoor humidity: 30% ~ 90%
Outdoor temperature: -50°C ~ +70°C
- Temperature high/low alert function (settable)
- Max/Min memory
- Moon phase and tide display
- Low-batteryindicator for Outdoor Remote Sensor
- Perpetual Calendar Up toYear 2069

- 12/24Hour time displayselectable
- Dayof week in 8 Languages Selectable
-Power supply: Receiver DC 1.5 V AA size x2 pcs
Transmitter DC 1.5 V AAsize x2 pcs
-Size : 145 x 130 x22 mm, standingor hangingpurpose
Caution: Please participate in the preservation of the environment by
properly disposing of used-up batteries and accumulators at designated
disposal points.
1.3. Get familiarwith the instrument
Learn about the details of the instrument.
1.3.1 Receiver(Display unit)

LCD:
A1: Weather Forecast A2: Outdoor Temperature
A3: Indoor HumidityA4: Indoor Temperature
A5: Moon Phase/Tide Indicator A6: Radio Controlled Time
Buttons:
B1: “WEATHER” buttonB2: “CHANNEL” button B3:
“MODE/SET” button B4: “ALERT“ button
B5: “+ (12/24)” button B6: “SNOOZE/LIGHT” button
B7: “-(°C/°F)” button B8: “ALARM ON/OFF” button
B9“MAX/MIN” button B10: “RESET” button
Housing:
C1: Cover C2: Wall Mount Hole
C3: BatteryCompartment C4: Stand

1.3.2 Thermo SensorUnit (Transmitter)
D1: Outdoor Temperature D2: Transmission Indication LED
D3: Temperature Probe D4: “°C/°F” button
D5: Channel SelectingSwitch D6: “TX” button
D7: Wall Mount Hole D8: BatteryDoor
1.4. Getting started
•Open the batterycompartment of displayunit and transmitter and place both
instruments on a desk with a distance of approximately1.5 meter. Check that no
other electronic devices are close. Insert the batteries first into the battery
compartment of the displayunit and immediatelyafterwards the batteries of the
transmitter, observingthe correct polarity.
•The weather symbol indicator (A1) starts flashing. Usingthe buttons “+” (B5) and
“-“ (B7) you can set the actual weather of your place. The weather symbol can be
set later, without insertingthe batteries again (see 1.5.4 Weather symbol setting).
•The displayunit automaticallystarts scanningthe RF 433MHz signal to register
the Thermo Sensor Unit after batteries are inserted. If the reception of outdoor
temperature fails, check the batteries and tryit again. Check if there is anysource
of interference. Manual initialization can be helpful (see 1.5.7 transmitter).The
attached transmitter is preset to channel 1. Usingchannel switch (D5), youcan
choose another channel as well.
•After scanning the Thermo Sensor Unit the clockwill then scan the DCF (radio

controlled clock) frequencysignal. “ ” flashes on the LCD. The signal “ ”
appears permanentlywhen the signal is received successfully.
•The clock automaticallyscans the time signal at 3.00 a.m. everydayto maintain
accurate timing.For failed reception, scanningstops (“ ” on the LCD disappear)
and repeats again at 4.00 a.m. 5.00 a.m. and 6.00 a.m.
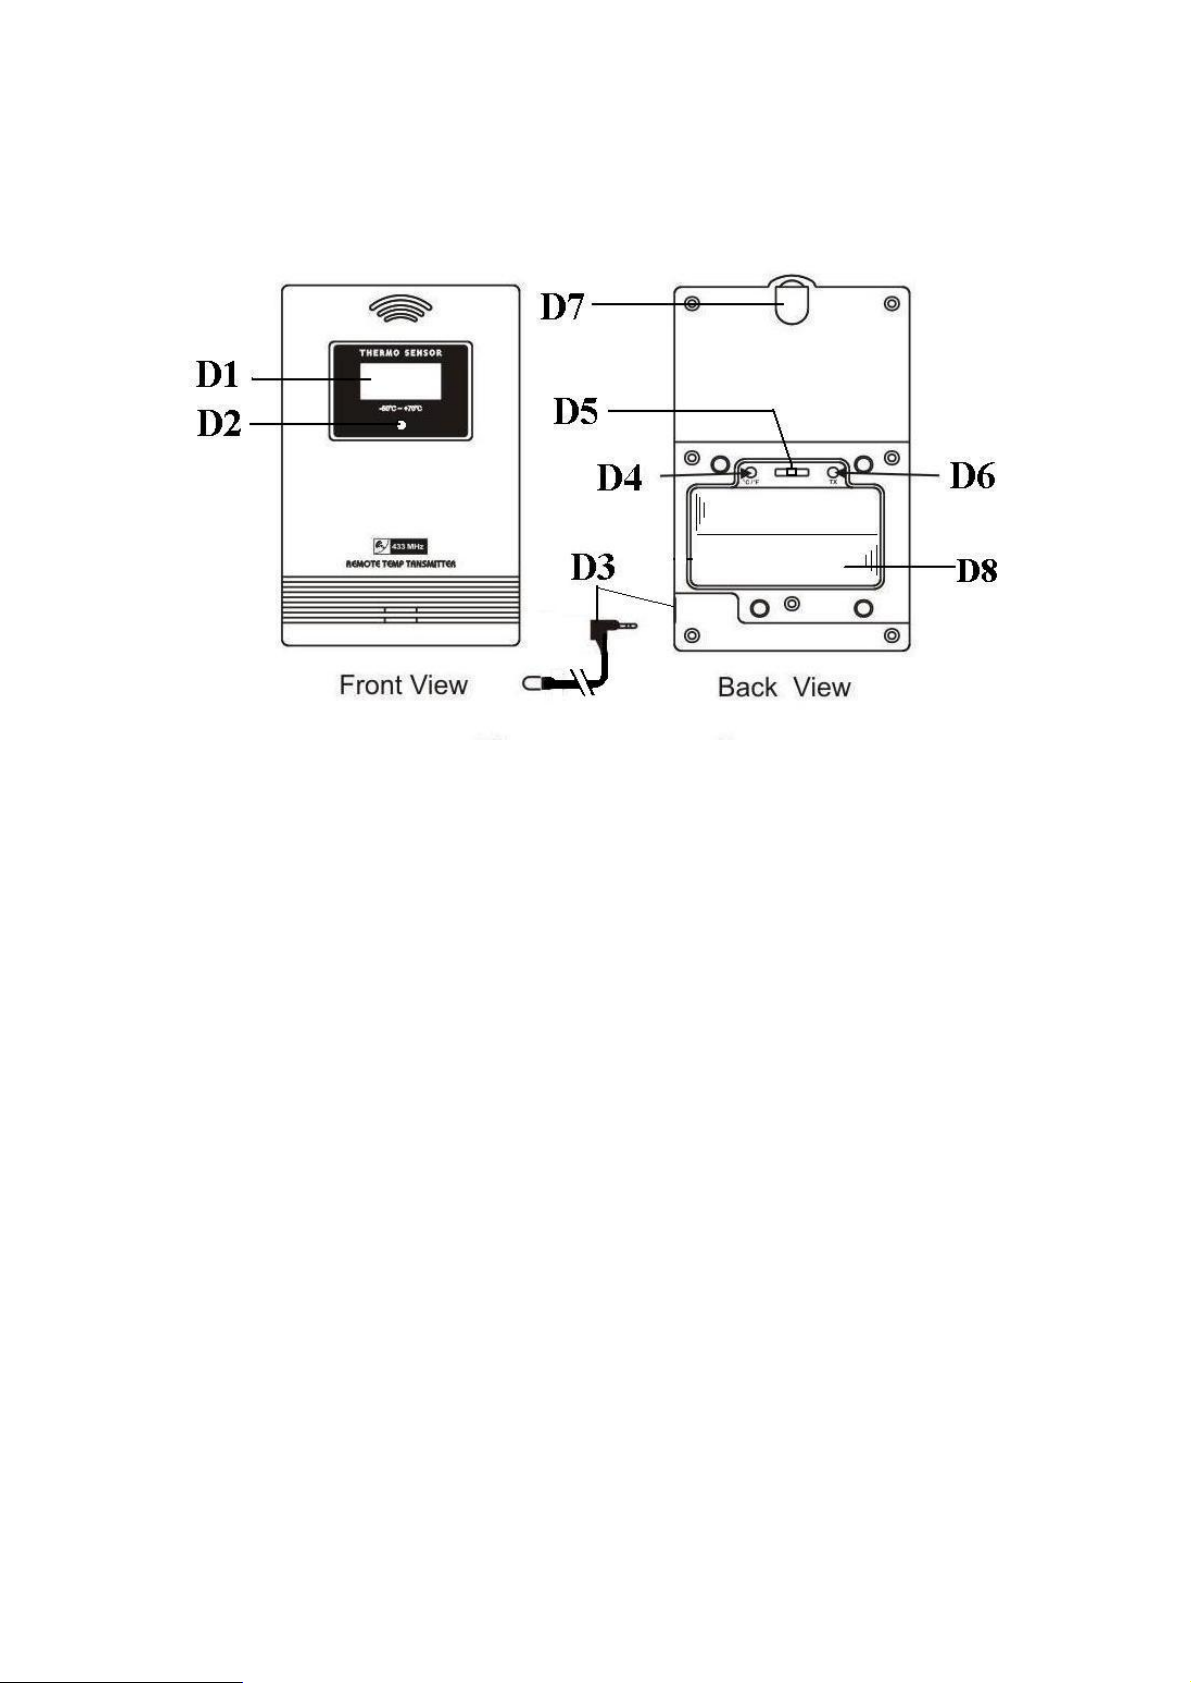
•The clock manuallyscans the time signal byholding “-(°C/°F)” button (B7) for
3 seconds. Press “-(°C/°F)” button (B7) again for 3 seconds to stop scanning
when receivingDCF signal.
•Time can be set manuallyas well (see 1.5.1 Clock setting).
1.5 How to operate
Important:
•Buttons will not function while scanningDCF oroutdoor temperature signal
unless theyare well received or stopped manually.
•Duringoperation, all successful settings will be confirmed byan acoustical signal.
•The instrument will quit the settingmode, if there is no button used within 5
seconds period.
•Holding“+” or “-” buttons, you will enter fast mode.
1.5.1 Manual Time Setting:
•Hold “ MODE” button for 2 seconds. Press “+” or“-” buttons to adjust Hours.
Using“ MODE” button you can switch to settingminutes, seconds, year,
month/daysequence, month, day, time zone, day-of-week language.
•In“month/daysequence” the two different date displays can be selected:
Month/date (American version) or date/month (European version).
•The time zone is used for the countries where the DCF signal can be received but
the time zone is different from the German time (e.g. 1=one hour later).
•Languages and their selected abbreviations for each dayof the week are shown in
the followingtable:
Language
Sunday
Monday Tuesday Wednesday
Thursday
Friday Saturday
German, GE SO MO DI MI DO FR SA
English, EN SU MO TU WE TH FR SA
Russian, RU BC NH BT CP HT NT CY
Denmark, DA
SO MA TI ON TO FR LO

Dutch, NE ZO MA DI WO DO VR ZA
Italian, IT DO LU MA ME GI VE SA
Spanish, ES DO LU MA MI JU VI SA
French, FR DI LU MA ME JE VE SA
•The Time SettingMode will automaticallyexit in 5 seconds without any
adjustment.
•DuringDaylight Saving Time DSTappears on the display.
•Choose 12 HR or 24 HR system bypressingthe “+ (12/24)” button (B5).
1.5.2 SnoozeAlarmClock Function:
•Press “MODE” button toselect to view Alarm Time:
Time Date/Month /WeekdayAlarm Time (“ ” appears on the LCD)
•When viewingthe AlarmTime, hold “MODE” button for 3 seconds to enter
Alarm Time setting. Press “+” or “-” buttons to adjust the alarm time. Confirm
hours with “MODE” button and switch to minutes setting.
•Press “ALARM” button to switch alarm on or off. If it is on, “ ” is shown on
the LCD. Press anybutton to stop the alarm.
•Press “SNOOZE” when alarm is soundingto activate snooze alarm. “ ” is
flashing on the LCD. 5 minutes later the alarm will start again.
1.5.3 Maximum/Minimumfunction:
•Press “MAX/MIN” button to show the maximum (MAX) and minimum (MIN)
outdoor temperature, indoor temperature and humidity.
•Hold “MAX/MIN” button for 3 seconds to clear the recorded maximum and
minimum reading.
1.5.4 WeatherSymbol Setting
•After batteries were inserted, or when holding“WEATHER” button for 3 seconds,
the weather symbol flashes (A1) for 5 seconds. Enter the actual weather during
this time bypressing“+” or “-” button.
•Press “MODE/SET” button to confirm the setting.
•The weather forecast may be not accurate if the entered weather symbol is
incorrect.
1.5.5 WeatherForecast
There are 5 different weather symbols:

means Sunny .
means Slightly Cloudy.
means Cloudy.
means Rainy
means Cloudburst.
There are 3 different symbols for the trend of atmospheric pressure:
“increasing
“steady
“decreasing
The weather forecast relates to a range of 6 to 24 hours and indicates onlya general
weather trend.
1.5.6 Thermometer:
•Press “-(°C / °F)” button (B7) to select Temperature display in Celsius mode or
Fahrenheit mode.
•The trend pointer displayed on the LCD indicates the trend of the outdoor
temperature.
There are 3 different symbols for the outdoor temperature trend:
increasing

steady
decreasing
1.5.6.1 TemperatureAlert function:
•Press “ALERT” button (B4) to set the Temperature Alert function on or off. “ ”
appears on the LCD if this function is on.
•Hold “ALERT” button for 3 seconds to enter the Alert settingmode. Indoor
temperature flashes. Press “+” or “-” button to select indoor or outdoor
temperature and the requested channel for the temperature alert. Press ”ALERT”
button to confirm the settings. Press “ +” or “-” button to set the upper “ ” and
lower “ ” limit of the temperature. Ifyou want to select onlyone value, set the
final value as upper or lower limit (Indoor temperature: 0°C ~ +50°C, Outdoor
temperature: -50°C ~ +70°C).
1.5.7 Outdoorthermo sensorunit registration procedure:
•The weather station automaticallystarts receiving the outdoor temperature signal
from the Outdoor Thermo Sensor and the Sensor will transmit the temperature to
the weather station after new batteries are inserted.
•The batteries compartment of the Thermo Sensor is located behind the backcover.
Unscrew it to open. Press “TX” button (D6) on the Thermo Sensor unit to transmit
temperature to the weather station manually (e.g.for testingor in case of loss of
transmitter signal).The weather station gives a “beep” sound if it received the
temperature.
•Press “°C /°F” button (D4) on the Thermo Sensor unit to select Celsius mode or
Fahrenheit mode for the Thermo Sensor display.
•Close the batterycompartment of transmitter carefully.
1.5.7.1Additional Transmitters
•The weather station allows you to add up to 3 transmitters. For havingmore than
one external transmitter (maximum3), select the Channel, CH1, CH2 or CH3 to
ensure each sensor is transmittingdifferent channels before insertingbatteries.
The channel select switch (D5) is at the back of the thermo sensor.
•To retrieve different channels at DisplayStation press “CHANNEL” button (B2)
to view the 3 Channels’temperature. For alternatingchannel display choose “ ”

symbol.
•To cancel an unused channel hold “CHANNEL”button for 3 seconds. Ifa new
channel is received it will be automaticallyregistered again.
1.5.7.2 The use of 1.5mcord TemperatureProbe:
•Insert the probe plugon the right hand side of the Thermo Sensor Unit. Put the
metal casingoutside and leave the Thermo Sensor Unit in an indoor area to avoid
freezingup the batterywhen the outdoor temperature is below -20 °C or when
measuringliquids.
•Be aware of sharp edges at window frames when passingcable through.
1.5.8 Moon Phase and Tide Indication
The Moon Phase and tide of each dayis shown on the LCD (A5).
A: New Moon B: WaxingCrescent C: First Quarter
D: WaxingGibbous E: Full Moon F: WaningGibbous
G: Last Quarter H: WaningCrescent
Tide Status :
H : HighTide M: Medium Tide L:Low Tide
1.6 Positioning of Display Unit and Transmitter
•Choose a shadyand dryposition for transmitter. Place the DisplayUnit at the final
position. Check the transmission of 433 Mhz signal (avoid anyinterferingfield
and object). If necessarychose another position for Transmitter and/or Display
Unit.
•Fix the transmitter byusingplastic hanger.
1.7 Battery Replacement
•When the batteries of the Transmitter are used up, Low batteryicon “ ” appears
at the outdoor temperature row (A2) indicatingthe external transmitter of the
channel is in low batterystatus.
•Use alkaline batteries only.Observe correct polarity.

1.8 Backlight
•Press the SNOOZE/LIGHTbutton (B6) to light up the displayfor 5 seconds.
1.9 Notes
lAlways read the users manual carefullybefore operatingthe Unit.
lIf the unit does not work properlyuse a pin to press the RESETbutton (B10).
lAvoid placingthe clock near interference sources/metal frames such as computer
or TVsets.
lDo not expose the instrument to extreme temperatures, vibration or shock.
2.0 Liability Disclaimer
The product is not a toy.Keep it out of reach of children.
The product is not to be used for medical purpose or for public information, but is
determined for home use only.
Improper use or unauthorized openingof housingwill mean the loss of warranty.
No part of this manual maybe reproduced without written consent of manufacturer.
Hereby,TFA declares that this equipment is in compliance with the essential
requirements and other relevant provisions of Directive 1999/5/EC.
Other TFA Weather Station manuals
Popular Weather Station manuals by other brands

La Crosse Technology
La Crosse Technology WS-2315 Operation manual

Oregon Scientific
Oregon Scientific BAR338P user manual

Bresser
Bresser ClimaTemp FW quick start guide

La Crosse Technology
La Crosse Technology Wireless Weather Station instruction manual

La Crosse Technology
La Crosse Technology WS-1611 Operation manual

Oregon Scientific
Oregon Scientific BAR220A user manual

Oregon Scientific
Oregon Scientific LW301 user manual

Oregon Scientific
Oregon Scientific BA900H user manual

Coastal Environmental Systems
Coastal Environmental Systems WEATHERPAK-2000 user manual

La Crosse Technology
La Crosse Technology C83349 manual

Auriol
Auriol 4-LD5380 instructions

La Crosse Technology
La Crosse Technology S84107 Faqs