TFA METEO SENS User manual

Bedienungsanleitung
Instruction manual
Mode d’emploi
Instrucciones de uso
Gebruiksaanwijzing
Istruzioni per l'uso
Kat. Nr. 35.1139
RoHS
TFA_No. 35.1139_Anleitung 11.04.2017 15:15 Uhr Seite 1

3
Fig. 1 Fig. 2
C 1
B 1A 7 A 8 A 12B 2 B 3 B 4
A 1
A 4
A 6
C 2
A 5
A 2
A 3
A 15
A 14
A 13
A 16
A 17
2
A 11 A 10A 9
TFA_No. 35.1139_Anleitung 11.04.2017 15:15 Uhr Seite 2

METEO SENS - Funk-Wetterstation
5
Fig. 3
4
Vielen Dank, dass Sie sich für dieses Gerät aus dem Hause TFA entschieden haben.
1. Bevor Sie mit dem Gerät arbeiten
•Lesen Sie sich bitte die Bedienungsanleitung genau durch.
So werden Sie mit Ihrem neuen Gerät vertraut, lernen alle Funktionen und Bestandteile kennen,
erfahren wichtige Details für die Inbetriebnahme und den Umgang mit dem Gerät und erhalten Tipps
für den Störungsfall.
•Durch die Beachtung der Bedienungsanleitung vermeiden Sie auch Beschädigungen des Gerätes
und die Gefährdung Ihrer gesetzlichen Mängelrechte durch Fehlgebrauch.
•Für Schäden, die aus Nichtbeachtung dieser Bedienungsanleitung verursacht werden, überneh-
men wir keine Haftung.
•
Ebenso haften wir nicht für inkorrekte Messwerte und Folgen, die sich aus solchen ergeben können.
•Beachten Sie besonders die Sicherheitshinweise!
•Bewahren Sie diese Bedienungsanleitung gut auf!
2. Lieferumfang
• Funk-Wetterstation
• Thermo-Hygro-Sender (Kat.-Nr. 30.3221.02)
• Bedienungsanleitung
3. Einsatzbereich und alle Vorteile Ihres neuen Gerätes auf einen Blick
• Außentemperatur und Luftfeuchtigkeit über kabellosen Außensender (433 MHz) mit Reichweite bis
80 m (Freifeld)
• Erweiterbar auf bis zu 3 Sender, auch zur Klimakontrolle von entfernten Räumen, z.B. Kinderzimmer,
Weinkeller, etc.
• Innentemperatur und Luftfeuchtigkeit
D 3 D 5
D 4D 1
D 2
TFA_No. 35.1139_Anleitung 11.04.2017 15:15 Uhr Seite 3

76
METEO SENS - Funk-Wetterstation
• Vor Feuchtigkeit schützen.
• Der Sender ist spritzwassergeschützt, aber nicht wasserdicht. Suchen Sie im Freien einen nieder-
schlagsgeschützten Platz für den Sender aus.
5. Bestandteile
Basisstation
Display-Anzeige (Fig. 1)
A 1: Grafische Darstellung des Luftdruckverlaufs der letzten 24 Std.
A 2: Wettervorhersage mit Symbolen
A 3: Relativer Luftdruck mit Tendenzpfeil
A 4: Innentemperatur
A 5: Tendenzpfeil
A 6: Maximum- und Minimum-Anzeige
A 7: Innenluftfeuchtigkeit
A 8: Batteriesymbol für das Basisgerät
A 9: Sommerzeit-Symbol
A 10: DCF Empfangssignal
A 11: Uhrzeit
A 12: Datum
A 13: Kanalnummer mit Empfangssymbol
A 14: Symbol für automatischen Kanalwechsel
A 15: Außentemperatur
A 16: Außenluftfeuchtigkeit
A 17: Batteriesymbol für den Sender
• Tendenzanzeigen und Maxima-/ Minimawerte
• Wettervorhersage mit Symbolen
• Luftdruck und grafischer Verlauf der letzten 24 Stunden
• Funkuhr mit Datum
• Zum Aufstellen
4. Zu Ihrer Sicherheit
• Das Produkt ist ausschließlich für den oben beschriebenen Einsatzbereich geeignet. Verwenden Sie
das Produkt nicht anders, als in dieser Anleitung dargestellt wird.
• Das eigenmächtige Reparieren, Umbauen oder Verändern des Gerätes ist nicht gestattet.
Vorsicht!
Verletzungsgefahr!
• Bewahren Sie die Geräte und die Batterien außerhalb der Reichweite von Kindern auf.
• Batterien nicht ins Feuer werfen, kurzschließen, auseinander nehmen oder aufladen. Explosionsgefahr!
• Batterien enthalten gesundheitsschädliche Säuren. Um ein Auslaufen der Batterien zu vermeiden,
sollten schwache Batterien möglichst schnell ausgetauscht werden.
•
Verwenden Sie nie gleichzeitig alte und neue Batterien oder Batterien unterschiedlichen Typs. Beim Han-
tieren mit ausgelaufenen Batterien chemikalienbeständige Schutzhandschuhe und Schutzbrille tragen!
Wichtige Hinweise zur Produktsicherheit!
• Setzen Sie die Geräte keinen extremen Temperaturen, Vibrationen und Erschütterungen aus.
TFA_No. 35.1139_Anleitung 11.04.2017 15:15 Uhr Seite 4

98
METEO SENS - Funk-Wetterstation
• Die LED-Kontrolllampe blinkt.
• Öffnen Sie das Batteriefach der Basisstation und legen Sie zwei neue Batterien 1,5 V AA polrichtig ein.
• Alle Segmente werden kurz angezeigt.
• Schließen Sie das Batteriefach wieder.
6.2 Empfang des Senders
• Nach dem Einlegen der Batterien startet die Basisstation automatisch mit dem Empfang der Mess-
werte. Die Funkwellen neben der Kanalnummer 1 blinken. Werden die Messwerte nicht empfangen,
erscheint „- -” auf dem Display. Prüfen Sie die Batterien und starten Sie einen weiteren Versuch.
Beseitigen Sie eventuelle Störquellen.
• Sobald die Basisstation die Funkzeit erhalten hat, können Sie die Initialisierung auch manuell starten.
Halten Sie die CHANNEL Taste für drei Sekunden gedrückt. Die Basisstation versucht die Messwerte
zu empfangen.
• Mit der TX Taste auf dem Sender können Sie die Messwerte manuell übertragen.
6.3 Empfang der Funkzeit
• Nachdem die Basisstation die Suche nach dem Sender abgeschlossen hat, beginnt das Gerät mit der
Suche nach dem DCF-Signal (Funkuhrsignal) und das DCF-Empfangszeichen blinkt.
• Wenn der Zeitcode nach 2-12 Minuten empfangen wurde, werden die funkgesteuerte Zeit, das
Datum und das DCF-Empfangszeichen ständig im Display angezeigt.
• Sie können die Initialisierung auch manuell starten.
• Drücken Sie die RCC/- Taste für 3 Sekunden.
• Das DCF-Empfangszeichen blinkt.
• Unterbrechen Sie den Empfangsversuch, indem Sie die RCC/- Taste drücken.
•
Der DCF-Signalempfang findet stündlich zwischen 1:00 Uhr bis 5:00 morgens statt. Ist der Empfang bis
5:00 Uhr nicht erfolgreich, so findet der nächste Empfangsversuch wieder um 1:00 Uhr morgens statt.
Tasten (Fig. 1)
B 1: SET Taste
B 2: CHANNEL Taste
B 3: MAXMIN/+ Taste
B 4: RCC/- Taste
Gehäuse (Fig. 2)
C 1: Batteriefach
C 2: Ständer
Sender (Fig. 3)
D 1: Schiebeschalter zur Kanalwahl
D 2: TX Taste
D 3: LED-Kontrolllampe
D 4: Batteriefach
D 5: Aufhängeöse
6. Inbetriebnahme
6.1 Einlegen der Batterien
• Legen Sie die Geräte in einem Abstand von ca. 1,5 Metern voneinander auf einen Tisch. Vermeiden Sie
die Nähe zu möglichen Störquellen (elektronische Geräte und Funkanlagen).
• Öffnen Sie das Batteriefach des Senders.
• Stellen Sie den Schiebeschalter auf Kanal 1.
• Legen Sie zwei neue Batterien 1,5 V AA polrichtig ein.
• Schließen Sie das Batteriefach wieder sorgfältig.
TFA_No. 35.1139_Anleitung 11.04.2017 15:15 Uhr Seite 5

1110
METEO SENS - Funk-Wetterstation
• Nachts sind die atmosphärischen Störungen meist geringer und ein Empfang ist in den meisten Fäl-
len möglich. Ein einziger Empfang pro Tag genügt, um die Genauigkeit zu gewährleisten und Abwei-
chungen unter 1 Sekunde zu halten.
7. Bedienung
• Halten Sie die MAXMIN/+ oder RCC/- Taste im Einstellmodus gedrückt, gelangen Sie in den Schnell-
lauf.
• Das Gerät verlässt automatisch den Einstellmodus, wenn länger als 20 Sekunden keine Taste
gedrückt wird.
7.1 Manuelle Einstellungen
• Halten Sie die SET Taste im Normalmodus gedrückt.
• dCF erscheint im Display und on (Voreinstellung) blinkt.
• Sie können mit der MAXMIN/+ oder RCC/- Taste den Empfang für das DCF Funksignal für die Uhrzeit
deaktivieren (OFF) oder aktivieren (on).
• Bei deaktiviertem Empfang müssen Sie die Uhrzeit manuell einstellen. Es erscheint keine Zeitzone.
• Drücken Sie die SET Taste noch einmal und Sie können nun nacheinander die Zeitzone (0 - Vorein-
stellung), die 12- oder 24 Stunden-Anzeige (24Hr - Voreinstellung), die Stunden, die Minuten, das
Jahr, den Monat, den Tag, den Luftdruck (Voreinstellung: 1013hpa) und die Temperaturanzeige (°C -
Voreinstellung) ansteuern und mit der MAXMIN/+ oder RCC/- Taste einstellen.
• Bestätigen Sie mit der SET Taste.
• Bei erfolgreichem Empfang des DCF-Funksignals und bei aktiviertem Empfang wird die manuell ein-
gestellte Zeit überschrieben.
• Falls die Funkuhr kein DCF-Funksignal empfangen kann (z.B. wegen Störungen, Übertragungsdi-
stanz, etc.), kann die Zeit manuell eingestellt werden. Das DCF-Empfangszeichen verschwindet und
die Uhr arbeitet dann wie eine normale Quarz-Uhr (siehe Manuelle Einstellungen).
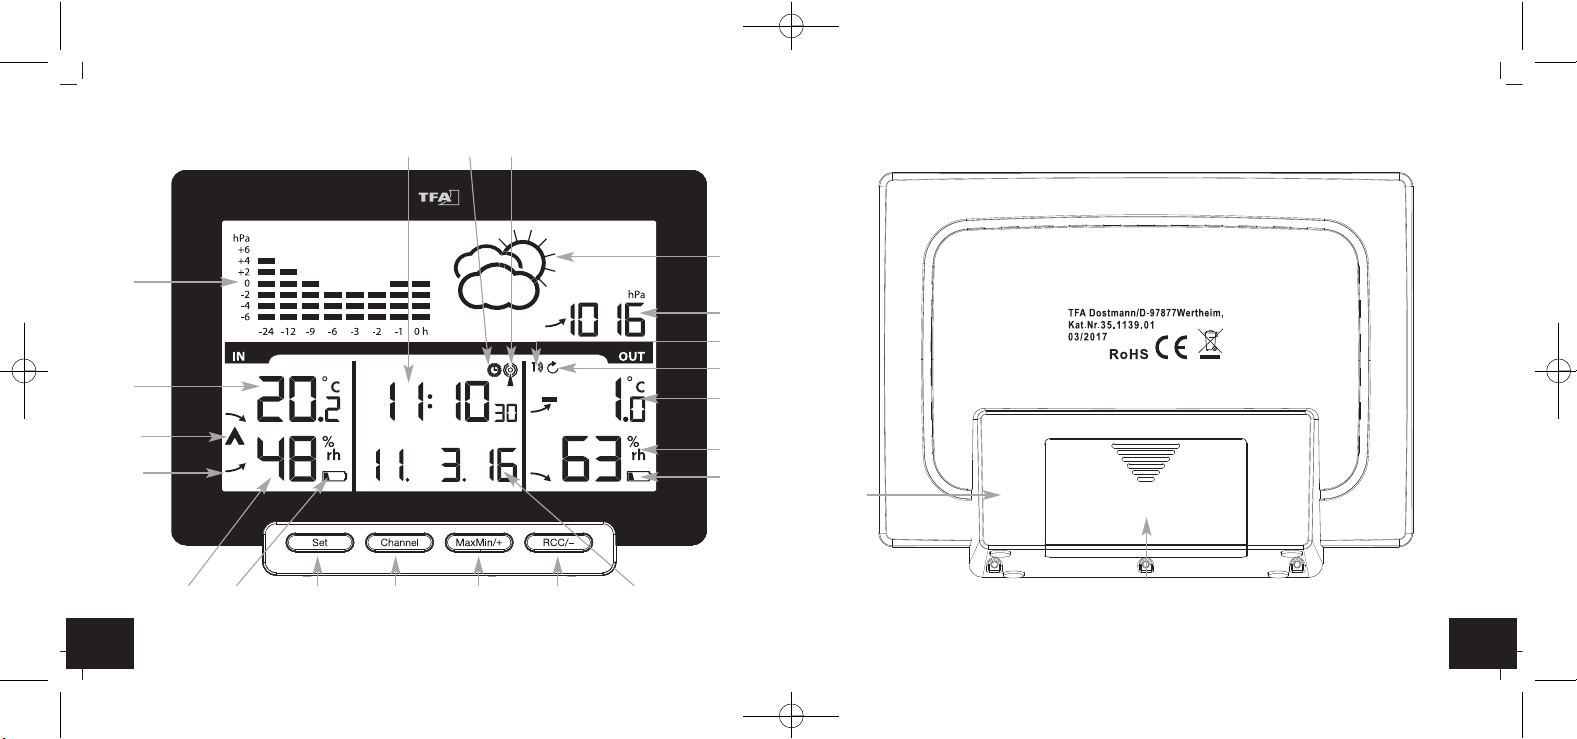
• Es gibt drei verschiedene Empfangssymbole:
Funkwellen blinken – Empfang aktiv
Funkwellen bleiben stehen – Empfang erfolgreich
kein Symbol – kein Empfang/Uhrzeit manuell eingestellt/Empfang ausgeschaltet
6.3.1 Hinweis zum Empfang der Funkzeit
Die Zeitübertragung erfolgt von einer Cäsium Atom-Funkuhr, die von der Physikalisch Technischen
Bundesanstalt in Braunschweig betrieben wird. Die Abweichung beträgt weniger als 1 Sekunde in einer
Million Jahren. Die Zeit ist kodiert und wird von Mainflingen in der Nähe von Frankfurt am Main durch
ein DCF-77 (77.5 kHz) Frequenzsignal übertragen mit einer Reichweite von ca. 1.500 km. Ihre Funkuhr
empfängt das Signal, wandelt es um und zeigt immer die exakte Zeit an. Auch die Umstellung von
Sommer- und Winterzeit erfolgt automatisch. Während der Sommerzeit erscheint das Sommerzeit-
Symbol im Display. Der Empfang hängt hauptsächlich von der geographischen Lage ab. Im Normalfall
sollten innerhalb des Radius von 1.500 km ausgehend von Frankfurt bei der Übertragung keine Proble-
me auftauchen.
Bitte beachten Sie folgende Hinweise:
• Es wird empfohlen, einen Abstand von mindestens 1,5 – 2 Metern zu eventuell störenden Geräten
wie Computerbildschirmen und Fernsehgeräten einzuhalten.
• In Stahlbetonbauten (Kellern, Aufbauten) ist das empfangene Signal natürlicherweise schwächer. In
Extremfällen wird empfohlen, das Gerät in Fensternähe zu platzieren und/oder durch Drehen das
Funksignal besser zu empfangen.
TFA_No. 35.1139_Anleitung 11.04.2017 15:15 Uhr Seite 6

1312
METEO SENS - Funk-Wetterstation
7.3 Wettervorhersage
• Die Funkwetterstation unterscheidet fünf unterschiedliche Wettersymbole (sonnig, teilweise bewölkt,
bedeckt, regnerisch und stürmisch).
• Die Vorhersage über die Symbolanzeige bezieht sich auf einen Zeitraum von 12 Stunden und gibt
lediglich einen Wettertrend an. Ist es zum Beispiel im Moment wolkig und es wird Regen angezeigt,
deutet dies nicht auf eine Fehlfunktion des Gerätes hin, sondern gibt an, dass der Luftdruck gesun-
ken und eine Wetterverschlechterung zu erwarten ist, wobei es sich aber nicht unbedingt um Regen
handeln muss. Die Genauigkeit beträgt etwa 70 %.
• Das Sonnensymbol wird auch bei Nacht angezeigt, wenn es sich um eine sternenklare Nacht handelt.
Wichtiger Hinweis!
• Bitte beachten Sie, dass die Symbolvorhersage sich im Laufe des Betriebs präzisiert. Die Symbol-
vorhersage ist bereits ab der Inbetriebnahme aktiv, allerdings steigt die Zuverlässigkeit der Progno-
sen mit der Menge an gesammelten Daten.
7.1.1 Einstellung der Zeitzone
• Im Einstellungsmodus können Sie die Zeitzonenkorrektur (-12/+12) vornehmen.
• Die Zeitzonenkorrektur wird benötigt, wenn das DCF Funksignal empfangen werden kann, die Zeitzo-
ne sich aber von der DCF Zeit unterscheidet (z.B. +1=eine Stunde später).
7.1.2 Einstellung der 12- und 24 Stunden-Anzeige
• Mit der MAXMIN/+ oder RCC/- Taste können Sie im Einstellungsmodus das 12- oder 24-Stunden-
Zeitsystem auswählen.
• Im 12-h-System erscheint AM oder PM (nach 12 Uhr) auf dem Display und die amerikanische
Datumsanzeige (erst der Monat, dann der Tag).
7.1.3 Einstellung des Luftdrucks
• Der relative Luftdruck ist bezogen auf Meereshöhe und muss auf Ihre Ortshöhe eingestellt werden.
Erfragen Sie den aktuellen Luftdruck Ihrer Umgebung (Wert vom Wetteramt, Internet, Optiker,
geeichte Wettersäulen an öffentlichen Gebäuden, Flughafen). Mit der MAXMIN/+ oder RCC/- Taste
können Sie im Einstellungsmodus den relativen Luftdruckwert einstellen.
7.1.4 Einstellung der Temperaturanzeige
• Mit der MAXMIN/+ oder RCC/- Taste können Sie im Einstellungsmodus zwischen °F (Fahrenheit)
oder °C (Celsius) als Temperaturanzeige auszuwählen.
7.2 Luftdruck
• Im Display werden der relative Luftdruck in hPa und der Luftdruckverlauf der letzten 24 Stunden
angezeigt.
TFA_No. 35.1139_Anleitung 11.04.2017 15:15 Uhr Seite 7

1514
METEO SENS - Funk-Wetterstation
• Die Außenwerte und die Kanalnummer werden auf dem Display der Basisstation angezeigt. Falls Sie
mehr als einen Außensender angeschlossen haben, können Sie mit der CHANNEL Taste auf der
Basisstation zwischen den Kanälen 1 bis 3 wechseln.
• Sie können auch einen automatischen Kanalwechsel einstellen. Nach dem letzten registrierten Sen-
der (1 bis 3) erscheint bei erneuter Bedienung der CHANNEL Taste das Kreissymbol für automati-
schen Kanalwechsel. Drücken Sie die CHANNEL Taste noch einmal, um die Funktion auszuschalten.
• Nach erfolgreicher Inbetriebnahme der Außensender schließen Sie das Batteriefach wieder sorgfältig.
8. Aufstellen und Befestigen der Basisstation und des Senders
• Suchen Sie im Freien einen schattigen, niederschlagsgeschützten Platz für den Sender aus. (Direkte
Sonneneinstrahlung verfälscht die Messwerte und ständige Nässe belastet die elektronischen Bau-
teile unnötig).
• Stellen Sie die Basisstation im Wohnraum auf. Vermeiden Sie die Nähe zu anderen elektrischen
Geräten (Fernseher, Computer, Funktelefone) und massiven Metallgegenständen.
• Prüfen Sie, ob eine Übertragung der Messwerte vom Sender am gewünschten Aufstellort zur Basis-
station stattfindet (Reichweite Freifeld bis zu 80 Meter, bei massiven Wänden, insbesondere mit
Metallteilen kann sich die Sendereichweite erheblich reduzieren.)
• Suchen Sie sich gegebenenfalls einen neuen Aufstellort für Sender und/oder Basisstation.
• Ist die Übertragung erfolgreich, können Sie die Sender an der Aufhängeöse befestigen oder auf einer
glatten Oberfläche hinstellen.
9. Pflege und Wartung
• Reinigen Sie die Geräte mit einem weichen, leicht feuchten Tuch. Keine Scheuer- oder Lösungsmittel
verwenden!
7.4 Trendpfeile
• Die Trendpfeile zeigen Ihnen, ob die Werte für Luftdruck, Temperatur und Luftfeuchtigkeit aktuell
steigen oder fallen. Bei gleichbleibenden Werten erfolgt keine Anzeige.
7.5 Maximum/Minimum-Funktion
• Drücken Sie die MAXMIN/+ Taste im Normalmodus.
• erscheint auf dem Display.
• Es erscheinen die höchsten Messwerte seit der letzten Rückstellung.
• Drücken Sie noch einmal die MAXMIN/+ Taste.
• erscheint im Display.
• Die niedrigsten Messwerte seit der letzten Rückstellung werden angezeigt.
• Drücken und halten Sie die MAXMIN/+ Taste für drei Sekunden, wenn die maximalen oder minimalen
Werte angezeigt werden, um die entsprechenden Werte zu löschen.
• Drücken Sie die MAXMIN/+ Taste noch einmal, um in den Normalmodus zurückzukehren.
7.6 Zusätzliche Außensender
• Wenn Sie mehrere Außensender anschließen wollen, wählen Sie mit dem CH 1/2/3 Schiebeschalter
im Batteriefach des Außensenders für jeden Außensender einen anderen Kanal (CH1, CH2 oder CH3)
aus. Legen Sie dann zwei neue Batterien 1,5 V AA polrichtig ein. Nehmen Sie die Basisstation
anschließend in Betrieb oder starten Sie die manuelle Sendersuche:
• Wählen Sie mit der CHANNEL Taste den gewünschten Sender aus.
• Halten Sie die CHANNEL Taste auf der Basisstation für drei Sekunden gedrückt. Der registrierte Sen-
der (Kanal) wird gelöscht.
• Drücken Sie nun die TX Taste im Batteriefach des entsprechenden Senders. Die Übertragung der
Daten erfolgt sofort.
TFA_No. 35.1139_Anleitung 11.04.2017 15:15 Uhr Seite 8

1716
METEO SENS - Funk-Wetterstation
➜Abstand zwischen Sender und Basisstation verringern
➜Beseitigen der Störquellen
Kein DCF Funkempfang ➜DCF-Empfang im Einstellmodus aktivieren
➜RCC/- Taste für 3 Sekunden drücken und Initialisierung starten
➜Empfangsversuch in der Nacht abwarten
➜Anderen Aufstellort für das Gerät wählen
➜Beseitigen der Störquellen
➜Neuinbetriebnahme gemäß Bedienungsanleitung
➜Uhrzeit manuell einstellen
Unkorrekte Anzeige ➜Batterien wechseln
➜Neuinbetriebnahme gemäß Bedienungsanleitung
11. Entsorgung
Dieses Produkt wurde unter Verwendung hochwertiger Materialien und Bestandteile hergestellt, die recycelt
und wiederverwendet werden können.
Batterien und Akkus dürfen keinesfalls in den Hausmüll!
Als Verbraucher sind Sie gesetzlich verpflichtet, gebrauchte Batterien und Akkus zur
umweltgerechten Entsorgung beim Handel oder entsprechenden Sammelstellen gemäß
nationaler oder lokaler Bestimmungen abzugeben.
Die Bezeichnungen für enthaltene Schwermetalle sind:
Cd=Cadmium, Hg=Quecksilber, Pb=Blei
• Entfernen Sie die Batterien aus allen Geräten, wenn Sie die Geräte längere Zeit nicht verwenden.
• Bewahren Sie Ihre Geräte an einem trockenen Platz auf.
9.1 Batteriewechsel
• Sobald das Batteriesymbol in der Displayzeile eines Kanals erscheint, wechseln Sie bitte die Batte-
rien im jeweiligen Sender.
• Sobald das Batteriesymbol in der Displayzeile der Innenwerte erscheint, wechseln Sie bitte die Batte-
rien in der Basisstation.
•Achtung: Bei einem Batteriewechsel muss der Kontakt zwischen Sender und Basisstation wieder
hergestellt werden – also manuelle Sendersuche starten oder Batterien in alle Geräte neu einlegen.
10. Fehlerbeseitigung
Problem Fehlerbeseitigung
Keine Anzeige ➜Batterien polrichtig einlegen
➜Batterien wechseln
Kein Senderempfang ➜Kein Sender installiert
Anzeige „- -“ ➜Batterien des Senders prüfen (keine Akkus verwenden!)
➜Neuinbetriebnahme von Sender und Basisstation gemäß Bedienungs-
anleitung
➜Manuelle Sendersuche starten: CHANNEL Taste auf der Basisstation
für 3 Sekunden drücken und dann TX Taste im Batteriefach des
Senders drücken
➜Anderen Aufstellort für Sender und/oder Basisstation wählen
TFA_No. 35.1139_Anleitung 11.04.2017 15:15 Uhr Seite 9

1918
METEO SENS - Funk-Wetterstation
Auflösung Luftfeuchtigkeit 1 % rH
Maximale Sendeleistung < 10mW
Reichweite ca. 80 m (Freifeld)
Übertragungsfrequenz 433 MHz
Übertragungszeit 50 Sekunden
Spannungsversorgung Basisstation: 2 x 1,5 V AA (Batterien nicht inklusive)
Sender: 2 x 1,5 V AA (Batterien nicht inklusive)
Sender
(Größe und Gewicht) 40 x 21 x 130 mm, 47 g
Basisstation
(Größe und Gewicht) 157 x 43 x 117 mm, 214 g (nur das Gerät)
Dieses Gerät ist entsprechend der EU-Richtlinie über die Entsorgung von Elektro- und
Elektronik-Altgeräten (WEEE) gekennzeichnet.
Dieses Produkt darf nicht mit dem Hausmüll entsorgt werden. Der Nutzer ist verpflichtet,
das Altgerät zur umweltgerechten Entsorgung bei einer ausgewiesenen Annahmestelle für
die Entsorgung von Elektro- und Elektronikgeräten abzugeben.
12. Technische Daten
Messbereiche
Temperatur innen 0 °C… 50°C (+32 °F …+122 °F)
Luftfeuchtigkeit innen 1% bis 99% rH
Luftdruck 800…1100 mb
Temperatur Sender -40 °C… 60 °C (-40 °F …140 °F)
Luftfeuchtigkeit Sender 1% bis 99% rH
Genauigkeit Temperatur ±1°C @ 0..50°C
Auflösung Temperatur 0,1°C
Genauigkeit Luftfeuchtigkeit ±5% rH (@ 30 … 80% rH)
TFA_No. 35.1139_Anleitung 11.04.2017 15:15 Uhr Seite 10

2120
METEO SENS - Funk-Wetterstation
METEO SENS - Wireless weather station
Thank you for choosing this instrument from TFA.
1. Before you use this product
•Please make sure you read the instruction manual carefully.
This information will help you to familiarize yourself with your new device, to learn all of its func-
tions and parts, to find out important details about its first use and how to operate it and to get
advice in the event of a malfunction.
•Following and respecting the instructions in your manual will prevent damage to your instrument
and loss of your statutory rights arising from defects due to incorrect use.
•We shall not be liable for any damage occurring as a result of non following of these instruc-
tions.
•Likewise, we take no responsibility for any incorrect readings or for any consequences resulting
from them.
•Please take particular note of the safety advice!
•Please keep this instruction manual safe for future reference.
2. Delivery contents
• Wireless weather station
• Thermo-hygro sensor (cat.-no. 30.3221.02)
• Instruction manual
3. Range of application and all the benefits of your new instrument at a glance
• Outdoor temperature and humidity wireless (433 MHz), distance range up to 80 m (open field)
• Expandable up to 3 outdoor transmitters, also for the climate control of remote rooms, e.g. children's
room, wine-cellar etc.
• Indoor temperature and humidity
Diese Anleitung oder Auszüge daraus dürfen nur mit Zustimmung von TFA Dostmann veröffentlicht werden. Die techni-
schen Daten entsprechen dem Stand bei Drucklegung und können ohne vorherige Benachrichtigung geändert werden.
Die neuesten technischen Daten und Informationen zu Ihrem Produkt finden Sie unter Eingabe der Artikel-Nummer
auf unserer Homepage.
EU-Konformitätserklärung
Hiermit erklärt TFA Dostmann, dass der Funkanlagentyp 35.1139 der Richtlinie 2014/53/EU entspricht. Der vollständi-
ge Text der EU-Konformitätserklärung ist unter der folgenden Internetadresse verfügbar:
www.tfa-dostmann.de
E-Mail: [email protected]
TFA Dostmann GmbH & Co. KG, Zum Ottersberg 12, D-97877 Wertheim, Deutschland 04/17
TFA_No. 35.1139_Anleitung 11.04.2017 15:15 Uhr Seite 11

2322
METEO SENS - Wireless weather station
• The transmitter is splashproof, but not watertight. When placed outdoors, choose a shady and dry
place for the transmitter.
5. Elements and buttons
Basisstation
Base station (Fig. 1)
A 1: Bar graph indication of atmospheric pressure for the last 24 hours
A 2: Weather forecast with weather symbols
A 3: Relative atmospheric pressure with trend arrow
A 4: Indoor temperature
A 5: Trend arrow
A 6: Maximum/minimum values
A 7: Indoor humidity
A 8: Battery symbol for the base station
A 9: Daylight Saving Time symbol
A 10: DCF reception icon
A 11: Time
A 12: Date
A 13: Channel number with reception icon
A 14: Circle symbol for alternating channel
A 15: Outdoor temperature
A 16: Outdoor humidity
A 17: Battery symbol for the transmitter
• Trend indictors and maximum/ minimum values
• Weather forecast with symbols,
• Atmospheric pressure with bar graph for the last 24 hours
• Radio-controlled clock with date
• Table standing
4. For your safety
• This product is exclusively intended for the range of application described above. It should only be
used as described within these instructions.
• Unauthorized repairs, alterations or changes to the product are prohibited.
Caution!
Risk of injury:
• Keep these devices and the batteries out of reach of children.
• Batteries must not be thrown into a fire, short-circuited, taken apart or recharged. Risk of explosion!
• Batteries contain harmful acids. Low batteries should be changed as soon as possible to prevent
damage caused by leaking.
• Never use a combination of old and new batteries together, nor batteries of different types. Wear
chemical-resistant protective gloves and safety glasses when handling leaking batteries.
Important information on product safety!
• Do not expose the devices to extreme temperatures, vibrations or shocks.
• Protect it from moisture.
TFA_No. 35.1139_Anleitung 11.04.2017 15:15 Uhr Seite 12

2524
METEO SENS - Wireless weather station
• The LED signal lamp flashes.
• Open the battery compartment of the base station and insert two new AA 1.5V batteries, polarity as
illustrated.
• All segments will be displayed briefly.
• Close the battery compartment again.
6.2 Reception of the transmitter
• After the batteries are inserted the base station will automatically receive the measured values. The
reception waves beside the channel number 1 flash. If the reception of the measured values fails,
”--” appears on the display. Check the batteries and try it again. Check if there is any source of inter-
ference.
• As soon as the base station receives the radio-controlled time, you can start the manual initialization
of the transmitter. Press and hold the CHANNEL button for three seconds. The base station will try to
receive the measured values.
• Press the TX button on the transmitter to transmit the measured values manually.
6.3 Radio-controlled time reception
• After the base station has completed the search for the transmitter, the device starts scanning the
DCF signal (radio signal) and the DCF reception symbol flashes.
• When the time code is successfully received after 2-12 minutes, the radio-controlled time, the date
and the DCF symbol will be shown steadily on the display.
• You can also start the initialization manually.
• Press and hold the RCC/- button for 3 seconds.
• The DCF reception symbol will be flashing.
• Interrupt the reception by pressing the RCC/- button again.
Buttons (Fig. 1)
B 1: SET button
B 2: CHANNEL button
B 3: MAXMIN/+ button
B 4: RCC/- button
Housing (Fig. 2)
C 1: Battery compartment
C 2: Stand
Transmitter (Fig. 3)
D 1: Channel search switch
D 2: TX button
D 3: LED signal lamp
D 4: Battery compartment
D 5: Mounting hole
6. Getting started
6.1 Insert the batteries
• Place the instruments on a table at a distance of about 1.5 meters from each other. Avoid being close
to possible sources of interference such as electronic devices and radio equipment.
• Open the battery compartment of the transmitter.
• Set the switch to the channel 1 position.
• Insert two new AA 1,5 V batteries, polarity as illustrated.
• Close the battery compartment carefully.
TFA_No. 35.1139_Anleitung 11.04.2017 15:15 Uhr Seite 13

2726
METEO SENS - Wireless weather station
• During night-time, the atmospheric interference is usually less severe and reception is possible in
most cases. A single daily reception is adequate to keep the accuracy deviation under 1 second.
7. Operation
• Press and hold the MAXMIN/+ or RCC/- button in the setting mode for fast mode.
• The device will automatically quit the setting mode if no button is pressed for 20 seconds.
7.1 Manual settings
• Press and hold the SET button in normal mode.
• dcF appears on the display and ON (default) will be flashing.
• Press the MAXMIN/+ or RCC/- button to deactivate (OFF) or activate (on) the DCF time reception.
• Once the DCF time reception is deactivated the clock must be manually set. No time zone will appear.
• Press the SET button to do the settings in the following sequence: Time zone (0 - default), the 12 or
24-hour system (24hr - default), the hours, the minutes, the year, the month, the day, the atmo-
spheric pressure (1013 hpa - default) and the temperature display (°C - default), press the
MAXMIN/+ or RCC/- button to adjust it.
• Confirm with the SET button.
• Once the DCF time signal is successfully received and the DCF reception is activated, the manually
set time is overwritten.
7.1.1 Time zone setting
• In the setting mode you can make the time zone correction (-12/+12).
• The time zone correction is needed for countries where the DCF signal can be received but the time
zone is different from the DCF time (e.g. +1=one hour plus).
• The DCF reception always takes place hourly between 1:00 and 5:00 o'clock in the morning. If the
reception is not successfully received until 5:00 o'clock, the next DCF reception attempt will happen
at 1:00 o'clock in the following morning.
• If the clock cannot detect the DCF-signal (e.g. due to interference, transmitting distance, etc.), the
time can be set manually. The DCF reception symbol disappears and the clock will then work as a
normal quartz clock (see: Manual settings).
• There are three different reception symbols:
radio waves are flashing – reception is active
radio waves stop flashing – reception is successful
No symbol – no reception/ time is set manually/reception is deactivated
6.3.1 Note on radio-controlled time
The time base for the radio-controlled time is a caesium atomic clock operated by the Physikalisch
Technische Bundesanstalt based in Braunschweig (Brunswick), Germany. It has a time deviation of less
than one second in one million years. The time is coded and transmitted from Mainflingen near Frank-
furt via the frequency signal DCF-77 (77.5 kHz) and has a transmitting range of approximately 1,500
km. The adjustment to Daylight Saving Time (summer/winter time) is automatic. In Daylight Saving
Time the DST symbol is shown on the display. The reception quality depends mainly on geographic
location. Normally there should be no reception problems within a 1,500 km radius around Frankfurt.
Therefore, please note the following steps:
• The recommended distance to any interfering sources like computer screens or TV sets is at least
1.5 - 2 meters.
• Within concrete walls (reinforced with steel) such as basements, the received signal is naturally
weakened. In extreme cases, please place the unit close to a window to improve reception.
TFA_No. 35.1139_Anleitung 11.04.2017 15:15 Uhr Seite 14

2928
METEO SENS - Wireless weather station
• The weather forecast covers a range of 12 hours and indicates only a general weather trend. For
example, if the current weather is cloudy and the rain symbol is displayed, it does not mean the
product is faulty because it is not raining. It simply means that the air pressure has dropped and the
weather is expected to get worse but not necessarily rain. The accuracy is about 70 %.
• The sun symbol also appears on a starry night.
Note!
• Please note that the forecast symbol will become more defined in the course of operation. The fore-
cast symbol is active right from the start, however, the reliability of the forecasts increases with the
amount of data collected.
7.4 Trend arrows
• The trend arrows indicate whether the atmospheric pressure, temperature and humidity values are
currently increasing or decreasing. If the values remain the same, there is no display.
7.5 Maximum/Minimum function
• Press the MAXMIN/+ button in normal mode.
• appears on the display.
7.1.2 12/24-hour display setting
• Press the MAXMIN/+ or RCC/- button in the setting mode to choose between the 12 or 24-hour sys-
tem.
• In the 12-hour system AM or PM (after 12 o'clock) appears on the display as well as the American
date format (month first, then the day).
7.1.3 Atmospheric pressure setting
• The relative atmospheric pressure is referred to the sea level’s pressure and has to be adjusted first
to your local altitude. Ask for the present atmospheric pressure of your home area (Local weather
service, Internet, optician, calibrated instruments in public buildings and airport). Press the
MAXMIN/+ or RCC/- button in the setting mode to set the relative atmospheric pressure.
7.1.4 Temperature setting display
• Press the MAXMIN/+ or RCC/- button in the setting mode to select the temperature display in °C
(Celsius) or °F (Fahrenheit) as temperature unit.
7.2 Atmospheric pressure
• The relative atmospheric pressure in hPa and the graphic development of the last 24 hours will
appear on the display.
7.3 Weather forecast
• The weather station has five different weather symbols (sunny, slightly cloudy, cloudy, rainy,
stormy).
TFA_No. 35.1139_Anleitung 11.04.2017 15:15 Uhr Seite 15

3130
METEO SENS - Wireless weather station
8. Positioning and mounting of the base station and the transmitter
• When placed outdoors, choose a shady and dry place for the transmitter. Direct sunlight may trigger
incorrect measurement and continuous humidity damages the electronic components needlessly.
• Place the base station in any room of the house. Avoid the vicinity of any source of interference such
as computer screens, TV sets or solid metal objects.
• Once the desired location is chosen, check whether the transmission from the transmitter to the
base station is possible (transmission range of up to 80m in open areas). Within solid walls, espe-
cially ones with metal parts, the transmission range can be reduced considerably.
• If necessary choose another position for the transmitter and/or base station.
• Once the transmission is successful, you can wall mount the transmitter or place it onto a flat sur-
face.
9. Care and maintenance
• Clean the device with a soft damp cloth. Do not use solvents or scouring agents.
• Remove the batteries from all instruments if you do not use the products for a long period of time.
• Keep the devices in a dry place.
9.1 Battery replacement
• When the battery symbol appears on a channel display, change the batteries of the respective trans-
mitter.
• Change the batteries of the base station, when the battery symbol appears on the display of the
indoor values.
•Please note: When the batteries are changed, the contact between the transmitters and the base
station must be restored – so always insert new batteries into all devices or start a manual transmit-
ter search.
• The maximum values measured since the last reset appear on the display.
• Press the MAXMIN/+ button again.
• appears on the display.
• The minimum values measured since the last reset appear on the display.
• When the maximum or the minimum values are displayed, press and hold the MAXMIN/+ button for
three seconds to reset the corresponding values.
• Press the MAXMIN/+ button again to return to normal mode.
7.6 Additional outdoor transmitters
• When having more than one external transmitter, select a different channel for each one by the CH
1/2/3 switch inside the transmitter's battery compartment. Insert two new AA 1,5 V batteries, polari-
ty as illustrated. Start the base station operation or the manual search for the outdoor transmitter:
• Choose the respective transmitter by pressing the CHANNEL button.
• Press and hold the CHANNEL button on the base station for three seconds. The registered transmit-
ter (channel) will be canceled.
• Press the TX button in the corresponding transmitter's battery compartment. The transmission of
the outdoor data will take place immediately.
• The outdoor values and the channel number will be shown on the base station display. If you have
installed more than one outdoor transmitter, press the CHANNEL button on the base station to
change between the channels 1 to 3.
• You can also choose an alternating channel display. Press the CHANNEL button. After the last regis-
tered channel (1 to 3) a circle symbol will appear. To deactivate the function press the CHANNEL but-
ton again.
• After successful installation close the outdoor transmitter's battery compartment carefully.
TFA_No. 35.1139_Anleitung 11.04.2017 15:15 Uhr Seite 16

3332
METEO SENS - Wireless weather station
Incorrect indication ➜Change the batteries
➜Restart the instrument according to the manual
11. Waste disposal
This product has been manufactured using high-grade materials and components which can be recycled
and reused.
Never dispose of empty batteries and rechargeable batteries in ordinary household waste.
As a consumer, you are required by law to take them to your retail store or to an appro-
priate collection site depending on national or local regulations in order to protect the
environment.
The symbols for the contained heavy metals are:
Cd = cadmium, Hg = mercury, Pb = lead
This product is labelled in accordance with the EU Waste Electrical and Electronic Equip-
ment Directive (WEEE).
Please do not dispose of this product in ordinary household waste. As a consumer, you
are required to take end-of-life devices to a designated collection point for the disposal of
electrical and electronic equipment, in order to ensure environmentally-compatible dis-
posal.
10. Troubleshooting
Problem Solution
No display ➜Ensure the batteries' polarity are correct
➜Change the batteries
No transmitter reception ➜No transmitter installed
Display “---"” ➜Check the transmitter batteries (do not use rechargeable batteries!)
➜Restart the transmitter and the base station according to the manual
➜Start manual search for the outdoor transmitter(s):
Press the CHANNEL button on the base station for three seconds and
then the TX button in the transmitter's battery compartment
➜Choose another place for the transmitters and/or the base station
➜Reduce the distance between the transmitters and the base station
➜Check if there is any source of interference.
No DCF reception ➜Activate DCF reception in setting mode
➜Press and hold the RCC/- button for three seconds and start the
initialization manually
➜Wait for an attempt reception during the night
➜Choose another place for your product
➜Check if there is any source of interference.
➜Restart the instrument according to the manual
➜Set the clock manually
TFA_No. 35.1139_Anleitung 11.04.2017 15:15 Uhr Seite 17

3534
METEO SENS - Wireless weather station
Transmission frequency 433 MHz
Transmission time 50 seconds
Power consumption Base station: 2 x 1,5 V AA (batteries not included)
Transmitter: 2 x 1,5 V AA (batteries not included)
Transmitter
(dimension and weight) 40 x 21 x 130 mm, 47 g
Base station
(dimension and weight) 157 x 43 x 117 mm, 214 g (device only)
No part of this manual may be reproduced without written consent of TFA Dostmann. The technical data are correct at
the time of going to print and may change without prior notice.
The latest technical data and information about your product can be found by entering the product number on our
homepage.
EU Declaration of conformity
Hereby, TFA Dostmann declares that the radio equipment type 35.1139 is in compliance with Directive 2014/53/EU.
The full text of the EU declaration of conformity is available at the following Internet address:
www.tfa-dostmann.de
E-Mail: [email protected]
TFA Dostmann GmbH & Co. KG, Zum Ottersberg 12, D-97877 Wertheim, Germany 04/17
12. Specifications
Measuring ranges
Indoor temperature 0 °C… 50°C (+32 °F …+122 °F)
Indoor humidity 1% to 99% rH
Atmospheric pressure 800…1100 mb
Temperature (transmitter) -40 °C… 60 °C (-40 °F …140 °F)
Humidity (transmitter) 1% to 99% rH
Temperature accuracy ±1°C @ 0..50°C
Temperature resolution 0.1°C
Humidity accuracy ±5% rH (@ 30 … 80% rH)
Humidity resolution 1%RH
Maximum
radio-frequency power < 10mW
Range max. 80 m (open field)
TFA_No. 35.1139_Anleitung 11.04.2017 15:15 Uhr Seite 18

3736
METEO SENS - Station météo radio-pilotée
• Température et humidité intérieure
• Indication de la tendance et des valeurs maximales/minimales
• Prévisions météo par symboles
• Pression atmosphérique avec indication graphique des dernières 24 heures
• Horloge radio-pilotée avec date
• À poser
4. Pour votre sécurité
• Le produit est destiné uniquement à l'utilisation décrite ci-dessus. N'utilisez jamais l’appareil à d'au-
tres fins que celles décrites dans le présent mode d'emploi.
• Vous ne devez en aucun cas réparer, démonter ou modifier l'appareil par vous-même.
Attention !
Danger de blessure :
• Gardez vos appareils et les piles hors de la portée des enfants.
• Ne jetez jamais de piles dans le feu, ne les court-circuitez pas, ne les démontez pas et ne les rechar-
gez pas.
• Les piles contiennent des acides nocifs pour la santé. Une pile faible doit être remplacée le plus rapi-
dement possible afin d'éviter toute fuite.
• N'utilisez jamais simultanément de piles anciennes avec des piles neuves ou des piles de types diffé-
rents. Pour manipuler des piles qui ont coulé, utilisez des gants de protection chimique spéciale-
ment adaptés et portez des lunettes de protection !
Conseils importants de sécurité du produit !
• Évitez d’exposer l’appareil à des températures extrêmes, à des vibrations ou à des chocs.
Nous vous remercions d'avoir choisi l'appareil de la société TFA.
1. Avant d'utiliser votre appareil
•Veuillez lire attentivement le mode d'emploi.
Vous vous familiariserez ainsi avec votre nouvel appareil, vous découvrirez toutes les fonctions et
tous les éléments qui le composent, vous noterez les détails importants relatifs à sa mise en service
et vous lirez quelques conseils en cas de dysfonctionnement.
•En respectant ce mode d'emploi, vous éviterez d'endommager votre appareil et de perdre vos
droits légaux en cas de défaut si celui-ci résulte d’une utilisation non-conforme.
•Nous n'assumons aucune responsabilité pour des dommages qui auraient été causés par le non-
respect du présent mode d'emploi.
•De même, nous n’assumons aucune responsabilité pour des relevés incorrects et les consé-
quences qu’ils pourraient engendrer.
•Suivez bien toutes les consignes de sécurité!
•Conservez soigneusement le mode d'emploi!
2. Contenu de la livraison
• Station météo radio-pilotée
• Émetteur thermo-hygro (réf. 30.3221.02)
• Mode d'emploi
3. Aperçu du domaine d'utilisation et de tous les avantages de votre nouvel appareil
• Température et humidité extérieure grâce à un émetteur sans fil (433 MHz), rayon d’action max.
80 m (champ libre)
• Peut être complété de jusqu'à 3 émetteurs, également pour le contrôle du climat dans des espaces
éloignés, p. ex. chambre d'enfants, cave
TFA_No. 35.1139_Anleitung 11.04.2017 15:15 Uhr Seite 19

3938
METEO SENS - Station météo radio-pilotée
Touches (Fig. 1)
B 1: Touche SET
B 2: Touche CHANNEL
B 3: Touche MAXMIN/+
B 4: Touche RCC/-
Boîtier (Fig. 2)
C 1: Compartiment à piles
C 2: Support
Émetteur (Fig. 3)
D 1: Interrupteur pour les canaux
D 2: Touche TX
D 3: Lampe LED de signalisation
D 4: Compartiment à piles
D 5: Œillet de suspension
6. Mise en service
6.1 Insertion des piles
• Déposez la station de base et les émetteurs sur une table à une distance d'environ 1,5 mètre les uns
des autres. Évitez la proximité de sources de parasitage (appareils électroniques ou appareils radio).
• Ouvrez le compartiment à piles de l'émetteur.
• Poussez le commutateur sur canal 1.
• Insérez deux piles neuves de type 1,5 V AA en respectant la polarité +/-.
• Refermez soigneusement le compartiment à piles.
• Protégez-le contre l'humidité.
• L'émetteur résiste aux éclaboussures d'eau mais il n'est pas étanche. Si vous installez un émetteur à
l’extérieur, choisissez un emplacement à l’ombre et protégé de la pluie.
5. Composants et touches
Station de base
Affichage (Fig. 1)
A 1: Développement graphique de la pression de l'air des dernières 24 heures
A 2: Prévisions météo par symboles
A 3: Pression atmosphérique relative avec flèche de tendance
A 4: Température intérieure
A 5: Flèche de tendance
A 6: Affichage maximum/minimum
A 7: Humidité intérieure
A 8: Symbole de pile pour la station de base
A 9: Symbole de l'heure d'été
A 10: Symbole de réception DCF
A 11: Horloge
A 12: Date
A 13: Numéro de canal avec symbole de réception
A 14: Symbole circulaire de changement automatique de canal
A 15: Température extérieure
A 16: Humidité relative extérieure
A 17: Symbole de pile pour l’émetteur
TFA_No. 35.1139_Anleitung 11.04.2017 15:15 Uhr Seite 20
Table of contents
Languages:
Other TFA Weather Station manuals
Popular Weather Station manuals by other brands

Auriol
Auriol ian 91679 Operation and safety notes

Bresser
Bresser Meteo NBF Colour instruction manual

Vitek
Vitek VT-3539 instruction manual

Nomenta Industries
Nomenta Industries Zeniq user guide

Hyundai
Hyundai WS2194 INTERNET instruction manual

La Crosse Technology
La Crosse Technology WS-2315AL Operation manual