Tieline Genie STL User manual

Genie STL and Merlin
IP Codec Quick Start Guide
Software Version: 2.2.2
Manual Version: 1.0
October, 2012

2 Codec 10 Step Quick Start Guide
© Tieline Pty. Ltd. 2012
1 10 Step Codec Quick Start
Warnings andSafety Information
1. Both appliance power cables must be removed from the device for Power Disconnection.
2. Remove the phone cable from the POTS interface before servicing.
THUNDERSTORM AND LIGHTNING WARNING:
DO NOT USE Tieline codecs during thunderstorms and lightning. You may suffer an injury
using a phone, Tieline codec, or any device connected to a phone during a thunderstorm.
This can lead to personal injury and in extreme cases may be fatal. Protective devices can
be fitted to the line, however, due to the extremely high voltages and energy levels involved
in lightning strikes, these devices may not offer protection to the users, or the Tieline
codec and equipment connected to the codec.
Secondary strikes can occur. These secondary strikes are induced by lightning strikes
and also produce dangerously high currents and energy levels. You only need to be near
an object struck by lightning to lead to personal injury or damage to equipment. e.g. if you
are located near a lighting tower at a sports facility, water features and drains on golf
courses, you will be affected by these secondary strikes.
Damage to personnel and Tieline codecs may occur during thunderstorm, even if the codec
is turned off but remains connected to the phone system or the power.
ANY DAMAGE TO A TIELINE PRODUCT CAUSED BY LIGHTNING or an ELECTRICAL
STORM WILL VOID THE WARRANTY. Use of this product is subject to Tieline's
SOFTWARE LICENSE and WARRANTY conditions, which should be viewed at
www.tieline.com/support before using this product.
DIGITAL PHONE SYSTEM WARNING:
DO NOT CONNECT YOUR Tieline CODEC TO A DIGITAL PHONE SYSTEM.
PERMANENT DAMAGE MAY OCCUR! If you are unfamiliar with any facility, check that
the line you are using is NOT a digital line. If the Tieline codec becomes faulty due to the
use of a digital phone system, the WARRANTY WILL BE VOID.
WARNING:
HIGH LEAKAGE CURRENT. EARTH CONNECTION ESSENTIAL BEFORE CONNECTING
SUPPLY.
If the total leakage current exceeds 3.5 mA, or if the leakage current of the connected
loads is unknown, connect the supplementary ground terminal to a reliable ground
connection in your facility.
Supplementary ground connection
A supplementary ground terminal is provided on the codec to connect the unit to a ground
connection. The ground terminal has an M4 stud with M4 retaining nuts and is compatible
with all grounding wires. Remove only NUT 2 to connect your ground wire. The ground wire
must have a suitable lug. When refitting NUT 2 ensure that both NUT 1 & NUT 2 are
correctly tightened to establish and maintain a proper earth connection.

310 Step Codec Quick Start
© Tieline Pty. Ltd. 2012
Initial Setup
Before attempting a new audio stream connection please connect and adjust the following:
1. Attach power to the codec.
2. Attach RJ45 Ethernet cables to at least one of the ETH ports on the codec's rear panel.
IMPORTANT: Always use ETH1 if you are connecting only one Ethernet cable to the codec.
Programs created using the front panel of the codec are always configured to send audio
over ETH1.
3. Attach headphones to the 6.35mm (1/4") headphone jack on the codec's front panel.
4. Check that the correct country is selected in the codec.
i. Press the CONFIGURE button.
ii. Navigate to System and press the button.
iii.Navigate to Country and press the button.
iv. Use the navigation buttons to select your country of operation and press the button.
5. Make sure you know the IP address of the destination codec.
Important Note: The following procedure will create a custom connection program using
the codec front panel keypad and navigation buttons. It instructs how to connect your
codec point-to-point over IP for the very first time without using the Toolbox web-GUI and
your computer for configuration. For more detailed information about configuring your codec
and managing audio stream connections, download the latest user manual for your codec.
4 Codec 10 Step Quick Start Guide
© Tieline Pty. Ltd. 2012
10 Step Connection Quick Start
1. Press the button and right navigation button to open the Input Audio level adjustment
screen and adjust audio levels.
Press on the numeric KEYPAD to toggle channel 1 on and off and press to toggle
channel 2 on and off.
Use the up and down navigation buttons to select Gang 1 + 2 and press the
button to toggle ganging on/off.
Use the up and down navigation buttons to select a single channel, or ganged
channels. Note: A channel is highlighted when selected.
Use the left and right navigation buttons to adjust the input levels up or down.
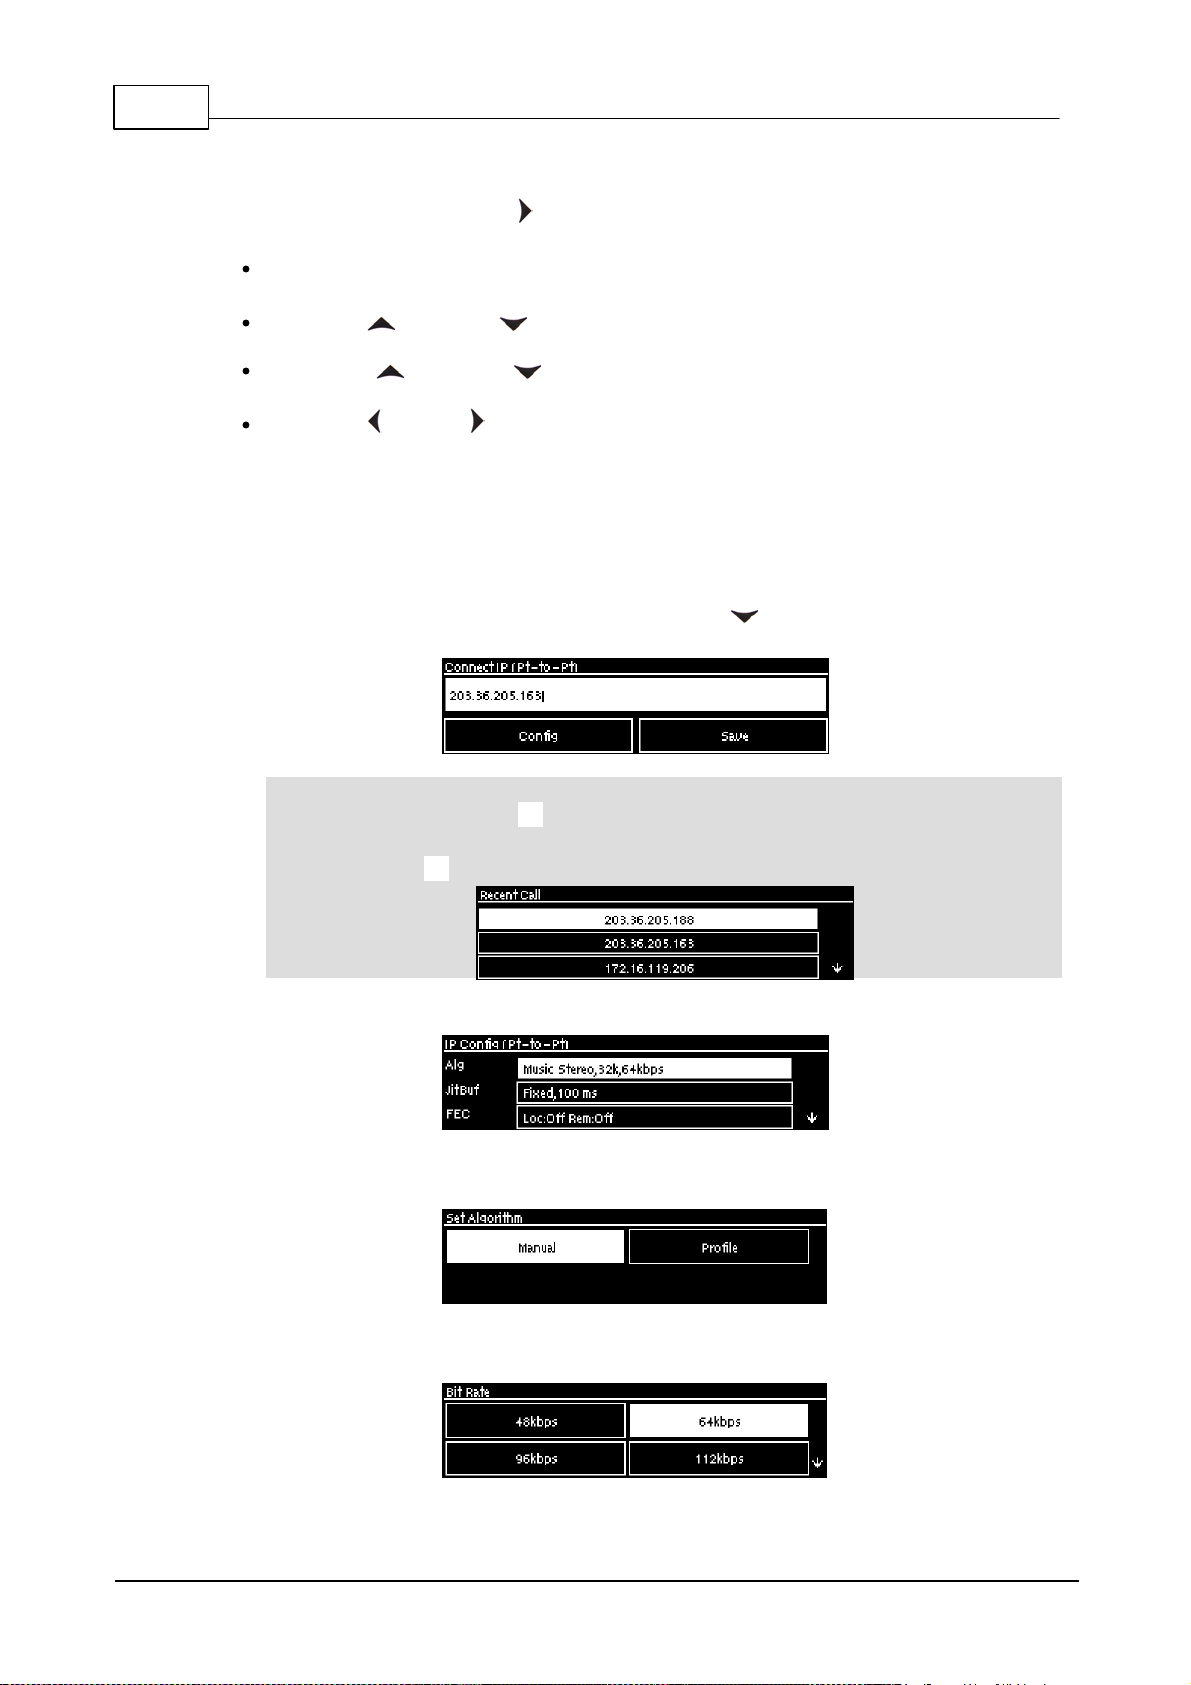
2. Press the HOME button to return to the Home screen, select Connect, then select IP
and press the button.
3. Use the RETURN button to delete numbers already entered, then use the numeric
KEYPAD to enter the IP address of the codec you want to dial, using the or buttons to
enter the periods in the IP address. Next, press the down navigation button to select Config
and press .
Important Note: The codec remembers recent IP addresses just like a cell-phone. To
view these addresses press when you select the Connect IP screen. The most recent
addresses and programs are listed first and you can use the navigation buttons to scroll up
and down. Press to select the address you have highlighted.
4. Navigate to Alg (algorithm) and press .
5. Use the navigation buttons to select an algorithm profile or manually enter algorithm settings,
then press .
If you decide to manually program the algorithm, use the navigation buttons to select your preferred
algorithm sample rate (if displayed) and bit rate, pressing after each option is selected.
510 Step Codec Quick Start
© Tieline Pty. Ltd. 2012
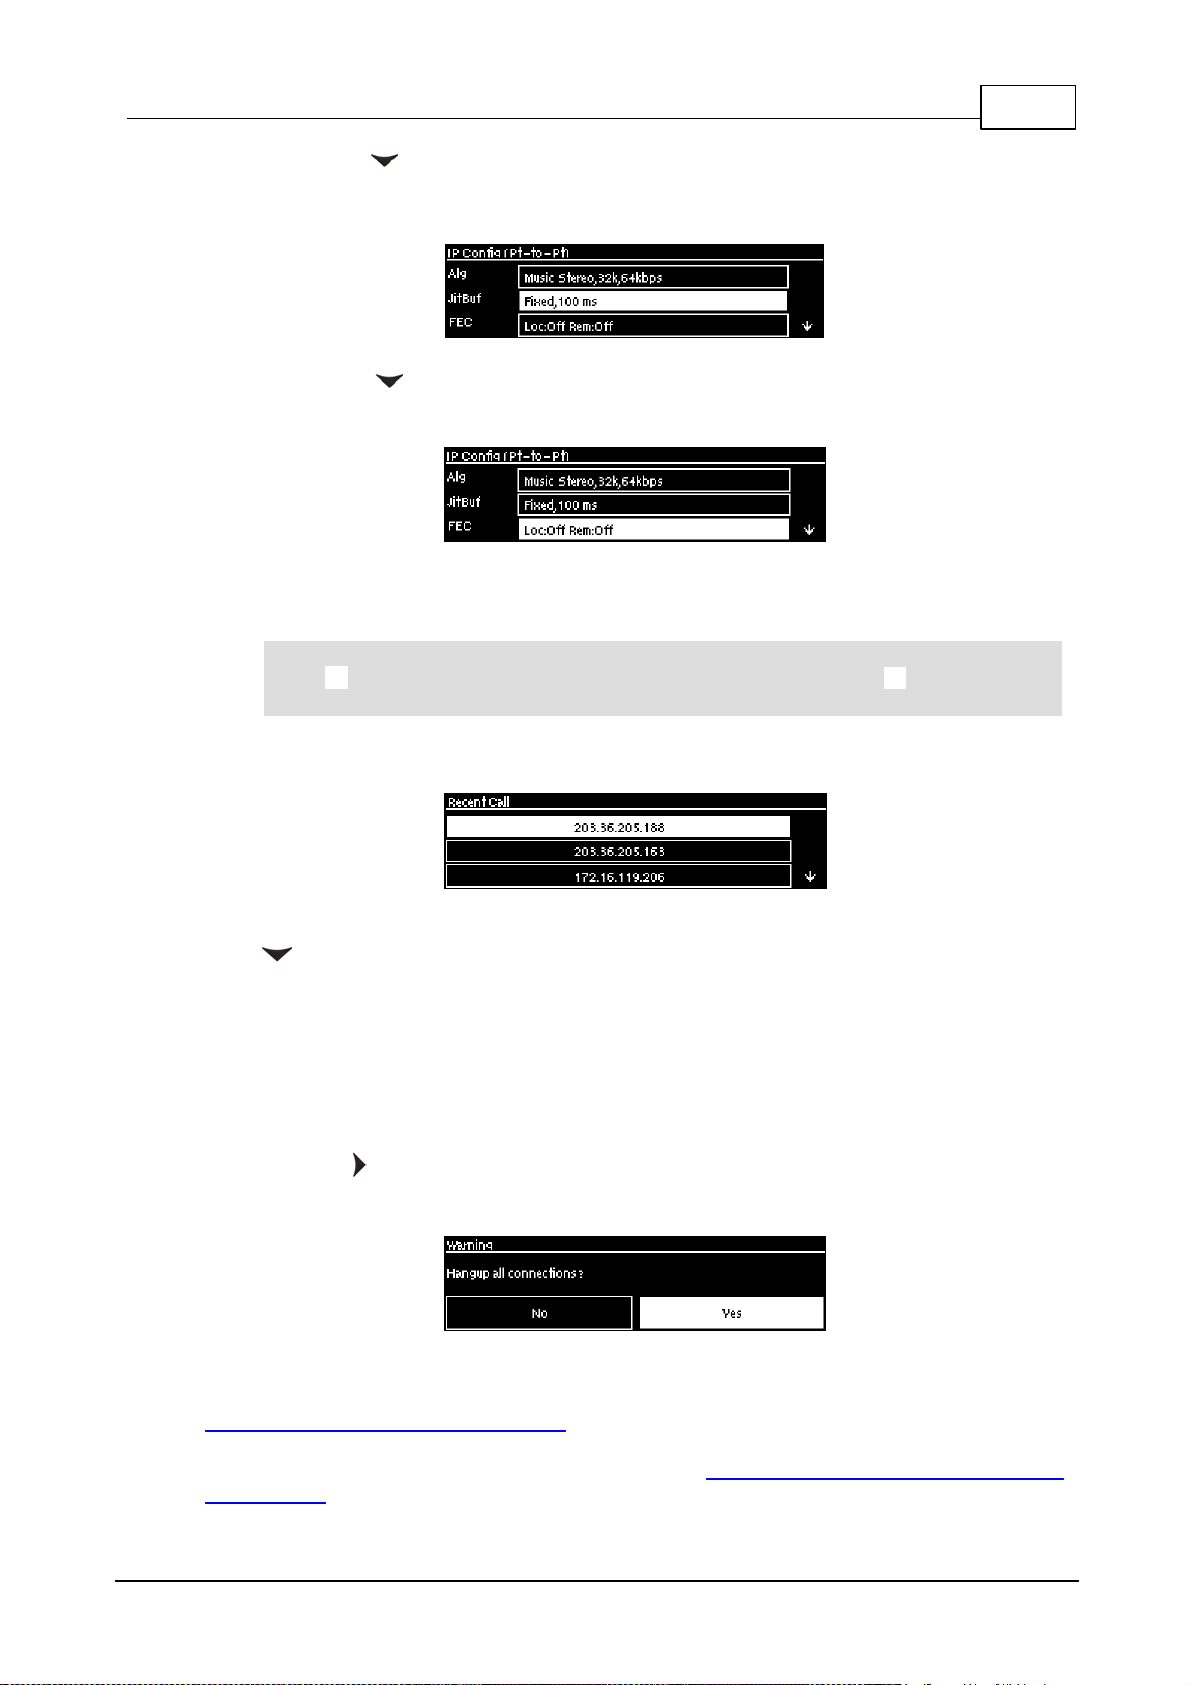
6. Press the down navigation button to select Jitt (jitter buffer delay) and press to select a
different automatic jitter buffer setting for your connection, or to enter a fixed buffer setting in
milliseconds (maximum 999 ms). The default Auto, Best Compromise setting is a good
starting point for most internet connections.
7. Press the down navigation button to select FEC (forward error correction) and press to
view selection options. Use the navigation buttons to choose the FEC percentage you want to
use and press .
8. When programming is complete press the RETURN button to navigate backwards to the
Connect IP screen that the IP address was entered into.
Important Note: At this point you can navigate to Save on the Connect IP screen and
press to use the numeric KEYPAD to name the program and press to save the
program.
9. Press the CONNECT button to make a connection. The Wait Connecting screen appears
during the connection process.
When connected, the green CONNECTED LED on the front of the unit will illuminate. Use the
down navigation button to select Cxns and view connection Status and press to view
connection statistics for IP packets being sent over the connection. To negotiate higher bit-rates
press then 3 on the numeric KEYPAD; for lower bit-rates press then 9.
Disconnecting
1. Press the red DISCONNECT button on the numeric KEYPAD at any time to hangup a
connection.
2. Use the right navigation button to select Yes and press the DISCONNECT button or
the button to confirm the disconnection.
User Manuals and Latest Firmware
To download the latest firmware for your codec and view software release notes visit
www.tieline.com/Support/Latest-Firmware
To download the latest user manual for your codec visit www.tieline.com/Support/Documentation/
User-Manuals
Other manuals for Genie STL
3
This manual suits for next models
1
Table of contents
Other Tieline Conference System manuals


