Tiiwee TWWS01 User manual

Copyright © 2019 Tiiwee. All rights reserved. This manual or any portion thereof may not be reproduced or used in any manner whatsoever.
1
ENGLISH
Tiiwee Door & Window Sensor (For indoor use only)
For Tiiwee Home Alarm System
Introduction
Congratulations with your Tiiwee Door & Window sensor. It is intended to be used in combination with
the components of the Tiiwee Home Alarm System and can be wirelessly connected to the Tiiwee A1
Alarm Unit or the Tiiwee A2 PIR Motion Sensor Alarm (available separately).
Box contents
1 x Door & Window sensor for Tiiwee Home Alarm System
1 x battery, 23A, 12V alkaline
2 x screws
1 x set of double sided mounting tape
1 x instructions for use
Product Overview and Operation
The Door & window sensor consists of a magnet and a sensor which contains a detector for changes in
magnetic fields (‘flux’). When the magnet is moved away from the sensor, the detector will detect that
motion and will send a wireless signal to the Tiiwee A1- or A2 Alarm unit. The Tiiwee Alarm unit will
now emit a strong alarm sound or a Chime depending on the settings of the Alarm unit.
Connecting the door & window sensor to an Alarm siren
This door & window sensor is compatible with the Tiiwee Home Alarm System. Connect it wirelessly
with the Tiiwee A1 Alarm Unit or the Tiiwee A2 PIR Sensor Alarm.
The instructions for pairing the Door & Window sensor with the Tiiwee Home Alarm System are
included with the Tiiwee A1 Alarm unit and the Tiiwee A2 PIR Alarm sensor or can be downloaded
on our website www.tiiwee.com .

Copyright © 2019 Tiiwee. All rights reserved. This manual or any portion thereof may not be reproduced or used in any manner whatsoever.
2
General installation guidelines
•Do not install the Door/Window sensors on breakable material, but choose instead the frame
of a window to attach your Door/window sensor.
•Do not install on instable parts.
•Do not install the sensor near magnetic parts - that might trigger the alarm by accident.
•Clean the surface before installation if the tape will be used for attachment.
•It is important that the sensor and the magnet are placed on the door and frame respectively
to allow an alarm to be triggered when sensor and magnet are separated.
Installation of the Door & Window sensor
IMPORTANT: Please note that the sensor and magnet are lined up correctly. At the right-hand side of
the sensor a mark in the shape of a triangle indicates the position to align the magnet to. The magnet
shows a similar triangle mark. Align both triangle marks for best performance.
It is not essential to install the sensor and magnet at the same levels. If the sensor and magnet move
past one another when the door or window is opened, they will work perfectly. Also, a distance of up
to 1.5 centimetres is acceptable when sensor and magnet are installed on parts that do NOT move past
one another when the door or window is opened as long as they are aligned at the triangle mark.
Installation examples
12 3
Situation 1. Door and doorpost are at the same vertical level. This is the ideal situation. Sensor and
magnet are aligned next to one another.

Copyright © 2019 Tiiwee. All rights reserved. This manual or any portion thereof may not be reproduced or used in any manner whatsoever.
3
Situation 2 & 3. The door or doorpost are at uneven levels. Sensor and magnet can be installed if the
distance between the two is not more than 1.5 centimetres or more if the sensor and magnet move
past another when the door or window is opened.
If the space between doorpost and door is more than 1.5 centimetre, the double-sided tape can be cut
and stacked to create a thicker spacer to overcome the distance.
Installation
Make sure that both the installation area is clean, and free from grease and dust.
Magnet:
-Installation with screws: Using a small screwdriver, remove the cover from the magnet by lifting
the cover at the top (short end) of the magnet. Then, position the magnet at the desired
position. Now, place the cover back on the magnet again.
-Installation with double sided tape: peel off the protective cover from one side and position
the tape at the door or doorpost. Then, peel off the other part of protective cover and position
the magnet onto it.
Sensor:
-Indicate the desired position next to the magnet in such a way that the triangle indicators are
aligned at the horizontal axis (they are at the same level).
-Use the double-sided tape to install the sensor. Peel off the protective cover from one side of
the tape and position the tape at the door or doorpost. Then, peel off the other part of
protective cover and position the sensor onto it.
Test
1. After the installation, open the window or door.
2. The red indicator light on the front of the sensor will flash once
3. The sensor is now properly setup.
Low battery indicator
Replace the battery when the LED is continuous ON.
Technical Specifications
Transmission Distance: 100m (Open Area)
Transmission Frequency: 433MHz
Operating Voltage: 12V
Size:76×37×17mm
Magnet Size:55×13×20mm

Copyright © 2019 Tiiwee. All rights reserved. This manual or any portion thereof may not be reproduced or used in any manner whatsoever.
4
DEUTSCH
Tiiwee Tür & Fenster Sensor (für den inneren Gebrauch)
Für Tiiwee Home Alarm System
Einführung
Wir beglückwünschen Sie zum Kauf des Tiiwee Tür & Fenster Sensors. Der Sensor ist ein Teil des Tiiwee
Home Alarm Systems und kompatibel mit dem Tiiwee Hausalarm Starter Set, der Tiiwee A1
Alarmeinheit und dem Tiiwee A2 PIR Bewegungsmelder Alarm.
Was wird geliefert?
1 x Tür & Fenster Sensor für das Tiiwee Home Alarm System
1 x Batterie, 23A, 12V, alkalisch
2 x Schrauben
1 x Klebepads für schraubenlose Montage
1 x Gebrauchsanleitung
Produktübersicht und Gebrauch
Der Tür & Fenster Sensor besteht aus dem Magneten und dem Sensor, welcher Änderungen in der
magnetischen Feldstärke misst. Wenn der Magnet und der Sensor voneinander getrennt werden, wird
dies durch den Sensor wahrgenommen und ein drahtloses Signal wird an die verbundene
Alarmeinheit gesendet (Tiiwee A1- bzw. A2 Alarmeinheit). Die Alarmeinheit wird dann entweder einen
lauten Alarm oder einen Benachrichtigungston abgeben - je nach den vorgenommenen Einstellungen.
Verbinden des Tür & Fenster Sensors mit einer Alarmeinheit
Der Tiiwee Tür & Fenster Sensor ist kompatibel mit dem Tiiwee Home Alarm System und verbindet sich
drahtlos mit der Tiiwee A1 Alarmeinheit oder dem Tiiwee A2 PIR Bewegungsmelder Alarm.
Die Anleitung zum Verbinden des Tür & Fenster Sensors mit dem Tiiwee Home Alarm System finden
Sie in den entsprechenden Anleitungen des Tiiwee Hausalarm Starter Sets, der Tiiwee A1
Alarmeinheit und des Tiiwee A2 PIR Bewegungsmelder Alarms. Alternativ können diese auch von

Copyright © 2019 Tiiwee. All rights reserved. This manual or any portion thereof may not be reproduced or used in any manner whatsoever.
5
unserer Webseite www.tiiwee.com heruntergeladen werden.
Installation des Tür & Fenster Sensors
ALLGEMEINE RICHTLINIEN:
•Installieren Sie den Tür & Fenster Sensor nicht auf leicht brechbarem Untergrund - ein solider
Untergrund wie beispielsweise ein Fenster- oder Türrahmen sind empfohlen.
•Installieren Sie den Tür & Fenster Sensor nicht auf instabilen Untergründen.
•Installieren Sie den Tür & Fenster Sensor nicht in der Nähe von magnetischen Teilen, da dies
zu einer Fehlauslösung führen könnte.
•Reinigen Sie die Installationsfläche bitte gründlich, wenn Sie das mitgelieferte Klebeband
verwenden möchten.
•Eine korrekte Installation des Sensors und des Magneten an der Tür und dem Türrahmen sind
von entscheidender Bedeutung für eine korrekte Funktion.
WICHTIG: Bitte beachten Sie, dass Sensor und Magnet korrekt positioniert werden, um die beste
Leistung zu erzielen. Sie finden entsprechende Positionierungshilfen (Dreiecke) sowohl auf der
rechten Seite des Sensors als auch auf der linken Seite des Magneten.
Der Sensor und der Magnet müssen nicht zwingenderweise auf demselben Niveau angebracht werden.
Solange der Sensor bzw. der Magnet aneinander vorbeigehen und sich dabei das Magnetfeld ändert, ist
eine korrekte Funktion gewährleistet. Aber auch ein maximaler Abstand von 0,8 cm ist möglich, im Fall
Magnet und Sensor gehen nicht aneinander vorbei. In diesem Fall sollte aber die korrekte Positionierung
(Dreiecke) gewährleistet sein. Bitte sehen Sie dazu auch die untere Abbildung.
Installationsbeispiele
Situation 1. Tür und Türrahmen bzw. Fenster und Fensterrahmen haben dasselbe Niveau. Dies ist die
1.5cmmax.
1.5cmmax.
1
2
3
8mm max.
8mm max.

Copyright © 2019 Tiiwee. All rights reserved. This manual or any portion thereof may not be reproduced or used in any manner whatsoever.
6
ideale Situation. Sensor und Magnet können mit Hilfe der Positionierungsmarken (Dreiecke) korrekt
positioniert werden.
Situation 2 & 3. Tür und Türrahmen bzw. Fenster und Fensterrahmen haben unterschiedliche Niveaus
(Tiefen). Sensor und Magnet können installiert werden, solange der Abstand zwischen beiden 0,8 cm
nicht überschreitet oder wenn Sensor und Magnet beim Öffnen der Tür bzw. des Fensters aneinander
vorbeigehen und sich dabei das Magnetfeld ändert.
Sollte der Niveau-Unterschied grösser als 0,8 cm sein, nutzen Sie bitte die mitgelieferten doppelseitigen
Klebepads, um den Niveau-Unterschied zu verkleinern. Hierbei können auch zwei Klebepads
aufeinander geklebt werden.
Installation
-Bitte reinigen Sie die entsprechenden Flächen vorher gründlich. Die Flächen sollten fett- und
staubfrei sein.
Magnet:
-Installation mit Schrauben: Entfernen Sie die Abdeckung des Magneten mittels eines kleinen
Schraubenziehers. Dies erfolgt durch leichtes Anheben der Abdeckung auf der oberen Seite.
Setzen Sie die Abdeckung nach der Installation mit den Schrauben wieder auf.
-Installation mittels Klebepads: Entfernen Sie eine Klebeabdeckung des doppelseitigen
Klebepads und kleben Sie es auf den Magneten. Entfernen Sie nun die andere Klebeabdeckung
und positionieren Sie den Magneten korrekt.
Sensor:
-Installation mit Schrauben: Entfernen Sie die Rückseite des Sensors. Setzen Sie die
Sensoreinheit nach der Installation mit den Schrauben wieder auf.
-Installation mittels Klebepads: Wählen Sie zunächst die korrekte Position für den Sensor. Bitte
beachten Sie dabei den Abstand und die Positionierungsmarken (Dreiecke). Sehen Sie dazu
auch die obige Abbildung. Gehen Sie dabei, wie oben für den Magneten beschrieben, vor.
Test
1. Öffnen Sie nun die Tür bzw. das Fenster.
2. Dabei muss das rote Kontrolllicht einmal aufleuchten.
3. Der Sensor ist nun korrekt installiert.
Batterie-Kontrollanzeige
Ersetzen Sie die Batterie, wenn die das rote Kontrolllicht dauerhaft leuchtet.
Technische Spezifikationen
Transmission Distanz: 100m (freies Feld)
Transmission Frequenz: 433MHz
Arbeitsspannung: 12V
Sensor Größe: 76×37×17mm
Magnet Größe: 55×13×20mm

Copyright © 2019 Tiiwee. All rights reserved. This manual or any portion thereof may not be reproduced or used in any manner whatsoever.
7
ITALIANO
Tiiwee Door & Window Sensor (Solo per uso interno)
Per Tiiwee Home Alarm System
Introduzione
Congratulazioni per il vostro Tiiwee Door & Window Sensor, sensore per porta e finestra. È destinato ad
essere utilizzato in combinazione con i componenti del Tiiwee Home Alarm System ossia del sistema di
allarme per casa della Tiiwee e può essere collegato in modalità wireless al Tiiwee A1 Alarm Unit (unità
di allarme A1 della Tiiwee) o al Tiiwee A2 PIR Motion Sensor Alarm (sensore di movimento PIR)
(disponibili separatamente).
Contenuto della confezione
1 Sensore Porta & Finestra per il Tiiwee Home Alarm System
1 batteria, 23A, 12 V alcalina
2 viti
1 set di nastro biadesivo per il montaggio
1 istruzioni per l’uso
Panoramica sul Prodotto e sul Funzionamento
Il sensore per porta & finestra è costituito da un magnete e da un sensore che contiene un rilevatore
per i cambiamenti nei campi magnetici ('flusso'). Quando il magnete viene allontanato dal sensore, il
sensore rileverà il movimento e invierà un segnale wireless all'unità di Allarme Tiiwee A1 o A2. L'unità
di Allarme Tiiwee ora emetterà un suono di allarme forte o una suoneria a seconda delle impostazioni
dell’unità di Allarme.
Collegamento del sensore per porta & finestra a una sirena d'Allarme
Questo sensore per porta & finestra è compatibile con il Tiiwee Home Alarm System. Collegare in
modalità wireless con il Tiiwee A1 Alarm Unit o il Tiiwee A2 PIR Sensor Alarm.
Le istruzioni per abbinare il Tiiwee Door & Window Sensor con il Tiiwee Home Alarm System sono
incluse con il Tiiwee A1 Alarm unit e il Tiiwee A2 PIR Alarm sensor o possono essere scaricate sul

Copyright © 2019 Tiiwee. All rights reserved. This manual or any portion thereof may not be reproduced or used in any manner whatsoever.
8
nostro sito web www.tiiwee.com .
Norme generali di installazione
LINEE GUIDA GENERALI:
•Non installare i sensori di Porta/Finestra su materiali fragili, piuttosto scegliere il telaio di una
finestra per collegare il sensore Porta/Finestra.
•Non installare su parti instabili.
•Non installare il sensore vicino a parti magnetiche - il che potrebbe far scattare l'allarme in
maniera accidentale.
•Pulire la superficie prima dell'installazione, nel caso il nastro verrà utilizzato per il fissaggio.
•È importante che il sensore e il magnete siano collocati rispettivamente sulla porta e sul
telaio per consentire che un allarme possa essere attivato quando sensore e magnete
vengono separati.
Installazione del Door & Window Sensor
IMPORTANTE: Si prega di notare se il sensore e il magnete siano allineati correttamente. Sul lato
destro del sensore un segno a forma di un triangolo indica la posizione per allineare il magnete. Il
magnete mostra un segno simile ad un triangolo. Allineare entrambi i contrassegni a triangolo per
ottenere delle prestazioni ottimali.
Non è indispensabile installare il sensore e il magnete siano allo stesso livello. Fino a quando il sensore
e il magnete si spostano l’uno dall’altro quando la porta o la finestra viene aperta, funzionano
perfettamente. Inoltre, una distanza fino a 0,8 centimetri è accettabile quando il sensore e il magnete
sono installati sulle parti che NON si spostano l’uno dall’altro, quando la porta o la finestra viene aperta,
purché siano allineati al segno a triangolo.
Esempi di installazione
1
2
3

Copyright © 2019 Tiiwee. All rights reserved. This manual or any portion thereof may not be reproduced or used in any manner whatsoever.
9
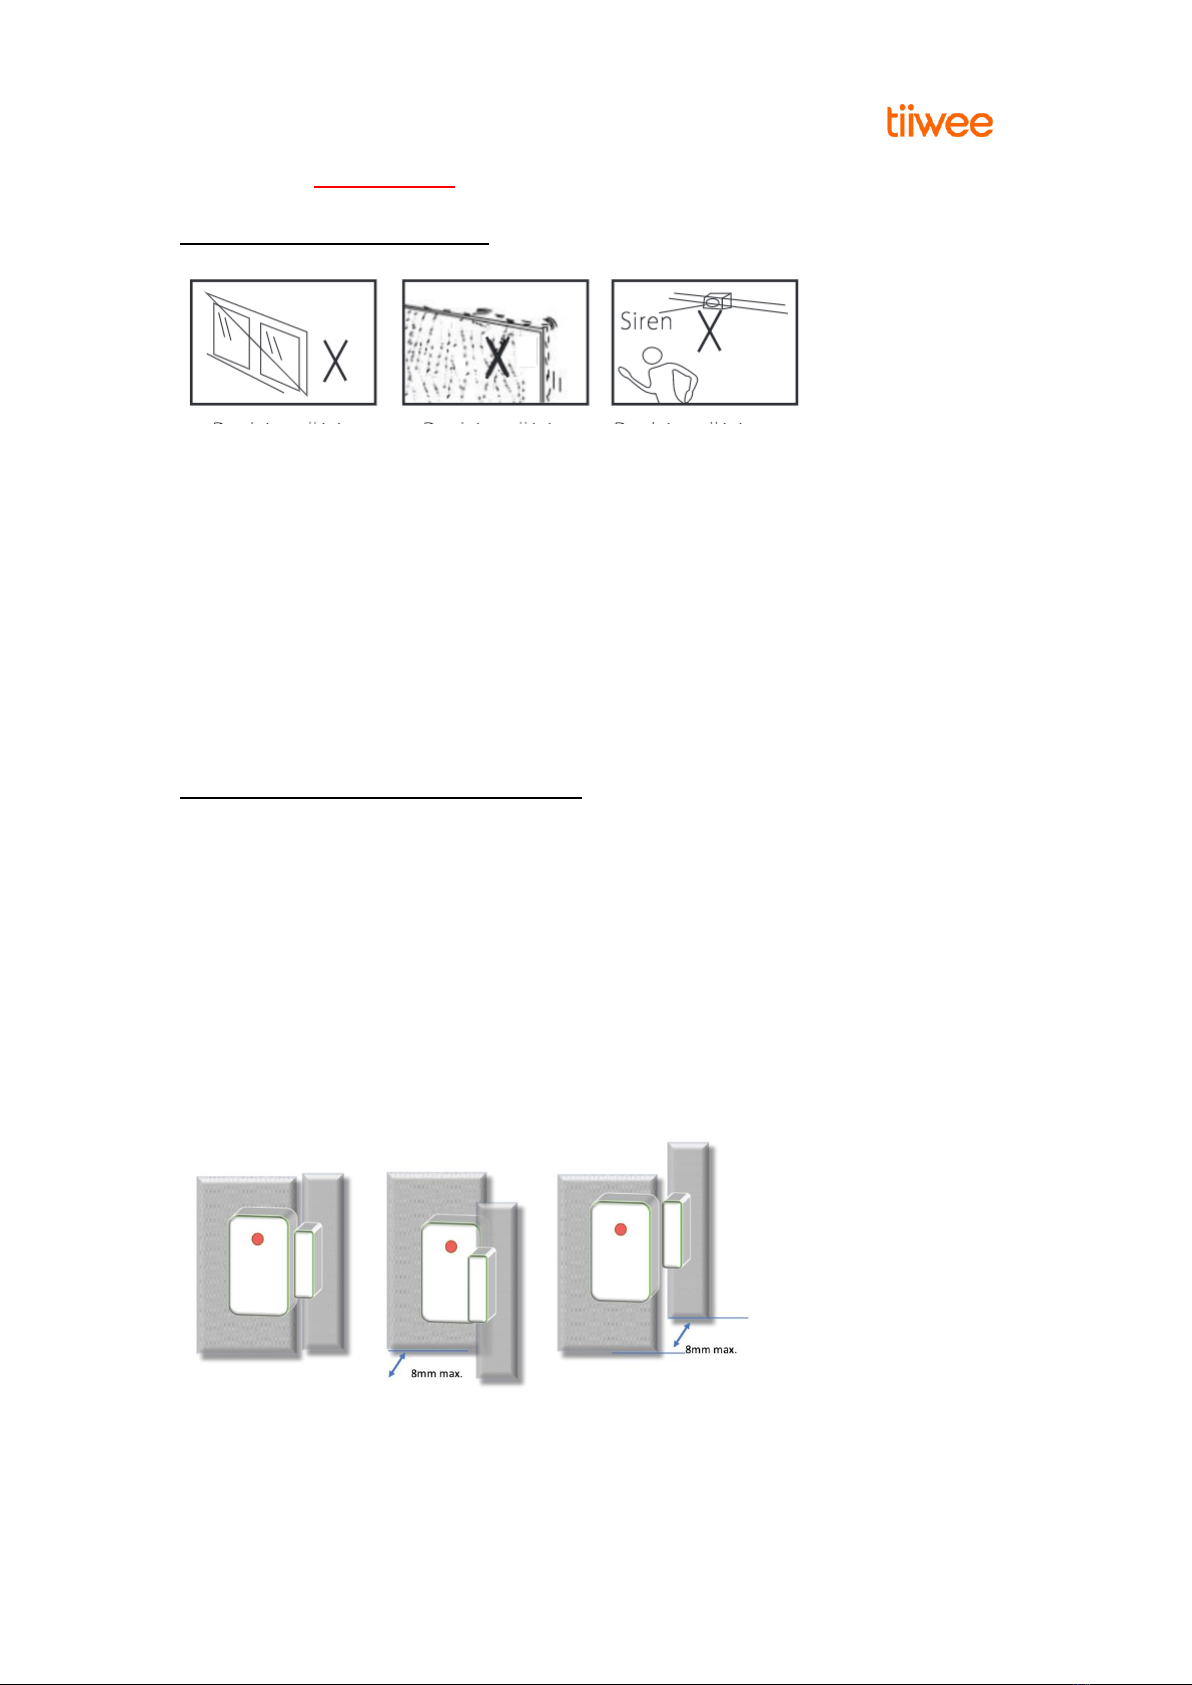
Situazione 1. Porte e stipiti sono allo stesso livello verticale. Questa è la situazione ideale. Sensore e
magnete sono allineati uno accanto a altro.
Situazione 2 & 3. Situazione 2 & 3. La porta o lo stipite sono a livelli irregolari. Il sensore e il magnete
possono essere installati fino a quando la distanza tra i due non è superiore ai 0,8 centimetri o più se
il sensore e il magnete si spostano l’un dall’altro quando la porta o la finestra viene aperta.
Se lo spazio tra stipite e porta è superiore ai 0,8 centimetri, il nastro biadesivo può essere tagliato e
sovrapposto per creare un maggior spessore per eliminare la distanza.
Installazione
-Assicurarsi che sia la zona di installazione sia pulita e libera da polvere e unto.
Magnete:
-Installazione con viti: con un piccolo cacciavite, rimuovere il coperchio dal magnete sollevando
del coperchio nella parte superiore (lato corto) del magnete. Quindi, posizionare il magnete
nella posizione desiderata. Ora, posizionare nuovamente il coperchio sul magnete.
-Installazione con nastro biadesivo: staccare la pellicola di protezione da un lato e posizionare il
nastro alla porta o allo stipite. Togliere la pellicola l'altra parte dello strato di protezione, quindi
posizionarci su il magnete.
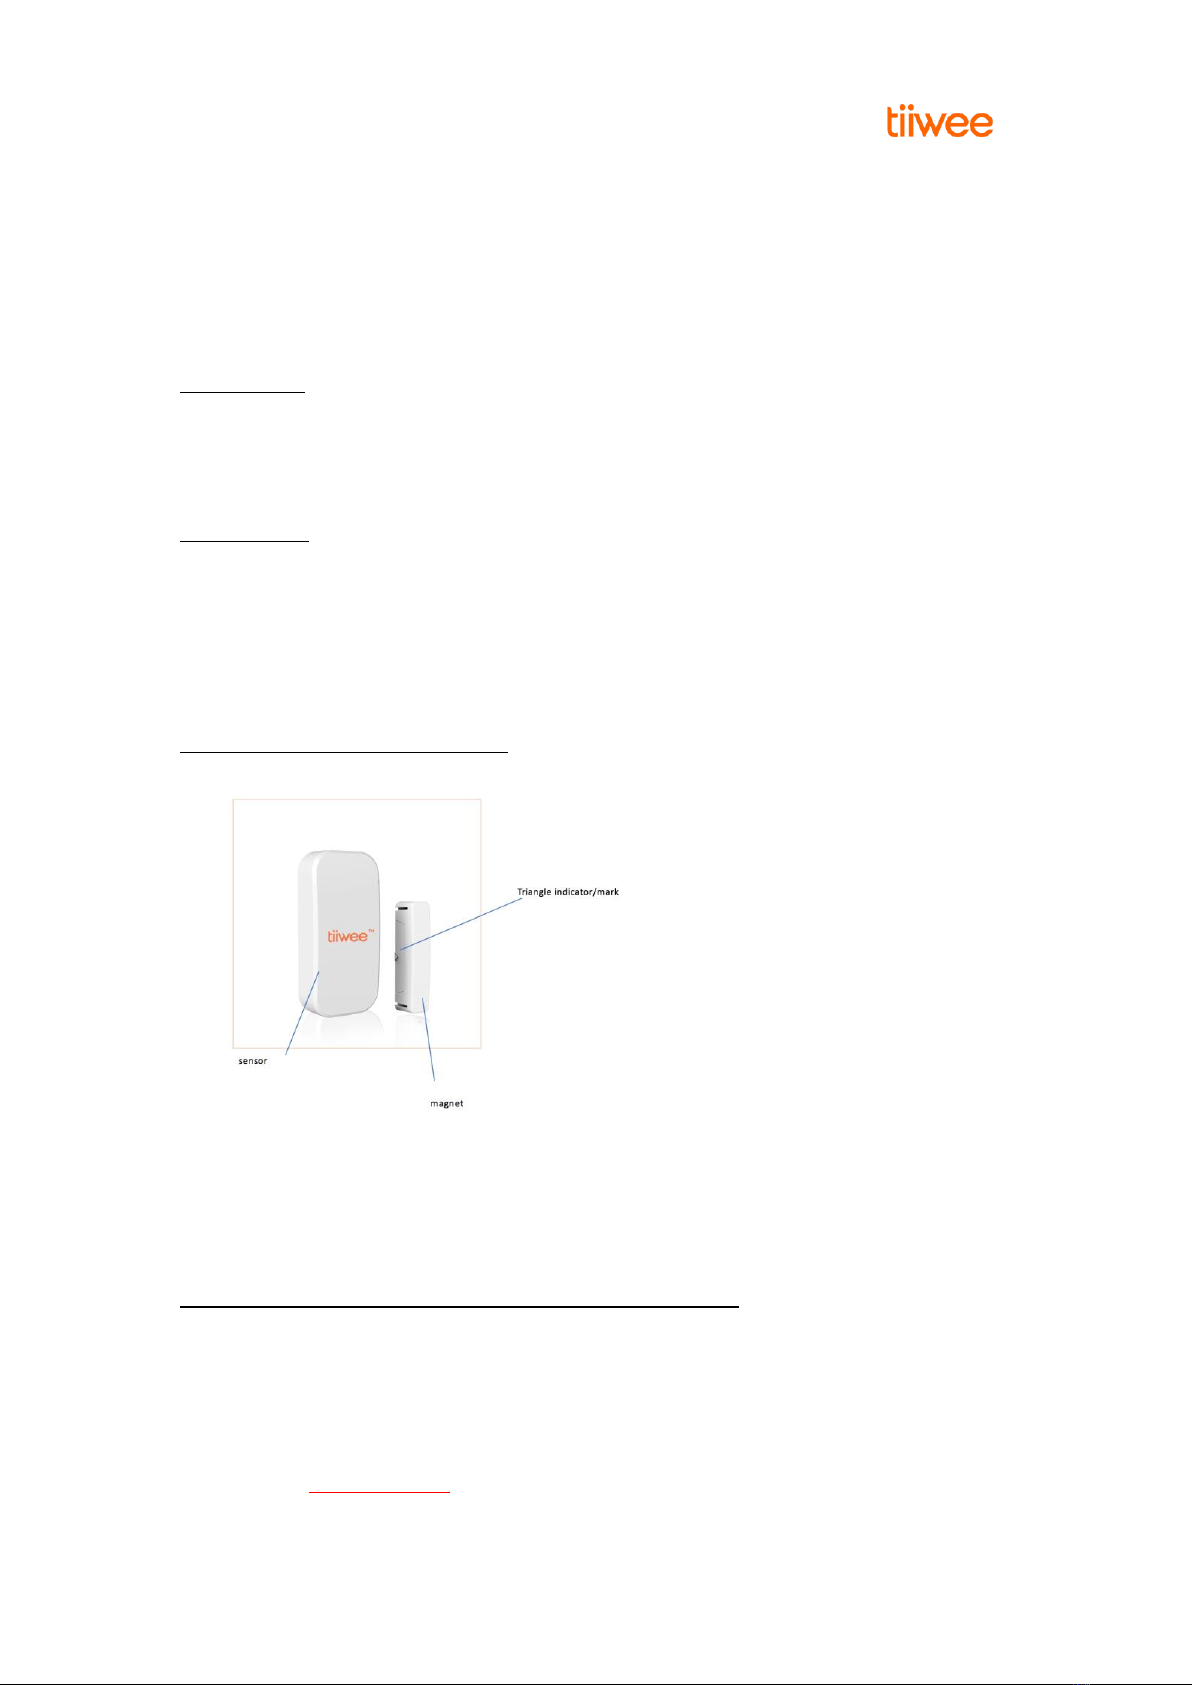
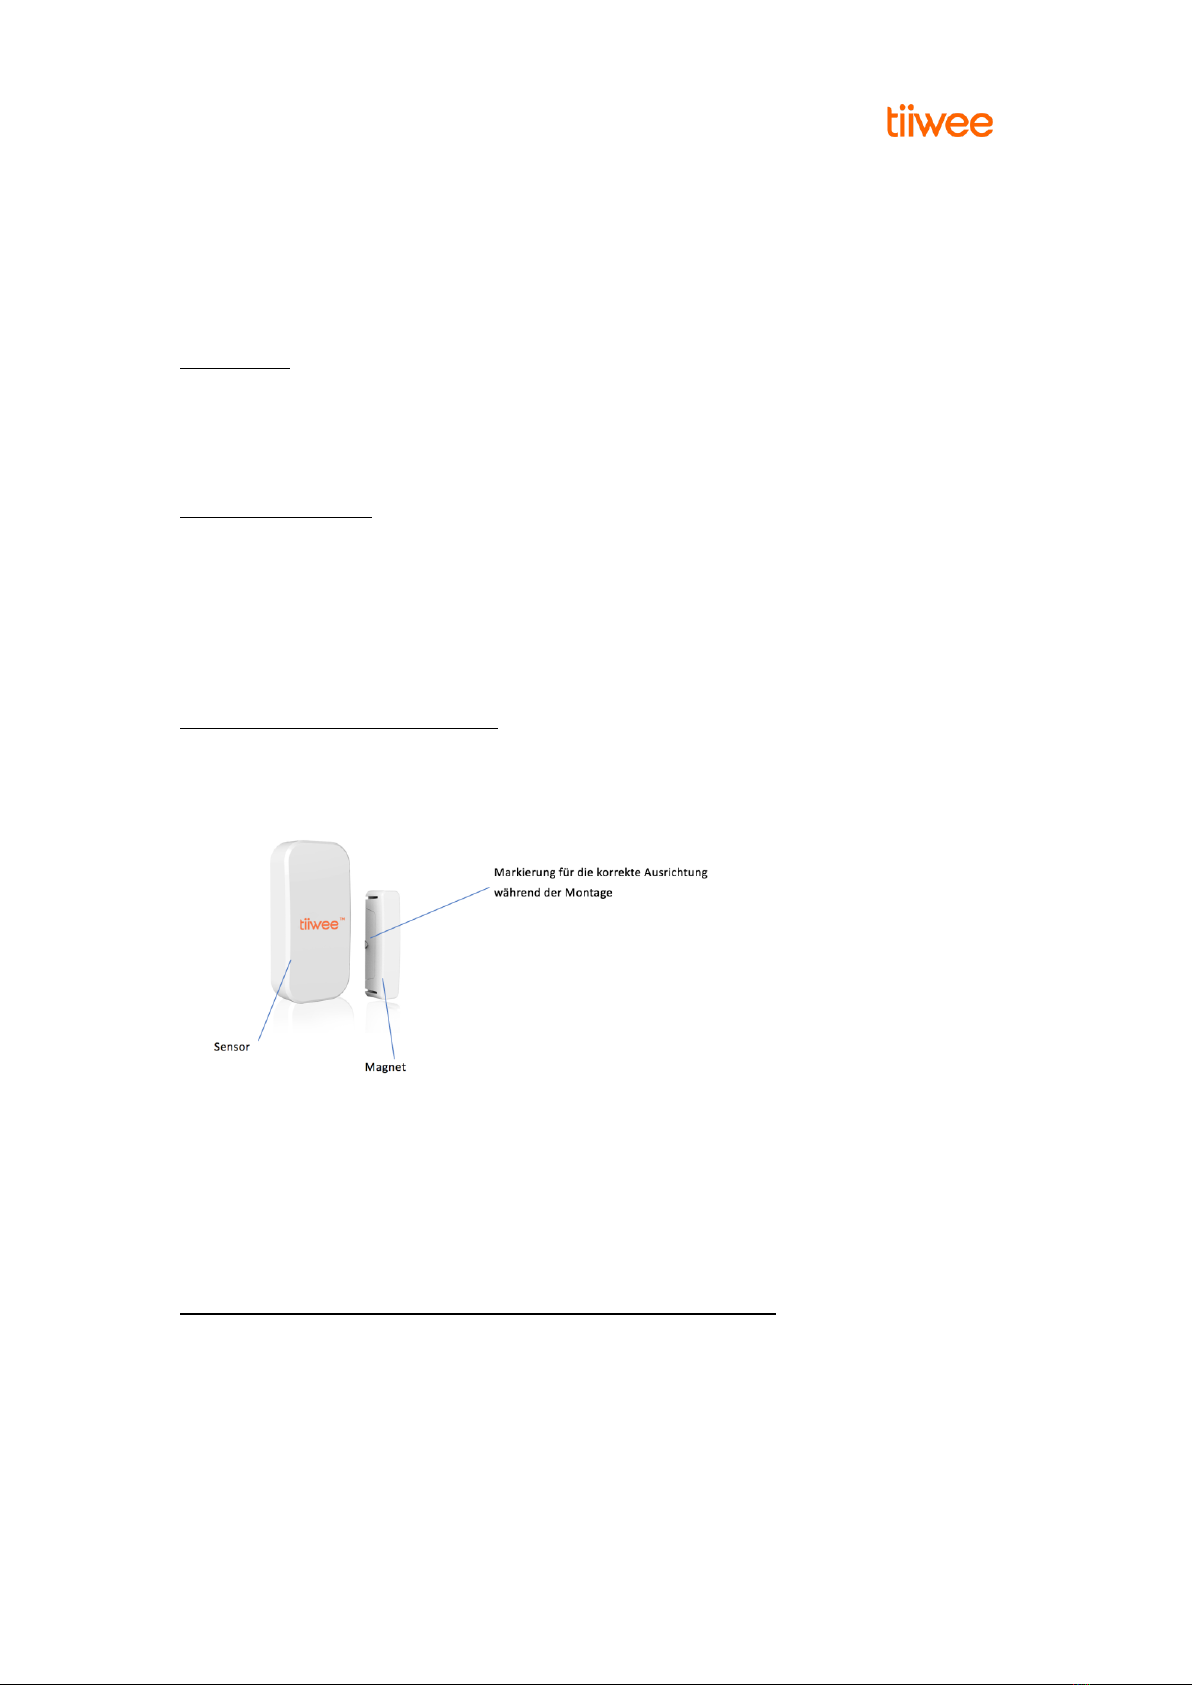
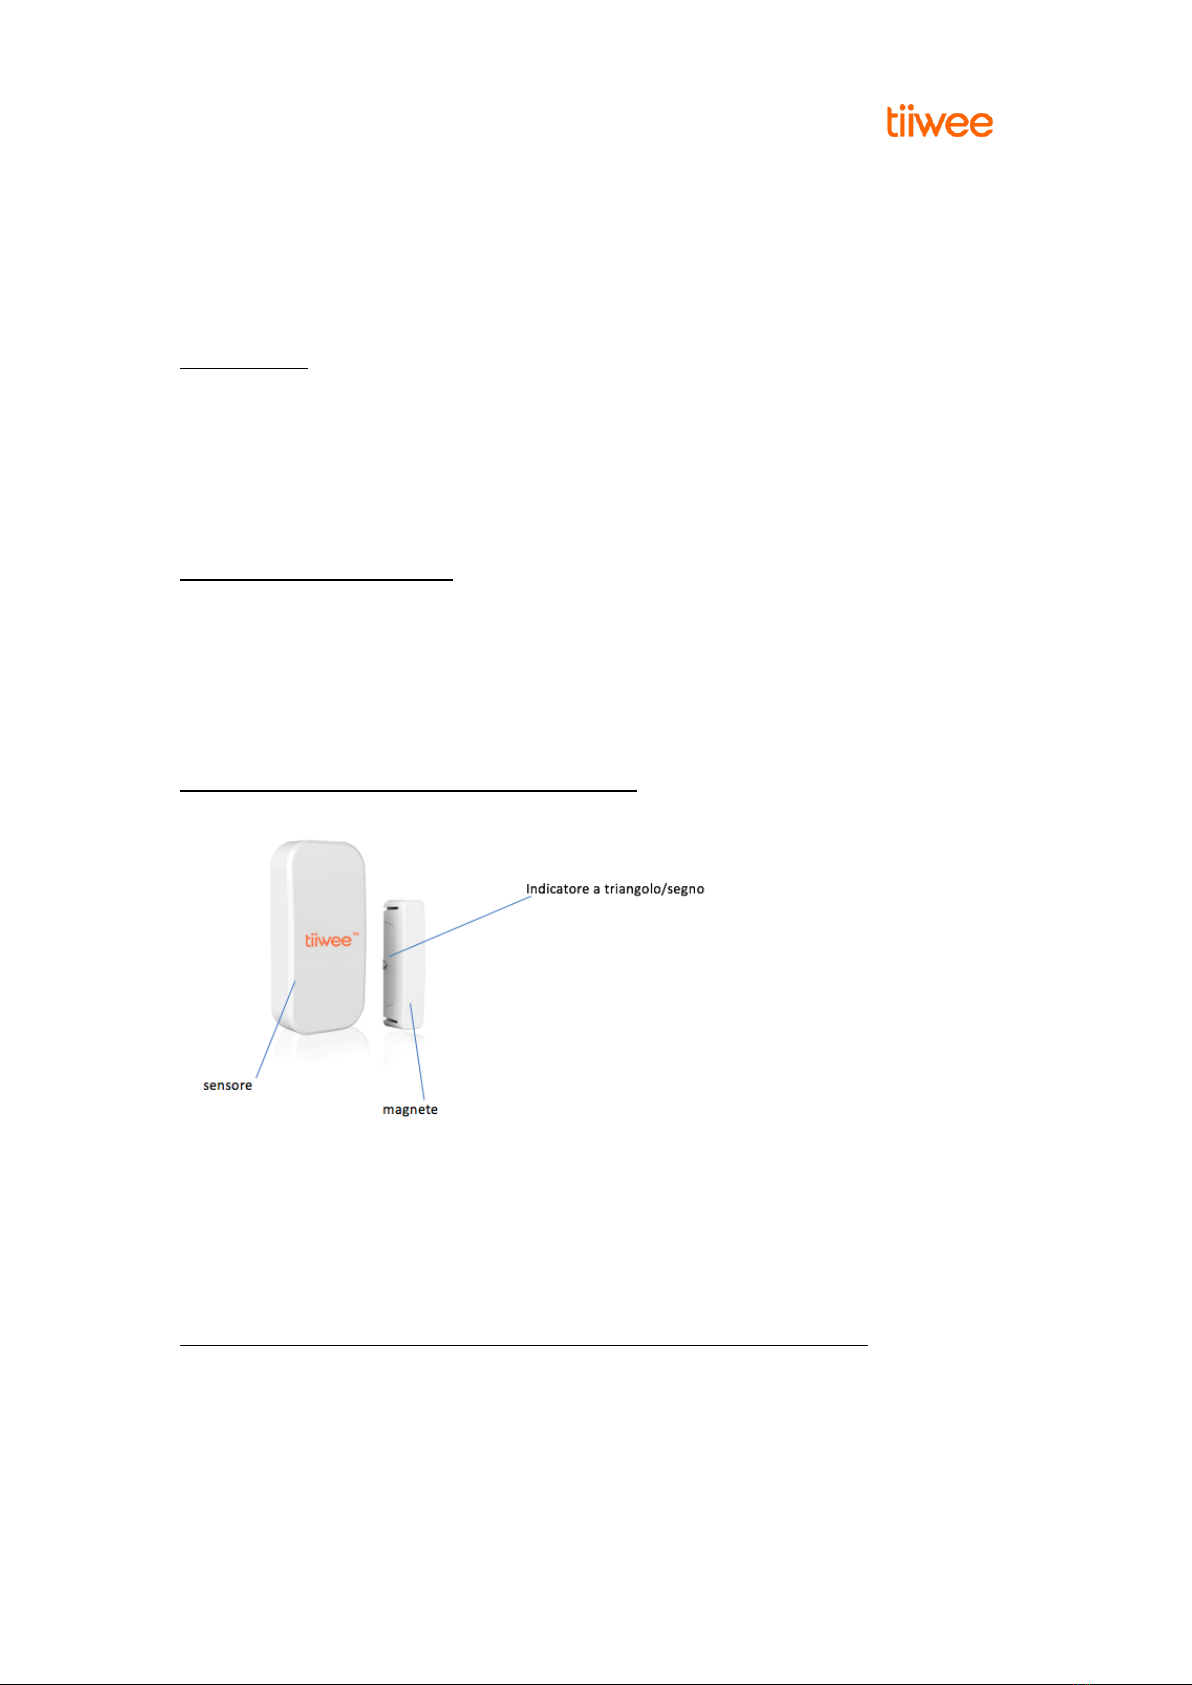
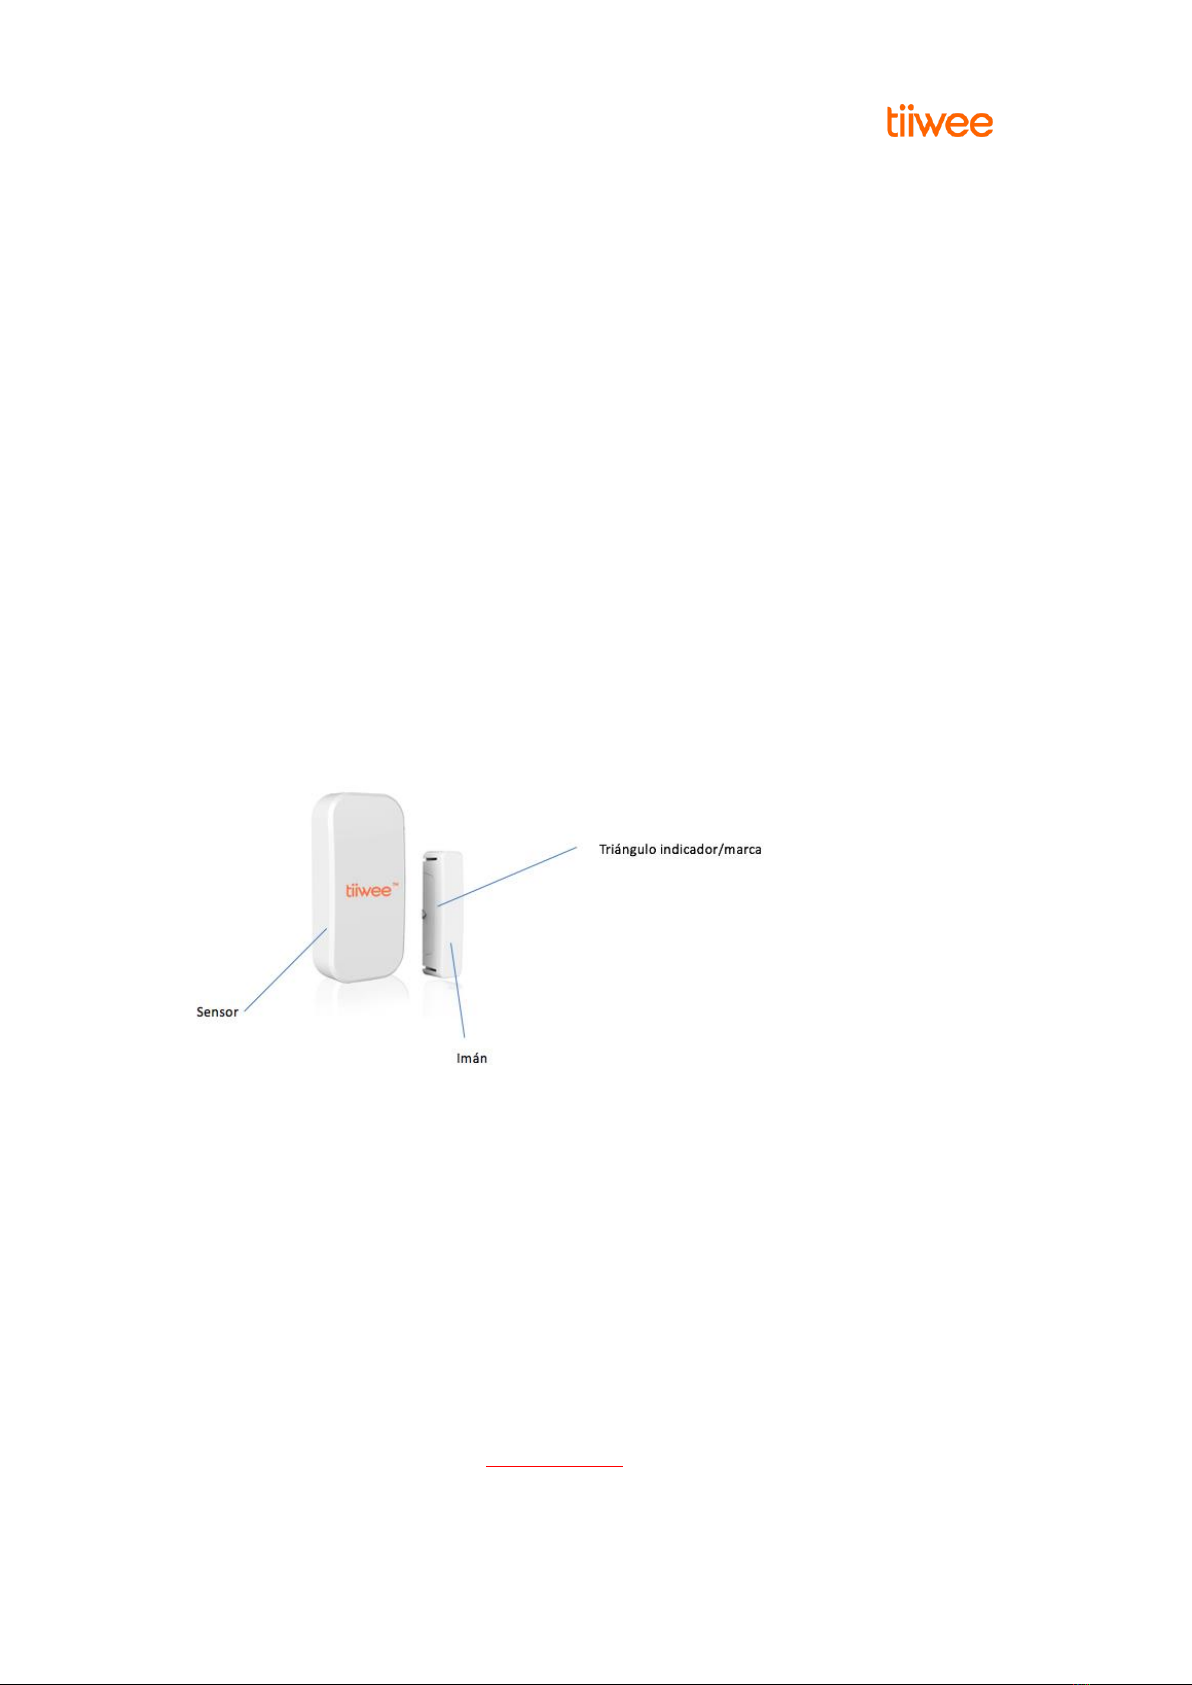
Sensore:
-Indicare la posizione desiderata accanto al magnete in modo che gli indicatori del triangolo
siano allineati sull'asse orizzontale (sono allo stesso livello).
-Utilizzare il nastro biadesivo per installare il sensore. Staccare lo strato di protezione da un lato
del nastro e posizionare il nastro alla porta o allo stipite. Togliere la pellicola l'altra parte dello
strato di protezione, quindi posizionarci su il sensore.
Test
- Dopo l'installazione, aprire la finestra o la porta.
- La spia rossa sulla parte anteriore del sensore lampeggia una volta
- Il sensore è ora correttamente configurato.
Indicatore di batteria scarica
Sostituire la batteria quando il LED rimane acceso.
Specifiche Tecniche
Distanza di Trasmissione: 100 metri (spazio aperto)
Frequenza di Trasmissione: 433MHz
Voltaggio: 12V
Dimensioni: 76×37×17mm
Dimensione Magnete: 55×13×20mm

Copyright © 2019 Tiiwee. All rights reserved. This manual or any portion thereof may not be reproduced or used in any manner whatsoever.
10
ESPANOL
Sensor de Puertas y Ventanas Tiiwee (Sólo para uso en interiores)
Para el Sistema de Alarma Hogareño de Tiiwee
Introducción
Felicitaciones por su sensor de puerta y ventana Tiiwee. Está diseñado para ser utilizado en combinación
con los componentes del Sistema de Alarma Hogareño de Tiiwee y puede conectarse de forma
inalámbrica al kit de inicio de la unidad de alarma Tiiwee Hogar A1 o a la alarma PIR del sensor de
movimiento Tiiwee A2 (disponible por separado).
Contenido de la caja
1 x sensor de puerta y ventana para el Sistema de Alarma Hogareño Tiiwee
1 x batería, 23A, 12V alcalina
2 x tornillos
1 x juego de cinta de montaje doble faz
1 x instrucciones de uso
Descripción general del producto y funcionamiento
El sensor de Puerta y Ventana consiste en un imán y un sensor que contiene un detector para cambios
en campos magnéticos ('flujo'). Cuando el imán se aleja del sensor, el detector detectará ese
movimiento y enviará una señal inalámbrica a la unidad de alarma Tiiwee A1 o A2. La unidad de alarma
de Tiiwee emitirá entonces un sonido de alarma fuerte o un timbre más calmo, dependiendo de los
ajustes de la unidad de alarma.
Conexión del Sensor de Puerta y Ventana a una Sirena de Alarma
Este sensor de puerta y ventana es compatible con el Sistema de Alarma Hogareño Tiiwee. Conéctelo
de forma inalámbrica con la unidad de alarma Tiiwee A1 o con la alarma de sensores PIR de Tiiwee A2.
Las instrucciones para sincronizar el sensor de la puerta y ventana con el sistema de alarma Tiiwee
vienen incluías con la unidad de alarma Tiiwee A1 y el sensor de alarma Tiiwee A2 PIR o se pueden
descargar desde nuestra página web www.tiiwee.com .

Copyright © 2019 Tiiwee. All rights reserved. This manual or any portion thereof may not be reproduced or used in any manner whatsoever.
11
Instrucciones generales de instalación
REGLAS GENERALES:
•No instale el sensor de puerta / ventana en material rompible, por el contrario, elija el marco
de una ventana para conectar el sensor de puerta / ventana.
•No lo instale en piezas inestables.
•No instale el sensor cerca de partes magnéticas. Eso podría disparar la alarma por accidente.
•Limpie la superficie antes de la instalación si utilizará cinta para su fijación.
•Es importante que el sensor y el imán estén colocados en la puerta y el marco
respectivamente para permitir que se active una alarma cuando el sensor y el imán sean
separados.
Instalación del sensor de puerta y ventana
IMPORTANTE: Asegúrese de que el sensor y el imán están alineados correctamente. En el lado
derecho del sensor una marca en forma de un triángulo indica la posición para alinear el imán al
sensor. El imán muestra una marca de triángulo similar. Alinee ambas marcas de triángulo para
obtener el mejor rendimiento.
No es esencial instalar el sensor y el imán en los mismos niveles. Mientras el sensor y el imán se muevan
uno al otro cuando la puerta o ventana se abre, funcionarán perfectamente. También es aceptable una
distancia de hasta 0,8 centímetros cuando el sensor y el imán están instalados en partes que NO se
mueven una tras otra cuando se abre la puerta o la ventana siempre que estén alineadas en la marca
del triángulo.
Ejemplos de Instalación
1
2
3

Copyright © 2019 Tiiwee. All rights reserved. This manual or any portion thereof may not be reproduced or used in any manner whatsoever.
12
Situación 1. La puerta y el poste de la puerta están en el mismo nivel vertical. Esta es la situación ideal.
El sensor y el imán están alineados uno junto al otro.
Situación 2 y 3. La puerta o el poste de la puerta están en niveles desiguales. El sensor y el imán pueden
instalarse siempre y cuando la distancia entre los dos no sea superior a 0,8 centímetros o más si el
sensor y el imán pasan al otro cuando se abre la puerta o la ventana.
Si el espacio entre la puerta y la puerta es de más de 0,8 centímetros, la cinta de doble cara se puede
cortar y apilar para superar la distancia.
Instalación
Asegúrese de que el área de instalación esté limpia y libre de grasa y polvo.
Imán:
•Instalación con tornillos: con un destornillador pequeño, retire la cubierta del imán
levantando la tapa en la parte superior (extremo corto) del imán. A continuación, coloque el
imán en la posición deseada. Ahora, vuelva a colocar la cubierta en el imán.
•Instalación con cinta de doble faz: quite la cubierta protectora de un lado y coloque la cinta
en la puerta o en el poste de la puerta. Luego, despegue la otra parte de la cubierta
protectora y coloque el imán sobre ella.
Sensor:
•Indique la posición deseada junto al imán de tal manera que los indicadores triangulares
estén alineados en el eje horizontal (están al mismo nivel).
•Utilice la cinta de doble faz para instalar el sensor. Retire la cubierta protectora de un lado de
la cinta y coloque la cinta en la puerta o en el poste de la puerta. A continuación, despegue la
otra parte de la cubierta protectora y coloque el sensor sobre ella.
Prueba
-Después de la instalación, abra la ventana o la puerta.
-La luz indicadora roja en la parte delantera del sensor parpadeará una vez
-El sensor ya está correctamente configurado.
Indicador de batería baja
Reemplace la batería cuando la LED está encendido.
Especificaciones técnicas
Distancia de transmisión: 100m (Área abierta)
Frecuencia de transmisión: 433MHz
Voltaje de funcionamiento: 12V
Tamaño: 76 × 37 × 17mm
Tamaño del imán: 55 × 13 × 20 mm

Copyright © 2019 Tiiwee. All rights reserved. This manual or any portion thereof may not be reproduced or used in any manner whatsoever.
13
FRANCAIS
Capteur de fenêtre et porte Tiiwee (Pour une utilisation intérieure seulement)
Pour le système d’alarme à domicile Tiiwee
Introduction
Félicitations avec votre capteur de porte et de fenêtre Tiiwee. Il est destiné à être
utilisé en combinaison avec les composants du système d'alarme à domicile Tiiwee et
peut être connecté sans fil à l'unité d'alarme Tiiwee A1 ou à l'alarme de détecteur de
mouvement PIR T2 Tiiwee (disponible séparément).
Contenu de la boîte
1 x Capteur de porte et fenêtre pour le système d’alarme à domicile Tiiwee
1 x pile, 23A, 12V alcaline
2 x vis
1 x Ensemble de bande de montage double face
1 x instructions pour utilisation
Aperçu du produit et utilisation
Le capteur de porte et de fenêtre se compose d'un aimant et d'un capteur qui contient un détecteur
pour les changements de champs magnétiques ('flux'). Lorsque l'aimant est éloigné du capteur, le
détecteur détectera ce mouvement et enverra un signal sans fil à l'unité d'alarme Tiiwee A1- ou A2.
L'unité d'alarme Tiiwee émet alors un son d'alarme fort ou un carillon en fonction des réglages de
l'unité d'alarme.
Connexion du capteur de porte et fenêtre à une sirène d’alarme
Ce capteur de porte et de fenêtre est compatible avec le système d'alarme à domicile Tiiwee.
Connectez-le sans fil avec l'unité d'alarme Tiiwee A1 ou l'alarme capteur Tiiwee A2 PIR.
Les instructions d'association du capteur de porte et de fenêtre avec le système d'alarme maison
Tiiwee sont fournies avec l'unité d'alarme Tiiwee A1 et le capteur d'alarme PIR T2 Tiiwee ou
peuvent être téléchargées sur notre site www.tiiwee.com .

Copyright © 2019 Tiiwee. All rights reserved. This manual or any portion thereof may not be reproduced or used in any manner whatsoever.
14
Directives générales d'installation
DIRECTRIVES GENERALES :
•N'installez pas les capteurs de porte : fenêtre sur un matériau cassable, mais choisissez plutôt
le cadre d'une fenêtre pour fixer votre capteur de porte/fenêtre.
•Ne pas installer sur des pièces instables.
•N'installez pas le capteur près de pièces magnétiques, ce qui pourrait déclencher l'alarme par
accident.
•Nettoyez la surface avant l'installation si la bande doit être utilisée pour la fixation.
•Il est important que le capteur et l'aimant soient placés respectivement sur la porte et sur le
cadre pour permettre l'activation d'une alarme lorsque le capteur et l'aimant sont séparés.
Installation du capteur de fenêtre et porte
IMPORTANT : Veuillez noter que le capteur et l'aimant sont alignés correctement. Sur le côté droit du
capteur, un repère en forme de triangle indique la position à laquelle l'aimant doit être aligné.
L'aimant montre une marque de triangle similaire. Alignez les deux triangles pour une meilleure
performance.
Il n'est pas indispensable d'installer le capteur et l'aimant aux mêmes niveaux. Tant que le capteur et
l'aimant se déplacent l'un de l'autre lorsque la porte ou la fenêtre est ouverte, ils fonctionneront
parfaitement. En outre, une distance de 0,8 centimètre est acceptable lorsque le capteur et l'aimant
sont installés sur des pièces qui ne passent PAS l'une devant l'autre lorsque la porte ou la fenêtre est
ouverte tant qu'ils sont alignés sur la marque triangulaire.
Exemples d’installation
1
2
3

Copyright © 2019 Tiiwee. All rights reserved. This manual or any portion thereof may not be reproduced or used in any manner whatsoever.
15
Situation 1. La porte et le montant de la porte sont au même niveau vertical. C'est la situation idéale.
Le capteur et l'aimant sont alignés l'un à côté de l'autre.
Situation 2 & 3. La porte ou le montant de la porte sont à des niveaux irréguliers. Le capteur et l'aimant
peuvent être installés tant que la distance entre les deux n'est pas supérieure à 0,8 centimètres ou
plus si le capteur et l'aimant passent d'un autre lorsque la porte ou la fenêtre est ouverte.
Si l'espace entre la porte et la porte est plus de 0,8 centimètre, le ruban double face peut être coupé
et empilé pour créer une entretoise plus épaisse pour surmonter la distance.
Installation
-Assurez-vous que la zone d'installation soit propre et exempte de graisse et de poussière.
Aimant :
-Installation avec des vis : avec un petit tournevis, retirez le couvercle de l'aimant en soulevant
le couvercle en haut (extrémité courte) de l'aimant. Ensuite, placez l'aimant à la position
désirée. Maintenant, placez le couvercle sur l'aimant.
-Installation avec du ruban adhésif double face : décoller le couvercle de protection d'un côté
et positionner le ruban adhésif à la porte ou au montant de la porte. Ensuite, décollez l'autre
partie de la housse de protection et positionnez l'aimant dessus.
Capteur :
-Indiquez la position souhaitée à côté de l'aimant de telle sorte que les indicateurs triangulaires
soient alignés sur l'axe horizontal (ils sont au même niveau).
-Utilisez le ruban adhésif double face pour installer le capteur. Retirez le couvercle de protection
d'un côté de la bande et positionnez le ruban à la porte ou au montant de la porte. Ensuite,
décollez l'autre partie du capot de protection et positionner le capteur sur celui-ci.
Test
1. Après l'installation, ouvrez la fenêtre ou la porte.
2. Le voyant rouge situé à l'avant du capteur clignote une fois
3. Le capteur est maintenant correctement configuré.
Indicateur de batterie faible
Remplacez la batterie quand la DEL est continuellement sur ON.
Spécifications techniques
Distance de transmission : 100m (Zone ouverte)
Fréquence de la transmission : 433MHz
Tension de fonctionnement : 12V
Taille : 76×37×17mm
Taille de l’aimant :55×13×20mm

Copyright © 2019 Tiiwee. All rights reserved. This manual or any portion thereof may not be reproduced or used in any manner whatsoever.
16
NEDERLANDS
Tiiwee Deur & Raam Sensor (voor gebruik binnenshuis)
Voor gebruik met het Tiiwee Home Alarm System
Inleiding
Gefeliciteerd met uw Tiiwee Deur en Raam sensor. Gebruik deze sensor in combinatie met andere
onderdelen van het Tiiwee Home Alarm System. Deze sensor kan draadloos verbonden worden met de
Tiiwee A1 Alarm Unit of de Tiiwee A2 PIR-bewegingsmelder (apart verkrijgbaar).
Inhoud van de doos
1 x Deur en raam sensor voor het Tiiwee Home Alarm System
1 x batterij, 23A, 12V alkaline
2 x schroeven
1 x set dubbelzijdig tape
1 x gebruiksinstructies
Product overzicht en ingebruikname
De deur en raam sensor bestaat uit een magneet en een sensor. De sensor bevat een detector voor
veranderingen in het magnetisch veld. Wanneer de magneet van de sensor verwijderd wordt zal de
sensor dat detecteren en een draadloos signaal naar de Tiiwee A1- of A2 alarm Unit zenden. Op haar
beurt zendt de Alarm Unit dan een hoorbare sirene of belgeluid uit afhankelijk van de instellingen van
de Alarm Unit.
De deur en raam sensor met de Alarm Unit verbinden
Deze deur en raam sensor kan uitsluitend gebruikt worden met het Tiiwee Home Alarm System en kan
draadloos verbonden worden met de Tiiwee A1- of A2 Alarm of PIR Units.
De instructies voor het verbinden van de deur en raam sensoren met de Tiiwee A1 of A2 Alarm
Units zijn gevoegd bij de betreffende producten. Ook kunnen ze gedownload worden op onze

Copyright © 2019 Tiiwee. All rights reserved. This manual or any portion thereof may not be reproduced or used in any manner whatsoever.
17
website www.tiiwee.com .
Installatie van de deur sensor
Algemene richtlijnen:
-Installeer de deur sensor niet op breekbare onderdelen.
-Installeer de deur sensor niet op instabiele onderdelen. Dit kan valse alarmen veroorzaken.
-Installeer de deur sensor niet in de buurt van sterke magneten
-Reinig de oppervlakken grondig voor installatie van de deur sensor
-Installeer de sensor en de magneet op twee verschillende onderdelen van een raam of deur
(bv de sensor op de deur en de magneet op het kozijn).
BELANGRIJK: Let erop dat de magneet en de sensor correct ten opzichte van elkaar gemonteerd
worden. Aan de rechterkant van de sensor vindt u een klein merkje in de vorm van een driehoek. Op
de magneet vindt u eenzelfde driehoekje. Deze twee driehoekjes dienen zich op dezelfde hoogte en
tegenover elkaar te bevinden na de montage.
Het is niet belangrijk dat de sensor en de magneet zich vlak naast elkaar bevinden (zie ook de installatie
voorbeelden). Er mag gerust enige afstand bevinden tussen de sensor en de magneet. Wanneer de
magneet zich langs de sensor verplaatst wanneer de deur geopend wordt, zal altijd een alarm afgegeven
worden. Wanneer de magneet bij het openen van de deur zich niet langs de sensor beweegt maar
ervandaan, dient de maximale afstand kleiner te zijn dan 1.5 centimeter.
Installatie voorbeelden
1
2
3

Copyright © 2019 Tiiwee. All rights reserved. This manual or any portion thereof may not be reproduced or used in any manner whatsoever.
18
Situatie 1. De deur en het kozijn bevinden zich op gelijke hoogte. Dit is de ideale situatie. De sensor en
de magneet bevinden zich vlak naast elkaar.
Situatie 2 & 3. De deur en het kozijn bevinden zich op verschillende ‘dieptes’. De sensor en de magneet
kunnen geïnstalleerd worden als de afstand tussen de twee niet meer als 1.5 centimeter bedraagt of
meer indien de magneet zich langs de sensor beweegt indien het raam of de deur geopend wordt.
Als de afstand tussen de deur en het kozijn meer is dan 1.5 centimeter, kan het dubbelzijdige tape in
kleinere stukjes geknipt worden en op elkaar geplakt om een grotere afstand te overbruggen.
Installatie
Verwijder vooraf stof en zorg voor een vetvrije ondergrond. De sensor en de magneet kunnen met zowel
dubbelzijdig tape als schroeven bevestigd worden.
Test de positie eerst door sensor en magneet op hun plaats te houden en de deur te openen. Indien
het rode lichtje op de sensor gaat branden, zijn de twee goed uitgelijnd.
Magneet:
-Installeren met schroeven: Verwijder de kap van de magneet door met een kleine
schroevendraaier of mes aan de kopse kant de kap ervan af te wippen.
-Plaats de magneet op de gewenste positie en teken de schroefgaten af op het kozijn.
-Schroef de magneet op zijn plaats en plaats de kap terug.
Sensor
-Schuif aan de achterzijde het plaatje naar beneden en verwijder het. Plaats het plaatje op de
gewenste positie en teken de schroefgaten af. Plaats nu het plaatje door middel van de
schroeven. Schuif de sensor over het plaatje van boven naar beneden.
De bevestiging met dubbelzijdig tape gaan hetzelfde. Verwijder eerst de beschermingsfolie van een zijde
van de tape. Plak deze op de plek waar de sensor of magneet moet komen. Verwijder nu de
beschermingsfolie op de andere zijde en plaats de sensor of magneet.
Test
1. Open na de installatie de deur of het raam
2. Het rode lichtje op de sensor gaat nu branden
3. Uw sensor en magneet zijn goed geïnstalleerd
Regelmatige controle is vereist
Test de werking van de sensor regelmatig door de deur of het raam te openen. Het lichtje van de sensor
gaat nu branden. Indien niet, vervang dan de batterij.
Techniche Specificaties:
Draadloos bereik: 100m (Open gebied; muren en deuren beperken het bereik)
Frequentie: 433MHz
Gebruiksspanning: 12V
Afmetingen:76×37×17mm
Magneet grootte: :55×13×20mm
Other manuals for TWWS01
1
Table of contents
Languages:
Other Tiiwee Security Sensor manuals