manuals.online logo
Brands
  1. Home
  2. •
  3. Brands
  4. •
  5. Tork
  6. •
  7. Dispenser
  8. •
  9. Tork 555520A Building instructions

Tork 555520A Building instructions

Washroom Dispenser Service and Parts Manual
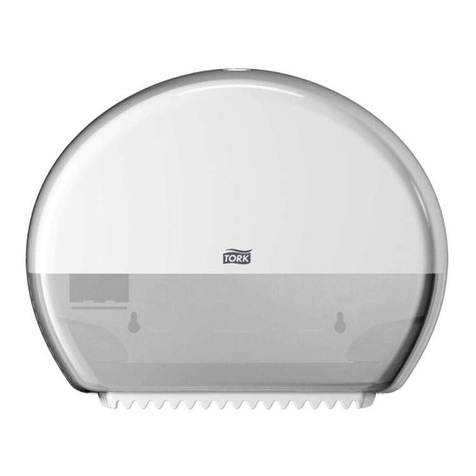
Tork Elevation T2 Mini Twin Jumbo Roll Tissue Dispenser
555520A, 555528A Revision Date: 4-28-10
Tork Elevation T2 Mini Twin JBT Dispenser:
T2 System: 555520A (white), 555528A (black)
Dispenser Dimensions HxWxD inches (cm):
10.66 x 16.4 x 5.44 (27.08 x 41.66 x 13.82 cm)
Tork T2 Mini Jumbo Bath Product Options:
12024402 (Tork Advanced, 2 Ply)
12013902 (Tork Advanced, 1 Ply)
120246 (Tork Advanced, 2-Ply)
Dispenser Parts Part Description Replacement SKU
1 of 5
LEFT/RIGHT ROLL ARM
SPINDLE
PAPER ACCESS DOOR
HOOD ASSY WHITE
HOOD ASSY BLACK
(Includes 2 e-clips & pins)
225556P (white)
225557P (black)
200260 KEY FOR ALL
TORK DISPENSERS 200260 KEY
TORK LOCK
200262-10 or
200262-20
200261 KEYHANDLE
FOR KEYLESS ENTRY 200261
KEYHANDLE
Washroom Dispenser Service and Parts Manual
Tork Elevation T2 Mini Twin Jumbo Roll Tissue Dispenser
555520A, 555528A Revision Date: 4-28-10
Part Description with Replacement Instructions
Parts with SKUs listed are available for order as of the revision date on the manual. Contact an SCA
Sales Rep or the SCA Tissue Quality Coordinator to order these parts.
If no SKU is listed, the availability of the part is unknown. Please contact the SCA Tissue Quality
Coordinator for more information (see Contacting SCA section).
Replacement SKU Description & Replacement Instructions
LEFT/RIGHT ROLL ARM
The roll arms sit on the outside of the bath tissue rolls. As the roll is depleted,
the roller gets close to the spindle, and allows the access door to unlock and
slide to the opposite side for access to the reserve tissue roll. Not replaceable.
SPINDLES
Hold two jumbo bath tissue rolls. Not replaceable.
PAPER ACCESS DOOR
The access door will be locked to one side, allowing access to one of the tissue
rolls and blocking access to the other until one roll has completely dispensed.
Not replaceable.
225556P White
225557P Black T2 MINI TWIN HOOD ASSEMBLY
With door open, locate e-clip holding the hinge piN in place. Use pliers to
remove the e-clip. Pull hinge pin out by pulling out to the left and the right side.
Each hood assembly will include the hood, 2 new e-clips and 2 matching color
hinge pins.
200262-20 TORK LOCK
The lock can be replaced by removing the U-clip from the inside of the dispenser
with a pliers or screwdriver.
200261
KEYHANDLE SCA 200261 KEYHANDLE
Insert keyhandle into lock to provide keyless access. Note: Lock cannot revert ba
c
keyed entry once keyhandle has been inserted.
200260 KEY SCA 200260 METAL KEY FOR ALL TORK DISPENSERS
Loading Instructions
1. To fill dispenser after mounting: Open cover. Before loading paper, slide door completely to one side.
Raise the each roll arm, placing refill on spindle and resting arm on outside of full roll. Feed the paper
through the opening and close the cover. For best performance, rolls should be oriented so each tail
feeds over the top of the roll into the center of the dispenser.
2. When one of the rolls is completely dispensed, the access door will unlock and the user will be able to
slide it to the opposite side. The user will then have access to the reserve tissue roll.
3. To replenish rolls: Open cover. Raise roll arm and remove the empty cores. Load a new Tork Jumbo
Bath Tissue refill onto spindle
Preventive Maintenance
The dispenser should be cleaned any time there is heavy paper dust build-up inside the dispenser. If
paper dust is not a problem, approximately every year is a good frequency for cleanings. The following is
the recommended procedure to cleaning:
1) Open the dispenser and remove the rolls of paper.
2 of 5
Washroom Dispenser Service and Parts Manual
Tork Elevation T2 Mini Twin Jumbo Roll Tissue Dispenser
555520A, 555528A Revision Date: 4-28-10
2) Clean out any paper dust. This can be done is several ways, such as, vacuuming, blowing out with a
can of compressed air (wear safety glasses), wiping out with a damp cloth, etc.
3) Clean the cover with a general all-purpose cleaner that is safe for plastics.
Troubleshooting
Problem: Any paper-related problem.
•Take note of the date code on the outside of the case of paper product. Then contact the SCA
Tissue Quality Coordinator and explain the problem.
Problem: Any other problem not stated above.
•Contact the SCA Tissue Quality Coordinator.
Contacting SCA
To contact the SCA Tissue Quality Coordinator, dial 1-866-722-6659 and press 6.
Product Date Code Location: The product assembly code can be found on a white sticker placed on the
inside of the dispenser door. The date code is in the following format: DD/MM/YYYY.
This is a TorkSelect product. The TorkSelect label is affixed to the inside, right side of the dispenser.
The system identifier (to match product refills) and the dispenser item number are printed on the bottom
of this label.
3 of 5
Washroom Dispenser Service and Parts Manual
Tork Elevation T2 Mini Twin Jumbo Roll Tissue Dispenser
555520A, 555528A Revision Date: 4-28-10
555520A, 555528A Tork ElevationT2 Mini Twin Dispenser
Mounting Diagram
Carton Instructions
4 of 5
Washroom Dispenser Service and Parts Manual
Tork Elevation T2 Mini Twin Jumbo Roll Tissue Dispenser
555520A, 555528A Revision Date: 4-28-10
Recommended Mounting Height (standard access)
Mount dispenser 27.5” (70cm) above finished floor.
Recommended Mounting Height (ADAAG Guideline)
4.16.6 Dispensers. Toilet paper dispensers shall be installed within reach, as shown in Fig. 29(b).
Dispensers that control delivery, or that do not permit continuous paper flow, shall not be used.
Figure 29b
Grab Bars at Water Closets
Side Wall
A 42 inch (1065 mm) minimum length grab bar is required to the side of the water closet spaced 12
inches (305 mm) maximum from the back wall and extending a minimum of 54 inches (1370 mm) from
the back wall at a height between 33 and 36 inches (840-915 mm). The toilet paper dispenser shall be
mounted at a minimum height of 19 inches (485 mm). (4.16.3, 4.16.4, 4.16.6)
Note: Compliance with ADA guidelines is the responsibility of the installer and building owner.
Local and state requirements may differ from ADAAG guidelines.
5 of 5

This manual suits for next models

1

Other Tork Dispenser manuals

Tork W6 Configuration guide

Tork

Tork W6 Configuration guide

Tork 571020A Building instructions

Tork

Tork 571020A Building instructions

Tork B3 System Building instructions

Tork

Tork B3 System Building instructions

Tork Xpress 451000 User manual

Tork

Tork Xpress 451000 User manual

Tork Tork Matik 551102 User manual

Tork

Tork Tork Matik 551102 User manual

Tork S4 Intuition User manual

Tork

Tork S4 Intuition User manual

Tork Intuition User manual

Tork

Tork Intuition User manual

Tork Intuition 5511201 User manual

Tork

Tork Intuition 5511201 User manual

Tork S2 User manual

Tork

Tork S2 User manual

Tork Elevation H2 Xpress Mini Building instructions

Tork

Tork Elevation H2 Xpress Mini Building instructions

Tork S1 System Building instructions

Tork

Tork S1 System Building instructions

Tork Image Design Tork 466100 User manual

Tork

Tork Image Design Tork 466100 User manual

Tork TRK565828 User manual

Tork

Tork TRK565828 User manual

Tork Elevation H2 Xpress Building instructions

Tork

Tork Elevation H2 Xpress Building instructions

Tork 86ECO Building instructions

Tork

Tork 86ECO Building instructions

Tork Xpressnap N4 System User manual

Tork

Tork Xpressnap N4 System User manual

Tork Image Design Matic 460001 User manual

Tork

Tork Image Design Matic 460001 User manual

Tork Tork Matic 551100 User manual

Tork

Tork Tork Matic 551100 User manual

Tork 93T Guide

Tork

Tork 93T Guide

Tork 6521281 Building instructions

Tork

Tork 6521281 Building instructions

Tork Image Design 460013 User manual

Tork

Tork Image Design 460013 User manual

Tork Matic Elevation H1 User manual

Tork

Tork Matic Elevation H1 User manual

Tork Xpressnap Cafe N10 User manual

Tork

Tork Xpressnap Cafe N10 User manual

Tork Xpressnap N4 User manual

Tork

Tork Xpressnap N4 User manual

Popular Dispenser manuals by other brands

Stern Engineering TRENDY FOAM Installation and maintenance guide

Stern Engineering

Stern Engineering TRENDY FOAM Installation and maintenance guide

Presto 60375 installation guide

Presto

Presto 60375 installation guide

Cornelius PRISM owner's manual

Cornelius

Cornelius PRISM owner's manual

Selbach OTHG 105 manual

Selbach

Selbach OTHG 105 manual

Follett Chewblet 7 Series Installation, operation and service manual

Follett

Follett Chewblet 7 Series Installation, operation and service manual

MTN Products Horizons Counter Top Complete manual

MTN Products

MTN Products Horizons Counter Top Complete manual

jbc DPM-A instruction manual

jbc

jbc DPM-A instruction manual

Fiap profifeed BeltFeeder PRO operating instructions

Fiap

Fiap profifeed BeltFeeder PRO operating instructions

Sealey MK66.V3 instructions

Sealey

Sealey MK66.V3 instructions

Graco PR70 Series Operation and maintenance manual

Graco

Graco PR70 Series Operation and maintenance manual

Bennett Horizon 2422FS-1 Series installation manual

Bennett

Bennett Horizon 2422FS-1 Series installation manual

Westomatic Primo Compact Install, Clean & Fill

Westomatic

Westomatic Primo Compact Install, Clean & Fill

WEPA Satino 331070 Assembly instructions

WEPA

WEPA Satino 331070 Assembly instructions

dosatron D 8 RE 3000 owner's manual

dosatron

dosatron D 8 RE 3000 owner's manual

Lavit LB115 Series Service manual

Lavit

Lavit LB115 Series Service manual

Wittern VendNet SCRUBYRAK 3597 Service manual

Wittern

Wittern VendNet SCRUBYRAK 3597 Service manual

FCI MagicRound ASD-0001 installation manual

FCI

FCI MagicRound ASD-0001 installation manual

San Jamar VENUE H5000PTBK Technical data sheet

San Jamar

San Jamar VENUE H5000PTBK Technical data sheet

manuals.online logo
manuals.online logoBrands
  • About & Mission
  • Contact us
  • Privacy Policy
  • Terms and Conditions

Copyright 2025 Manuals.Online. All Rights Reserved.