Toro 23516 User manual

FormNo.3382-918RevB
18inWalk-BehindAerator
ModelNo.23516—SerialNo.314000001andUp
ModelNo.33516—SerialNo.314000001andUp
G022080
Registeratwww.Toro.com.
OriginalInstructions(EN)*3382-918*B

WARNING
CALIFORNIA
Proposition65Warning
Thisproductcontainsachemicalorchemicals
knowntotheStateofCaliforniatocausecancer,
birthdefects,orreproductiveharm.
Theengineexhaustfromthisproduct
containschemicalsknowntotheStateof
Californiatocausecancer,birthdefects,
orotherreproductiveharm.
ThissparkignitionsystemcomplieswithCanadianICES-002.
Becauseinsomeareastherearelocal,state,orfederal
regulationsrequiringthatasparkarresterbeusedonthe
engineofthismachine,asparkarresterisavailableas
anoption.Ifyourequireasparkarrester,contactyour
AuthorizedToroServiceDealer.
GenuineTorosparkarrestersareapprovedbytheUSDA
ForestryService.
Important:ItisaviolationofCaliforniaPublic
ResourceCodeSection4442touseoroperatetheengine
onanyforest-covered,brush-covered,orgrass-covered
landwithoutasparkarrestermufermaintainedin
workingorder,ortheengineconstricted,equipped,and
maintainedforthepreventionofre.Otherstatesor
federalareasmayhavesimilarlaws.
Introduction
Thisaerator,whichiscontrolledbyawalkingoperator,
isintendedtobeusedbytrainedoperatorsinresidential
andcommercialapplications.Itisprimarilydesignedfor
aeratingsmalltomid-sizedareasofwell-maintainedlawnson
residentialgrounds,parks,sportselds,andoncommercial
grounds.
Readthisinformationcarefullytolearnhowtooperateand
maintainyourproductproperlyandtoavoidinjuryand
productdamage.Youareresponsibleforoperatingthe
productproperlyandsafely.
YoumaycontactTorodirectlyatwww .Toro.comforproduct
andaccessoryinformation,helpndingadealer,ortoregister
yourproduct.
Wheneveryouneedservice,genuineToroparts,oradditional
information,contactanAuthorizedServiceDealerorToro
CustomerServiceandhavethemodelandserialnumbersof
yourproductready.Figure1illustratesthelocationofthe
modelandserialnumbersontheproduct.Writethenumbers
inthespaceprovided.
1
G022081
Figure1
1.Locationofthemodelandserialnumbers
ModelNo.
SerialNo.
Thismanualidentiespotentialhazardsandhassafety
messagesidentiedbythesafetyalertsymbol(Figure2),
whichsignalsahazardthatmaycauseseriousinjuryordeath
ifyoudonotfollowtherecommendedprecautions.
Figure2
1.Safetyalertsymbol
Thismanualuses2wordstohighlightinformation.
Importantcallsattentiontospecialmechanicalinformation
andNoteemphasizesgeneralinformationworthyofspecial
attention.
©2014—TheToro®Company
8111LyndaleAvenueSouth
Bloomington,MN554202
Contactusatwww.Toro.com.
PrintedintheUSA
AllRightsReserved

Contents
Introduction..................................................................2
Safety...........................................................................3
SafeOperatingPractices...........................................3
SlopeIndicator.......................................................5
SafetyandInstructionalDecals.................................6
Setup............................................................................8
UnfoldingtheHandle..............................................8
CheckingtheEngineOilLevel..................................8
ProductOverview..........................................................8
Controls................................................................9
Specications........................................................10
Operation....................................................................10
CheckingtheEngine-OilLevel.................................10
FillingtheFuelTank...............................................11
StartingtheEngine.................................................12
StoppingtheEngine...............................................12
DrivingtheMachine...............................................12
Aerating................................................................12
AddingWeighttotheMachine.................................13
AdjustingtheCoringDepth.....................................13
SecuringtheMachineforTransport..........................14
OperatingTips......................................................14
Maintenance.................................................................15
RecommendedMaintenanceSchedule(s)......................15
PremaintenanceProcedures........................................15
DisconnectingtheSpark-plugWire...........................15
AccessingtheTines................................................15
TippingtheMachine...............................................16
Lubrication...............................................................16
LubricatingtheDriveChain.....................................16
GreasingtheMachine.............................................17
EngineMaintenance..................................................17
ServicingtheAirCleaner.........................................17
ChangingtheEngineOil.........................................18
ServicingtheSparkPlug..........................................19
DriveSystemMaintenance.........................................20
CheckingtheTirePressure......................................20
CheckingtheTensionoftheAeratorDrive
Chain................................................................20
BeltMaintenance......................................................21
CheckingandAdjustingtheBeltTension...................21
TineMaintenance......................................................22
CheckingandReplacingtheTines.............................22
Storage........................................................................23
RemovingtheMachinefromStorage.........................23
Troubleshooting...........................................................24
Safety
Improperlyusingormaintainingthemachinecanresult
ininjury.Toreducethepotentialforinjury,complywith
thesesafetyinstructionsandalwayspayattentiontothe
safetyalertsymbol,whichmeans
Caution
,
W ar ning
,or
Danger
—personalsafetyinstruction.Failuretocomply
withtheinstructionmayresultinpersonalinjuryor
death.
SafeOperatingPractices
ThefollowinginstructionsareadaptedfromtheANSI
B71.4-2012andB71.8-2004standard.
Training
•ReadtheOperator’sManualandothertrainingmaterial.If
theoperator(s)ormechanic(s)cannotreadorunderstand
theinformation,itistheowner’sresponsibilitytoexplain
thismaterialtothem.
•Becomefamiliarwiththesafeoperationoftheequipment,
operatorcontrols,andsafetysigns.
•Alloperatorsandmechanicsshouldbetrained.The
ownerisresponsiblefortrainingtheusers.
•Neverletchildrenoruntrainedpeopleoperateorservice
theequipment.Localregulationsmayrestricttheageof
theoperator.
•Theowner/usercanpreventandisresponsiblefor
accidentsorinjuriesoccurringtopeopleordamageto
property.
Preparation
•Evaluatetheterraintodeterminewhataccessoriesand
attachmentsareneededtoproperlyandsafelyperform
thejob.Onlyuseaccessoriesandattachmentsapproved
bythemanufacturer.
•Wearappropriateclothingincludingsafetyglassesand
hearingprotection.Longhair,looseclothing,orjewelry
maygettangledinmovingparts.
•Inspecttheareawheretheequipmentistobeusedand
removeallobjectssuchasrocks,toys,andwirewhichcan
becontactedbythemachine.
•Checkthatthecontrols,safetyswitches,andshieldsare
attachedandfunctioningproperly.Donotoperateunless
theyarefunctioningproperly.
Operation
•Neverrunanengineinanenclosedarea.
•Onlyoperateingoodlight,keepingawayfromholesand
hiddenhazards.
•Besurealldrivesareinneutralbeforestartingengine.
•Neveroperatewithouttheshields,covers,orotherguards
securelyinplace.Besureallinterlocksarefunctioning
properly.
3

•Donotchangetheenginegovernorsettingoroverspeed
theengine.
•Raisethetines,stopthemachine,andstoptheengine
beforeleavingtheoperator’spositionforanyreason.
•Stoptheequipmentandinspectthetinesafterstrikingan
objectorifanabnormalvibrationoccurs.Makenecessary
repairsbeforeresumingoperation.
•Keephandsandfeetawayfromthetinearea.
•Nevercarrypassengersandkeeppetsandbystanders
away.
•Bealert,slowdown,andusecautionwhenmakingturns.
Lookbehindandtothesidebeforechangingdirections.
•Slowdownandusecautionwhencrossingroadsand
sidewalks.
•Donotoperatethemachineundertheinuenceof
alcoholordrugs.
•Lightningcancausesevereinjuryordeath.Iflightning
isseenorthunderisheardinthearea,donotoperate
themachine;seekshelter.
•Useextremecarewhenloadingorunloadingthemachine
intooroutofatrailerortruck.
•Usecarewhenapproachingblindcorners,shrubs,trees,
orotherobjectsthatmayobscurevision.
•Alwaysbeawareofobstaclesthatmaybeintheareaof
operation.Planyouraerationpathtoavoidcontactwith
anyobstaclebyyouorthemachine.
SafeHandlingofFuels
•Toavoidpersonalinjuryorpropertydamage,use
extremecareinhandlinggasoline.Gasolineisextremely
ammableandthevaporsareexplosive.
•Extinguishallcigarettes,cigars,pipes,andothersources
ofignition.
•Useonlyanapprovedfuelcontainer.
•Neverremovefuelcaporaddfuelwiththeengine
running.
•Allowenginetocoolbeforerefueling.
•Neverrefuelthemachineindoors.
•Neverstorethemachineorfuelcontainerwherethereis
anopename,spark,orpilotlightsuchasonawater
heateroronotherappliances.
•Neverllcontainersinsideavehicleoronatruckor
trailerbedwithaplasticliner.Alwaysplacecontainerson
thegroundawayfromyourvehiclebeforelling.
•Removeequipmentfromthetruckortrailerandrefuelit
ontheground.Ifthisisnotpossible,thenrefuelsuch
equipmentwithaportablecontainer,ratherthanfroma
fueldispensernozzle.
•Keepthenozzleincontactwiththerimofthefueltank
orcontaineropeningatalltimesuntilfuelingiscomplete.
•Donotuseanozzlelockopendevice.
•Iffuelisspilledonclothing,changeclothingimmediately.
•Neveroverllfueltank.Replacefuelcapandtighten
securely.
SlopeOperation
•Donotoperateonslopeswhengrassiswet.Slippery
conditionsreducetractionandcouldcauseslidingand
lossofcontrol.
•Donotmakesuddenturnsorrapidspeedchanges.
•Reducespeedanduseextremecautiononslopes.
•Removeormarkobstaclessuchasrocks,treelimbs,
sprinklerheads,etc.fromtheoperatingarea.Tallgrass
canhideobstacles.
MaintenanceandStorage
•Waitforallmovementtostopbeforeadjusting,cleaning,
orrepairing.Raisethetines,stopthemachine,stopthe
engine,anddisconnectthespark-plugwire.
•Cleangrassanddebrisfromthetines,drives,mufer,and
enginetohelppreventres.Cleanupoilorfuelspillage.
•Lettheenginecoolbeforestoringanddonotstorenear
ame.
•Shutoffthefuelwhilestoringortransportingontrailers.
Donotstorefuelnearamesordrainindoors.
•Parkthemachineonlevel,hardground.Neverallow
untrainedpersonneltoserviceit.
•Usejackstandsorsafetylatchestosupportthemachine
whenworkingunderit.
•Removethespark-plugwirebeforemakinganyrepairs.
•Keephandsandfeetawayfrommovingparts.Ifpossible,
donotmakeadjustmentswiththeenginerunning.
•Keepallpartsingoodworkingconditionandallhardware
tightened.Replaceallwornordamageddecals.
•UseonlyToro-approvedattachments.Thewarranty
maybevoidedifthemachineisusedwithunapproved
attachments.
Hauling
•Usecarewhenloadingorunloadingthemachineintoa
trailerortruck.
•Securethetinesintothetransportpositionwiththetine
lockingpinbeforehauling.
•Usefullwidthrampsforloadingmachineintotraileror
truck.
•Tiethemachinedownsecurelyusingstraps,chains,cable,
orropes.Bothfrontandrearstrapsshouldbedirected
downandoutwardfromthemachine.
4

SlopeIndicator
G01 1841
Figure3
Thispagemaybecopiedforpersonaluse.
1.Themaximumslopeyoucansafelyoperatethemachineonis20degrees.Usetheslopecharttodeterminethedegreeofslope
ofhillsbeforeoperating.Donotoperatethismachineonaslopegreaterthan20degrees.Foldalongtheappropriateline
tomatchtherecommendedslope.
2.Alignthisedgewithaverticalsurface,atree,building,fencepole,etc.
3.Exampleofhowtocompareslopewithfoldededge.
5
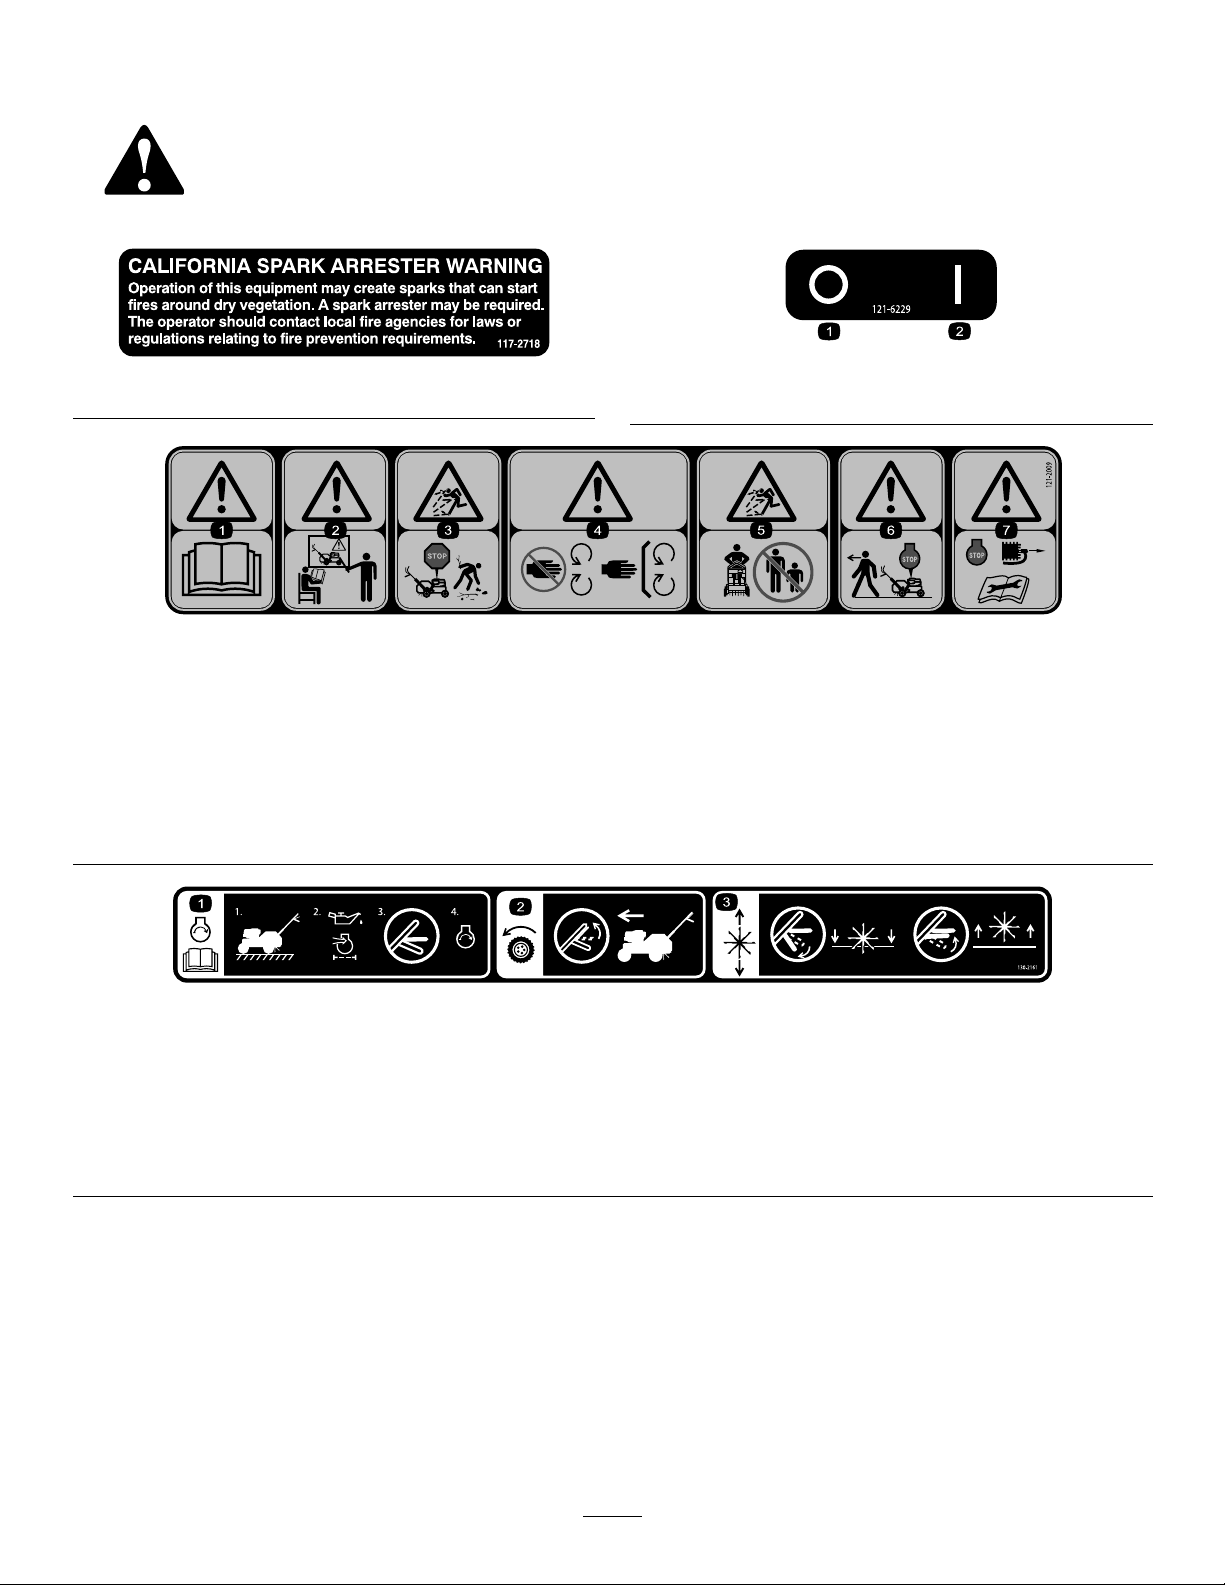
SafetyandInstructionalDecals
Safetydecalsandinstructionsareeasilyvisibletotheoperatorandarelocatednearanyareaofpotential
danger.Replaceanydecalthatisdamagedorlost.
117–2718121–6229
1.Off2.On
121-2009
1.Warning—readthe
Operator’sManual.
3.Thrownobject
hazard—stopthemachine
andpickupdebrisbefore
operating.
5.Thrownobject
hazard—keepbystanders
asafedistancefromthe
machine.
7.Warning—stoptheengine
andremovethesparkplug
wirebeforeperforming
anymaintenanceonthe
machine.
2.Warning—donotoperate
thismachineunlessyou
aretrained.
4.Warning—keephands
awayfrommovingparts,
keepallguardsandshields
inplace.
6.Warning—stoptheengine
beforeleavingthemachine.
130-2161
1.Formoreinformationonstartingtheengine,readthe
Operator'sManual—1)Parkthemoweronalevelsurface;
2)Checktheoillevelandtheairlter;3)Ensurethe
traction-controlbailisintheneutralposition;4)Startthe
engine.
3.Engagingtheaeratingtines—lowerthetine-controlleverto
engagethetines;raisethetine—controllevertodisengage
thetines.
2.Engagingtheforwarddrive—holdthetraction—controlbail
againstthehandletomovethemowerforward.
6

121-6150
1.Cuttinghazardofhandandfoot–stayawayfrommoving
parts.
130-2155
121–6222
1.Choke3.Slow
2.Fast
7

Setup
UnfoldingtheHandle
1.Raisethehandletotheoperatingposition.
1
G022082
Figure4
1.Handle-lockingring
2.Slidethehandle-lockingringdowneachsideofthe
upperhandleoverthelowerhandle,lockingthehandle
sectionstogether.
CheckingtheEngineOilLevel
Beforeoperating,checktheengineoilleveltoensurethat
ithasenoughoil.Themachinecomesfromthefactory
withoilintheenginecrankcase;however,youmayneedto
addoil.RefertoChangingtheEngineOil(page18),foroil
specicationsandinstructions.
ProductOverview
Figure5
1.Fuelvalve6.Weights
2.Aircleaner7.Handle-lockingring
3.Spark-plugwire8.Transportlockingpin
4.Engine9.Wheelstop
5.Fuel-tankcap10.Tie-down/liftloops
12
3
45
6
8
7
9
G022084
Figure6
1.Tine-controllever6.Dipstick
2.Handle7.Mufer
3.Throttlelever8.Tines
4.Engineswitch9.Traction-controlbail
5.Recoil-starthandle
8
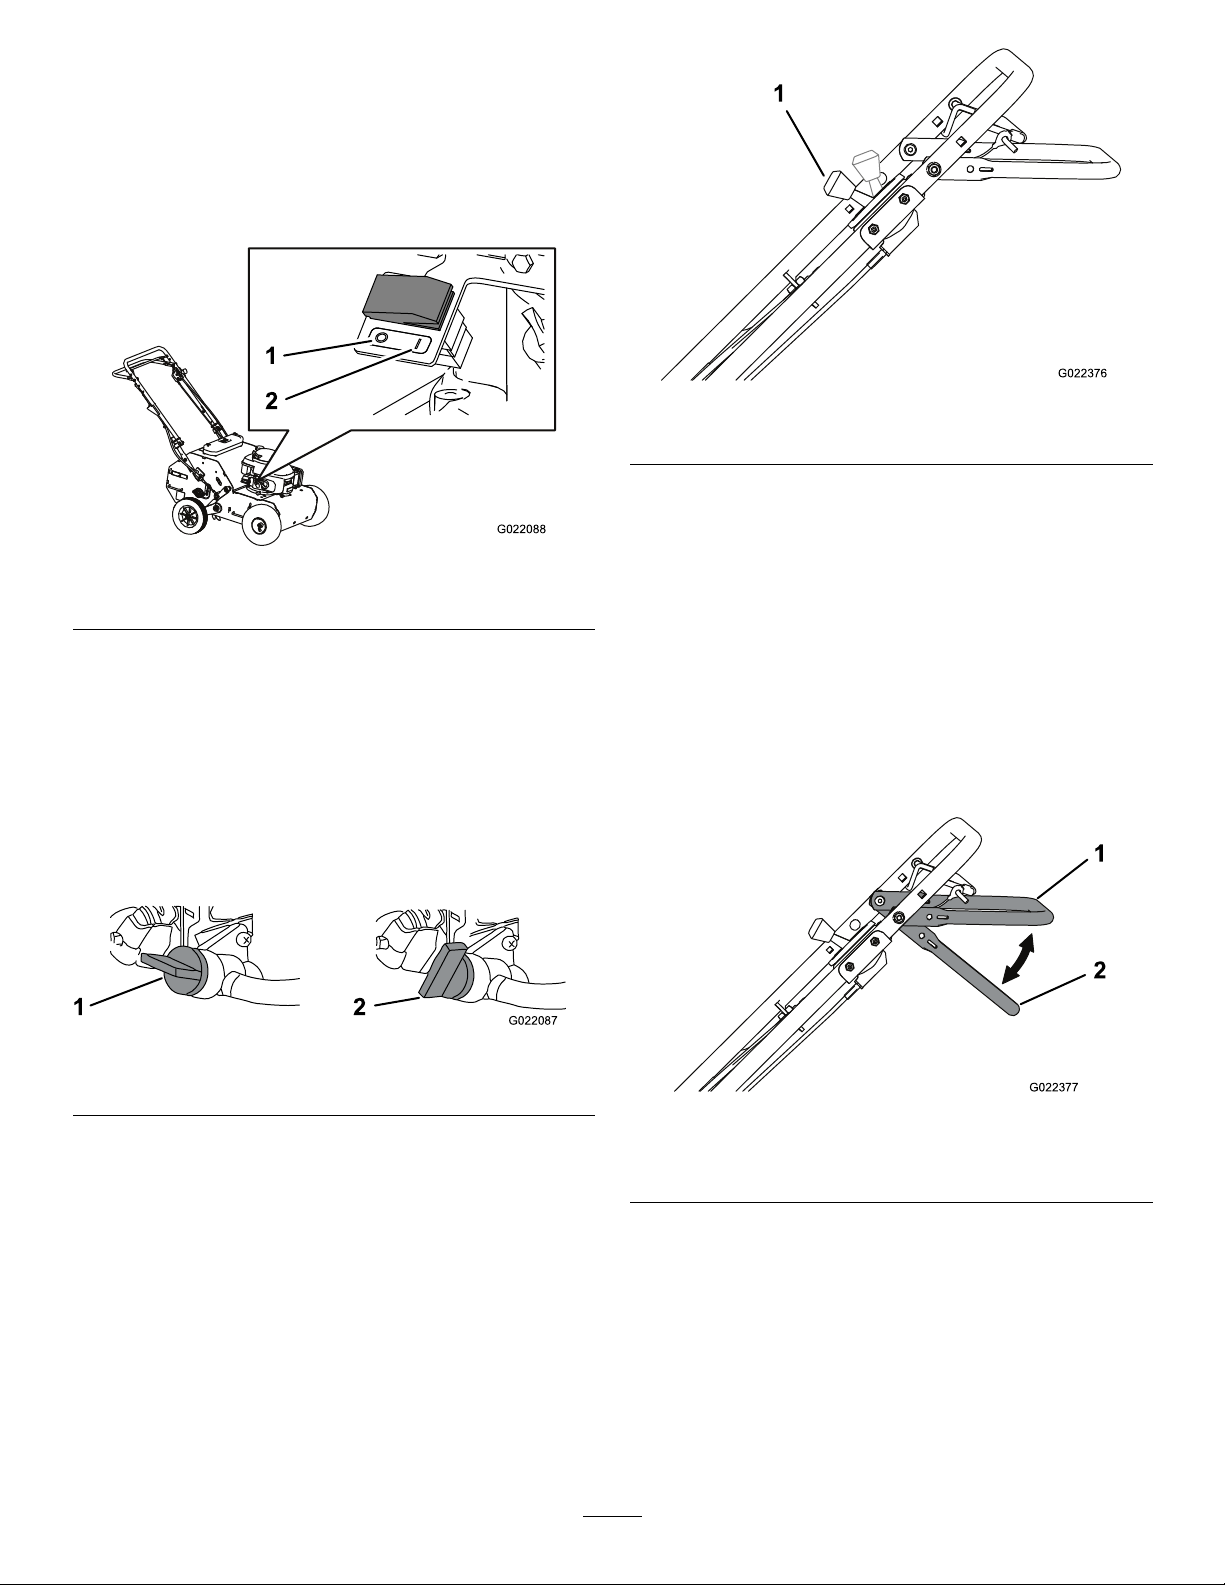
Controls
EngineSwitch
WhentheengineswitchisintheOnposition,itallowsthe
enginetorun.MovingtheengineswitchtotheOffposition
stopstheengine.
1
2
G022088
Figure7
1.Off2.On
Recoil-startHandle
Pulltherecoil-starthandle(Figure6)tostarttheengine.
FuelValve
Openthefuelvalvetoallowfueltoowtotheengine.Close
thefuelvalvewhentransportingorstoringthemachine
(Figure5).
1 2
G022087
Figure8
1.Openposition2.Closedposition
ThrottleLever
Beforestartingacoldengine,movethethrottlelever(Figure
9)forwardtotheChokeposition.Aftertheenginestarts,pull
thethrottleleverbacktotheFastposition.
Note:Awarmenginerequireslittleornochoking.
1
G022376
Figure9
1.Throttlelever
Traction-controlBail
Thetraction-controlbail(Figure6)controlstheforwardand
neutralactionsofthemachine.RefertoDrivingtheMachine
(page12)formoreinformation.
Tine-controlLever
Thetine-controllever(Figure10)liftstherearwheels,causing
therearofthemachinetobesupportedontheaeratingtines.
Pushthetine-controlleverdowntoengagethetines.Pull
ituptodisengagethetines.
1
2
G022377
Figure10
1.Tine-control
lever—disengaged
2.Tine-control
lever—engaged
9
Specications
Length(operating)146cm(57.5inches)
Length(withhandlestored)96.5cm(38inches)
Width74cm(29inches)
Height(operating)109cm(43inches)
Height(withhandlestored)71cm(28inches)
Weight(asshippedwith2
weights)
135.6kg(299lb)
Operation
Note:Determinetheleftandrightsidesofthemachine
fromthenormaloperatingposition.
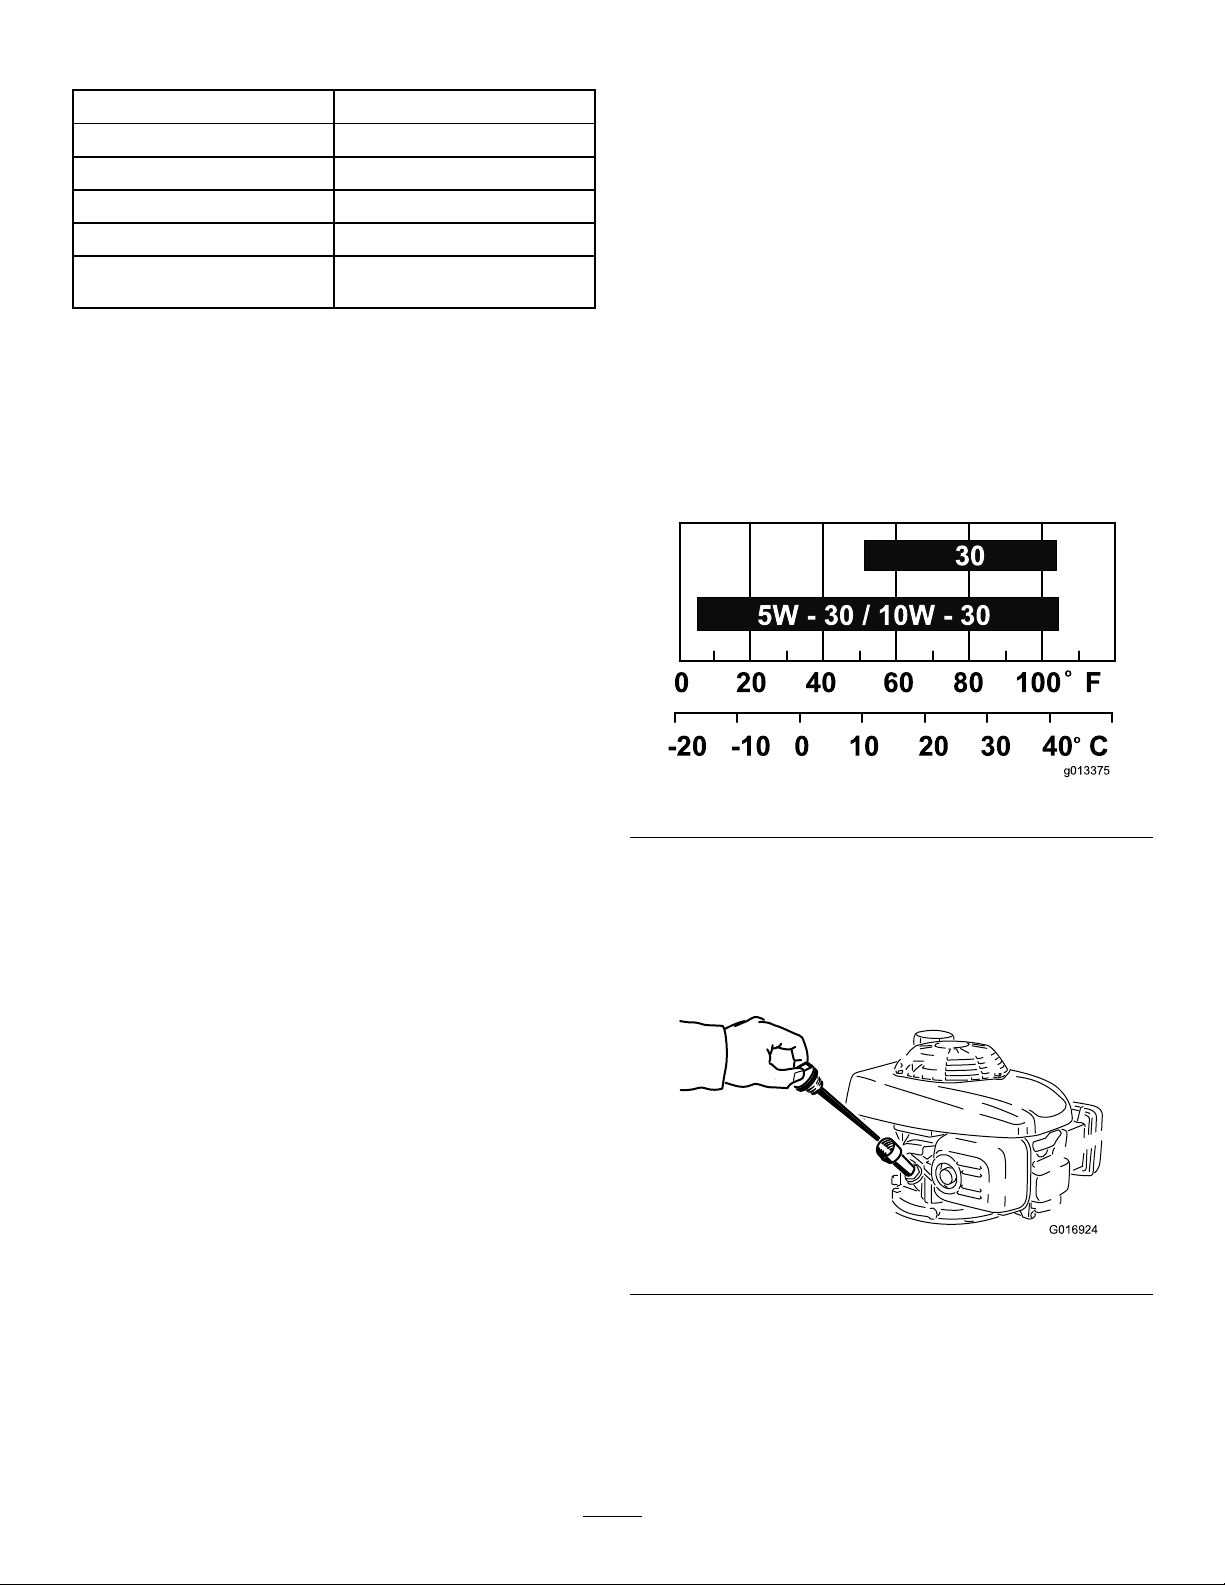
CheckingtheEngine-OilLevel
ServiceInterval:Beforeeachuseordaily
Note:ToroPremiumEngineOilisavailablefromyour
AuthorizedToroDealer.
Important:Use4-cycleengineoilthatmeetsorexceeds
therequirementsforAPIservicecategorySJ,SL,SM,
orhigher.
CrankcaseCapacity:0.55L(18.6oz)
Viscosity:RefertoFigure11.
g013375
0 20 40 60 80 100 F
-20 -10 0 10 20 30 40 C o
o
30
5W - 30 / 10W - 30
Figure11
1.Movethemachinetoalevelsurface;stoptheengine
andallowittocool.
2.Cleanaroundthedipstick(Figure12).
3.Removethedipstickbyrotatingthecap
counterclockwiseandpullingitout.
G016924
Figure12
4.Wipethedipstickcleanwithacleancloth.
5.Insertthedipstickintothellerneck,butdonot
rotatethecapclockwisetosecureit(Figure13),
thenremoveit.
10

1
2
3
G022085
Figure13
1.Dipstick3.Lower-limitmark
2.Upper-limitmark
6.Readtheoillevelonthedipstick.
7.Iftheoillevelisbelowthelower-limitmarkonthe
dipstick,slowlypouronlyenoughoilintotheller
holetoraisetheoilleveltotheupper-limitmarkon
thedipstick.
Note:Allowtheoiltosettlebeforecheckingtheoil
levelagain.
Important:Donotoverllthecrankcasewithoil
andruntheengine;enginedamagewillresult.
Draintheexcessoiluntiltheoillevelreachesthe
upper-limitmarkonthedipstick.
8.Insertthedipstickintothellerneck,androtatethe
capclockwiseuntilitistight.
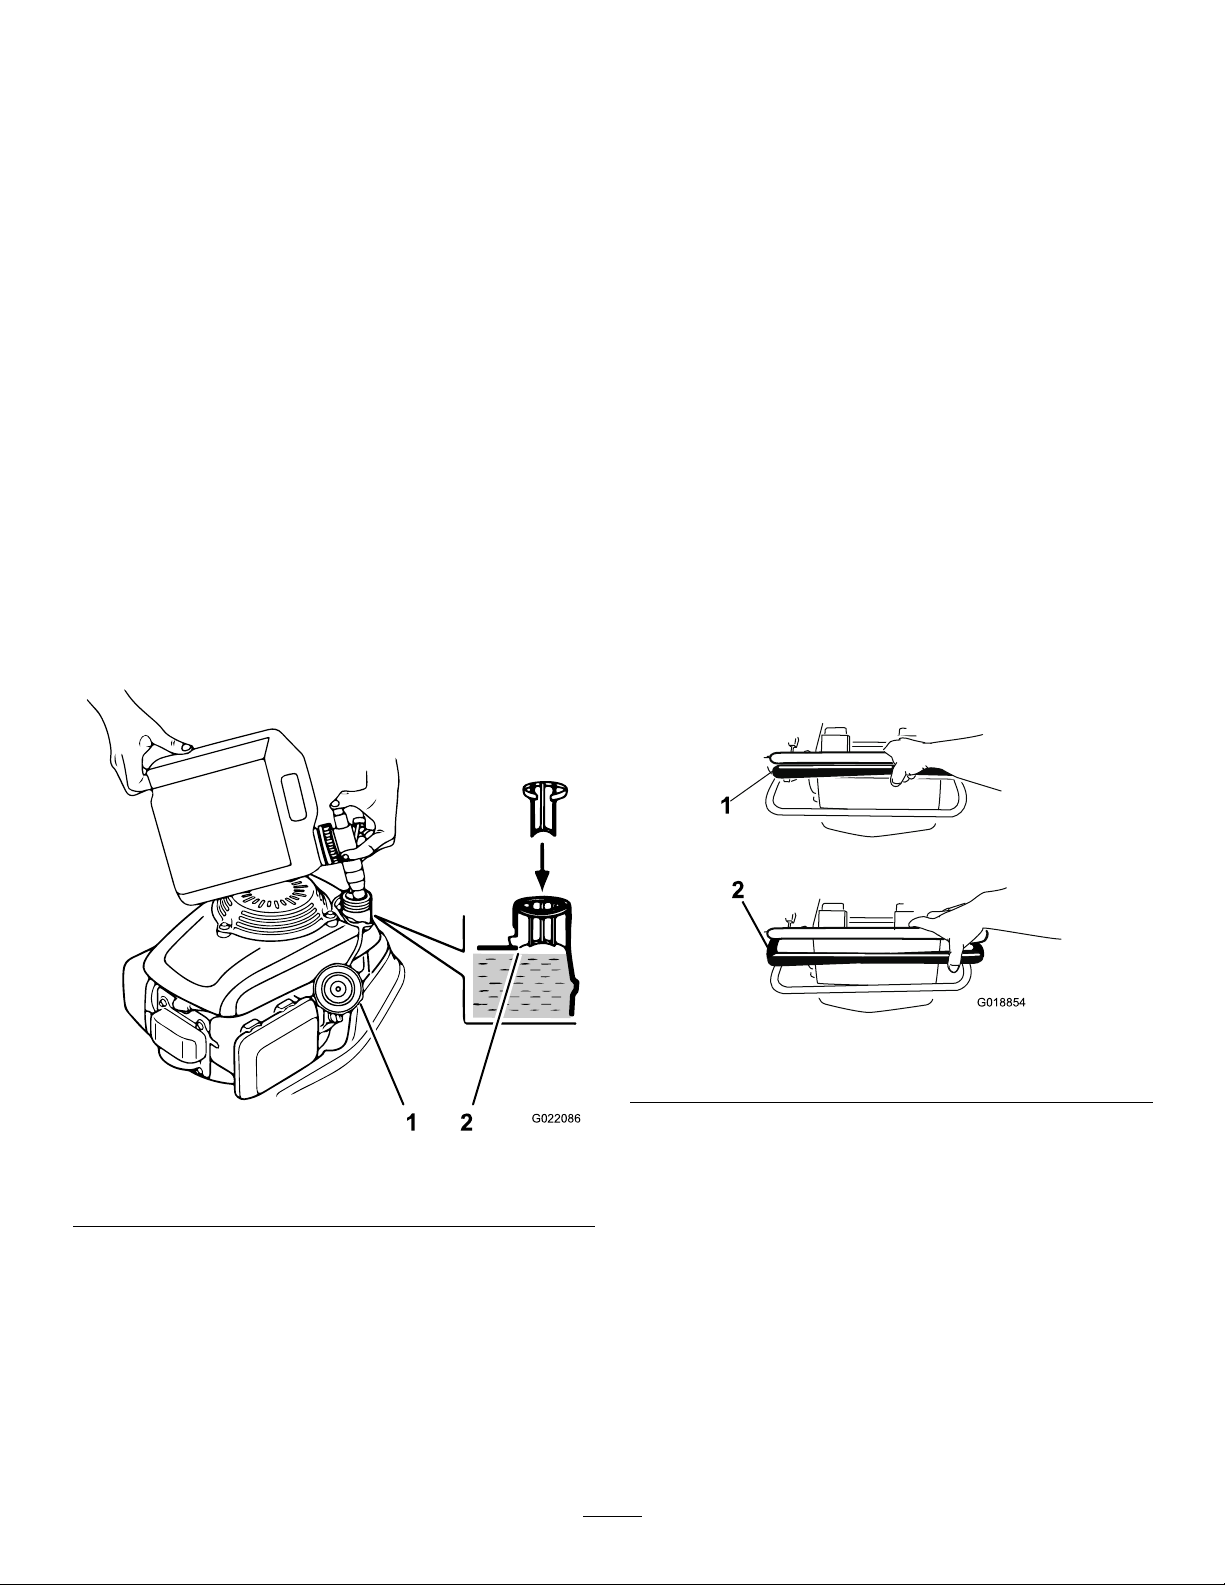
FillingtheFuelTank
Capacity:0.93L(0.25USgallons)
DANGER
Incertainconditions,gasolineisextremely
ammableandhighlyexplosive.Areorexplosion
fromgasolinecanburnyouandothersandcan
damageproperty.
•Fillthefueltankoutdoors,inanopenarea,and
whentheengineiscold.Wipeupanygasoline
thatspills.
•Donotllthefueltankcompletelyfull.Add
gasolinetothefueltankuntilthelevelis6to13
mm(1/4to1/2inch)belowthebottomofthe
llerneck.Thisemptyspaceinthetankallows
thegasolinetoexpand.
•Neversmokewhenhandlinggasoline,andstay
awayfromanopenameorwhereasparkmay
ignitethegasolinefumes.
•Storegasolineinanapprovedfuelcontainerand
keepitoutofthereachofchildren.
•Donotbuymorethana30-daysupplyof
gasoline.
DANGER
Whenfueling,undercertaincircumstances,astatic
chargecandevelop,ignitingthegasoline.Areor
explosionfromgasolinecanburnyouandothers
anddamageproperty.
•Alwaysplacegasolinecontainersontheground
andawayfromyourvehiclebeforelling.
•Donotllgasolinecontainersinsideavehicleor
onatruckortrailerbed,becauseinteriorcarpets
orplastictruck-bedlinersmayinsulatethe
containerandslowthelossofanystaticcharge.
•Whenpractical,removegasoline-powered
equipmentfromthetruckortrailerandfuelthe
equipmentwiththewheelsontheround.Ifthis
isnotpossible,thenfuelsuchequipmentona
truckortrailerfromaportablecontainer,not
fromagasoline-dispensernozzle.
•Ifyoumustuseagasoline-dispensernozzle,
keepthenozzleincontactwiththerimofthe
fueltankorcontaineropeningatalltimesuntil
fuelingiscomplete.
RecommendedFuel
•Forbestresults,useonlyclean,fresh(lessthan30days
old),unleadedgasolinewithanoctaneratingof87or
higher((R+M)/2ratingmethod).
11
Note:Freshfuelislessthan30daysold.
•Ethanol:Gasolinewithupto10%ethanol(gasohol)
or15%MTBE(methyltertiarybutylether)byvolume
isacceptable.EthanolandMTBEarenotthesame.
Gasolinewith15%ethanol(E15)byvolumeisnot
approvedforuse.Neverusegasolinethatcontainsmore
than10%ethanolbyvolume,suchasE15(contains15%
ethanol),E20(contains20%ethanol),orE85(contains
85%ethanol).Usingunapprovedgasolinemaycause
performanceproblemsand/orenginedamagewhichmay
notbecoveredunderwarranty.
•Donotusegasolinecontainingmethanol.
•Donotstorefueleitherinthefueltankorfuelcontainers
overthewinterunlessafuelstabilizerisused.
•Donotaddoiltogasoline.
1.Cleanaroundthefuel-tankcap.
2.Removethecapfromthetank.
3.Fillthefueltankwithunleadedgasolinetowithin6to
13mm(1/4to1/2inch)fromthetopofthetank.Do
notllintothellerneck.
Important:Donotllthetankmorethan6mm
(1/4inch)fromthetopofthetank,becausethe
gasolinemusthaveroomtoexpand.
1 2 G022086
Figure14
1.Fuel-tankcap2.Maximumfuellevel
4.Installthefuel-tankcap,andwipeupanyspilled
gasoline.
StartingtheEngine
1.Ensurethatthespark-plugwireisconnectedtothe
sparkplug.
2.Openthefuelvalvebyturningitin-linewiththefuel
hose;refertoFuelValve(page9).
3.MovetheengineswitchtotheOnposition.
4.Movethethrottleleverallthewayforwardtothe
Chokeposition;refertoThrottleLever(page9).
Note:Donotusethechokewhentheengineiswarm.
5.Pullthestarterhandlelightlyuntilyoufeelresistance,
thenpullitsharply.Allowtheropetoreturntothe
handleslowly.
6.Whentheenginestarts,movethethrottlelevertothe
Fastposition.
Note:Thethrottlesettinggovernsthemaximumdrive
speedofthemachine.
StoppingtheEngine
1.Releasethetraction-controlbail,andallowittoreturn
totheneutralposition.
2.MovetheengineswitchtotheOffpositiontostop
theengine.
DrivingtheMachine
•Tomoveforward,pressthetraction-controlbailforward
(Figure15).Adjustthespeedwiththethrottle.
G018854
Figure15
1.Forward2.Neutral(Stop)
•Toturnthemachine,moveslowlyandpressdownonthe
handle,turnthemachineinthedesireddirection,then
resumenormaloperation.
•Tostop,releasethetraction-controlbail(Figure15).
Aerating
1.Drivethemachinetothedesiredlocation,andstopit.
2.Removethetransportlockingpinfromthespring
bracketandstoreitintheholeabovewhileaerating
(Figure16).
12

Figure16
1.Storagehole3.Transportlockingpin
2.Transporthole
3.Pushthetine-controlleverdownandforwardtoraise
therearwheelsandengagethetines.
1
2
G022377
Figure17
1.Tine-controllever—disengaged
2.Tine-controllever—engaged
4.Drivethemachinetoaeratethedesiredarea.
5.Whennished,stopthemachineandpullthetine
controlleverrearwardanduptolowertherearwheels
andliftsthetinesoutoftheground.
Important:Donotdrivethemachineacross
pavementorotherhardsurfaceswithoutrst
raisingthetines.Crossinghardsurfaceswiththe
tinesloweredwilldamagethetines.
AddingWeighttotheMachine
Toensurethatthetinespenetratefullyintothesoil,youcan
addweighttothetopofthemachine.Themachineisshipped
with2weightsandhas2poststhatholdtheweights.
1
2
3
G022089
Figure18
1.Weight3.Post
2.Hairpincotters
AdjustingtheCoringDepth
Acoringdepthof6.35cm(2-1/2inches)isrecommended,
butyoucanchangethedepthasfollows:
1.Raisethetines,stopthemachine,stoptheengine,and
disconnectthespark-plugwire.
2.Loosenthenutssecuringthewheelstopontheright
sideofthemachine(Figure19).
Figure19
1.Nuts2.Wheelstop
3.Raisethewheelstoptoincreasethecoringdepth,and
lowerittoreducethedepth,asrequired.
4.Tightenthenutssecurelytolockthewheelstopin
place.
5.Repeatsteps2through4forthewheelstopontheleft
sideofthemachine.
Note:Setthewheelstopstothesameheightoneach
side.
13

SecuringtheMachinefor
Transport
Whentransportingthemachineonatrailer,alwaysusethe
followingprocedure:
Important:Donotoperateordrivethemachineon
roadways.
1.Drivethemachineontothetrailer,stopthemachine,
stoptheengine,turnoffthefuelvalve,anddisconnect
thespark-plugwire.
Important:Ifyoudonotturnoffthefuelvalve,
theenginemayoodduringtransport.
2.Insertthetransportlockingpinintothespringbracket
().
3.Securethemachinetothetrailerwithchainsorstraps,
usingthetie-down/liftloops(Figure5).
OperatingTips
•Forbestperformanceandmaximumtinepenetration,
watertheturfthoroughlythedaybeforeaerating.
•Cleantheareaofdebrisbeforeusingthemachine.
•Markandavoidshallowobstaclessuchassprinklerheads
andinvisible-fencewires.
14

Maintenance
RecommendedMaintenanceSchedule(s)
MaintenanceService
IntervalMaintenanceProcedure
Aftertherst8hours•Changetheengineoil.
Aftertherst10hours•Checkthetensionofthedrivechain.
Aftertherst25hours•Checkthetensionofthetransmissiondrivebelts.
Beforeeachuseordaily
•Checktheengine-oillevel.
•Checkthetirepressure.
•Checktheconditionofthecoringtinesandreplaceanythataredamagedor
excessivelyworn.
•Checkforloosefasteners.
Every25hours•Lubricateandcheckthedrivechain.
•Cleanthefoampre-cleaner(morefrequentlyindustyconditions).
Every50hours
•Changetheengineoil.
•Checkthetensionofthedrivechain.
•Checkthetensionofthetransmissiondrivebelts.
Every100hours•Inspectandadjustthesparkplug;replaceitifnecessary.
Every200hours•Replacethesparkplug.
Yearly•Replacethepaperairlter(morefrequentlyindustyconditions).
Yearlyorbeforestorage•T ouchupchippedpaint.
Premaintenance
Procedures
DisconnectingtheSpark-plug
Wire
CAUTION
Ifyouleavethespark-plugwireconnected,
someonecouldaccidentlystarttheengineand
seriouslyinjureyouorotherbystanders.
Beforeperforminganymaintenance,parkthe
machineonalevelsurface,stoptheengine,and
disconnectthespark-plugwire.Setthewireaside
sothatitdoesnotaccidentallycontactthespark
plug.
Pullthespark-plugwireofftheterminalofthesparkplug
(Figure20).
G022090
Figure20
AccessingtheTines
Youcanaccessthetinesthroughtheopeningontherearof
themachine.
15

1
G022091
Figure21
1.Rearopening
TippingtheMachine
Ifyouneedtoworkontheundersideofthemachine,you
cantipitbackandraisethefront.Donottipthemachine
forward,oryouwillfoultheaircleanerwithgasoline.Secure
themachinewithajackstandbeforeworkingunderit(Figure
22).
1
G022092
Figure22
1.Jackstand
WARNING
Mechanicalorhydraulicjacksmayfailtosupport
themachineandcauseaseriousinjury.
Usejackstandswhensupportingthemachine.
Lubrication
LubricatingtheDriveChain
ServiceInterval:Every25hours
1.Raisethetines,stopthemachine,stoptheengine,and
disconnectthespark-plugwire.
2.Raisethefrontofthemachinetogainaccesstothe
chain,andblockitinplace;refertoTippingthe
Machine(page16).
CAUTION
Ifyoudonotsecurelyblockupthefrontofthe
machine,themachinecouldfallonyouduring
service,injuringyou.
Ensurethatyouplaceajackstandorblock
underthefrontofthemachinetoholditup
securely.
Important:Donotraisetherearofthemachine.
Raisingtherearofthemachinewillcausethe
enginetooodandtheaircleanertobefouled
withgasoline.
1
G022094
Figure23
1.Chain
3.Applyageneral-purposeoil(10W-30)ontothelower
chainspanwhilerotatingthefrontwheeltoexpose
un-oiledchainlinks,untilthewholechainisoiled.
4.Wipeupanyspilledoil,andlowerthemachinetothe
groundwhenyouarenished.
16
GreasingtheMachine
Useagreaseguntolubricatethegreasettingsonthefront
axlewithgeneral-purposelithiumgrease(Figure24).
G022093
Figure24
EngineMaintenance
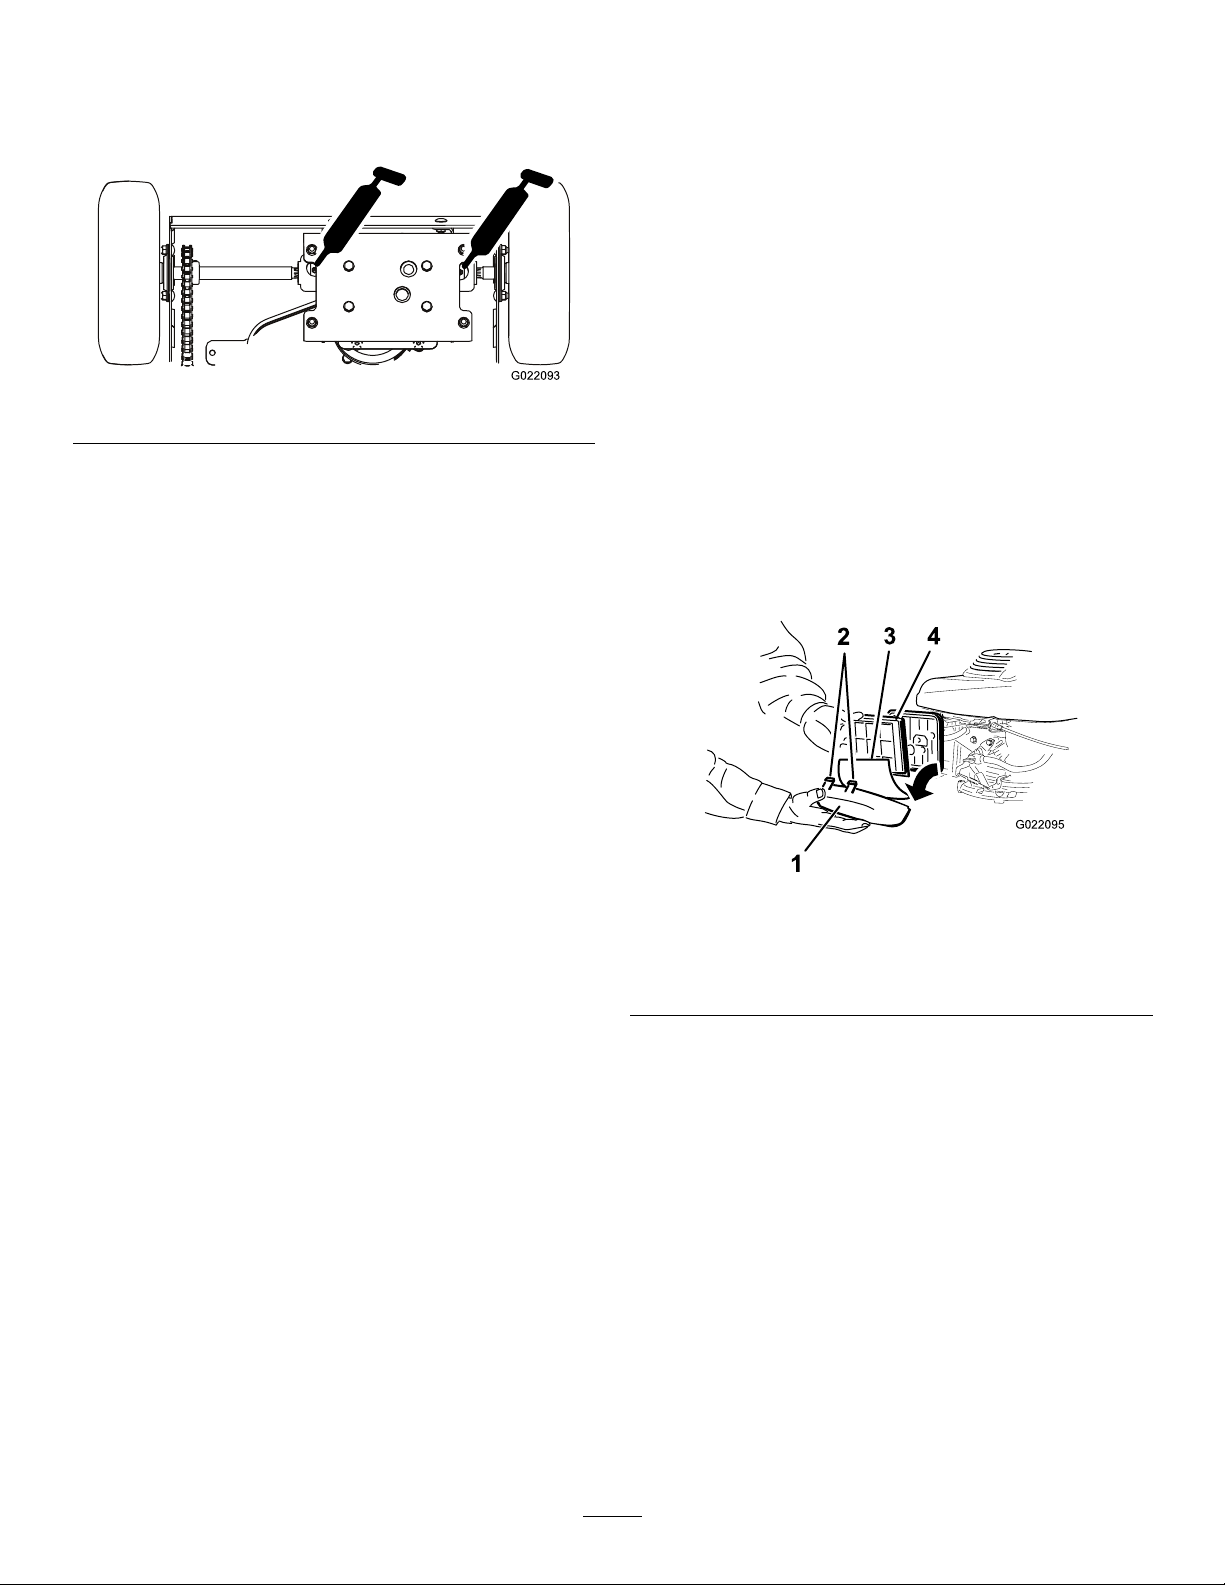
ServicingtheAirCleaner
ServiceInterval:Every25hours—Cleanthefoam
pre-cleaner(morefrequentlyindusty
conditions).
Yearly—Replacethepaperairlter(morefrequently
industyconditions).
Important:Donotoperatetheenginewithouttheair
lterassembly;extremeenginedamagemayoccur.
1.Stoptheengineandwaitforallmovingpartstostop.
2.Disconnectthewirefromthesparkplug.
3.Wipedirtfromthebaseandthecoverwithamoistrag.
Note:Becarefultopreventdirtanddebrisfrom
enteringtheairductleadingtothecarburetor.
4.Removethecover,andremovethefoampre-cleaner
fromthecover(Figure25).
G022095
23
1
4
Figure25
1.Cover3.Foampre-cleaner
2.Latchtabs4.Paperlterandscreen
grid
5.Washthefoampre-cleanerwithamilddetergentand
water,thenblotitdry.
6.Removeandinspectthepaperlter(Figure25).
•Ifitisdirty,tapitonahardsurfaceseveraltimes
toremovethedirt.
•Ifitisexcessivelydirty,damaged,orwetwithoil
orfuel,replaceit.
Important:Donottrytocleanapaperlter.
7.Installthefoampre-cleanerintotheair-cleanercover
Figure25.
8.Setthepaperlterandscreengridintheair-cleaner
body,andinstalltheair-cleanercover.
17

Note:Useanewpaperlterifyoudiscardedtheold
one.
ChangingtheEngineOil
ServiceInterval:Aftertherst8hours
Every50hours
Note:ToroPremiumEngineOilisavailablefromyour
AuthorizedToroDealer.
Important:Use4-cycleengineoilthatmeetsorexceeds
therequirementsforAPIservicecategorySJ,SL,SM,
orhigher.
CrankcaseCapacity:0.55L(18.6oz)
Viscosity:RefertoFigure26.
g013375
0 20 40 60 80 100 F
-20 -10 0 10 20 30 40 C o
o
30
5W - 30 / 10W - 30
Figure26
1.Runtheenginetowarmtheengineoil.
Note:Warmoilowsbetterandcarriesmore
contaminants.
WARNING
Oilmaybehotafterenginehasbeenrun,and
contactwithhotoilcancauseseverepersonal
injury.
Avoidcontactingthehotengineoilwhenyou
drainit.
2.Stoptheengineandwaitforallmovingpartstostop.
3.Disconnectthewirefromthesparkplug.
4.Placeadrainpanonthegroundtotherightofthe
machine.
5.Removethedipstick(Figure27).
G016924
Figure27
6.Tipthemachinetotheside,withtheairlterup,to
draintheusedoiloutthroughtheoil-lltube(Figure
28).
G022105
Figure28
7.Tipthemachineupright,andcleananyspilledoilfrom
themachine.
8.Slowlypouroilintotheoillltube,periodically
checkingthelevelwiththedipstick,untilthedipstick
indicatesthattheengineisfull(Figure29).Donot
overll.
Note:Allowtheoiltosettlebeforecheckingthe
oillevelagain.Tochecktheoillevel,insertthe
dipstickintothellerneck,butdonotrotatethecap
clockwisetosecureit.
Important:Donotoverllthecrankcasewithoil
andruntheengine;enginedamagewillresult.
Draintheexcessoiluntiltheoillevelreachesthe
upper-limitmarkonthedipstick.
18
1
2
3
G022085
Figure29
1.Dipstick3.Lower-limitmark
2.Upper-limitmark
9.Installthedipsticksecurely.
10.Recycletheusedoilaccordingtolocalcodes.
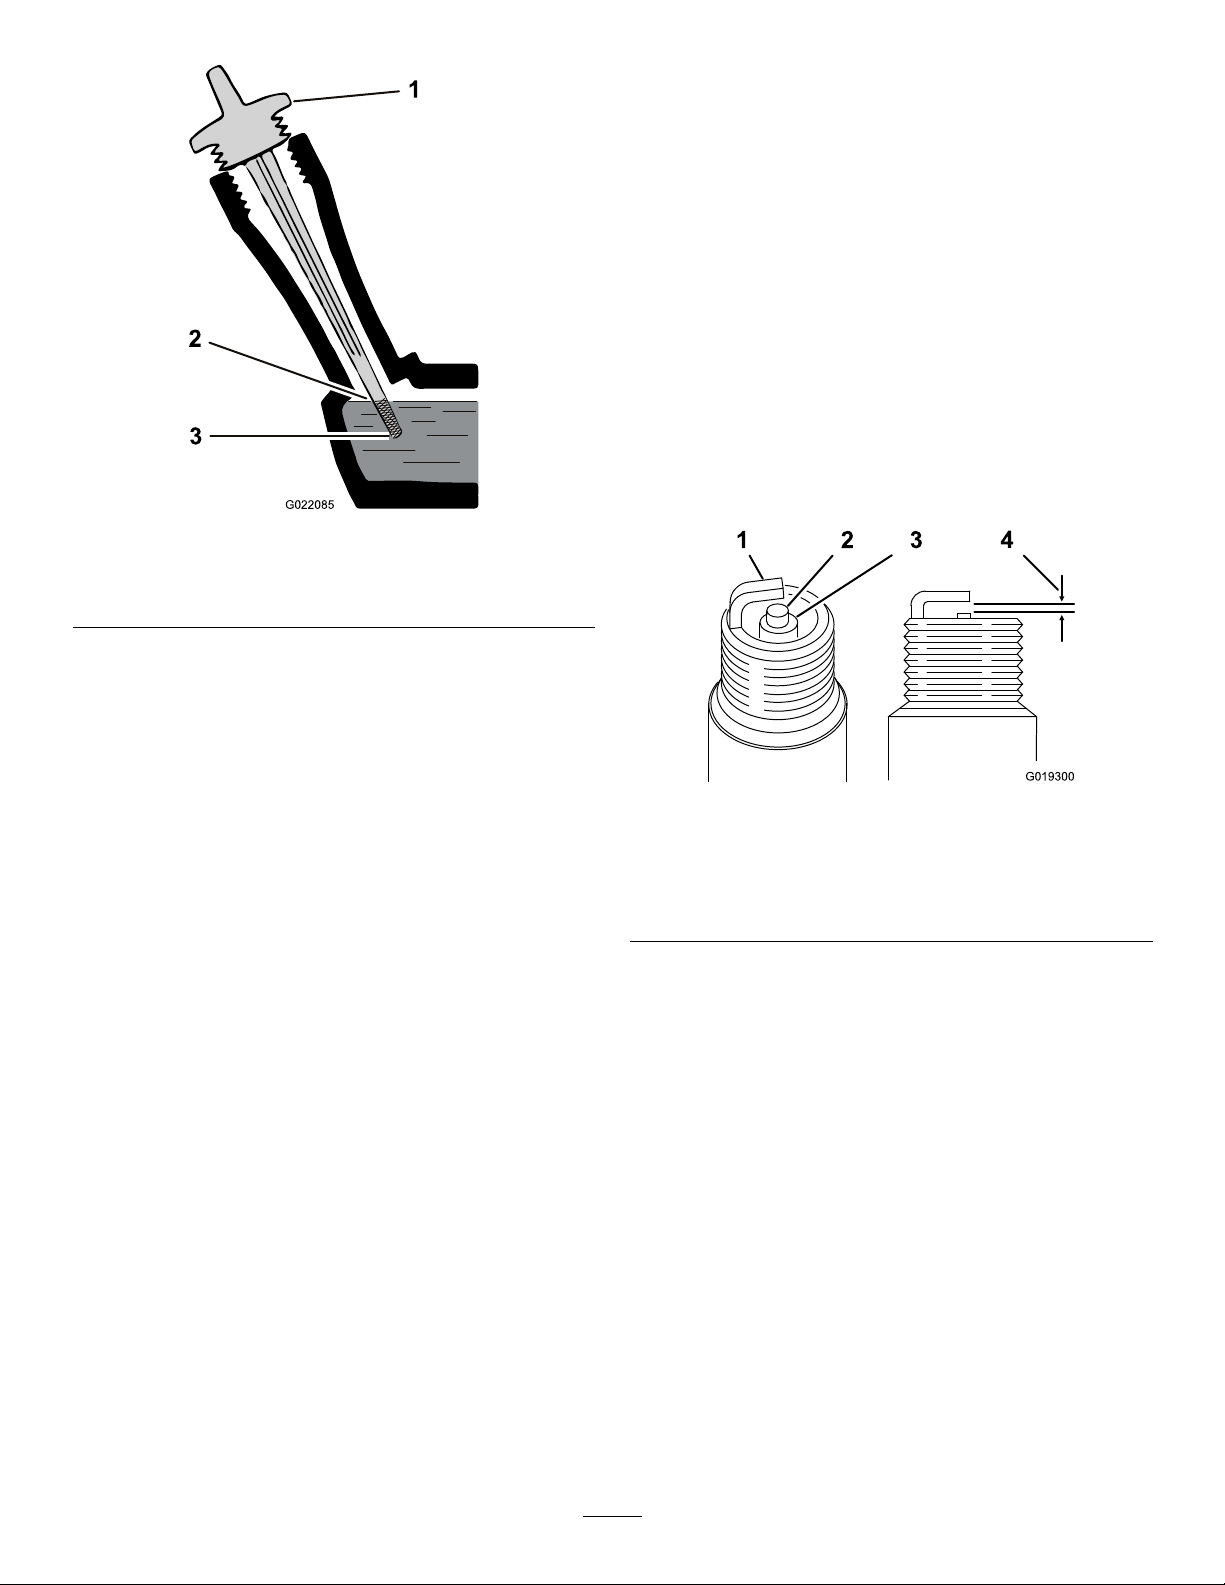
ServicingtheSparkPlug
ServiceInterval:Every100hours—Inspectandadjustthe
sparkplug;replaceitifnecessary.
Every200hours—Replacethesparkplug.
UseanNGKBPR5ESsparkplugorequivalent.
1.Stoptheengineandwaitforallmovingpartstostop.
2.Disconnectthewirefromthesparkplug.
3.Cleanaroundthesparkplug.
4.Removethesparkplugfromthecylinderhead.
Important:Replaceacracked,fouled,ordirty
sparkplug.Donotcleantheelectrodes,because
gritenteringthecylindercandamagetheengine.
5.Setthegapontheplugto0.7to0.8mm(0.028to
0.031inch);refertoFigure30.
G019300
1 2 4
3
Figure30
1.Sideelectrode
2.Centerelectrode
3.Insulator
4.0.7to0.8mm(0.028to0.031inch)gap
6.Carefullyinstallthesparkplugbyhand(toavoidcross
threading)untilitishandtight.
7.Tightenthesparkpluganadditional1/2turnifitis
new;otherwise,tightenitanadditional1/8to1/4turn.
Important:Aloosesparkplugcanbecomevery
hotandcandamagetheengine;overtighteninga
sparkplugmaydamagethethreadsinthecylinder
head.
8.Connectthewiretothesparkplug.
19

DriveSystem
Maintenance
CheckingtheTirePressure
ServiceInterval:Beforeeachuseordaily
Maintaintheairpressureinthetiresasspecied.Checkthe
tireswhentheyarecold,togetthemostaccuratereading.
Pressure:138kPa(20psi)
1
G003793
Figure31
1.Valvestem
CheckingtheTensionofthe
AeratorDriveChain
ServiceInterval:Aftertherst10hours
Every50hours
1.Raisethetines,stopthemachine,stoptheengine,and
disconnectthespark-plugwire.
2.Raisethefrontofthemachinetogainaccesstothe
chain,andblockitinplace.
CAUTION
Ifyoudonotsecurelyblockupthefrontofthe
machine,themachinecouldfallonyouduring
service,injuringyou.
Ensurethatyouplaceajackstandorblock
underthefrontofthemachinetoholditup
securely.
Important:Donotraisetherearofthemachine.
Raisingtherearofthemachinewillcausethe
enginetooodandtheaircleanertobefouled
withgasoline.
3.Pulldownonthechainneartheopeningintheframe
with4.5kg(10lb)offorce(Figure32).Ifthechain
deectsmorethan6mm(1/4inch),tightenitas
follows:
g013126
1
2
Figure32
1.Flexinthechain2.Bottomoftheframe
opening
A.Loosenthenutsecuringtheidlersprocketofthe
chain(Figure33).
1
G022106
2
Figure33
1.Nut2.Idlersprocket
B.Pulldownontheidlersprocketuntiltheslackis
takenoutofthechainandthereisnomorethan6
mm(1/4inch)ofdeectionwhenyouapply4.5
kg(10pounds)offorcetothechain.
Important:Ensurethatthechaindoesnot
comeintocontactwiththeframeattheframe
opening.
C.Tightentheidlersprocketnutandtorqueitto
40.6N-m(30ft-lb).
20
This manual suits for next models
1
Table of contents
Other Toro Tiller manuals


