Toro 58601 User manual

FormNo.3445-371RevA
10inCultivator
58601
Motoazadade25cm(10")
58601
Cultivateurde25cm(10po)
58601
www.T oro.com.*3445-371*


FormNo.3441-764RevC
10inCultivator
ModelNo.58601—SerialNo.321000001andUp
Registeratwww.Toro.com.
OriginalInstructions(EN)*3441-764*

ItisaviolationofCaliforniaPublicResourceCode
Section4442or4443touseoroperatetheengineon
anyforest-covered,brush-covered,orgrass-covered
landunlesstheengineisequippedwithaspark
arrester,asdenedinSection4442,maintainedin
effectiveworkingorderortheengineisconstructed,
equipped,andmaintainedforthepreventionofre.
WARNING
CALIFORNIA
Proposition65Warning
Theengineexhaustfromthisproduct
containschemicalsknowntotheStateof
Californiatocausecancer,birthdefects,
orotherreproductiveharm.
Useofthisproductmaycauseexposure
tochemicalsknowntotheStateof
Californiatocausecancer,birthdefects,
orotherreproductiveharm.
Introduction
Thiscultivatorisintendedtobeusedbyresidential
homeownersorprofessional,hiredoperatorsto
cultivateandlevelsoilaswellasblendlandscape
materials,compostandfertilizer.Usingthisproduct
forpurposesotherthanitsintendedusecouldprove
dangeroustoyouandbystanders.
Readthisinformationcarefullytolearnhowtooperate
andmaintainyourproductproperlyandtoavoid
injuryandproductdamage.Youareresponsiblefor
operatingtheproductproperlyandsafely.
Visitwww.T oro.comformoreinformation,including
safetytips,trainingmaterials,accessoryinformation,
helpndingadealer,ortoregisteryourproduct.
Wheneveryouneedservice,genuineToroparts,or
additionalinformation,contactanAuthorizedService
DealerorT oroCustomerServiceandhavethemodel
andserialnumbersofyourproductready.Figure1
identiesthelocationofthemodelandserialnumbers
ontheproduct.Writethenumbersinthespace
provided.
g342516
Figure1
1.Modelandserialnumberlocation
ModelNo.
SerialNo.
Thismanualidentiespotentialhazardsandhas
safetymessagesidentiedbythesafety-alertsymbol
(Figure2),whichsignalsahazardthatmaycause
seriousinjuryordeathifyoudonotfollowthe
recommendedprecautions.
g000502
Figure2
Safety-alertsymbol
Thismanualuses2wordstohighlightinformation.
Importantcallsattentiontospecialmechanical
informationandNoteemphasizesgeneralinformation
worthyofspecialattention.
©2020—TheToro®Company
8111LyndaleAvenueSouth
Bloomington,MN554202
Contactusatwww.Toro.com.
PrintedintheUSA
AllRightsReserved

Contents
Safety.......................................................................3
GeneralSafety...................................................3
SafetyandInstructionalDecals..........................4
Setup........................................................................5
1AssemblingtheHandle....................................5
2RotatingtheDragStake...................................6
ProductOverview.....................................................7
Controls.............................................................7
Specications....................................................8
BeforeOperation...................................................8
BeforeOperationSafety.....................................8
AddingFuel........................................................9
PerformingDailyMaintenance..........................10
RemovingandInstallingtheTines....................10
DuringOperation..................................................11
DuringOperationSafety....................................11
StartingtheEngine...........................................12
ShuttingOfftheEngine.....................................12
AdjustingtheWheels........................................12
AdjustingtheDragStake..................................13
OperatingTips.................................................13
AfterOperation....................................................14
AfterOperationSafety......................................14
HaulingtheMachine.........................................14
Maintenance...........................................................15
MaintenanceSafety..........................................15
RecommendedMaintenanceSchedule(s)...........15
Pre-MaintenanceProcedures..............................15
PreparingforMaintenance...............................15
EngineMaintenance...........................................16
ServicingtheAirFilter.......................................16
ServicingtheSparkPlug...................................16
Storage...................................................................17
StorageSafety..................................................17
CleaningandStoringtheMachine....................17
Troubleshooting......................................................19
Safety
Thismachinehasbeendesignedinaccordancewith
ANSIB71.8-2016.
GeneralSafety
Thisproductiscapableofamputatinghandsand
feetandofthrowingobjects.Alwaysfollowallsafety
instructionstoavoidseriouspersonalinjuryordeath.
•Read,understand,andfollowtheinstructions
andwarningsinthisOperator’sManualandon
themachineandattachmentsbeforestartingthe
engine.
•Donotputyourhands,feet,otherbodyparts,or
clothingnearmovingpartsofthemachine.
•Donotoperatethemachinewithoutallguards
andothersafetyprotectivedevicesinplaceand
functioningproperlyonthemachine.
•Keepbystandersandchildrenoutoftheoperating
area.
•Donotallowchildrentooperatethemachine.
Allowonlypeoplewhoareresponsible,trained,
familiarwiththeinstructions,andphysically
capabletooperatethemachine.
•Shutoffthemachineandwaitforallmovingparts
tostopbeforeyouleavetheoperator’sposition.
Allowthemachinetocoolbeforeadjusting,fueling,
unclogging,servicing,cleaning,orstoringthe
machine.
Improperlyusingormaintainingthismachinecan
resultininjury.T oreducethepotentialforinjury,
complywiththesesafetyinstructionsandalways
payattentiontothesafety-alertsymbol,which
meansCaution,Warning,orDanger—personalsafety
instruction.Failuretocomplywiththeseinstructions
mayresultinpersonalinjuryordeath.
3
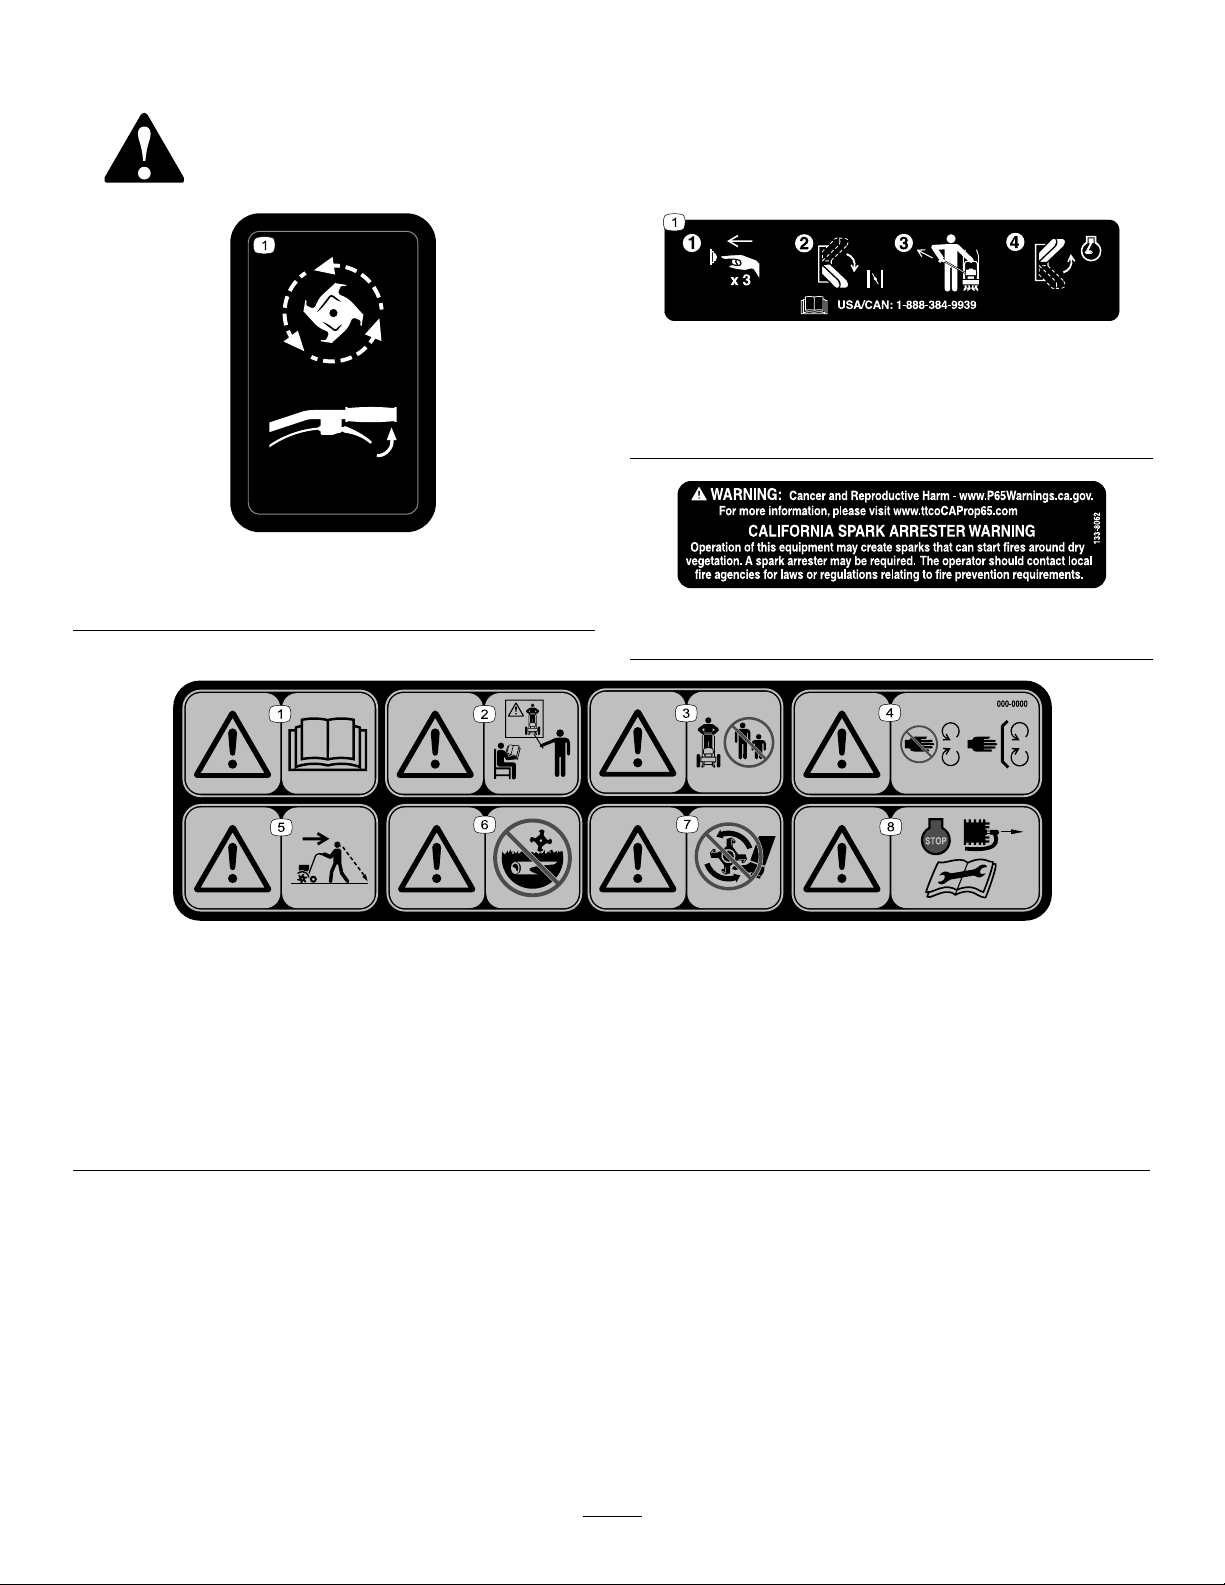
SafetyandInstructionalDecals
Safetydecalsandinstructionsareeasilyvisibletotheoperatorandarelocatednearanyarea
ofpotentialdanger.Replaceanydecalthatisdamagedormissing.
decal144-4726
144-4726
1.Squeezethethrottletoengagethetines.
decal144-4732
144-4732
1.Presstheprimer3times,pushthechokeleverdown,pull
therecoil-starthandle,andoncetheengineisrunningpull
thechokeleverup.
decal133-8062
133-8062
decal144-4727
144-4727
1.Warning—readtheOperator'sManual.5.Warning—lookbehindyouwhenoperatingthemachinein
reverse.
2.Warning—alloperatorsshouldbetrainedbeforeoperating
themachine.
6.Warning—donotoperateoverburiedlines.
3.Warning—keepbystandersaway.7.Warning—keepfeetawayfrommovingparts.
4.Warning—stayawayfrommovingparts;keepallguardsand
shieldsinplace.
8.Warning—shutofftheengineanddisconnectthespark
plugandreadtheOperator’sManualbeforeperforming
maintenance.
4
Setup
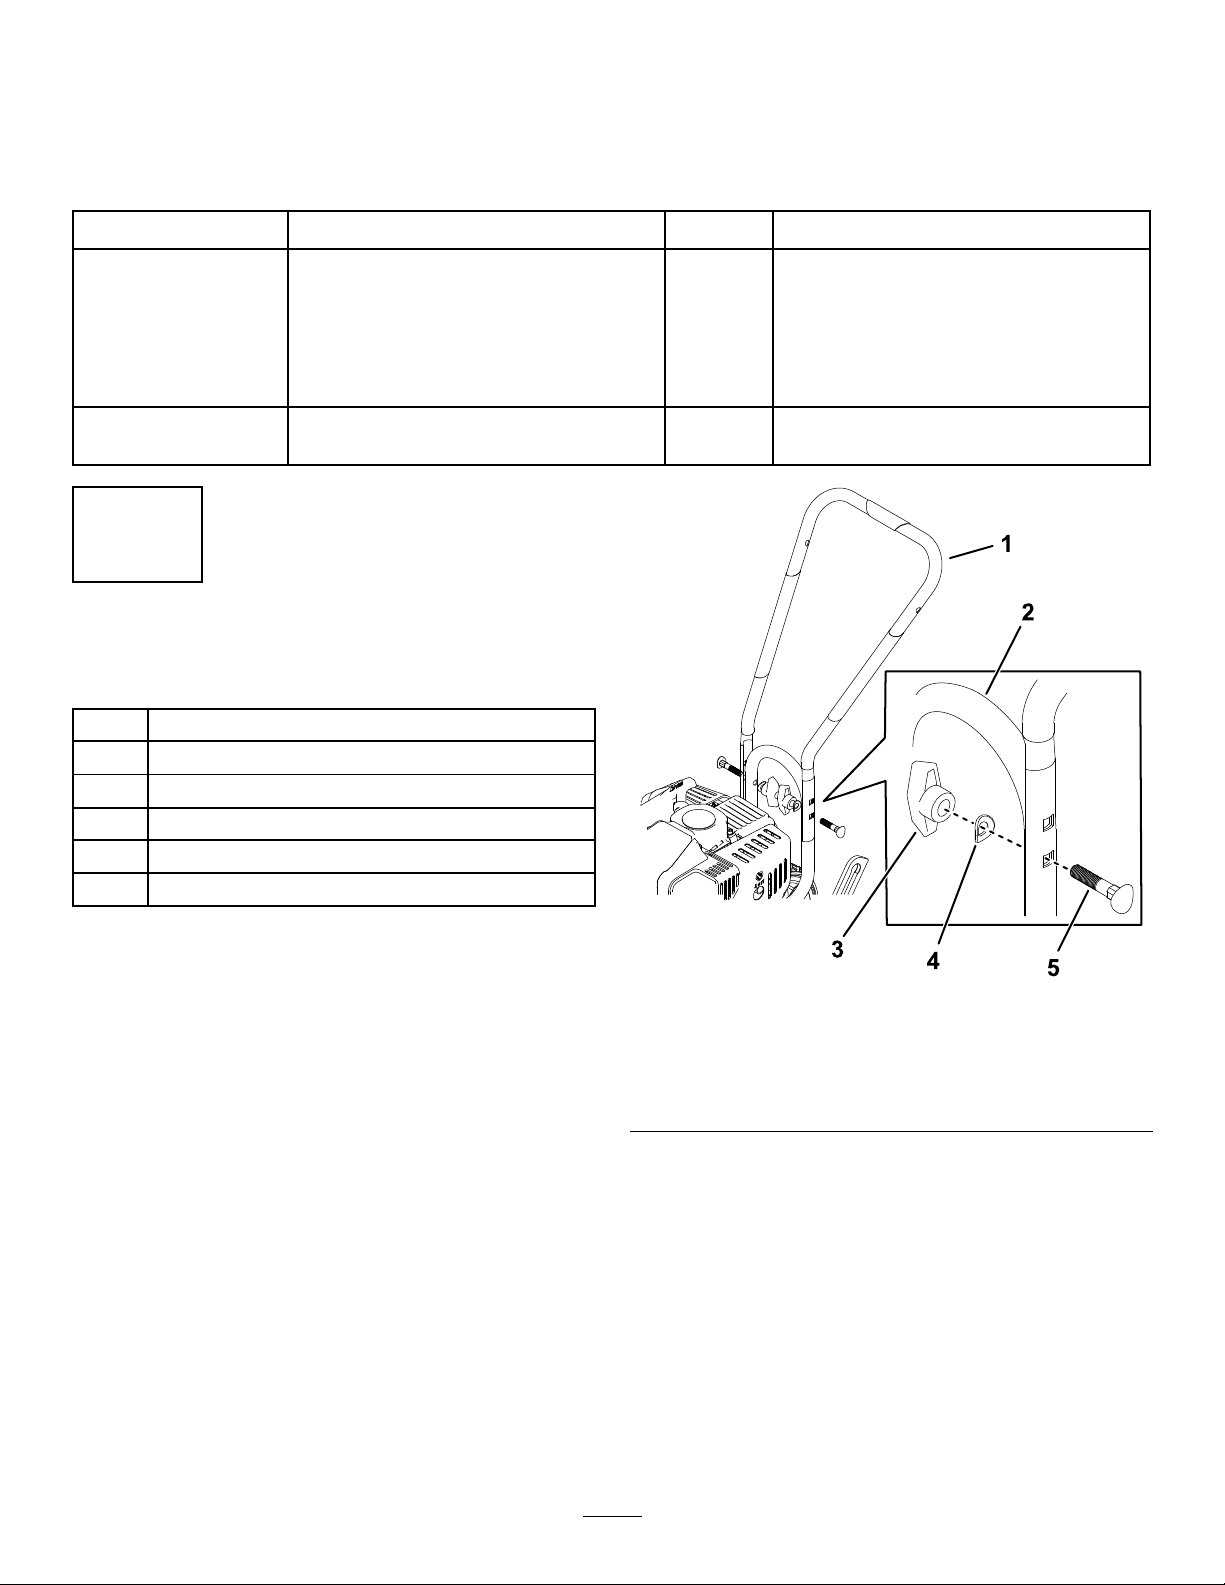
LooseParts
Usethechartbelowtoverifythatallpartshavebeenshipped.
ProcedureDescriptionQty.Use
Knobnut4
Curvedwasher4
Saddlebolt4
Middlehandlebar1
Upperlefthandlebar1
1
Upperrighthandlebar1
Assemblethehandle.
2Nopartsrequired–Rotatethedragstake.
1
AssemblingtheHandle
Partsneededforthisprocedure:
4Knobnut
4Curvedwasher
4Saddlebolt
1Middlehandlebar
1Upperlefthandlebar
1Upperrighthandlebar
Procedure
1.Parkthemachineonalevelsurface.
2.Setthewheelstothelowestposition;Adjusting
theWheels(page12).
3.Attachthemiddlehandlebartothelower
handlebar.
Note:Youcaninstallitintheupperorlower
holes,dependingonheightpreference.
Important:Donotovertightentheknob
nuts.
g334211
Figure3
1.Middlehandle4.Curvedwasher(2)
2.Lowerhandle5.Saddlebolt(2)
3.Knobnut(2)
4.Attachtheupperrightandupperlefthandlebars
tothemiddlehandlebar.
Important:Donotovertightentheknob
nuts.
5

g334212
Figure4
1.Knobnut(2)4.Leftupperhandle
2.Curvedwasher(2)5.Rightupperhandle
3.Saddlebolt(2)
2
RotatingtheDragStake
NoPartsRequired
Procedure
1.Removethelockpin.
2.Rotatethedragstakesothatitpointsdownward,
facingtowardthetines.
3.Installthelockpin.
g334215
Figure5
1.Lockpin2.Dragstake
6

ProductOverview
g334228
Figure6
1.Engineon/offswitch6.Engine
2.Chokelever7.Fuelcap
3.Throttlecontrol8.Tines
4.Handlebar-heightadjustment9.Primerbulb
5.Starterhandle10.Wheelverticalguide
Controls
EngineOn/OffSwitch
UsetheengineOn/Offswitchtoshuttheengineoff.
EnsurethattheswitchisintheONpositionbefore
startingtheengine.
ThrottleControl
Thethrottlecontrolstheenginespeed,andithasa
continuous-variablesetting.
Operatethemachineusingfullthrottleforbest
performance.
ChokeLever
MovethechokeleverontheenginetotheCHOKE
positionwheninitiallystartingacoldengine,then
moveitintotheRUNpositiononcestarted.
7

Specications
Specicationsanddesignaresubjecttochange
withoutnotice.
Height97cm(38inches)
Length89cm(35inches)
Width46cm(18inches)
Weight15kg(33lb)
Cultivatingwidth15to25cm(6to10inches)
CultivatingdepthUpto20cm(8inches)
Toensureoptimumperformanceandcontinuedsafety
certicationofthemachine,useonlygenuineT oro
replacementpartsandaccessories.Replacement
partsandaccessoriesmadebyothermanufacturers
couldbedangerous,andsuchusecouldvoidthe
productwarranty.
Operation
Note:Determinetheleftandrightsidesofthe
machinefromthenormaloperatingposition.
BeforeOperation
BeforeOperationSafety
GeneralSafety
•Donotallowchildrenoruntrainedpeopleto
operateorservicethemachine.Localregulations
mayrestricttheageoftheoperator.
•Shutoffthemachineandwaitforallmovingparts
tostopbeforeyouleavetheoperator’sposition.
Allowthemachinetocoolbeforeadjusting,fueling,
unclogging,servicing,cleaning,orstoringthe
machine.
•Becomefamiliarwiththesafeoperationofthe
equipment,operatorcontrols,andsafetysigns.
•Checkthatallguardsandsafetydevices,suchas
deectorsand/orgrasscatcher,areinplaceand
functioningproperly.Donotoperatethemachine
unlesstheyarefunctioningproperly.
•Knowhowtoshutofftheenginequickly.
•Inspectthemachinefrequentlytoensurethatit
isinsafeworkingconditionandthatshearbolts,
engine-mountingbolts,andotherfastenersare
properlytightened.
•Inspecttheareawhereyouwillusethemachine
andremoveallobjectsthatcouldinterferewith
theoperationofthemachineorthatthemachine
couldthrow.
•Contactwiththemovingtineswillcauseserious
injury.Donotputyourhandsorfeetnearthem.
FuelSafety
•Useextremecareinhandlingfuel.Itisextremely
ammableanditsvaporsareexplosive.
•Extinguishallcigarettes,cigars,pipes,andother
sourcesofignition.
•Useonlyanapprovedfuelcontainer.
•Donotremovethefuelcaporaddfueltothetank
whiletheengineisrunning.
•Allowtheenginetocoolbeforellingthefueltank.
•Donotllthefueltankindoors.
•Donotstorethemachineorfuelcontainerwhere
thereisanopename,spark,orpilotlight,such
asonawaterheaterorotherappliance.
•Donotllcontainersinsideavehicleoronatruck
ortrailerbedwithaplasticliner.Alwaysplace
8

containersontheground,awayfromthevehicle
beforelling.
•Removethemachinefromthetruckortrailer
beforellingthefueltank.Ifthisisnotpossible,
thenaddfuelfromaportablecontainerratherthan
fromafuel-dispensernozzle.
•Keepthefuel-dispensernozzleincontactwith
therimofthefueltankorcontaineropeningat
alltimesuntilfuelingiscomplete.Donotusea
nozzlelock-opendevice.
•Ifyouspillfuelonyourclothing,changeyour
clothingimmediately.
•Donotoverllthefueltank.Replacethefuelcap
andtightenitsecurelyafterfueling.
•Ifyouspillfuel,donotattempttostarttheengine;
movethemachineawayfromthespillandavoid
creatingasourceofignitionuntilthefuelvapors
havedissipated.
•Storefuelinafuelcontainerandkeepitoutofthe
reachofchildren.
•Fuelisharmfulorfatalifswallowed.Long-term
exposuretovaporscancauseseriousinjuryand
illness.
–Avoidprolongedbreathingofvapors.
–Keepyourhandsandfaceawayfromthe
nozzleandthefuel-tankopening.
–Keepfuelawayfromyoureyesandskin.
AddingFuel
RecommendedFuel
TypeUnleadedgasoline
Minimumoctanerating87(US)or91(research
octane;outsidetheUS)
EthanolNomorethan10%byvolume
MethanolNone
MTBE(methyltertiarybutyl
ether)
Lessthan15%byvolume
Oil2-cycleoil;mixedin50:1
fuel-to-oilratio
Useonlyclean,fresh(nomorethan30daysold),fuel
fromareputablesource.
MixingFuel
Thisproductispoweredbya2-cycleengineand
requirespre-mixingfueland2-cycleoil.Pre-mix
unleadedgasolineand2-cycleengineoilinaclean
containerapprovedforfuel.Donotmixquantities
largerthanusableina30-dayperiod.
Important:Topreventenginedamage,donotuse
automotiveoil(suchasSAE30or10W30)orfuel
mixedatthewrongfuel-to-oilratio.
50:1Fuel-to-OilRatioMixingChart
FuelOil
3.8L(1USgallon)76ml(2.6oz)
7.6L(2USgallons)152ml(5.1oz)
19L(5USgallons)380ml(13oz)
1.Pour1.9L(0.5USgallon)fresh,unleadedfuel
intoanapprovedfuelcontainer.
2.Add2-cycleoiltothefuelaccordingtothechart.
g001120
Figure7
3.Installthecaponthefuelcontainer.
4.Shakethecontainertomixthefuelandoil
thoroughly.
5.Slowlyremovethecapandaddtheremaining
amountoffuel.
9

Note:Donotmixfuelandoilinthefueltank.Oilat
roomtemperaturemixeseasierandmorethoroughly
thancoldoil.Oilbelow0°C(32°F)requiresadditional
mixing.
UsingStabilizer/Conditioner
Usefuelstabilizer/conditionerinthemachinetokeep
thefuelfreshlongerwhenusedasdirectedbythe
fuel-stabilizermanufacturer.
Important:Donotusefueladditivescontaining
methanolorethanol.
Addtheamountoffuelstabilizer/conditionertofresh
fuelasdirectedbythefuel-stabilizermanufacturer.
FillingtheFuelTank
Fuel-tankcapacity:1.1L(36oz)
Refertoyourengineowner’smanualforadditional
information.
FillthefueltankasshowninFigure8.
g230458
Figure8
PerformingDaily
Maintenance
Beforestartingthemachineeachday,performthe
EachUse/DailyprocedureslistedinMaintenance
(page15).
RemovingandInstalling
theTines
1.Parkthemachineonalevelsurface,shutoffthe
engine,andallowtheenginetocool.
2.Removethehairpincotterfromeachendofthe
tineshaft.
g334235
Figure9
1.Hairpincotter
3.Slidethetinesofftheshaft.
4.Slidetheinnertines(“B”and“C”)ontheshaft.
Note:Thelettersarestampedonthetines.
Slidetine“B”ontheleftsideoftheshaft,and
slidetine“C”totherightsideoftheshaft.
g334237
Figure10
5.Slidetheoutertines(“A”and“D”)ontheshaft,
sothattheorderofthetinesis“A”,“B”,“C”,“D”,
whenviewedfromtheoperatingposition.
Note:Ensurethatthehubcollarsonboththe
leftandrightpairsoftinesfaceeachotherto
ensureadequatespacingbetweenthetine
blades.
10
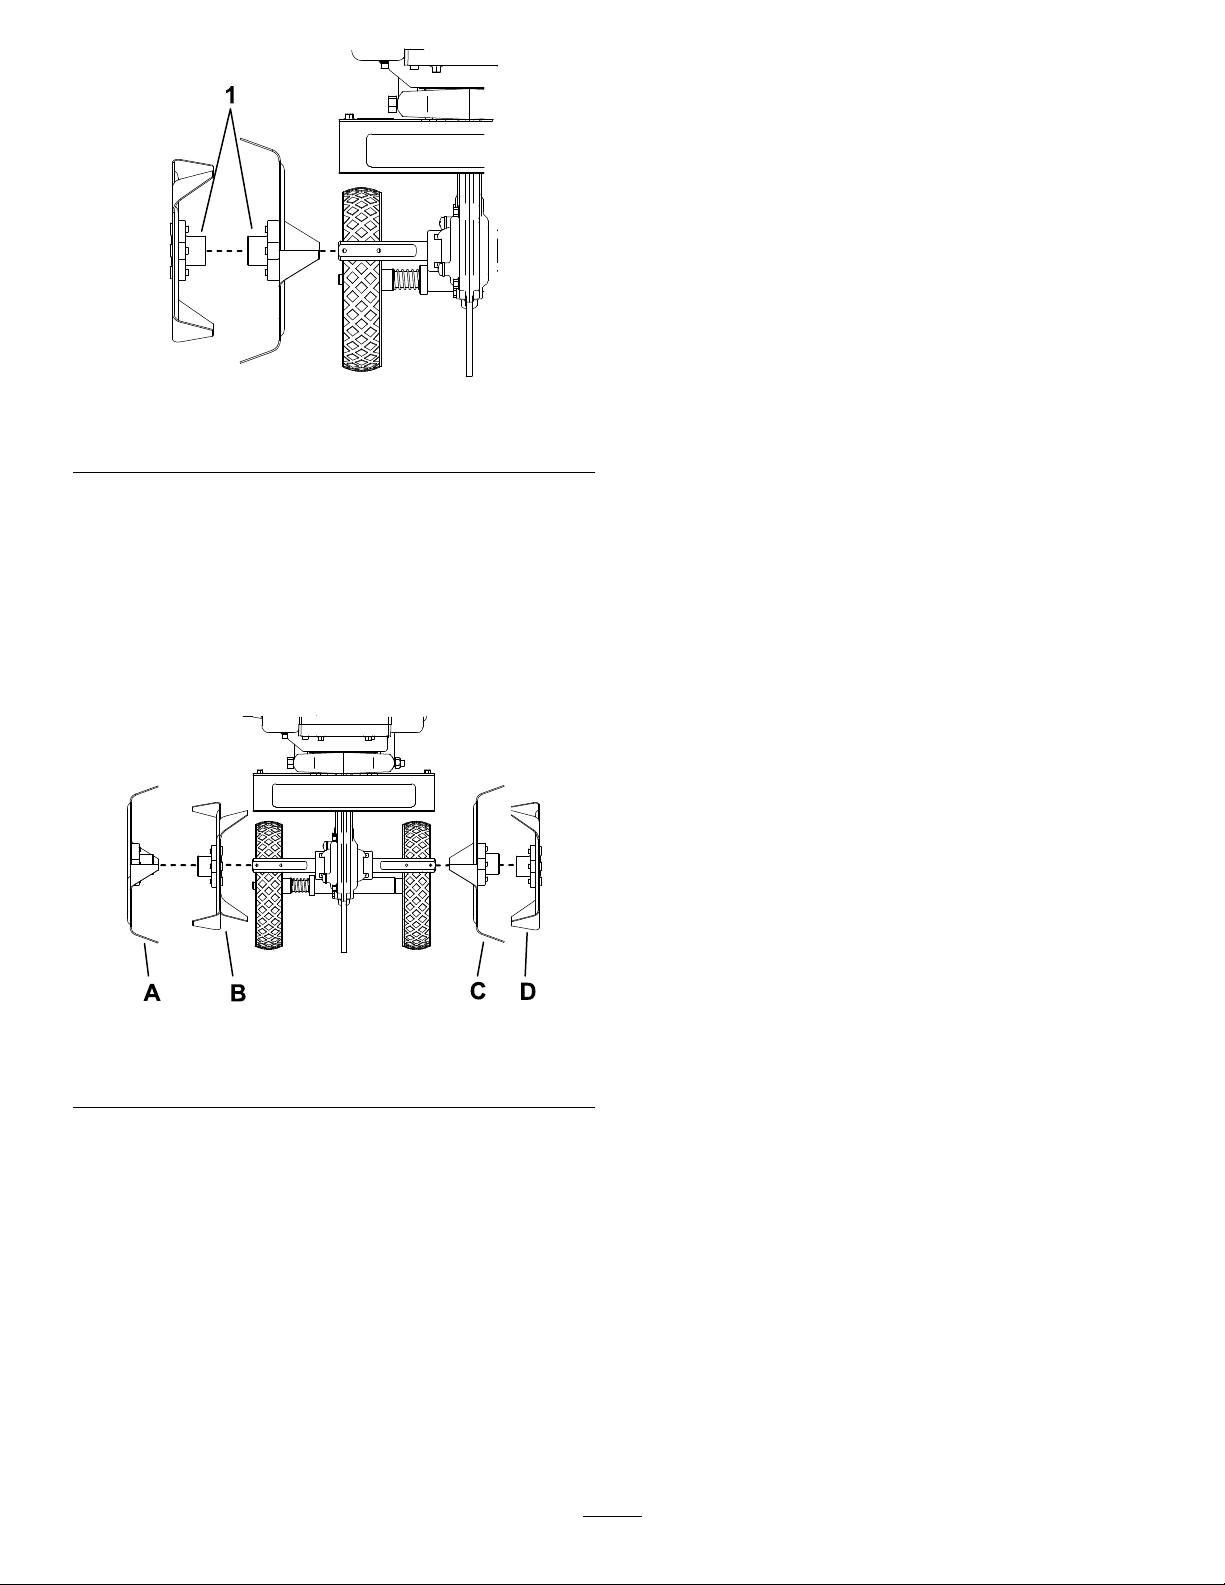
g334236
Figure11
1.Hubcollar
6.Installahairpincotteroneachendofthetine
shaft.
Note:Todigmoreaggressively,reversetheorder
ofthetinessothatthetipsfaceforward(“D”,“C”,
“B”,“A”,whenviewedfromtheoperatingposition)as
showninFigure12.
Note:Foramorenarrowdiggingwidth,donotinstall
tines“A”and“D”instep5.
g334238
Figure12
Tineorderformoreaggressivedigging
DuringOperation
DuringOperationSafety
GeneralSafety
•Useyourfullattentionwhileoperatingthe
machine.Donotengageinanyactivitythat
causesdistractions;otherwise,injuryorproperty
damagemayoccur.
•Donotoperatethemachinewhileill,tired,or
undertheinuenceofalcoholordrugs.
•Usingapoweredwalk-behindcultivatoris
strenuous.Youmustbeingoodphysicalcondition
andmentallyalert.Ifyouhaveamedicalcondition
thatmightbeaggravatedbystrenuouswork,check
withyourdoctorbeforeoperatingthemachine.
•Wearappropriateclothing,includingeye
protection;longpants;substantial,slip-resistant
footwear;hearingprotection;andgloves.Tieback
longhairanddonotwearlooseclothingorloose
jewelry.
•Keepyourhands,feet,otherbodyparts,and
clothingawayfromrotatingtinesandmovingparts
ofthemachine.Thetinesbeginrotatingwhen
youstarttheengineandmaycontinuetorotate
momentarilyafteryoushutofftheengine.
•Starttheenginecarefullyaccordingtoinstructions
inthisOperator’sManualandwithyourfeetwell
awayfromthetines.
•Useextremecautionwhenreversingorpulling
themachinetowardyou.T oavoidgettingpinned
againstastructure,allowenoughdistanceto
reversedirectionnearawallorfence.
•Keepbystandersoutoftheoperatingarea.Keep
smallchildrenoutoftheoperatingareaandunder
thewatchfulcareofaresponsibleadultwhois
notoperatingthemachine.Stopthemachineif
anyoneentersthearea.
•Beforeyoustarttheengine,ensurethatalldrives
areinneutralandyouareintheoperatingposition.
•Operatethemachineonlyingoodvisibilityand
appropriateweatherconditions.Donotoperate
themachinewhenthereistheriskoflightning.
•Donotattempttoadjustthemachinewhilethe
engineisrunning.
•Ifthemachinestrikesanobjectorstartstovibrate
abnormally,immediatelyshutofftheengine,wait
forallmovingpartstostop,anddisconnectthe
wirefromthesparkplugbeforeexaminingthe
machinefordamage.Vibrationisoftenawarning
signoftrouble.Makeallnecessaryrepairsbefore
resumingoperation.
•Donotoperatethemachineathightransport
speedsonhardorslipperysurfaces.
•Donotoverloadthemachinecapacityby
attemptingtotillorcultivatetoodeepandattoo
fastarate.
•Donotpickuporcarryamachinewhiletheengine
isrunning.
•Exercisecautionandbesureofyourfooting,
especiallywhenbackingup,toavoidslippingor
falling.
•Becarefulwhencultivatinginhardground.The
tinescancatchinthegroundandpropelthe
11
machineforward.Ifthisoccurs,letgoofthe
machine;donottrytorestrainit.
•Exerciseextremecautionwhencrossinggravel
surfaces.Stayalertforhiddenhazardsortrafc.
•Donotleavearunningmachineunattended.
•Shutoffthemachineandwaitforallmovingparts
tostopbeforeyouleavetheoperator’sposition.
Allowthemachinetocoolbeforeadjusting,fueling,
unclogging,servicing,cleaning,orstoringthe
machine.
•Operatetheengineonlyinwell-ventilatedareas.
Exhaustgasescontaincarbonmonoxide,whichis
anodorless,deadlypoison.
•Useonlyaccessoriesandattachmentsapproved
byTheToro®Company.
•Donotchangetheenginegovernorsettingsor
overspeedtheengine.
•Alwaysbesureofyourfooting;keeparmholdon
thehandleandwalk,neverrun.
•Allowthemuferandengineareatocoolbefore
touchingthem.
•Thetinesshouldnotrotatewhentheengineis
idling;iftheydorotate,contactyourAuthorized
ServiceDealer.
•Ifanobjectbecomeslodgedinthetines,shutoff
theengine,disconnectthewirefromthespark
plug,andallowtheenginetocoolbeforeremoving
theobject.
StartingtheEngine
1.Presstheprimerbulbuntiltheprimerhoseis
lledwithgas.
Note:Allowthebulbtoreturntoitsoriginal
positionbetweenpresses.
Note:Awarmorhotenginemaynotrequire
priming.
2.MovethechokelevertotheCHOKEposition.
Note:Awarmorhotenginemaynotrequire
choking.
3.PresstheengineOn/OffswitchtotheON
position.
4.Standintheoperatingpositionandgrabthe
handlebarwith1hand.
5.Withyourotherhand,pullthestarterhandle
lightlyuntilyoufeelresistance,thenpullthe
handlebriskly.Returnthestarterhandlegently.
Note:Iftheenginedoesnotstartafter5or6
pulls,presstheprimerbulbonceandpullthe
starterhandleagain.
6.Oncetheengineisrunning,movethechoke
levermidwaybetweentheCHOKEandRUN
positions.
7.Whentheenginerunssmoothly,movethechoke
levertotheRUNposition.
8.Squeezethethrottlelevertothedesiredspeed.
Note:Usefullthrottlewhenpossible.Donotlet
themachineidleforextendedperiodsoftime.
ShuttingOfftheEngine
1.Releasethethrottlelever.
2.Remainintheoperatingpositionandgrabthe
handlebarwith1hand.
3.MovetheengineOn/OffswitchtotheOFF
position.
4.Waitforallmovingpartstostopbeforeleaving
theoperatingposition.
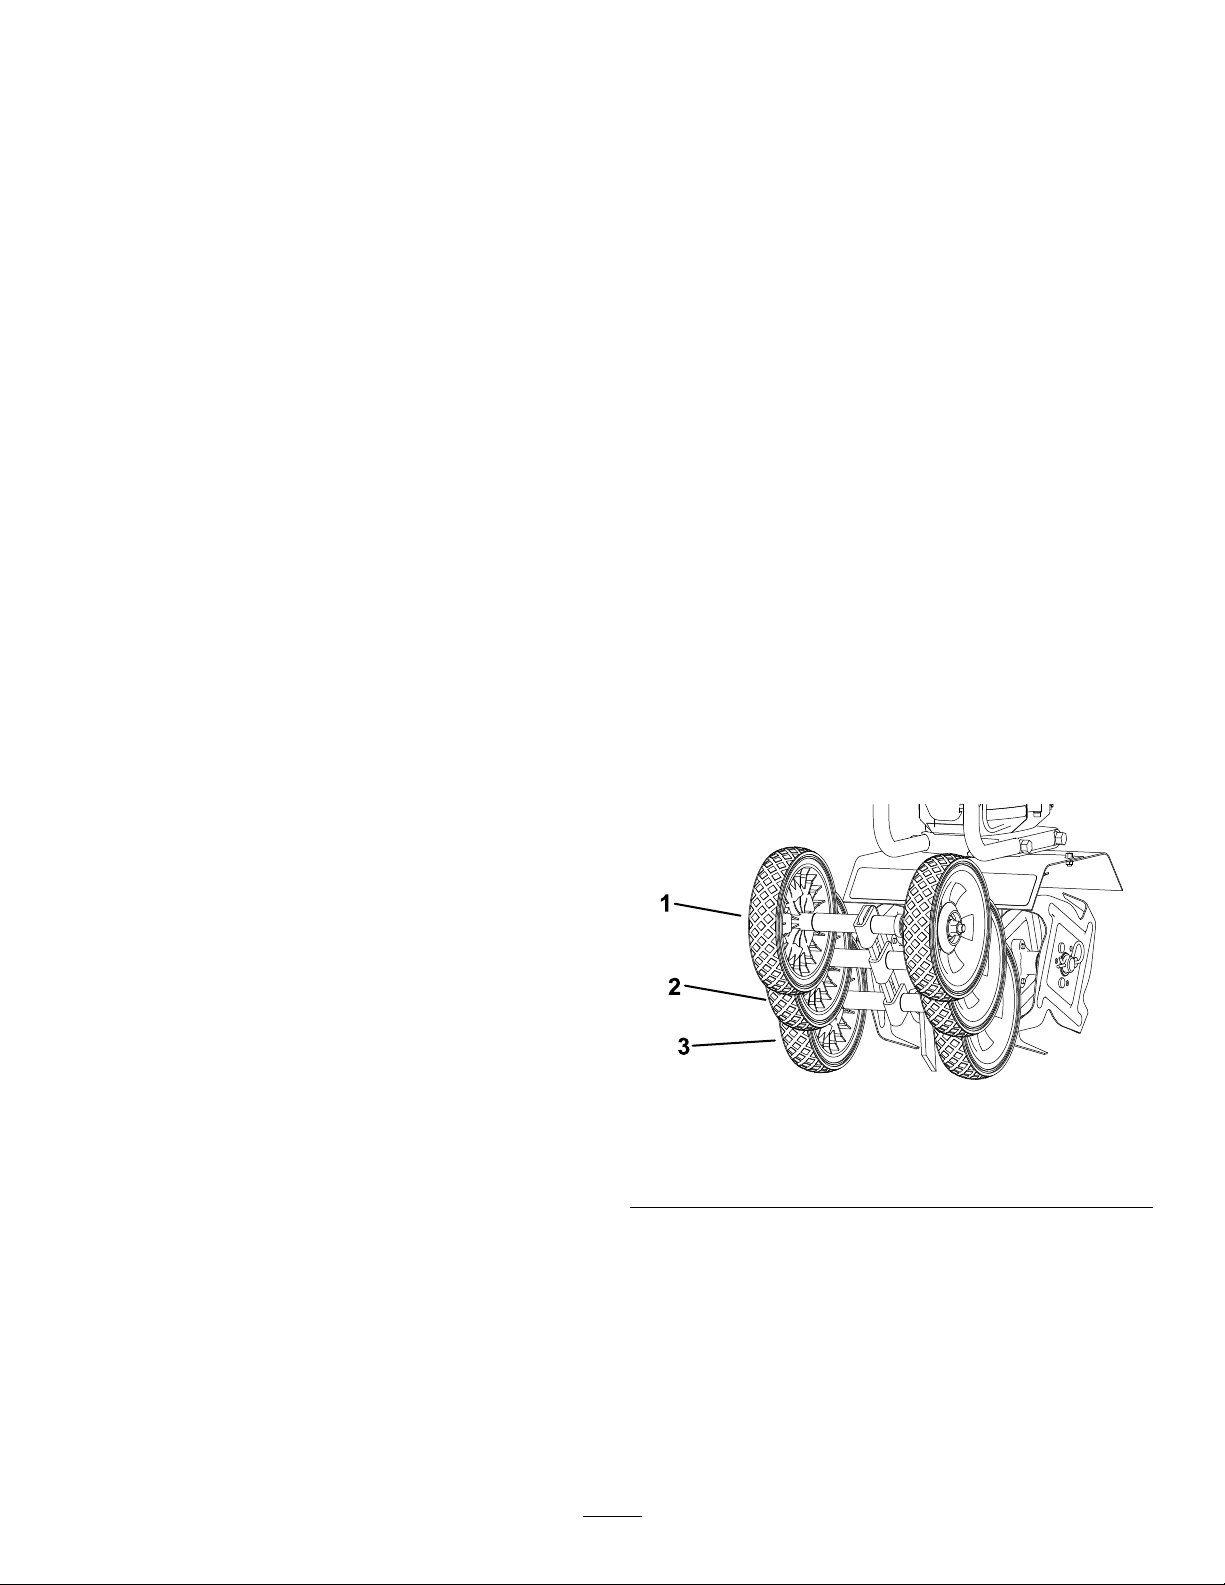
AdjustingtheWheels
Adjustthewheelsto1of3positions.Usethelow
positionwhentransportingthecultivatoroverlevel
surfaceswhiletheengineisoff.Usethemiddleand
highpositionstohelpstabilizethemachinewhen
cultivatingatdifferentdepths.
g334240
Figure13
1.Highposition3.Lowposition
2.Middleposition
1.Movethemachinetoalevelsurface,shutoffthe
engine,andwaitforallmovingpartstostop.
2.Pullthelockingsleeveawayoutofthevertical
guidetotheunlockedposition(Figure14).
3.Slidethewheelstothedesiredposition.
4.Releasethelockingsleeveandensureitlocks
intoanotchintheverticalguide.
12

g334239
Figure14
1.Lockingsleeve—locked
position
2.Lockingsleeve—unlocked
position
AdjustingtheDragStake
Thedragstakehelpsregulatecultivatingdepthand
preventsthecultivatorfromjerkingforwardduring
operation.Setthedragstakeinthelowestposition
toincreaseresistancetoforwardmotionandtodig
deeper.
1.Movethemachinetoalevelsurface,shutoffthe
engine,andwaitforallmovingpartstostop.
2.Removethelockpin.
3.Positionthedragstaketothedesireddepthwith
thetippointingdownward.
4.Securethedragstakewiththelockpin.
g334215
Figure15
1.Lockpin2.Dragstake
OperatingTips
•Inspecttheareawhereyouwillusethecultivator
andremoveallobjectssuchaslargerocks,
trash,andbranchesbeforecultivatingtoprevent
equipmentdamage.
•Theclutchtransfersmaximumpowerafterabout
2hoursofnormaloperation.Duringthisbreak-in
period,theclutchmayslip.Keeptheclutchfreeof
oilandothermoistureforefcientoperation.
•Alwaysbegincultivatingwiththeslowestground
speedpossible.Increasethespeedifconditions
permit.
•Donotplaceexcessivebodyweightonthe
cultivator.Usetheweightofthemachineto
cultivatemoreefciently.
13

AfterOperation
AfterOperationSafety
GeneralSafety
•Shutoffthemachineandwaitforallmovingparts
tostopbeforeyouleavetheoperator’sposition.
Allowthemachinetocoolbeforeadjusting,fueling,
unclogging,servicing,cleaning,orstoringthe
machine.
•Cleandebrisfromthemachinetohelpprevent
res.Cleanupoilorfuelspills.
HaulingSafety
•Disconnectthewirefromthesparkplugbefore
loadingthemachineforhauling.
•Usecarewhenloadingorunloadingthemachine.
HaulingtheMachine
DANGER
Whentransportingthemachineinsidean
enclosedspaceinsideavehicle,fuelandfuel
vaporsmayigniteandcauseseriousinjury
ordeath.
Transportthemachineinanuprightposition
inanopenvehicleorremovefuelfromthe
machine.
Ensurethatthefuelcapistightandtransportthe
machineinanuprightpositioninanopenvehicle.
Securethemachinefrommovement.
Iffuelispresentinthefueltankandyoumusttransport
themachineinanenclosedvehicle,continueas
follows:
1.Drainthefuelintoanapprovedfuelcontainer.
2.Startthemachineandrunituntilitshutsoff.
3.Wipeawayanyfuelspillsandallowthemachine
todry.
4.Tightlyscrewonthefuelcap.
5.Securethemachinefrommovement.
14
Maintenance
MaintenanceSafety
•Shutoffthemachineandwaitforallmovingparts
tostopbeforeyouleavetheoperator’sposition.
Allowthemachinetocoolbeforeadjusting,fueling,
unclogging,servicing,cleaning,orstoringthe
machine.
•Disconnectthespark-plugwirefromthesparkplug
beforeperforminganymaintenanceprocedure.
•Wearglovesandeyeprotectionwhenservicing
themachine.
•Nevertamperwithsafetydevices.Checktheir
properoperationregularly.
•Keepallpartsingoodworkingcondition.Replace
allworn,damaged,ormissingpartsanddecals.
Keepallfastenerstighttoensurethatthemachine
isinsafeworkingcondition.
•Toensureoptimumperformanceofthemachine,
useonlygenuineTororeplacementpartsand
accessories.Replacementpartsandaccessories
madebyothermanufacturerscouldbedangerous,
andsuchusecouldvoidtheproductwarranty.
•Weargloveswhenservicingthetines.Donot
repairoralterthem.
RecommendedMaintenanceSchedule(s)
MaintenanceService
IntervalMaintenanceProcedure
Beforeeachuseordaily•Checktheairlter.
•Cleandebrisfromcoolingns,airinletsandlinkages.
Every20hours
•Cleantheairlter.(Cleandailyinextremelydustyconditions.)
•Replacetheairlter.
•Check,clean,andgapthesparkplug.
Yearly•Replacetheairlter.
•Replacethesparkplug.
Pre-Maintenance
Procedures
PreparingforMaintenance
1.Movethemachinetoalevelsurface,shutoffthe
engine,andwaitforallmovingpartstostop.
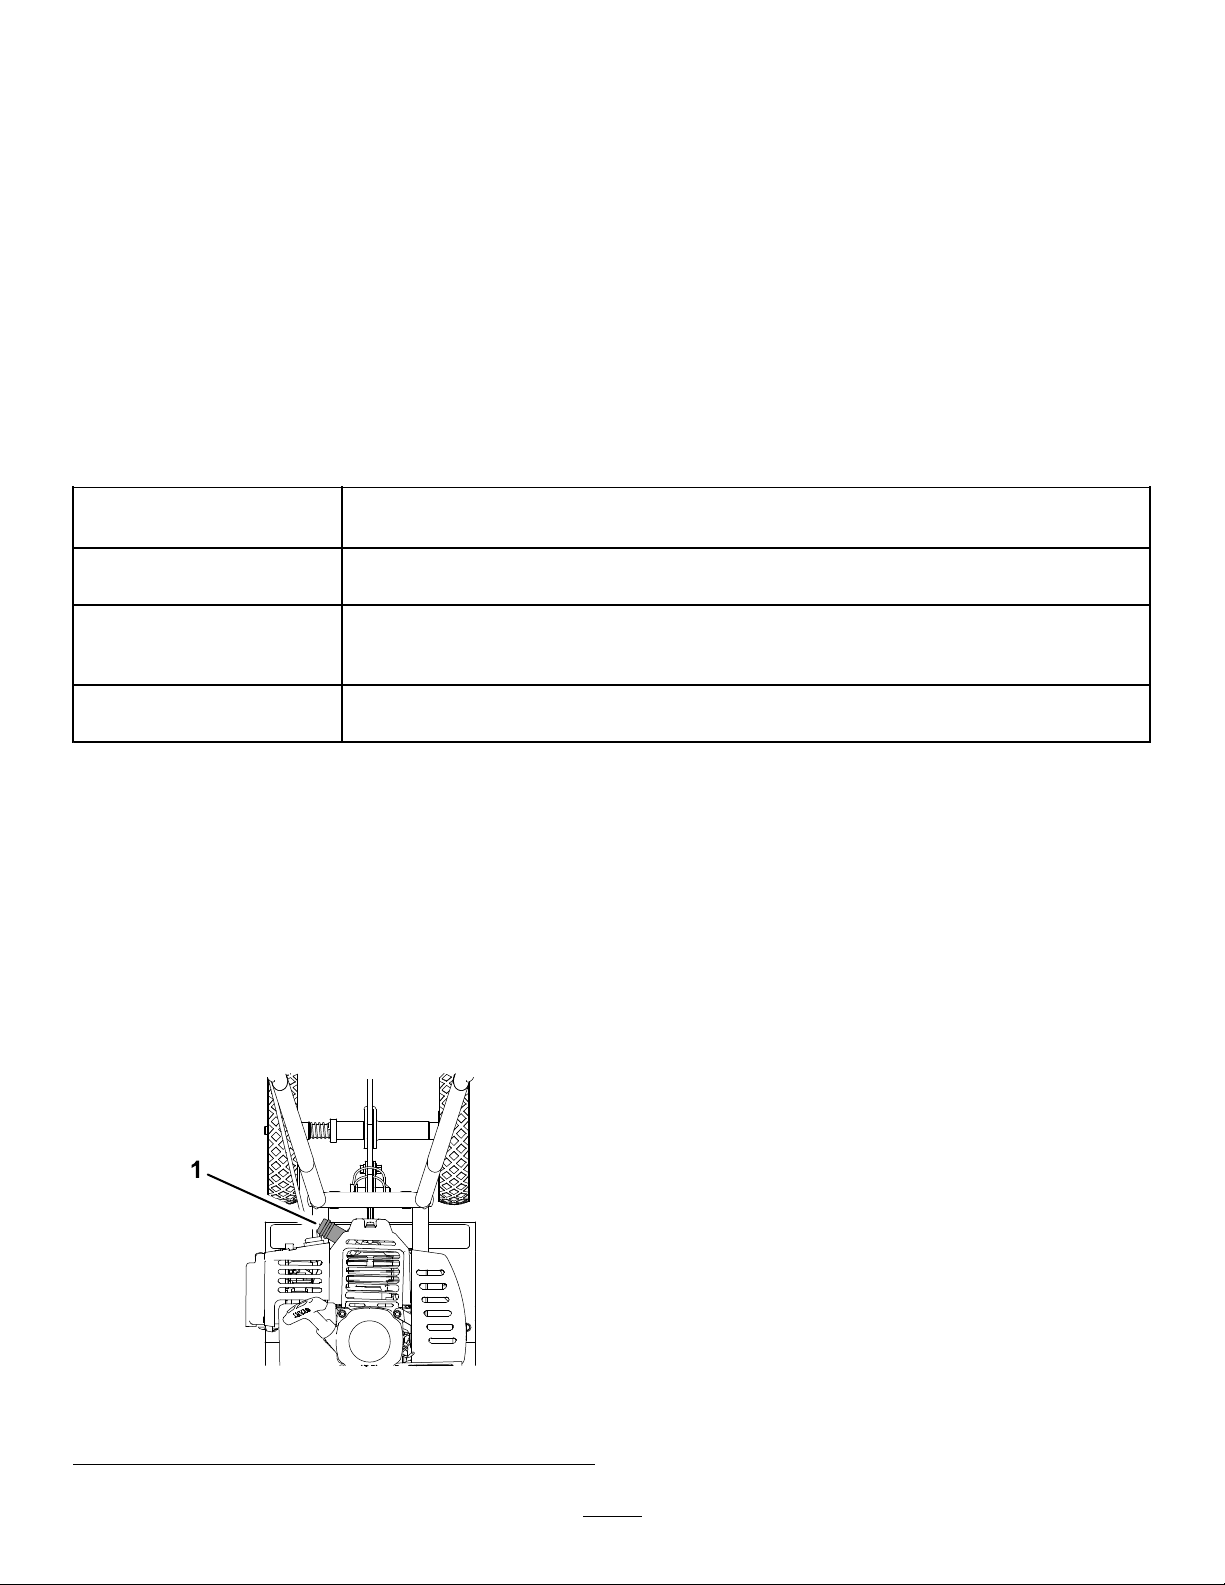
2.Disconnectthespark-plugwirefromthespark
plug.
g335329
Figure16
1.Spark-plugwire
3.Afterperformingthemaintenanceprocedure(s),
connectthespark-plugwiretothesparkplug.
Important:Beforetippingthemachineto
replacetheblade,allowthefueltanktorun
drythroughnormalusage.Ifyoumusttip
themachinepriortorunningoutoffuel,use
ahandfuelpumptoremovethefuel.
15
EngineMaintenance
ServicingtheAirFilter
ServiceInterval:Beforeeachuseordaily—Check
theairlter.
Every20hours—Cleantheairlter.(Clean
dailyinextremelydustyconditions.)
Every20hours—Replacetheairlter.
Yearly—Replacetheairlter.
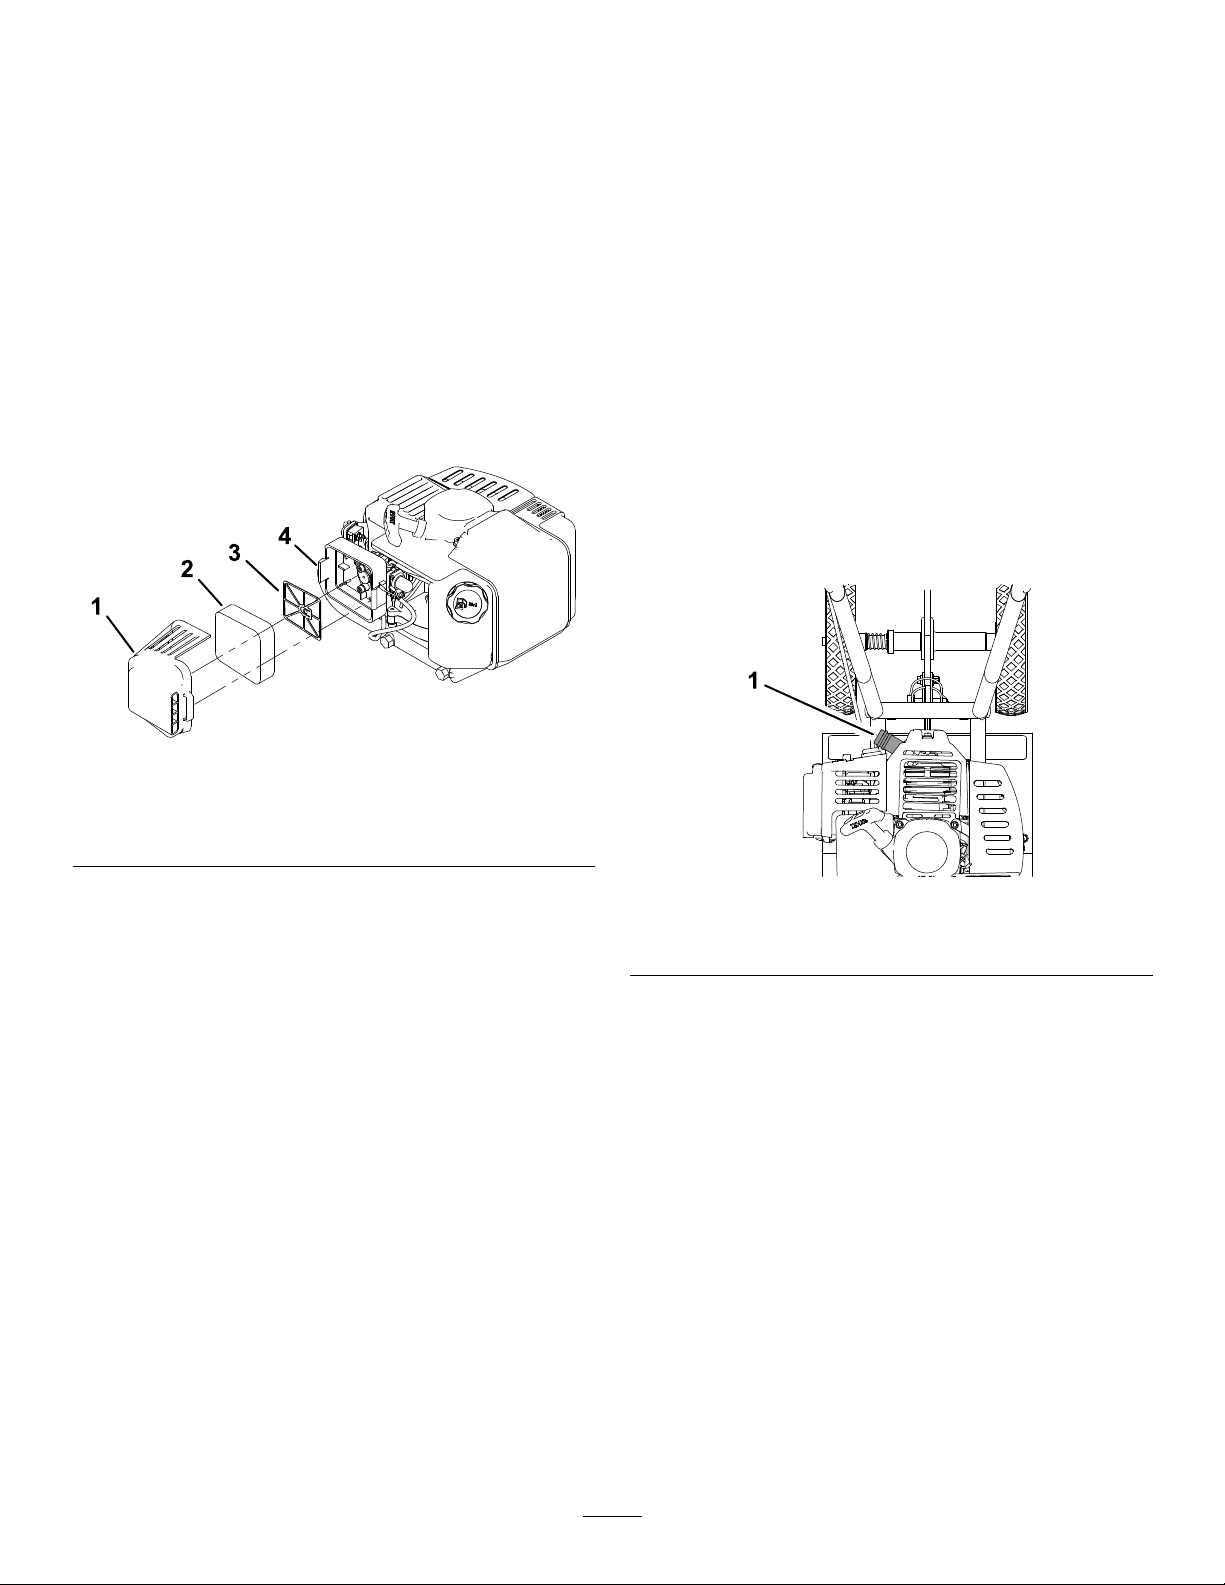
1.MovethechokelevertotheCHOKEposition.
2.Squeezethelatchtabsandrotatetheairlter
coveroffthemachine.
g335328
Figure17
1.Airltercover3.Filter-reinforcementplate
2.Foamlterelement4.Latchtab(2)
3.Removeandinspectthefoamlterelement.
Important:Replacethefoamelementifit
istornorworn.
4.Washthefoamelementinliquidsoapand
warmwater.Whentheelementisclean,rinse
itthoroughly.
Important:Donottwistthefoamelement
whilecleaningit.
5.Drytheelementbysqueezingitinacleancloth.
6.Dipthefoamelementincleanengineoil(30or
40weight),thensqueezeouttheexcessoil.
7.Installthelteroverthelter-reinforcement
plate.Pressthefoamlterevenlyovertheplate
toensureitisfullyseatedintoitssealedposition.
8.Installtheairltercover.Ensurethatitsnaps
intoplaceandissecuredbythelatchtabs.
ServicingtheSparkPlug
ServiceInterval:Every20hours—Check,clean,and
gapthesparkplug.
Yearly—Replacethesparkplug.
Ensurethattheairgapbetweenthecenterandside
electrodesiscorrectbeforeinstallingthesparkplug.
Useasparkplugwrenchforremovingandinstalling
thesparkplug(s)andagappingtool/feelergaugeto
checkandadjusttheairgap.Installanewspark
plug(s)ifnecessary.
Type:T orchL7RTC,ChampionRCJ8Y ,orequivalent
Airgap:0.71mm(0.028inch)
RemovingtheSparkPlug
1.Disconnectthespark-plugwirefromthespark
plug.
g335329
Figure18
1.Spark-plugwire
2.Cleanaroundthesparkplugstopreventdirt
fromenteringtheengineandpotentiallycausing
damage.
3.Removethesparkplug.
16
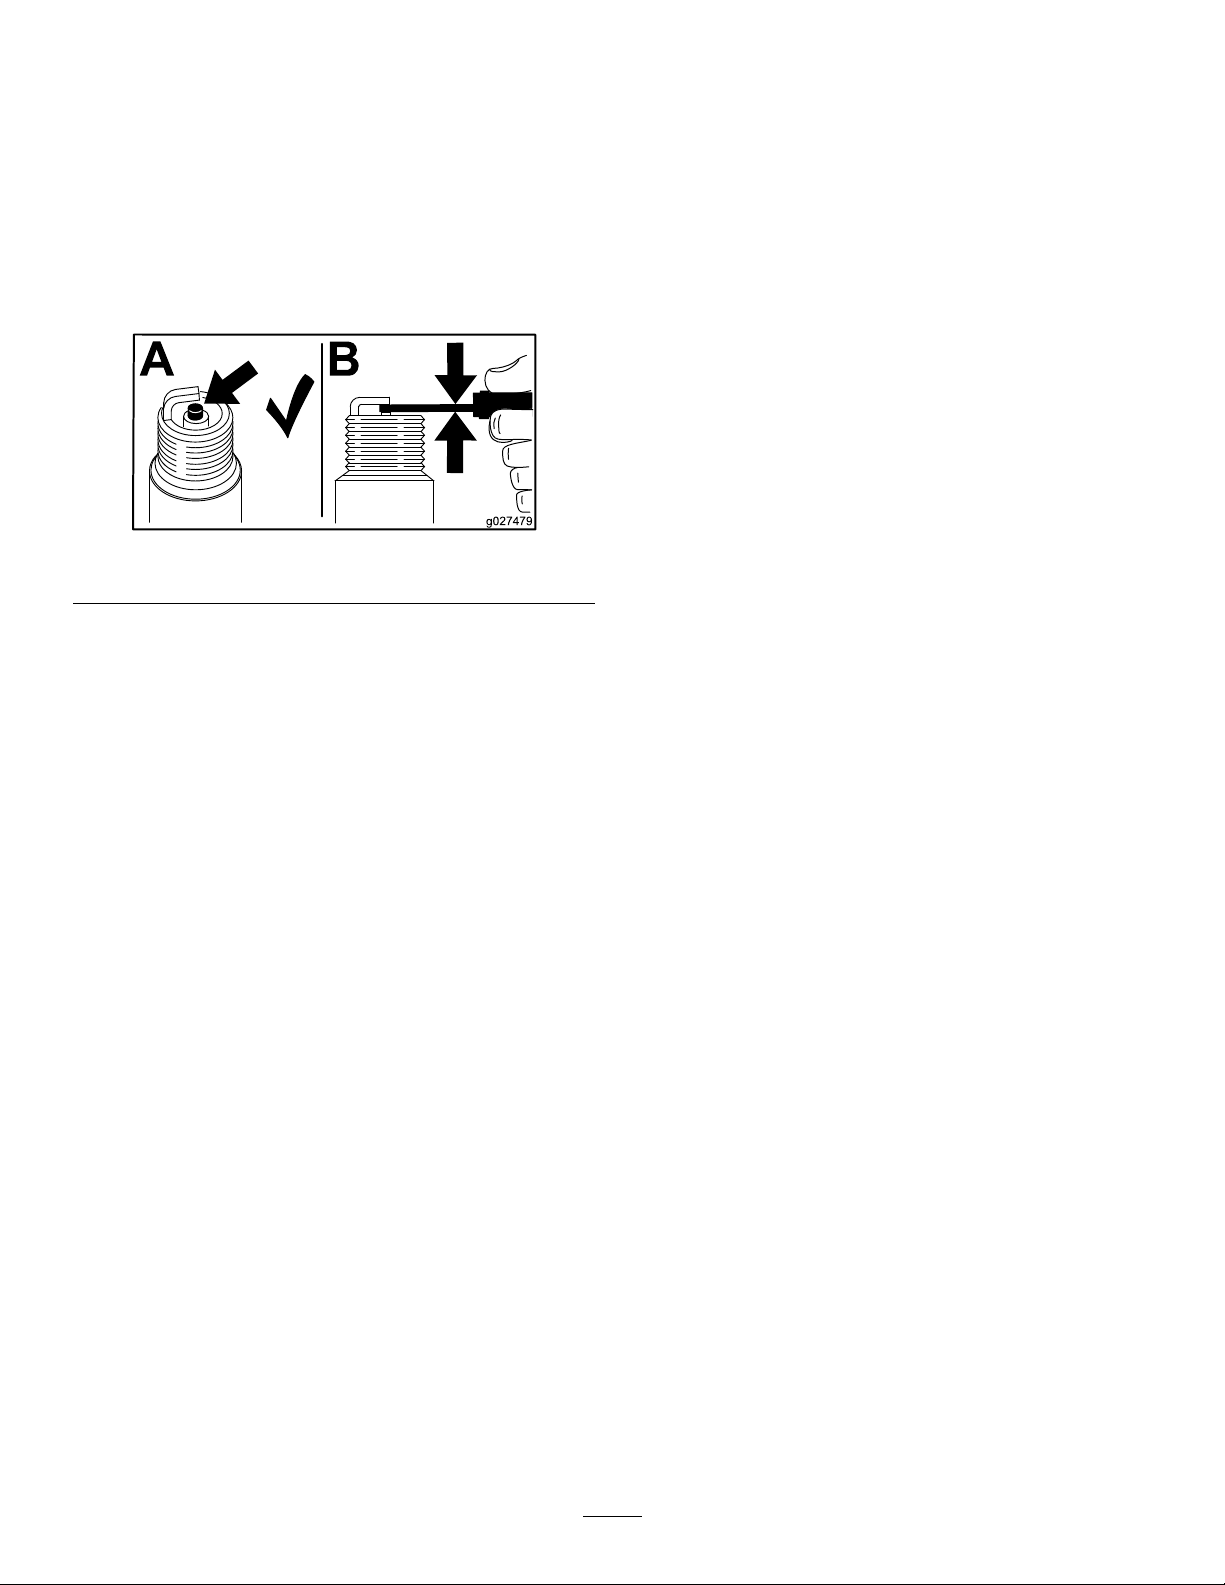
CheckingtheSparkPlug
Important:Donotcleanthesparkplug(s).
Alwaysreplacethesparkplug(s)whenithasa
blackcoating,wornelectrodes,anoilylm,or
cracks.
Ifyouseelightbrownorgrayontheinsulator,the
engineisoperatingproperly.Ablackcoatingonthe
insulatorusuallymeanstheaircleanerisdirty.
Setthegapto0.71mm(0.028inch).
g027479
Figure19
InstallingtheSparkPlug
1.Threadthesparkplugclockwiseintothe
spark-plugholebyhand.
2.Rotatethesparkplugclockwiseusinga
spark-plugwrenchuntiltheplugandsealing
washerareseated.
3.Tightenthesparkplugasfollows:
•Wheninstallingtheoriginalsparkplug,
tightenthepluganadditional1/2turn.
•Wheninstallinganewsparkplug,tightenthe
pluganadditional1/8to1/4turn.
Important:Aloosesparkplugmaycause
thecylindertooverheat.Anover-tightspark
plugmaydamagethethreadsinthecylinder
head.
4.Connectthespark-plugwiretothesparkplug.
Storage
StorageSafety
•Shutoffthemachineandwaitforallmovingparts
tostopbeforeyouleavetheoperator’sposition.
Allowthemachinetocoolbeforeadjusting,fueling,
unclogging,servicing,cleaning,orstoringthe
machine.
•Runtheenginedryorremovethefuelwithahand
pump;neversiphonthefuel.Ifyoumustdrainthe
fueltank,doitoutdoors.
•FollowtheinstructionsinthisOperator’sManual
tosafelyunload,transport,andstorethemachine.
•Donotstorethemachinewithfuelinthefuel
tankinsideabuildingwhereignitionsourcesare
present,suchashotwaterandspaceheatersand
clothesdryers.Allowtheenginetocoolbefore
storingthemachineinanenclosure.
•FollowtheinstructionsinthisOperator’sManual
forimportantinformationonstoringthemachine
foranextendedtime.
CleaningandStoringthe
Machine
1.Parkthemachineonalevelsurface,shutoff
theengine,andwaitforallmovingpartstostop
beforeleavingtheoperatingposition.
2.Removedebrisfromthecultivatortinesand
engine.
Important:Youcanwashthemachine
withmilddetergentandwater.Donot
pressure-washthemachine.Avoid
excessiveuseofwater,especiallynearthe
engineandtransmission.
3.Servicetheairlter;refertoServicingtheAir
Filter(page16).
4.Preparethemachineforstorageforover
30daysasfollows:
A.Addfuelstabilizer/conditionertofreshfuel
inthetank.Followmixinginstructionsfrom
thefuelstabilizermanufacturer.Donot
useanalcohol-basedstabilizer(ethanolor
methanol).
B.Runtheenginetodistributeconditionedfuel
throughthefuelsystemfor5minutes.
C.Shutofftheengine,allowittocool,and
drainthefueltank.
D.Starttheengineandrunituntilitshutsoff.
E.Disposeoffuelproperly.Recyclethefuel
accordingtolocalcodes.
17

Important:Donotstorefuelcontaining
stabilizer/conditionerlongerthan
thedurationrecommendedbythe
fuel-stabilizermanufacturer.
5.Removeandchecktheconditionofthespark
plug;refertoServicingtheSparkPlug(page16).
Withthesparkplugremovedfromtheengine,
pour15ml(1tablespoon)ofengineoilintothe
sparkplughole.Installthesparkplugandpull
therecoilrope3timestocoatthecylinderwith
oil.Donotinstallthewireonthesparkplug.
6.Checkandtightenallfasteners.Repairor
replaceanypartthatisdamaged.
7.Paintallscratchedorbaremetalsurfaces.Paint
isavailablefromyourAuthorizedServiceDealer.
8.Storethemachineinanuprightpositionina
clean,drygarageorstoragearea.Keepitout
ofreachofchildrenorotherunauthorizedusers.
Coverthemachinetoprotectitandkeepitclean.
18
Other manuals for 58601
1
Table of contents
Languages:
Other Toro Tiller manuals


Popular Tiller manuals by other brands


Texas Equipment
Texas Equipment Vision 700 NC Assembly and use instructions

Troy-Bilt
Troy-Bilt OEM-290-262 Installation and operation instructions

Yard Machines
Yard Machines 390 Series Operator's manual

Ryobi
Ryobi EXPAND-IT ACT05 Original instructions

Grillo
Grillo 2500 Operator's manual

Billy Goat
Billy Goat AE550 Operator owner's manual


