manuals.online logo
Brands
  1. Home
  2. •
  3. Brands
  4. •
  5. Toto
  6. •
  7. Bathroom Fixture
  8. •
  9. Toto TS100G User manual

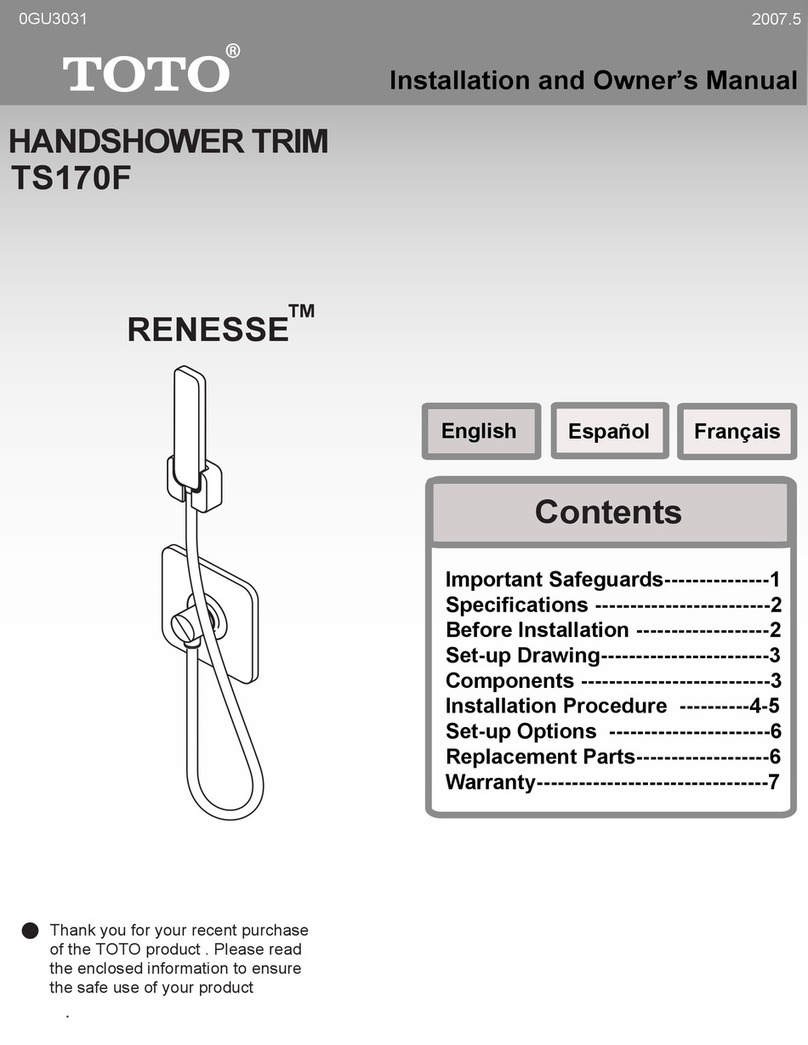
Toto TS100G User manual

Slide Bar
Barra Deslizante
Barre Murale
Installation Manual
Manual de Instrucciones
Manuel d’Installation
TOTO®
U.S.A., Inc. 1155 Southern Road Morrow, Georgia 30260
Tel: 888-295-8134 Fax: 800-699-4889
www.totousa.com
©TOTO
®
U.S.A.
REV 02/07 OGU4064
FRANÇAIS
ESPAÑOL
ENGLISH
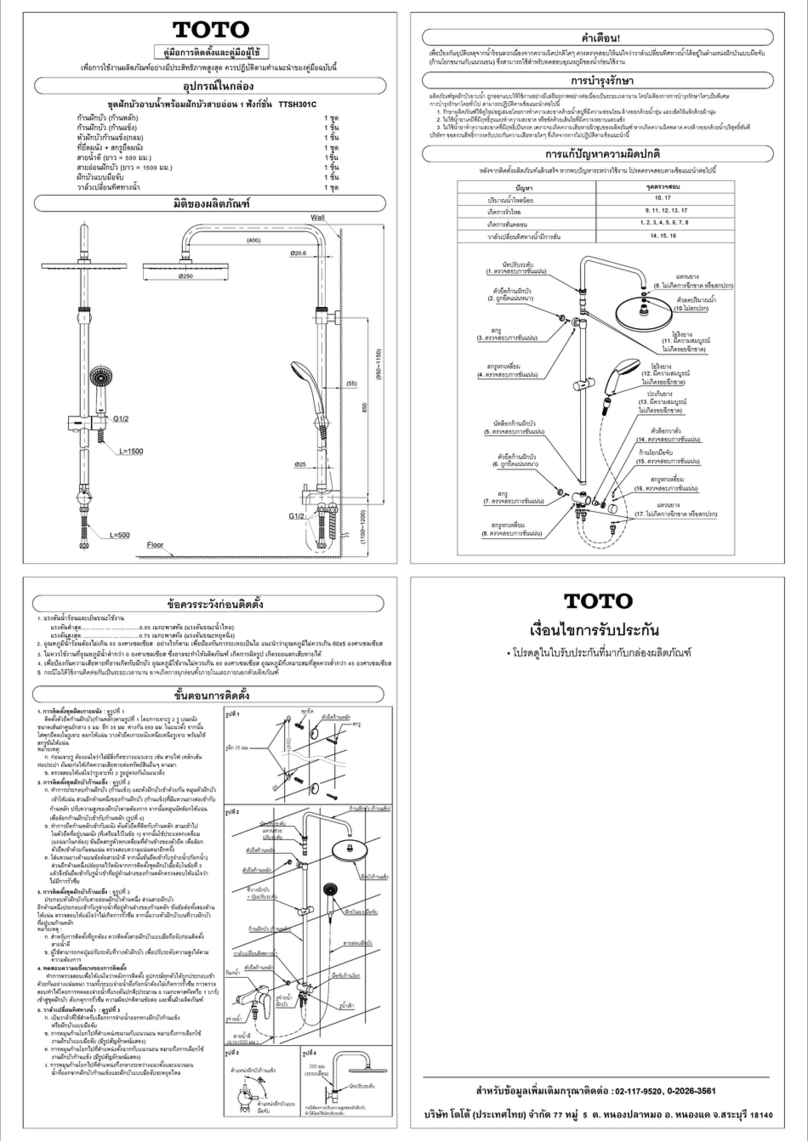
TS100G
7
Procédure d'installation Vérification des articles
Déterminez la position de la barre murale et percez les
avant-trous. (diamètre de l'avant-trou : 3.5~4 mm)
Attention
Mettez le joint sur les fixations. (Deux endroits)
Enfilez les vis de serrage dans les rondelles et vissez-les
dans les fixations.
<Si le mur est carrelé ou en béton>
Veuillez installer les chevilles Fisher ci-joints à
l'emplacement de la barre murale. (Diamètre du
foret : 6mm)
Attention
Attention à ne pas
orienter la barre
murale de manière
incorrecte.
Support
coulissant
Guide
inférieur.
Haut
Bas
Fixation
Rondelle
Vis de
serrage
Joint
Avant-trou
(3.5 ~ 4 mm)
<Pour carrelage
ou béton>
Cheville Fisher
(Diamètre du
foret : 6mm)
Placez les caches sur les fixations. (supérieure et
inférieure) Attention
Ne pas confondre le haut et le bas. (le cache avec
le logo TOTO doit se positionner en bas)
Cache supérieur
Fixation
Cache inférieur
Fixation
Vérifiez les articles suivants après avoir terminé l'installation.
Vérifiez s'il y a du mou
Vérifiez l'orientation.
Assurez-vous qu'il n'y a pas de mou sur la barre murale.
Est-ce que le guide sur la barre murale est en bas ?
Veuillez donner le manuel de l'utilisateur ci-joint au client.
Après avoir fermé le robinet, et en fonction de
l'angle du pommeau de la douche, l'eau peut
continuer à goutter. Si cela se produit, veuillez
régler l'ange.
Support
coulissant
Guide
2
Please install the product correctly, as outlined in these instructions so that it will function properly.
After installation, please show the customer how to use the product.
Safety Precautions Confirmation of Parts
Please confirm that you have the following parts.
Before installation, please read these safety precautions
thoroughly.
• These instructions include symbols for the proper and safe
installation of the product. Observing these symbols will
prevent property damage and personal injuries.
If this symbol's content is ignored and handled
improperly, injury or physical damage could
result.
Symbol Meaning
Caution
• The symbols are divided up as follows.
"Prohibited"
Do not disassemble.
"Required". Must be carried out.
Caution
Do not use the slide bar as a handrail
or grab bar.
Otherwise, this could result in property
damage or personal injury.
Do not disassemble or modify
the unit beyond what is indicated in
this manual.
Otherwise, this could damage the unit.
Attach the unit firmly.
Otherwise, this could result in
personal injury.
After installation, check to make sure
the unit is mounted securely.
Otherwise, this could result in
personal injury.
Upper
cover
Lower
cover
Washers
(2)
Fisher plugs
(2)
Packing
(2)
Set screws
(2)
Installation
Instructions
Owner's
manual
Slide bar
Full Installation Diagram
Please do not install lights, mirrors, counters or similar items
within the desinated area. Otherwise, the shower may not hang
properly.
(Tapping screw
with washer)
Bottom
Top
e
l
g
n
A
t
n
em
tsu
j
d
a
e
g
n
a
r
twist
pull
Prohibited
Do not
take apart
Be sure to
do this!
26” (66.0cm)
2-3/8”
(6.0cm)
2-3/8”
(6.0cm)
1-1/4”
(3.2cm)
13-3/4” (35 cm)
13-3/4” (35 cm)
11-3/4”
(29.8cm)
1-1/8” (2.9 cm)
1.0” (2.5 cm)
1-1/2” (3.8 cm)
27-1/2 ± 3/16” (70 ± .5cm)
FRANÇAIS
ENGLISH
FRANÇAIS
6
Veuillez suivre les consignes suivantes afin d'installer correctement le produit et d'assurer
unfonctionnement optimal. Après l'installation, veuillez montrer au client comment s'utilise le produit.
Consignes de
sécurité Confirmation des pièces
Vérifiez que vous disposez des pièces suivantes.
Avant l'installation, veuillez lire toutes les « consignes de
sécurité » et installer le produit correctement.
• Ces consignes comprennent des symboles pour l'installation
adéquate en toute sécurité du produit tout en évitant les
dommages corporels ou matériels aux personnes. Ci-dessous,
ces symboles et leur signification.
Ignorer ou manipuler de manière non adaptée
le contenu de ce symbole peut entraîner un
dommage corporel ou matériel.
Symbole Signification
Attention
• Les symboles sont divisés comme suit.
« Interdit ». Vous ne devez pas le faire.
Ne pas démonter.
« Obligatoire ». Vous devez le faire.
Attention
Ne pas utiliser la barre murale comme
rampe ou ne rien accrocher dessus.
Dans le cas contraire, la barre murale
ou le mur où elle est fixée risqué d'être
endommagé ou provoquer un accident.
Ne pas démonter plus de pièces que
celles qui sont indiquées dans ces
consignes ou les modifier au risque de
casser l'unité.
Otherwise, it could get broken.
Veuillez fixer la barre fermement de
manière à ce qu'elle ne se déloge pas
ou n'ait pas de mou.
Au risque de déstabiliser l'installation et
provoquer un accident.
Après l'installation, veuillez vérifier qu'il
n'y a pas de mou dans la barre murale.
Si la barre murale n'est pas tendue, elle
pourrait se déloger et endommage
le mur.
Cache
supérieur
Cache
inférieur
Rondelles
(2)
Chevilles
Fisher (2)
Joint
(2)
Vis de
serrage (2)
Manuel de
l'utilisateur
Owner's
manual
Barre murale
Schéma d'installation complet
Veuillez ne pas installer des lumières, miroirs, compteurs ou
similaires à proximité de ce produit au risque que la douche ne
soit pas fixée correctement.
(Vis
autotaraudeuse
avec rondelle)
Bas
Haut
u
d e
d
util
p
mA
e
d
eg
a
l
gé
r
e
l
g
na
'
l
tournez
tirez
Interdit
Ne pas
laisser de
côté
Assurez-
vous de
faire cette
opération
*Dimensions en millimètre
3
Installation Procedure Inspection Items
Determine the slide bar position and drill the pilot holes.
(Pilot hole diameter: 1/8”- 5/32”)
Caution
Put the packing on the mounts. (Two places) (Pilot hole
diameter: 1/8”- 5/32”)
Put the set screws through the washers and tighten into the
mounts.
<If the wall is tile or concrete>
Please install the enclosed Fisher plugs where the
slide bar will be mounted. (Drill diameter: ~1/4”)
Caution
Make sure the slide
bar is oriented
correctly.
Slide
hanger
Guide on
bottom.
Top
Bottom
Mount
Washer
Set Screw
Packing
Pilot hole
(1/8”- 5/32”)
<For Tile or
Concrete>
Fisher Plug
(Drill Diameter: ~1/4”)
Place cover on mounts. (Top and bottom)
Caution
Do not to mix up the top and bottom cover.
(The cover with the TOTO logo should be on the
bottom.)
Top cover
Mount
Bottom cover
Mount
Please check the following items after completing the
installation.
Check for tightness
Check the orientation.
Please check to make sure there is no looseness in the
slide bar.
Is the guide on the slide hanger on the bottom?
Please give the customer the enclosed owner's manual.
Depending on the angle of the shower head, water
may drip out after it has been shut off. If that
happens, please adjust the angle.
Slide
Hanger
Guide
FRANÇAIS
ENGLISH
4
5
Instale el producto correctamente, según se describe en estas instrucciones, para que funcione en
forma apropiada. Después de la instalación, muestre al cliente cómo utilizar el producto.
Precauciones de
seguridad Confirmación de piezas
Confirme que tiene las siguientes piezas.
Antes de la instalación, lea las "precauciones de
seguridad" completas e instale el producto correctamente.
• Estas instrucciones incluyen símbolos para una instalación
correcta y segura del producto, y para evitar el daño a la
propiedad o lesiones personales al cliente o a otras personas.
Estos son los símbolos y sus significados:
Si se ignora el contenido de este símbolo y
se maneja el producto de manera incorrecta,
puede producirse daño físico o lesión.
Símbolo Significado
Precaución
• Los símbolos se dividen del siguiente modo:
"Prohibido" No se debe hacer.
No desarme.
"Requerido" Debe realizarse.
Precaución
No use la barra deslizante como barra
de apoyo o para colgar cosas de ella.
De lo contrario, la barra deslizante o la
pared a la que está sujeta podrían
dañarse o podría producirse una lesión.
No desarme la unidad más de lo
indicado en estas instrucciones ni la
modifique.
De lo contrario, podría romperse.
Ajuste la barra firmemente para que no
se salga ni se afloje.
De lo contrario, podría desestabilizarse
la instalación y producirse una lesión.
Después de la instalación, verifique que
no haya piezas flojas en la barra
deslizante.
Si la barra deslizante está floja, podría
salirse y dañar la pared.
Cubierta
superior
Cubierta
inferior
Arandelas
(2)
Tarugos Fisher
(2)
Empaquetaduras
(2)
Tornillos de
fijación (2)
Instrucciones de
instalación
Manual del
propietario
Barra deslizante
Diagrama de instalación completa
No instale luces, espejos, mostradores ni elementos similares
alrededor de este producto. De lo contrario, la ducha puede no
colgar correctamente.
gire
tire
Prohibido
No
desarme
¡Asegúrese
de hacer
esto!
Procedimiento de instalación Elementos de inspección
Determine la posición de la barra deslizante y perfore los
orificios piloto. (Diámetro del orificio piloto: 3.5 a 4 mm)
Precaución
Coloque las empaquetaduras en los soportes. (Dos
lugares)
Ponga los tornillos de fijacion por las arandulas y ajuste en
los soportes.
<Si la pared es de azulejos o de hormigón>
Instale los tarugos Fisher en el lugar donde se
montará la barra deslizante. (Diámetro de
perforación: 6 mm)
Tenga cuidado de
no orientar la barra
deslizante de
manera incorrecta.
Soporte
deslizante
Guía en la
parte
inferior
Parte
superior
Soporte
Arandela
Tornillo de
fijación
Empaquetadura
Orificio piloto
(3.5 a 4 mm)
<Para azulejo u
hormigón>
Tarugo Fisher
(Diámetro de
perforación: 6 mm)
Coloque la cubierta sobre los soportes. (superior e inferior)
Tenga cuidado de no mezclar las cubiertas.
(La cubierta que tiene el logotipo de TOTO debe
colocarse en la parte inferior.)
Cubierta superior
Soporte
Cubierta inferior
Soporte
Verifique los siguientes elementos después de completar
la instalación.
Verifique que la barra deslizante no esté floja.
Verifique la orientación.
Verifique que no haya ninguna pieza floja en la barra
deslizante.
¿La guía del soporte deslizante está en la parte inferior?
Entregue al cliente el manual del propietario que se
suministra.
Según el ángulo del cabezal de la ducha, puede
gotear después de haberse cerrado. Si esto
sucede, ajuste el ángulo.
Soporte
deslizante
Guía
Precaución
Parte
inferior
Precaución
Bottom
Top
26” (66.0cm)
2-3/8”
(6.0cm)
2-3/8”
(6.0cm)
1-1/4”
(3.2cm)
13-3/4” (35 cm)
13-3/4” (35 cm)
11-3/4”
(29.8cm)
1-1/8” (2.9 cm)
1.0” (2.5 cm)
1-1/2” (3.8 cm)
27-1/2 ± 3/16” (70 ± .5cm)
(Tornillo
roscado
con arandela)
e
d
o
gnaR
l
e
d
e
ts
u
ja
olu
gn
á
ESPAÑOL
ESPAÑOL

Other manuals for TS100G

1

Other Toto Bathroom Fixture manuals

Toto Washlet EK TCF6402G User manual

Toto

Toto Washlet EK TCF6402G User manual

Toto YH150RS User manual

Toto

Toto YH150RS User manual

Toto Aquia YH416 Installation instructions

Toto

Toto Aquia YH416 Installation instructions

Toto TBW07025U Installation instructions

Toto

Toto TBW07025U Installation instructions

Toto YB990 Installation instructions

Toto

Toto YB990 Installation instructions

Toto TTSR103MK User manual

Toto

Toto TTSR103MK User manual

Toto Keane TS211E Installation instructions

Toto

Toto Keane TS211E Installation instructions

Toto Neorest II Series User manual

Toto

Toto Neorest II Series User manual

Toto Connelly TL221SD12 Installation instructions

Toto

Toto Connelly TL221SD12 Installation instructions

Toto Oberon-S TL363SD12R Installation instructions

Toto

Toto Oberon-S TL363SD12R Installation instructions

Toto DGM301CFN Service manual

Toto

Toto DGM301CFN Service manual

Toto Washlet EK 2.0 User manual

Toto

Toto Washlet EK 2.0 User manual

Toto TS100B Installation instructions

Toto

Toto TS100B Installation instructions

Toto WASHLET S500E SW3044 01 Series User manual

Toto

Toto WASHLET S500E SW3044 01 Series User manual

Toto LT162 User manual

Toto

Toto LT162 User manual

Toto Guinevere TS970AL Installation instructions

Toto

Toto Guinevere TS970AL Installation instructions

Toto WASHLET SW4047AT60 User manual

Toto

Toto WASHLET SW4047AT60 User manual

Toto Aimes TS626C2 Installation instructions

Toto

Toto Aimes TS626C2 Installation instructions

Toto GLORIA THX118SGZ User manual

Toto

Toto GLORIA THX118SGZ User manual

Toto Aquia TB416DD Installation instructions

Toto

Toto Aquia TB416DD Installation instructions

Toto NEOREST TBXM1B V201 User manual

Toto

Toto NEOREST TBXM1B V201 User manual

Toto TBW01001 Series User manual

Toto

Toto TBW01001 Series User manual

Toto TBP02001 Series User manual

Toto

Toto TBP02001 Series User manual

Toto TX423MEB User manual

Toto

Toto TX423MEB User manual

Popular Bathroom Fixture manuals by other brands

Kebo SH-PN-7142 manual

Kebo

Kebo SH-PN-7142 manual

DUSCHY 523n-70 installation manual

DUSCHY

DUSCHY 523n-70 installation manual

April identiti Inline Panel installation instructions

April

April identiti Inline Panel installation instructions

Uberhaus 14925004 Operator's manual

Uberhaus

Uberhaus 14925004 Operator's manual

Helvex Nuva RM-22 installation guide

Helvex

Helvex Nuva RM-22 installation guide

GME VITRO instruction manual

GME

GME VITRO instruction manual

KOVYX K2O KSM1006 instruction manual

KOVYX

KOVYX K2O KSM1006 instruction manual

Moen ANNEX TS3661NH installation guide

Moen

Moen ANNEX TS3661NH installation guide

Helvex WC Austral installation guide

Helvex

Helvex WC Austral installation guide

Fackelmann B.PERFEKT 84102 Instructions for mounting and use

Fackelmann

Fackelmann B.PERFEKT 84102 Instructions for mounting and use

Imperial Attica XM83400100 Mounting instructions

Imperial

Imperial Attica XM83400100 Mounting instructions

HydroTherm FC/500 quick start guide

HydroTherm

HydroTherm FC/500 quick start guide

homechoice Splash user guide

homechoice

homechoice Splash user guide

agape MEMORY MIX EMIX435D Assembly instructions

agape

agape MEMORY MIX EMIX435D Assembly instructions

Emco asis plus Mounting instruction

Emco

Emco asis plus Mounting instruction

Kohler ENGLEFIELD EXCLUSIVE Series installation instructions

Kohler

Kohler ENGLEFIELD EXCLUSIVE Series installation instructions

IB RUBINETTI BOLD 022 Fitting instructions

IB RUBINETTI

IB RUBINETTI BOLD 022 Fitting instructions

KEUCO Plan 07895 171500 Mounting instruction

KEUCO

KEUCO Plan 07895 171500 Mounting instruction

manuals.online logo
manuals.online logoBrands
  • About & Mission
  • Contact us
  • Privacy Policy
  • Terms and Conditions

Copyright 2025 Manuals.Online. All Rights Reserved.