manuals.online logo
Brands
  1. Home
  2. •
  3. Brands
  4. •
  5. TP-Link
  6. •
  7. Wireless Access Point
  8. •
  9. TP-Link Auranet EAP115-Wall User manual

TP-Link Auranet EAP115-Wall User manual

Other manuals for Auranet EAP115-Wall

2

Other TP-Link Wireless Access Point manuals

TP-Link TL-WA1201 User manual

TP-Link

TP-Link TL-WA1201 User manual

TP-Link TL-WA7210N User manual

TP-Link

TP-Link TL-WA7210N User manual

TP-Link TL-WA3001 User manual

TP-Link

TP-Link TL-WA3001 User manual

TP-Link Omada EAP225 User manual

TP-Link

TP-Link Omada EAP225 User manual

TP-Link Deco M1300 User manual

TP-Link

TP-Link Deco M1300 User manual

TP-Link WR702N User manual

TP-Link

TP-Link WR702N User manual

TP-Link TL-WA801ND User manual

TP-Link

TP-Link TL-WA801ND User manual

TP-Link TL-WA701ND User manual

TP-Link

TP-Link TL-WA701ND User manual

TP-Link TL-WA701ND User manual

TP-Link

TP-Link TL-WA701ND User manual

TP-Link Auranet Series User manual

TP-Link

TP-Link Auranet Series User manual

TP-Link Auranet EAP110 User manual

TP-Link

TP-Link Auranet EAP110 User manual

TP-Link Auranet EAP110 User manual

TP-Link

TP-Link Auranet EAP110 User manual

TP-Link Omada EAP773 User manual

TP-Link

TP-Link Omada EAP773 User manual

TP-Link Omada EAP110 User manual

TP-Link

TP-Link Omada EAP110 User manual

TP-Link AP300 V1 Quick start guide

TP-Link

TP-Link AP300 V1 Quick start guide

TP-Link Deco X50-PoE User manual

TP-Link

TP-Link Deco X50-PoE User manual

TP-Link Auranet EAP225 User manual

TP-Link

TP-Link Auranet EAP225 User manual

TP-Link TL-WA901N User manual

TP-Link

TP-Link TL-WA901N User manual

TP-Link TL-WA901ND User manual

TP-Link

TP-Link TL-WA901ND User manual

TP-Link PW-AN401 User manual

TP-Link

TP-Link PW-AN401 User manual

TP-Link TL-WA701ND User manual

TP-Link

TP-Link TL-WA701ND User manual

TP-Link Omada Pro AP9650 User manual

TP-Link

TP-Link Omada Pro AP9650 User manual

TP-Link EAP265 HD User manual

TP-Link

TP-Link EAP265 HD User manual

TP-Link TL-PA4010 User manual

TP-Link

TP-Link TL-PA4010 User manual

Popular Wireless Access Point manuals by other brands

TRENDnet TPL-410AP user guide

TRENDnet

TRENDnet TPL-410AP user guide

EnGenius EWS377-FIT quick start guide

EnGenius

EnGenius EWS377-FIT quick start guide

D-Link DWL-6700AP Quick installation guide

D-Link

D-Link DWL-6700AP Quick installation guide

Aerohive Networks Aerohive AP121 Hardware reference guide

Aerohive Networks

Aerohive Networks Aerohive AP121 Hardware reference guide

Vonets VAP11G Step-by-step guide

Vonets

Vonets VAP11G Step-by-step guide

Ubiquiti UniFi AP AC Outdoor quick start guide

Ubiquiti

Ubiquiti UniFi AP AC Outdoor quick start guide

Monoprice MW301A user guide

Monoprice

Monoprice MW301A user guide

D-Link DWL-2700AP - AirPremier Outdoor Wireless Access... user manual

D-Link

D-Link DWL-2700AP - AirPremier Outdoor Wireless Access... user manual

D-Link DWL-2100AP - AirPlus Xtreme G Quick installation guide

D-Link

D-Link DWL-2100AP - AirPlus Xtreme G Quick installation guide

D-Link DWL-2100AP - AirPlus Xtreme G Quick installation guide

D-Link

D-Link DWL-2100AP - AirPlus Xtreme G Quick installation guide

Ubiquiti NanoStation NSM2 quick start guide

Ubiquiti

Ubiquiti NanoStation NSM2 quick start guide

Aruba IAP-335 user guide

Aruba

Aruba IAP-335 user guide

Advantek Networks AWN-AP-54MR user manual

Advantek Networks

Advantek Networks AWN-AP-54MR user manual

IP-COM AP355 user guide

IP-COM

IP-COM AP355 user guide

Buffalo AirStation WLA-L11G user manual

Buffalo

Buffalo AirStation WLA-L11G user manual

EnGenius EnStationACv2 user manual

EnGenius

EnGenius EnStationACv2 user manual

D-Link DAP-3662 Quick installation guide

D-Link

D-Link DAP-3662 Quick installation guide

Edimax CAP1200 user manual

Edimax

Edimax CAP1200 user manual

manuals.online logo
manuals.online logoBrands
  • About & Mission
  • Contact us
  • Privacy Policy
  • Terms and Conditions

Copyright 2025 Manuals.Online. All Rights Reserved.

Network Topology
Hardware Overview 1
Installation Steps
Quick Installation Guide
EAP115-Wall
300Mbps Wireless N Wall-Plate Access Point
3
Front Panel
Rear Panel
LAN Port
EAPEAPEAP
PC
PoE Switch
Router
Internet
Clients
EAP Controller
RESET
LED
Pre-Installation Checklist
2
UPLINK+PoE Port
Connected to a PSE (Power Sourcing Equipment), such as a PoE switch, for
both data transmission and Power.
LED/Wi-Fi Button
When the EAP is working in Standalone Mode and enabled with Wi-Fi
Control, press the button to turn on/o both of the Wi-Fi and LED. In other
cases, press the button to turn on/o the LED only.
LAN Port
A wired device can be connected to the LAN port via an Ethernet cable
and access the network.
RESET
With the EAP powered on, press and hold the button for about 5 seconds
until the LED ashes. The EAP will restore to factory default settings.
LED Indicator
On: Working normally/Initializing.
O: Working abnormally/Power o/LED is turned o.
Flashing:
Initialization: The LED ashes twice after initialization is complete.
Upgrade: The LED ashes once per second while upgrading.
Reset: The LED ashes ve times in quick session during the reset. The
EAP will then reboot.
The EAP115-Wall can only be powered by a PSE device, such as a PoE switch.
Connect the PoE switch to the UPLINK+PoE port with an Ethernet cable.
A DHCP server (typically a router) with DHCP function enabled is required to
assign IP addresses to the EAPs and clients in your local network.
Before installation, be sure that you have the following items:
1. A pre-installed wall junction box
2. An RJ45 plug
3. A triangular screwdriver
EAP115-Wall can be mounted into either an 86mm wall junction box or a
standard EU wall junction box. The junction box should be pre-installed with
a running-in-wall Ethernet cable connected to a PoE switch.
LED/Wi-Fi Button
Standard EU wall junction box
86mm wall junction box
4. A Phillips screwdriver
5. A PoE switch
1. Detach the faceplate of the junction box with a Phillips screwdriver
(demonstrated with an 86mm wall junction box).
©2018 TP-Link 7106507920 REV2.0.1
Software Conguration
4
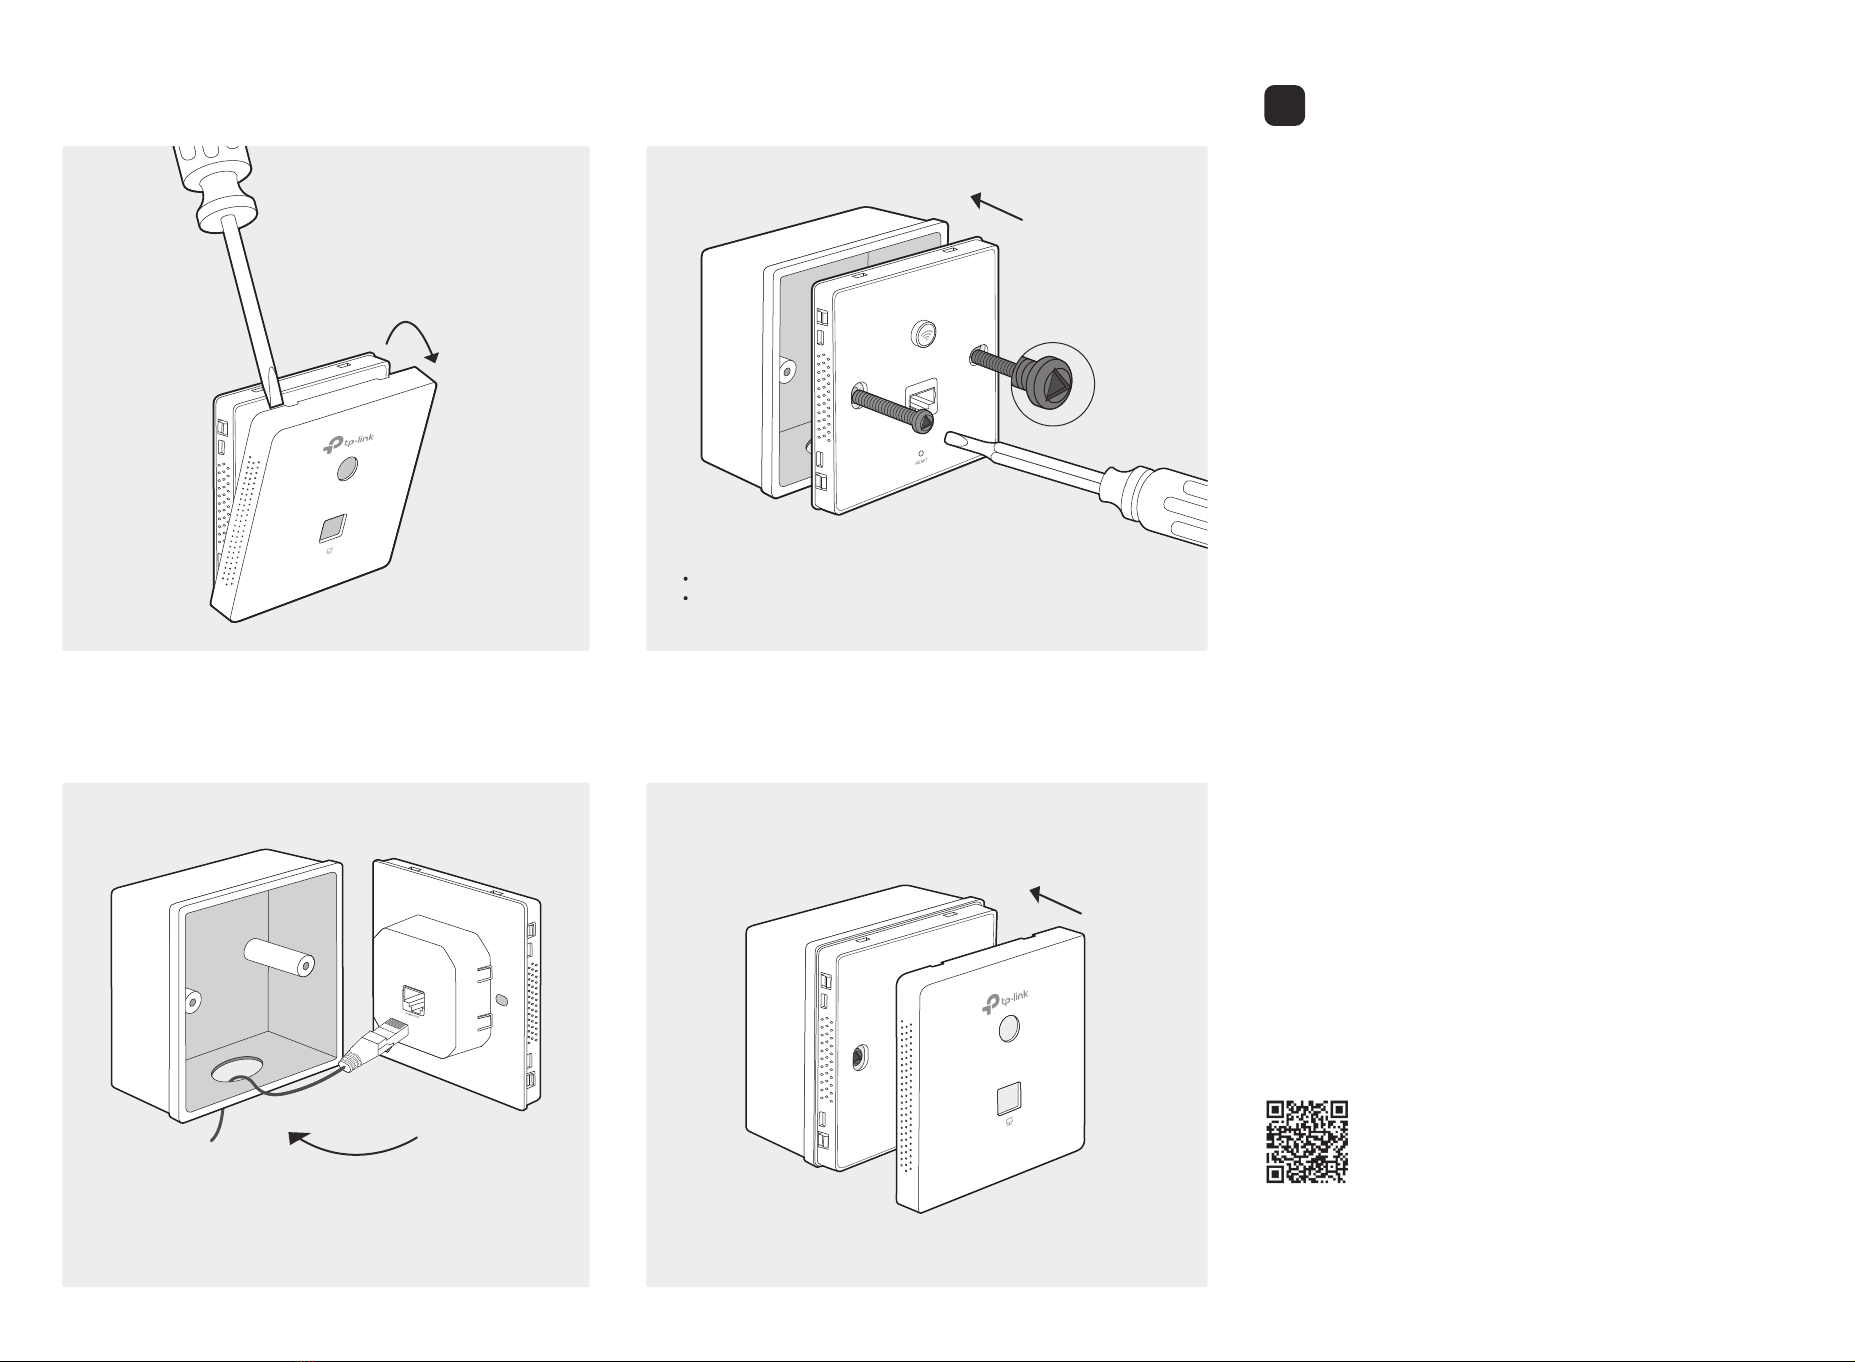
2. Detach the faceplate of the EAP with a screwdriver.
3. Connect the Ethernet cable inside the junction box to an RJ45 plug.
Then connect the cable to the UPLINK+PoE port. Position the Ethernet
cable to ensure it is not strained.
5. Press the faceplate of the EAP back into position.
Note:
If the junction box does not have enough room to accommodate the EAP without
straining the Ethernet cable, replace the junction box with an open‑end or deeper one.
The EAP supports two conguring options:
To congure and manage mass EAPs via centralized controller software,
please refer to Option 1.
To congure a single EAP via a web browser directly, please refer to Option 2.
Option 1: Via EAP Controller
Step 1: Installing EAP Controller
On the PC, download the EAP Controller installation le from
http://www.tp-link.com/en/download/EAP-Controller.html. Run the le and
follow the wizard to install the EAP Controller.
Step 2: Conguring EAP Controller
Launch the EAP Controller and follow the step-by-step instructions to
complete the Quick Setup. After the wizard is nished, a login screen will
appear.
Step 3: Logging in to EAP Controller
Enter the admin name and password you created and click Sign In. Then
you can further congure the EAP Controller.
For detailed congurations, please visit http://www.tp-link.com/support to
download the User Guide of EAP Controller in the download center.
Option 2: Via Web Browser
Step 1: Connecting to the EAP Device
Power on the EAP and connect wirelessly by using the default SSID
(format: TP-LINK_2.4GHz_XXXXXX) printed on the product label.
Step 2: Logging in to the EAP Device
Launch a web browser and enter http://tplinkeap.net in the address bar.
Use admin for both Username and Password to log in.
Step 3: Conguring the EAP Device
Set up a new Username and Password for secure management purpose.
Modify the wireless parameters and reconnect your wireless devices to
the new wireless network.
For detailed congurations, please visit http://www.tp-link.com/support to
download the User Guide of EAP in the download center.
For technical support and other information, please visit
http://www.tp-link.com/support, or simply scan the QR code.
The products of TP-Link partly contain software code developed by third parties, including software
code subject to the GNU General Public License (“GPL”). As applicable, the terms of the GPL and
any information on obtaining access to the respective GPL Code used in TP-Link products are
available to you in GPL-Code-Centre under (http://www.tp-link.com/en/support/gpl/). The respective
programs are distributed WITHOUT ANY WARRANTY and are subject to the copyrights of one or
more authors. For details, see the GPL Code and other terms of the GPL.
4. Insert the enclosed screws and tighten them with a triangular screwdriver to
secure the mounting bracket.
Note:
Do not over tighten the screws.
If the enclosed screws do not t the junction box, use the screws attached to the
junction box instead.