manuals.online logo
Brands
  1. Home
  2. •
  3. Brands
  4. •
  5. Traxon
  6. •
  7. Lighting Equipment
  8. •
  9. Traxon Mesh Installation instructions manual

Traxon Mesh Installation instructions manual

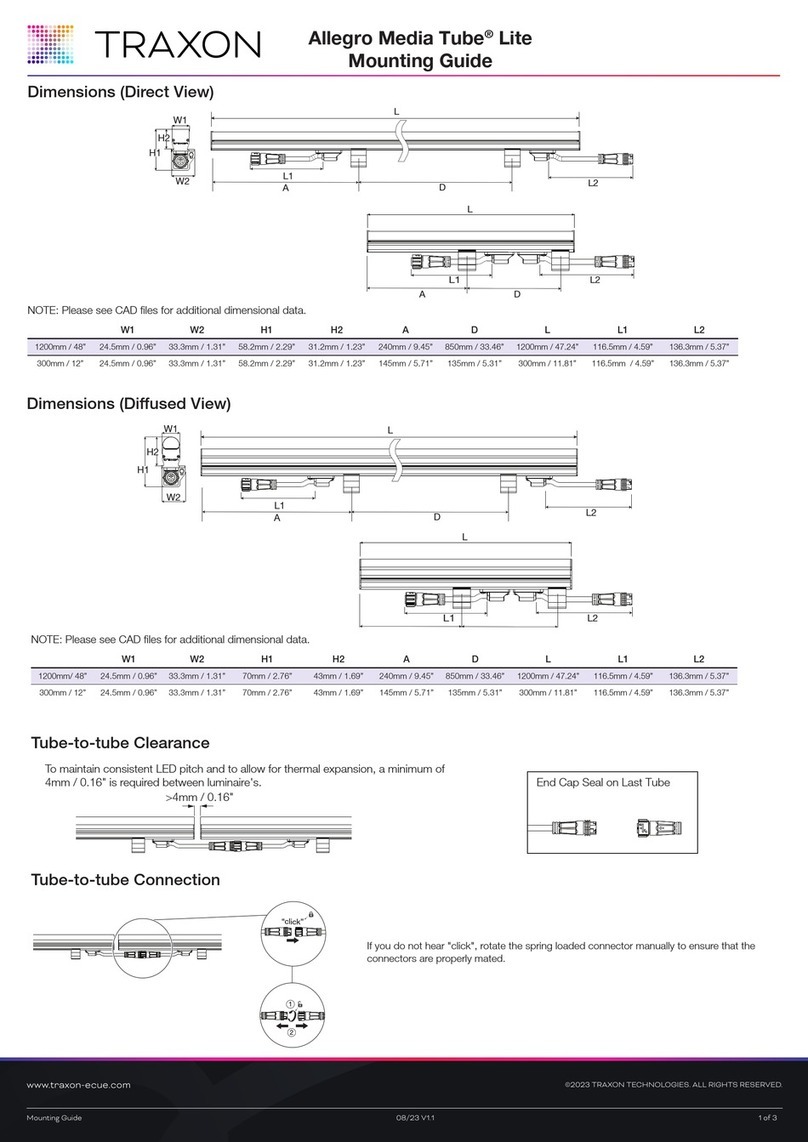
Mesh
Mounting Guide
www.traxontechnologies.com
©2015 TRAXON TECHNOLOGIES - AN OSRAM BUSINESS. ALL RIGHTS RESERVED. TRAXON™, TX CONNECT®, ARE TRADEMARKS OF TRAXON TECHNOLOGIES. U.S. PATENTS, E.U. PATENTS, JAPAN PATENTS, OTHER PATENTS PENDING. SPECIFICATIONS ARE SUBJECT TO CHANGE
WITHOUT NOTICE.
Mounting Guide 05/15 V0.3 1 of 3
Mesh
Mounting Guide
www.traxontechnologies.com
©2015 TRAXON TECHNOLOGIES - AN OSRAM BUSINESS. ALL RIGHTS RESERVED. TRAXON™, TX CONNECT®, ARE TRADEMARKS OF TRAXON TECHNOLOGIES. U.S. PATENTS, E.U. PATENTS, JAPAN PATENTS, OTHER PATENTS PENDING. SPECIFICATIONS ARE SUBJECT TO CHANGE
WITHOUT NOTICE.
Mounting Guide 05/15 V0.3 2 of 3
Mesh unit attached to steel wires
with Pixel Distributor on top.
Total weight (including steel wires) is 4.2kg.
Pixel Distributor alternative mounting
position – behind the Mesh grid.
To increase stability, particularly
for outdoor, multi-unit installations,
anchor mounting wires at 1m intervals.
NOTE:
To keep the entire Mesh installation
straight, bolt the mounting wires to the
ceiling and to the floor to ensure the wires
are tort.
X
Y
(Anchors not included.)
100mm/4”
(clearance)
150mm/6”
(clearance)
2000mm/78.74” (typ.)
ø2mm stainless steel wire
Pixel Distributor alternative
mounting using the wall brackets.
Pixel Distributor mounting
on steel wire.
Tighten wire-clips
with 5mm hex key.
4Mount the Pixel Distributor.
Mounting additional Mesh units. Mounting back-to-back Mesh units.
(C) Slide wire-stopper down.(A) Clip Mesh unit onto wire. (B) Rest mesh unit on top stoppers. (D) Wire-stoppers shown in position.
3Attach Mesh unit onto mounting wires.
X: Attach to above unit first.
Y: Clip wire-holders to wire and
rest on adjacent unit.
Slide wire-stoppers in place.
Mount Mesh units from left to right.
Pixel Distributor
Use provided screws to
secure the units together.
2Assemble the Mesh grids.
Clip the Mesh grids together
at an angle.
Slide the wire-stoppers
with the spacings shown.
Use spirit level to ensure
top wire-stoppers
are horizontal.
Fix mounting wires with
the distances shown.
For easier mounting,
allow wires to hang loose.
Bolt wires at bottom after
all units are mounted.
1Prepare the mounting wires.
340mm/26.8”
312.5mm/12.3” 312.5mm/12.3”
125mm/5”
125mm/5”
155mm/6”
For single-row back-to-back installations:
1. Remove the wire-holders on the back unit.
2. Pre-assemble back-to-back units.
3. Hang the back-to-back units using the
same method as above.
For two-row back-to-back installations:
(Second row Mesh units require customized
lead cable length of 2.5m)
1. Hang Mesh units on one side.
2. Remove the wire-holders on the back units.
3. Attach and screw on second row back units.
4. Hide second row lead cables in above units.
5. Attach and screw on first row back units.
Wire-holder on
front unit only.
(Hex key not included.)
(Brackets and screws included.)
Wire-stopper slides
freely when plunger
is pressed down.
Wire-stopper hold
its position when
plunger is released.
(Note that
Wire-stopper can
still slide upward)
©2015 TRAXON TECHNOLOGIES - AN OSRAM BUSINESS. ALL RIGHTS RESERVED. TRAXON™, TX CONNECT®, ARE TRADEMARKS OF TRAXON TECHNOLOGIES. U.S. PATENTS, E.U. PATENTS, JAPAN PATENTS, OTHER PATENTS PENDING. SPECIFICATIONS ARE SUBJECT TO CHANGE
WITHOUT NOTICE.
Mounting Guide 05/15 V0.3 3 of 3
–ConneCt to the power supply in aCCordanCe with national
regulations.
–if the external flexible Cable of this luminaire is damaged,
it shall be exClusively replaCed by the manufaCturer or a
similar qualified person in order to avoid any hazard.
–installation/maintenanCe only by skilled personnel.
–during overhaul/maintenanCe only use original parts.
–if any luminaire is subsequently modified, the person
responsible for the modifiCation shall be Considered the
manufaCturer.
–the manufaCturer bears no liability for damage Caused by
inappropriate use or appliCation.
–netzansChluss bitte naCh den länderspezifisChen
erriChtungsbestimmungen tätigen.
–falls das externe flexible kabel dieser leuChte besChädigt ist, darf
es aussChliesssliCh ersetzt werden durCh den hersteller oder einer
ähnliCh qualifizierten person, um gefährdungen zu vermeiden.
–montage/wartung nur durCh faChkräfte.
–bei instandsetzung/instandhaltung nur originalteile verwenden.
–werden naChträgliCh änderungen an leuChten vorgenommen, so gilt
derjenige als hersteller, der diese änderung vornimmt.
–der hersteller übernimmt keine haftung für sChäden, die durCh
unsaChgemässen einsatz entstehen.
–Connexion à l’alimentation Conformément aux normes en
vigueur.
–si le Câble extérieur souple ou le Cordon de Ce luminaire
est endommagé, il doit être remplaCé exClusivement par le
fabriCant, ou toute personne de qualifiCation équivalente,
CeCi afin d’éviter tout risque.
–les operations d’installation et d’entretien doivent être
effeCtuées exClusivement par des personnes qualifiées.
–dans le Cas d’une remise en état, utiliser uniquement des
Composants d’origine.
–toutes modifiCations apportées au luminaire se feront sous la
responsabilité exClusive de Celui qui les effeCtue.
–le fabriCant deCline toute responsabilité resultant d’un mise
en oeuvre inappropriée du produit.
–effettuare l’allaCCiamento alla rete seCondo le norme di
installazione vigenti nel paese d’utilizzo.
–se il Cavo flessibile esterno di questo appareCChio d’illuminazione
è danneggiato, per evitare periColi esso può essere sostituito
esClusivamente dal produttore o da persona dotata di analoga
qualifiCa.
–montaggio/manutenzione solo per mezzo di personale speCializzato.
–per riparazione/manutenzione impiegare solo parti originali.
–il Costruttore si riserva il diritto di apportare senza preavviso
modifiChe di peso, dimensioni e CaratteristiChe teChniChe.
–il Costruttore non é responsabile per danni derivanti da modifiChe
realizzate da terzi e da una installazione non Corretta.
–la Conexión a red debe de realizarse siguiendo las normas
espeCífiCas de Cada países.
–en Caso de que el Cable externo flexible de esta luminaria
este dañado sólo puede reemplazarse por el fabriCante o una
persona similar CualifiCada, para evitar peligros.
–el montaje y manteminiento lo efeCtuaran úniCamente los
téCniCos espeCializados.
–para reparaCiones han de emplearse solo piezas originales de
reCambio.
–reservado el dereCho de modifiCaCion de dimensiones, pesos y
CaraCteristiCas teCniCas, sin previo aviso.
–el fabriCante no assume responsabilidad por modifiCaCiones
realizadas por terCeros, nip or instalaCion inCorreCta.
–ligar à fonte de alimentação, de aCordo Com a regulamentação
naCional.
–Caso o Cabo externo e flexível da luminária se danifique, deve ser
substituído pelo fabriCante ou pessoa igualmente qualifiCada, para
evitar situações de perigo.
–montagem/manutenção efeCtuada uniCamente por pessoal téCniCo
espeCializado.
–utilizar somente peças originais do fabriCante.
–o fabriCante não se responsabiliza por danos resultantes da
inadequada utilização dos materiais.
–ΗσύνδεσΗ με τΗν παροχΗ ρεύματοσ να γίνεταί σύμφωνα με τίσ
εθνίκεσ προδίαγραφεσ.
–σε περίπτωσΗ πού το εξωτερίκο εύκαμπτο καλωδίο αύτού τού
φωτίστίκού είναί κατεστραμμενο, πρεπεί να αντίκατασταθεί
αποκλείστίκα καί μονο απο τον κατασκεύαστΗ Η απο αλλο
εξούσίοδοτΗμενο ατομο, γία τΗν αποφύγΗ κίνδύνων.
–τοποθετΗσΗ/σύντΗρΗσΗ μονο απο Ηλεκτρολογο.
–κατα τΗν επίσκεύΗ/δίατΗρΗσΗ χρΗσίμοποίείτε γνΗσία ανταλλακτίκα
μονο.
–aansluiten op het liChtnet, Conform de nationale regelgeving.
–als het externe flexibele snoer van deze armatuur besChadigd is, mag
dit uitsluitend worden vervangen door de fabrikant of een andere
gekwalifiCeerde persoon, om risiCo’s te voorkomen.
–montage/serviCe alleen door vakkundig personeel.
–bij inbedrijfstellen/onderhoud alleen originele onderdelen
gebruiken.
–nätanslutning skall ske enligt nationella bestämmelser.
–är den externa flexibla sladden på lampan skadad, får
endast tillverkaren eller en annan person med liknande
kvalifikationer byta ut denna, för att undvika faror.
–montering akötsel endaat av faCkfolk.
–använd bara originaldelar vid igangsättning/underhall.
–koble til strømforsyningen i henhold til nasjonale bestemmelser.
–hvis den eksterne og fleksible kabelen til denne lampen er skadet, så
må den kun skiftes ut av produsenten eller en likeverdig kvalisert
person, for at skader unngås.
–monteres kun av fagperonell.
–ved feilretting : bruk kun orginaldeler.
–připojení k síťovému napětí dle platnýCh národníCh norem.
–pokud je externí pružný kabel tohoto svítidla poškozen,
smí jeho výměnu provést pouze výrobCe nebo podobně
kvalifikovaná osoba, aby nedošlo k žádnému ohrožení.
–montáž a údržba může být prováděna výhradně odbornou
osobou.
–při údržbě nebo opravě musí být použity jen originální náhradní
díly.
– В ы п о л н и т ь п о д к л ю ч е н и е к с е т и В с о о т В е т ст В и и с п р и н я т ы м и В
данной стране праВилами монтажа.
–В случае поВреждения Внешнего гибкого кабеля этого сВетильника,
чтобы исключить риски, он должен быть заменен только
изготоВителем или лицом, имеющим такую же кВалификацию.
–при ремонте применять только теже самые части.
–монтаж/обслужиВание только специалистами.
–Csatlakoztassa a tápegységbe a helyi előírásoknak
megfelelően.
–ha ezen lámpák hajlítható/rugalmas kábelei megsérülnek, akkor
azok kizárólag Csak a gyártó vagy hasonlóan kvalifikált
személy által Cserélhetők ki, hogy elkerüljük a baleseteket.
–a szerelést/karbantártast Csak szakszemélyzet végezheti.
–üzembehelyezesnel/karbantartasnal Csak eredeti alkatrészek
használhatók.
–zasilanie należy połąCzyć zgodnie z wymaganiami odpowiedniCh norm.
–w przypadku uszkodzenia przewodu zasilająCego należy go wymienić
na nowy. wymiana przewodu może być wykonana jedynie przez
wykwalifikowanego elektryka.
–montaż/konserwaCja tylko przez faChowy personal.
–dla naprawy/bieżąCej eksploataCji stosować tylko oryginalne CzęśCi
zamienne.
–zapojte do el. prívodu podľa predpísanýCh noriem.
–ak je externý pružný kábel tohto svietidla poškodený, smie byť
nahradený výlučne výrobCom alebo podobne kvalifikovanou
osobou, aby sa zabránilo ohrozeniu.
–montažo/vzdrževanje lahko izvrši le ustrezno usposobljena
oseba.
–pri popravilu/vzdrževalnih delih se lahko uporabljajo samo
originalni deli.
–v kolikor se na svetilkah naknadno izvedejo spremembe, se za
proizvajalCa svetilke smatra tisti, ki je izvedel spremembo.
–proizvajaleC ne jamči za škodo, ki bi nastala zaradi nepravilne
uporabe.
–Şebeke bağlantisini lütfen ülkeye özgü kurulum kurallari
çerçevesinde yapiniz.
–avizenin [luminaire] hariCi esnek kablosunun hasar görmesi
durumunda, tehlikelerden kaçinmak üzere bu sadeCe üretiCi
tarafindan veya benzeri vasifli kiŞiler tarafindan değiŞtirilebilir.
–montaj ve bakim sadeCe yetkili peronel tarafindan yapilmalidir.
–bakimda sadeCe orjinal parCalar kullanimalidir.
–molimo izvršite mrežni priključak prema speCifičnim
naCionalnim odredbama o njegovom izvršenju.
–ukoliko je eksterni, fleksibilni kabel te svjetiljke oštećen,
zamjena istog je dozvoljena isključivo proizvođaču ili sličnoj
kvalifiCiranoj osobi, kako bi se izbjegle opasnosti.
–montažu/održavanje mora vršiti odgovarajuće osposoblejena
osoba.
–pri popravku/održavanju koristiti samo originalne dijelove.
–ukoliko se na svjetiljkama naknadno vrše promjene, za
proizvodača svjetiljke se smatra taj koji je promjene izvršio.
–proizvodač ne garantuje za štetu koja bi mogla nastati usled
nepravilne upotrebe.
–molimo da mrežni priključak provedete prema speCifičnim naCionalnim
odredbama o njegovom provođenju.
–ako je eksterni fleksibilni kabal ove svetiljke oštećen, njega sme da
zameni isključivo proizvođač ili neko slično kvalifikovano liCe, da bi
se izbegla ugrožavanja.
–montažu/održa vanje može da obavi samo stručno osposobljena
osoba.
–pri popravljanju/održavanju upotrebljavati samo originalne delove.
–ukoliko se na svetilkama naknadno urade izmene, za proizvadača
svetilke će se smatrati onaj ko izmene izvrši.
–proizvadač ne garantuje za štetu koja bi mogla nastati usled
nepravilne upotrebe.

Other Traxon Lighting Equipment manuals

Traxon Media Tube HO Installation instructions manual

Traxon

Traxon Media Tube HO Installation instructions manual

Traxon Allegro Dot S Direct View User manual

Traxon

Traxon Allegro Dot S Direct View User manual

Traxon ProPoint Vista 100W User manual

Traxon

Traxon ProPoint Vista 100W User manual

Traxon Media Tube HO User manual

Traxon

Traxon Media Tube HO User manual

Traxon Cove Light AC DIM Installation instructions manual

Traxon

Traxon Cove Light AC DIM Installation instructions manual

Traxon Allegro Media Tube Lite User manual

Traxon

Traxon Allegro Media Tube Lite User manual

Traxon Washer Quattro AC XB Installation instructions manual

Traxon

Traxon Washer Quattro AC XB Installation instructions manual

Traxon RGB 50 144PXL User manual

Traxon

Traxon RGB 50 144PXL User manual

Traxon e:cue Genius AM38213003I Specification sheet

Traxon

Traxon e:cue Genius AM38213003I Specification sheet

Traxon Allegro Dot S Direct View User manual

Traxon

Traxon Allegro Dot S Direct View User manual

Traxon ARCHISHAPE Tube Ultra Slim User manual

Traxon

Traxon ARCHISHAPE Tube Ultra Slim User manual

Traxon e:cue SYMPL pro Node User manual

Traxon

Traxon e:cue SYMPL pro Node User manual

Traxon Allegro Dot M/L Direct View User manual

Traxon

Traxon Allegro Dot M/L Direct View User manual

Traxon Allegro Media Tube Lite Installation instructions manual

Traxon

Traxon Allegro Media Tube Lite Installation instructions manual

Traxon Pro Washer Pro Nano User manual

Traxon

Traxon Pro Washer Pro Nano User manual

Traxon Allegro Dot M Installation instructions manual

Traxon

Traxon Allegro Dot M Installation instructions manual

Traxon ProPoint Vista Series User manual

Traxon

Traxon ProPoint Vista Series User manual

Traxon Osram Media Tube Go User manual

Traxon

Traxon Osram Media Tube Go User manual

Traxon ARCHISHAPE Dot 2.0 S CE User manual

Traxon

Traxon ARCHISHAPE Dot 2.0 S CE User manual

Traxon e cue Osram ProPoint KR.MA.01.10001 Installation instructions manual

Traxon

Traxon e cue Osram ProPoint KR.MA.01.10001 Installation instructions manual

Popular Lighting Equipment manuals by other brands

Beghelli Tempesta LED ECO instructions

Beghelli

Beghelli Tempesta LED ECO instructions

Coemar Infinity Wash M instruction manual

Coemar

Coemar Infinity Wash M instruction manual

lightculture NEON MICRO Y installation guide

lightculture

lightculture NEON MICRO Y installation guide

Original BTC Primo Table instruction manual

Original BTC

Original BTC Primo Table instruction manual

Trilux T 200 Series Mounting instructions

Trilux

Trilux T 200 Series Mounting instructions

visplay Xero Twin P/L Assembly and operating instructions

visplay

visplay Xero Twin P/L Assembly and operating instructions

American DJ LS-70 User instruction

American DJ

American DJ LS-70 User instruction

Color Sage CS-B144B user manual

Color Sage

Color Sage CS-B144B user manual

Titanium TT-TRK-10W-1R quick start guide

Titanium

Titanium TT-TRK-10W-1R quick start guide

LaMetric Elf's crown installation guide

LaMetric

LaMetric Elf's crown installation guide

CLARIUS PLUS Quick installation guide

CLARIUS

CLARIUS PLUS Quick installation guide

GRE CIPROV1001 manual

GRE

GRE CIPROV1001 manual

IndoorLED Quantum Max 150W instruction manual

IndoorLED

IndoorLED Quantum Max 150W instruction manual

Luxibel LX152 user manual

Luxibel

Luxibel LX152 user manual

VelLight LEDA212NW user manual

VelLight

VelLight LEDA212NW user manual

Lampo HYPERCOLOR 575 user manual

Lampo

Lampo HYPERCOLOR 575 user manual

MGL LICHT MDL68 Mounting instruction

MGL LICHT

MGL LICHT MDL68 Mounting instruction

HERA PD 60 DYNAMIC WHITE SERIES User manual & installation guide

HERA

HERA PD 60 DYNAMIC WHITE SERIES User manual & installation guide

manuals.online logo
manuals.online logoBrands
  • About & Mission
  • Contact us
  • Privacy Policy
  • Terms and Conditions

Copyright 2025 Manuals.Online. All Rights Reserved.