Trek RIDE+ R250 User manual

Electric bicycle
Owner’s Manual
Benutzerhandbuch
Gebruikers handleiding
Le Manuel du Propriétaire

3
ENGLISHDEUTSCHNEDERLANDSFRANÇAIS
ENGLISH
This Electric bicycle manual is additional to the manual provided with your bicycle.
It treats those aspects in which the Electric bicycle differs from the non-electric bikes.
© Trek Bicycle retains all rights to this Owner’s Manual.
No texts, details, or illustrations from this Manual may be reproduced or distributed,
or become the subject of unauthorized use for commercial purposes, nor may they be made
available to others. Additional manuals for using the Electric bicycle may be ordered as separate
items from Trek Bicycle. Nevertheless, should you discover any errors, we would be grateful if you
would bring them to our attention.
DEUTSCH
Diese Bedienungsanleitung für Elektro-Bikes ist als Ergänzung zur Bedienungsanleitung gedacht,
die Ihrem Fahrrad beiliegt. Sie behandelt sämtliche Punkte, in denen das Elektro-Bike sich von
einem Fahrrad ohne Elektromotor unterscheidet.
© Trek Bicycle behalt sich samtliche Rechte an dieser Bedienungsanleitung vor.
Weder Texte noch Auszuge daraus oder Illustrationen aus dieser Bedienungsanleitung durfen
nachgedruckt oder anderweitig verbreitet oder in anderer, nicht autorisierter Form fur kommerzielle Zwecke
verwendet und dritten Personen zuganglich gemacht werden.Falls notig, konnen weitere
Bedienungsanleitungen fur dieses Elektro-Bike separat bei Trek Bicycle bestellt werden. Diese
Bedienungsanleitung wurde vom Hersteller nach bestem Wissen und Gewissen erstellt. Dies schließt jedoch
mögliche Fehler und Irrtümer aufgrund geringer Abweichungen einzelner Bauteile am Fahrrad nicht aus.
Sollten Sie dennoch Fehler bemerken, wurden wir uns freuen, wenn Sie uns davon unterrichten.
NEDERLANDS
Deze handleiding voor uw Elektrische fiets is een uitbreiding van de handleiding bij uw fiets.
Hierin staan de zaken beschreven die specifiek zijn voor de Elektrische fiets.
© Trek Bicycle behoudt alle auteursrechten op deze handleiding.
U mag geen teksten, details of illustraties uit deze handleiding dupliceren, wijzigen of anderszins
distribueren. Ze mogen ook niet zonder toestemming gebruikt worden voor commerciële
doeleinden, noch mogen ze anderen ter beschikking gesteld worden.
Extra exemplaren van deze handleiding kunt u bij Trek Bicycle bestellen.
Deze handleiding is met de uiterste zorg samengesteld. Mocht u echter fouten aantreffen,
dan zouden wij het zeer op prijs stellen als u ons daar op wees.
FRANÇAIS
Ce manuel de vélo électrique est un supplément au manuel fourni avec votre vélo électrique.
Il aborde les aspects du vélo électrique qui diffèrent des vélos classiques.
© Trek Bicycle se réserve tous les droits concernant ce manuel d’utilisation.
Toute reproduction et distribution des textes ainsi que les illustrations contenues dans ce manuel
sont formellement interdites. Il est également interdit de les utiliser sans autorisation pour un but
commercial ou de les mettre à disposition de tiers. Des manuels d’utilisation pour ce vélo
électrique peuvent être commandes séparément auprès de Trek Bicycle. Ce manuel a été écrit par
le fabricant, avec soin et la meilleure connaissance disponible. Ceci n’exclut pas la possibilité
d’erreurs ou d’omissions suite à des modifications ultérieures de montages des vélos. Si vous
deviez y découvrir des erreurs, nous vous serions reconnaissants de nous les signaler.

4
ENGLISH
General 4
Congratulations on your new electric bicycle! 5
1. Quick start 6
1.1. BionX G2 Controller 6
1.2. RIDE+ Pro Controller 7
1.3. RIDE+ EASY Controller 8
1.4. RIDE+ EASY II Controller 9
1.5. Charging 10
1.6. Rack Battery (RIDE+ R250, RIDE+R320) 11
1.7. Down tube Battery (RIDE+ C320, RIDE+ C420) 12
2. Description 13
2.1. Specific parts for the electric bicycle 13
2.2. Assistance – Regeneration 15
2.3. Bontrager Satellite Elite ForkLight 16
3. 40 KM/H ‘Fast Electric Bike’ 17
3.1. Legal rules 17
3.2. Differences in equipment 17
3.3. Instruction for use 17
4. Instructions for Use 18
4.1. BionX G2 controller 18
4.2. RIDE+ Pro controller 21
4.3. RIDE+ EASY Controller 24
4.4. RIDE+ EASY II Controller 26
4.5. Rear Rack Battery-pack 28
4.6. Downtube Battery-pack 29
4.7. Charging the Battery-pack 30
4.8. Battery care 32
4.9. Suggestions for use 32
4.10. Programming (bikes with ‘BionX G2’ and ‘RIDE+ Pro’ controller only) 33
5. Maintenance 34
5.1. Cleaning 34
5.2. Removal and refitting of wheels for bikes with a rear wheel motor 34
5.3. Removal and refitting of wheels for bikes with a front wheel motor 35
6. Technical description 37
6.1. Bike specifics 37
6.2. Battery packs 37
6.3. Minimum and maximum temperatures for battery-pack 37
6.4. Power supply 37
7. Problem solving 38
7.1. Drive problems 38
7.2. Charging problems 38
7.3. Display problems 38
8. Limited warranty 39
Table of contents

5
ENGLISH
Congratulations on your new electric bicycle!
Your electric bicycle is a bike with electric pedal assistance.
This means that you can pedal it as a normal bike, or that the bike can assist you in your pedaling.
The electric bicycle will assist you when you are pedaling. The amount of assistance depends on
the force you exert on the pedals.
RIDE+ bicycles come in two classes: Pedelecs and Fast Electric Bikes.
• Pedelecs assist up to a speed of 25 km/h. This class is legally considered a bicycle.
• Fast Electric Bikes assist at higher speeds. This class is legally considered a lightweight moped.
This manual covers the following bikes, both pedelecs and fast class
• Derailleur/Roller brake,
• Derailleur/Rim (Magura, V-brake) or disc brake.
• Internal gear hub/Roller brake
• Internal gear hub/ Rim (Magura, V-brake) or disc brake.
The electric bicycle differs only slightly from a non-electric bike.
The following parts are specific to an electric bicycle
• The battery-pack in the rear rack or on the down tube,
• The motor in the rear- or front wheel hub,
• The controller on the handlebars or on the clamp in front of the handlebars.
Congratulations

Quick start - BionX G2 Controller
6
ENGLISH
1. Quick start
This manual has all the information that you’ll
need to get the best from your electric bicycle.
We strongly recommend that you read it through.
However, for quick use of the bike, please read
the Quick Start guide for the type of controller
and battery on your bicycle.
1.1 BionX G2 Controller
• Switching system On / Off
Push any of the two upper buttons to switch the system
‘on’. Push button to switch the system off. When
switched on, the bike is in cycle mode (zero assist).
• Assistance/ Regeneration Level
Push ‘+’ button once for assistance level 1, again for
higher levels. Push ‘-’ button to go to a lower level.
Regeneration levels can be controlled in a similar way.
Push ‘-’ button once for regeneration level 1, again for a
higher level. Push ‘+’ button to reduce regeneration.
Notice: It is strongly advised to ride away in a
straight line when an assistance level is selected. Never
select assistance level 3 or 4 during maneuvering or riding away in a tight corner. The powerful reaction
of motor might take you unawares.
• Switching lights On / Off
Press the button for 2 seconds to switch On / Off the
display light, and, if present, the front and rear lights.
• See time, average speed, odometer, trip distance
Use button to change computer functions (Order of
appearance: trip distance, odometer, average speed, time
of day). To prevent loss of riding information, please
make sure that the system is switched off before the
controller is removed from the bike.
• Using the remote
Some bikes have the controller positioned on a middle clamp, which means that
the controller can more easily be operated with a remote. This device can be used
to select a higher or lower assist or regeneration level without removing your hands
off the handlebars. The red throttle button on the BionX remote is a convenient
help to move the bike without pedaling (up to 4 km/h) walking next to the e-bike.
Caution:Beware of unintended use of the throttle button when the system is switched on.

RIDE+ Pro Controller - Quick start
7
ENGLISH
1.2 RIDE+ Pro Controller
• Switching system On / Off
Push any of the two upper buttons to switch the system
‘on’. Push button to switch the system off. When
switched on, the bike is in cycle mode (zero assist).
• Assistance / Regeneration Level
Push ‘+’ button once for assistance level 1, again
for higher levels. Push ‘-’ button to go to a lower level.
Regeneration levels can be controlled in a similar way.
Push ‘-’ button once for regeneration level 1, again for a
higher level. Push ‘+’ button to reduce regeneration.
Notice: It is strongly advised to ride away in a
straight line when an assistance level is selected. Never select assistance level 3 or 4 during maneuvering
or riding away in a tight corner. The powerful reaction of motor might take you unawares.
• Switching lights On / Off
Press the button for 2 seconds to switch On / Off
the Controller display light, and, if present, the front and
rear lights. Once activated, the text ‘Light On’ or ‘Light
Off’ will appear in the lower field of the display.
• See time, average speed, odometer, trip distance
Use button to change bike computer functions
(Order of appearance: trip distance, odometer, average
speed, time). To prevent loss of riding information,
please make sure that the system is switched off
before the controller is removed from the bike.
• Using the RIDE+ Link
Most bikes with the ‘RIDE+ Pro’ controller positioned on the middle clamp are
equipped (or can be equipped) with the RIDE+ Link. This device can be used to
select a higher or lower assist or regeneration level and to turn the lights On/Off
without removing your hands off the handlebars.The red throttle button on the
RIDE+ Link is a convenient help to move the bike without pedaling (up to 4 km/h)
walking next to the e-bike.
Caution:Beware of unintended use of the throttle button when the system is switched on.

8
ENGLISH
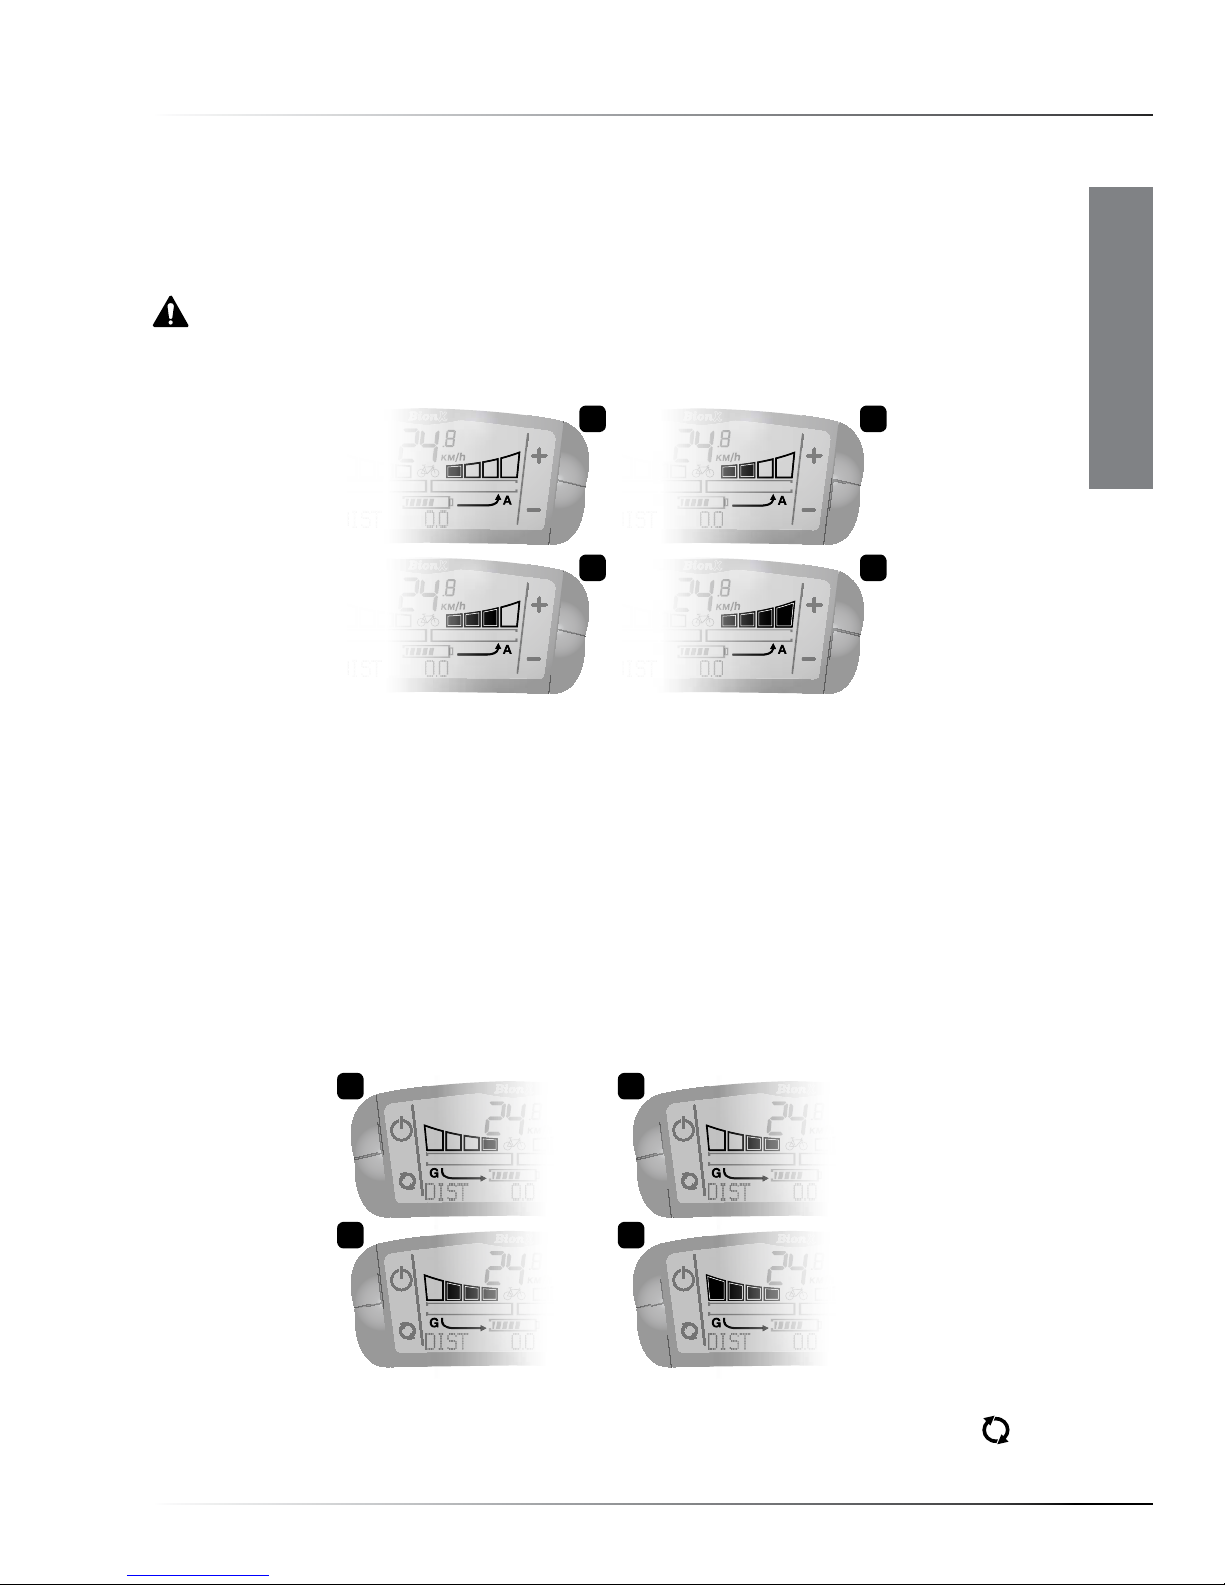
1.3 RIDE+ EASY Controller
• Switching system On / Off
To switch the system on, push the ‘Side’ button once.
To switch it off, push the ‘Side’ button again.
After switching on, the bike is always in cycle mode (zero assist).
Notice: It is strongly advised to ride away in a straight line
when an assistance level is selected. Never select assistance level 3
or 4 during maneuvering or riding away in a tight corner. The powerful reaction of motor might take
you unawares.
• Assistance Level/(Regeneration) Level
For assistance level 1, push the ‘+ (right hand)’ button once.
Push it again for higher levels.Push the ‘- (left hand)’ button to go
to a lower level. Regeneration levels are not installed as standard on
the controller.
• Switching Lights On / Off
Press the ‘Side’ button for 2 seconds to switch On / Off the
Controller display light, and if present, the front and rear lights.
Once activated, the light symbol will appear on the screen.
Quick start - RIDE+ EASY Controller

9
ENGLISH
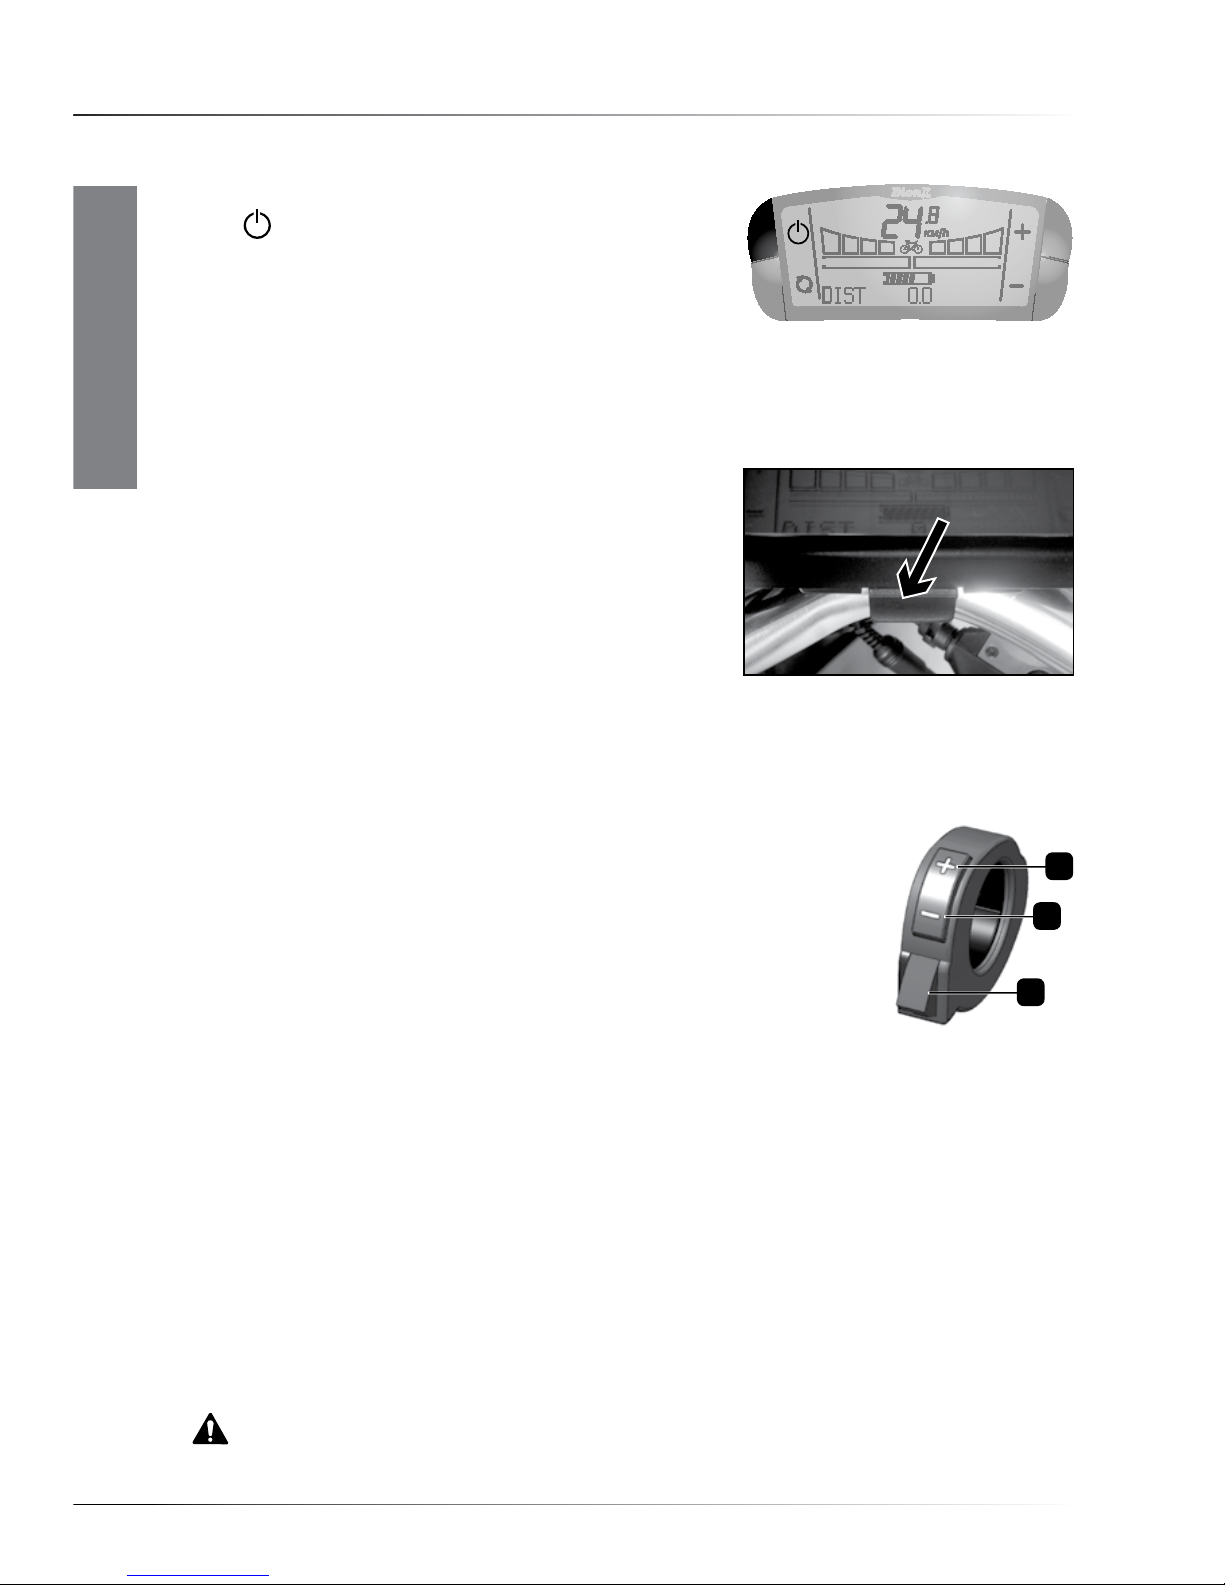
1.4 RIDE+ EASY II Controller
• Switching system On / Off
To switch the system on, push the ‘Side’ button once. To switch it
off, push the ‘Side’ button again. After switching on, the bike is
always in cycle mode (zero assist). To prevent loss of riding
information, please make sure that the system is switched off
before the controller is removed from the bike.
Notice: It is strongly advised to ride away in a straight line when an assistance level is selected.
Never select assistance level 3 or 4 during maneuvering or riding away in a tight corner. The powerful
reaction of motor might take you unawares.
• Assistance /(Regeneration) Level
Push ‘+’ button once for assistance level 1, again for higher levels.
Push ‘-’ button to go to a lower level. Regeneration levels are not
installed as standard on the controller.
• Switching lights On /Off
Press the ‘Side’ button for 2 seconds to switch On / Off the
Controller display light, and if present, the front and rear lights.
Once activated, the light symbol will appear on the screen.
• See total distance/ trip distance
Push ‘-’ button for 5 seconds to switch between total distance and
trip distance.
RIDE+ EASY II Controller - Quick start

GREEN/ORANGE
GREEN/ORANGE GREEN/ORANGE
10
ENGLISH
1.5 Charging
• Power supply
The charging process is the same for rack batteries (39-cell and 30-cell) and batteries mounted
on the down tube (39-cell and 52-cell). All batteries can be charged using the power supply.
RIDE+ R250 RIDE+ R320
RIDE+ R320 RIDE+ C320 and RIDE+ C420
• Charging the battery-pack:
1. Turn the system off.
2. Connect the connector of the power supply to the charging port of
the battery and connect the power supply to the power outlet.
Warning: Replace a damaged power cable immediately to prevent an electric shock.
3. The battery will emit beeps and then the charging port will turn
orange. When the battery is full, the charging port will turn green.
To stop charging, just disconnect both connectors.
Quick start - Charging
1. 2.
1. 2.
3. 4.
3. 4.
11
ENGLISH
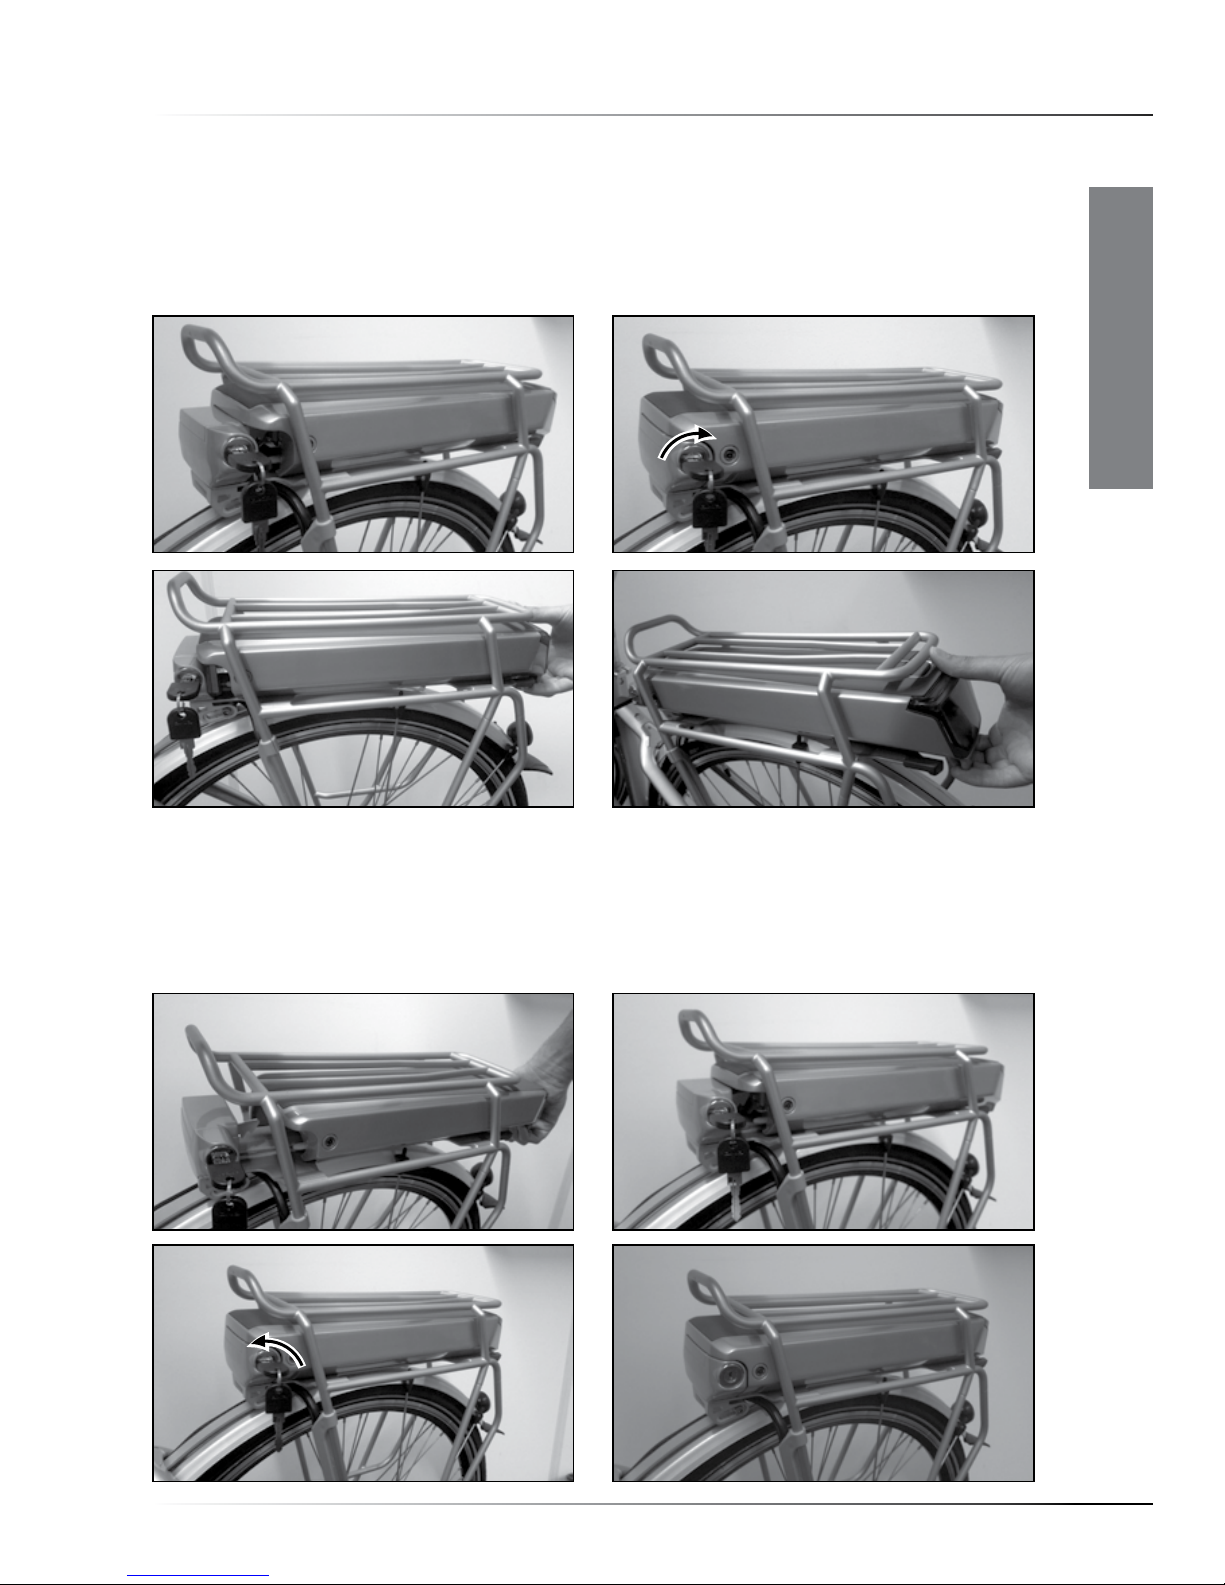
1.6. Rack Battery (RIDE+ R250, RIDE+R320)
• Removing the battery-pack
Insert the key in the lock, twist the key clockwise (1,2). Now slide the battery-pack rearwards out of
the rear rack (3,4). After you remove the battery, don’t forget to take the keys out of the lock.
• Replacing the battery-pack
Slide the battery-pack into the rack, electrical-contact side first (1). Carefully push all the way
forward, also through a slightly higher resistance at the end (2,3). Now turn the key of the lock
counter clockwise until the battery is locked and take the key out of the lock (4). Do not ride the
bike with the lock open.
Rack Battery - Quick start
Contacts at the bottom side of the down tube
1. 2. 3.
5.4.
1. 2.
3. 4.
12
ENGLISH
Quick start - Down Tube Battery
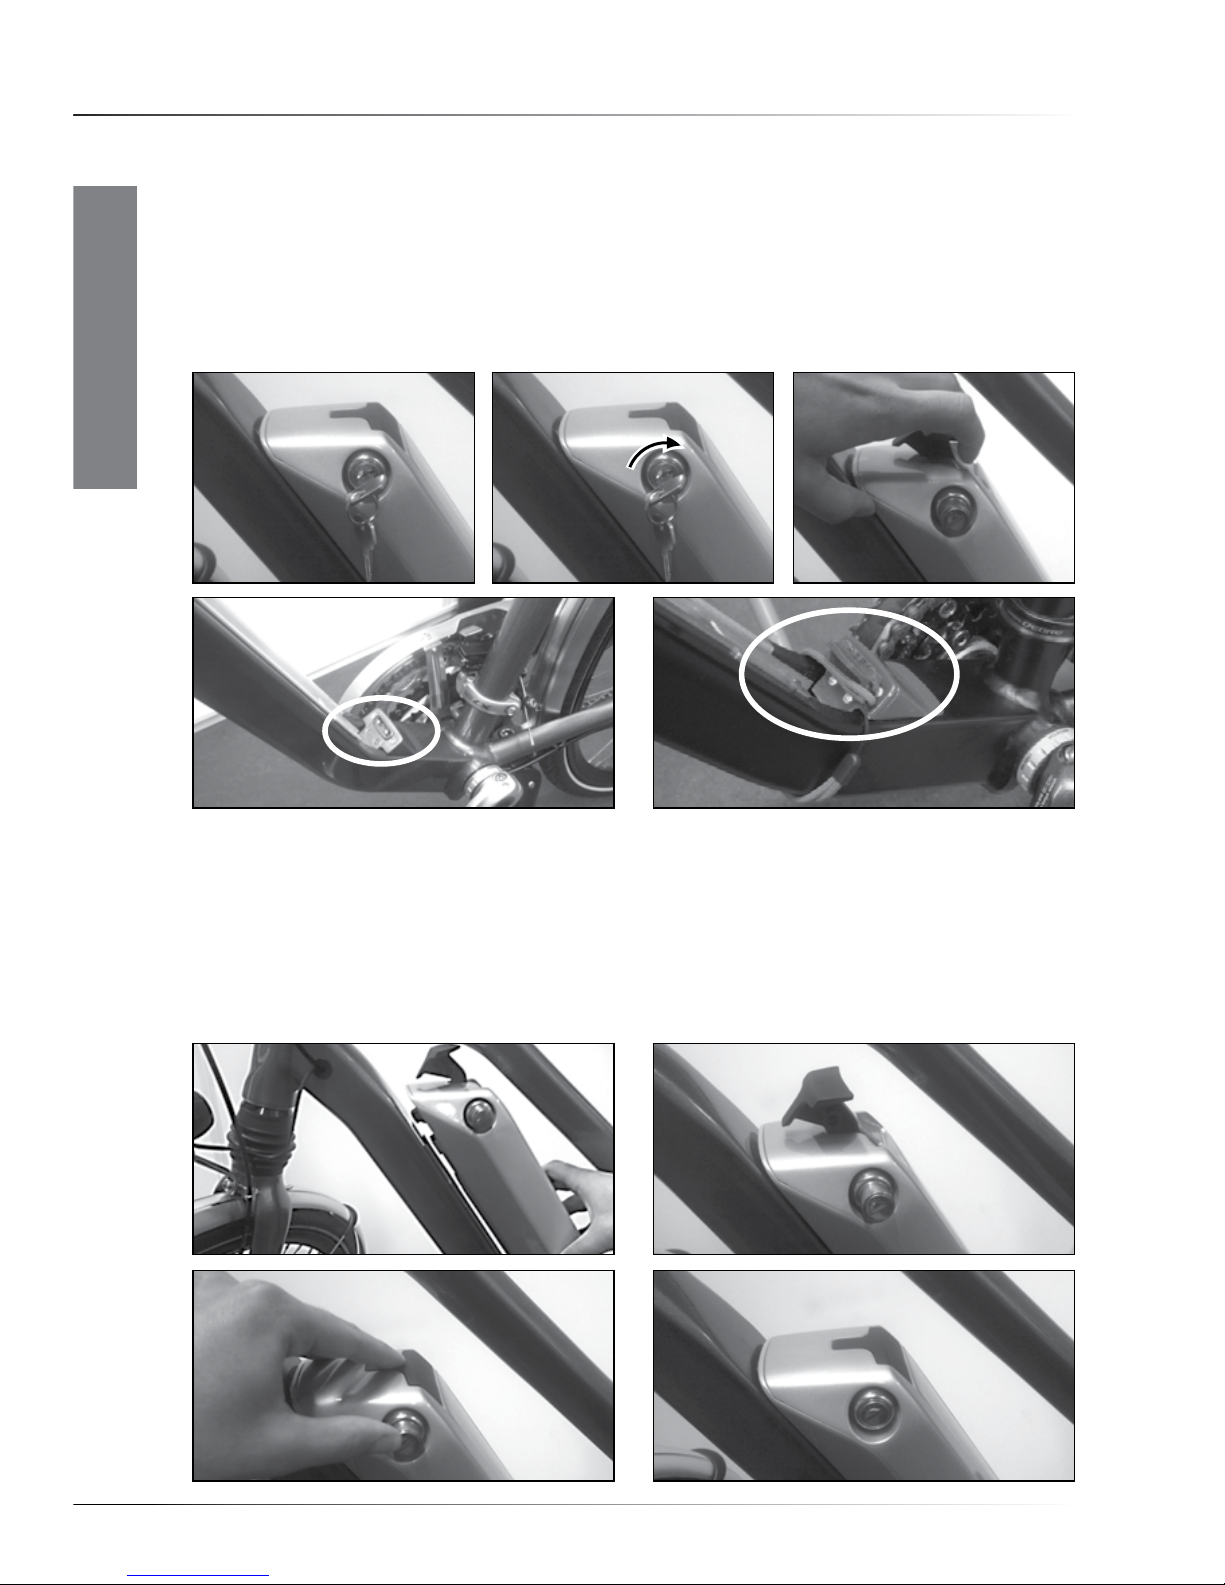
1.7 Down tube Battery (RIDE+ C320, RIDE+ C420)
• Removing the battery-pack
Insert the key in the lock, twist the key clockwise until the lock springs out (1,2). When the lock
springs out, the lever of the battery will be released. Now take the key from the lock and pull the
lever of the battery so that it slides upwards - parallel to the down tube - until it releases from the
rail (3). When the battery is not on the bike, always use the protective cover on the contacts on the
frame to protect the electrical system from water (5).
• Replacing the battery-pack
Position the battery over the down tube (with some space between the seat tube and the lower end
of the battery) (1). Now, slide the battery-pack down onto the rail (2). Use the lever to lower the
battery carefully during the last phase of sliding, so that the connectors engage (3). Be sure that
the connector at the bottom of the battery and the connector on the docking engage properly.
When the battery is fully in place, push the lock in until it clicks (4). Do not ride the bike with the
lock open.
1 3
5
2
1
3
5
4
4
2 2 3 4
1
1
3 52 4 6
2
13
ENGLISH
2. Description
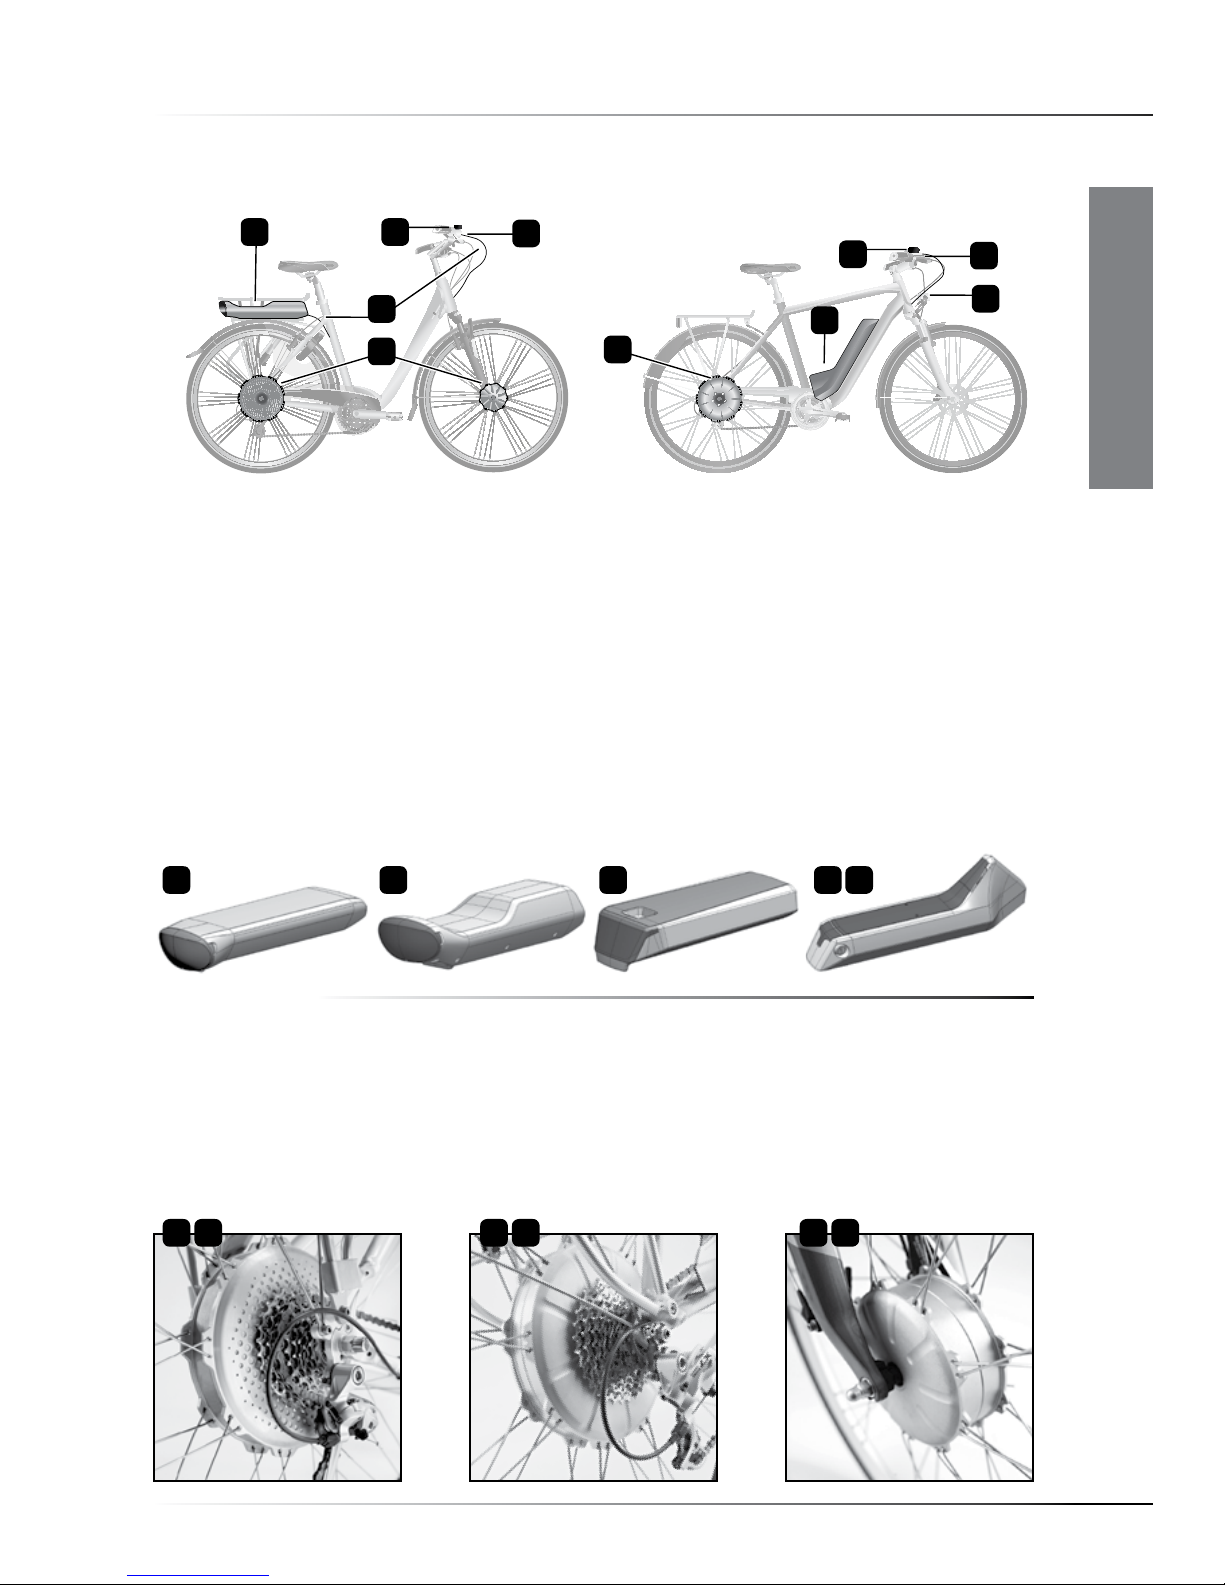
2.1. Specific parts for the electric bicycle
There are several models of electric bicycles, with different equipment options. Find the options
that are on your electric bicycle. In the pictures of the bikes you will see the battery-pack (1), the
motor ‘front or rear’ (2), the controller (3), the brake switch (4), and the wiring harness (5).
• Battery-packs
There are four types of batteries for RIDE+ bicycles:
1 ‘RIDE+ R250 Battery-pack’, containing 30 Li-Mn (Lithium-Ion) cells, 4.8 Ah, 250 Wh.
2 ‘RIDE+ R320 Battery-pack’ (2 editions), containing 39 Li-Mn (Lithium-Ion) cells, 6.6 Ah, 320 Wh.
3 ‘RIDE+ C320 Battery-pack’, containing 39 Li-Mn (Lithium-Ion) cells, 6.6 Ah, 320 Wh
4 ‘RIDE+ C420 Battery-pack’, containing 52 Li-Mn (Lithium-Ion) cells, 8.8 Ah, 420 Wh
• Motor configurations
1 250W RIDE+ rear motor, derailleur and roller brakes
2 250W RIDE+ rear motor, derailleur and disc brakes or rim brakes (Magura or V-brake)
3 250W RIDE+ rear SL motor (lightweight), derailleur and roller brakes
4 250W RIDE+ rear SL motor (lightweight), derailleur and disc brakes or rim brakes (Magura or V-brake)
5 250W RIDE+ Front motor, Internal gear hub and roller brakes
6 250W RIDE+ Front motor, Internal gear hub and rim brakes (Magura or V-brake)
Description
1
1 2
2 3 4
14
ENGLISH
Description
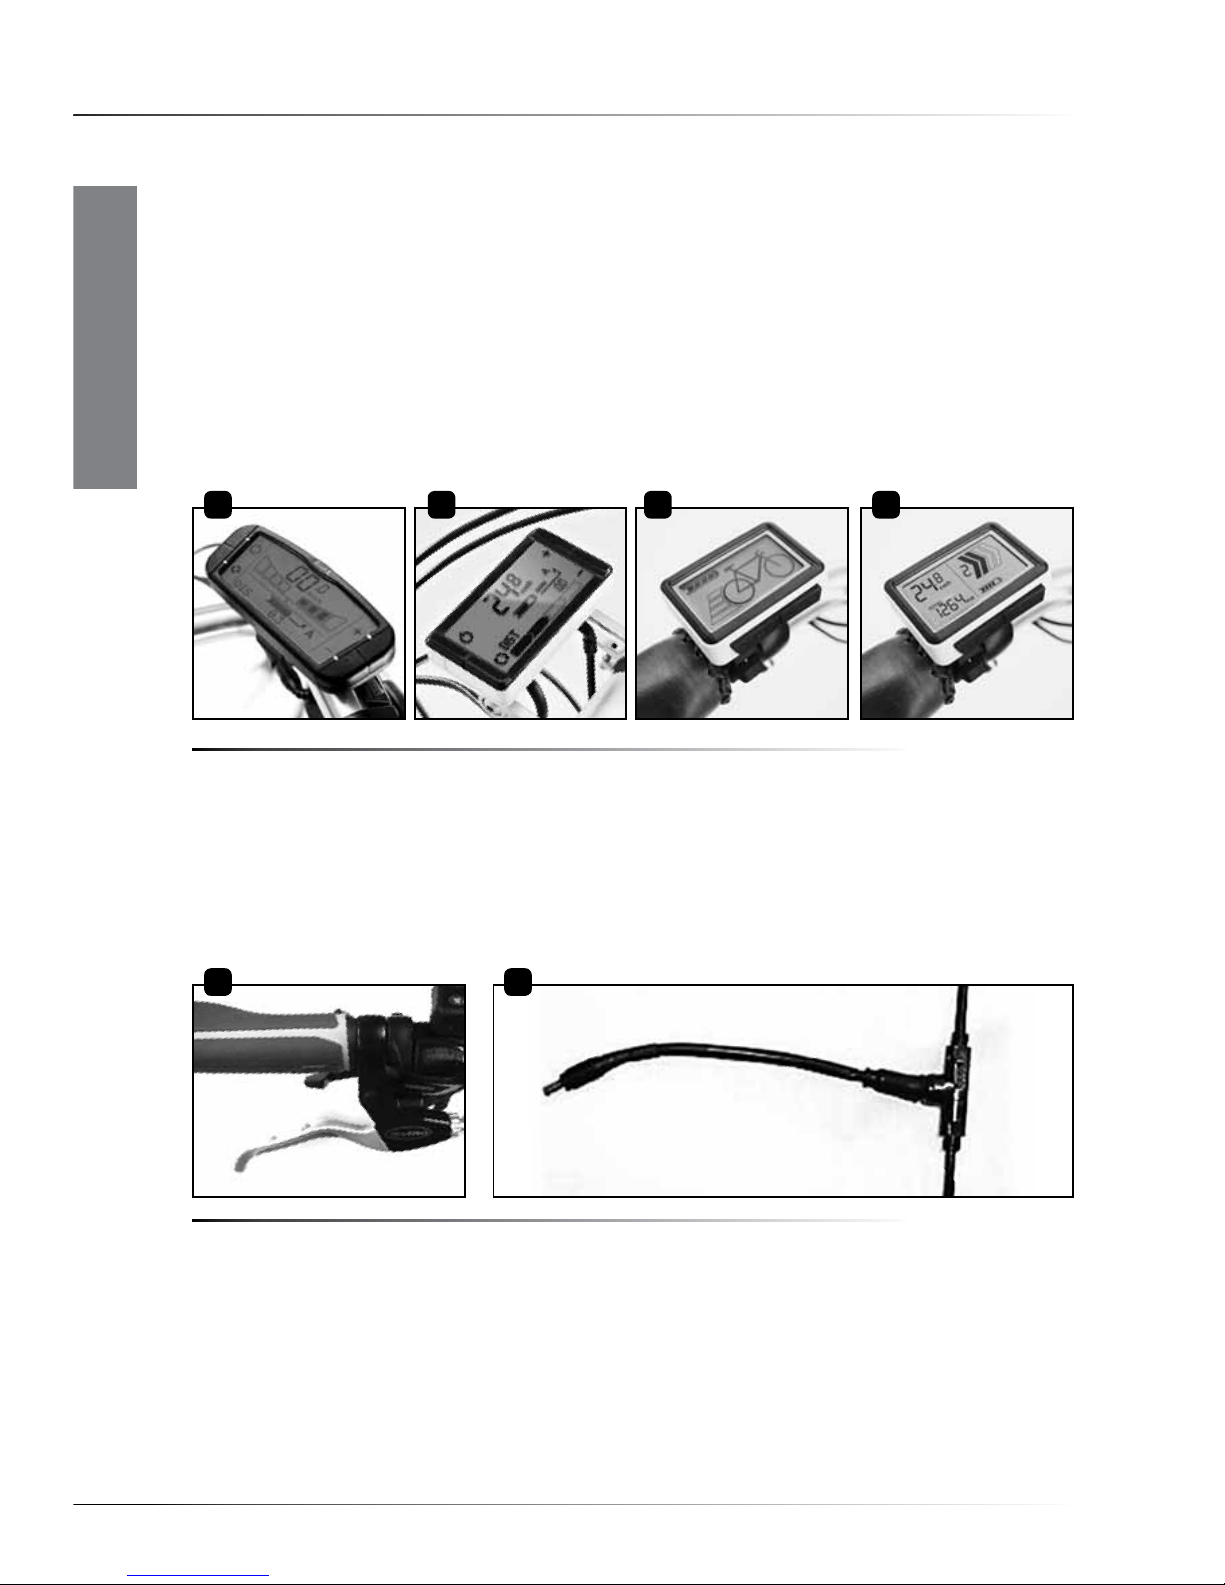
• Controllers
1 BionX G2 controller: controls all functions: on/off, the four assist levels, the four regenerative
levels and lights on/off. It also functions as a bicycle computer, measuring speed and distance,
and shows the battery level.
2 RIDE+ Pro controller: controls all functions: on/off, the four assist levels, the four regenerative
levels and lights on/off. It also functions as a bicycle computer, measuring speed and distance,
and shows the battery level. All the information can be provided in different languages (see
‘programming’)
3 RIDE+ Easy Controller: controls all functions: on/off, the four assist levels, and Lights on/off.
4 RIDE+ Easy II Controller: controls all functions: on/off, the four assist levels, Lights on/off, and trip
and total distance.
• Brake Switches
1 The right hand brake lever of cable-activated brakes contains a switch that cuts off the power to
the motor, and switches the motor to generation mode as soon as the right hand brake lever is
pulled.
2 On bikes with hydraulic brakes (Magura), the switch is also located in the right hand brake lever,
or a (similar) switch is placed in the hydraulic brake line (disc brake).
• Wiring Harness
The wiring harness links controller, brake switch, battery-pack and motor. It runs through the frame
and is linked to the battery-pack via the docking station in the rear rack or via the docking station
on the down tube.

15
ENGLISH
Assistance – Regeneration
2.2 Assistance – Regeneration
The systems with the BionX G2 controller, RIDE+ Pro controller, RIDE+ EASY controller and RIDE+
EASYII controller have four levels of assistance. When the system is set to assistance, the electric
motor drives the rear wheel and assists you in your pedaling.
Additionally, the systems with the BionX G2 Controller and RIDE+ Pro Controller have four levels of
regeneration. The systems with the RIDE+ Easy Controller and RIDE+ Easy II Controller do not have
regenerating by default. On systems with these Controllers, regenerating can be activated by the
dealer. When the system is set to regeneration, the electric motor is used as a dynamo and
generates electricity for charging the battery-pack. Going downhill, you can reduce your speed by
regulating the amount level of regeneration as the created resistance acts as a motor brake.
Though, that generation mode is not a substitute for using brakes to control speed or stop.
The tables below give an indication of the effort that is compensated in the different assistance and
regeneration levels. The real percentages of compensated effort depend on the software settings of
the bike.
Assistance
Effort
Compensation
with Batt. R320,
C320 and C420
Effort
Compensation
with Batt. R250
Recharge Situation
125% 25% Flat ground
250% 50% Uphill slopes, headwind
3100% 80% Hill, strong headwind
4200% 150% Very steep hill
Regenerative
braking Recharge Very steep descent,
braking
Regeneration
Effort
Compensation
with Batt. R320,
C320 and C420s
Effort
Compensation
with Batt. R250
Recharge Situation
-1 -25% -25% Recharge Mild downhill, tailwind
-2 -50% -50% Recharge Downhill, tailwind
-3 -100% -100% Recharge Descent
-4 -200% -200% Recharge Steep descent

C
16
ENGLISH
2.3 Bontrager Satellite Elite ForkLight*
The Bontrager Satellite Elite ForkLight comes in different versions.
The RIDE+ version can be operated via the controller on the handlebar.
The energy that is needed to power the lights comes from the battery.
Both lights always work simultaneously.
*Depending on model.
• Adjusting the beams
The height of the beams can be
adjusted by turning knobs ‘C’
(on both sides of the fork). Both
beams can be adjusted
independently by turning knob
‘C’ with a cross-headed
screwdriver. Both beams at the
same height gives best
performance.
Bontrager Satellite Elite ForkLight*

17
ENGLISH
40 km/h ‘Fast Electric Bike’
3. 40km/h ‘Fast Electric Bike’
The ’40 km/h fast electric bike’ is an electric bicycle of which the assistance does not stop at
25 km/h but at 40 km/h. This higher assist speed makes it the perfect electric bicycle for people
who like riding faster than 25 km/h. Note, though, that the actual maximum speed that you can
reach depends first and foremost on how strongly you pedal.
3.1 Legal rules
Legally, the 40 km/h fast electric bike is no longer considered being a ‘bicycle’ but a ‘lightweight
moped’. It has type approval as such.
NOTE, For these bicycles third party insurance is mandatory.
In most countries, wearing a helmet is not mandatory. However, we strongly recommend to
always wear a helmet for your own safety.
Since 40 km/h electric bicycles are legally considered to be lightweight mopeds, they do have
a throttle, which allows riding them up to 20 km/h using motor power only. This means, that up
to 20km/h your bike can be used as an E-Bike, rather than as a Pedelec. Above that speed,
the motor will assist pedaling up to a speed of 40 km/h.
Important: The maximum power of the motor on your bicycle is limited to 250 W. Your
40 km/h electric bicycle is still a bicycle. It is therefore not recommended that you use it as a
moped or an E-bike without pedaling. Using battery power only will strongly limit your range.
3.2 Differences in equipment
The technical equipment of these 40 km/h bikes is almost identical to that on Pedelecs.
The following parts are additional and/or different:
• the rear view mirror
• the insurance plate holder
• the throttle on the controller
• extra reflectors
•Slightly different brake levers
• the type-approval plate on the frame.
These are all part of the type approval. It is not allowed to remove or exchange them for
other (non-certified) equipment. This also applies to the handlebars, tires, seat post, headlight,
rear light, brakes, kickstand and controller.
3.3 Instructions for use
Riding is the same as the Pedelec bikes, except that the assistance does not stop at 25 km/h
but at 40 km/h.
Ride carefully. Other road users may not expect a bicycle to go this fast.
Maximum range on one battery charge depends very much on your style of use. Due to the
higher speed that can be reached, be prepared to find the range slightly shorter than on regular
Pedelec bikes that have a maximum assistance speed of 25 km/h.

5
6
34 1
92
7
8
18
ENGLISH
Instructions for Use
4. Instructions for Use
There are four types of controller: BionX G2, RIDE+ Pro, RIDE+ EASY and RIDE+ EASY II.
4.1 BionX G2 controller
1• Speed indication 2• Distance, Odometer, Chronometer, Average speed 3• Current assistance
level 4• Current generation level 5• On/Off button 6• Mode-switch button 7• ‘+’ button 8•
‘-’ button 9• Battery level
• Switching system On / Off
Press any of the two top buttons to switch the system on.
The battery will beep four times, the system will perform a
short self-check (shown on the display as a countdown in the
‘speed’-field), and the system will activate (switch to ‘on’).
As soon as the system is ‘on’, the screen will display and each
function will be shown next to its corresponding button.
• Same as in the Quick Start
To switch the system off, press the button . The battery-
pack will beep five times. Riding with the system ‘On’ in level 0
is the same as riding with the system ‘Off’. If the bike is left with
the system on, it will automatically switch off after about 10
minutes. Same as in the Quick Start
• Changing the position of the buttons
Normally, the On/Off button and the mode-switch
button are on the right, and the ‘+’ and ‘-’ buttons on the left.
The functionality of the buttons can be swapped right-to-left.
The code to access this is 2009. More information about
programming via the controller can be found later in this
manual.
• Assistance
When the motor provides power, the bicycle is in assistance
mode. There are four levels of assistance. The level of
assistance is shown by the bar graph on the right, below the
digits for speed. The narrow graph on the display shows the
amount of energy delivered to the motor.
1
3
2
4
1
3
2
4
19
ENGLISH
Instructions for Use
To increase assistance, press button ‘+’. For assistance level 1, press once. Press again for more
assistance. For less assistance press button ‘-’. When there is no assistance level shown and the
bicycle icon is visible on the screen, there is no assistance. Pedaling is then the same as on a normal
bicycle. To switch from any level of regeneration to the first assist level, press and hold the ‘+‘ button.
Notice: It is strongly advised to ride away in a straight line when an assistance level is selected.
Never select assistance level 3 or 4 during maneuvering or riding away in a tight corner. The powerful
reaction of motor might take you unawares.
• Regeneration
When the bicycle generates electricity for the battery, the system is in generation mode. The motor
then works as a dynamo. There are four levels of regeneration. The level of assistance is shown by
the bar graph on the left, below the digits for speed. The narrow graph on the display shows the
amount of energy delivered to the battery.
To increase the regeneration level, press button ‘-’. For regenerative level 1 press once. Press again
to increase the regeneration level to a higher level. For a lower regeneration level press button ‘+’.
To switch from any level of assistance to the first regenerative level, press and hold the ‘-’ button.
When the rear brake lever is pulled, the system always switches to generating. The arrow and G
will show in the display.
• Distance, Odometer, Chronometer, Average speed
The bottom of the display shows distance, odometer, chronometer, and average speed. Press
button to switch modes. To reset distance, chronometer, or average speed, keep this button
pressed for 2 seconds.
1
2
3
20
ENGLISH
Instructions for Use
• Switching lights On / Off
Press button for 2 seconds to switch On / Off the Controller
display light, and, if present, the front and rear lights. This
switches on the front light, the rear light, and the backlight in
the display. The lights will stay on even when you stop. To
switch the lights off, hold the button for 2 seconds. Even when the battery-gauge shows ‘empty’, there
is enough energy to run the lights for about two hours. If the battery-pack is fully drained, the lights
will be powered by the system as it switches to generative mode automatically.
• Removing and installing the BionX G2 Controller
To remove the BionX G2 Controller from the bike, press the
catch at the back of the holder and slide the controller off
towards the rear. To install the BionX G2 Controller onto the
handlebar, align the controller with its clamp and slide the
controller forward until it clicks. To prevent loss of riding
information, please make sure that the system is switched
off before the controller is removed from the bike.
• Unintended removal of Controller out of its dock.
If the controller is moved off its clamp while the system is active (‘on’), the system will no longer
assist, even when the controller is replaced into its clamp. Please select the correct level of
assistance again to reactivate the system.
• Using the BionX remote
Most bikes with the BionX G2 controller positioned on the middle clamp are
equipped (or can be equipped) with the BionX remote.
This device is mounted either the right or left side of the handlebar and can
be used to regulate the following functions without moving your hands off the
handlebar:
1• ‘+’ button Increase assist level (or decrease regeneration level)
2• ‘-‘ button Decrease assist level (or increase regeneration level)
3• Throttle button For Pedelecs: walk assist up to 3 or 6 km/h (pedaling not needed)
For fast E-bikes: assist up to 25 km/h (pedaling not needed)
• Installation of the BionX remote for non-equipped bikes:
To connect the BionX remote to the system, the remote connector can be plugged into the receiver
connector of the controller docking. After that, the brake generator connector can be plugged into
the remote connector.
The red throttle button on the BionX remote is a convenient help to move the bike without pedaling
(up to 4 km/h) walking next to the e-bike.
Caution:Beware of unintended use of the throttle button when the system is switched on.

9
8
24 1
76
3
4
5
21
ENGLISH
Instructions for Use
4.2 RIDE+ Pro controller
1• Speed indication 2• Battery level 3• ‘+’ button 4• ‘-’ button 5• Distance, Odometer, Chronometer,
Average speed, Clock 6• Current assistance level 7• Current generation level 8• Mode-switch
button 9• On/Off button 10• Light indicator, On or Off
• Switching system On / Off
Press any of the two top buttons to switch the system on.
The battery will beep four times, the system will perform a
short self-check (shown on the display as a countdown in the
‘speed’-field), and the system will activate (switch to ‘on’).
As soon as the system is ‘on’, the screen will display and each
function will be shown next to its corresponding button.
To switch the system off, press the button . The battery-pack
will beep five times. Riding with the system ‘on’ in level 0 is the
same as riding with the system ‘Off’. If the bike is left with the
system on, it will automatically switch off after about 10 minutes.
• Changing the position of the buttons
Normally, the On/Off button and the mode-switch button
are on the right, and the ‘+’ and ‘-’ buttons on the left. The
functionality of the buttons can be swapped right-to-left. The code
to access this is 2009. More information about programming via
the controller can be found later in this manual.
• Assistance
When the motor provides power, the bicycle is in assistance mode. There are four levels of
assistance. The level of assistance is shown by the arrows at the bottom of the display.
Notice: It is strongly advised to ride away in a straight line when an assistance level is selected.
Never select assistance level 3 or 4 during maneuvering or riding away in a tight corner. The powerful
reaction of motor might take you unawares.
To increase assistance, press button ‘+’. For assistance level 1,
press once. Press again for more assistance. For less assistance
press button ‘-’. When there is no assistance level shown, there is
no assistance so riding is the same as pedaling a normal bicycle.
This manual suits for next models
6
Table of contents
Languages:
Other Trek Bicycle Accessories manuals

Trek
Trek Sonic 2.0 User manual

Trek
Trek Pro RT User manual

Trek
Trek Radar User manual

Trek
Trek INCITE 6i User manual

Trek
Trek Fusion C User manual

Trek
Trek INCITE 6i User manual

Trek
Trek INCITE 11i User manual

Trek
Trek Bicycle Computer User manual

Trek
Trek TQ HPR50 User manual

Trek
Trek Bicycle Computer User manual


Popular Bicycle Accessories manuals by other brands


Specialized
Specialized Elite CylcoComputer user manual

Sigma
Sigma BC 16.16 manual

Playcore
Playcore Dero Setbacks installation instructions

VDO Cyclecomputing
VDO Cyclecomputing x3dw instruction manual

Cateye
Cateye RAPID X2 manual

buratti meccanica
buratti meccanica Clorofilla Trail Use and maintenance manual


