MP 1601 SD
English
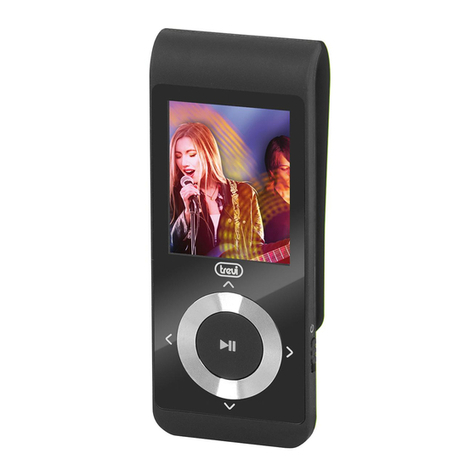
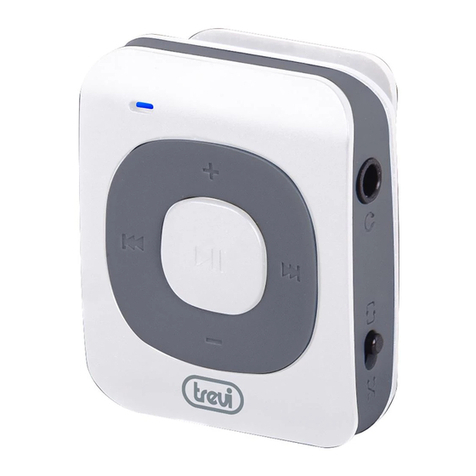
1. USB interface
2. Earphone interface
3. Power switch
4. Volume
5. Down
6. Menu
7. Up
8. Play/Pause
9. TF card interface
10. Screen display area
1.1 BUTTON INTRODUCTION
1. POWER button: the device powers on automatically when this button is switched to
[ON], and powers off when switched to [OFF].
2.VOLUME button: short press the VOLUME button to return to the previous menu; long
press theVOLUME button to adjust the volume; then press the BACK and FORWARD
buttons to make the volume lower or higher.
3. PREVIOUS: select the menu leftwards on the main interface.
4. NEXT: select the menu rightwards on the main interface.
5. OK button: function confirmation.
6. ON/OFF/PLAY/PAUSE: short press the button to switch between pause and play; short
press the PLAY button to turn on the device; press the button for 3sec when the device is
on to turn off the device.
1.2 BASIC OPERATION
• ON/OFF
ON: the device powers on automatically when the POWER button is switched to [ON].
OFF: press [8] for 3sec under the main interface to turn off the device. (The system will
also power off automatically in case of low battery level.)
• PC connection and data file transfer
Boot up the PC and connect the device to the PC with a USB connecting cable. In this way,
USB power supply or USB data transmission can be realized.This device,
connected to the PC through a USB interface, can be used as a USB flash disk.
• Charging
Please charge the device when any of the following situations occur:
A.The battery level icon shows empty.
B.The system powers off automatically, and powers off again soon after restart.
Charging method
Prior to charging, plug in the charger which is equipped at random, and insert one end of
the USB cable which is also equipped at random into the charger, and the other end into the
USB interface of the digital media player.Then charging begins.When the battery level icon at
the upper right corner shows full, charging is completed.
Notes:
1. During charging, it is normal that the temperature of the charger and the digital media
player rises to a certain degree.
2. Lithium battery which is rechargeable is adopted for this player. For the first several times
of charging, the charging should last for more than 3 hours each time and should be carried
out after the battery is completely used up, in order to ensure the service life of the battery.
3. The usable time of the battery is determined by factors like volume and type of the file
played.
4. This player should not be charged with chargers of other types. Our company will take
no responsibility if the digital media player is burnt down as a result of using a different type
of charger. If you are in need of an original charger to match this player, please contact any
distributor of our company.
II. MAIN MENU
Enter the main interface after the device is started; press to loop select among six options,
namely,“Music, Recording,Voice Play, Radio Mode, System Setting, and Text View”.When a
selection is made, press [M] to select the corresponding option. Short press to enter the
play mode, and long press [M] to return to the main menu.
1.0 MUSIC MODE
Short press [7/5] to select [Music Mode] on the main menu interface.
Short press [M] to enter the music play interface, and short press [8] to have the music
played; Under the music interface, long press [M] to return to the main menu.
1.1 MUSIC PLAY
A. Enter the main menu after the device is started; short press [7/5] to select [Music].
B. Short press [M] to enter the play interface, and short press [8] to start music play.
C. Under the music interface, short press [7/5] to select the previous or the next.
1.2 FUNCTION OPTIONS OF PLAY SUBMENU
1.21 MUSIC PAUSE MODE
When playing of a music file pauses, short press [M] to enter the submenu where four
options are available, namely, Home Directory, Delete File, Delete All, and Exit.
Under the music pause interface, short press [M] to enter the play submenu.
A. Short press [7/5] to select [Home Directory], and short press [M] to enter the music list.
B. Short press [7/5] to select [Delete File], and short press [M] to delete the file selected.
C. Short press [7/5] to select [Delete All], and short press [M] to delete all files.
D. Short press [7/5] to select [Exit], and short press [M] to exit and return to the music
interface.
1.22 MUSIC PLAY MODE
When a music file plays, short press [M] to enter the submenu where four options are
available, namely, Sound Mode, Cycle Mode, Repeat Mode, and Exit.
1. Short press [7/5] to select [Sound Mode], and short press [M] to enter the sound setting
interface.
2. Short press [7/5] to select [Cycle Mode], and short press [M] to enter the cycle mode
setting interface.
3. Short press [7/5] to select [Repeat Mode], and short press [M] to enter the repeat mode
setting interface.
4. Short press [7/5] to select [Exit], and short press [M] to return to the music interface.
5. Short press [VOL] to return to the previous menu; long press [VOL], and select [7/5] to
adjust the volume.
6. Short press [VOL] to return to the previous menu.
Trevi S.p.A. - Strada Consolare Rimini-San Marino, 62
47924 Rimini (RN) - Italy
www.trevi.it - info@trevi.it
MADE IN CHINA
STATEMENT
In order to enable you to easily operate our digital media player, we randomly attach this
detailed User Manual. Product introduction, operation methods and other information can
be found in this Manual. Prior to operating the digital media player, please carefully read all
materials provided by us at random to make sure the product can be used properly.
Precautions:
This Manual contains important safety precautions and information on how to use the
product properly; in order to avoid accidents, please carefully read this Manual prior to
operating this product.
• Please do not put the product in a high-temperature environment or in a place which
is damp or dusty, to prevent the service life of the product from being shortened.
• Take measures to prevent the product from falling off or being strongly impacted;
avoid violent vibration of the LTPS screen, or the LTPS screen may be damaged or
have abnormal display.
• Properly set the sound volume; the volume should not be set too high when earpho-
nes are used; in case of tinnitus, please adjust the volume lower or stop using the
player.
• Please do not suddenly disconnect the player during formatting, uploading or downlo-
ading; otherwise, program error may be resulted in.
• Without authorization, please do not disassemble the product; do not use alcohol,
thinner or benzene to clean the product surface.
• Please do not use this product in an area where use of electronic devices is forbidden,
e.g., an airplane.
• Please do not use this product during driving or walking on a street, to avoid possible
accidents.
• System software will occupy some of the memory capacity, so the total memory
capacity will be smaller than the actual capacity.
• This product is not moisture-proof or waterproof.
• Batteries should be replaced only by professional maintenance personnel so as to
avoid battery explosion caused by improper operations.
I. UNIT INTRODUCTION
2.0 RECORDING MODE
1. Under the main interface, press [7/5] to select [Recording].
2. Short press [M] to enter the recording interface. Short press [8] to start recording or
pause; long press [M] to save the recording file and return to the main menu interface.
2.1 RECORDING SETTING
1. Under the recording interface, short press [M] to enter the recording menu, and select
[Recording Type] or [Exit].
2. Short press [7/5] to select [Recording Type], and short press [M] to carry out setting.
3. Short press [7/5] to select [Exit], and short press [M] to exit and return to the recording
interface.
3.0 VOICE MODE
1. Enter the main menu interface; short pres [7/5] to select the voice mode.
2. Short press [M] to enter the voice mode and begin playing.
3. Short press [VOL] to return to the previous menu; long press [VOL] and select [7/5] to
adjust the volume.
4.0 SYSTEM SETTING
Under the main interface, press [7/5] to select System Setting. Press [M] to enter the setting
menu
SCREEN SETTING
Short press [7/5] to select [Screen Setting], and short press [M] to enter the setting menu,
[Backlight Time, Contrast Adjustment, Exit]
[Backlight Time]
Short press [7/5] to select [Backlight Time], and short press [M] to enter the setting interfa-
ce.Then short press [7/5] to select the backlight time ranging from 0s (constant on) to 30s
(time setting), and short press [M] to confirm.
[Contrast Adjustment]
Short press [7/5] to select [Contrast Adjustment], and short press [M] to enter the setting
interface.Then short press [7/5] to select the required contrast from 0 to 8, and short press
[M] to confirm.
[Exit]
Short press [7/5] to select [Exit], and short press [M] to exit and return to the main setting
menu
5.0 EBOOK MODE
1) Turn on the MP 1601SD and select the EBOOK mode by the buttons < PREV (2) o >
NEXT (6).
2) Press the button M (8) and select EBOOK mode.
3) Press the button < PREV (2) or > NEXT (6) to select the text file.
4) Press the button >II PLAY/PAUSA (3) to start the text reading.
NOTE: for normal play, only text in TXT format is supported.
TECHNICAL SPECIFICATION
Operative Sistem............................................................Windows® 2000/XP/Vista/7 - Mac® OS 10
USB Type .......................................................................... 2.0 alta velocità
Capacity............................................................................Micro SD Card until 8GB
File Audio ......................................................................... MP3,WMA
File Recording .................................................................WAV
DC.....................................................................................Batteria al Lithio ricaricabiletramite USB
Precautions for correct disposal of the product.
The symbol shown on the equipment indicates that waste must be disposed of in “separate
collection” and so the product must not be disposed of together with urban waste.
The user must take the product to special“separate waste collection centres” provided by local
government, or deliver it to the retailer against the purchase of a new product.
Separate collection of waste and subsequent treatment, recycling and disposal operations
promotes the production of equipment with recycled materials and limits negative effects on
the environment and on health caused by improper handling of waste.
Illegal disposal of the product leads to the enforcement of administrative penalties.
