manuals.online logo
Brands
  1. Home
  2. •
  3. Brands
  4. •
  5. Trigano
  6. •
  7. Baby Swing
  8. •
  9. Trigano NATURA NA200 Installation guide

Trigano NATURA NA200 Installation guide

Réf.14140P6 Réf.14245P6
Réf.14140 Réf.14245
Réf.14455
N°123 823-2 Rev A
NA100 NA200
NA400
NOTICE DE MONTAGE
Assembling instructions
Montage Answeisungen
Montaje instructie
Noticia de montagen
Istruzioni per il montaggio
Instructiones de montaje NATURA
Gamme NATURA-H1,90m
Attention ! – Warning – Achtung – Attenzione – Atencion - Atençao
A LIRE IMPERATIVEMENT AVANT DE COMMENCER LE MONTAGE DE VOTRE PRODUIT - SCELLEMENT BETON IMPERATIF
Réservé à un usage familial en extérieur.
────────────
IT IS ESSENTIAL TO READ THE MANUAL BEFORE STARTING TO ASSEMBLY YOUR PRODUCT - MUST BE FIXED IN CONCRETE
Only for domestic use, for outdoor.
────────────
VOR DER MONTAGE DES ARTIKELS UNBEDINGT DURCHLESEN - MUSS UNBEDINGT EINBETONIERT WERDEN
Ausschließlich für den Privatgebrauch im Frien.
────────────
LEES DIT VERPLICHT EN GRONDIG DOOR VOORDAT U UW TOESTEL GAAT MONTEREN - HET IS NOODZAKELIJK TE BEVESTIGEN
MET GRONDANKERS. Uitsluitend voor gebruik in de gezinskring buitens huis.
────────────
LEGGERE ATTENTAMENTE PRIMA DI INIZIARE IL MONTAGGIO DEL PRODOTTO - ESSERE FISSATO SALDAMENTE NEL CEMENTO
Sólo para uso doméstico en exteriores.
────────────
DE LECTURA IMPRESCINDIBLE ANTES DE EMPEZAR CON EL MONTAJE DEL PRODUCTO - EMPOTRAMIENTO IMPERATIVO
Utilizzo esclusivamente familiare, per esterni.
────────────
A LER IMPERATIVAMENTE ANTES DE COMECAR A MONTAGEM DO SEU PRODUTO - - O CHUMBAMENTO É IMPERATIVO
Exclusivamente para uso familiar no exterior.
GB
F
D
NL
I
SP
P
Veuillez garder impérativement la notice de montage qui vous sera utile pour l’entretien de votre produit. Aucune
modification ne doit être apportée sur le produit. Pour l’entretien du produit n’utiliser que des pièces d’origine.
────────────
It is imperative that you keep the assembling instructions, which be of use for product maintenance. Not to bring
modifications to the product, and any change must be made with parts of origine.
────────────
Bewahren Sie unbedingt die Montageanleitung auf, die Sie zur Wartung und Pflege Ihres Artikels brauchen.
────────────
Bewaar de gebruiksaanwijzing zorgvuldig, deze zal nuttig zijn voor het onderhoud van uw produkt.
────────────
Guarde imperativamente as intruções de montagem, que serão úteis para a manutenção do seu produto.
────────────
Conservare il manuale di montaggio per le ulteriori operazioni di manutenzione.
────────────
Conserve cuidadosamente las intrucciones de montage, ya que le servirán para el mantenimiento de su producto.
F
G
D
NL
P
I
SP
10
13
TRIGANO JARDIN
Le Boulay
41170 – Cormenon, France
www.triganojardin.com
1 Notice N°123 823-2 Rev A
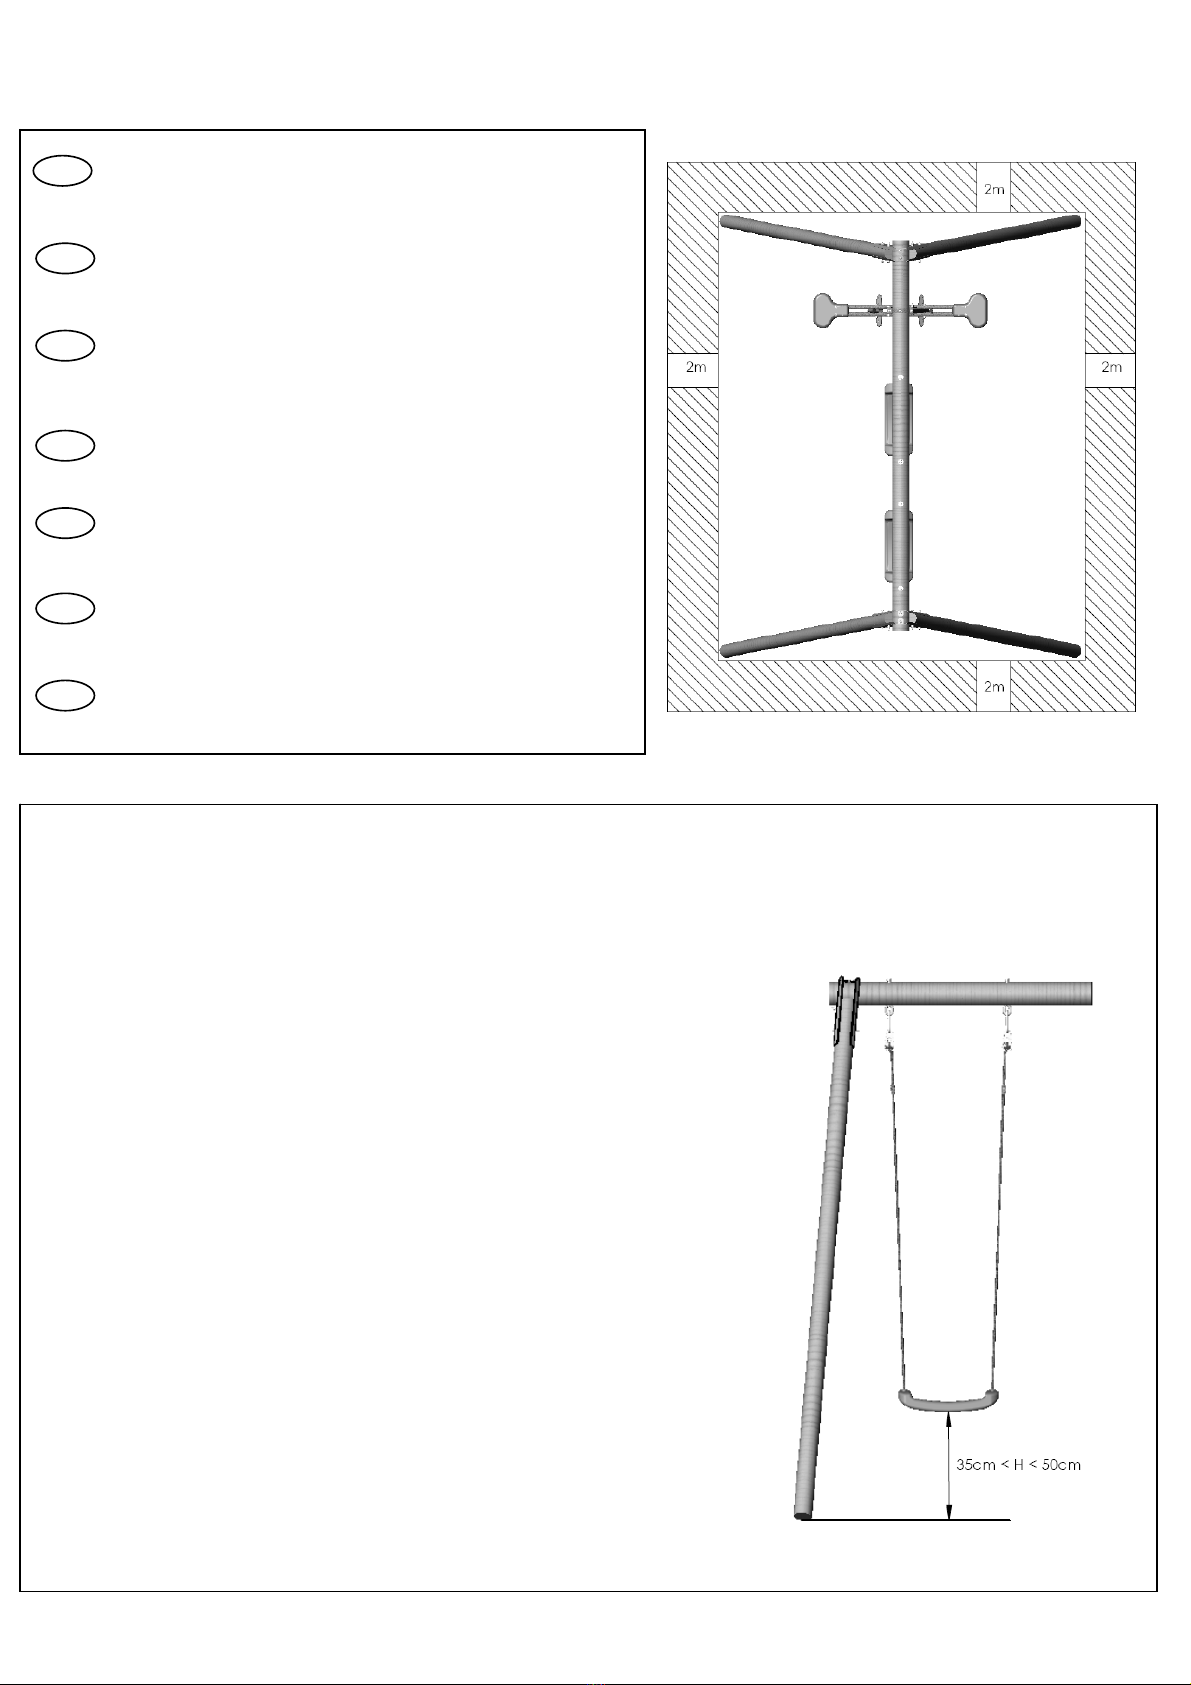
Zone de sécurité : 2,00 m.
- aucun objet en appui sur le produit
- Recouvrir le béton de 5 cm de terre meuble
─────────────────
Safety area : 2,00 m.
- No object around the product
- Cover the concrete dies with a 5cm layer of soil
─────────────────
Sicherheitsbereich: 2,00 m.
- Kein Gegenstände in der Nähe der Rutsche belassen
- 5cm Rasenüberdeck ung erforderlich im Leiterbereich und
im Auslaufbereich
─────────────────
Veiligheidszone : 2,00 m.
- Geen enkel voorwerp rondom het toestel
- Bedek de betonblokken met 5cm losse aarde
─────────────────
Zona di sicurezza : 2,00 m.
- Nessun oggetto intorno al prodatto
- Ricoprire i dadi in cemento di 5cm terra mobile
─────────────────
Area de seguridad : 2,00 m.
- Ningún objecto alrededor del producto
- Recubrir el hormigón con 5cm de tierra blanda
─────────────────
Zona de segurança : 2,00 m.
- Nenhum objecto em redor do producto
- Abranger o betão de 5cm de terra móvel.
UK
D
NL
I
SP
P
F
F - Votre balançoi re est prévue pour êtr e montée sur des porti ques de hauteurs
différentes. Avant d'utiliser votre portique et régulièrement par la suite, contrôler que le
dessous du siège de balançoire est toujours compris entre 35 et 50cm par rapport au
sol. Si ce n'est pas le cas, procéder impérativement à ce réglage.
─────────────────
GB -Your swing is designed to be gone up on gantr ies of different sizes. Before using
your gantry and regularly there after, controlling that the lower part of the seat of swing
always lies between 35 and 50c m c ompared to the ground. If i t i s not the case, to
carry out this adjustment imperatively.
─────────────────
D - Ihre Schaukel ist vorgesehen, um auf Säulenhallen anderer Größen aufgerichtet
zu w erden. Bevor Ihre Säulenhal le und regelmäßig später z u benutz en zu
kontrollieren, das s die U nterseite de s Schaukel sitzes i mmer z wischen 35 und 50
gelegen w ird cm hins ichtlich des Bodens. Wenn es ni cht der Fall, diese Einstellung
dringend durchzuführen ist.
─────────────────
NL- Uw schommel is voorzien om op portalen van verschillende omvang gestegen te
zijn. Alvorens uw portaal te gebruiken en r egelmatig vervolgens, control eren dat de
onderkant van de zetel van schommel altijd tussen 35 en 50cm ten opz ichte van de
bodem wordt omvat. Als het niet het geval, verplicht tot dit regelen overgaan is.
─────────────────
I - La vostra altalena è prevista per essere montata su cavalletti di di mensioni
diverse. Prima di u tilizzare il vostro cavalletto e regolarmente successivamente,
controllare che il sotto della sede d'altalena è sempre compreso tra 35 e 50cm rispetto
al suolo. Se non è il caso, procedere imperativamente a questa messa a punto.
─────────────────
SP - Su columpio está previsto subirse sobre pórticos de tamaños diferentes. Antes
de uti lizar su pórti co y regul armente más tarde, c ontrolar que l a parte inferior de la
sede de columpio siempre se incluye entre 35 y 50cm con relación al suelo. Si no es
el caso, proceder imperativamente a este ajuste.
─────────────────
P - O vosso baloiço está previsto para ser montado sobre pórti co de di mensões
diferentes. Antes d e u tilizar o vosso pórtico e re gularmente seguidamente, controlar
que o abai xo da sede de baloi ço sempre é compreendido entre 35 e 50 c m em
relação ao solo. Se não é o caso, proceder imperativamente à este ajustamento.
2 Notice N°123 823-2 Rev A
FR - Pour mesurer les écartements entre les pieds avant de faire vos plots de scellement, tirer
modérément les pieds vers l 'extérieur du po rtique pour être s ur d' obtenir l 'angle de 95°
minimum (comme figure ci-contre).
─────────────────
GB - Pull the feet a little bit away from the frame to ensure the angle is at least 95° (see figure
below) before measuring the distance between the feet and making your mounting blocks.
─────────────────
DE - Um den Abstand z wischen den Füßen zur Bestimmung der Verankerungspunkte zu
bemessen, die Füße des Gerüs ts l eicht na ch außen z iehen, um s icherzugehen, dass der
Winkel mindestens 95° beträgt (siehe Abbildung oben).
─────────────────
NL - Voor u de afstandblok jes vastmaakt, m oet de afstand ertussen gemeten worden. T rek
zachtjes de poten naar de buitenzijde van de speelconstructie zodat u een minimale hoek van
95° hebt (zie figuur hierboven).
─────────────────
ES - Para medir las separaciones entre los pies antes de realizar sus juntas de sellado, tire
moderadamente de los pies hacia afuera del pórtico para asegurarse de que tiene un ángulo
de 95° como mínimo (como figura más arriba).
─────────────────
IT - Per m isurare lo scarto tra i piedi prima di procedere al fissaggio definitivo, tirare con
moderazione i piedi verso l'esterno della struttura per essere sicuri di avere un a ngolo di
minimo 95° (come mostrato dalla figura qui sopra).
─────────────────
PO - Para medir as distâncias entre os pés antes de fazer os blocos de fi xação, puxar
moderadamente os pés para o exterior do pórtico para ter a certeza de ter um ângulo de 95°
mínimo (como figura acima).
-Scellement béton impératif
-Must be fixed in concrete
-Muss unbedingt einbetoniert werden
-Het is noodzakelijk te bevestigen met grondankers
-O chumbamento é imperativo
-Essere fissato saldamente nel cemento
-Empotramiento imperativo
35 Kg
MAX
35 Kg
MAX
35 Kg
MAX
20
3 Notice N°123 823-2 Rev A
Nous vous précisons que le bois est un produit naturel qui réagit aux variations de température et d'humidité. Des fissures et des fentes peuvent apparaître.
C'est tout à fait normal et cela n'affecte en rien la solidité, la durée de vie ou la garantie de ce produit.
────────────────────────────────────────────────
Please be aware, wood is a natural product that re-acts to temperature and humidity variations. Splits and cracks will occur. This is completely normal and
does not affect the integrity of your product or your warranty.
────────────────────────────────────────────────
Wir erinnern Ihnen, dass das Holz natürlich ist. Es kann sein, dass einige Ritze wegen Feuchtigkeitsveranderungen erscheinen. Das ist ganz normal und
das verschlechtert überhaupt nicht die Festigkeit, Lebensdauer oder die Garantie dieses Produckts.
────────────────────────────────────────────────
Wij wijzen er op dat hout een natuurlijk product is dat reageert op temperatuur-en vochtigheidsverschillen. Er kunnen scheurtjes en gleuven optreden. Dit is
normaal en doet niets af aan de degelijkheid, de levensduur of
de garantie van dit product.
────────────────────────────────────────────────
Indicamos-ihe que a madeira é um produto natural que reage às variações de temperatura e de humidade. Rachas e fendas podem aparecer. É normal e
isso não afecta em nada a solidez, a duração de vida ou a garantia deste produto.
────────────────────────────────────────────────
Precisiamo che il legno è un prodotto naturale che reagisce alle variazioni di temperatura e diumidità. Possono apparire delle fessure e delle crepe. Ciò è
del tutto normale e non ha alcun effetto sulla solidità, la durata di vita o la
garanzia di questo prodotto.
────────────────────────────────────────────────
Le recordamos que la madera es un producto natural que reacciona a las variaciones de temperatura y humedad. Pueden aparecer fisuras o grietas. Es
normal y no afecta en absoluto a la solidez, la vida útil o la garantía del producto.
F
UK
D
NL
I
SP
P
14245
14250
14140
4 Notice N°123 823-2 Rev A
F – Procéder à l’assemblage des pièces avec la visserie, sans serrer. Une fois assemblé entièrement, serrer définitivement toutes les vis. Ensuite, sceller
impérativement votre portique. Pour un portique 6 pieds, l’angle formé par la poutre et les 4 pieds formant la plate-forme doit être de 90°. Par contre l’angle formé
par la poutre et les 2 pieds restants doit être au moins de 95°vers l’extérieur. Le non respect de ces consignes risque d’endommager votre produit et annulera la
garantie.
─────────────────
GB – Use the screws to assemble the pieces but without tightening them. Once entirely assembled tighten all the screws definitively. It is then essential to firmly
anchor your frame. For frames with 6 legs the angle between the beam and the 4 legs forming the platform should be 90°. However, the outer angle between the
beam ans the 2 remaining legs should be.
─────────────────
DE – Die Einzeteilte mit Hilfe der Sch rauben zusammenbauen, dabei die Schrauben erst nur lose anziehen. Sobald alles zusammengabaut wurde, alle Schrauben
festziehen. Anschlieβend muss das Gerüst unbeding fest verankert warden. Bei einem Gerüst mit 6 Füβen muss der Winkel zwischen dem Balken und den 4
Füβen, die die Plattform bilden, 90°betragen. Allerding m uss der Auβenwinkel zwischen dem Balken und den beiden verbleibenden Füβen mindestens 95°betragen
. Wenn diese Vorschriften nicht beachtet warden, besteht das Risiko, dass der Artikel beschädigt wird und die Garantie erlischt
─────────────────
NL – Ga verder mt het samenstellen, stuk per stuk, door gebruik te maken van de schroeven, zonder deze aan te draaien. Wanneer alles gemonteerd is, kunt u de
schroeven complete aandraaien. Maak hierna uw speelconstructie heel steig hast. Bij een speelconstructie met 6 poten, moet de hoek gevormd door de balk en de
4 poten die het platvorm ondersteunen, 90°zijn. Boven dien moet de hoek gevormd door de balk en de resterende 2 poten , 95°zijn naar nuiten to.
─────────────────
ES – Proceda a ensamblar las piezas con tornillos y pernos, sin ajustar. Una vez que haya realizado el ensamblado complete, ajuste definitivamente todos los
tornillos. A continuación, es obligatorio que selle el portico. Para un pórtico 6 pies, el ángulo entre la viga y los 4 pies que forman la plataforma debe ser de 90°. En
cambio, el ángulo formado por la viga y los 2 pies restantes debe ser, como minimo, de 95°hacia el exterior.
─────────────────
IT – Procedere all’assemblaggio dei pezzi con viti e bulloni, senza stringere. Una volta completato l’assemblaggio, stringere definitivamente tutte le viti. In seguito,
sigillare obbligatoriamente la struttura. Per una struttura a 6 piedi, l’angolo formato dalla trave e dai 4 piedi della piattaforma deve essere di 90°. L’angolo formato
dalla trave e dai 2 rimanenti piedi deve invece essere di almeno 95°verso l’esterno.
─────────────────
PO – Procederà montagem das peças com os parafusos, sem apertar. Um avez montado completamente apertar definitivamente todo os parafusos. Em seguida,
fixar imperativamente o seu pórtico . Para o pórtico 6 pés, o ângulo formado pela trave e os 4 pés que forman a plataforma deve ser de 90°. Por outro lado, o
ângulo formado pela trave e os 2 pés restantes deve ser de pelo menos 95°para exterior.
14455
14445
5 Notice N°123 823-2 Rev A
Réf., Rif., Art., Nr., Ref.
Quantité, quantità, anzahl, quantity , aantal, cantidad, quantidade
NATURA 1,90m
NA100
Réf.14140
NA200
Réf.14245
NA201
Réf.14250
NA400
Réf.14455
NA401
Réf.14445
11111
125 512 125 513 125 512
125 514
125 514
125 14244444
150 776
44444
122 037
24444
150 774
- - - 1 1
150 775
- - - 1 1
150 466
- - - 2 2
151 090
- - - 2 2
122 502
- - - 2 2
122 830
- - - 2 2
122 833
12222
122 570-1
24444
En option : 122 840
24444
9610-1
- - 1 - 1
152 810
44444
Ø6x45 - 121 011
- - - 2 2
Ø6x55 - 121 013
- - - 4 4
Ø8x20 - 121 110
- - - 2 2
Ø8x100 - 121 134
10 10 10 10 10
Ø8x70 - 121 202
- - - 2 2
Ø8x55 - 121 209
- - - 2 2
Ø8x60 - 121 311
88899
Ø8 - 121 505
10 10 10 10 10
Ø10 - 121 509
24444
Ø6 - 121 511
- - - 6 6
Ø8 -121 512
10 10 10 16 16
Ø6 - 121 602
- - - 6 6
Ø8 - 121 603
28 28 28 34 34
Ø8 nylon - 121 609
- - - 2 2
ØLL8 - 121 613
- - 1 - 1
ØLL10 - 121 617
48888
122 506
- - - 4 4
122 536
- - - 2 2
122 623
- - - 4 4
6 Notice N°123 823-2 Rev A
Teinté = 125 250
125 512T 125 513T 125 512T 125 514T 125 514T
Non Teinté
Teinté
A
B
C
D
9710 / 9720
A
B
C
D
Ø
80 122 037 121 617 121 617 121 509
100 122 035 121 616 121 530
I
I
121 110
H Ø8x20
121 603
Ø8
150 775 17
150 774 17
121 512
Ø8
121 603
Ø8
121 603
Ø8
121 311
Ø8x60
REF.
A
14140
125 512
Teinté = 125 512T
14245
125 513
teinté = 125 513T
14250
14455
125 514
Teinté = 125 514T
14445
7 Notice N° 123 823 - 2 Rev A
A
I
121 603
121 512
121 603
121 603
121 311
121 603
121 311
A
B
Ht
121 603
121 512
121 505
121 134
121 603
C
90°
95°
84
2
1
3
Ht
A
B
C
1,90 m
121 134 150 776 125 142
2,30 m
121 135 150 777
125 198
2,50 m
125 128
8 Notice N°123 823-2 Rev A
125 250
"CLICK"
option 2
option 1
Ø
D
C
B
A
1
2
3
3
1
1 2
2
Ø
A
B
C
D
80 122 037 121 617 121 617 121 509
100 122 035 121 616 121 530
9 Notice N°123 823-2 Rev A
Ht
2
4
123414
32
1
3
Ht A B
1,90 m 151 090
2,30 m 151 117
2,50 m 151 123 150 759
121 609
122 506
121 202
150 466
121 512 A
121 511
121 013122 502
121 602 121 011
122 830
121 511
121 602
A
A
121 209
121 603
121 512
122 623
122 536
B
A
A
B
121 602
A
121 511
B
121 008
A
10 Notice N°123 823-2 Rev A

This manual suits for next models

5

Other Trigano Baby Swing manuals

Trigano SALLY User manual

Trigano

Trigano SALLY User manual

Trigano ELIROU User manual

Trigano

Trigano ELIROU User manual

Trigano TE 1400 Installation guide

Trigano

Trigano TE 1400 Installation guide

Trigano RELAX J-JOU056 Technical specifications

Trigano

Trigano RELAX J-JOU056 Technical specifications

Trigano NATURA NA100 Installation guide

Trigano

Trigano NATURA NA100 Installation guide

Trigano LIMA LI700 Installation guide

Trigano

Trigano LIMA LI700 Installation guide

Trigano RELAX User manual

Trigano

Trigano RELAX User manual

Trigano MAYA User manual

Trigano

Trigano MAYA User manual

Trigano EMMA User manual

Trigano

Trigano EMMA User manual

Trigano Nacelle portique Bois 590 Installation guide

Trigano

Trigano Nacelle portique Bois 590 Installation guide

Trigano Kikou J-41226 User manual

Trigano

Trigano Kikou J-41226 User manual

Trigano AXION AX400 Installation guide

Trigano

Trigano AXION AX400 Installation guide

Trigano TO605 User manual

Trigano

Trigano TO605 User manual

Trigano MIRAPOU User manual

Trigano

Trigano MIRAPOU User manual

Trigano HALI User manual

Trigano

Trigano HALI User manual

Trigano YUBI User manual

Trigano

Trigano YUBI User manual

Trigano FUNNY Installation guide

Trigano

Trigano FUNNY Installation guide

Trigano FUNNY FU180 Installation guide

Trigano

Trigano FUNNY FU180 Installation guide

Trigano TATOU User manual

Trigano

Trigano TATOU User manual

Trigano ALLEGRO User manual

Trigano

Trigano ALLEGRO User manual

Popular Baby Swing manuals by other brands

SPORTSPOWER SW-003 User and assembly manual

SPORTSPOWER

SPORTSPOWER SW-003 User and assembly manual

Garden Oasis D71 M34522 Use and care guide

Garden Oasis

Garden Oasis D71 M34522 Use and care guide

Swing-N-Slide WS 2080 quick start guide

Swing-N-Slide

Swing-N-Slide WS 2080 quick start guide

Fisher-Price 75960 Handbook

Fisher-Price

Fisher-Price 75960 Handbook

Fisher-Price N6020 manual

Fisher-Price

Fisher-Price N6020 manual

PlaySafe PlaySafe Dizzy Quad Merry-Go-Round 22-PS044T Owner's manual & assembly instructions

PlaySafe

PlaySafe PlaySafe Dizzy Quad Merry-Go-Round 22-PS044T Owner's manual & assembly instructions

Wagan 2509 user manual

Wagan

Wagan 2509 user manual

Playdale JTSW(2) Installation instruction

Playdale

Playdale JTSW(2) Installation instruction

Polini kids Liana instructions

Polini kids

Polini kids Liana instructions

Evenflo ExerSaucer Bumbly instructions

Evenflo

Evenflo ExerSaucer Bumbly instructions

Mattel Fisher-Price CHM78 owner's manual

Mattel

Mattel Fisher-Price CHM78 owner's manual

Ledon 1174 EX Assembly instructions

Ledon

Ledon 1174 EX Assembly instructions

Dundalk LeisureCraft Double Log Swing Assembly instructions

Dundalk LeisureCraft

Dundalk LeisureCraft Double Log Swing Assembly instructions

Outdoor Play 2006834 instruction manual

Outdoor Play

Outdoor Play 2006834 instruction manual

Royalcraft Verona Padded 3 Seat Swing Assembly instructions

Royalcraft

Royalcraft Verona Padded 3 Seat Swing Assembly instructions

Jamara Grow With Me 3in1 instructions

Jamara

Jamara Grow With Me 3in1 instructions

All Things Cedar PS48U manual

All Things Cedar

All Things Cedar PS48U manual

Munchkin Baby Bloom Toy Mobile owner's guide

Munchkin

Munchkin Baby Bloom Toy Mobile owner's guide

manuals.online logo
manuals.online logoBrands
  • About & Mission
  • Contact us
  • Privacy Policy
  • Terms and Conditions

Copyright 2025 Manuals.Online. All Rights Reserved.