TRONE Neodoro NETBCERN-12.WH User manual

Neodoro Instruction Manual

TABLE OF CONTENTS
1. Safety precautions ............................................................................... 2
2. Signs and meanings ............................................................................. 2
3. Warnings........................................................................................... 3-6
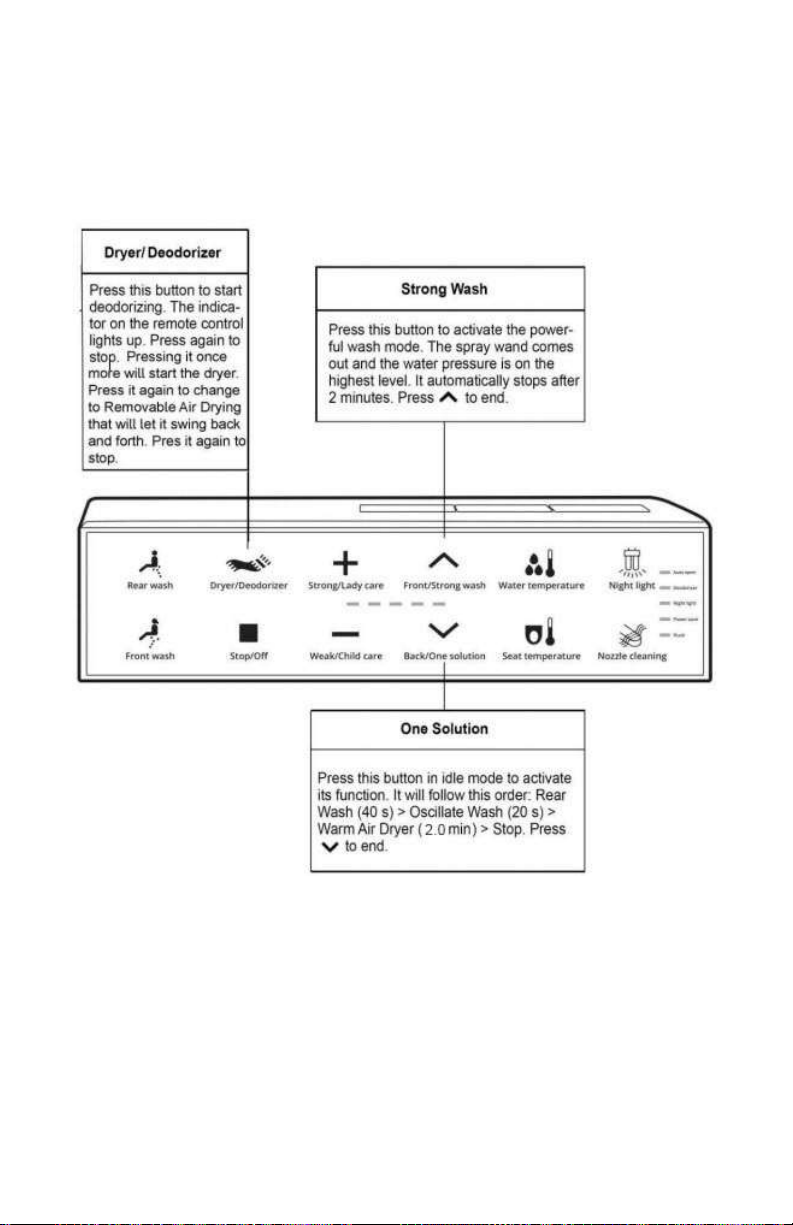
4. Line drawings
4.1.Remote Control ............................................................................. 7
4.2.Bidet Toilet..................................................................................... 7
5. Automatic Functions............................................................................ 8
6. Getting to know your remote ………………………………………………….... 9-13
7. Getting to know your lid and seat
7.3. Opening and closing the lid ........................................................ 14
7.4. Opening and closing the seat...................................................... 14
7.5. Adjustable Seat temperature...................................................... 14
8. Getting to know your bidet
8.6. Stop............................................................................................. 15
8.7. Rear Wash................................................................................... 15
8.8. Adjustable Water Pressure ......................................................... 15
8.9. Adjustable Spray Wand Position................................................. 15
8.10. Adjustable Water Temperature................................................ 16
8.11. Front Wash ............................................................................... 16
8.12. Drying........................................................................................ 16
8.13. Adjustable Drying Temperature ............................................... 16
8.14. Strong and Soft Massage .......................................................... 17
8.15. Cool and Warm Massage.......................................................... 17
8.16. Children Wash........................................................................... 17
8.17. Power Save/Eco Mode.............................................................. 18
9. Getting to know your bowl
9.18. Night Light................................................................................. 18
9.19. Automatic Flush........................................................................ 18
9.20. Adjusting the Flush Time ..................................................... 18-19
10. Pairing the remote............................................................................. 19
11. Smart Operation ........................................................................... 20-23
12. Troubleshooting Guide ................................................................. 24-26
13. Cleaning and care ......................................................................... 27-29
14. Product specifications........................................................................ 30

SAFETY PRECAUTIONS
Basic safety precautions must be followed when handling or using
electrical products, especially those within the reach of children.
Please make yourself aware of the following guidelines:
•This product should only be used by children who are 8
years and older or by persons with disabilities who have
received supervision and instructions on the safe use and
the hazards involved when using this product.
•It is unwise to allow children to play with this electronic
bidet, supervised or not.
•It is not recommended that children who are unsupervised
be allowed to clean and perform maintenance for this
product.
SIGNS AND MEANINGS
Improper operations due to ignorance
of the instructions may result in death
or injury
Improper operations due to ignorance
of the instructions may result in body
injury and property loss
Not allowed
Should be followed
WARNINGS
Please do not touch the electrical outlet with wet hands.
•Or it may cause electric shock
Please do not pour liquids such as water or detergent
on top of the electronic outlet and the toilet.
•Or it may cause fire, electric shock, heat or
short circuit
•Or it may cause injury and indoor water
seepage because of the damaged part
Never attempt to disassemble, repair, or alter the
product yourself.
•Or it may cause fire, electric shock, heat or
short circuit
Please do not install the toilet in the car, ship, or any
other moving objects.
•Or it may cause fire, electric shock, short circuit
or fault
•Or the ceramic, seat, and the main part will be
damaged due to fall
Do not use if it is broken. Under the following condition,
please turn off the toilet and the water angle valve.
•Water leakage from the pipe or inner parts of
the toilet
•Smoke
•Unusual heating and smell
•Blockage

Continuous use of the toilet despite of the damages and
above-mentioned conditions may result to fire, electric
shock, heat, short circuit, injury, and indoor water
seepage.
Please don't use seawater and other water except for
tap water or potable well water (underground water)
•Or it may cause skin irritation or inflammation
During thunderstorms, do not touch the electrical plug
•Or it may cause electric shock
Please do not let the water inlet soft pipe connect to the
electrical plug and outlet
•Or it may cause fire, electric shock, heat, and
short circuit because of moisture condensation
Please do not damage the power cable or plug. Do not
strike, yank, twist, bend excessively, or alter the
electrical cords. Also, do not place anything heavy on,
bind or pinch the cords
•Or it may cause fire, electric shock, heat, and
short circuit if it's broken
Please do not use a loose or faulty electrical outlet
•Or it may cause fire or short circuit
Please use the electrical outlet and wire appliance in the
specified outlet
•Or it may cause fire
Please do not put your finger or anything into the warm
air outlet. Do not cover or put objects or clothes on the
air outlet.
•Or it may cause scalding, electric shock, or fire
Pay attention to the low temperature scalding
Improper use of warm seat may cause low temperature
scalding
If you sit for a long time, please turn the temperature
setting to "off level. Please turn the seat temperature
setting to "off level, warm air-dry temperature to "low"
level under the following situations
•Children and elders or those who cannot adjust
the temperature to the proper level
•Persons with disability and patients with
behavioral problems
•People who have taken medicines with side
effects of hypnosis (hypnotics, cold meds, etc.),
orthose who are excessively drinking alcohol, too
tired, and with somnolence
This is an electrical product, please do not install it in a
place where it will get wet easily or in areas with high
humidity. If installed in the bath- ram, please install a
ventilator to maintain the bathroom ventilation.
Or it may cause fire or electric shock
The product must be connected to the cold water
supply
•Or it may cause body burn or machine fault
Please confirm if the electrical outlet is connected to
the ground.
•Or it may cause shock because of fault or short
circuit
The outlet for power wire should obey the following
rules or it may cause fire or electric shock.
Please ask the maintenance team or similar
department to replace the power soft wire if it is broken
to avoid danger. Repair work must be done by
professionals.
Please do not throw lighted cigarettes and other
flaming material into the toilet.
•Or it may cause fire
Do not install this product in a room where it may be
frosted. The room temperature can’t be less than 39.2
degrees Fahrenheit.
Don’t block the air outlet
Do not use excessive force when closing the cover and
the seat.
Do not intentionally soil, spray, or block the cleaning
nozzle.
Unplug the electrical cord and clean off the dust with a
dry cotton cloth.
Use the new hose parts that come with the product.
The old ones should not be reused.
Keep the product away from the heater.
Close the water supply valve before taking out the
junction block.
If you need to be away for a long time, be sure to
unplug the bidet, turn off the water, and drain the
remaining water inside the bidet. The remaining water
may freeze when the product is transported over long
distances or stored for a long time in cold winter or
alpine region.

LINE DRAWINGS
Remote Control
Electronic Bidet

AUTOMATIC FUNCTIONS
Self-Cleaning Wand
The spray wand cleans itself before and after every use by rinsing itself
as it enters and exits.
Deodorizer
The deodorizer starts anytime the seat sensor has been activated. You
can stop the deodorizer by pressing the stop button in idle mode. The
deodorizer will stop automatically after a user leaves the seat for
around 60 seconds.
Pre-Rinse
The Pre-Rinse starts anytime the seat sensor has been activated. A quick
jet of water covers the bowl to help waste slide down.
Automatic Flush
The toilet will flush automatically when being changed from washing to
drying, or when someone leaves the seat sensor if no washing has
occurred. This setting can be turned on and off.

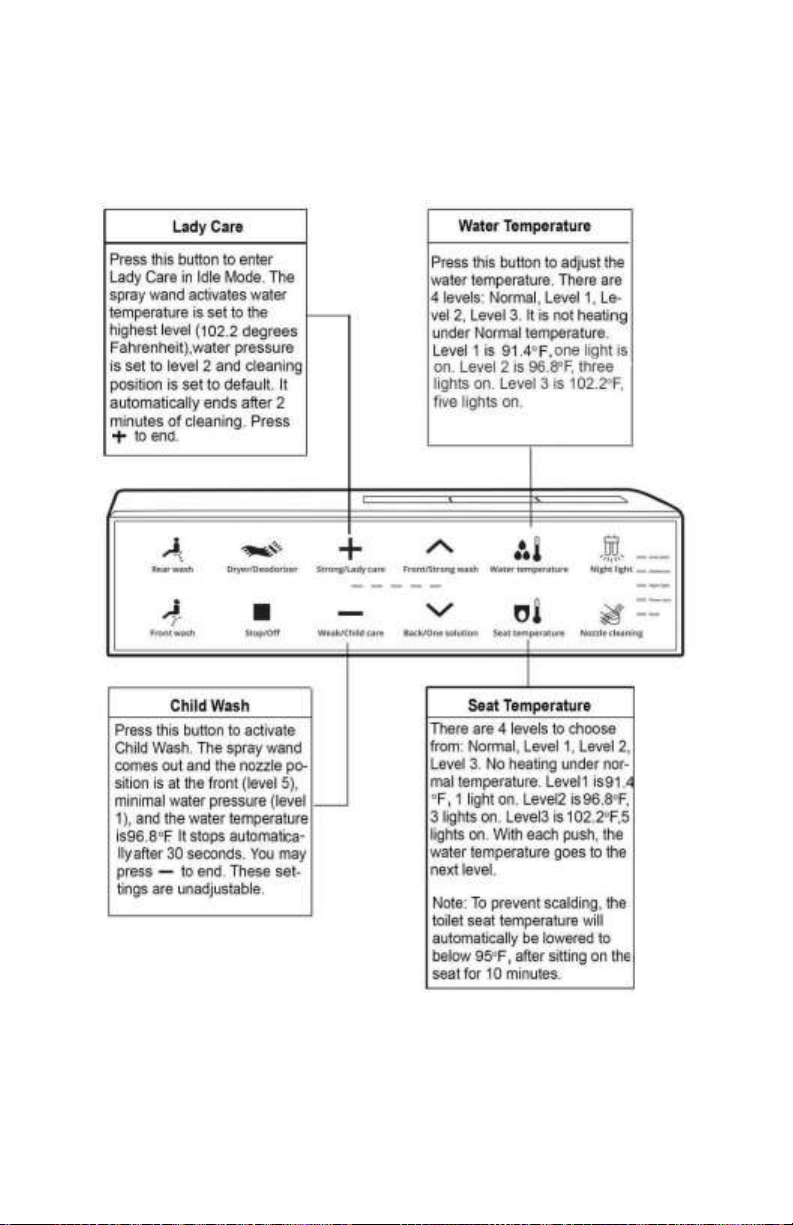
GETTING TO KNOW YOUR REMOTE
Level Indicator Light
•The Level Indicator Light [ ] will display the
current level.
•The water pressure adjustment, spray wand position
adjustment, and the temperature adjustments have
four gear positions: Close, Low, Mid, and High. When
you successfully change from one level to the other
the light indicator changes position and you hear one
beep. If you hear two beeps you have reached the
maximum or minimum level.


GETTING TO KNOW YOUR LID & SEAT
Opening and Closing the lid
There is one method to open and close the lid. This method is by
hand.
•Method 1: Using your hand you can open or close the lid.
oNote: Do not interrupt the lid opening or closing
with your hand if it is moving via another method. This
can cause the gears to break.
Opening and Closing the seat
There is one method to open and close the seat. This method by
hand.
•Method 1: Using your hand you can open or close the seat.
oNote: Do not interrupt the lid opening or closing
with your hand if is moving via another method. This
can cause the gears to break.
Adjustable Seat Temperature
•Press the Seat Temperature button [ ] and use the
Adjustment buttons [ +-] buttons to adjust the seat
temperature according to your preference.

GETTING TO KNOW YOUR BIDET
Stop
•You can turn the toilet power on and off by pressing and holding
the Stop button [ ] for approximately 2-3 seconds.
•Press the Stop button [ ] to immediately end any of the
following functions: rear wash, front wash, drying, strong &
weak massage, cold & warm massage, children wash, self-
cleaning of nozzle, drying, and live water replacement.
Rear Wash
•When the user is seated, press the Rear Wash button [ ] to
start rear washing. The pipe oscillating function starts
automatically to help increase the cleaning area. Press the Rear
Wash button [ ] again to stop the oscillating function.
•Press the Stop button [ ] to stop Rear Wash.
oNote: It will stop cleaning and start the drying
function automatically after continuous cleaning for
about 90 seconds.
Adjustable Water Pressure
•When you are washing, use the Adjustment buttons
[ + -] to increase or decrease the water pressure. There are
four levels of adjustment which can be seen on the level display.
•Use the Adjustment buttons [ + -] to increase or decrease the
water pressure.
Adjustable Spray Wand Position
•While washing, press the Spray Wand Adjustment button
[ ]. There are four levels of adjustment which can be seen
on the level indicator light.
•Use the Spray Wand Adjustment button [ ] to increase or
decrease the wand position.

Adjustable Water Temperature
•Press the Temperature Adjustment button [ ] and use the
Adjustment buttons [ + -] to adjust the seat temperature
according to your preference.
Front Wash
•When the user is seated, press the Feminine Wash button [ ]
to start front washing. The oscillating function starts
automatically to help increase the cleaning area. Press the
Feminine Wash button again to stop the oscillating function.
•Press the Stop button [ ] to stop Feminine Wash.
oNote: It will stop cleaning and start the drying
function automatically after continuous cleaning for
about 90 seconds.
Drying
•When the user is seated, press the Dry button [ ] to start
the drying function.
•Press the Stop button [ ] to stop drying.
oNote: The dryer will automatically turn on after a
user has finished washing. This feature can be activated
and deactivated.
oNote: The dryer will stop automatically after
continuous drying for about 5 minutes.
Adjustable Drying Temperature
•While you are drying, press the Adjustment buttons [ + - ] until
the air temperature is selected. There are four levels of
temperature adjustment which can be seen on the level
indicator display.
•Use the Level Adjustment button [ ] to increase or
decrease the drying temperature

Strong & Soft Massage
•While the user is washing, press and hold the Rear Wash button
[ ] to turn on/off the Strong & Weak Massage. The water
pressure will begin continuously switching between high and
low pressure.
oNote: Strong & Weak massage can be used in rear
wash and front wash. Pressing and holding will not
switch between the two different types of washing.
oNote: Pressing stop will end the wash. To end the
pressure adjustment but continue washing, you need to
press and hold the Rear and Wash button.
Cool & Warm Massage
•While the user is washing, press and hold the Font Wash button
[ ] to turn on/off the Cool & Warm Massage. The water
temperature will begin continuously switching between low and
high temperature.
oNote: Cool & Warm massage can be used in rear
wash and front wash. Pressing and holding will not
switch between the two different types of washing.
oNote: Pressing stop will end the wash. To end the
temperature adjustment but continue washing, you
need to press and hold the Rear and Wash button.
Children Wash
•When the user is seated, press and hold the Child Care button
[ -] for approximately 2-3 seconds. Child washing begins and
will automatically stop after 90 seconds. Child washing presets
the water pressure to low and the water temperature to warm.
oNote: Water temperature, water pressure, spray
wand position selection, oscillating, and massage
functions cannot be adjusted when this function starts.

Power Save/Eco Mode
•Press the Power Save/Off button [ ] to turn on/off the
Eco Mode. The remote has an indicator that blinks while on
standby, then Eco Mode activates 1.5 minutes after leaving the
seat.
GETTING TO KNOW YOUR BOWL
Night Light
•Press the Night Light button [ ] to turn on/ the night
light. You will notice the indicator level light up momentarily a
short beep when the night light is turned on or off.
Automatic Flush
•Press and hold the Flush button [ ] for 3 seconds to turn
this function on/off. When the function is turned on, you will
hear short beep. When you turn it off, you will hear a long beep.
oNote: When automatic flush is off, the toilet will not
flush when you a) leave the seat after sitting down b)
leave the seat after standing as detected by the sensor.
Adjusting the Flush Time
•Rotate the side knob downwards for Front Wash [ ] for
approximately 8 seconds. When you have successfully entered
this mode, you will hear a double beep and the green light on
the knob begins flashing green.
•You are now ready to adjust the amount of water that fills the
bowl before the flush. Using the remote press the [ +- ] button
to increase or decrease the amount. When you hear a double
beep, you have reached the maximum or minimum setting.
Once you have set your desired level press the flush button on
the side knob. Your side knob begins flashing yellow.

•You are now ready to adjust the length of time that the
SyphonAssist jet is active. Using the remote press the [ +-]
button to increase or decrease the amount. When you hear a
double beep, you have reached the maximum or minimum
setting. Once you have set your desired level press the flush
button on the side knob. Your side knob begins flashing red.
•You are now ready to adjust the amount of water that fills the
bowl after the flush. Using the remote press the [ +- ] button to
increase or decrease the amount. When you hear a double
beep, you have reached the maximum or minimum setting.
Once you have set your desired level press the flush button on
the side knob. You have now exited the flushing time
adjustment.
oNote: Waiting too long without any buttons pressed
in any of these adjustments will cause the toilet to exit
this mode.
PAIRING THE REMOTE
1)Unplug the other smart bidet toilets nearby (tripping the GFCI
on the plug will also work).
2)While the remote is on standby mode, press and hold the
Weak [ -] and Back [ ] buttons at the same time for 3
seconds or more until the light indicators on the front of the
remote start flashing at the same time.
3)Enter the code mode, then press the Water Temperature
[ ] or Seat Temperature [ ] to adjust the address code.
4)Make sure to press the Stop button [ ] to save the settings.
Failure to do so after 5 seconds will automatically exit without
saving any changes.
5)Press and hold the On/Off button [ ] on the toilet’s side to
turn it on. Once the code is successfully matched, you may
already use the remote to control your smart toilet.
SMART OPERATION
Table of contents
Other TRONE Toilet manuals

TRONE
TRONE GANZA II User manual

TRONE
TRONE Zentina User manual

TRONE
TRONE Zendoro ZETBCDER-12.WH User manual

TRONE
TRONE Nobelet NETBCDER-12.WH User manual

TRONE
TRONE Tahum TETBCERN-12.WH User manual

TRONE
TRONE Aquatina II A2ETBCERN-12.WH User manual

TRONE
TRONE Aquatina III A3ETBCERN-12.WH User manual

TRONE
TRONE Aquatina III A3ETBCERN-12.WH User manual

TRONE
TRONE Fountina FETBCERN-12.WH User manual
Popular Toilet manuals by other brands


Reece
Reece CAROMA FORMA CLEANFLUSH INVISI II 9506686 manual

Toto
Toto Washlet E200 installation instructions

Mirabelle
Mirabelle VILAMONTE MIRVL220WH installation instructions

Laufen
Laufen LEMA 8.4019.7 manual

Toto
Toto Washlet TCF4914 Series instruction manual

Kallista
Kallista P70083 installation instructions