Trotec TTK 171 ECO User manual

OPERATING MANUAL
DEHUMIDIFIER
TTK 171 ECO
EN
TRT-BA-TTK171ECO-TC-001-EN

1Operating Manual – Dehumidifier TTK 171 ECO EN
Notes regarding the operating manual ............................... 01
Information about the device.............................................. 02
Safety ................................................................................ 04
Assembly........................................................................... 05
Transport ............................................................................05
Start-up ..............................................................................05
Operation............................................................................06
Errors and faults .................................................................09
Maintenance...................................................................... 10
Disposal............................................................................. 15
Declaration of conformity ....................................................15
Symbols
Hazardous electric current!
Warns about hazards from electric current which can
lead to injuries or even death.
Danger!
Warns of a hazard which can lead to personal injury.
Caution!
Warns of a hazard which can lead to damage to
property.
The current version of the operating manual can be found at:
www.trotec.de
Legal notice
This release replaces all previous versions. No part of this
publication may be reproduced without written permission from
TROTEC®. The same applies for electronically processing,
duplicating or spreading the publication. Subject to technical
changes. All rights reserved. Trademarks are used without
guarantee that they may be used freely and primarily following
the spelling of the manufacturer. Product names are registered.
Changes to construction in the interests of constant
improvements to the product, as well as changes to the shape
and colour are reserved.
The scope of delivery may vary from product images. This
document was created with all due care. TROTEC®accepts no
liability whatsoever for possible mistakes or omissions.
©TROTEC
®
Table of contents
Notes regarding the operating manual

EN Operating Manual – Dehumidifier TTK 171 ECO 2
Description of the device
This device uses the principle of condensation to automatically
dehumidify rooms.
The fan sucks damp room air through the air inlet (9), the air filter,
the evaporator and to the condenser located behind it. The air is
cooled at the cold evaporator until it is below the dew point. Water
vapour contained in the room air precipitates on the evaporator
fins as either condensation or frost. The dehumidified, cooled air
is warmed and blown out at the condenser. The drier air, thus
conditioned, mixes with the air in the room. The humidity in the
room where the device is positioned is reduced as air constantly
circulates through the device.
Depending on the air temperature and the relative humidity, the
condensed water either drops continuously or only during the
defrost phase into the condensation tank (6).
Once the maximum filling level of the condensation tank (6) is
reached, an indication lights up at the control panel (2) and the
device switches off. The indicator light only goes out again once
the emptied condensation tank (6) is reinserted.
Optionally, the condensed water can be drained by means of a
hose.
The device enables a reduction of the relative humidity level in
living and working spaces, business premises, basements,
laundry facilities and workshops to approx. 30 % and is also
designed for the application in warehouses and on building sites.
Because of the heat dissipation, which develops during operation,
the room temperature can rise by approx. 1 °C to 3 °C.
Device depiction
Information about the device
No. Designation
1 transport handle
2 control panel
3 transport wheel
4 condensation hose feed-through
5 air outlet
6 condensation tank
7 mains power cable
8 cable holder
9 air inlet incl. air filter
1
4
8
9
6
3
7
2
5

3Operating Manual – Dehumidifier TTK 171 ECO EN
Technical data Accessories
Wiring diagram
Parameter Value
Model TTK 171 ECO
Dehumidification performance 50 l / 24 h
Operating temperature 5 °C to 32 °C
Operating range for relative humidity 20 % RH to 90 % RH
Amount of air 450 m3/h
Electric connection 230 V / 50 Hz
Power input 800 W
Current consumption 3.6 A
Fuse on site 16 A
Condensation tank 6.6 l
Refrigerant R410A
Amount of refrigerant 400 g
Weight 36.5 kg
Dimensions (height x depth x width) 900 x 535 x 453 mm
Minimum distance to walls or other
objects
A: Top: 50 cm
B: Rear: 50 cm
C: Sides: 50 cm
D: Front: 50 cm
Sound pressure level
(measured at a distance of 1 m)
52 dB(A)
Name Article number
adapter (connector) 7331001160
hose TF-L 160 (l = 6 m) 6100001125

EN Operating Manual – Dehumidifier TTK 171 ECO 4
Read this manual carefully before starting or using the
device. Store the manual near the device or its site of use!
• Do not use the device in potentially explosive rooms. Do not
use the device in atmospheres containing oil, sulphur,
chlorine or salt.
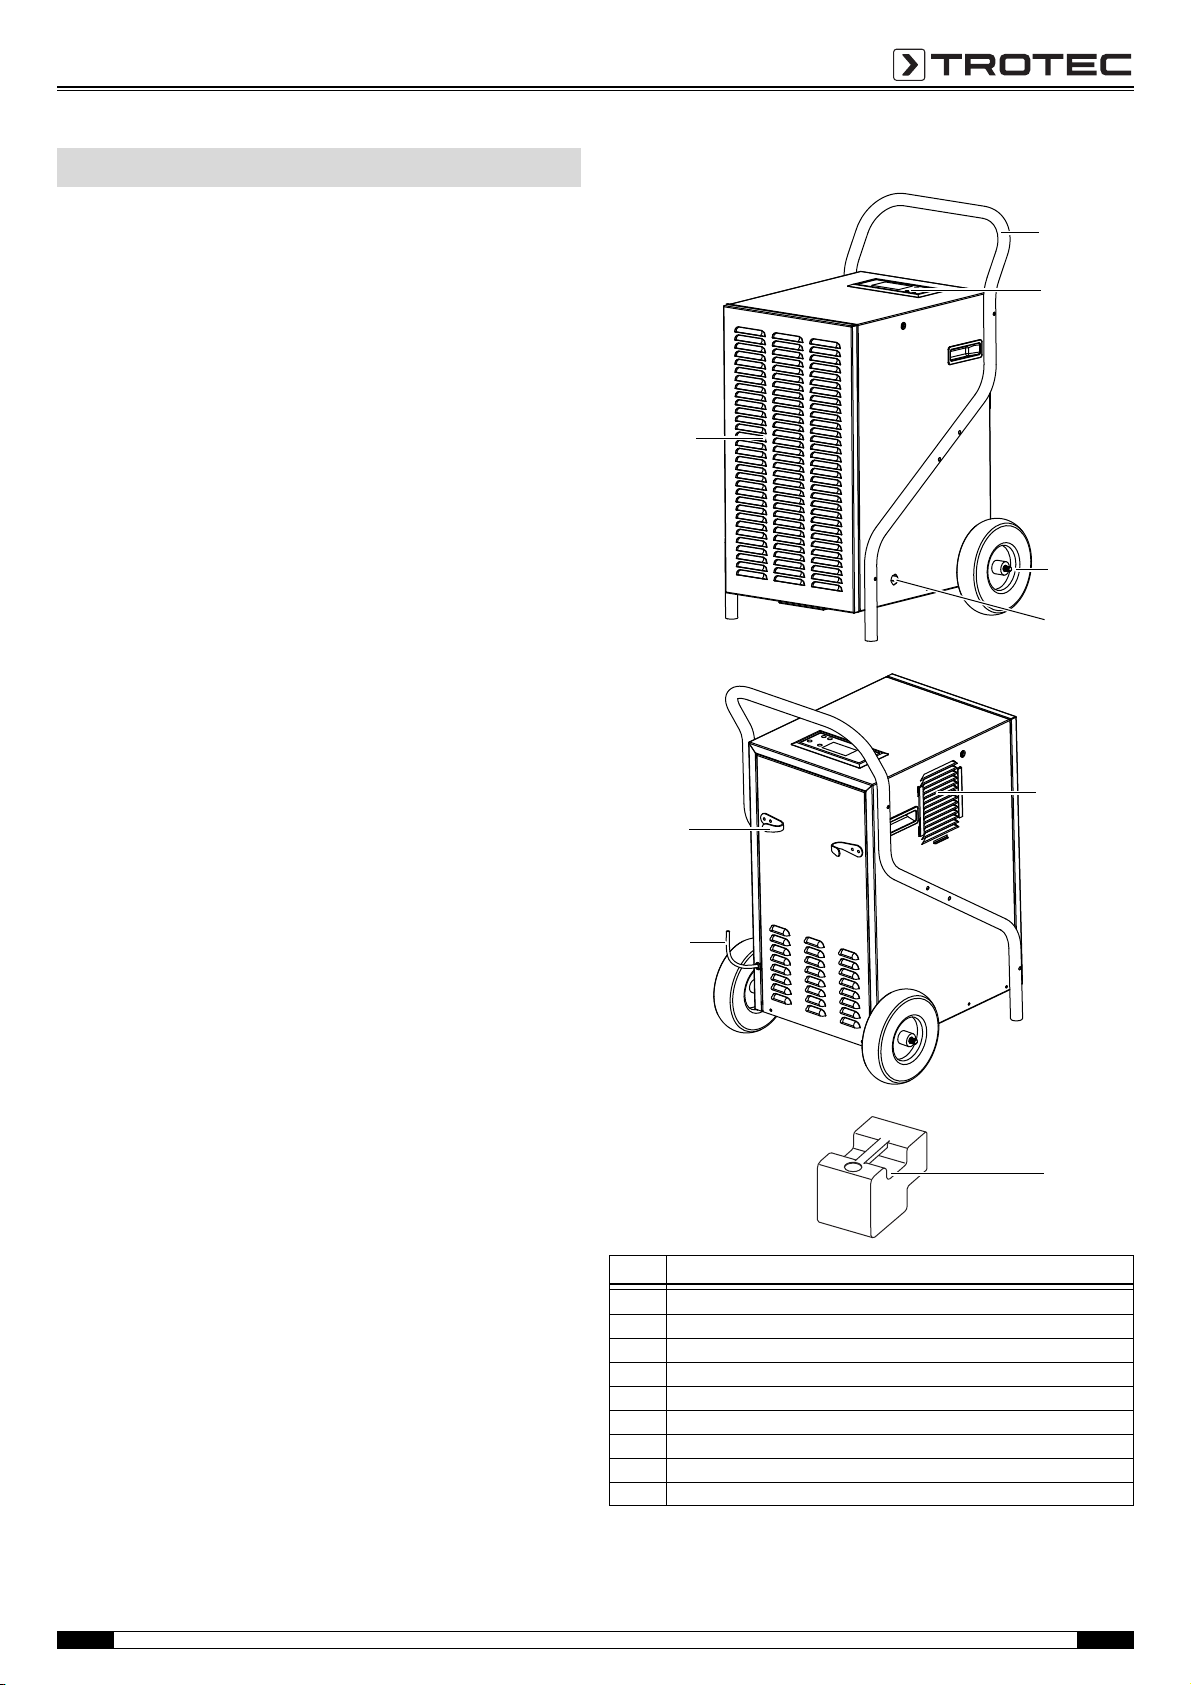
• The device is designed for indoor installation.
• Set the device in an upright and stable position.
• Ensure that the air inlet and outlet are not obstructed.
• Ensure that the side of the device where the air inlet is found
is kept free of dirt and loose objects.
• Never reach or put objects into the device.
• Do not cover or transport the device during operation.
• Ensure that all electric cables outside of the device are
protected from damage (e.g. from animals).
• Only use extensions to the connecting cable which are
appropriate to the device power consumption, the length of
its cable and its use. Avoid electrical overload.
• Only transport the device with an emptied condensation tank.
• Dispose of the collected condensation. Do not drink it. Health
hazard!
Intended use
Only use the device TTK 171 ECO for drying and dehumidifying
room air, while adhering to and following the technical data.
Improper use
Do not place the device on wet or flooded ground. Do not use the
device outdoors or for drying rooms and areas after water
damages from burst pipes or flooding. Do not lay any objects, e.g.
wet clothing, on the device for drying. Any unauthorised changes,
modifications or alterations to the device are forbidden.
Personnel qualifications
People who use this device must:
• be aware of the dangers that occur when working with
electric devices in damp areas.
• have read and understood the operating manual, especially
the Safety chapter.
Residual risks
Hazardous electric current!
Work on the electrical components must only be carried
out by an authorised specialist company!
Hazardous electric current!
Before any work on the device, remove the mains plug
from the mains socket!
Danger!
The device is not a toy and does not belong in the hands
of children.
Danger!
Dangers can occur at the device when it is used by
untrained people in an unprofessional or improper way!
Observe the personnel qualifications!
Danger!
Do not leave the packaging lying around. Children may
use it as a dangerous toy.
Caution!
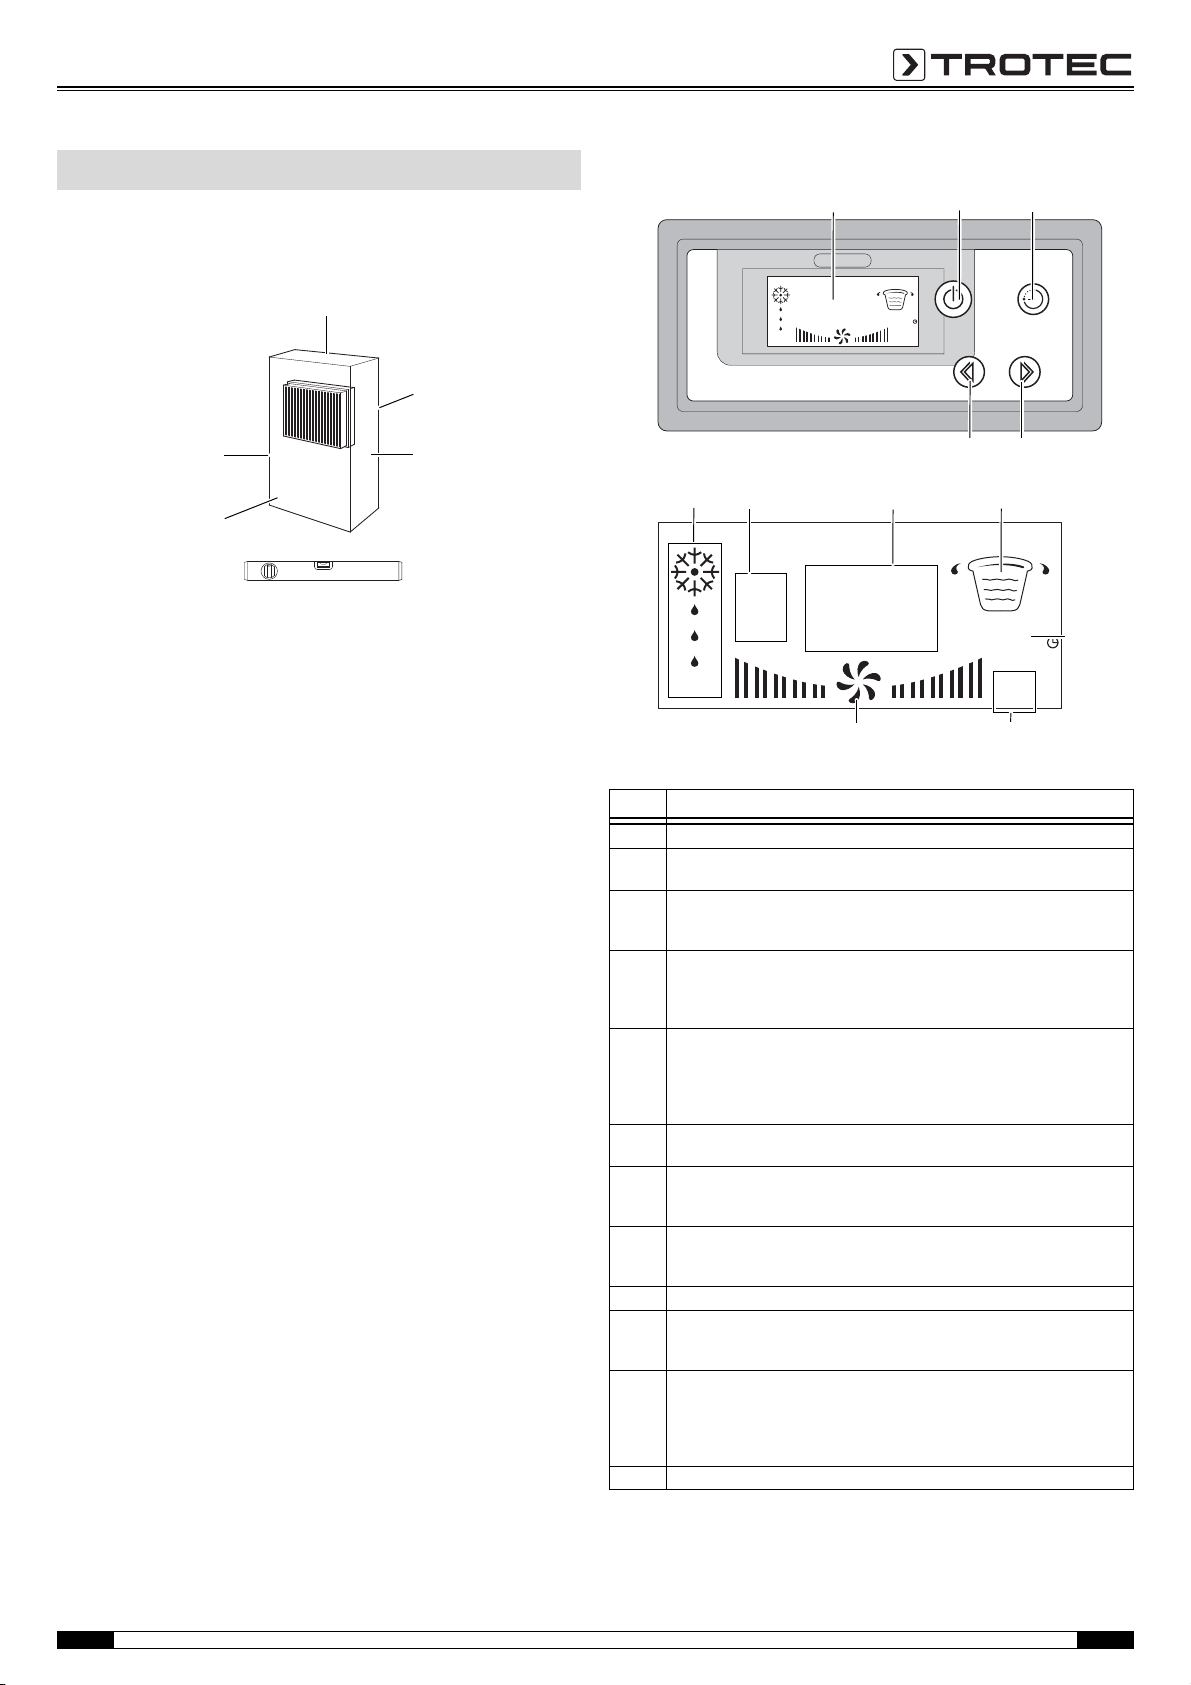
To avoid damages to the device, never operate the
device without an air filter inserted!
Behaviour in the event of an emergency
1. Disconnect the device from the mains power in an
emergency.
2. Do not reconnect a defective device to the mains power.
Safety

5Operating Manual – Dehumidifier TTK 171 ECO EN
• Affix the transport handle (1) to both sides of the device using
screws.
To make the device easier to transport, it is fitted with a transport
handle and two wheels.
Before transporting the device, proceed as follows:
1. Switch off the device at the mains switch.
2. Remove the mains plug from the mains socket.
3. Empty the condensation tank. Check for dripping
condensation.
4. Do not incline the device by more than 45 °, for otherwise the
compressor could be damaged.
After transporting the device, proceed as follows:
1. Set the device in an upright position after transport.
2. Wait one hour before switching the device back on!
Storage
When out of use, store the device as follows:
•dry,
• with a roof overhead,
• in an upright position where it is protected from dust and
direct sunlight,
• with a plastic cover to protect it from invasive dust, if
necessary.
• The storage temperature is the same as the range given for
the operating temperature in the technical data.
Inserting air filter
• Before switching the device on, insert the air filter.
Assembly
Transport
Start-up
A.
B.

EN Operating Manual – Dehumidifier TTK 171 ECO 6
Positioning
When positioning the device, observe the minimum distance from
walls or other objects as specified in the technical data.
• Set the device in a level and stable position.
• If possible, set the device in the middle of a room and keep it
away from sources of heat.
• When positioning the device in wet areas such as laundries,
bath rooms or the like, secure the device locally with an RCD
(Residual Current Device) which complies with the
appropriate regulations.
• Ensure that extension cords are completely unrolled.
Notes regarding the dehumidification performance
Dehumidification performance depends on:
• the spatial composition of the room
• the room temperature
• the relative humidity
The higher the room temperature and relative humidity, the
higher the dehumidification performance.
For using in living rooms, a relative humidity of approx. 50-60 %
is sufficient. In store rooms and archives, the humidity should not
exceed approx. 50 %.
Operating elements
Operation
CC
A
B
D
No. Operating elements
10 Display
11 Power button:
Switches the device on or off or activates automatic operation.
12 Timer button:
Enables the programming mode for start and stop times for automatic
operation.
13 Minus button:
Reduces the nominal value of the humidity in per cent.
In the timer programming mode the start and stop times for
automatic operation are being reduced in increments of one hour.
14 Plus button:
Increases the nominal value of the humidity in percentage
increments.
In the timer programming mode the start or stop times for automatic
operation are being increased in increments of one hour.
15 DEFROST symbol:
Permanently illuminated. Animated when automatic defrost is active.
16 Operating display
RUN (yellow): The device is ready for operation.
HUMI (blue): The nominal value for dehumidification is reached.
17 Humidity indication in per cent.
Nominal value: The display flashes during programming.
Actual value: constant display value
18 Operating display dehumidification, animation
19 Hour indication:
Displays the pre-programmed hours of the start and stop timer for
automatic operation.
20 Timer on/off indication:
TIME OFF: is illuminated, when the switch-off time for automatic
operation is enabled.
TIME ON: is illuminated, when the switch-on time for automatic
operation is enabled.
21 Operating display fan, animation
HUMI
RUN RH %
DEHU
DEFROST
FULL
TIME OFF
TIME ON
h
DEHUMIDIFIER
88
88
Power
HUMI
RUN RH %
DEHU
DEFROST
FULL
TIME OFF
TIME ON
h
DEHUMIDIFIER
Delay Start
Time
Humi.-Humi.+
Hour.+
Industrial Dehumidifier
Humidity%
88
88
1110
1314
15 17
12
18
19
20
16
21

7Operating Manual – Dehumidifier TTK 171 ECO EN
Switching the device on
Note:
Wait for 3 minutes before you switch the device back on (e.g.
after draining the condensation tank).
• After being switched on, the device operates fully
automatically until it is either switched off manually or a full
condensation tank causes the device to switch itself off.
• The fan is running continuously until the device is switched
off.
• Avoid open doors and windows.
1. Ensure that the condensation tank is empty and inserted
correctly. Otherwise, the device will not operate!
2. Insert the mains plug into a properly secured mains power
socket.
3. Press the Power button (11).
– The operating display RUN is illuminated.
– The device is ready for operation.
– Regulate the desired room humidity level via the buttons
Plus (14) or Minus (13).
Operation with hose attached to the condensation
connection
A.
B.
C.
10 mm
D.
E.

EN Operating Manual – Dehumidifier TTK 171 ECO 8
Continuous operation mode
In continuous operation the device permanently dehumidifies the
air regardless of the moisture content until it is switched off
manually or by means of the programmed switch-off timer.
In order to start continuous operation, select a nominal value of
< 30 % for the humidity.
Setting the timer
The timer can be used in two different ways:
• After a predefined time, the device switches itself on
automatically.
• After a predefined operating time, the device switches itself
off automatically.
To set the automatic switch-on timer, please proceed as follows:
1. Press the Timer button (12) once.
2. Adjust the desired length of time until the automatic
switch-on in hourly increments using the Plus (14) or Minus
button (13).
3. Press the timer button again to set the automatic switch-off
time. Press the button again to leave the menu.
4. Press the Power button (11) to switch over to automatic
operation.
5. The device switches on after the predefined time. It keeps
running until the given switch-off time has expired or until the
device is switched off manually.
To set the automatic switch-off timer, please proceed as follows:
1. Press the Timer button (12) twice.
2. Adjust the desired length of time until the automatic
switch-off in hourly increments using the Plus (14) or Minus
button (13).
3. Press the Timer button (12) again to exit the timer settings.
Automatic defrost
At low ambient temperatures the evaporator can freeze up during
dehumidification. The device then carries out an automatic
defrost. The duration of the defrost process can vary.
Do not turn off the device during the automatic defrost. Do not
remove the mains plug from the mains socket.
Memory function
In case of brief power failures the device memorizes the
programmed nominal value for humidity.
The pre-programmed start and stop times for automatic
operation are not saved.
Connecting adapter and hose (optional)
Shutdown
1. Press the Power button (11) to switch the device off.
2. Do not touch the mains plug with wet or damp hands.
3. Remove the mains plug from the mains socket.
4. Empty the condensation tank. Check for dripping
condensation.
5. Clean the device, and especially the air filter, according to the
chapter Maintenance.
6. Store the device according to chapter Storage.
A.
B.

9Operating Manual – Dehumidifier TTK 171 ECO EN
The accurate functionality of the device was tested during
production a number of times. However, if functionality faults do
occur, then check the device according to the following list.
Note!
The device comes with a safety timer. Switch-ons and
switch-offs can be delayed by up to 3 minutes.
The device does not start:
• Check the power connection.
• Check the mains plug for damages.
• Check that the condensation tank is positioned correctly.
Check the filling level of the condensation tank and empty it,
if necessary. The FULL indication must not light up on the
display (10).
• Wait for 10 minutes before restarting the device. If the device
is not starting, have the electrics checked by a specialist
company for cooling and air-conditioning or by TROTEC®.
The device runs but forms no condensation:
• Check the float in the condensation tank for damages. If
necessary, clean the condensation tank. The float must be
able to move freely.
• Check the room temperature. Check the device's permissible
operating range complies with the technical data.
• Check the air filter is not dirty. If necessary, clean or replace
the air filter.
• From the outside, check the condenser for dirt (see chapter
Maintenance). If your condenser is dirty, have it cleaned by a
specialist company for cooling and air-conditioning or by
TROTEC®.
The device is loud or vibrates; condensate is leaking:
• Check whether the device is standing upright and on an even
surface.
The device gets very warm, is loud or is losing performance:
• Check the air inlets and air filter are not dirty. Remove
external dirt.
• Check the inside of the device and especially the fan, the fan
housing, the evaporator and the condenser for external dirt
(see chapter Maintenance). If the inside of the device is dirty,
have it cleaned by a specialist company for cooling and
air-conditioning or by TROTEC®.
Your device still does not operate correctly after these
checks?
Bring the device to a specialist company for cooling and
air-conditioning or to TROTEC®for repair.
Errors and faults

EN Operating Manual – Dehumidifier TTK 171 ECO 10
Maintenance intervals
Maintenance and care log
Device type: ........................................
Device number: ........................................
Maintenance
Maintenance and care interval before every start as needed at least every
2 weeks
at least every
4 weeks
at least every
6 months
at least annu-
ally
empty condensation tank X
check air inlets and outlets for dirt and foreign objects
and clean if necessary X
clean housing X X
visually check the inside of the device for dirt X X
check air inlet grid and air filter for dirt and foreign
objects and clean or replace if necessary XX
replace air filter X
check for damages X
check attachment screws X X
carry out a test run X
Maintenanceandcareinterval 12345678910111213141516
check air inlets and outlets for dirt and foreign objects
and clean if necessary
clean housing
visually check the inside of the device for dirt
check air inlet grid and air filter for dirt and foreign
objects and clean or replace if necessary
replace air filter
check for damages
check attachment screws
carry out a test run
Remarks:
1. Date: ...............................................
Signature:............................................
2. Date: ...............................................
Signature: ...........................................
3. Date:...............................................
Signature: ............................................
4. Date: ...............................................
Signature: ...........................................
5. Date: ...............................................
Signature:............................................
6. Date: ...............................................
Signature: ...........................................
7. Date:...............................................
Signature: ............................................
8. Date: ...............................................
Signature: ...........................................
9. Date: ...............................................
Signature:............................................
10. Date: .............................................
Signature: ...........................................
11. Date:.............................................
Signature: ............................................
12. Date: .............................................
Signature: ...........................................
13. Date: .............................................
Signature:............................................
14. Date: .............................................
Signature: ...........................................
15. Date:.............................................
Signature: ............................................
16. Date: .............................................
Signature: ...........................................

11 Operating Manual – Dehumidifier TTK 171 ECO EN
Activities required before starting maintenance
1. Do not touch the mains plug with wet or damp hands.
2. Before any work, detach the mains plug!
Maintenance tasks which require the housing to be
opened must only be carried out by specialist
companies for cooling and air-conditioning or by
TROTEC®.
Visual check for dirt in the inside of the device
1. Remove the air filter (see chapter Cleaning the air filter).
2. Use a torch to illuminate the openings of the device.
3. Check the inside of the device for dirt.
4. If you see a thick layer of dust, have the inside of the device
cleaned by a specialist company for cooling and
air-conditioning or by TROTEC®.
5. Put the air filter back in.
Cleaning the housing
1. Use a soft, lint-free cloth for cleaning.
2. Dampen the cloth with clean water. Do not use sprays,
solvents, alcohol-based or abrasive cleaners to dampen the
cloth.

EN Operating Manual – Dehumidifier TTK 171 ECO 12
Cleaning the air filter
Caution!
Ensure that the air filter is not worn or damaged. The
corners and edges of the air filter must not be rounded
or misshaped.
Before reinserting the air filter, ensure that it is dry and
is not damaged!
Read the chapter Maintenance intervals and replace
the air filter in due time!
A.
B.
C.
C.
D.

13 Operating Manual – Dehumidifier TTK 171 ECO EN
Emptying the condensation tank
A.
B.
C.
Power
HUMI
RUN RH %
DEHU
DEFROST
FULL
TIMEOFF
TIMEON
h
DEHUMIDIFIER
Delay Start
Time
Humi.-Humi.+
Hour.+
Industrial Dehumidifier
Humidity%
88
88
FULL
D.
F.
E.

EN Operating Manual – Dehumidifier TTK 171 ECO 14
Overview and list of spare parts
No. Spare part No. Spare part No. Spare part
101 plastic water tray 203 PCB 316 hinge
102 water tank 204 key panel 317 big wheel
103 sensor cover 205 humidity sensor 318 magnet
104 sensor bottom plate 206 5k temp sensor 401 exchanger
105 handle 207 compressor capacitor 402 high voltage tube
106 pressing block cover 208 motor capacitor 403 low voltage tube
107 pressing block bottom 209 terminal 404 liquid inlet tube
108 protective ring Ø 10 210 micro switch seat 405 triplet filter
109 protective ring Ø 30 301 side plate 406 fill up tube
110 transparent tube 302 front plate 407 capillary
111 PCB isolated columns 303 back plate 408 discharge pipe
112 filter 304 seat components 501 power cord
113 control panel 305 PCB bracket 601 heat insulation sleeve
114 rubber pipe sleeve 306 water tank pallet 602 reservoir fan
201 compressor 307 wheel spindle 603 sealness foam
201A overload 308 handle 604 waterproof foam
201B cover 309 side bracket 605 air outlet foam
201C crash pad 310 bottom plate 701 cross bolt M 6
201D cover spacer 311 locator card 801 PE foam package up
201E spring washer 312 lovator card of bottom tank 802 PE foam package down
201F nut 313 capacitor clip 803 carton
201G nut spacer 314 centrifugal fan 804 bottom of carton
202 motor 315 volute 805 key board plate
Note!
The position numbers of the spare parts differ from those
describing the positions of other parts mentioned in this
operating manual.

15 Operating Manual – Dehumidifier TTK 171 ECO EN
In the European Union, electronic equipment must not
be treated as domestic waste, but must be disposed of
professionally in accordance with Directive
2002/96/EC of the European Parliament and Council of 27th
January 2003 concerning old electrical and electronic equipment.
At the end of its life, please dispose of this device according to the
valid legal requirements.
The device uses an environmentally friendly and ozone-neutral
cooling agent (see chapter Technical data).
Dispose of the refrigerant appropriately and according to the
national regulations.
in accordance with the EC Low Voltage Directive 2006/95/EC,
Annex III, Section B and the EC Directive 2004/108/EC about
electromagnetic compatibility.
Herewith, we declare that the dehumidifier TTK 171 ECO was
developed, constructed and produced in compliance with the
named EC directives.
Applied harmonised standards:
EN 55014-1:2006 A1:2009 and A2:2011
EN 55014-2:1997 A1:2001 and A2:2008
EN 61000-3-2:2006 A1:2009 and A2:2009
EN 61000-3-3:2013
The marking is found on the device nameplate.
Manufacturer:
Trotec GmbH & Co. KG
Grebbener Straße 7
D-52525 Heinsberg
Phone: +49 2452 962-400
Fax: +49 2452 962-200
E-mail: in[email protected]
Heinsberg, 28/09/2014
Managing Director: Detlef von der Lieck
Disposal Declaration of conformity


Trotec GmbH & Co. KG
Grebbener Str. 7
D-52525 Heinsberg
+49 2452 962-400
+49 2452 962-200
info@trotec.com
www.trotec.com
Other manuals for TTK 171 ECO
1
Table of contents
Other Trotec Dehumidifier manuals

Trotec
Trotec TTR 200 User manual

Trotec
Trotec TTK 28 E User manual

Trotec
Trotec TTK 90 E User manual

Trotec
Trotec TTK 75 E User manual

Trotec
Trotec TTR 2800 User manual

Trotec
Trotec TTK 75 S User manual

Trotec
Trotec TTK 800 User manual

Trotec
Trotec TTK 655 S User manual

Trotec
Trotec TTK 99 HEPA User manual

Trotec
Trotec TTK 140 S User manual

Trotec
Trotec TTK 175 S User manual

Trotec
Trotec TTK 100 E User manual

Trotec
Trotec DH 145 S User manual

Trotec
Trotec TTK 40 E User manual

Trotec
Trotec TTK 100 S User manual

Trotec
Trotec TTK 128 E User manual

Trotec
Trotec TTR 400 User manual

Trotec
Trotec TTK 30 E User manual

Trotec
Trotec TTR 160 User manual

Trotec
Trotec TTK 60 E User manual