Trust 12022 User manual

Trust Wireless Keyboard & Mouse
GB
TRUST WIRELESS KEYBOARD &
MOUSE
Instruction Manual
Version 1.0

Trust Wireless Keyboard & Mouse
01 UK 12022 WIRKEYBMOUSE.DOC
Thank you
Thank you very much for purchasing this product from the Trust range. We wish you hours of fun
with it. Please read this manual carefully before using the product.
Registration
Register your purchase at our Internet site, www.trust.com, so that you can receive optimal
guarantee and service support. You will be automatically informed of developments to your
product and other Trust products. You will also have the chance of winning some spectacular
prizes.
Copyright statement
No part of this instruction manual may be reproduced or transmitted, in any form or by any means,
electronic or mechanical, including photocopying, recording, or information storage and retrieval
systems, for any purpose other than the purchaser's own personal use, without prior written
permission from the manufacturer.
Disclaimer statement
The manufacturer specifically disclaims all warranties, either expressed or implied, including, but
not limited to, implied warranties for the marketability and suitability for a particular purpose, with
respect to the software, the accompanying product manual(s) and written material, and all other
accompanying hardware. The manufacturer reserves the right to revise or make improvements to
its product at any time and without obligation to notify any person of such revisions or
improvements.
In no event shall the manufacturer be liable for any consequential or incidental damages, including
any loss of business profits or any other commercial damages, arising out of the use of its
products.
All company or product names are trademarks or registered trademarks of their respective
owners.

Trust Wireless Keyboard & Mouse
1
GB
Contents
1. Introduction ..................................................................................................................................... 2
1.1 Conventions used in the manual............................................................................................ 2
1.2 Contents of the box.................................................................................................................. 2
1.3 Minimum system requirements .............................................................................................. 2
2. Safety................................................................................................................................................ 3
2.1 General information ................................................................................................................. 3
2.2 Batteries .................................................................................................................................... 3
2.3 Interference............................................................................................................................... 3
3. Connecting....................................................................................................................................... 4
4. Inserting the batteries..................................................................................................................... 4
4.1 Wireless Keyboard ................................................................................................................... 4
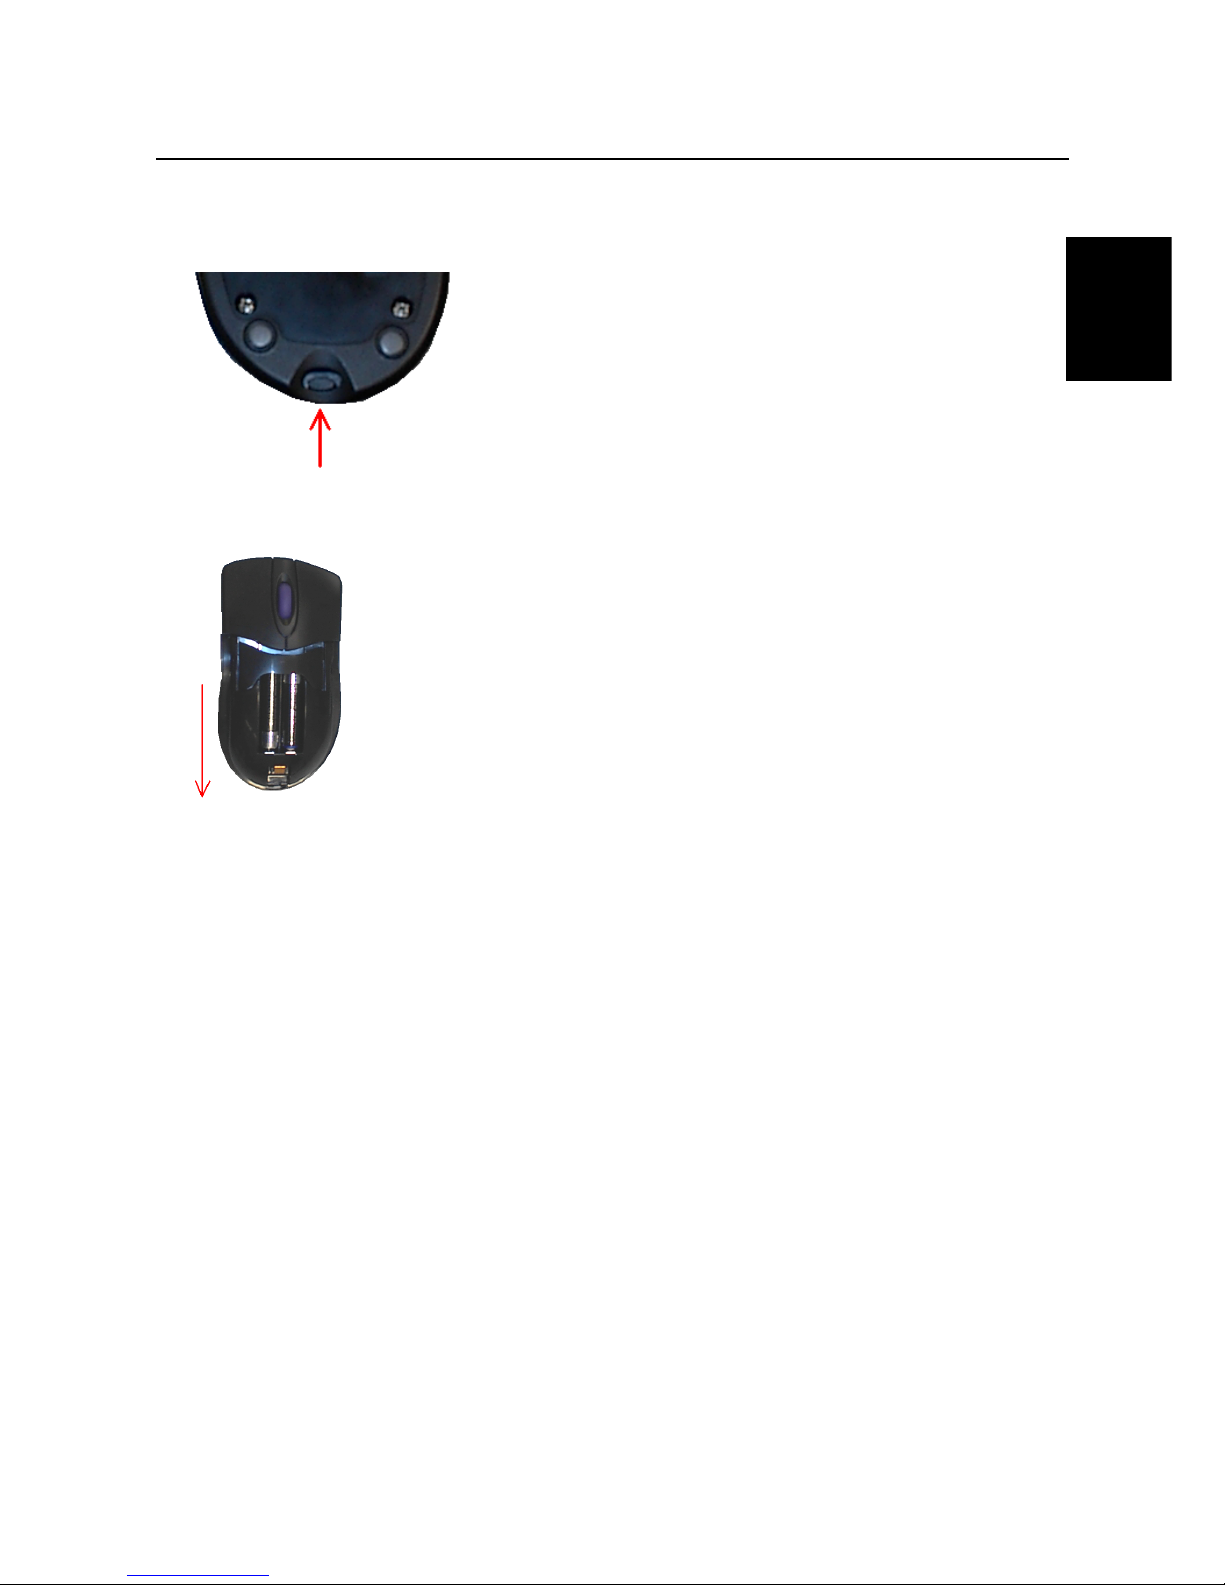
4.2 Wireless Mouse ........................................................................................................................ 5
5. Selecting the channel ..................................................................................................................... 5
5.1 Wireless Keyboard ................................................................................................................... 5
5.2 Wireless Mouse ........................................................................................................................ 5
5.3 Wireless Receiver..................................................................................................................... 5
6. Installation ....................................................................................................................................... 6
6.1 Trust Software Installer ........................................................................................................... 6
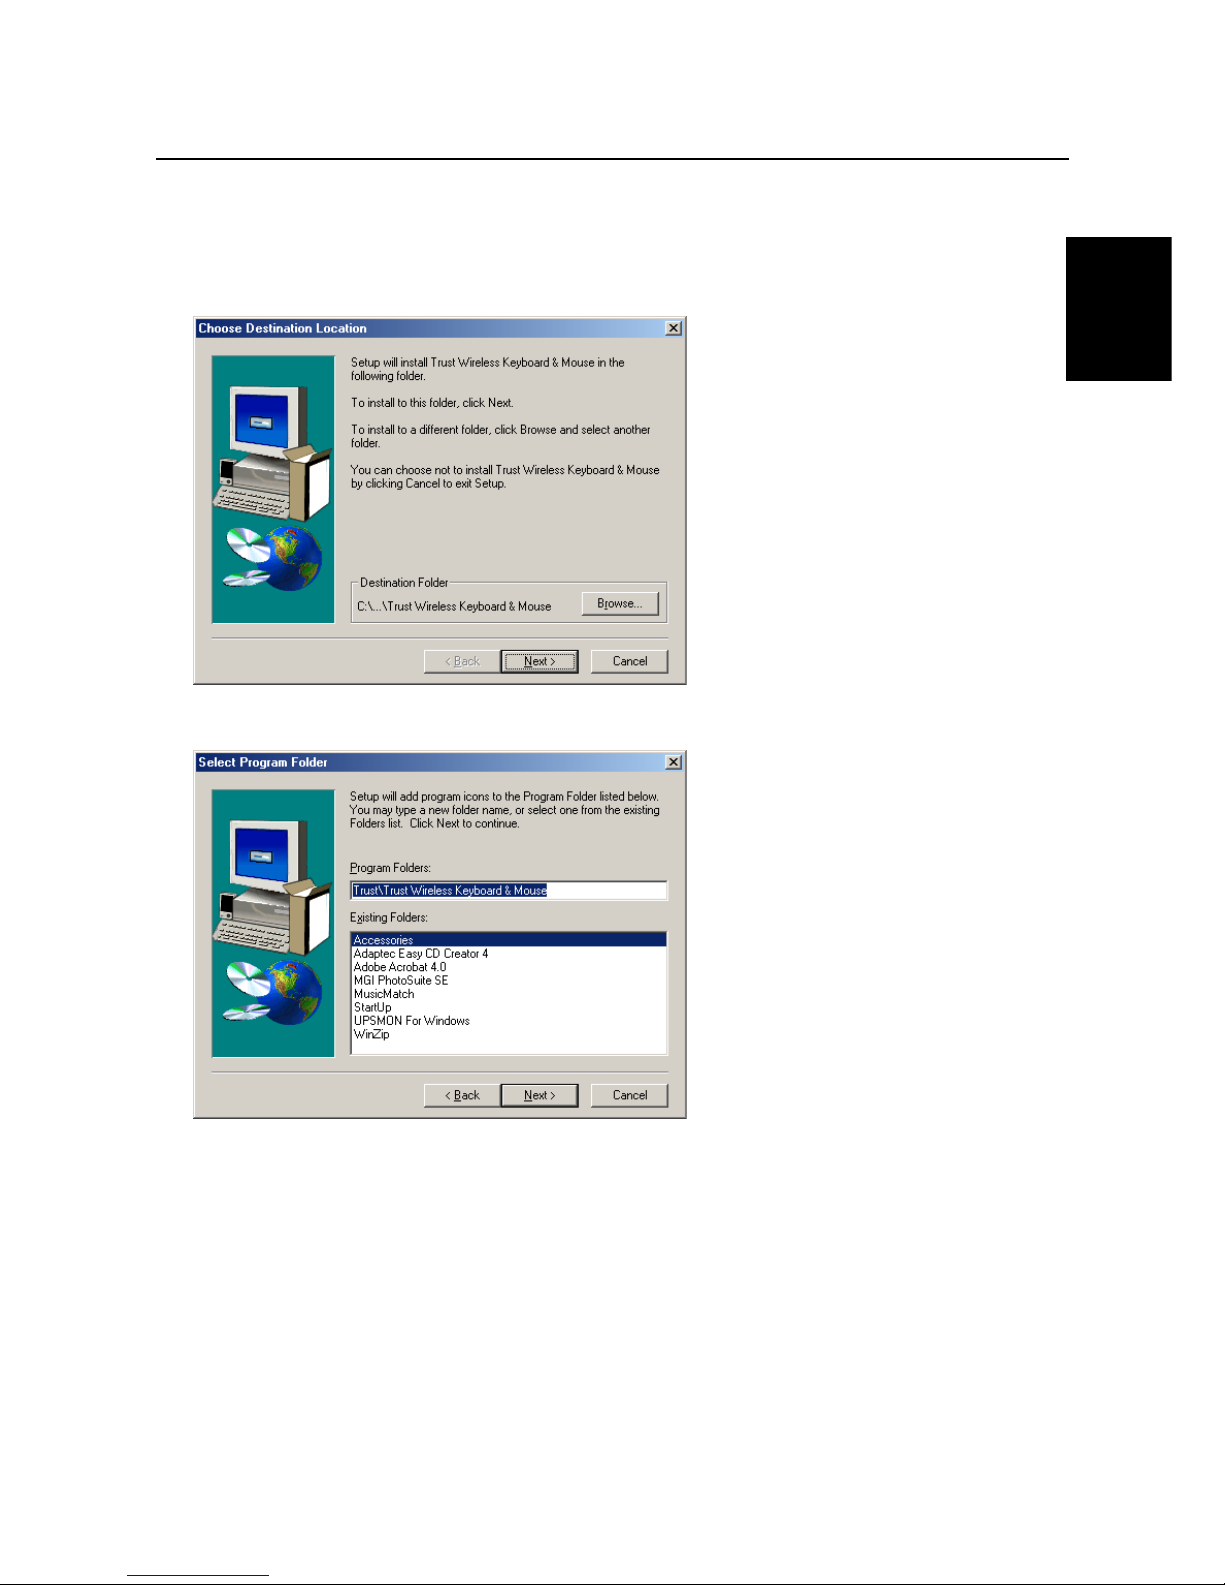
6.2 Installing the software ............................................................................................................. 7
7. Use.................................................................................................................................................... 8
7.1 Description of the multimedia buttons .................................................................................. 8
7.2 Description of the Wireless Mouse buttons .......................................................................... 9
8. Using the software ........................................................................................................................ 10
8.1 Setting up the Wireless Keyboard ........................................................................................ 10
8.2 Setting up the Wireless Mouse ............................................................................................. 10
8.2.1 'Buttons' tab..................................................................................................................... 10
8.2.2 'Pointers' tab .................................................................................................................... 12
8.2.3 'Quick Access Wheel' tab ............................................................................................... 12
8.2.4 'Scroll' tab ........................................................................................................................ 14
8.2.5 'Action' tab ....................................................................................................................... 15
8.2.6 'Orientation' tab ............................................................................................................... 16
8.2.7 'Cursor' tab....................................................................................................................... 17
8.2.8 'Wireless' tab.................................................................................................................... 17
8.2.9 'Information' tab............................................................................................................... 18
8.3 CD Player................................................................................................................................. 19
9. Uninstalling.................................................................................................................................... 19
10. Maintenance .................................................................................................................................. 19
11. Troubleshooting............................................................................................................................ 21
12. Specifications ................................................................................................................................ 22
13. Trust Customer Care Centres ...................................................................................................... 23
Appendix A: Functions for button assignment............................................................................... 24
Appendix B: Preference settings...................................................................................................... 26

Trust Wireless Keyboard & Mouse
2
1. Introduction
This instruction manual is intended for users of the Trust Wireless Keyboard & Mouse. If you have any
questions, please contact one of the Trust Customer Care Centres. The last page of this electronic
instruction manual, as well as the back of the printed quick installation manual, contains more information
about these Customer Care Centres.
1.1 Conventions used in the manual
The following conventions have been used in this manual to indicate instructions:
<key> Here you should press a key. The name of the key is given between brackets.
‘System’ This is a specific term used in a program. These are the terms used by, for example,
Microsoft Windows 98.
[DIR] Type the text shown between square brackets [….].
Additional information will be shown as follows:
Note: The Wireless Keyboard and the Wireless Mouse only work when connected to your computer's
PS/2 port!
The examples assume that the letter "D" has been assigned to your CD-ROM drive. If your system uses a
different letter for your CD-ROM drive, for example "E", you should replace "D" by "E".
1.2 Contents of the box
Check the contents of the box before reading the instruction manual. It should contain the following:
•Wireless Keyboard
•Wireless Mouse
•RF Receiver
•Wrist support
•Batteries (4x type AA, 2x type AAA)
•The quick instruction manual
•CD-ROM containing the drivers, software and instruction manuals
Please contact one of the Trust Customer Care Centres if anything is missing or damaged. You can find
more information at the back of this instruction manual.
1.3 Minimum system requirements
•80486 processor
•PS/2 keyboard connection
•16MB RAM
•16MB free hard disk space
•4-speed CD-ROM drive
•Windows 95
•Sound card (recommended)

Trust Wireless Keyboard & Mouse
3
GB
2. Safety
2.1 General information
1. Do not use this device in a damp environment, such as a bathroom, damp basement, swimming pool,
etc.
2. Do not try to repair this device yourself.
3. Under the following circumstances, have the device repaired by qualified personnel:
a) The wire or plug is damaged or worn;
b) Liquid has entered the device;
c) The device has fallen and/or the casing is damaged;
d) The performance of the device is clearly becoming worse
4. Position the device so that the cables cannot be damaged.
5. If the device must be cleaned, wipe it using a damp cloth. Do not use a liquid cleaning product or a
spray.
6. Make sure the keyboard is not used in a dusty room. This will reduce the life span of the device.
2.2 Batteries
1. The batteries are not rechargeable. Do not try to recharge them. Recharging the batteries may cause an
explosion.
2. Do not throw the batteries onto an open fire. This may cause the batteries to explode.
3. Do not drill into the batteries.
4. Keep the batteries out of the reach of small children.
5. When the batteries are empty, ask your local authority where you can dispose of them.
2.3 Interference
1. If there is another user close by using a similar keyboard with the same channel settings, it is possible
that your keystrokes will be visible on his/her monitor. It is then necessary to change the channel settings.

Trust Wireless Keyboard & Mouse
4
3. Connecting
Note: The Wireless Keyboard and the Wireless Mouse only work when connected to your computer's
PS/2 port!
1. Turn the computer off and remove the plug from the wall socket.
2. Remove the old keyboard from your computer.
3. Remove the old mouse from your computer.
4. Fix the wrist support to the Wireless Keyboard.
5. Connect the plugs from the Wireless Receiver to the computer's keyboard connection and mouse
connection (see figure 1).
6. Insert the computer's plug back into the wall socket.
Figure 1: Connecting
4. Inserting the batteries
Note: Inserting the batteries incorrectly can damage the keyboard and the mouse!
4.1 Wireless Keyboard
1. Open the two battery flaps on the bottom of the keyboard by pushing the flaps in the direction indicated in
figure 2 and then pulling the flaps off of the keyboard. Do not use excessive force. The battery
compartment will now be visible.
Figure 2: Inserting the batteries
2. Insert the four AA batteries into the battery compartment as indicated by the diagram. Pay attention to the
polarity.
3. Fit the two battery flaps back onto the keyboard.

Trust Wireless Keyboard & Mouse
5
GB
4.2 Wireless Mouse
1. Push the button on the bottom of the mouse indicated in figure 3.
The battery flap will come loose.
Figure 3: Bottom of the mouse
2. Remove the battery flap from the top of the mouse by sliding it off of the mouse. The battery
compartment will now be visible (see figure 4).
Figure 4: Battery compartment
3. Insert the two AAA batteries into the mouse as indicated by the diagram.
4. Slide the battery flap back onto the mouse until a click is heard. The batteries have now been correctly
installed.
5. Selecting the channel
Before you can use the Wireless Keyboard & Mouse, you must make sure the channel that the keyboard and
mouse use is the same as the Wireless Receiver's channel.
5.1 Wireless Keyboard
1. Find the switch used to change the channel on the bottom of the keyboard. This is located in the top left-
hand corner.
2. Switch this to the left or right (respectively channel 1 or 2). Channel 1 is recommended.
5.2 Wireless Mouse
1. Find the switch used to change the channel on the bottom of the mouse.
2. Switch this to the top or bottom position (respectively channel 1 or 2). Channel 1 is recommended.
5.3 Wireless Receiver
1. Find the switch used to change the channel on the bottom of the RF Receiver.
2. Set this to the same position you have just set the keyboard and mouse to (position 1 or 2).
Note: The channel must be changed if you experience disturbance from, for example, another wireless
device during use. Follow the points given above to do this.

Trust Wireless Keyboard & Mouse
6
6. Installation
This chapter describes how to install the software provided.
Note: If installed, first remove the software for your previous keyboard and mouse.
6.1 Trust Software Installer
1. Start Windows.
2. Insert the CD-ROM into your CD-ROM drive.
3. Click on ‘Start’ and select ‘Run’ (see figure 5).
Figure 5: Starting setup
4. In the command line type, [d:\setup] and click on ‘OK’.
5. Select the language you wish to have the Trust Software Installer displayed in. Figure 6 will appear.
Figure 6: Trust Software Installer
6. Select an option from the menu.

Trust Wireless Keyboard & Mouse
7
GB
6.2 Installing the software
1. Start the Trust Software Installer (see chapter 6.1).
2. Select ‘Install Wireless Keyboard and Mouse’ from the main menu.
3. Select the language you wish to have the software installed in and click on 'OK'. Figure 7 will appear.
Figure 7: Software installation
4. Accept the default file location by clicking on 'Next'. Figure 8 will appear.
Figure 8: Start menu location
5. Accept the default Start menu location by clicking on 'Next'. A number of files will be copied to your
computer. When completed, figure 9 will appear.

Trust Wireless Keyboard & Mouse
8
Figure 9: Restarting the computer
6. Click on Finish to restart your computer.
7. Use
7.1 Description of the multimedia buttons
Your keyboard has 16 extra multimedia buttons for use in Windows 95, 98, NT4, 2000 and Millennium (see
figure 10). The following functions are installed as standard:
Figure 10: Multimedia buttons

Trust Wireless Keyboard & Mouse
9
GB
Multimedia
buttons
Function
Returns a music CD to the previous track
Plays/Pauses a CD or film
Stops a CD or film
Continues to the next track of a music CD
Opens the CD tray
Increases/Reduces the sound volume
Turns the sound on/off
Screen Saver Starts the screen saver
Calculator Starts the Windows calculator
E-mail Starts the e-mail program
Back Returns to the previous document in your Internet browser
WWW Starts your Internet browser
Forward Goes to the next page in your Internet browser
Sleep Puts the computer into the 'sleep' position (Suspend mode)
Wake up Takes the computer out of the 'sleep' setting
Table 1: Description of multimedia buttons
Note: If programs such as the Calculator or the e-mail program are not (correctly) installed, you may
receive a Windows error message when you try to use these keyboard buttons. Install these
programs for optimal use of the keyboard.
7.2 Description of the Wireless Mouse buttons
Figure 11: Position of the buttons

Trust Wireless Keyboard & Mouse
10
Button Function
A Scroll wheel + third mouse button
B Right mouse button
C Left mouse button
D Fourth mouse button
E Fifth mouse button
Table 2: Description of the mouse buttons
8. Using the software
All the keyboard's multimedia buttons and the mouse are ready for use after you have installed the driver. It is
now also possible to change the menu.
8.1 Setting up the Wireless Keyboard
Right-click on the icon in the taskbar indicated by the number 1 in figure 12. The window displaying the menu
options shown in figure 12 will appear.
Figure 12: Taskbar icon
The following options are now available:
Menu option Function description
Setup Program the 'E-mail' and 'WWW' buttons
OSD Change the OSD settings, such as letter font, OSD position or turn off the OSD
Config Change the CD Player settings
Exit Close the OSD
Table 3: Explanation of figure 12
8.2 Setting up the Wireless Mouse
The basic mouse functions have been optimally set for the user. If you wish to change the mouse settings,
refer to the relevant chapter.
Double-click on the icon in the taskbar indicated by the number 2 in figure 12 to open the 'Mouse Properties'
window. Figure 13 will appear on your monitor.
Close the program if you wish to play a game using the mouse but do not wish to use the special mouse
properties. To do this, right-click on the icon and select 'Close Trust Ami Mouse Wireless 200'.
8.2.1 'Buttons' tab
Click the 'Buttons' tab (figure 13) to assign a function to the mouse buttons.

Trust Wireless Keyboard & Mouse
11
GB
Figure 13: Mouse Properties - Buttons
8.2.1.1 Button assignment
Click the down arrow to select a function from the list. Repeat this for each mouse button.
The complete list of functions is given in Appendix A.
8.2.1.2 Mode
Office 97 Mode: Supports zoom, scrolling and Auto-scrolling in Microsoft Office 97 / 2000.
This option is the same as the Microsoft IntelliMouse.
Ami Mouse Mode: Supports all applications with a scroll bar, including Office 97 / 2000 with
zoom, scroll functions and auto panning.
8.2.1.3 Profile configuration
Using profile configuration, you can use, change and save three preference settings for 'Button assignment',
'Quick Access Wheel' and 'Quick Access Files'.
The standard profile settings are given in Appendix B.
Save profile Follow the instructions below to change and save a profile.
1. Select the desired profile.
2. Set the functions for the mouse buttons as you wish to have them.
3. Set the functions for 'Quick Access Wheel' and 'Quick Access Files' as you wish to have
them.
4. Click on 'Save' to save the profile.
Reset If you do not wish to save the changes that you have made, click on 'Reset' to return
all the profiles to the default settings.

Trust Wireless Keyboard & Mouse
12
8.2.2 'Pointers' tab
You can alter the mouse pointers using the 'Pointers' tab (see figure 14).
Figure 14: Mouse Properties- Pointers
Click the down arrow to select the desired scheme.
You can also make you own scheme by selecting a mouse pointer for each item by clicking on 'Browse'. You
can save the scheme by clicking on the 'Save As' button.
See Windows Help for more information.
8.2.3 'Quick Access Wheel' tab
Quick Access Wheel is an application that can be set for use under one of the mouse buttons. When Quick
Access Wheel is started, a wheel will be displayed. Eight commonly used applications or functions can be
started using this wheel.
Click on the 'Quick Access Wheel' tab (figure 15) to alter the default settings.

Trust Wireless Keyboard & Mouse
13
GB
Figure 15: Mouse Properties - Quick Access Wheel
For each item, click the down arrow to select the desired function.
Use the Quick Access Files option if you wish to add an application or function to the Quick Access Wheel.
Click on 'Apply' to activate the alterations.
8.2.3.1 Quick Access Files
Figure 16: Mouse Properties - Quick Access Files
This window is used to add or remove items for the Quick Access Files.
Drives Give the location of certain items

Trust Wireless Keyboard & Mouse
14
File type Filter to search for certain types of files (*.exe, *.doc, *.txt and *.* for all files)
Add Item Add an item from the list (also by doubling clicking)
Remove Item Remove an item from the list
Remove All Remove all items from the list
Move Up/Down Set the order by moving an item up or down.
Click on 'OK' to return to the Quick Access Wheel.
8.2.4 'Scroll' tab
Click on the 'Scroll' tab (figure 17) to set the mouse wheel properties.
Figure 17: Mouse Properties - Scroll
Scrolling Speed: Set the speed for scrolling in a document etc.
Trust Dynamic Scroll Increased scrolling speed in a document when the mouse button and mouse wheel
are used together.
Scrolling Direction The direction of rotation of the mouse can be changed using this function.

Trust Wireless Keyboard & Mouse
15
GB
8.2.5 'Action' tab
Figure 18: Mouse Properties - Action
Mouse Speed Set the speed that the mouse moves across the monitor.
Double Click Speed Set the speed for double clicking. Double-click on the Trust icon to test the speed.
Button Swap Set the mouse for left-handed or right-handed use.

Trust Wireless Keyboard & Mouse
16
8.2.6 'Orientation' tab
Select the 'Orientation' tab to calibrate the mouse. See figure 19.
Figure 19: Mouse Properties - Orientation
Follow the instructions below to set the mouse to the desired position in your hand or to move the mouse in a
more natural position
1. Click on ‘Set Orientation’
2. Move the mouse in a straight line in the direction of the finish line until the racing car reaches the finish
line.
3. Click on 'Apply' to keep these settings.
Click on 'Cancel' to delete the new settings.
Note: A message will be displayed on the screen if you have not moved the mouse in a straight line.
Click on 'Retry' to carry out the calibration again.

Trust Wireless Keyboard & Mouse
17
GB
8.2.7 'Cursor' tab
Extra mouse pointer properties are included in the cursor tab.
Figure 20: Mouse Properties - Cursor
Button Find: By selecting this option, the mouse automatically jumps to the active button.
Trails: This option makes it easier to find the mouse pointer. This function only works on an LCD
monitor.
Loop: When this option is selected, the mouse pointer will reappear at the other side of the monitor
when it reaches the end of the screen.
8.2.8 'Wireless' tab
Figure 21: Mouse Properties - Wireless

Trust Wireless Keyboard & Mouse
18
This window gives information about the status of the batteries. A message will be displayed if they are
empty. An icon of a battery with a red cross through it will also be shown in the taskbar.
The batteries must then be replaced (see chapter 3).
8.2.9 'Information' tab
Figure 22: Mouse Properties - Information
This window gives the version number of the driver.
Click on http://www.trust.com for more information about Trust computer products, FAQ's, new drivers, etc.
Table of contents
Other Trust Computer Accessories manuals

Trust
Trust 365L User manual

Trust
Trust 3010A User manual

Trust
Trust 3012A User manual

Trust
Trust DS-4400D User manual

Trust
Trust 16069 User manual

Trust
Trust Dual Shock Rally Master User manual

Trust
Trust 15907 User manual

Trust
Trust Tecla 18040 User manual

Trust
Trust SoundeCube USB User manual

Trust
Trust DS-3200 User manual
Popular Computer Accessories manuals by other brands

Socket
Socket CompactFlash Scan Card Series 5 quick start guide

TYPHOON
TYPHOON Wireless Keyboard Optical Mouse Set user guide

Contour
Contour RollerMouse Pro Wireless product manual

TerraTec
TerraTec Headset Master VC Product information

Sony
Sony USM32U2 operating instructions

Thermaltake
Thermaltake Urban S1 CA-1A8-00M1NN-00 user manual