manuals.online logo
Brands
  1. Home
  2. •
  3. Brands
  4. •
  5. Tucano Urbano
  6. •
  7. Motorcycle Accessories
  8. •
  9. Tucano Urbano TERMOSCUD R198X User manual

Tucano Urbano TERMOSCUD R198X User manual

GB
IVista riepilogativa delle fasi di montaggio (A>F) e del
prodotto finito montato sullo scooter.
Summary view of the assembly steps (A>F) and
finished product fitted on the scooter.
GB
I
GB
I
TERMOSCUD - R191
®
2
step
C
step
A
step
D
3
GB
I
GB
I
1
!
TERMOSCUD - R191
®
I
GB
AVVERTENZE
WARNING
INIZIO
Start
ISTRUZIONI DI MONTAGGIO
INSTRUCTION MANUAL
Stendere Termoscud® sulla sella con i nastri 3 e
6 in avanti.
Unfold Termoscud® on the scooter’s seat with
straps 3 and 6 forward.
Infilare la prolunga F fino in fondo
tra il cupolino ed il parabrezza trasparen-
te. Quindi, agganciare gli attacchi fastex
del nastro F al Termoscud® nei punti
1F.
Thread extension
strap F
as far as
it will go between the fairing and the
Perspex screen. Secire the
Termoscud®
using the
fastex buckles
at
point 1F
.
Rimuovere la vite in plastica dello Scrivet A.
Inserire ciò che rimane nel foro 3 all’interno
del vano ruota. Quindi fissare nastro 3 con la
vite B.
Remove the plastic screw from the
Scrivet A
.
Insert the remaining part of the Scrivet into
the
hole 3
inside the wheel compartement.
Then fasten the
strap 3
with
screw B
.
Collegare i due lembi del nastro 3bis e X
utilizzando l’aggancio a baionetta, facendo
passare il nastro sul retro dello scudo.
Tesare i nastri e adattare il Termoscud® in
modo che il bordo aderisca all’interno della
carrozzeria come in figura.
Close the buckles of straps 3bis and X under
the leg cover. Behing the bodywork. Tighten
up the straps and position Termoscud® so
that the edge bonds inside the bodywork, as
shown.
i
,
le
l
io
io
l
è
n
r
o
g
y
h
If
g
▪ Prima del montaggio verificare la compatibilità del
coprigambe Termoscud® con il vostro modello di
scooter presso il rivenditore o sul sito www.tucanourbano.it.
▪ Per un uso efficiente e sicuro del vostro coprigambe seguire
attentamente le istruzioni di montaggio: in caso di dubbio rivolgersi a personale esperto.
▪ Eseguito il montaggio, verificarne la correttezza, accertandosi che nessuna parte del prodotto
sia di ostacolo alla posizione di guida, al movimento dello sterzo, alla messa a terra dei piedi o
al funzionamento del mezzo; il verificarsi di una di tali circostanze o l’eventuale presenza d
nastri liberi che possano impigliarsi in parti in movimento dello scooter può compromettere
l’efficienza del prodotto e la vostra sicurezza.
▪ L’inesperienza nell’uso del coprigambe può comportare rischi per il suo uso sicuro, pertanto
prima di utilizzare per la prima volta il prodotto con lo scooter nel traffico, abituarsi a mettere
a terra rapidamente i piedi e verificare di essere in grado di completare in sicurezza tutte
manovre esercitandosi in un luogo sicuro e senza traffico dapprima da fermi, rimanendo su
cavalletto, e quindi in movimento.
▪ Ad ogni utilizzo del vostro scooter e comunque sempre a seguito di eventuali urti (ad esemp
salendo o scendendo da marciapiedi alti), cadute o altre circostanze, assicurarsi del corretto
posizionamento del prodotto e dell’integrità di tutti i punti di aggancio e in caso contrario
smontare il prodotto prima di proseguire. In ogni caso, periodicamente, ispezionare con cura
il corretto serraggio delle viti/dadi di tenuta e la tensione dei nastri.
▪ Durante l’uso del vostro scooter posizionare i piedi in modo che sia agevole il rapido appogg
a terra al momento della sosta; in particolare in caso di utilizzo dei nastri 5 rimboccati sotto i
sedere.
▪ Non apportare modifiche di alcun genere al prodotto e utilizzare solo componenti originali.
▪ Il coprigambe può determinare un cambiamento nell’aerodinamica del vostro mezzo:
necessario tenerne conto e adeguare la velocità e la propria condotta di guida, soprattutto i
caso di vento forte.
▪ Ricordarsi di mantenere sempre gonfie le camere d’aria SGAS antisventolio.
▪ Conservare queste istruzioni per riferimento futuro.
▪ Before assembling the product, check that Termoscud® is
compatible with your model of scooter. Consult your dealer o
website www.tucanourbano.it .
▪ Ensure correct and safe usage of the leg cover by following
the assembly instructions carefully: in case of doubt, consult
qualified personnel.
▪ Once you have assembled the product, check that it is correctly attached and that no part of
the product impedes driving, steering, correct functioning of the vehicle, or your ability t
place your feet on the ground. Make sure all straps are securely fixed with no risk of catchin
in any moving part. Failure to follow these instructions will impair the products performance
and put your safety at risk.
▪ Before using the product for the first time, practice putting your feet to the ground quickl
and check that all other manoeuvres can be safely executed. Do this in a safe place where
there is no traffic, first on the centre stand with the vehicle still and then whilst driving at low
speed. Failure to follow these instructions will put your safety at risk.
▪ Every time you use your scooter and after any fall, accident or impact (eg. riding off a hig
pavement), check carefully that the product is correctly positioned, that the straps are
correctly tensioned, that all screws and bolts are tight and that all attachments are intact.
not, remove the product before proceeding.
▪ When using your scooter, position your feet so they can rapidly contact the ground durin
stops, especially when ‘side straps 5’ are tucked between seat and driver.
▪ Do not change or modify the product in any way. Only use original parts.
▪ The leg cover may alter the aerodynamics of your vehicle. This must be taken into conside-
ration. keep the vehicle and its speed under control, especially in strong winds.
▪ Remember to keep the anti-flap SGAS air chambers fully inflated.
▪ Keep these instructions for future reference.
X
3bis
C
Predisposizione fissaggio
accessori Fidlock®
SHS
Ability to fasten
accessories by Fidlock®
TERMOSCUD - R191
®
TERMOSCUD - R198X
®1TERMOSCUD - R198X
®2TERMOSCUD - R198X
®3TERMOSCUD - R198X
®4
step
A
step
C
step
B
STEP C
STEP B STEP A
F
3
M
A
X
I
M
U
M
P
R
E
S
S
U
R
E
0
,
1
B
A
R
/
1
,
3
P
S
I
STEP E
6STEP F
2
Y
STEP D
3bis
X
6
Y
2
6
2
3 3
X X
F
3bis 3bis
1F 1F
M
A
X
I
M
U
M
P
R
E
S
S
U
R
E
0
,
1
B
A
R
/
1
,
3
P
S
I
M
A
X
I
M
U
M
P
R
E
S
S
U
R
E
0
,
1
B
A
R
/
1
,
3
P
S
I
F
1F
3
A
A
A
B
3
KIT DI MONTAGGIO
ASSEMBLY KIT
x 4
Ax 4
B
Cx 2
step
B
GB
I
step
F
I
GB
Le foto e i disegni sono puramente indicativi. Tucano Urbano si riserva il diritto
di modificare o migliorare il prodotto in qualsiasi momento, senza preavviso e
senza obblighi di dover applicare tali modifiche su prodotti già venduti.
Photos and drawings are purely indicative. Tucano Urbano reserves
the right to modify or improve the product at any time, without prior
notification and with no obligation to apply such modifications to products
already sold.
NOTE
I
GB
TERMOSCUD - R198X
®
ISTRUZIONI DI MONTAGGIO
INSTRUCTION MANUAL
mod. R198X
for
HONDA FORZA 125/300 > 2018
Rimuovere la vite in plastica dello Scrivet A.
Inserire ciò che rimane nel foro 6 all’interno
del vano ruota. Quindi fissare nastro 6 con la
vite B.
Remove the plastic screw from the Scrivet A.
Insert the remaining part of the Scrivet into
the hole 6 inside the wheel compartment.
Then fasten the strap 6 with screw B.
GB
I
Agganciare la prolunga Y al bordo posteriore della carrozzeria sotto alla pedana.
Chiudere il fastex del lato destro. E’ possibile tesare i nastri di collegamento da
entrambi i lati (2).
Attach the extension strap Y to the rear edge of the bodywork below the footplate.
Attach the fastex connector on the right side. You can now adjust the lenght of the
extension strap Y by pulling on two connecting straps (2).
Vedi dettagli
See details
step E
6
A
A
A
B
3
TERMOSCUD - R198X
®5
GB
IUtilizzare i punti di regolazione dei nastri per adattare Termoscud® alla forma dello
scooter e metterlo bene in tensione, così da evitare lo sventolio e l’entrata di
spifferi.
Infine gonfiare le camere d’aria S.G.A.S.
Terminate le regolazioni, le porzioni di nastro libere vanno rimboccate
all’interno sotto ai bordi di Termoscud®.
I nastri verde e giallo n° 4 non sono necessari per il montaggio, ma vanno utiliz-
zati solamente per arrotolare Termoscud® nella stagione calda.
Adjust the position of Termoscud® using the regulations of the straps to fit
perfectly on the shield.
Finally inflate S.G.A.S. tubes.
Exceeding portions of the straps must be tucked under the Termoscud®
cover to avoid flapping.
The green and yellow straps 4 are not necessary for assembly.
They are only for rolling up Termoscud® in warm weather.
Note !
TERMOSCUD - R198X
®6
BREVETTATO
PATENTED
S.G.A.S. (sistema brevettato antisventolio) con nuova valvola dotata
di tappo integrato e chiusura stagna a vite.
Adattatore S.G.A.S. in dotazione per gonfiare a fiato/con pompa:
rende igienico il gonfiaggio ed evita la fuoriuscita dell’aria durante la
chiusura della valvola.
S.G.A.S. (patented anti-flap inflatable system) with new valve fitted
with incorporated cap and watertight closure.
S.G.A.S. adapter included for manual/ pump inflation: makes
pumping hygienic and prevents air leakage when the valve is being
closed.
TERMOSCUD - R198X
®7
I
DETTAGLI
GB
DETAILS
T
A
R
G
A
:
A
B
3
7
6
5
4
5100
4
1
2
5
6
3
4
1 Pettorina con sgancio di sicurezza con Velcro regolabile.
2 Nastri 4 (verde e giallo) per arrotolare al Termoscud®
quando fa caldo (tenere la pelliccia all’interno e, se occorre,
sgonfiare le camere S.G.A.S.).
3 Nastri 5 da rimboccare sotto il sedere per ottenere la
massima protezione.
4 Tassello rifrangente da personalizzare con il numero di
targa.
5 Coprisella elastico e impermeabile da rimboccare intorno
alla sella per proteggerla dalla pioggia in parcheggio,
utilizzare la tracolla come ulteriore aggancio antivento.
6 Adesivi trasparenti per proteggere la carrozzeria dallo
sfregamento dei nastri. Gli adesivi sono removibili e non
lasciano residui di colla.
Attenzione: occorre comunque mantenere sempre i nastri
tesati e lo scooter pulito per evitare che col tempo si creino
segni o rigature sulla carrozzeria.
7 Per lavare Termoscud® a fine stagione utilizzare un pano
umido, sciacquare abbondantemente i nastri e fare asciugare
bene prima di riporre in luogo asciutto.
1 Chest cover with safety strap.
2 In mild weather, roll up Termoscud® (with the lining on
the inside) and fix it with straps 4 (green and yellow). If
necessary deflate the S.G.A.S. air tubes.
3 Get a better protection by sitting on straps 5, especially
in cold conditions.
4 As a deterrent write your registration number in the
space provided.
5 An elasticized waterproof cover can be pulled over the
seat when the scooter is parked.
6 Inside the Termoscud® packaging are some clear
adhesive stickers to be applied to the bodywork in order
to protect the paintwork. These are removable and will not
leave residues of glue. If the Termoscud® is not fitted
correctly or the straps kept taught, marks could appear on
the bodywork after a period of time.
7 To wash Termoscud® at the end of the season use a
damp cloth and let dry well before storing.
M
A
X
I
M
U
M
P
R
E
S
S
U
R
E
0
,
1
B
A
R
/
1
,
3
P
S
I
Y
2
E
F
E
F
TERMOSCUD - R191 2
step
C
step
A
step
B
step
3
E
F
1TERMOSCUD - R191
®
E
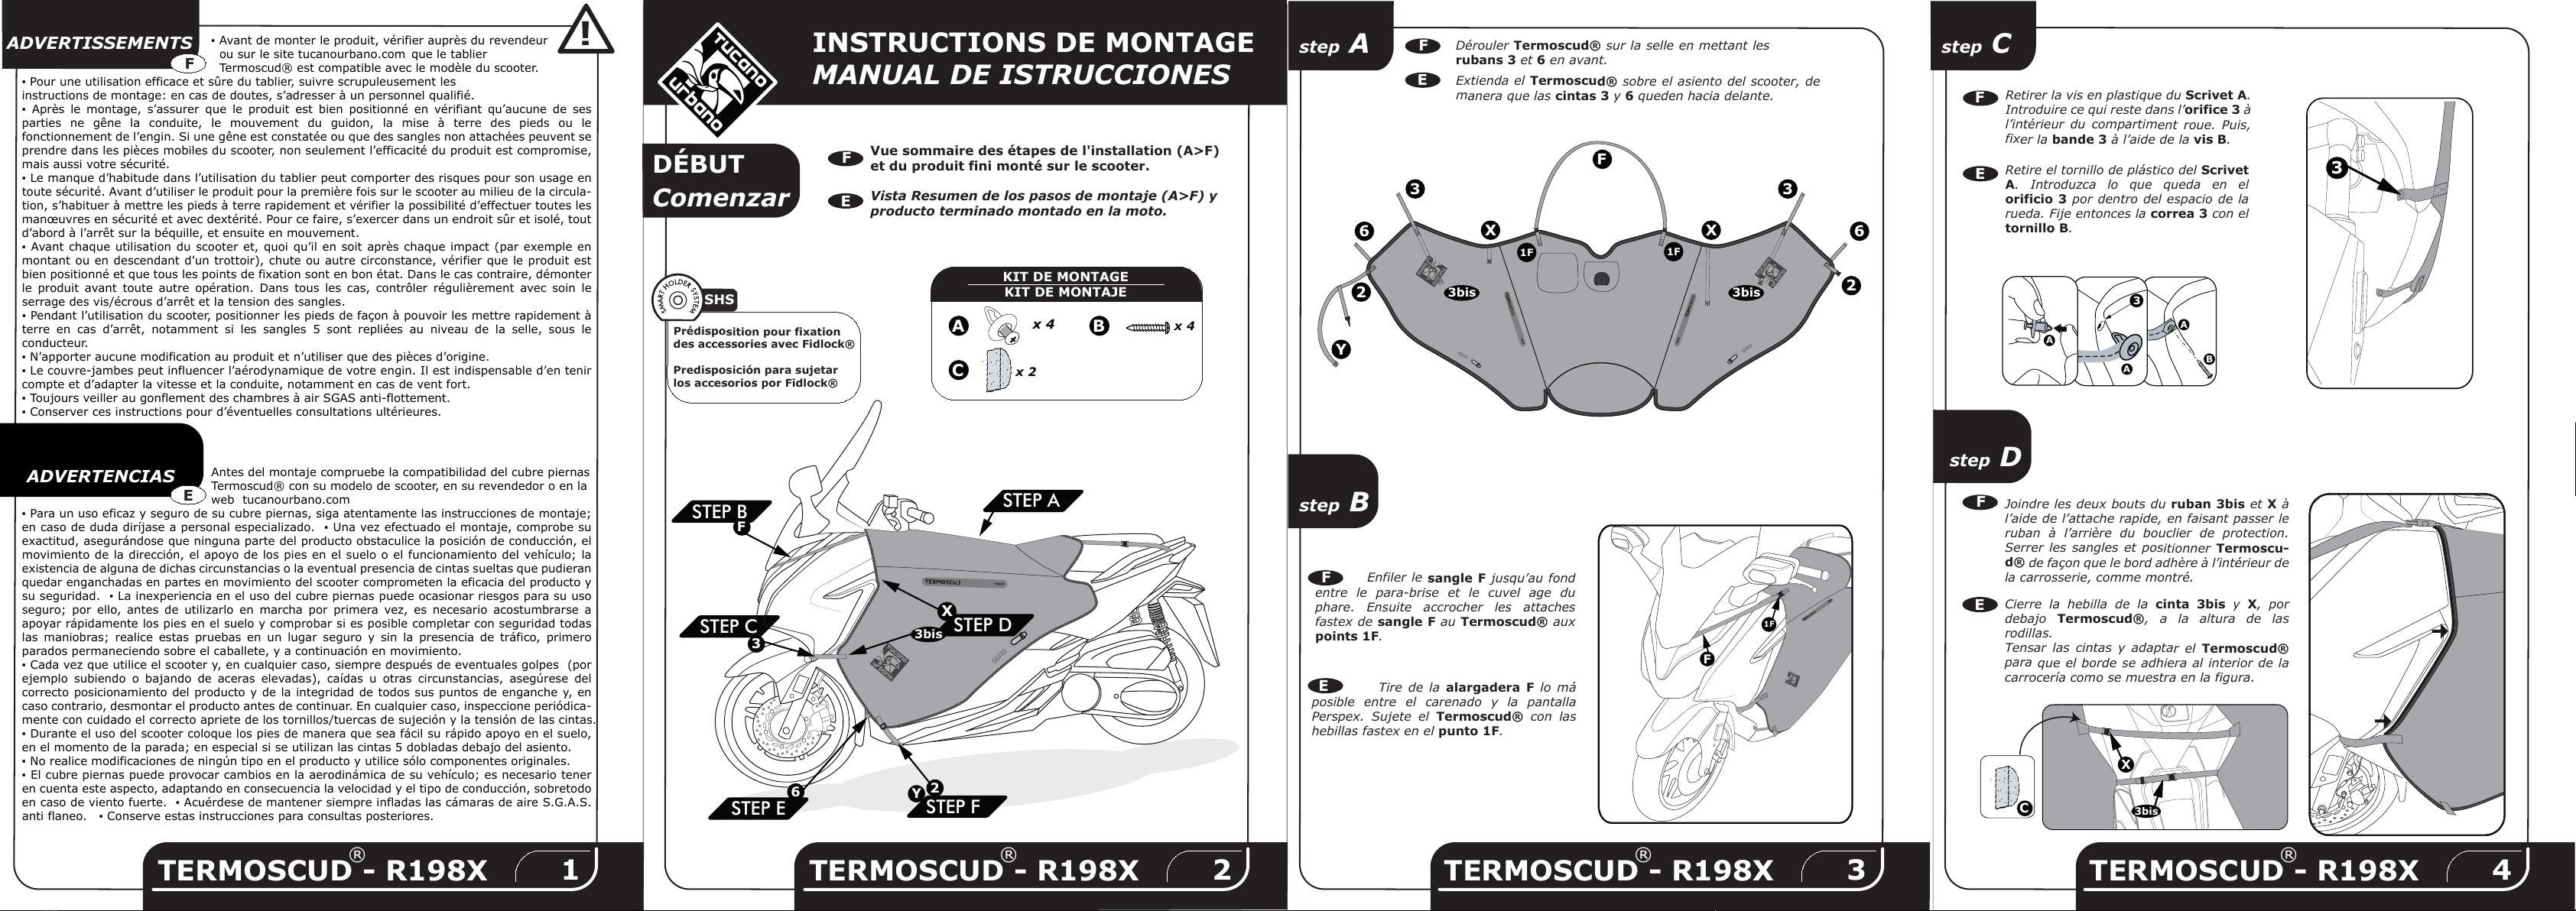
FVue sommaire des étapes de l'installation (A>F)
et du produit fini monté sur le scooter.
Vista Resumen de los pasos de montaje (A>F) y
producto terminado montado en la moto.
Enfiler le sangle F jusqu’au fond
entre le para-brise et le cuvel age du
phare. Ensuite accrocher les attaches
fastex de sangle F au Termoscud® aux
points 1F.
Tire de la alargadera F lo má
posible entre el carenado y la pantalla
Perspex. Sujete el Termoscud® con las
hebillas fastex en el punto 1F.
F
1F
DÉBUT
Comenzar
INSTRUCTIONS DE MONTAGE
MANUAL DE ISTRUCCIONES
Dérouler Termoscud® sur la selle en mettant les
rubans 3 et 6 en avant.
Extienda el Termoscud® sobre el asiento del scooter, de
manera que las cintas 3 y 6 queden hacia delante.
▪ Avant de monter le produit, vérifier auprès du revendeur
ou sur le site tucanourbano.com que le tablier
Termoscud® est compatible avec le modèle du scooter.
▪ Pour une utilisation efficace et sûre du tablier, suivre scrupuleusement les
instructions de montage: en cas de doutes, s’adresser à un personnel qualifié.
▪ Après le montage, s’assurer que le produit est bien positionné en vérifiant qu’aucune de ses
parties ne gêne la conduite, le mouvement du guidon, la mise à terre des pieds ou le
fonctionnement de l’engin. Si une gêne est constatée ou que des sangles non attachées peuvent se
prendre dans les pièces mobiles du scooter, non seulement l’efficacité du produit est compromise,
mais aussi votre sécurité.
▪ Le manque d’habitude dans l’utilisation du tablier peut comporter des risques pour son usage en
toute sécurité. Avant d’utiliser le produit pour la première fois sur le scooter au milieu de la circula-
tion, s’habituer à mettre les pieds à terre rapidement et vérifier la possibilité d’effectuer toutes les
manœuvres en sécurité et avec dextérité. Pour ce faire, s’exercer dans un endroit sûr et isolé, tout
d’abord à l’arrêt sur la béquille, et ensuite en mouvement.
▪ Avant chaque utilisation du scooter et, quoi qu’il en soit après chaque impact (par exemple en
montant ou en descendant d’un trottoir), chute ou autre circonstance, vérifier que le produit est
bien positionné et que tous les points de fixation sont en bon état. Dans le cas contraire, démonter
le produit avant toute autre opération. Dans tous les cas, contrôler régulièrement avec soin le
serrage des vis/écrous d’arrêt et la tension des sangles.
▪ Pendant l’utilisation du scooter, positionner les pieds de façon à pouvoir les mettre rapidement à
terre en cas d’arrêt, notamment si les sangles 5 sont repliées au niveau de la selle, sous le
conducteur.
▪ N’apporter aucune modification au produit et n’utiliser que des pièces d’origine.
▪ Le couvre-jambes peut influencer l’aérodynamique de votre engin. Il est indispensable d’en tenir
compte et d’adapter la vitesse et la conduite, notamment en cas de vent fort.
▪ Toujours veiller au gonflement des chambres à air SGAS anti-flottement.
▪ Conserver ces instructions pour d’éventuelles consultations ultérieures.
!
▪ Antes del montaje compruebe la compatibilidad del cubre piernas
Termoscud® con su modelo de scooter, en su revendedor o en la
web tucanourbano.com
▪ Para un uso eficaz y seguro de su cubre piernas, siga atentamente las instrucciones de montaje;
en caso de duda diríjase a personal especializado. ▪ Una vez efectuado el montaje, comprobe su
exactitud, asegurándose que ninguna parte del producto obstaculice la posición de conducción, el
movimiento de la dirección, el apoyo de los pies en el suelo o el funcionamiento del vehículo; la
existencia de alguna de dichas circunstancias o la eventual presencia de cintas sueltas que pudieran
quedar enganchadas en partes en movimiento del scooter comprometen la eficacia del producto y
su seguridad. ▪ La inexperiencia en el uso del cubre piernas puede ocasionar riesgos para su uso
seguro; por ello, antes de utilizarlo en marcha por primera vez, es necesario acostumbrarse a
apoyar rápidamente los pies en el suelo y comprobar si es posible completar con seguridad todas
las maniobras; realice estas pruebas en un lugar seguro y sin la presencia de tráfico, primero
parados permaneciendo sobre el caballete, y a continuación en movimiento.
▪ Cada vez que utilice el scooter y, en cualquier caso, siempre después de eventuales golpes (por
ejemplo subiendo o bajando de aceras elevadas), caídas u otras circunstancias, asegúrese del
correcto posicionamiento del producto y de la integridad de todos sus puntos de enganche y, en
caso contrario, desmontar el producto antes de continuar. En cualquier caso, inspeccione periódica-
mente con cuidado el correcto apriete de los tornillos/tuercas de sujeción y la tensión de las cintas.
▪ Durante el uso del scooter coloque los pies de manera que sea fácil su rápido apoyo en el suelo,
en el momento de la parada; en especial si se utilizan las cintas 5 dobladas debajo del asiento.
▪ No realice modificaciones de ningún tipo en el producto y utilice sólo componentes originales.
▪ El cubre piernas puede provocar cambios en la aerodinámica de su vehículo; es necesario tener
en cuenta este aspecto, adaptando en consecuencia la velocidad y el tipo de conducción, sobretodo
en caso de viento fuerte. ▪ Acuérdese de mantener siempre infladas las cámaras de aire S.G.A.S.
anti flaneo. ▪ Conserve estas instrucciones para consultas posteriores.
ADVERTISSEMENTS
ADVERTENCIAS
F
E
Retirer la vis en plastique du Scrivet A.
Introduire ce qui reste dans l’orifice 3 à
l’intérieur du compartiment roue. Puis,
fixer la bande 3 à l’aide de la vis B.
Retire el tornillo de plástico del Scrivet
A. Introduzca lo que queda en el
orificio 3 por dentro del espacio de la
rueda. Fije entonces la correa 3 con el
tornillo B.
A
A
A
B
3
step
D
E
F
Joindre les deux bouts du ruban 3bis et X à
l’aide de l’attache rapide, en faisant passer le
ruban à l’arrière du bouclier de protection.
Serrer les sangles et positionner Termoscu-
d® de façon que le bord adhère à l’intérieur de
la carrosserie, comme montré.
Cierre la hebilla de la cinta 3bis y X, por
debajo Termoscud®, a la altura de las
rodillas.
Tensar las cintas y adaptar el Termoscud®
para que el borde se adhiera al interior de la
carrocería como se muestra en la figura.
X
3bis
C
3
Prédisposition pour fixation
des accessories avec Fidlock®
Predisposición para sujetar
los accesorios por Fidlock®
SHS
TERMOSCUD - R191
®
TERMOSCUD - R198X
®1TERMOSCUD - R198X
®2TERMOSCUD - R198X
®3TERMOSCUD - R198X
®4
step
A
step
C
STEP C
STEP B STEP A
F
3
M
A
X
I
M
U
M
P
R
E
S
S
U
R
E
0
,
1
B
A
R
/
1
,
3
P
S
I
STEP E
6STEP F
2
Y
STEP D
3bis
X
6
Y
2
6
2
3 3
X X
F
3bis 3bis
1F 1F
M
A
X
I
M
U
M
P
R
E
S
S
U
R
E
0
,
1
B
A
R
/
1
,
3
P
S
I
M
A
X
I
M
U
M
P
R
E
S
S
U
R
E
0
,
1
B
A
R
/
1
,
3
P
S
I
KIT DE MONTAGE
KIT DE MONTAJE
x 4
Ax 4
B
Cx 2
step
B
F
E
Les photos et les dessins sont purement indicatifs. Tucano Urbano se réserve le droit
de modifier ou améliorer le produit à tout moment, sans préavis et sans obligation
d’apporter telles modifications aux produits déjà vendus.
Las fotos y los dibujos se muestran únicamente a modo de ejemplo.
Tucano Urbano se reserva el derecho de modificar o mejorar el producto en cualquier
momento, sin previo aviso y sin la obligación de tener que aplicar dichas modificacio-
nes a los productos ya vendidos.
NOTE
F
E
TERMOSCUD - R198X
®
INSTRUCTIONS DE MONTAGE
MANUAL DE ISTRUCCIONES
Voir les détails
Ver màs detalles
step E
TERMOSCUD - R198X
®5
E
FUtiliser les points de réglage des rubans 2 pour adapter Termoscud® à
la forme du scooter et pour bien le tendre afin d’éviter qu’il flotte et
que de l’air s’y glisse par les ouvertures.
En conclusion, gonfler les chambres à air S.G.A.S.
Les parties de ruban qui dépassent doivent être repliées à l’intérieur, sous
les bords de Termoscud®, après avoir terminé leur réglage.
Les rubans vert et jaunes 4 ne servent pas pour le montage, mais
simplement pour enrouler Termoscud® dans la belle saison.
Ajuste la posición del Termoscud® con los reguladores de las cintas para
que la funda encaje perfectamente en el escudo del carenado y tire bien de todas
las cintas.
Por último, infle las cámaras S.G.A.S.
Las partes sobrantes de las cintas deben meterse dentro de la funda
Termoscud®.
Las cintas verdes y amarillas nº 4 no son necesarias para el montaje.
Sólo sirven para enrollar el Termoscud® y llevarlo recogido cuando hace
calor.
Notas
Notes !
TERMOSCUD - R198X
®6
MODELE DEPOSE
Modelo patentado
SYSTEME GONFLABLE ANTI-FLOTTEMENT
▪ Les chambres à air gonflables rendent les extrémités letérales du
tablier rigides et annulent le flottement qui se produit aux grandes
vitesses.
▪ Après le gonflage des chambres à air, serrez le petit tuyau pour
empêcher la sortie d’air et fermez avec le bouchon.
DISPOSITIVO HINCHABLE ANTIFLANEO
▪ Las fundas Termoscud® para faldones disponen de un dispositivo
hinchable antiflaneo patentado que evita el flaneo de la funda
cuando se circula a gran velocidad.
▪ Apriete el tubo mientras coloca el tapón de la válvula.
TERMOSCUD - R198X
®7
F
DÉTAILS
E
DETALLES
T
A
R
G
A
:
A
B
3
7
6
5
4
5100
4
1
2
5
6
3
4
1 Le tablier Termoscud® est doté d’un
plastron avec une bandoulière à déclenchement de sécurité.
2 Dans la bonne saison, on peut enrouler le tablier Termo-
scud® (avec la fourrure à l’intérieur et, si nécessaire,
dégonfler les chambres à air S.G.A.S.) et le fixer au bouclier
de protection, en utilisant les sangles vertes et jaunes n° 4.
3 S’asseoir sur les sangles n°5 pour bien les tendre et
mieux couvrir les hanches, pour une meilleure protection aux
basses températures.
4 Marquez le numéro de votre plaque d’immatriculation à
l’aide d’un marqueur indélébile sur l’emplacement spécialem-
ent prévu. C’est un bon système de dissuasion contre le vol.
5 Couvre-selle élastique et imperméable. Vous n’avez qu’à
le bloquer sous la selle en stationnement.
6 Le tablier Termoscud® est livré avec des autocollants
transparents servant à protéger la carrosserie contre l’usure
sur les points critiques. Ils sont amovibles et ne laissent
aucune marque de colle. Attention: il faut toujours que les
sangles soit bien tendues et la carrosserie propre afin d’éviter
les rayures.
7 Pour laver Termoscud® à la fin de la saison, utilizer une
ésponge humide, puis le faire bien sécher avant de le ranger.
1 Protección del pecho con cinta de seguridad.
2 Cuando no llueva ni haga frío, enrolle el Termoscud®
(con el forro hacia dentro) y sujételo con las cintas 4
(verdes y amarillas). Si es necesario, desinfle las cámaras
de aire S.G.A.S.
3 Especialmente cuando hace frío, protéjase más sentándose
sobre las cintas 5.
4 Para disuadir a los ladrones escriba su número de
registro en el espacio facilitado.
5 Si deja la moto aparcada, puede extender una funda
impermeable y elástica sobre el asiento.
6 Dentro del envoltorio del Termoscud®, hay algunos
adhesivos transparentes que debe adherir al carenado para
proteger la pintura. Los adhesivos se pueden retirar y no
dejan rastro de pegamento. Si el Termoscud® no está bien
encajado o las cintas no están tensas, con el tiempo,
pueden producirse marcas en el carenado.
7 Para lavar el Termoscud® al final de la temporada, utilice
un paño húmedo y deje secar bien la funda antes de
guardarla.
E
F
step
F
Retirer la vis en plastique du Scrivet A. Intro-
duire ce qui reste dans l’orifice 6 à l’intérieur
du compartiment roue. Puis, fixer la bande 6 à
l’aide de la vis B.
Retire el tornillo de plástico del Scrivet A.
Introduzca lo que queda en el orificio 6 por
dentro del espacio de la rueda. Fije entonces la
correa 6 con el tornillo B.
E
F
Accrocher la ralonge Y à l’arriere de la carosserie sous la pédane. Fermer le fastex
du côté droit. Il est possible de tendre les sangles des du côtés (2).
Fije la extensión Y en el borde posterior de la carrocería debajo de la plataforma.
Cerrar el fastex en el lado derecho. Il es posible tensar las cintas de conexión de
ambos lados (2).
6
A
A
A
B
3
Y
2
mod. R198X
for
HONDA FORZA 125/300 > 2018
M
A
X
I
M
U
M
P
R
E
S
S
U
R
E
0
,
1
B
A
R
/
1
,
3
P
S
I

Other Tucano Urbano Motorcycle Accessories manuals

Tucano Urbano R044 TERMOSCUD User manual

Tucano Urbano

Tucano Urbano R044 TERMOSCUD User manual

Tucano Urbano R363 User manual

Tucano Urbano

Tucano Urbano R363 User manual

Tucano Urbano R363X User manual

Tucano Urbano

Tucano Urbano R363X User manual

Tucano Urbano TERMOSCUD R200X User manual

Tucano Urbano

Tucano Urbano TERMOSCUD R200X User manual

Tucano Urbano R367X User manual

Tucano Urbano

Tucano Urbano R367X User manual

Tucano Urbano R206X User manual

Tucano Urbano

Tucano Urbano R206X User manual

Tucano Urbano TERMOSCUD R192X User manual

Tucano Urbano

Tucano Urbano TERMOSCUD R192X User manual

Tucano Urbano TERMOSCUD-R204X User manual

Tucano Urbano

Tucano Urbano TERMOSCUD-R204X User manual

Tucano Urbano TERMOSCUD R184 User manual

Tucano Urbano

Tucano Urbano TERMOSCUD R184 User manual

Tucano Urbano TERMOSCUD R201X User manual

Tucano Urbano

Tucano Urbano TERMOSCUD R201X User manual

Tucano Urbano TERMOSCUD-R202X User manual

Tucano Urbano

Tucano Urbano TERMOSCUD-R202X User manual

Tucano Urbano TERMOSCUD PRO User manual

Tucano Urbano

Tucano Urbano TERMOSCUD PRO User manual

Tucano Urbano TERMOSCUD PRO Series User manual

Tucano Urbano

Tucano Urbano TERMOSCUD PRO Series User manual

Tucano Urbano R369X User manual

Tucano Urbano

Tucano Urbano R369X User manual

Tucano Urbano Termoscud PRO R187PRO User manual

Tucano Urbano

Tucano Urbano Termoscud PRO R187PRO User manual

Tucano Urbano Termoscud Pro User manual

Tucano Urbano

Tucano Urbano Termoscud Pro User manual

Tucano Urbano TERMOSCUD R224X User manual

Tucano Urbano

Tucano Urbano TERMOSCUD R224X User manual

Tucano Urbano TERMOSCUD R199 User manual

Tucano Urbano

Tucano Urbano TERMOSCUD R199 User manual

Tucano Urbano R235X User manual

Tucano Urbano

Tucano Urbano R235X User manual

Tucano Urbano TERMOSCUD - R232X User manual

Tucano Urbano

Tucano Urbano TERMOSCUD - R232X User manual

Popular Motorcycle Accessories manuals by other brands

Rosenbauer HEROS-smart User information

Rosenbauer

Rosenbauer HEROS-smart User information

Caberg HORUS manual

Caberg

Caberg HORUS manual

Sena 10C EVO quick start guide

Sena

Sena 10C EVO quick start guide

3M Speedglas 9100 MP User instructions

3M

3M Speedglas 9100 MP User instructions

probrake HO10-3 Mounting instruction

probrake

probrake HO10-3 Mounting instruction

PVP Communications Motor-One user manual

PVP Communications

PVP Communications Motor-One user manual

KTM Power Parts 60112020000 manual

KTM Power Parts

KTM Power Parts 60112020000 manual

BRP EXOME user guide

BRP

BRP EXOME user guide

Bagster BOOMERANG Fitting instructions

Bagster

Bagster BOOMERANG Fitting instructions

PUIG 9873 Mounting instructions

PUIG

PUIG 9873 Mounting instructions

hepco & becker 6507513 00 01 Mounting instructions

hepco & becker

hepco & becker 6507513 00 01 Mounting instructions

AGV Orbyt user manual

AGV

AGV Orbyt user manual

probrake AP11-1 Mounting instruction

probrake

probrake AP11-1 Mounting instruction

R&G LP0282 Fitting instructions

R&G

R&G LP0282 Fitting instructions

Denali LAH.07.11000 instruction manual

Denali

Denali LAH.07.11000 instruction manual

Triumph My Triumph Connectivity Owner's handbook

Triumph

Triumph My Triumph Connectivity Owner's handbook

BestRest Products R11 GS Series installation manual

BestRest Products

BestRest Products R11 GS Series installation manual

Memphis Shades 2321-0047 Mounting instructions

Memphis Shades

Memphis Shades 2321-0047 Mounting instructions

manuals.online logo
manuals.online logoBrands
  • About & Mission
  • Contact us
  • Privacy Policy
  • Terms and Conditions

Copyright 2025 Manuals.Online. All Rights Reserved.