Tune Spurtreu User manual

Anleitung |Tune Tool SPURTREU www.tune.de
Stand Januar 2017 Seite 1 von 4
Ab.2
Ab.1
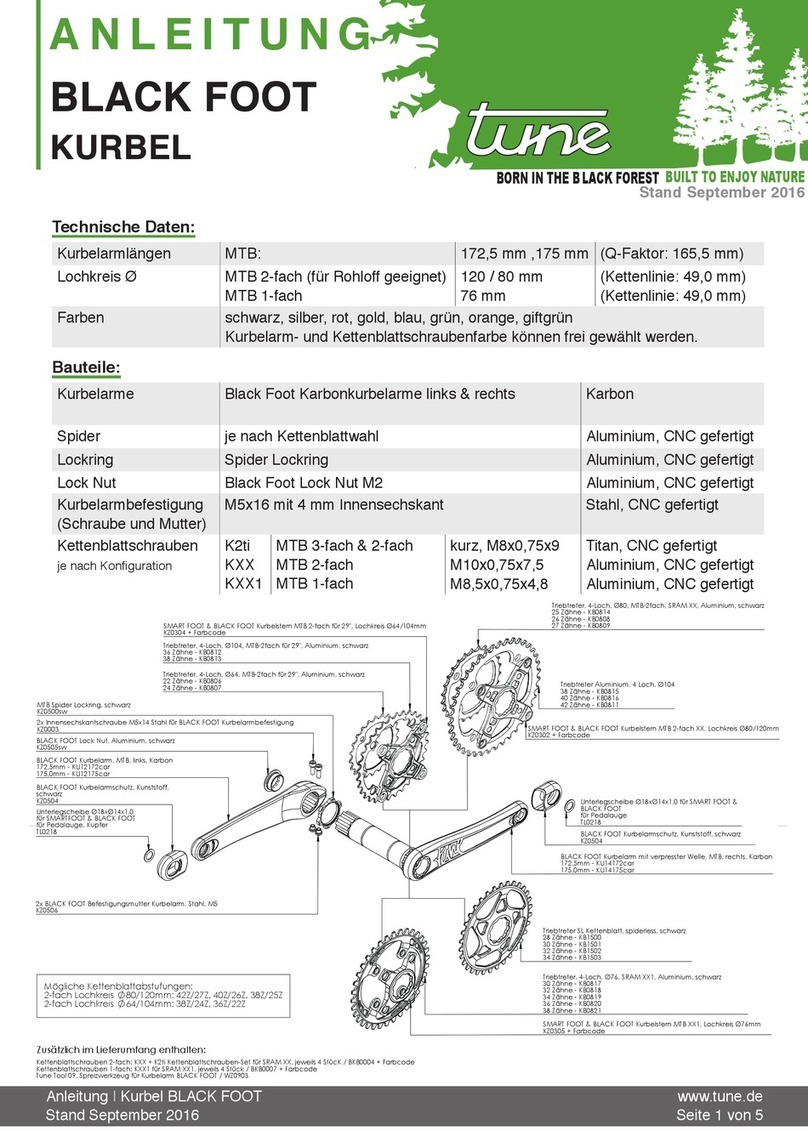
Wir gratulieren Dir zum Kauf Deines TUNE Produkts. Du hast eine gute Wahl getroffen.
TUNE Produkte werden nach dem höchsten Qualitätsstandard gefertigt.
Dennoch ist es notwendig, dass Du die folgenden Hinweise beachtest und Dein TUNE Produkt
gemäß diesen Angaben pegst. Bitte mache eventuelle Mitbenutzer mit dieser Anleitung vertraut.
Lieferumfang:
• Grundplatte TUNE Tool Spurtreu
• Laserpointer (Laserklasse 2M) mit drei 1,5V LR44 Knopfzellen
• Madenschraube M4 x 3
Wichtige Informationen zum Laserpointer:
Im Spurtreu Werkzeug ist ein Laserpointer der Laserklasse 2M verbaut. Blicken Sie nicht in den Laserstrahl!
Laserdaten: Wellenlänge: 625-660 nm
Max. Ausgangsleistung <5 mW
Laserklasse 2M
EN 60825-1:2007
Verwenden Sie das Spurtreu Werkzeug auf keinen Fall während der Fahrt!
Vorsicht! Das TUNE Tool Spurtreu wird von Werk aus mit einem optimal justierten Laserpointer ausgeliefert.
Allerdings kann sich die Position des Laserpointers in Bezug zur Grundplatte etwa durch den Batteriewechsel,
ein Herunterfallen des Spurtreus oder ein Lösen der Madenschraube ändern. Dadurch kann eine erneute Jus-
tage des Laserpointers nötig werden.
Von Zeit zu Zeit sollten sie überprüfen, ob der Laserpointer noch richtig justiert ist und gegebenenfalls eine
erneute Justage durchführen. Hierzu führen Sie bitte die Schritte die unter Justage des Laserpointers beschrie-
ben sind aus.
Verwendung:
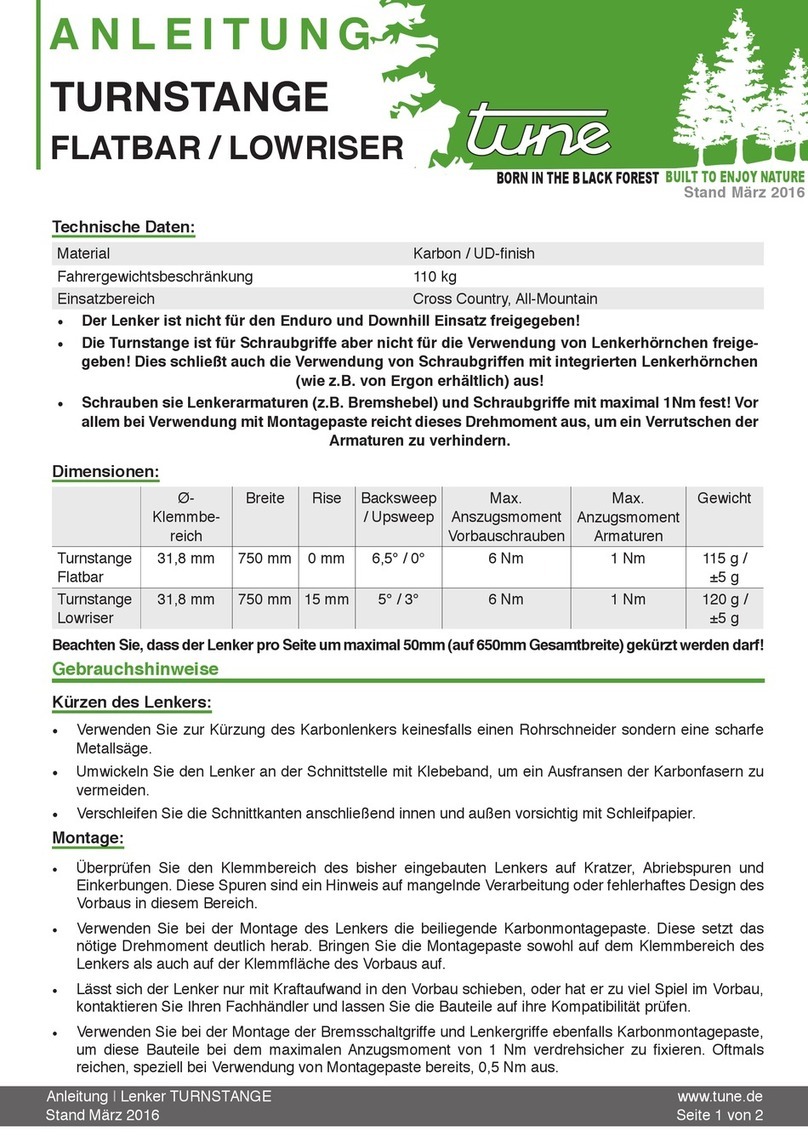
Mit dem TUNE Tool Spurtreu ist die genaue Ausrichtung des Vorbaus in Bezug zum Vorderrad möglich und somit
ein perfekter Geradeauslauf einstellbar.
2Setzen Sie das TUNE Tool Spurtreu auf Vorbau
und Lenker wie in Abbildung 2 dargestellt ist.
1Lösen Sie die Schrauben des Vorbaus an der
Gabelklemmung, damit das Verstellen der Vor-
bauposition ermöglicht wird (siehe Abbildung 1).
BUILT TO
ENJOY NATURE
BORN IN THE B LACK FOREST
Stand Januar 2017
ANLEITUNG
SPURTREU
TUNE TOOL

Anleitung |Tune Tool SPURTREU www.tune.de
Stand Januar 2017 Seite 2 von 4
Ab.6
Ab.8
Ab.7
Ab.5
Ab.4
Justage des Laserpointers:
Benötigte Werkzeuge / Hilfsmittel:
Ein Stück Karton, ein Filzstift, eine ebene Unterlage (etwa eine Tischäche), ein Lineal oder Geodreieck, ein 1,5
mm Inbusschlüssel.
Ab.3
2Legen Sie das TUNE Tool Spurtreu auf einer
Seite liegend, wie in Abbildung 7 dargestellt, im
Abstand von ungefähr 1 m zum markierten Kar-
ton auf die ebene Tischäche und richten Sie
den Laserpointer so aus, dass er auf den Karton
leuchtet.
1Zur Justage wird ein horizontaler Strich im
Abstand von 35 mm zur ebenen Tischäche
benötigt. Diesen können Sie etwa durch Anbrin-
gen eines Striches im Abstand von 35mm zu
einer Kante eines Kartons erzeugen (siehe
Abbildungen 5-6).
3Betätigen Sie den Laserpointer und drehen Sie
den Vorbau in diejenige Position, in der der
Laserpointer mittig auf den Vorderreifen leuchtet
(siehe Abbildung 3).
4Schrauben Sie die Klemmschrauben des
Vorbaus erneut fest (Beachten Sie hierbei die
angegebenen Drehmomente des Vorbau- und
Gabelschaftherstellers) und fertig ist die genaue
Ausrichtung ihres Vorbaus (siehe Abbildung 4)!
4
Zur genauen Kalibrierung aktivieren Sie den
Laserpointer und stellen Sie die Schrauben so
ein, dass der Laserpunkt genau auf dem einge-
zeichneten Strich liegt (siehe Abbildung 7).
Fertig!
3Mit den drei 3 Schrauben am Laserpointer kann
das TUNE Tool Spurtreu kalibriert werden (sie-
he Abbildung 8).

Manual |Tune Tool SPURTREU www.tune.de
As of January 2017 Pages 1 of 4
g.2
g.1
We congratulate you on purchasing your TUNE product. You made a good choice.
TUNE products are manufactured under highest quality standards in Germany.
Nonetheless it is necessary to follow these instructions and maintain your product
as told in this manual. Familiarize possible other users with this manual.
Content:
• baseplate TUNE Tool Spurtreu
• laser pointer (laser class 2M) with three 1,5V LR44 button cells
• setscrew M4 x 3
Important Informations:
• The Spurtreu Tool includes a laser pointer of laser class 2M.
• Never look directly into the light beam!
Specications of the laser: wavelength: 625-660 nm
max. output power <5 mW
laser class 2M
EN 60825-1:2007
Do not use the Spurtreu Tool while riding!
Caution! The laser pointer of the TUNE Tool Spurtreu is correctly adjusted at factory. Although the position of the
laser pointer in relation to the baseplate may change, e.g. due to battery change, falling or release of the set-
screw. Hereby a new alignment of the laser pointer may be necessary.
From time to time you should check whether the Spurtreu is still correctly aligned and make a new alignment if
necessary. Therefore follow these instructions given under Adjusting the Laser Pointer.
Application:
The TUNE Tool Spurtreu enables an exact alignment of the stem in relation to the front-wheel thus ensuring a stable
straight-ahead riding. 1Release the clamping bolts of your stem for the
steering tube, so that you can change the position
of the stem (see gure 1).
2Place the TUNE Tool Spurtreu on top of the stem
and handlebar as shown in gure 2.
BUILT TO
ENJOY NATURE
BORN IN THE B LACK FOREST
January 2017
MANUAL
SPURTREU
TUNE TOOL

Manual |Tune Tool SPURTREU www.tune.de
As of January 2017 Pages 2 of 4
g.6
g.8
g.6
g.5
Adjusting the Laser Pointer:
Needed Tools:
A piece of carton or similar, a felt-pen, a plane base (e.g. a table or a bench), a ruler and a 1,5mm allen key.
1For the alignment a horizontal line in a distance
of 35 mm to the plane base is needed. For ex-
ample a line, 35 mm above the edge of a carton
can be drew (see gure 5-6).
3Switch on the laser pointer and turn the stem
till the laser points centric on the front-tire (see
gure 3).
4
Tighten the stem-screws (pay attention to the
max. torque advised by the stem and fork
manufacturer) (see gure 4).
2Place the TUNE Tool Spurtreu on the plane
base in a distance of about 1m to the marked
carton, as shown in gure 7.
3With the 3 bolts at the laserpointer the TUNE
Tool Spurtreu can be calibrated.
4
For exact adjustment activate the laserpointer
and adjust the 3 bolts, till the laser points at the
marked line.
Now the laserpointer is ready.

Manual |Tune Tool SPURTREU www.tune.de
As of January 2017 Pages 3 of 4
Appendix (Extract from the operating instructions of the laser pointer):
Intended use:
For safety and approval purposes (CE), you must not rebuild and / or modify this product for purposes other than those described above,
the product may be damaged. In addition, improper use can cause hazards such as short circuiting, re, electric shock etc. Read the instruc-
tions carefully and keep them. Make this product available to third parties only together with this instructions.
Safety instructions:
Persons / Product:
• The product is not a toy. Keep it out of the reach of children and pets.
• Protect the product from extreme temperatures, direct sunlight, strong jolts, high humidity, moisture, ammable gas vapours
and solvents.
• Do not place the product under any mechanical stress.
• If it is no longer possible to operate the product safely, take it out of operation and protect it from any accidental use.
• Safe operation can no longer be guaranteed if the product is visibly damaged, is no longer working properly, has been stored
• for extended periods in poor ambient conditions or has been subjected to any serious transport- related stresses.
• Handle the product carefully. Jolts, impacts or a fall even from a low height can damage the product.
Laser:
• Laser beam must not be stared into or viewed directly with optical instruments.
• Laser beam must not be pointed on mirrors or other reecting areas.
• Laser beam must not be directed at other people or animals or into public areas. Laser radiation may lead to eye or skin in-
juries.
• This product is equipped with a class 3R laser according to EN 60825-1:2007.
• Caution: Operating the product or alternating its setting other than described herein could lead to hazardous radiation exp
sure.
•Batteries:
• Correct polarity must be observed while inserting the batteries.
• Batteries should be removed from the device if it is not used for a long period of time to avoid damage through leaking. Leaking
or damaged batteries might cause acid burns when in contact with skin, therefore use suitable protective gloves to handle
corrupted batteries.
• Batteries must be kept out of the reach of children. Do not leave the battery lying around, as there is risk, that children or pets
swallow it.
• All the batteries should be replaced at the same time. Mixing old and new batteries in the device can lead to battery leakage
and device damage.
• Batteries must not be dismantled, short-circuited or thrown into re. Never recharge non-rechargeable batteries. There is a
risk of explosion!
Miscellaneous:
• Consult an expert when in doubt about operation, safety or connection of the device
• Maintenance, modications and repairs are to be performed exclusively by an expert or at a qualied shop.
Operating elements:
Disposal of batteries / rechargeable batteries:
The user is legally obliged (battery regulation) to return used batteries and rechargeable batteries. Disposing used batteries in the household
waste is prohibited! Batteries / rechargeable batteries containing hazardous substances are marked with the crossed-out wheeled bin. The
symbol indicates that the product is forbidden to be disposed via domestic refuse. The chemical symbols for respective hazardous substances
are Cd=Cadmium, Hg=Mercury and Pb=Lead. You can return used batteries / rechargeable batteries free of charge to any collecting point of
your local authority or where batteries / rechargeable batteries are sold.
Consequently you comply with your legal obligations and contribute to environmental protection!
Technical Facts:
Operating voltage 3 x 1,5V / DC LR44 button cell
Laser beam distance 100 m
Laser output max. <5 mW
Emitted wavelength 625-660 nm
Laser class 2M
Operating temperature +15 bis +35°C
Table of contents
Languages:
Other Tune Bicycle Accessories manuals

Tune
Tune RH1 User manual

Tune
Tune SKYRACER User manual

Tune
Tune VERHUTERLI User manual

Tune
Tune CARBON BRAKE SHOES User manual

Tune
Tune MIG70 User manual

Tune
Tune TURNSTANGE User manual

Tune
Tune Seatpost clamp User manual

Tune
Tune BLACK FOOT User manual

Tune
Tune SPEEDNEEDLE User manual

Tune
Tune TURNSTANGE WUNDERBAR User manual
Popular Bicycle Accessories manuals by other brands

Specialized
Specialized Elite CylcoComputer user manual

Sigma
Sigma BC 16.16 manual

Playcore
Playcore Dero Setbacks installation instructions

VDO Cyclecomputing
VDO Cyclecomputing x3dw instruction manual

Cateye
Cateye RAPID X2 manual

buratti meccanica
buratti meccanica Clorofilla Trail Use and maintenance manual