manuals.online logo
Brands
  1. Home
  2. •
  3. Brands
  4. •
  5. Tyco
  6. •
  7. Security Camera
  8. •
  9. Tyco Illustra Standard V Series User manual

Tyco Illustra Standard V Series User manual

Package
Overview
Installation
1
2
3
4
① Loosen the nut from the main element.
② Run the network cable (without RJ 45 connector) through the
both elements. Then crimp the cable with RJ 45 connector.
③ Connect the cable to the hermetic connector. Then tighten the
nut and the main cover.
Warning and Caution
■ If the product does not work properly, please contact your dealer
or the nearest service center. Never attempt to disassemble the
camera yourself. (We shall not be responsible for any problems
caused by unauthorized repair or maintenance.)
■ Do not allow water or liquid intrusion into the camera.
■ In the use of the product, you must be strict compliance with the
electrical safety regulations of the nation and region. When the
product is mounted on wall or ceiling, the device shall be firmly
fixed.
■ Do not use camera beyond specified voltage range.
■ Do not drop the camera or subject it to physical shock.
■ Avoid touching the camera lens.
■ If cleaning is necessary, please use clean cloth to wipe it gently.
If the device will not be used for a long time, please cover the lens
cap to protect the device from dirt.
■ Do not aim the camera at the sun or extra bright place.
■ Do not place the camera in extremely hot, cold (the operating
temperature shall be -30˚C~60˚C), dusty or damp locations, and do
not expose it to high electromagnetic radiation.
■ To avoid heat accumulation, good ventilation is required for
operating environment.
Camera Quick start guide
CD Plastic plug ×4
Drill template
CVBS&DC
IN cables
Screwdriver
4 tapping screws PA4×25
1 machine screw PWM3×5
●
Alarm Input: Join the grounding ends of the sensor and the camera
and then connect the signal cable of the sensor to the alarm input
port of the camera.
Alarm Output: Loosen the screws in the alarm output port. Then
insert the signal wires of the alarm output devices into the port of
COM and OPEN separately. Finally tighten the screws. Some of the
external alarm output devices need the power supply.
● Connecting Network Cable
Alarm Connection
■ Please read this instruction carefully before using the product
and keep it for further reference.
■ All the examples and pictures used here are for reference only.
■ The contents of this manual are subject to change without
notice.
2
13
7
8
9
10
11
1 Ethernet Connector *
2 Audio Input (MIC)
3 Audio Output (HP)
4 CVBS Video Output
5 Alarm Input/Output
6 Power Connector *
7 Reset
8 DC IN&CVBS Interface
9 Zoom -
10 Zoom +
11 Micro SD Card Slot
* 1
* 2 This series can be powered by AC24VDC 12V/PoE power supply. If the PoE
switch is used to power the camera, AC24V/DC12V power supply is not required.
* 3 AC24V power supply is not available for ISV-B05M023-N/ISV-B05M024S-N/
JSV05-B02-OI01.
It is recommended to install the security cap for outdoor installation.
1
3
4
5
6
2
ALARM
4 3 2 1
Security cap
1--ALM-COM
2--ALM-OPEN
3--ALM-INA
4--ALM-GND
DC12V
ALARM
4 3 2 1
Illustra Standard Series
Bullet Camera
Quick Start Guide
V
MENU
IPC
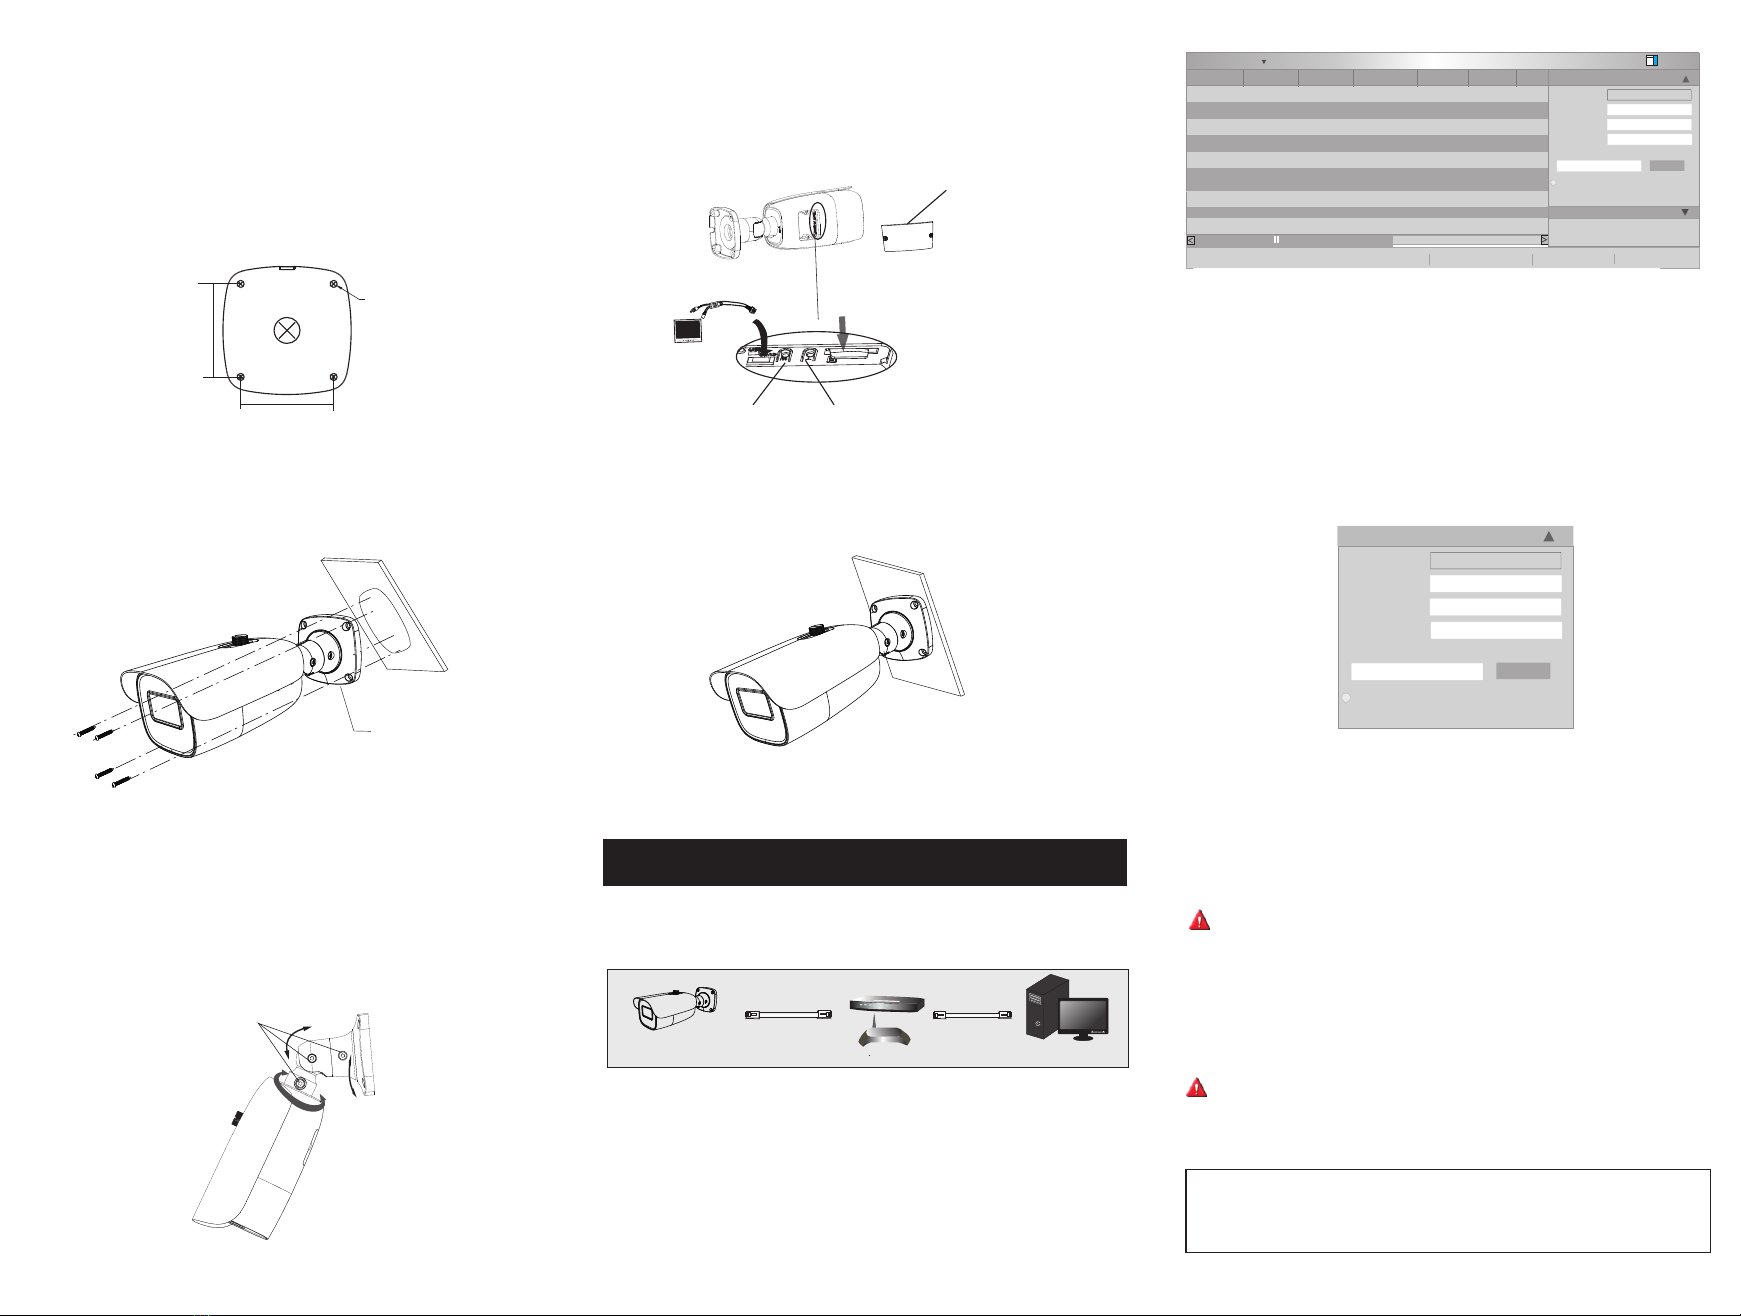
Network Cable Network Cable
Switch
Router Computer
Network Connection
5
Mounting Base
Insert a micro
SD card
④ Bracket adjustment. Before adjustment, preview the image of the
camera on a monitor (See the left figure of step ⑤) and then loosen the
fixed screws to adjust the view angle of the camera. After that, tighten
the fixed screws.
64.6mm
64.6mm
∅5
② Route the cables and connect the relevant cables.
③ Fasten the mounting base to the wall with the screws provided.
Fixed Screws
Pan 360°
Tilt 90°
Rotate
360°
Zoom+
Zoom-
Monitor
⑥
screws. ( )
Install the cover back to the camera and fix it with the firmly
Note that the cover should not be installed unevenly.
Please make sure that the wall or ceiling is strong enough to
withstand 3 times the weight of the camera. Please install the camera
in the dry environment. You'd better install back the cover
of the camera less than 4 hours after removing it.
① Drill the screw holes and the cable hole (if you want to route
through the ceiling) on the wall or ceiling according to the drill
template.
Cover
⑤
and then insert a micro SD card. After that,
to obtain an optimum image. Before adjustment, view the image of
the camera on a monitor.
Open the cover of the camera as shown in the following figure
press the T or W button
● Access the camera through TycoIPTool
① Make sure that the camera and the PC are well connected to the
LAN.
② Find the TycoIPTool from the CD and then install it in the
computer. After that, run the TycoIPTool as shown below.
③ Modify the IP address. The default IP address of this camera is
192.168.1.168. Click the information of the camera listed in the
above table to show the network information on the right hand.
Modify the IP address and gateway of the camera and make sure its
network address is in the same local network segment as that of the
computer. Please modify the IP address of your device according
to the practical situation.
About
Immediate Refresh
Device Name
name
name
name
IPC
IPC
IPC
xxx
xxx
xxx
192.168.1.168
192.168.1.2
192.168.1.3
80
80
80
9008
9008
9008
255.255.
255.255.
255.255.
Device Type
Product Model
IP Address Http Port Data Port Subnet Modify Network Parameter
Mac Address
IP Address
Subnet Mask
Gateway
Modify
CE :98 :23 :75 :35 :22
192 .168 . 1 . 168
255 . 255 . 255 . 0
192 .168 . 1 . 1
Tip: Enter the administrator p assword, and
then modify the network parameters.
Restore IPC Default Configuration
Total Device: 3
Local IP Address :192.168.1.4Subnet Mask:255 .255.255.0 Gateway: 192.168.1.1DNS:210.21.196.6
i
For example, the IP address of your computer is 192.168.1.4. So the
IP address of the camera shall be changed to 192.168.1.X and the
gateway shall be changed to 192.168.1.1. After modification, please
enter the password of the administrator and click “Modify” button to
modify the settings.
The default password of the administrator is “ ”.admin
④ Double-click the camera listed in the IP-Tool or manually enter the
IP address in the address bar of the web browser to connect IP-CAM.
Then follow directions to download and install the plugin.
⑤ Enter the username and password in the login interface.
The default username is admin; the default password is admin.
Mac Address
IP Address
Subnet Mask
Gateway
Modify
CE :98 :23 :75 :35 :22
192 .168 . 1 . 168
255 . 255 . 255 . 0
192 .168 . 1 . 1
Tip: Enter the administrator password, and
then modify the network parameters.
i
Modify Network Parameter
ISV-B05M023S-N
ISV-B02M014S-N
ISV-B02M023S-N
ISV-B02M013S-N
ISV-B02M024S-N
ISV-B05M024S-N
ISV-B02M015S-N
ISA-B02M015S-N
ISA-B04M015S-N
Available Models:
ISV-B04M015S-N

This manual suits for next models

10

Other Tyco Security Camera manuals

Tyco E Series User manual

Tyco

Tyco E Series User manual

Tyco Illustra Standard V Series User manual

Tyco

Tyco Illustra Standard V Series User manual

Tyco Illustra Pro IPS03CFOCWST User manual

Tyco

Tyco Illustra Pro IPS03CFOCWST User manual

Tyco Illustra Pro series User manual

Tyco

Tyco Illustra Pro series User manual

Tyco Illustra Essentials 1MP User manual

Tyco

Tyco Illustra Essentials 1MP User manual

Tyco Illustra Standard V Series User manual

Tyco

Tyco Illustra Standard V Series User manual

Tyco Illustra Standard Series User manual

Tyco

Tyco Illustra Standard Series User manual

Tyco IFS02-D12-ITA4 User manual

Tyco

Tyco IFS02-D12-ITA4 User manual

Tyco Illustra Standard E Series User manual

Tyco

Tyco Illustra Standard E Series User manual

Tyco Illustra Pro User manual

Tyco

Tyco Illustra Pro User manual

Tyco DSC-D114 User manual

Tyco

Tyco DSC-D114 User manual

Tyco Illustra Flex Gen 3 User manual

Tyco

Tyco Illustra Flex Gen 3 User manual

Tyco Illustra Standard E Series User manual

Tyco

Tyco Illustra Standard E Series User manual

Tyco American Dynamics Illustra 625 User manual

Tyco

Tyco American Dynamics Illustra 625 User manual

Popular Security Camera manuals by other brands

Panasonic WV-BF320 operating instructions

Panasonic

Panasonic WV-BF320 operating instructions

Amcrest IP3M-941 quick start guide

Amcrest

Amcrest IP3M-941 quick start guide

ALC AWF51 SightHD user guide

ALC

ALC AWF51 SightHD user guide

Samsung SCC-B2315P user manual

Samsung

Samsung SCC-B2315P user manual

Siemens Solaris CCDS1415-ST Configuration manual

Siemens

Siemens Solaris CCDS1415-ST Configuration manual

EverFocus EZ180 User's manual and operation instructions

EverFocus

EverFocus EZ180 User's manual and operation instructions

VISUALINT VI-4300 installation guide

VISUALINT

VISUALINT VI-4300 installation guide

Idis DC-T3234HRX quick guide

Idis

Idis DC-T3234HRX quick guide

TBK TBK-PTZ6610IR Installation & user manual

TBK

TBK TBK-PTZ6610IR Installation & user manual

Videotec ULISSE MAXI instruction manual

Videotec

Videotec ULISSE MAXI instruction manual

VADDIO ZOOMSHOT WALLVIEW SR 999-6918-001 Installation and user guide

VADDIO

VADDIO ZOOMSHOT WALLVIEW SR 999-6918-001 Installation and user guide

System Q Zip IPCND705 quick start guide

System Q

System Q Zip IPCND705 quick start guide

AVer PTZ310 user manual

AVer

AVer PTZ310 user manual

TRENDnet TV-IP310PI Quick installation guide

TRENDnet

TRENDnet TV-IP310PI Quick installation guide

Samsung SCC-B9372P user manual

Samsung

Samsung SCC-B9372P user manual

Vitek VTC-C661 operating instructions

Vitek

Vitek VTC-C661 operating instructions

SUNBA 603-D25X 4G quick start guide

SUNBA

SUNBA 603-D25X 4G quick start guide

Dante DLI1971 Installation and operation manual

Dante

Dante DLI1971 Installation and operation manual

manuals.online logo
manuals.online logoBrands
  • About & Mission
  • Contact us
  • Privacy Policy
  • Terms and Conditions

Copyright 2025 Manuals.Online. All Rights Reserved.