manuals.online logo
Brands
  1. Home
  2. •
  3. Brands
  4. •
  5. Ultra Power
  6. •
  7. Batteries Charger
  8. •
  9. Ultra Power UP-S6 User manual

Ultra Power UP-S6 User manual

UP-S6 employs the circuit that features 6 totally independent but identical power
outputs which are powered 4.35W each. It is designed for charging single cell LiPo
and LiHV. Insert the battery lead to the right connector in each port, the charger can
charge 6 batteries at the same time. The charging current can be adjusted from 0.1-
1.0A and also support 5V, 2.1A USB charging. The charging status can be displayed
in digital segment LED Indicators.
Thank you for choosing Ultra Power UP-S6 Charger for charging 1S battery. This
unit is simple to use but its operation does require some knowledge on the part of
the user. Please read this entire operating manual completely and attentively before
using this product, as it covers a wide range of information on operating and safety.
INTRODUCTION
SPECIFICATION
FEATURES
CHARGE PROCEDURES(Connection and self-checking)
- 1 - - 2 -
UP-S6 INSTRUCTION MANUAL
LIPO/LIHV SMART CHARGER FOR 1S BATTERY
DC input voltage
Charge power
Charge current
Battery type
Battery cell count
Indication
Support battery port
Support USB charge port
Net weight
Dimension
9.0V-15.0V
Max. 4.35W x6, ±10%
(0.1-1.0A) x6, ±10%
LiPo/LiHV
1cell
LED light
Micro, MX, mCPX
5V/2.1A
70g
100x50x22mm
Six independent ports can be used at the same time
Three different kinds of battery connectors in each port
Six independent charging circuits
LED and audible sound indicate charging status
Adjustable charging current from 0.1-1.0A
USB port (5V/2.1A) for charging iPad, mobile phones, digital cameras, etc.
Maximum protection: battery reverse polarity protection, battery over voltage
protection and DC input voltage protection
1.Correctly connect with DC Input or battery input.
2. After powered on, UP-S6 will start self-checking. All six indicators will light on with
red and all LED segment display will light on as number 888.
3. All indicators will change the color from red to green and the LED segment display
will show voltage value of power input.
4. Check each channel, the indicators will light on one by one from channel 1 to
channel 6, If all check results ok, the 6 indicators will light off after self-checking
5. The LED segment display will show the setting current value. And UP-S6 is ready
to charge batteries.
6. The user can change the current setting and battery setting before battery
connected. Please refer to chapter “Charge Setting” with detailed process.
7. After setting done, the user can connect with 1s batteries. Once any channel
connected, UP-S6 will start to charging automatically with flashing red color
indicator. The flash frequence is different according to different battery types
(LiHV is faster than LiPo).
8. During charging, the display will show the battery type and battery voltage of each
working channel circularly.
9. Once any channel fully charged, the indicator of this channel will change to green
color and stop flashing.
DCInput
9-15V
DCOutput
5V/2.1A
MICRO
MX
mCPX
Segment LED Display
Button
LED Indicators
Battery
Sockets
- 3 - - 4 -
UP-S6 support current setting from 0.1A to 1.0A as below picture. This set
current value applies for all 6 channels. Short press the button to adjust the target
current value from 0.1A to 1.0A.
Short press button
UP-S6 support current setting and battery type setting. Short press button to activate
current setting mode and long press the button to activate battery type setting. Both
setting can be activated even during charging.
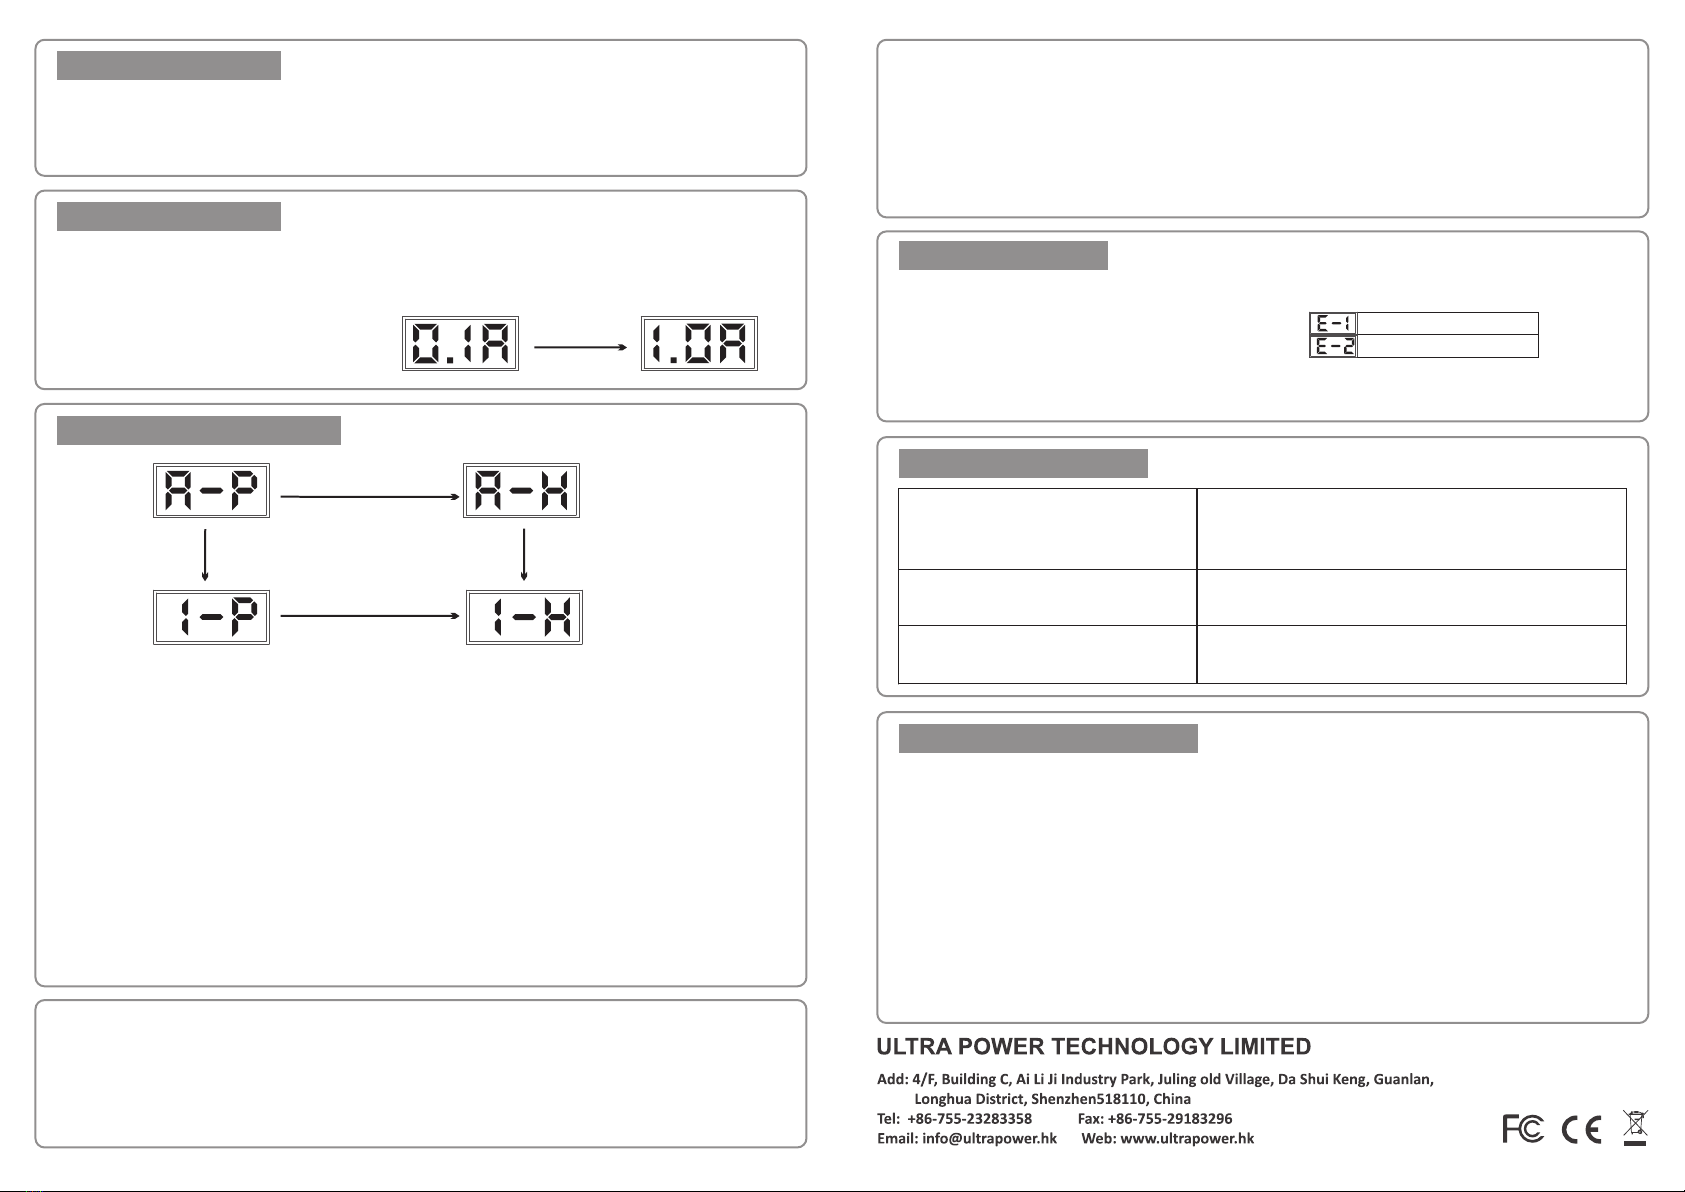
1. UP-S6 support both LiPo and LiHV battery, Long press (3 seconds) the button to
activate battery type setting as above pictures.
2.The LED segment display show default setting “A-P” which means battery type
setting mode activated.
3. The first letter (position “A”) in the display represents which channel is under
setting. It could be ” A”, “1”,”2”,”3”,”4”,”5”,”6”. “A” means all 6 channels will be set
together. “1”-“6” means specific channel under setting.
4.The last letter (position “P”) represent battery type. It will change between “P” and
“H”. “P” means LiPo and “H” means LiHV.
5. Short press button to change the first letter for different channels, Long press
button (3S) to change the last letter (battery type).
CHARGER SETTING
ERROR WARNING
SAFETY PROTECTION
CURRENT SETTING
BATTERY TYPE SETTING
If you want to charge specific channel one by one, short press the button to choose
the appropriate channel and the last letter on the display shows current setting of
chosen channel. You need to long press the button to change the battery type for this
channel. After one channel set, you can short press the button to set another
channel in next step.
If you want to change all 6 channels battery type together, just short press the
button to make the first letter shows “A”, then long press the button to choose the
appropriate battery type.
After all the setting done, wait for 3 seconds along with 2 beeps sound and the
indicators will blink one round to confirm all the settings recorded by UP-S6.
UP-S6 can record the last charging setting and recall it in next power on.
We guarantee this product to be free of manufacturing and assembly defects for a
period of one year from the time of purchase. The warranty only applies to material
or operational defects, which are present at the time of purchase. During that period,
we will repair or replace free of service charge for products deemed defective due to
those causes, For any repair or replace service, please contact your dealer in the
first instance, who is responsible for processing guarantee claims. This warranty is
not valid for any damage or subsequent damage arising as a result of misuse,
modification or as a result of failure to observe the procedures outlined in
this manual.
For the error “input voltage too low” and “input voltage too high”, the error code
shows on the display along with beep sound.
For the other errors, which belongs to specific channel, only flash indicator without
showing battery type and battery voltage on the display.
WARRANTYANDSERVICE
Note:
Short press button to activate
current setting mode and long
press the button to activate
battery type setting
Short press button,
change to below status
Long press button (3 seconds),
change to right side status
Input voltage too low protection
If DC input with battery and cell voltage lower
than 3.3V, UP-S6 will stop charging and make
reminder warning.
Polarity protection If the battery connected with wrong polarity,
UP-S6 can not start charging.
Over voltage protection if detect the battery over voltage, UP-S6 will
stop charging and keep flashing.
input voltage too high
input voltage too low

Other manuals for UP-S6

2

Other Ultra Power Batteries Charger manuals

Ultra Power UP300AC Touch User manual

Ultra Power

Ultra Power UP300AC Touch User manual

Ultra Power UP400AC Duo User manual

Ultra Power

Ultra Power UP400AC Duo User manual

Ultra Power B6 mini User manual

Ultra Power

Ultra Power B6 mini User manual

Ultra Power UP200AC DUO User manual

Ultra Power

Ultra Power UP200AC DUO User manual

Ultra Power UP600AC DUO User manual

Ultra Power

Ultra Power UP600AC DUO User manual

Ultra Power UP610 User manual

Ultra Power

Ultra Power UP610 User manual

Ultra Power UP1200AC PLUS User manual

Ultra Power

Ultra Power UP1200AC PLUS User manual

Ultra Power UP-S6 User manual

Ultra Power

Ultra Power UP-S6 User manual

Ultra Power UP1350W Touch User manual

Ultra Power

Ultra Power UP1350W Touch User manual

Ultra Power UP240AC DOU User manual

Ultra Power

Ultra Power UP240AC DOU User manual

Ultra Power UP1200+ User manual

Ultra Power

Ultra Power UP1200+ User manual

Ultra Power UP616 User manual

Ultra Power

Ultra Power UP616 User manual

Ultra Power UP1200AC PLUS User manual

Ultra Power

Ultra Power UP1200AC PLUS User manual

Ultra Power UP-S6 User manual

Ultra Power

Ultra Power UP-S6 User manual

Ultra Power UP-S4AC User manual

Ultra Power

Ultra Power UP-S4AC User manual

Ultra Power UP200 Duo User manual

Ultra Power

Ultra Power UP200 Duo User manual

Ultra Power UP240AC Plus User manual

Ultra Power

Ultra Power UP240AC Plus User manual

Ultra Power UP120AC DUO User manual

Ultra Power

Ultra Power UP120AC DUO User manual

Popular Batteries Charger manuals by other brands

eMotorWerks Juicebox Pro 32 manual

eMotorWerks

eMotorWerks Juicebox Pro 32 manual

betteries betterLink user manual

betteries

betteries betterLink user manual

unotec 31.0301.01.00 manual

unotec

unotec 31.0301.01.00 manual

Christie C2536D Installation and operating instructions

Christie

Christie C2536D Installation and operating instructions

Radio Shack 17-6025 owner's manual

Radio Shack

Radio Shack 17-6025 owner's manual

Braun 5301 manual

Braun

Braun 5301 manual

Cantec Systems CHFC-3 Installation and user manual

Cantec Systems

Cantec Systems CHFC-3 Installation and user manual

Furuno BC-6158 owner's manual

Furuno

Furuno BC-6158 owner's manual

Lindy 73329 user manual

Lindy

Lindy 73329 user manual

PowerBase 620674 instruction manual

PowerBase

PowerBase 620674 instruction manual

Milwaukee M18/M12 48-59-1807 Operator's manual

Milwaukee

Milwaukee M18/M12 48-59-1807 Operator's manual

Philips SCB7075CB/05 user manual

Philips

Philips SCB7075CB/05 user manual

Purkeys DIRECT PLUS Diagnostics guide

Purkeys

Purkeys DIRECT PLUS Diagnostics guide

Conrad Electronic Voltcraft Duo tech operating instructions

Conrad Electronic

Conrad Electronic Voltcraft Duo tech operating instructions

Black & Decker BM3B instruction manual

Black & Decker

Black & Decker BM3B instruction manual

Renesas ISL9241 Application note

Renesas

Renesas ISL9241 Application note

Hama 87060 operating instructions

Hama

Hama 87060 operating instructions

Powermat 2X owner's manual

Powermat

Powermat 2X owner's manual

manuals.online logo
manuals.online logoBrands
  • About & Mission
  • Contact us
  • Privacy Policy
  • Terms and Conditions

Copyright 2025 Manuals.Online. All Rights Reserved.