UltraPro 40958 User manual

READ IT OR WATCH IT
Read instructions or watch easy-to-follow video.
Scan QR code or visit http://bit.ly/2RBrvAl
40958
DAYSMART 7-DAY
INDOOR PLUG-IN TIMER
SETUP
1. If no numbers are visible on-screen, plug timer into an
outlet and charge for 1 hour. Once charged, press the
reset ( ) button in the lower-right corner using a
toothpick or pencil.
2. Press and hold set button ( ) for 3 seconds. Use up
( ) and down ( ) arrows to set current time, take
note of AM or PM time and press set button ( ).
3. “YEAR” will flash on the screen. Use ( ) to select
the current year and press set button ( ).
4. “MONT” will flash on the screen. Use ( ) to select
the current month and press set button ( ).
5. “DAY” will flash on the screen. Use ( ) to select
the current day and press set button ( ).
6. “ZONE” will flash on the screen. Use ( ) to select
current zone (see Figure 1). Zone is used to determine
sunrise/sunset times. Press set button ( ).
7. “DST” (daylight saving time) will flash on the screen. Use ( ) to select “ON” if
you would like the timer to automatically adjust for daylight saving time or “OFF”
if you would not like the timer to adjust automatically. Press set button ( ).
Note: Choose DST ON if your area observes daylight saving time. The timer will
automatically adjust backward and forward an hour. Choose DST OFF if your area
does not observe daylight saving time.
PROGRAMMING OPTIONS
Note: An illuminated LED beside a button indicates the program is active. To deactivate
program, press the button again and the LED will turn o. LED will illuminate when plugged in.
On time: Press ON TIME button and the clock will begin
flashing. Use arrows to set the desired on time ( )
and press set button ( ). Default is 6PM for all days. Days
of the week will flash on-screen. Use arrows ( ) to
select the correct day options and press set button ( ).
O time: Press OFF TIME button and the clock will begin
flashing. Select desired o time and press set button ( ).
Default is 10PM for all days. Days of the week will flash on-
screen. Use arrows ( ) to select the correct day options
and press set button ( ).
Sunset on: Press SUNSET ON button and the sunset time
will flash on the screen. Use arrows ( ) to adjust time
up to 1 hour in either direction and press set button ( ).
Days of the week will flash on-screen. Use arrows ( ) to
select the correct day options and press set button ( ).
Sunrise o: Press SUNRISE OFF button and the sunrise time
will flash on the screen. Use arrows ( ) to adjust time
up to 1 hour in either direction and press set button ( ).
Days of the week will flash on-screen. Use arrows ( ) to
select the correct day options and press set button ( ).
PRESET SCHEDULE
Evening - Sunset to 12AM: Press EVENING button and the
sunset time will flash on the screen. Use arrows ( ) to
adjust time up to 1 hour in either direction and press set
button ( ). Days of the week will flash on the screen. Use
arrows ( ) to select the correct day options and press
set ( ).
EXTRA PROGRAMS
This option oers seven additional ON/OFF programs. Press
EXTRA PROGRAMS button, “ON 1” will flash on-screen and
“--:--” displays. Press set button ( ) to select program “ON 1”
and the “--:--” will flash on-screen. Use arrows ( ) to select
time and press set button ( ). Days of the week will flash on-
screen. Use arrows ( ) to select the desired days of the
week and press set button ( ). Program ON 1 is now set. To
create more schedules, use the arrows ( ) and press set
button ( ) on the next program. Repeat these steps to program OFF 1, ON 2, OFF 2, etc.
To skip through without setting, stop pressing buttons and the display will revert to clock
mode after 10 seconds or press set button ( ). You can also use the arrows ( ) to scroll
through the options without setting a time. After program OFF 7, the menu starts over with
program ON 1. The LED indicator light will remain on if any of the additional programs are set.
To delete one of the extra programs, use arrows ( ) to choose the program and press
set button ( ). Use arrows ( ) to scroll time to between 11:59PM and 12:00AM. The
display will show “--:--” to confirm the program has been deleted. No additional steps are
needed. The display will revert back to clock mode after 10 seconds or when the set button
( ) is pressed.
Note: When program on is set to “--:--,” “DELE” flashes to confirm program has been deleted.
DAYS OF THE WEEK OPTIONS ORDER
Days of the week options will display in the following order when using the up ( )
arrow unless you are using the settings in extra programs. In this case, they will begin
with the last on time set.
ON/OFF OVERRIDE BUTTON
Using ON/OFF override with no scheduled programs:
- If the device is o, press & release the ON/OFF override to
turn the device on.
- If the device is on, press & release the ON/OFF override to
turn the device o.
Using the ON/OFF override with scheduled programs:
- If a scheduled program is running and the device is on,
press & release the ON/OFF override to turn the device
o. It will remain o until the next scheduled program
turns the device on.
-
If a scheduled program is running and the device is o, press
& release the ON/OFF override to turn the device on. It
will remain on until the next scheduled program turns the
device o.
10:10
CLOCK SET
SUNSET
ON
SUNRISE
OFF
OFF TIME
R
ON TIME
EXTRA
PROGRAMS
EVENING
- 12AM
NORTH
ALASKA
HAWAII
NORTH
CENTRAL
CENTRAL
SOUTH
SOUTH
FIGURE 1
M thru Su — all days of the week
M thru F
Sa, Su
Su thru Th
F, Sa
Su thru Sa — each day of the week separately
10:10
CLOCK SET
SUNSET
ON
SUNRISE
OFF
OFF TIME
ON TIME
EXTRA
PROGRAMS
EVENING
- 12AM
RRESET
BUTTON
10:10
CLOCK SET
SUNSET
ON
SUNRISE
OFF
OFF TIME
R
ON TIME
EXTRA
PROGRAMS
EVENING
- 12AM
10:10
CLOCK SET
SUNSET
ON
SUNRISE
OFF
OFF TIME
ON TIME
EXTRA
PROGRAMS
EVENING
- 12AM
R
10:10
CLOCK SET
SUNSET
ON
SUNRISE
OFF
ON TIME
EXTRA
PROGRAMS
EVENING
- 12AM
OFF TIME
R
10:10
CLOCK SET
SUNRISE
OFF
OFF TIME
ON TIME
EXTRA
PROGRAMS
EVENING
- 12AM
SUNSET
ON
R
10:10
CLOCK SET
OFF TIMEON TIME
EXTRA
PROGRAMS
EVENING
- 12AM
SUNSET
ON
SUNRISE
OFF
R
10:10
CLOCK SET
SUNRISE
OFF
OFF TIME
ON TIME
EXTRA
PROGRAMS
EVENING
- 12AM
SUNSET
ON
R
10:10
CLOCK SET
SUNSET
ON
SUNRISE
OFF
OFF TIME
R
ON TIME
EXTRA
PROGRAMS
EVENING
- 12AM
ON/OFF
OVERRIDE
BUTTON

Supplier Declaration of Conformity | Model #: 40958 | Jasco Products Co.,
10 E. Memorial Rd., Oklahoma City, OK 73114, www.byjasco.com
This device complies with Part 15 of the FCC and Industry Canada license-exempt RSS
standards. Operation is subject to the following two conditions: (1) this device may not
cause harmful interference, and (2) this device must accept any interference received,
including interference that may cause undesired operation.
FCC NOTE: The manufacturer is not responsible for any radio or TV interference
caused by unauthorized modifications to this equipment. Such modifications could
void the user’s authority to operate the equipment.
NOTE: This equipment has been tested and found to comply with the limits for a Class
B digital device, pursuant to Part 15 of the FCC Rules. These limits are designed to
provide reasonable protection against harmful interference in a residential installation.
This equipment generates, uses and can radiate radio frequency energy, and if not
installed and used in accordance with the instructions, may cause harmful interference
to radio communications. However, there is no guarantee interference will not occur
in a particular installation. If this equipment does cause harmful interference to radio
or television reception, which can be determined by turning the equipment off and
on, the user is encouraged to try to correct the interference by one or more of the
following measures:
— Reorient or relocate the receiving antenna.
— Increase the separation between the equipment and receiver.
— Connect the equipment into an outlet on a circuit different from which the receiver
is connected.
— Consult the dealer or an experienced radio/TV technician for help.
CAN ICES-3(B)/NMB-3(B)
125V 50/60Hz
15A 1875W General/Resistive
10A 1250W Tungsten
1/2HP
Works with LED, CFL, incandescent and halogen bulbs
FCC/IC - EN
SPECIFICATIONS
RISK OF ELECTRICAL
SHOCK
•PLUG DIRECTLY INTO AN
ELECTRICAL OUTLET
•DO NOT USE IN WET
LOCATIONS
•USE INDOORS ONLY
•UNPLUG TIMER BEFORE
CLEANING
•KEEP CHILDREN AWAY
RISK OF FIRE
•DO NOT USE TO CONTROL
APPLIANCES THAT
CONTAIN HEATING
ELEMENTS (COOKING
APPLIANCES, HEATERS,
IRONS, ETC.)
•DO NOT EXCEED
ELECTRICAL RATINGS
WARNING
MADE IN CHINA/HECHO EN CHINA
Distributed by Jasco Products Company LLC, 10 E. Memorial Rd., Oklahoma City, OK 73114.
This Jasco product comes with a 2-year warranty. Visit www.byjasco.com for
warranty details.
Questions? Contact our U.S.-based Consumer Care at 1-800-654-8483 between
7AM—8PM M-F, Central Time.
©JASCO 2020 | 40958 | 07/30/20 v2

40958
TEMPORIZADOR DE 7 DÍAS
INTELIGENTE ENCHUFABLE PARA
INTERIORES
CONFIGURACIÓN
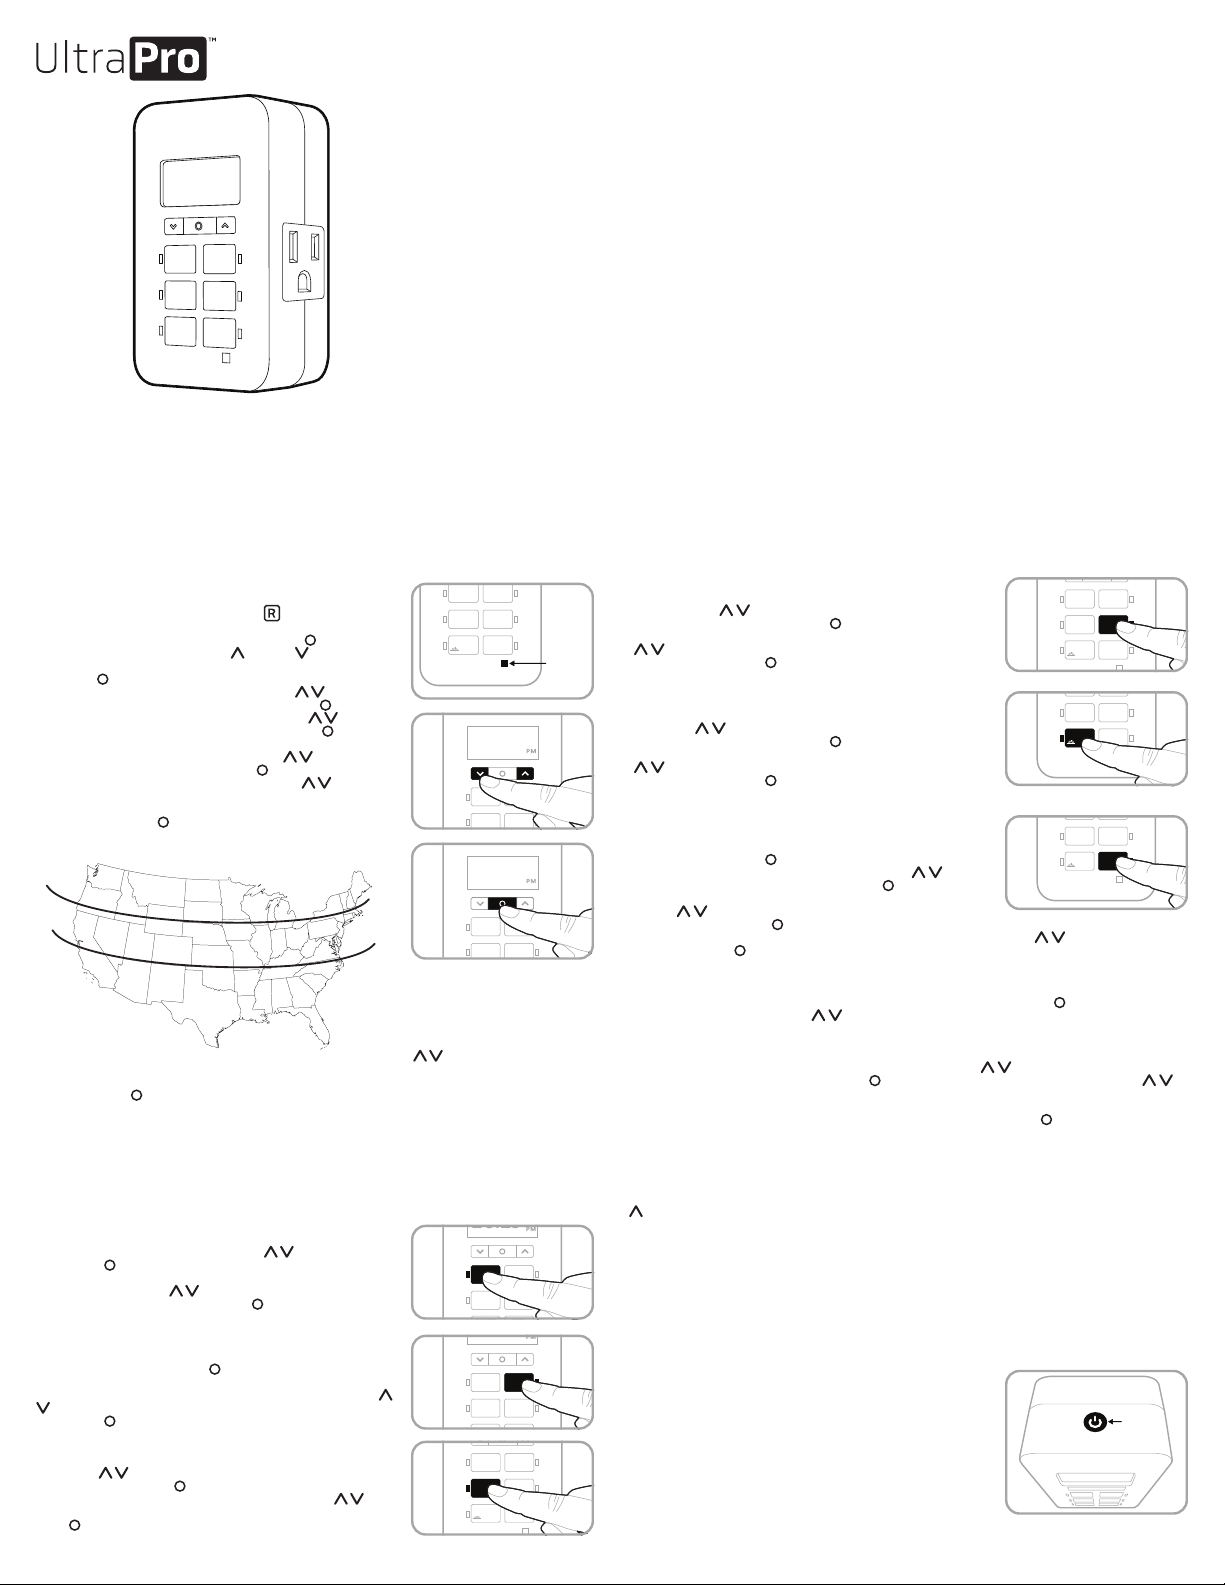
1. Si no aparecen números en la pantalla, enchufe el temporizador en
un tomacorriente y deje que se cargue durante una hora. Una vez
cargado, presione el botón restablecer ( ) que se encuentra en la
esquina inferior derecha con un lápiz o un mondadientes.
2. Mantenga oprimido el botón “set” (configurar) ( ) durante 3
segundos. Use las flechas arriba ( ) y abajo ( ) para programar
la hora actual (tenga en cuenta si es AM o PM) y presione el botón
“set” ( ) (programar).
3. En la pantalla parpadeará “YEAR” (año). Use ( ) para
seleccionar el año actual y presione el botón “set” ( ) (configurar).
4. En la pantalla parpadeará “MONTH” (mes). Use ( ) para
seleccionar el mes actual y presione el botón “set” ( )
(configurar).
5. En la pantalla parpadeará “DAY” (día). Use ( ) para seleccionar
el día actual y presione el botón “set” ( ) (configurar).
En la pantalla parpadeará “ZONE” (zona). Use ( ) para
seleccionar la zona actual (ver Figura 1). Zone (zona) se usa para
determinar los horarios del amanecer/anochecer. Presione el botón
“set” (configurar) ( ).
6. “DST” (Cambio de horario de verano) parpadeará en la pantalla. Use ( ) para seleccionar “ON”
(encendido) si desea que el temporizador se ajuste automáticamente al horario de verano, o bien
“OFF” (apagado) si no desea que el temporizador se ajuste automáticamente. Presione el botón ‘set’
(configurar) ( ).
Nota: Elija DST ON (activado) si en su área local se aplica el horario de verano. El temporizador se
ajustará automáticamente una hora hacia atrás o hacia adelante. Elija DST OFF (desactivado) si en su
área local no se aplica el horario de verano.
OPCIONES DE PROGRAMACIÓN
Nota: una luz LED de un botón iluminada indica que el programa está activo. Para desactivar el
programa, oprima el botón otra vez y la luz LED se apagará. La luz LED se iluminará una vez que esté
enchufada.
Hora de encendido: presione el botón “ON TIME” (hora de
encendido) y el reloj comenzará a parpadear. Use las flechas para
programar la hora de encendido deseada ( ) y presione el
botón “set” ( ) (configurar). La hora predeterminada es 6 p.m. para
todos los días. Los días de la semana comenzarán a parpadear en la
pantalla. Use las flechas ( ) para seleccionar las opciones de los
días correctos y presione el botón “set” ( ) (configurar).
Hora de apagado: presione el botón “OFF TIME” (hora de apagado)
y el reloj comenzará a parpadear. Establezca la hora de apagado que
desee y presione el botón “set” ( ) (configurar). La hora
predeterminada es las 10 p.m. para todos los días. Los días de la
semana comenzarán a parpadear en la pantalla. Use las flechas (
) para seleccionar las opciones de los días correctos y presione el
botón “set” ( ).
Encender al anochecer: presione el botón “SUNSET ON” (encender
al anochecer) y la hora del anochecer parpadeará en la pantalla. Use
las flechas ( ) para ajustar hasta una hora en cualquier dirección
y presione el botón “set” ( ) (configurar). Los días de la semana
comenzarán a parpadear en la pantalla. Use las flechas ( ) para
seleccionar las opciones de los días correctos y presione el botón
“set” ( ).
Apagar al amanecer: presione el botón “SUNRISE OFF” (apagar
al amanecer) y la hora del amanecer parpadeará en la pantalla.
Use las flechas ( ) para ajustar hasta una hora en cualquier
dirección y presione el botón “set” ( ) (configurar). Los días de
la semana comenzarán a parpadear en la pantalla. Use las flechas
( ) para seleccionar las opciones de los días correctos y
presione el botón “set” ( ).
HORARIOS PROGRAMADOS
Noche - Anochecer hasta las 12 a.m.: oprima el botón EVENING
(noche) y la hora del anochecer parpadeará en la pantalla. Use
las flechas ( ) para ajustar hasta una hora en cualquier
dirección y presione el botón “set” ( ) (configurar). Los días de
la semana comenzarán a parpadear en la pantalla. Use las flechas
( ) para seleccionar las opciones de los días correctos y
presione el botón “set” ( ).
PROGRAMAS ADICIONALES
Esta opción ofrece siete programas adicionales de encendido/
apagado. Presione el botón “EXTRA PROGRAMS” (programas
adicionales); en la pantalla parpadeará “ON1” y aparecerá “--:--.”
Presione el botón “set” ( ) para seleccionar el programa “ON 1”
y “--:--” parpadeará en la pantalla. Use las flechas ( ) para
seleccionar la hora y presione el botón “set” ( ) (configurar). Los
días de la semana comenzarán a parpadear en la pantalla. Use las
flechas ( ) para seleccionar los días de la semana que desee
y presione el botón “set”( ) (configurar). El programa ON1 ha
quedado configurado. Para pasar al siguiente programa, use las flechas ( ) y presione el botón
“set” (configurar) ( ) en el siguiente programa. Repita estos pasos para el programa OFF1, el
programa ON2, el programa OFF2, etc.
Para saltarse hasta el final sin configurar ninguno, deje de presionar los botones y la pantalla
volverá al modo de reloj después de 10segundos o presione el botón “set” ( ) (configurar).
También puede usar las flechas ( ) para desplazarse por las opciones sin programar una hora.
Después del programa OFF7, el menú comenzará de nuevo con el programa ON1. La luz LED
permanecerá encendida si se configura cualquiera de los programas adicionales.
Para borrar uno de los programas adicionales, use las flechas ( ) para seleccionar el programa
que desea borrar y presione el botón “set” para seleccionar el programa. Use las flechas ( )
para desplazar las horas entre las 11:59 p. m. y las 12:00 a. m. En la pantalla aparecerá “--:--“ para
confirmar que se ha eliminado el programa. No hace falta hacer nada más. La pantalla volverá al
modo reloj después de 10 segundos o cuando se presione el botón “set” ( ).
Nota: Cuando el programa de encendido esté configurado para las “--:--,” “DELE” parpadea para
confirmar que el programa ha sido borrado.
ORDEN DE LAS OPCIONES DE LOS DÍAS DE LA SEMANA
Las opciones de días de la semana se mostrarán en el orden siguiente al usar la flecha hacia arriba (
), a menos que esté utilizando las configuraciones de “extra programs” (programas adicionales).
En este caso, comenzarán con la última “ON TIME” (hora de encendido) que se haya configurado.
BOTÓN DE CONTROL MANUAL DE ENCENDIDO Y APAGADO
Usar el control manual de ENCENDIDO Y APAGADO sin programas configurados:
- Si el dispositivo está apagado, presione y suelte el control manual de ENCENDIDO Y APAGADO
para encenderlo.
- Si el dispositivo está encendido, presione y suelte el control
manual de ENCENDIDO Y APAGADO para apagarlo.
Usar el control manual de ENCENDIDO Y APAGADO con
programas configurados:
- Si un programa configurado está funcionando y el dispositivo
está encendido, presione y suelte el control manual de
ENCENDIDO Y APAGADO para apagar el temporizador.
Permanecerá apagado hasta que el programa configurado lo
encienda.
- Si un programa configurado está funcionando y el temporizador
está apagado, presione y suelte el control manual de
ENCENDIDO Y APAGADO para encender el temporizador.
Permanecerá encendido hasta que el programa configurado
lo apague.
10:10
CLOCK SET
SUNSET
ON
SUNRISE
OFF
OFF TIME
R
ON TIME
EXTRA
PROGRAMS
EVENING
- 12AM
NORTE
ALASKA
HAWÁI
NORTE
CENTRAL
CENTRAL
SUR
SUR
FIGURA 1
M a Su (lunes a domingo) -
todos los días de la semana
M a F (lunes a viernes)
Sa (SÁBADO), Su (DOMINGO)
Su thru Th (domingo a jueves)
F (VIERNES), Sa (SÁBADO)
Su thru Sat (domingo a sábado) - cada día
de la semana por separado
10:10
CLOCK SET
SUNSET
ON
SUNRISE
OFF
OFF TIME
R
ON TIME
EXTRA
PROGRAMS
EVENING
- 12AM
10:10
CLOCK SET
SUNSET
ON
SUNRISE
OFF
OFF TIME
ON TIME
EXTRA
PROGRAMS
EVENING
- 12AM
R
10:10
CLOCK SET
SUNSET
ON
SUNRISE
OFF
ON TIME
EXTRA
PROGRAMS
EVENING
- 12AM
OFF TIME
R
10:10
CLOCK SET
SUNRISE
OFF
OFF TIME
ON TIME
EXTRA
PROGRAMS
EVENING
- 12AM
SUNSET
ON
R
10:10
CLOCK SET
OFF TIMEON TIME
EXTRA
PROGRAMS
EVENING
- 12AM
SUNSET
ON
SUNRISE
OFF
R
10:10
CLOCK SET
SUNRISE
OFF
OFF TIME
ON TIME
EXTRA
PROGRAMS
EVENING
- 12AM
SUNSET
ON
R
10:10
CLOCK SET
SUNSET
ON
SUNRISE
OFF
OFF TIME
R
ON TIME
EXTRA
PROGRAMS
EVENING
- 12AM
CONTROL
MANUAL DE
ENCENDIDO
Y APAGADO
10:10
CLOCK SET
SUNSET
ON
SUNRISE
OFF
OFF TIME
ON TIME
EXTRA
PROGRAMS
EVENING
- 12AM
R
BOTÓN DE
RESTABLECER

Declaración de conformidad del proveedor | Modelo #: 45959 | Jasco Products Co.,
10 E. Memorial Rd., Oklahoma City, OK 73114, www.byjasco.com
Este dispositivo cumple con las especificaciones del apartado15 de las normas de laFCC
y con las especificaciones de las normas radioeléctricas (RSS) del Ministerio de Industria
de Canadá aplicables a aparatos exentos de licencia. El funcionamiento está sujeto a las
siguientes dos condiciones: (1) este dispositivo no debe provocar interferencia perjudicial, y
(2) este dispositivo debe aceptar toda interferencia que reciba, incluso la que pudiera causar
un funcionamiento no deseado.
NOTA DE LAFCC: El fabricante no se hace responsable de ninguna interferencia de radio
oTV ocasionada por modificaciones no autorizadas efectuadas a este dispositivo. Dichas
modificaciones podrían anular la autoridad del usuario para utilizar este dispositivo.
NOTA: Este equipo ha sido probado y cumple con los límites para aparatos digitales de Clase
B de conformidad con el apartado 15 de la normativa de la FCC. Estos límites están diseñados
para proveer protección razonable contra interferencias perjudiciales en instalaciones
residenciales. Este dispositivo genera, usa y puede irradiar energía de radiofrecuencias y,
si no se instala y usa según las instrucciones, puede provocar interferencia perjudicial a las
radiocomunicaciones. No obstante, no hay garantías de que no ocurrirá interferencia en una
instalación en particular. Si este equipo genera alguna interferencia perjudicial a la recepción
de radio o televisión, lo que puede determinarse encendiendo y apagando el equipo, se
recomienda que el usuario intente corregir la interferencia aplicando una o más de las
siguientes medidas:
— Reoriente o reubique la antena receptora.
— Incremente la separación entre el equipo y el receptor.
— Conecte el dispositivo a un tomacorriente de un circuito diferente del circuito al que el
receptor está conectado.
— Consulte al distribuidor o a un técnico con experiencia en radio/televisión para solicitar
asistencia.
CAN ICES-3(B)/NMB-3(B)
125V~50/60Hz
15A 1875W Fines generales/carga resistiva
10A 1250W Tungsteno
1/2HP
Funciona con bombillas atenuables LED, CFL, incandescentes e halógenas.
FCC/IC - ESP
ESPECIFICACIONES
RIESGO DE DESCARGA
ELÉCTRICA
•ENCHÚFELO
DIRECTAMENTE A
UN TOMACORRIENTE
ELÉCTRICO
•NO UTILIZAR EN LUGARES
HÚMEDOS.
•SOLO PARA USO EN
INTERIORES.
•DESCONECTE EL
TEMPORIZADOR ANTES DE
LIMPIAR
•MANTENER FUERA DEL
ALCANCE DE LOS NIÑOS.
RIESGO DE INCENDIO
•NO UTILICE PARA
CONTROLAR APARATOS
QUE INCLUYAN
RESISTENCIAS
ELÉCTRICAS (APARATOS
DE COCCIÓN,
CALEFACTORES,
PLANCHAS, ETC.)
•NO SUPERAR LOS
VALORES NOMINALES
ELÉCTRICOS.
ADVERTENCIA
MADE IN CHINA/HECHO EN CHINA
Distribuido por Jasco Products Company LLC,
10 E Memorial Rd., Oklahoma City, Oklahoma 73114.
Este producto de Jasco tiene una garantía de por vida limitada. Visite www.byjasco.com
para conocer los detalles de la garantía.
¿Preguntas? Comuníquese al 1-800-654-8483 entre las 7AM y las 8PM CST (hora
central estándar).
Other manuals for 40958
1
Table of contents
Languages:
Other UltraPro Timer manuals

UltraPro
UltraPro 41081 User manual

UltraPro
UltraPro 41092 User manual

UltraPro
UltraPro 40955 User manual

UltraPro
UltraPro 40958 User manual

UltraPro
UltraPro 45959 User manual

UltraPro
UltraPro 54850 User manual

UltraPro
UltraPro 45184 User manual

UltraPro
UltraPro 45184 User manual

UltraPro
UltraPro DAYSMART 7-DAY User manual

UltraPro
UltraPro 40955 User manual