45959
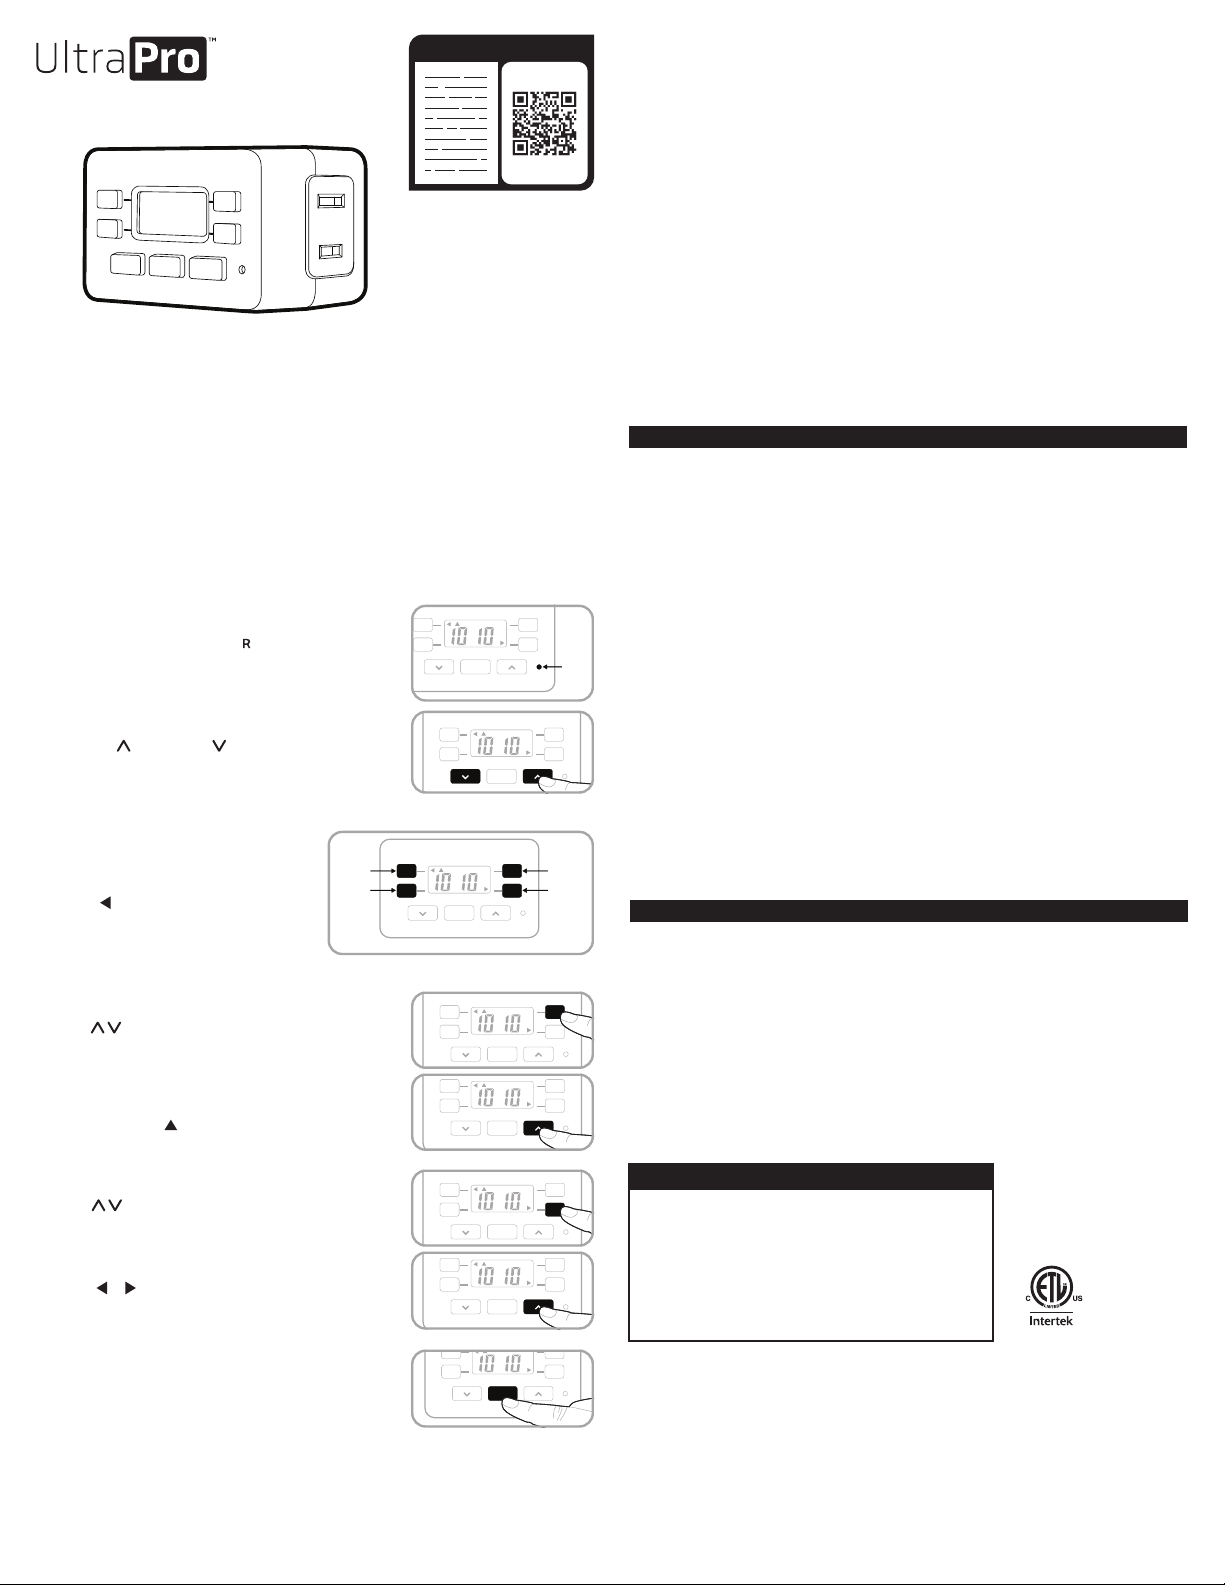
TEMPORIZADOR DIGITAL
ENCHUFABLE CON UN
TOMACORRIENTE
CONFIGURACIÓN
1. Si los números son difíciles de leer o no aparecen en la
pantalla, enchufe el temporizador en un tomacorriente y
deje que se cargue durante una hora. Una vez cargado,
presione el botón restablecer ( ) que se encuentra en la
esquina inferior derecha con un lápiz o mondadientes.
Nota: Cuando el temporizador esté cargado, se puede
desenchufar del tomacorriente para programarlo con
facilidad. Volver a enchufarlo al tomacorriente al finalizar.
Nota: al restablecer el temporizador, la hora se encenderá
en forma intermitente.
2. Use las flechas arriba ( ) y abajo ( ) para programar
la hora actual. Tenga en cuenta si es AM o PM.
OPCIONES DE PROGRAMACIÓN
TEMPORIZADOR PREDETERMINADO
Hay dos horas de ENCENDIDO/APAGADO disponibles con
horas predeterminadas y preestablecidas. Para activar las horas
predeterminadas, solo presione el botón
HORA DE ENCENDIDO o el botón HORA DE
APAGADO a fin de que la flecha ( ) junto al
botón aparezca en la pantalla. Para desactivar el
temporizador predeterminado, presione y suelte
el botón. La flecha junto a él desaparecerá.
TEMPORIZADOR PERSONALIZADO
Hora de encendido: presione y suelte cualquiera
de los botones HORA DE ENCENDIDO para
abrir el modo de configuración personalizada. La
hora de encendido predeterminada parpadea. Use los botones de flecha ( ) para establecer la
hora encendido deseada. Presione el botón HORA DE ENCENDIDO o espere 5 segundos para que se
establezca. Si no se presiona ningún botón durante
5 segundos, se establecerá el temporizador predeterminado y la pantalla regresará al modo reloj.
Si programa la hora de encendido antes de la hora actual, no se encenderá hasta el próximo día a la
hora programada.
Nota: El indicador de modo ( ) se desplazará por
PROGRAMAR mientras se configura la hora, luego regresará a
RELOJ si se acaba el tiempo o finaliza la programación de la
hora de encendido.
Hora de apagado: presione y suelte cualquiera de los botones
HORA DE APAGADO para abrir el modo de configuración
personalizada. La hora de apagado predeterminada parpadea.
Use los botones de flecha ( ) para establecer la hora de
apagado deseada. Si no se presiona ningún botón durante
5 segundos, se establecerá el temporizador predeterminado y
la pantalla regresará al modo reloj. Presione el botón HORA DE
APAGADO o espere 5 segundos para que se establezca.
Nota: Cuando se establece una hora de encendido o apagado,
el indicador del programa activo ( o ) aparecerá en la
pantalla debajo del botón. Los programas pueden activarse de
forma individual o simultánea.
BOTÓN DE CONTROL MANUAL DE ENCENDIDO Y APAGADO
Usar el control manual de ENCENDIDO Y APAGADO sin
programas configurados:
- Si el temporizador está apagado, presione y suelte
el control manual de ENCENDIDO Y APAGADO
para encenderlo.
- Si el temporizador está encendido, presione y suelte
el control manual de ENCENDIDO Y APAGADO
para apagarlo.
Usar el control manual de ENCENDIDO Y APAGADO con
programas configurados:
- Si un programa configurado está funcionando y el
temporizador está encendido, presione y suelte el control
manual de ENCENDIDO Y APAGADO para apagar
el temporizador. Permanecerá apagado hasta que el
programa configurado lo encienda.
- Si un programa configurado está funcionando y el temporizador está apagado,
presione y suelte el control manual de ENCENDIDO Y APAGADO para encender el temporizador.
Permanecerá encendido hasta que el programa configurado lo apague.
Declaración de conformidad del proveedor | Modelo #: 45959 | Jasco
Products Co., 10 E. Memorial Rd., Oklahoma City, OK 73114,
www.byjasco.com
Este dispositivo cumple con las especificaciones del apartado15 de las normas de laFCC
y con las especificaciones de las normas radioeléctricas (RSS) del Ministerio de Industria
de Canadá aplicables a aparatos exentos de licencia. El funcionamiento está sujeto a las
siguientes dos condiciones: (1) este dispositivo no debe provocar interferencia perjudicial, y
(2) este dispositivo debe aceptar toda interferencia que reciba, incluso la que pudiera causar
un funcionamiento
no deseado.
NOTA DE LAFCC: El fabricante no se hace responsable de ninguna interferencia de radio
oTV ocasionada por modificaciones no autorizadas efectuadas a este dispositivo.
Dichas modificaciones podrían anular la autoridad del usuario para utilizar este dispositivo.
NOTA: Este equipo ha sido probado y cumple con los límites para aparatos digitales
de Clase B, de conformidad con el apartado 15 de la normativa de la FCC. Estos límites
están diseñados para proveer protección razonable contra interferencias perjudiciales en
instalaciones residenciales.
Este dispositivo genera, usa y puede irradiar energía de radiofrecuencias y, si no se
instala y usa según las instrucciones, puede provocar interferencia perjudicial a las
radiocomunicaciones.
No obstante, no hay garantías de que no ocurrirá interferencia en una instalación en
particular.
Si este equipo genera alguna interferencia perjudicial a la recepción de radio o televisión, lo
que puede determinarse encendiendo y apagando el equipo, se recomienda que el usuario
intente corregir la interferencia aplicando una o más de las siguientes medidas:
— Reoriente o reubique la antena receptora.
— Incrementar la separación entre el equipo y el receptor.
— Conectar el dispositivo a un tomacorriente de un circuito diferente del circuito al que el
receptor está conectado.
— Consulte al distribuidor o a un técnico con experiencia en radio/televisión para
solicitar asistencia.
CAN ICES-3(B)/NMB-3(B)
125VAC, 60Hz
15A 1875W general/resistiva
5A 625W tungsteno
Motor de 1/2 HP
Funciona con bombillas atenuables LED y CFL
FCC/IC - ESP
ESPECIFICACIONES
AM
CLOCK
ON
TIME
ON
TIME
OFF
TIME
OFF
TIME
ON/OFF
R
SET
BOTÓN DE
RESTABLECER
AM
CLOCK
ON
TIME
ON
TIME
OFF
TIME
OFF
TIME
ON/OFF
R
SET
RIESGO DE DESCARGA
ELÉCTRICA
•ENCHÚFELO DIRECTAMENTE
A UN TOMACORRIENTE
ELÉCTRICO
•NO UTILIZAR EN LUGARES
HÚMEDOS.
•SOLO PARA USO EN
INTERIORES.
•DESCONECTE EL
TEMPORIZADOR ANTES DE
LIMPIAR
RIESGO DE INCENDIO
•NO UTILICE PARA
CONTROLAR APARATOS QUE
INCLUYAN RESISTENCIAS
ELÉCTRICAS (APARATOS DE
COCCIÓN, CALEFACTORES,
PLANCHAS, ETC.)
•NO SUPERAR LOS
VALORES NOMINALES
ELÉCTRICOS.
ADVERTENCIA
AM
CLOCK
ON
TIME
ON
TIME
OFF
TIME
OFF
TIME
ON/OFF
R
SET
6:00PM
6:00AM
5:00PM
HORA DE
ENCENDIDO 1
HORA DE
APAGADO 1
HORA DE
ENCENDIDO 2
HORA DE
ENCENDIDO 2
12:00AM
AM
CLOCK
ON
TIME
ON
TIME
OFF
TIME
OFF
TIME
ON/OFF
R
SET
AM
CLOCK
ON
TIME
ON
TIME
OFF
TIME
OFF
TIME
ON/OFF
R
SET
AM
CLOCK
ON
TIME
ON
TIME
OFF
TIME
OFF
TIME
ON/OFF
R
SET
AM
CLOCK
ON
TIME
ON
TIME
OFF
TIME
OFF
TIME
ON/OFF
R
SET
AM
CLOCK
ON
TIME
ON
TIME
OFF
TIME
OFF
TIME
ON/OFF
R
SET
MADE IN CHINA/HECHO EN CHINA
Distribuido por Jasco Products Company LLC,
10 E Memorial Rd., Oklahoma City, Oklahoma 73114.
Este producto de Jasco tiene una garantía de por vida limitada. Visite www.byjasco.com
para conocer los detalles de la garantía.
¿Preguntas? Comuníquese al 1-800-654-8483 entre las 7AM y las 8PM CST (hora
central estándar).
©JASCO 2020 | 45959 | 05/27/20 v3