Uni-ram UG4000D User manual

REV 2019-02
UG4000 SERIES:
UG4000D, UG4000E, UG4500E, UG4000FS
AUTOMATIC SPRAY GUN CLEANERS
WWW.UNIRAM.COM
CORPORATION
••381 Bentley Street, Markham ON L3R 9T2
• Tel. 1-800-417-9133
USER
MANUAL

2
MANUAL - UG4000 SERIES SPRAY GUN CLEANERS REVISED 2019-02
INTRODUCTION
Uni-ram holds many patents on designs used in its innovative products. Every machine is tested
for compliance with Quality Assurance standards. Follow the directions in this manual under Setup,
Operation and Maintenance in order to operate this machine safely and effectively. Not following these
instruction can lead to malfunction or damage to the machine. Ensure that the manual is readily available
for the operator at all times. If you have any questions about the operation of this machine, call Uni-Ram
Service Engineer at 1-800-417- 9133.
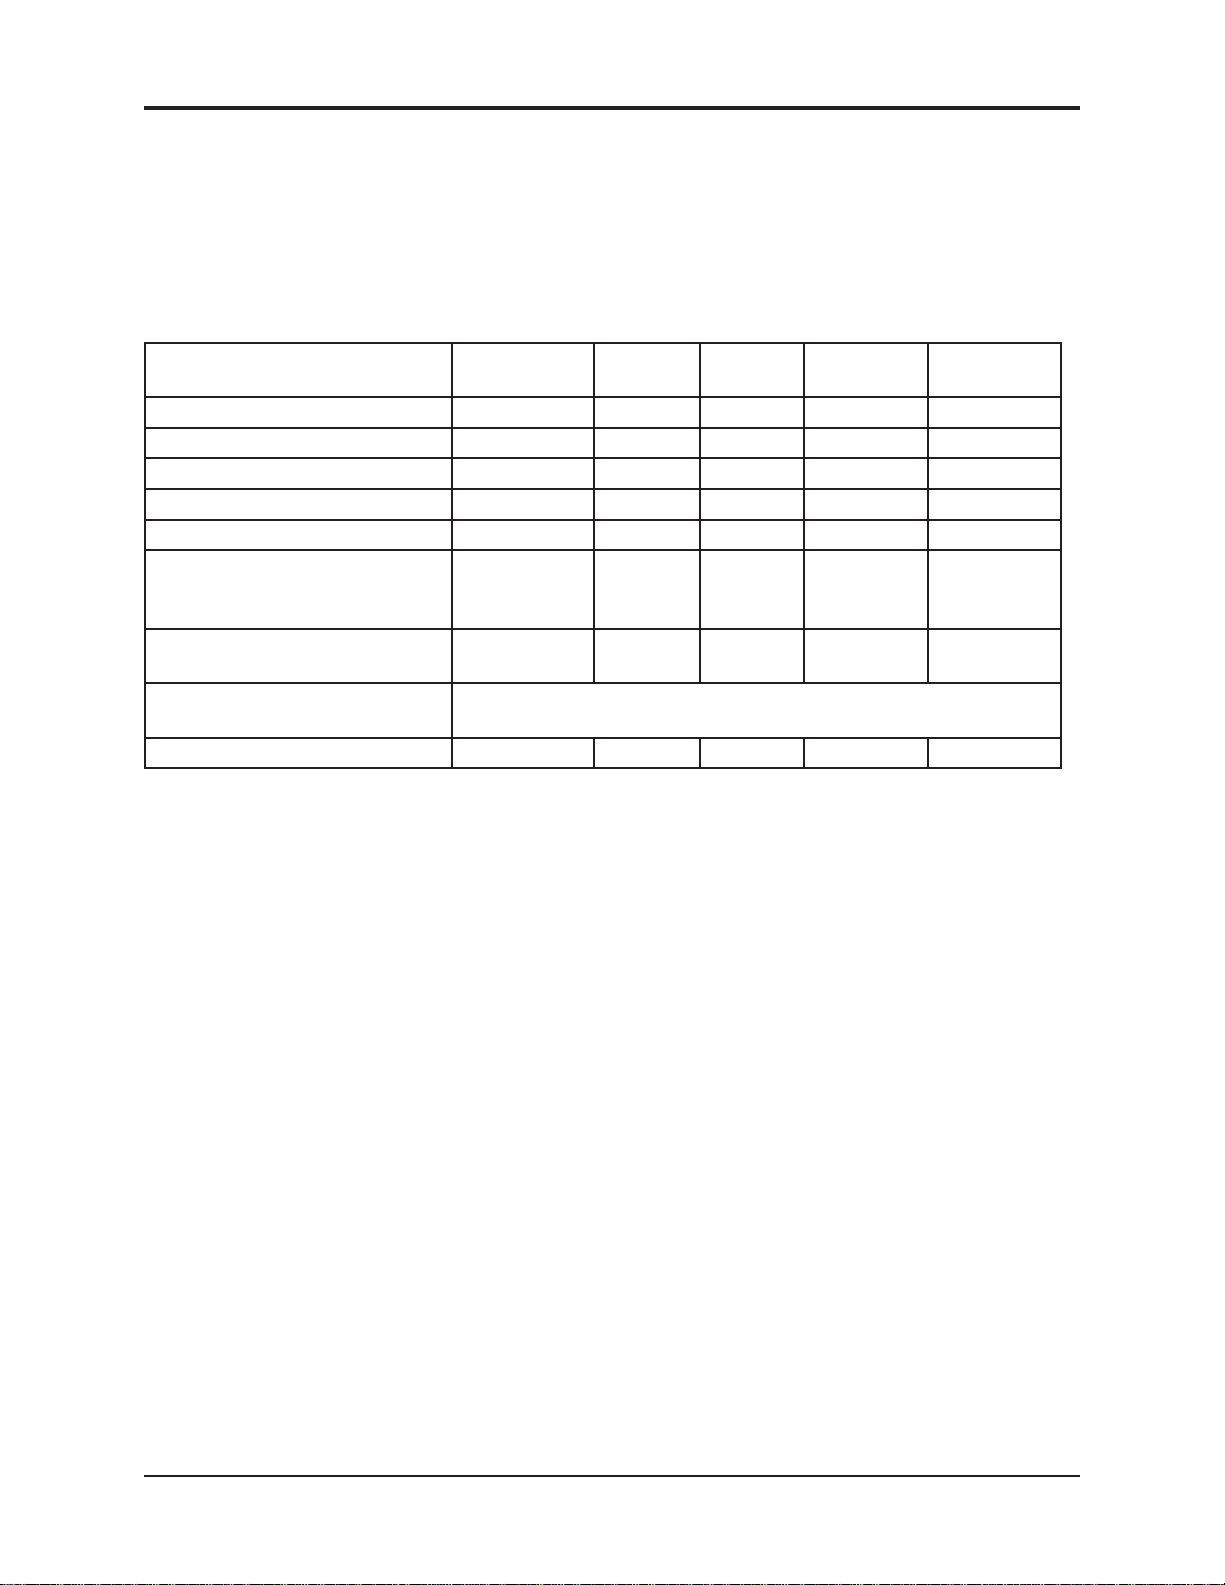
MODEL UG4000D UG4000E UG4500E UG4000FS UG4000DVM
HOSE CLEANING YES
MANUAL WASH SPIGOT
MANUAL RINSE WITH SPIGOT YES
COMBO READY YES YES YES
WASH SOLVENT PAIL INCL INCL INCL INCL INC
RINSE SOLVENT PAIL REQUIRED,
NOT IN-
CLUDED INCL INCL INCL REQUIRED,
NOT IN-
CLUDED
OVERFLOW TUBE AND RISER NOT RE-
QUIRED INCL NOT RE-
QUIRED
SHIPPING SIZE (WDH) 28 X 17 X 45 inches
71 X 43 X 114 cm
SHIPPING WEIGHT (LB / KG) 90 / 41 90 / 41 90 / 41 90 / 41
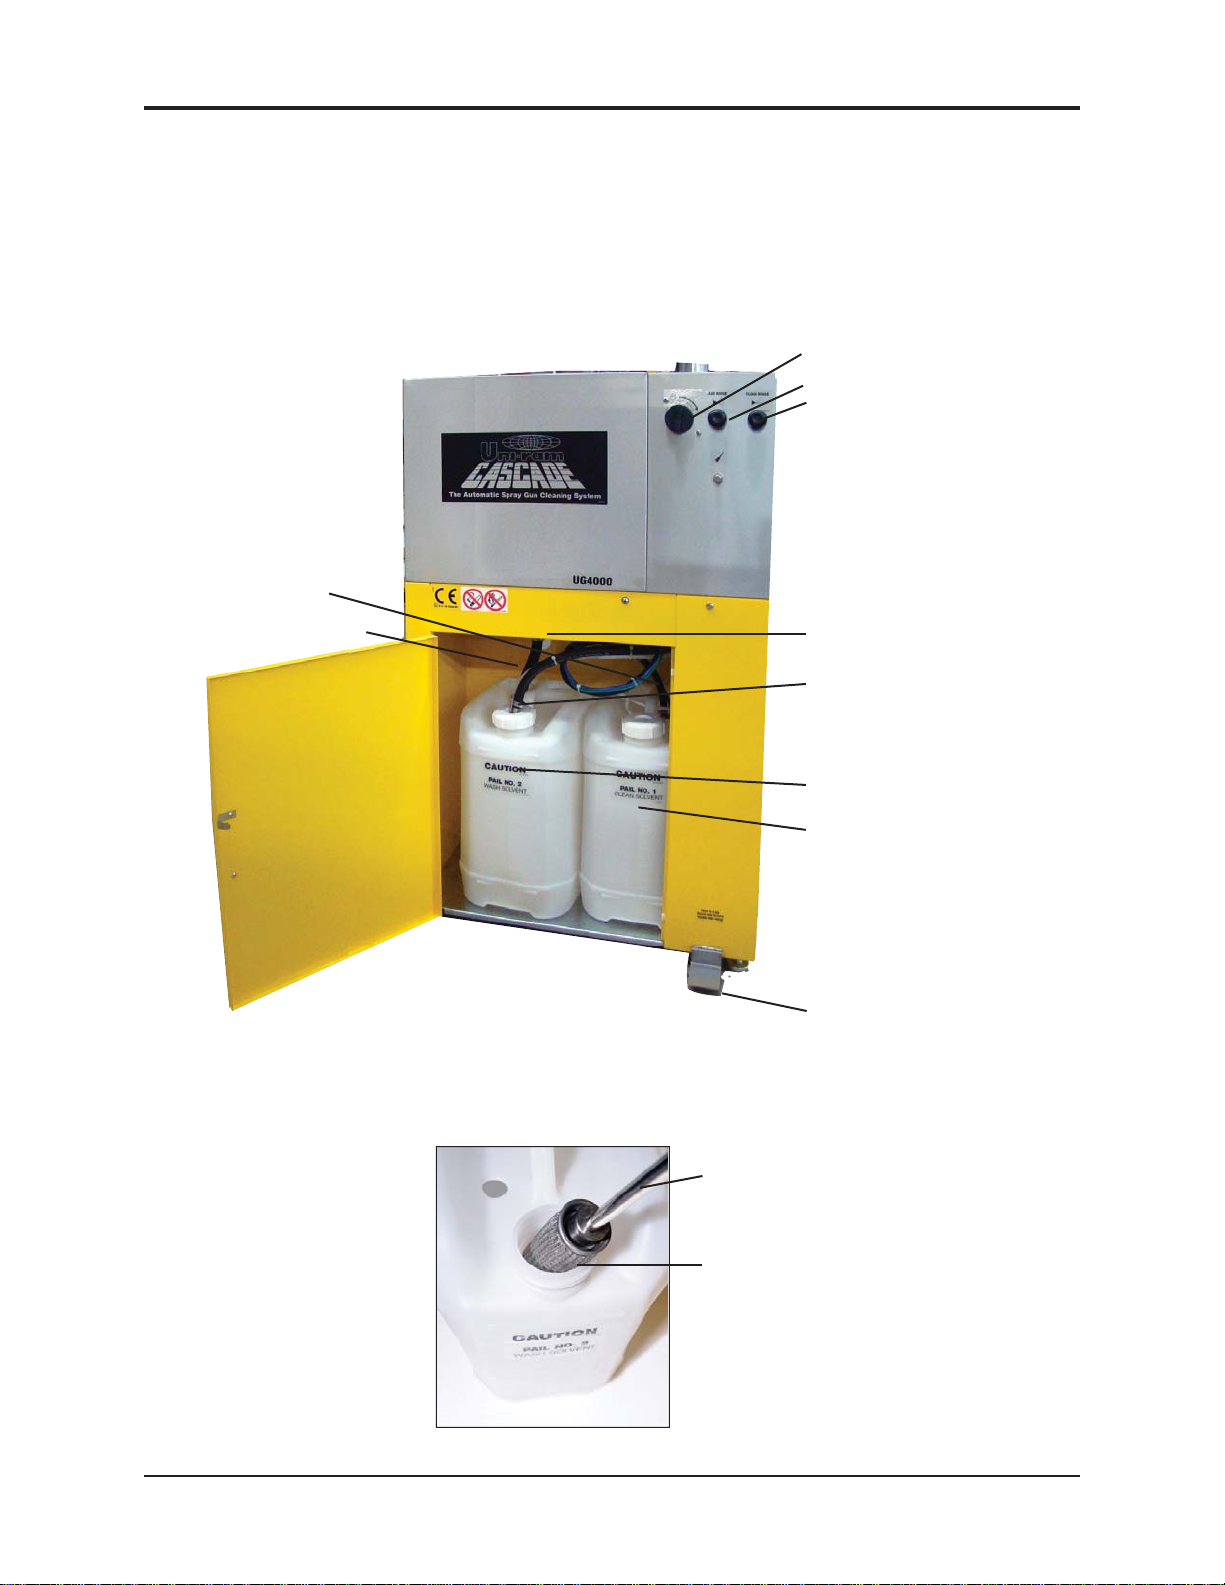
COMMON FEATURES
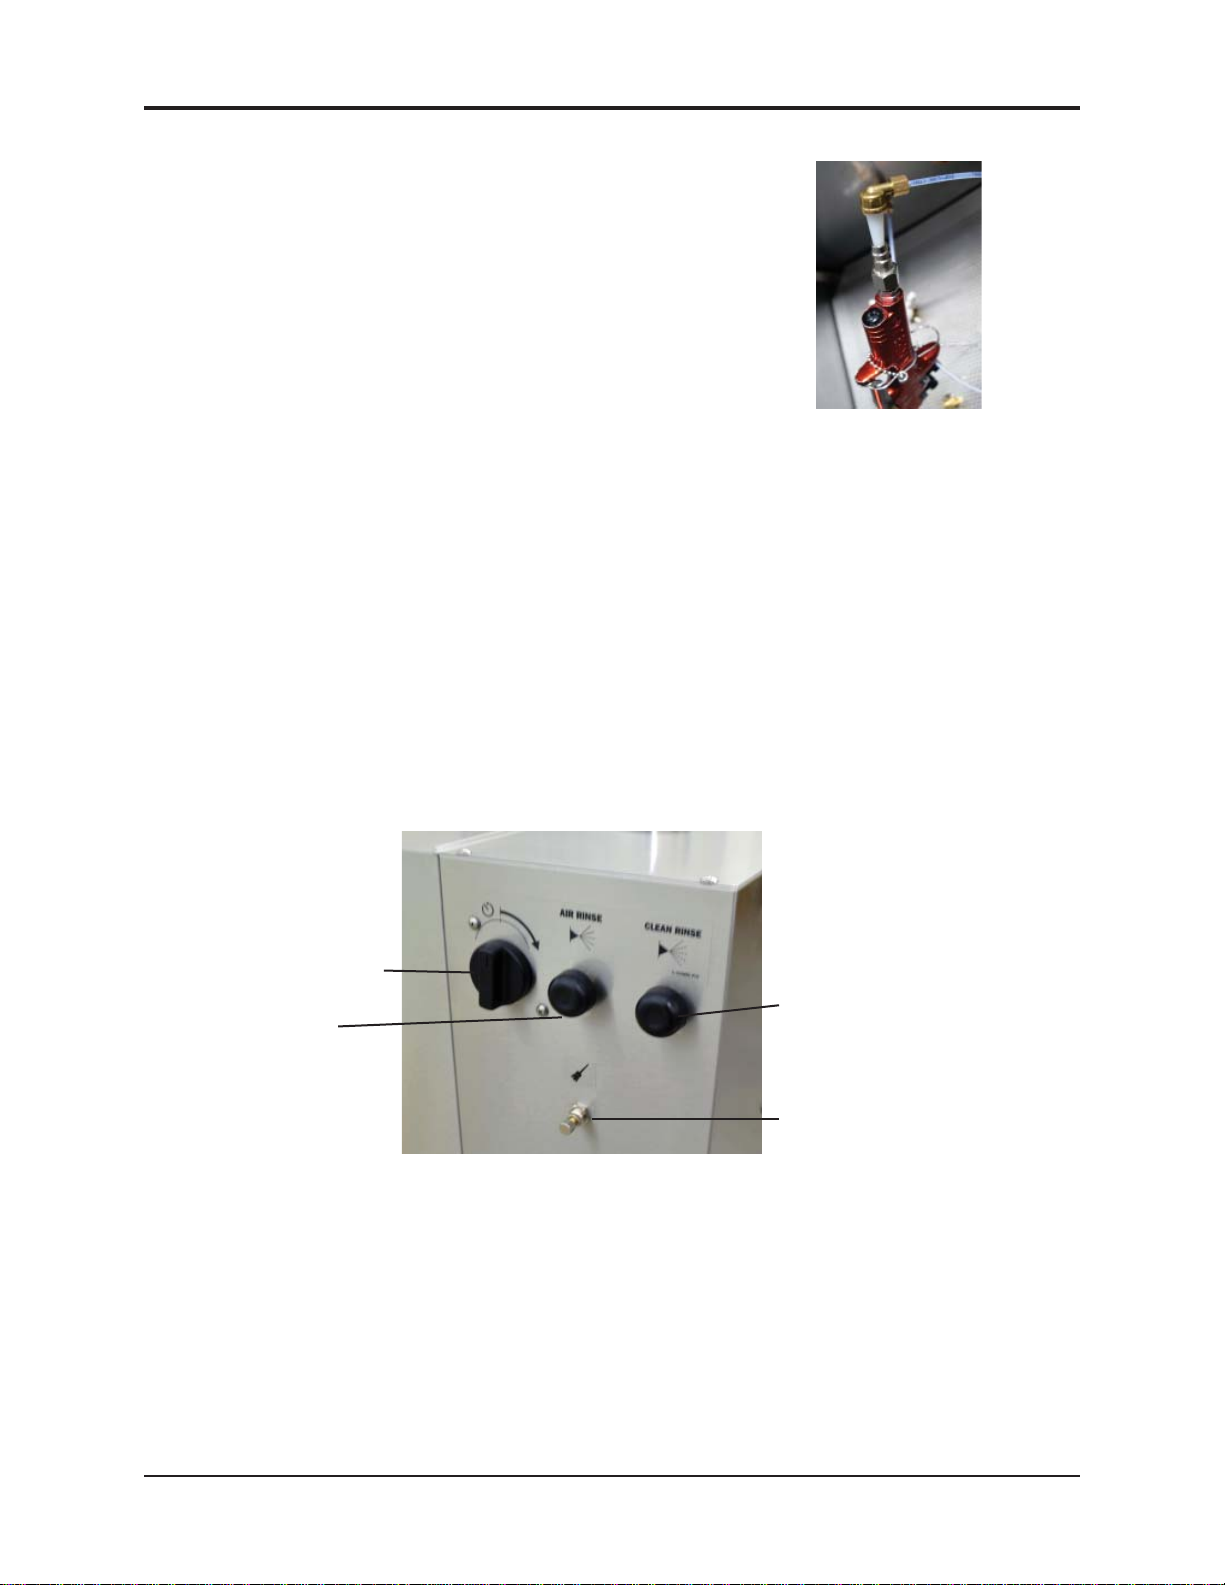
• Automatic Wash, Automatic Air Flush, Automatic Solvent Rinse.
• Flow-through Brush for manual washing. Flow Control.
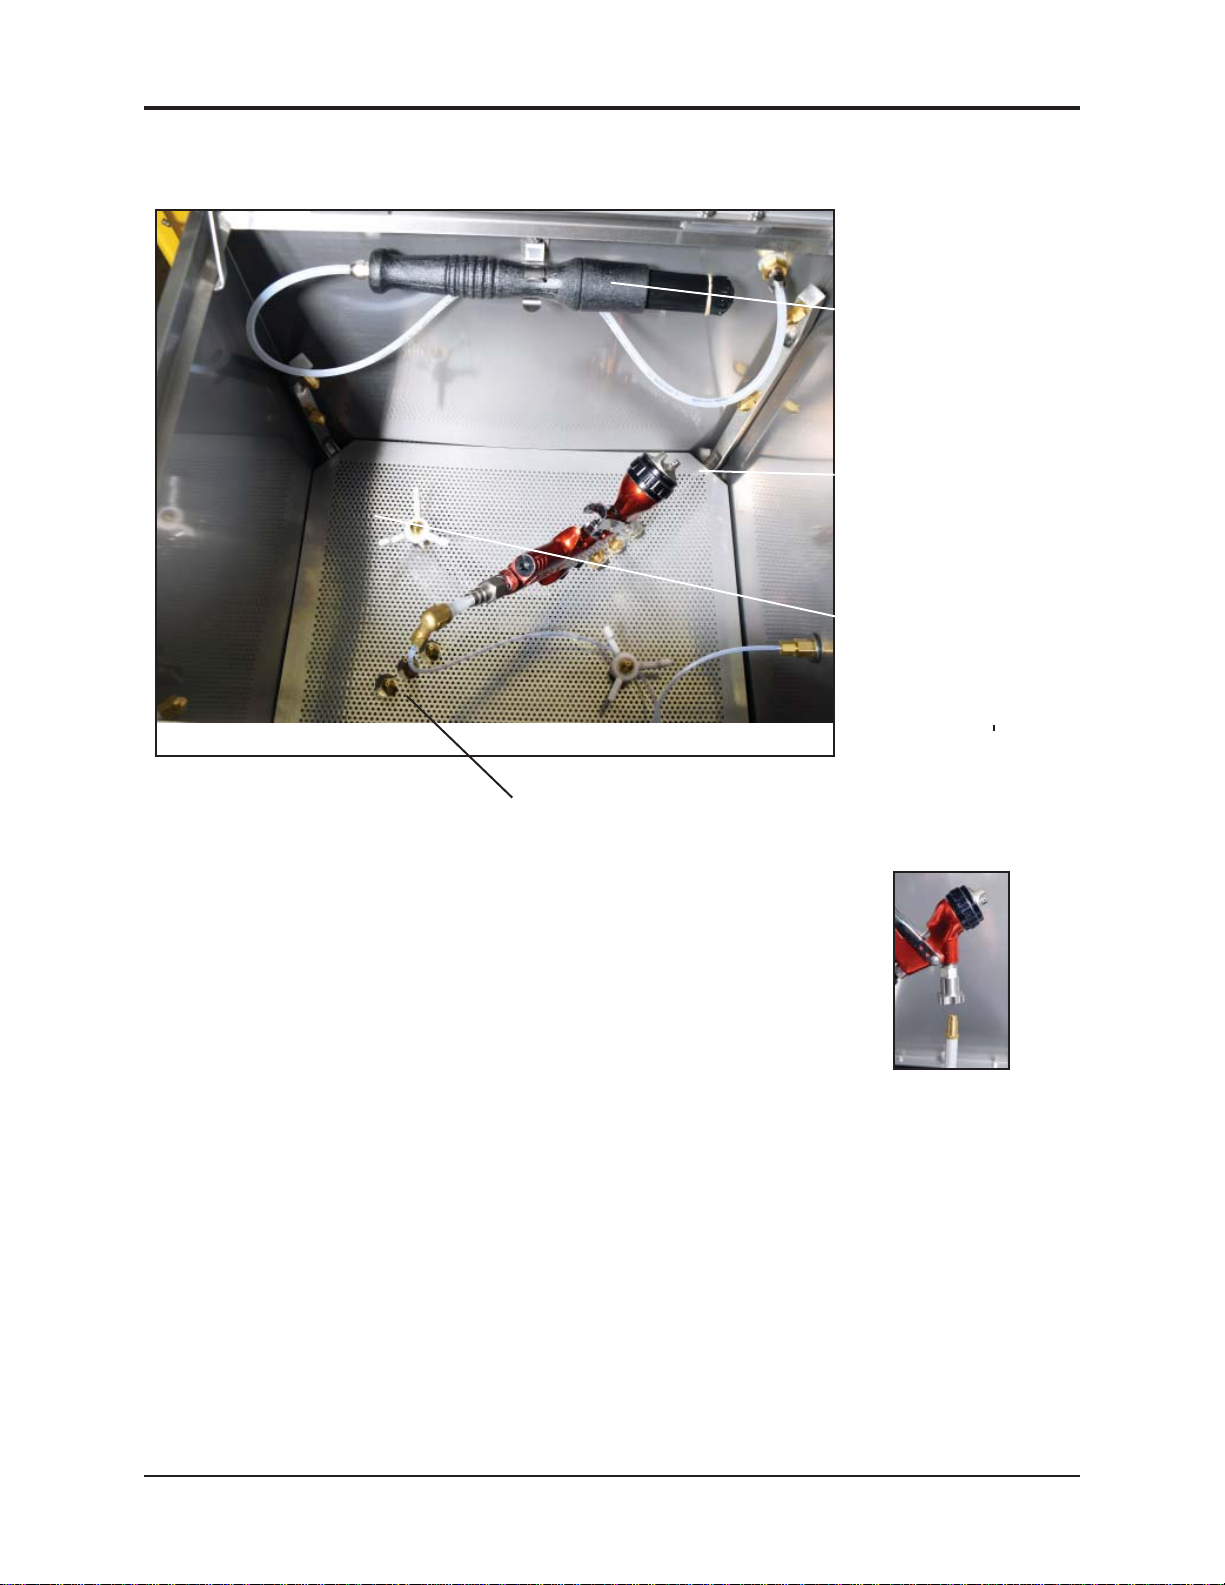
• Clean 2 Spray Guns and 2 Pots at the same time.
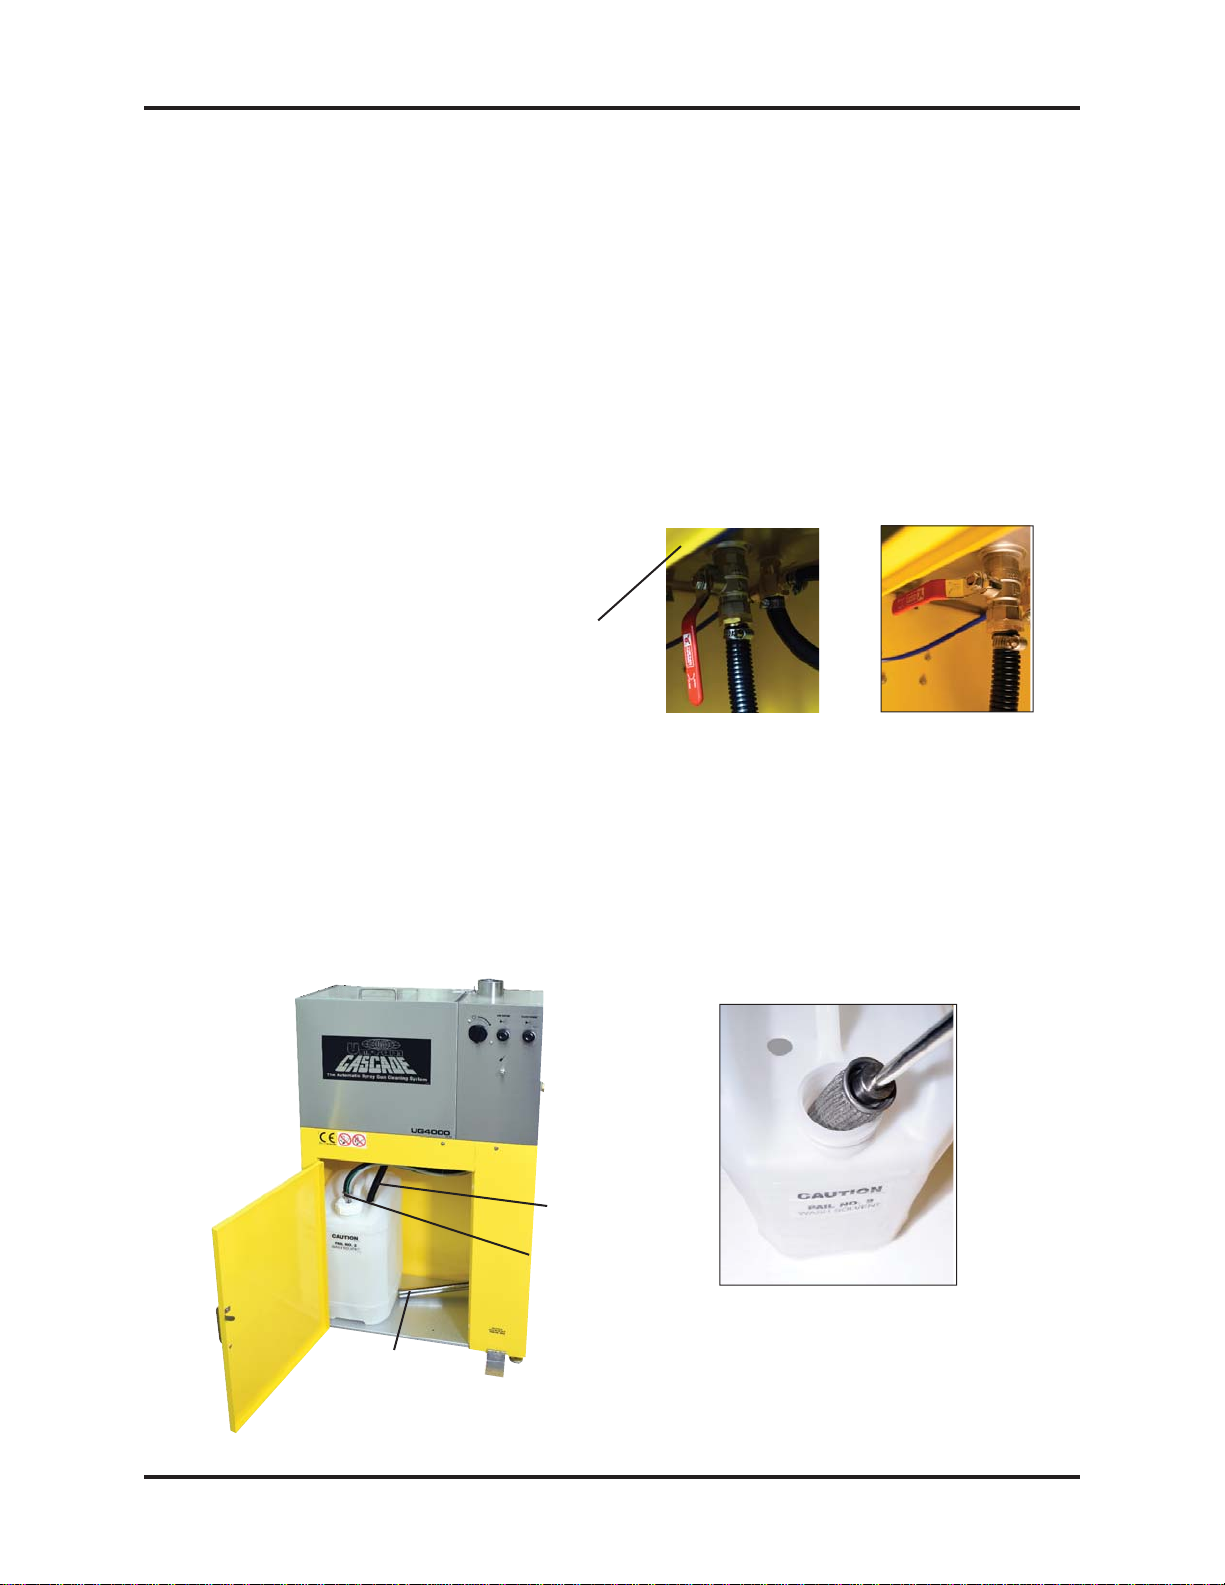
• Stainless steel inlet filter, located at the end of the suction hose, prevents debris from reaching the
pump and wash pail.
• 14 Cleaning Jets with swirl action.
• Shipping Size and Weight: 28" W x 17" D x 42" H, 91 LBS 41 KG.
CAUTIONS AND WARNINGS
• Always disconnect this machine from power sources before performing maintenance.
• Do not smoke or use near open flames, sparks or heat.
• Make sure all ground wires are connected and that unit itself is grounded properly.
SAFETY EQUIPMENT
• Wear safety eyeware, respiratory protection and protective clothing.
• Wear deluxe extended length neoprene gloves; SAS PN 6588 or Thicksters PN 6602-20 through
6605-20.

3
MANUAL - UG4000 SERIES SPRAY GUN CLEANERS REVISED 2019-02
Drain Valve (inside)
Suction hose for Wash pail and
brush. See Note 2 below.
Wash Pail See Note 2 below.
Clean Rinse Pail
NOTE 2: CLEAN PAIL IS
NOT PROVIDED WITH UNIT.
CUSTOMER TO PROVIDE
COMMERCIAL PAIL.
Foot petal
Timer
Air Rinse
Clean Rinse
Hose and airline
for rinse pump
Drain Hose
(rear)
UG4000D
Stainless steel inlet
filter located on end
of suction hose
Note 1: The stainless steel
inlet lter, located at the
end of the suction hose,
prevents debris from
reaching the pump and
wash tank. See the section
on Maintenance for cleaning
of the stainless inlet lter.
Wash Pail
Suction Hose

4
MANUAL - UG4000 SERIES SPRAY GUN CLEANERS REVISED 2019-02
SETUP
DELIVERY INSPECTION
• Inspect the shipping carton for any sign of transport damage. Carefully remove the unit from the ship-
ping carton and check the unit for damage. Report any transport damage immediately to the carrier
and to Uni-ram Corporation. Initiate a freight claim with the carrier. The manufacturer is not respon-
sible for the freight damage.
Bag of accessories contains the following:
• Manual
• Push on nozzle extension for disposable cup system or conventional cup system(110-430PPS).
• Push on nozzle extension for conventional cup system(110-430).
• Kit-Plug, Trigger Lock Spring, 2 in a package (140-2340).
LOCATION
Position the unit in a well-ventilated area away from sparks, heat and open flames, at least 6 " from the
back wall.
AIR SUPPLY
• Connect a male air supply adapter (not supplied) into the female Air Inlet on the unit. The male air
supply adapter is 1/4" NPT.
• Connect the female air supply hose to the adapter. The air supply hose must be at least 3/8"
inside diameter. The air supply pressure must be at least 85 PSI and the supply air must be
free from contaminants such as water, dust, rust, tar and grease. If the air supply is not
clean and dry install a moisture filter. The operation and longevity of the pump and other
components depends on clean dry supply air.
• To prevent damage to the Diaphragm Pump an internal Air Pressure Regulator has been
installed to limit the air pressure to 85 PSI. Do not install a second air pressure regulator or use a
pressure set below 85 PSI.
GROUNDING
• Connect the green ground wire at the back of the unit to a ground in the building using the ring
terminal on the ground wire.
Note: The pump and metal tube that inserts into each pail are grounded.
SOLVENT SELECTION
The adhesion quality of automotive paint has dramatically improved in recent years. The choice of sol-
vent is critical. Only use good quality solvent that is formulated for your paint and intended for use with
automatic spray guns cleaners. DO NOT USE CHLORINATED SOLVENT.
Ring Terminal

5
MANUAL - UG4000 SERIES SPRAY GUN CLEANERS REVISED 2019-02
•Use quality, compliant solvent such as Naked Gun Gold or equivalent solvent.
PAIL SETUP
The pail setup for the UG4000D and UG4500D is described first, followed by the pail set up for the
UG4000E and UG4500E.
PAIL SETUP - UG4000D and UG4500D
• Open the cabinet door.
• The spray gun cleaner comes with one plastic pail. The black drain hose and suction hose are
inserted into the plastic wash pail. See the photo of the unit below. The stainless steel inlet filter
is located at the end of the suction hose and prevents debris from reaching the pump and wash
tank. See the photo of the filter below. Clean the filter monthly. The procedure to clean the filter is
described in the Section, MONTHLY MAINTENANCE.
• Open the drain valve located inside the cabinet.
Rotate handle to the vertical position. (see photos
on right) Pour 3 gal (12 L) of solvent into the wash
tank to ll the wash pail.
• The customer provides the second the second pail with 5 gallons of solvent. This is the "Clean" pail.
The opening on the pail must be not larger than 2". The pail must be a pail approved for solvent such
as one received from your solvent supplier or a HDPE pail similar to the wash pail in the unit. Insert
the rinse pump into the opening and place the 5 gallon pail of solvent in the cabinet on the right side.
The rinse pump is stainless steel and located in the bottom of the cabinet.
• Check to ensure the Drain Valve is in the open position (handle in vertical position) and drain hose
is in the (left) pail.
Stainless steel inlet
filter located on end
of suction hose
f
f
f
f
f
f
f
t)
)
)
)
)
t)
)
)
t)
)
)
t)
t)
t)
t
)
t)
t)
t)
t
t
t)
t
t)
t)
t)
t)
t)
)
)
p
p
p
p
p
p
p
p
p
p
p
p
p
p
p
p
p
p
p
p
p
p
p
p
p
p
p
p
p
p
p
p
p
p
p
p
p
p
p
p
a
a
a
a
a
ai
i
i
i
i
a
a
a
a
a
ai
a
a
a
ai
ai
a
a
a
a
a
a
a
a
a
a
a
a
a
ai
a
l
l.l.
l.
.
l
.
l
Drain Valve
Open Closed
Suction hose
Drain hose
cabinet
Rinse Pump

6
MANUAL - UG4000 SERIES SPRAY GUN CLEANERS REVISED 2019-02
ITEM DESCRIPTION ITEM DESCRIPTION
1 GROUND WIRE 8 OVERFLOW TUBE
2 TRANSFER OUT HOSE TO RECYCLER 9 RINSE PUMP
3 DRAIN HOSE 10 AIR SUPPLY FOR RINSE PUMP
4 SUCTION TUBE FOR FLOW-THROUGH
BRUSH
11 GROUND WIRE
5 SUCTION TUPE FOR AUTO WASH 12 CLEAN PAIL
6 WASH PAIL 13 TRANSFER IN HOSE FROM RECYCLER
7 DRAIN VALVE (HORIZONTAL=CLOSED)
PAIL SETUP - UG4000E and UG4500E
GUN CLEANER - SOLVENT RECYCER COMBINATION UNITS
1234 5 6 789 10 11 12 13
PAIL SETUP - UG4000E and UG4500E
• Combo Ready units (UG4000E and UG4500E) come with the pails already installed as shown.
Transfer Hoses are provided with Uni-ram Solvent Recyclers designed for Combo operation.
• Fill the Wash Pail with about 3 Gal (12 L) of clean solvent.
• Fill the Rinse Pail with about 5 Gal (19 L) of clean solvent (about 1“ below the overflow pipe).
• After setting up the pails, make sure the Drain Valve is open (handle is in the vertical position).

7
MANUAL - UG4000 SERIES SPRAY GUN CLEANERS REVISED 2019-02
Pre clean Fluid
Passageway
PRE-CLEAN - DISPOSABLE CUP
Disconnect the spray gun from the air hose.
• Squirt solvent into the disposable cup adapter, shown
in photo on far right.
• Pull the gun’s trigger to ush the solvent through the uid
channel and into the paint waste container (not supplied)
for later disposal.
.
PRE-CLEAN - CONVENTIONAL CUP
Disconnect the spray gun from the air hose.
• Disconnect the cap and pour the paint waste into a paint waste container (not supplied).
CLEANING SPRAY GUNS AND CUPS
• Remove digital air gauge if so equipped.
• Loosen the air cap of the spray gun two full turns.
• Lock the trigger in the open position with the Trigger Lock Spring.
See photos below.
Remove
Gauge
Trigger Lock Spring Trigger Lock Spring
On Spray Gun

8
MANUAL - UG4000 SERIES SPRAY GUN CLEANERS REVISED 2019-02
Placing Spray Gun on
Nozzle Extension
Location for Push On
Nozzle Extension for
second spray gun
Cap points to
the corner jets
SPRAY GUN INSTALLED IN TANK
INSTALLING SPRAY GUNS IN TANK
•Place the spray gun on the nozzle with the cap facing the corner.
See photo on right and photo above.
Brush
Air Plug

9
MANUAL - UG4000 SERIES SPRAY GUN CLEANERS REVISED 2019-02

MANUAL - UG4000 SERIES SPRAY GUN CLEANERS REVISED 2019-02
PREVENT SOLVENT FROM ENTERING THE AIR PASSAGE OF SPRAY GUN:
• Insert the plastic plug into the air tting as in the photo below.
• Positive air will ow through the passage way during cleaning.
• If you disconnect the air plug from your spray gun attach the knurled nut on the chain with the trigger
lock spring to the air passageway of the spray gun.
Cleaning Cycle:
• Close the lid of the spray tank and turn the "Auto Wash Timer" clockwise. See photo below. The
wash cycle takes about 60 seconds.
• Push and hold the "Air Rinse" button for about 5 seconds to evacuate the wash solvent and air
rinse the spray guns. See photo below.
• Press and hold the "Clean Rinse" buttom for about 5 seconds to send 100 cc of clean solvent
through the jets to rinse the the spray guns. See photo below.
MANUAL WASH
• Open the lid and remove the brush from its holder on the back wall of the wash tank.
• Step on the foot pedal. A dedicated pump delivers wash solvent through the Flow-though brush. To
control the flow of solvent through the Brush, adjust the Flow Control, also on the front of the unit.
CONTROL OF FLOW FOR FLOW-THROUGH BRUSH
• See photo above. To increase flow, loosen the locking nut, rotate the dial anti-clock wise, and tighten
the locking nut.
Auto Wash Timer
Air Rinse
Clean Rinse
Control of ow
for Flow-Through
Brush
Air Plug inserted into the Air
Passage way of the spray gun

11
MANUAL - UG4000 SERIES SPRAY GUN CLEANERS REVISED 2019-02
Drain Valve Suction pipe with
Inlet lter
MAINTENANCE
• Clean the stainless steel inlet lter each month.
Procedure:
Follow step 1 and step 2 below under REPLACING SOLVENT.
Lift the suction pipe from the wash pail, (see the left photo below) unscrew the stainless steel lter from the
nut and clean it with clean solvent in a mixing cup. See the right photo below.
Remove Suction Pipe and Filter Clean Filter
REPLACING SOLVENT
• Replace the wash solvent when the solvent has lost cleaning eectiveness or after approximately 100
cleanings.
1) Remove the clean pail from the cabinet and then remove the rinse pump from the clean pail.
2) Close the drain valve (left photo below). Remove the drain hose and suction pipe from the wash pail and take
pail out of the cabinet. See middle and left photo below.
3) Pour used wash solvent from the wash pail into the waste drum. Return wash pail to the cabinet and insert
drain hose and suction hose. Pour 3 gal (12 L) of fresh solvent into the cleaning tank to drain to the wash pail.
Top up Clean Solvent pail to 5 gal. (19 L) and return rinse pump and pail to the cabinet.
Flow-through Brush washing a
spray gun
Wash Pail
Clean Pail
Suction pipe with inlet lter and
drain hose is located in wash pail.
Spray Gun
Flow-through
Brush

12
MANUAL - UG4000 SERIES SPRAY GUN CLEANERS REVISED 2019-02
TROUBLE SHOOTING
PROBLEM REASON CORRECTIVE ACTION
Drain valve closed
Open drain valve (put in vertical
position), if not already open
Liquid level too low
Check wash liquid level. Add liquid if
less than1/2 full.
Fill to 4 gal (11 L).
Debris in pump or suction and
output hose
Follow Procedure 1, "Blocked Fluid
Passage in Diaphragm pump" in the
next section.
Water or contaminants are in
air line of pump.
Passage in Diaphragm Pump" in the
next section.
Flow Control is closed.
Manual flow control is located on the
control panel on the front of the
machine. Loosen the locking nut and
rotate control to the left to increase
flow.
Liquid level too low
Check wash liquid level. Add liquid if
less than 1/2 full up to 4 gal (11 L).
Foot pedal switch not
functioning
Inspect foot switch for free travel, and
lubricate with gun oil. If switch will
not travel freely, replace with PN 155-
400BF2
Water in air line causes pump
to stall
Follow Procedure 2. "Blocked Air
Passage in Diaphragm Pump" in the
next section.
WASH PUMP DOES NOT
STOP UNLESS TIMER IS
TURNED BY HAND OR AIR IS
SHUT OFF. WASH PUMP
DOES NOT START.
Defective Timer
TIMER KNOB SPINS BACK
WHEN TURNED
Defective Timer Replace Timer. PN 115-200K.
Replace Timer, PN 115-200K.
WASH PUMP MAKES
HISSING SOUND AND LIQUID
DOES NOT FLOW
BRUSH PUMP DOES NOT
MAKE A NOISE AND LIQUID
DOES NOT FLOW WITH
PEDAL DEPRESSED
Brush is clogged with debris.
Unthread brush from hose and
operate foot pedal. If free solvent flow
is now seen, replace brush with PN
144-390S
WASH PUMP MAKES
PUMPING SOUND BUT
LIQUID DOES NOT FLOW
FROM THE JETS

13
MANUAL - UG4000 SERIES SPRAY GUN CLEANERS REVISED 2019-02
Trouble shooting continued
SYMPTOM REASON CORRECTIVE ACTION
INSIDE WALL OF TANK IS
COATED WITH PAINTEVEN
THOUGH OPERATOR
MAINTAINS TANK
Liquid lacks cleaning strength
Replace solvent / water and AQUA-
KLEEN in pail. Consider a solvent
that is formulated for type of paint
used and for use with automatic
spray gun cleaning.
Trigger not locked in open
position
Use Trigger Lock Spring PN 120-350
Spray gun is not properly
installed on to nozzle
Re-install with proper adapter
Incompatible solvent
pp
solvent formulated for type of paint
Low pressure in air supply
p
of 85 PSI
Plugged jets
yg
through the jets. If not successful,
SOLVENT APPEARS RED or
ORANGE
Water in solvent is corroding
metal pail
Replace or recycle wash solvent
GUNS NOT CLEAN, WASH
SOLVENT IS MILKY WHITE
Wash solvent is contaminated
with water
Replace or recycle wash solvent
Not enough liquid in clean
rinse pail (right side)
Add liquid
Rinse Pump is leaking from a
crack caused by corrosion
due to acidic or chlorine
contaminated solvent
Replace rinse pump, PN URP-100SF
Faulty Valve
CLEAN RINSE IS DIRTY
Replace Combination Valve, PN
UVB-400KIT
GUNS NOT CLEAN, PUMP
WORKING, SOLVENT FLOW
NORMAL
CLEAN RINSE DOES NOT
WORK

14
MANUAL - UG4000 SERIES SPRAY GUN CLEANERS REVISED 2019-02
TROUBLESHOOTING PROCEDURES PROCEDURE 1
Blocked Fluid Passage In Diaphagm Pump
If the pump sounds like it is working but liquid does not flow,
clear the fluid passage as follows:
• Remove suction tube from the pail and blow air at 85 PSI
into the INLET Liquid Hose (see diagram). Step on foot
pedal to activate pump. This procedure may have to be
repeated several times. If this procedure does not help,
blow some water into the suction hose using a spray gun,
wait one minute and step on foot pedal to activate pump.
This procedure may have to be repeated several times. If
this procedure does not work, the pump must be replaced.
If you need to replace the pump log-on to Service Channel and
Fixxbook or call the Uni-ram Service Engineer.
The warranty on the diaphragm pump is two years from date of
purchase.
This procedure will also clear a blockage in the fluid line for the brush. Follow the same procedure to
clear a blockage in the automatic nozzle except turn the timer instead of stepping on the foot pedal.
PROCEDURE 2
Blocked Air Passage In Diaphragm Pump
If there is a steady hissing sound and the pump is not
cycling, the spool valve has stalled due to a blocked air pas-
sage. Follow the procedure below to clear the blockage.
• Connect a blow gun to an 85 PSI source. Locate the
blue hose that extends from the air exhaust port of
the diaphragm pump. Use a blow gun to blow air into
the open end of this hose. Turn timer. If the procedure
is successful, the pump will start working. The proce-
dure may have to be repeated several times. If this
procedure does not work, replace the pump.
• Cause: Contaminants in the air supply (water, oil,
solid particles etc)
• Preventative Action: If necessary, install an Airline
(Moisture) Filter.
PROCEDURE 3
Blocked Passage in Air Line
The components in the air line are the diaphragm pump, air valve, foot pedal, 3-way ball valve
and regulator. See the Flow Diagram and the section: Replacement Parts.
To troubleshoot a component:
1) Disconnect the air line to the component using the quick disconnect.
2) Step on foot pedal and check for presence of positive air pressure in the air line. If there is ample
positive air pressure, replace the component.
If air pressure is absent, there is a faulty component upstream. Reconnect the air line and check the
operation of the next component upstream by following steps 1 and 2 above.

15
MANUAL - UG4000 SERIES SPRAY GUN CLEANERS REVISED 2019-02
UG4000D FLOW DIAGRAM
Use the diagram to trace the flow of compressed air and solvent.

16
MANUAL - UG4000 SERIES SPRAY GUN CLEANERS REVISED 2019-02
UG4500E FLOW DIAGRAM
Use the diagram to trace the flow of compressed air and solvent.

17
MANUAL - UG4000 SERIES SPRAY GUN CLEANERS REVISED 2019-02
UG4000FS FLOW DIAGRAM
Use the diagram to trace the flow of compressed air and solvent.

18
MANUAL - UG4000 SERIES SPRAY GUN CLEANERS REVISED 2019-02
8*(
8*'
'
8*'90
=21(
5(9
'(6&5,37,21
'$7(
1$0(
5(9,6,216
'
3$,/86(6.7<3('8(7286(
66),/7(5
.(1
&
86(66&$575,'*(),/7(5
.(1
%
&5($7('5$:,1*
.(1
%207DEOHRI8*'
,7(0
12
3DUW1R
'(6&5,37,21 0DWHULDO
8*'9047<
8*(47<
8*'47<
5HYLVLRQ
7
8*&$%,1(7
$66<
6((
3$576
'
)
8*7$1.:,7+
&21752/
%2;&203/(7(
6((
3$576
&
3$,/6(7)25(
02'(//,'
5(029$%/(7<3(
86(75$16/8&(1753
%8&.(7
6HH
3DUWV
)
6.6
62/9(17:$6+3$,/
+'3(
5(&7$1*8/$5/
*$//21:,7+66
),/7(5+2/(621&$3
$1''5$,1+2/(
3(+LJK
'HQVLW\
&
'
$
%
&
'
7+(,1)250$7,21&217$,1(',17+,6'5$:,1*,67+(62/(
3523(57<2)81,5$0&253$1<5(352'8&7,21,13$5725$6$
:+2/(:,7+2877+(:5,77(13(50,66,212)81,5$0&253,6
352+,%,7('
72/(5$1&(6
)5$&7,21$/
3/$&('(&,0$/
3/$&('(&,0$/
$1*8/$5
':1
7,7/(
':*12
81/(6627+(5:,6(63(&,),('
',0(16,216$5(,1,1&+(6
-81(
8*6(5,(6
*81&/($1(5
8*
3$7+
5'$1*/(352-(&7,21
8QLUDP
&RUSRUDWLRQ
0$5.+$0217$5,2&$1$'$
7(/
)$;
1?(QJLQHHUV?.(1?8*B8,&&?
6&$/(
%,1'(5
352-(&7
8*
'21276&$/('5$:,1*
6+((71R2)
'$7(
1$0(
.(1
&+.'
$33'
6HH3DUWV
0$7/
:(,*+7
47<
),/(1$0(
8*
/%6
'
5(9
$
%
&
REPLACEMENT PARTS
For replacement parts contact Uni-ram
Service Engineer at 1-800-417-9133.

19
MANUAL - UG4000 SERIES SPRAY GUN CLEANERS REVISED 2019-02
8*(
8*'
8*'90
8*
81,5$0&25325$7,21
5(9&'$7(
%207DEOHRI8*'
,7(0
12
3DUW1R
'(6&5,37,21
8*(47<
7
8*&$%,1(7$66<
)
8*7$1.:,7+
&21752/
%2;&203/(7(
3$,/6(7)25(
02'(//,'
5(029$%/(7<3(86(
75$16/8&(1753
%8&.(7
%207DEOHRI8*'
,7(0
12
3DUW1R
'(6&5,37,21
8*'47<
7
8*&$%,1(7
$66<
)
8*7$1.
:,7+&21752/
%2;&203/(7(
6.6
62/9(17:$6+
3$,/+'3(
5(&7$1*8/$5
/ *$//21
:,7+66),/7(5
+2/(621&$3
$1''5$,1+2/(
%207DEOHRI8*'
,7(0
12
3DUW1R
'(6&5,37,21
8*'9
047<
7
8*&$%,1(7
$66<
)
8*7$1.
:,7+&21752/
%2;&203/(7(

20
MANUAL - UG4000 SERIES SPRAY GUN CLEANERS REVISED 2019-02
8*
81,5$0&25325$7,21
5(9&'$7(
%207DEOHRI)&
,7(0
12
3DUW1R
'(6&5,37,21
47<
)
8*7$1.$66<
&21752/%2;:,7+
38036$1'),77,1*6
%207DEOHRI)
,7(0
12
3DUW1R
'(6&5,37,21
47<
1
8*7$1.
6
'(/,9(5<6678%($66<
&(175(&211(&725:,7+),77,1*
1</21:$6+(5
%5$6618781,21$'$3725136
'5$,19$/9(:,7+),77,1*6$1'+26(
68%$66<
1
)/$0(5(7$5',1*6&5((1
-
$,59(1785,$1'6833257
6
0$18$/%586+:,7+&2035(66
),77,1*00)2562/9(17
$,5385*(.,7635$<*81
+26(&/$0366)252'
PP72PP
7$3(512==/($'$37(5$/078%(
/*
336
12==/($'$37(5)25336$/078%(
/*
)
&83+2/'(5
7:26(76.,73/8*,1&/7:2
4&)/
48,&.&211(&7252'78%(;
137/21*
:$6+(5='
2'[,';7
),77,1*68%$66<720$18$/%586+
%207DEOHRI
,7(0
12
3DUW1R
'(6&5,37,21
47<
&21752/%2;:(/'0(17$66<
8'37$ '8$/',$3+5$*03803'(/5,1
%2'<7()/21',6&%0,1&/
8'37$%
',$38037()/21%$//:,7+00
,1/(7$1'00287/(7),77,1*6
5,16(9$/9($66<:$<+($9<'87<
07+5($'
)
386+%877205,16(
)
&20%,1$7,219$/9($66<
.
0(&+0$18$/7,0(5.,70,16
9
/,'6:,7&+$66<:$<287
35
$,535(6685(5(*8/$7256(77236,
='
/RFNQXW136%5$66
%$//9$/9($66(0%/<:,7+%5$&.(7
/,48,')/2:&21752/$66(0%/<00
78%(
4&7((
4&),77,1*7(()25002'+26(
8536
5,16(3803&&
,1/(778%(:,7+),/7(568%$66<
*5281':,5($66<*$/**5((1
Other manuals for UG4000D
1
This manual suits for next models
5
Table of contents
Other Uni-ram Ultrasonic Jewelry Cleaner manuals

Uni-ram
Uni-ram UG7500W User manual

Uni-ram
Uni-ram UG5000W Manual

Uni-ram
Uni-ram UG5000W User manual

Uni-ram
Uni-ram UG2000DM Series User manual

Uni-ram
Uni-ram UM80W User manual

Uni-ram
Uni-ram UG110 User manual

Uni-ram
Uni-ram UG7500 Series User manual

Uni-ram
Uni-ram UG4000D Manual

Uni-ram
Uni-ram UG2000DMV User manual