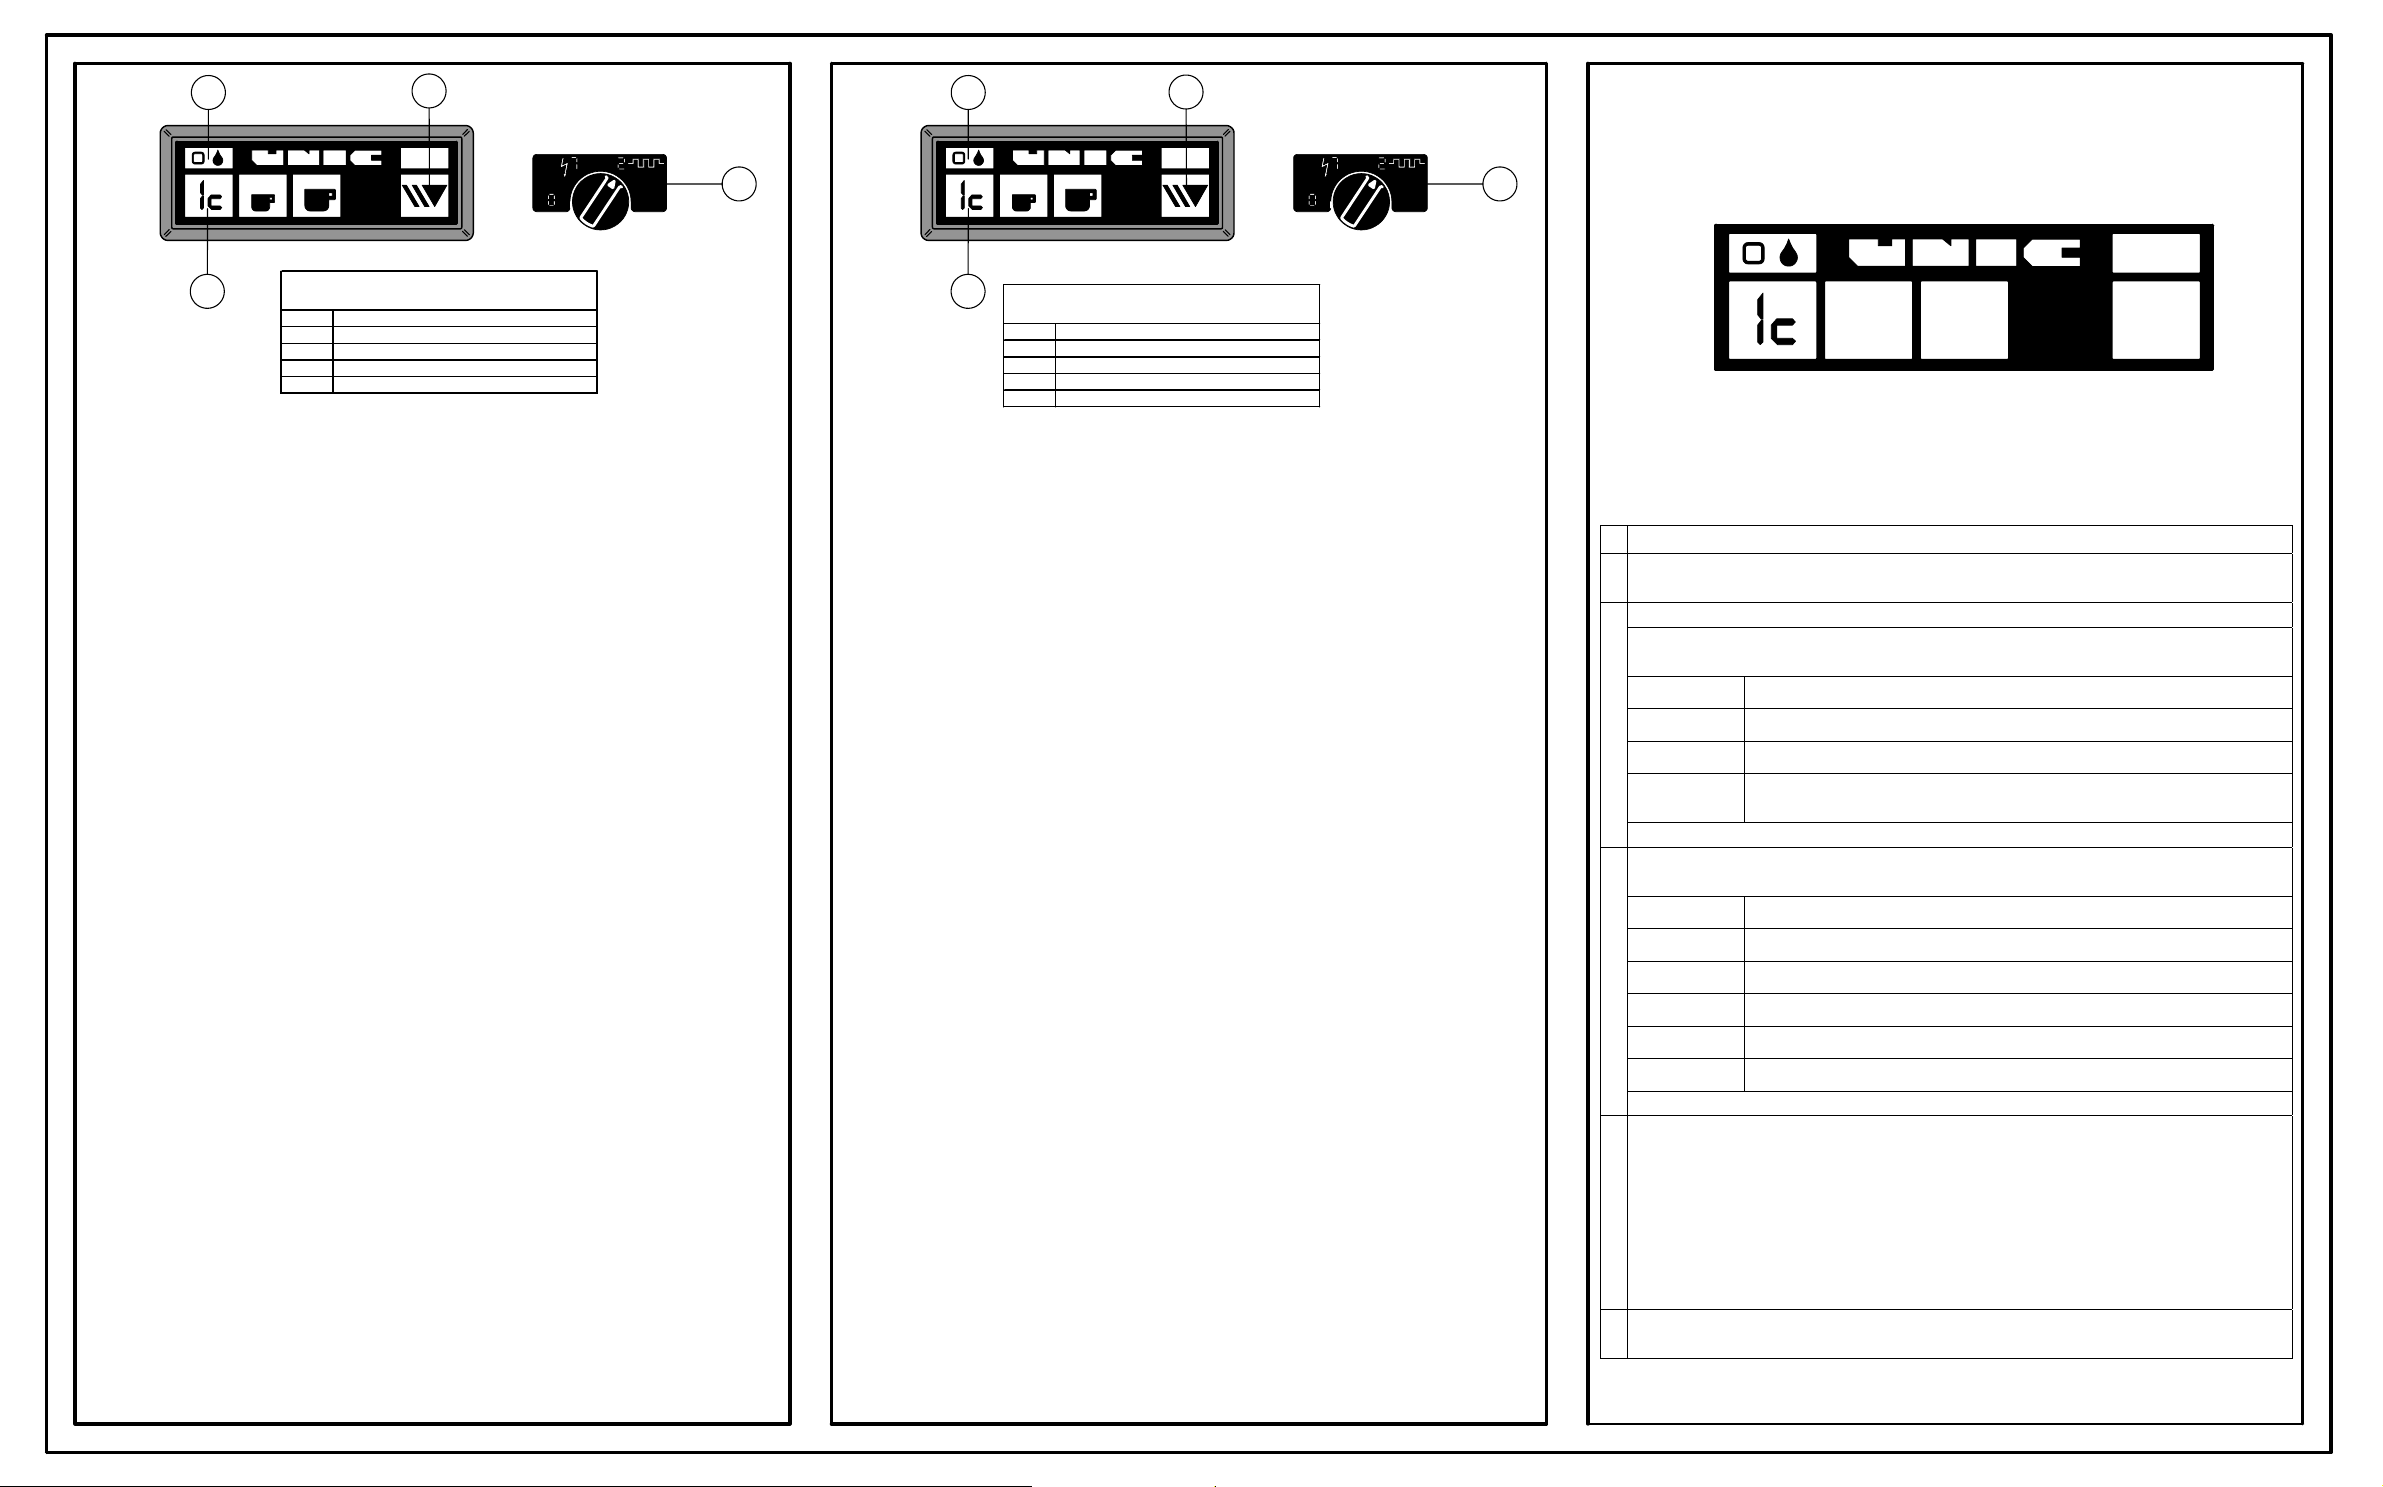
manuals.online logo
Brands
  1. Home
  2. •
  3. Brands
  4. •
  5. Unic
  6. •
  7. Coffee Maker
  8. •
  9. Unic Phoenix-R User manual

Unic Phoenix-R User manual

Z.I. 4° Rue - B.P.425 06515 CARROS CEDEX1
FRANCE
Tél : (33) 04 92 08 62 60 - Fax : (33) 04 93 29 24 23
http ://www.unic-sa.com - email : inf[email protected]
Entreprise certifiée ISO 9000 - 2000
LA MACHINE DU BON CAFE
Le Fabricant se réserve le droit de modifier sans préavis les caractéristiques de l'appareil , dans un soucis d'amélioration de ses performances / The manufacturer reserves the right to modify the appliances presented in this publication without notice.
NOTICE D'UTILISATION
INSTRUCTIONS FOR USE
CARACTERISTIQUES TECHNIQUES
TECHNICAL CHARACTERISTICS
37 55 76
REGLAGES / ADJUSTEMENTS
Température
Pression vapeur
Steam pressure
Soupape H.P. / H.P. valve
Soupape B.P. / L.P. valve
Dose café moulu
Dose of ground coffee
Dose d'eau / Dose of water
Temps d'infusion / Infusion time
POIDS / WEIGHT kg
DIMENSIONS cm
Largeur / Width
Hauteur (NSF) / Height (NSF)
Profondeur / Depth
PUISSANCE / WATTAGE
Les touches P1 à P4sont programmables.
1Arrêter la machine en tournant le commutateur sur 0.
2Maintenir la touche P5 appuyée et remettre la machine sous tension.
L'afficheur indique Pn puis Pc et Pr par appui successif sur la touche P5.
Pc = PROGRAMMATION CALCULEE
Enclencher un portefiltre ( avec café ) sur le groupe
Disposer une tasse
"P5 Afficher Pc
"P1 à P4 Choisir la dose à programmer (1c par exemple)
"P5 Démarrer le cycle d'infusion
"P5 Réappuyer pour arrêter lorsque la quantité de café désirée est
correcte
L'afficheur indique la valeur numérique correspondante (00 à 99)
3
Recommencer en 3 pour les autres doses ( 1Cpar exemple)
Pn = PROGRAMMATION NUMERIQUE
Programmation rapide sans café et/ou report de valeurs sur d'autres groupes
"P5 Afficher Pn
"P1 à P4 Choisir la dose à programmer
"P5 Afficher la valeur numérique de la dose choisie
"P1 Augmenter la valeur
"P4 Diminuer la valeur
"P5 Mémoriser la nouvelle valeur
4
Recommencer en 4 pour les autres doses
5Pr = PROGRAMMATION MANUELLE
Même procédure qu'en programmation calculée Pc.
La programmation manuelle ne calcule pas de valeur numérique.
Des volumes , plus petits ou plus grands queceux correspondant aux valeurs
numériques 00 et 99 peuvnet être programmées par Pr.
Attention: toute nouvelle programmation ( Pn ou Pc ) annule TOUTES les
programmations précédentes.
6Attendre la sortie automatique du mode programme ( 10 à 15 s ) ou éteindre et
rallumer la machine
P1 P2 P4
P5
TWIN
PHOENIX-R
65
51 (59)
55.9
TRI
PHOENIX-R
89
51 (59)
55.9
PROGRAMMATION
118 à 120° C
0,9 à 1 bar
13 bar
3,2 bar
7 gr
5 à 7 cl
20 à 25 s
118 à 120° C
0,9 à 1 bar
8 bar
3,2 bar
7 gr
5 à 7 cl
20 à 25 s
100 V mono
110 V mono
200 V mono
220 V mono
230 V mono
240 V mono
1,3 KW
1,7 KW
2,3 KW
2,7 KW
3 KW
3,2 KW
PHOENIX-R
31
51 (59)
56
-
-
2,3 / 3,3KW
2,7 / 4 KW
3 / 4,4 KW
3,2 / 4,8 KW
-
-
3,3 KW
4 KW
4,4 KW
4,8 KW
PRO
1
3
2
4
REP DESIGNATION
1
SAFETYLEVEL CONTROL
2
CONTINOUS /STOP
3
DISPLAY
4
ON / OFF SWITCH
ELECTRONIC BOXES
PRO
1
3
2
4
PROGRAMMING
The keys from P1 à P4 can be programmed.
1Set the machine switch to Position 0.
2Keep the key P5 pressed and put again the machine on.
Display of Pn then Pc and Pr by pressingseveral times the key P5
Pc = CALCULATED PROGRAMMING
Insert a filter-holder ( with coffee ) into the unit
Install cup
"P5 Display Pc
"P1 à P4 Select the dose to be programed (1c for example)
"P5 Start the infusion cycle
"P5 Press again to stop when the amount of coffee desired is correct.
Display of the corresponding digital value ( from 00 à 99 )
3
Repeat operation at 3 for the other doses ( 1C for example)
Pn = DIGITAL PROGRAMMING
Quick programming without coffee and/or values carried foward on other units.
"P5 Display Pn
"P1 à P4 Select the dose to be programed
"P5 Dispaly of the digital value ofthe selected dose
"P1 Increase the value
"P4 Reduce the value
"P5 Memorize the new value
4
Repeat operation at 4 for the other doses
5Pr = MANUAL PROGRAMMING
Same proceeding as in calculated programming Pc.
The manual programming doesn't calculate any digital value.
Some volumes, smaller or larger than the ones corresponding to 00 and99 can be
programed by Pr.
Caution: any new programming ( Pn or Pc ) cancel ALL previous programed
values.
6Wait until the program mode is automatically inactivated (from 10 to 15s), or switch
off and on again the machine.
START UP
When the machine has been installed and the hydraulic, electrical connections have been carried out by a
qualified installer :
1. TURNING THE MACHINE ON:
Put the main On/Off switch on position 1 (do not put it on position 2 until the boiler is full).
The On/Off indicator switches itself on and the boiler level is set automatically. The water-intake indicator
blinks to show that the boiler is filling.
2. HEATING:
When the water-intake indicator stops blinking, put the switch on position 2 to start the heating process.
When the correct température has been reached, the steam pressure is approximately 1 bar.
HOW TO PREPARE A CAPPUCCINO
1. Use a high, narrow container half-full of cold milk (preferably skimmed).
2. Keep the end-piece of the steam tube at the surface while moving the container horizontally in circles.
BE CAREFUL NOT TO BOIL THE MILK
3. After each use, clean the steam tube with a wet rag and press a moment on the steam tap to
eliminate the small amount of milk remaining in the tube.
INJECTION-UNIT CLEANING
1. Take the filter-holder.
2. Place the rubber plug ( DO-197A) inside the filter.
3. DECOMPRESSION CIRCUIT
a) Insert the filter-holder in the unit.
b) Turn the unit on to put the filter-holder under pressure, and then stop it. Repeat this operation
several times, each time removing the water from the filter-holder.
DAILY CLEANING AND MAINTENANCE
Clean the filter-holders and filters with détergent.
Use a soft rag and alcohol for the stainless steel parts and a non-abrasive détergent for the painted
parts.
DO NOT FORGET TO REGENERATE YOUR WATER SOFTENER PERIODICALLY
ATTENTION : Air must be able to circulate freely ail around the machine. The ventilation holes located
at the rear and on the top of the machine must not be obstructed.
FLUSHING INSTRUCTIONS
The unit is to be flushed prior to putting it into service, or after24 hours of inactivity.
Dispense to the drain :
Through each coffee head and water nozzle 0,5 litre of water
Through each steam nozzle some steam for 1 minute
MISE EN SERVICE
La machine étant installée et les raccordements hydrauliques, électriques ayant été effectués par du
personnel qualifié :
1. Mise sous tension
Mettre le commutateur de mise sous tension sur la position 1 (ne pas mettre sur la position 2 tant que la
chaudière n’est pas remplie).
Le voyant de mise sous tension s’allume et le niveau dans la chaudière est ajusté automatiquement.
Pour indiquer que le remplissage de la chaudière est en cours, le voyant d’entrée d’eau clignote.
2. Mise en chauffe
Lorsque le voyant d’entrée d’eau cesse de clignoter, mettre le commutateur sur la position 2 pour
démarrer la chauffe.
Lorsque la température de régulation est atteinte, la pression vapeur est voisine de 1 bar.
PREPARATION DU CAPPUCCINO
1. Utilisez un récipient étroit et haut à demi rempli de lait froid (de préférence maigre).
2. Maintenez embout du tube vapeur en surface tout en déplaçant le récipient horizontalement en
effectuant des cercles.
ATTENTION DE NE PAS FAIRE BOUILLIR LE LAIT
3. Après chaque utilisation, nettoyez le tube vapeur avec un chiffon humide et appuyez un bref instant
sur le robinet vapeur pour chasser le peu de lait restant à l’intérieur du tube.
NETTOYAGE GROUPE INJECTION
1. Prendre la coupe porte-filtre.
2. Placer le bouchon en caoutchouc ( DO-197A ) à l'intérieur du filtre.
3. CIRCUIT DE DECOMPRESSION
a) Enclencher la coupe sur le groupe.
b) Mettre le groupe en fonction pour mettre la coupe en pression , puis stopper le groupe.
Répéter plusieurs fois l'opération en vidant à chaque fois l'eau contenue dans la coupe.
ENTRETIEN
-Effectuer 2 ou 3 cycles d’infusion (sans café) pour nettoyer le groupe et le joint de coupe (coupe porte-
filtres non serrée).
-Nettoyer les coupes porte-filtres et les filtres dans un évier avec de la lessive.
-Utiliser un chiffon doux et de l'alcool pour les parties en inox et de la lessive non abrasive pour les
parties peintes.
N’OUBLIEZ PAS DE REGENERER VOTRE ADOUCISSEUR PERIODIQUEMENT
ATTENTION : L'air doit circuler librement tout autour de la machine. Les ouvertures d'aération situées à
l'arrière de la machine et sur le dessus ne doivent pas être obstruées.
REP DESIGNATION
1
SECURITE NIVEAU EAU
2
TOUCHE MARCHE/ARRETCONTINU
3
AFFICHEUR
4
COMMUTATEUR ON / OFF
BOITIERS ELECTRONIQUES
P1 P2 P4
P5

Other manuals for Phoenix-R

1

This manual suits for next models

2

Other Unic Coffee Maker manuals

Unic Tnira classic Configuration guide

Unic

Unic Tnira classic Configuration guide

Unic Tango Configuration guide

Unic

Unic Tango Configuration guide

Unic Mira User manual

Unic

Unic Mira User manual

Unic Tango Instruction Manual

Unic

Unic Tango Instruction Manual

Unic Mira Instruction Manual

Unic

Unic Mira Instruction Manual

Unic Phoenix-R Owner's manual

Unic

Unic Phoenix-R Owner's manual

Unic AURA 2 User manual

Unic

Unic AURA 2 User manual

Unic Stella di Caffe User manual

Unic

Unic Stella di Caffe User manual

Unic STELLA EPIC 3 User manual

Unic

Unic STELLA EPIC 3 User manual

Unic STELLA User manual

Unic

Unic STELLA User manual

Unic Pony 4 User manual

Unic

Unic Pony 4 User manual

Unic Stella di Caffe Manual

Unic

Unic Stella di Caffe Manual

Unic Tango STP Configuration guide

Unic

Unic Tango STP Configuration guide

Unic Stella Epic User manual

Unic

Unic Stella Epic User manual

Unic Rumba Operation and maintenance manual

Unic

Unic Rumba Operation and maintenance manual

Unic Stella di Caffe User manual

Unic

Unic Stella di Caffe User manual

Unic Stella Epic Specification sheet

Unic

Unic Stella Epic Specification sheet

Unic Tango Ace Service manual

Unic

Unic Tango Ace Service manual

Unic epic Configuration guide

Unic

Unic epic Configuration guide

Unic Tango ST Duo Instruction Manual

Unic

Unic Tango ST Duo Instruction Manual

Unic DIVA User manual

Unic

Unic DIVA User manual

Unic Tango Ace Instruction Manual

Unic

Unic Tango Ace Instruction Manual

Unic AURA 2GR Instruction Manual

Unic

Unic AURA 2GR Instruction Manual

Popular Coffee Maker manuals by other brands

Jura IMPRESSA S9 One Touch Manual for use

Jura

Jura IMPRESSA S9 One Touch Manual for use

Aroma Professional AEM-810 instruction manual

Aroma Professional

Aroma Professional AEM-810 instruction manual

WMF espresso Service manual

WMF

WMF espresso Service manual

Krups XP320850 manual

Krups

Krups XP320850 manual

Necta Kobalto Programming manual

Necta

Necta Kobalto Programming manual

Jura IMPRESSA XS95 manual

Jura

Jura IMPRESSA XS95 manual

Brandt CAF1318E instruction manual

Brandt

Brandt CAF1318E instruction manual

UFESA Duet instruction manual

UFESA

UFESA Duet instruction manual

KitchenAid 5KCM4212SX user manual

KitchenAid

KitchenAid 5KCM4212SX user manual

Saeco Incanto Rondo Service manual

Saeco

Saeco Incanto Rondo Service manual

HLF Italian Design 2700 instruction manual

HLF Italian Design

HLF Italian Design 2700 instruction manual

Nespresso thermoplan AGUILA 220 user manual

Nespresso

Nespresso thermoplan AGUILA 220 user manual

DeLonghi ETAM29.62 SERIES Instructions for use

DeLonghi

DeLonghi ETAM29.62 SERIES Instructions for use

Cremesso PROFESSIONAL COMPACT PRO user manual

Cremesso

Cremesso PROFESSIONAL COMPACT PRO user manual

Philips EP5930 user manual

Philips

Philips EP5930 user manual

Philips HD 7500/01 manual

Philips

Philips HD 7500/01 manual

Jura GIGA X9c Professional Operating & cleaning instructions

Jura

Jura GIGA X9c Professional Operating & cleaning instructions

Siemens TE711 RW Series instruction manual

Siemens

Siemens TE711 RW Series instruction manual

manuals.online logo
manuals.online logoBrands
  • About & Mission
  • Contact us
  • Privacy Policy
  • Terms and Conditions

Copyright 2025 Manuals.Online. All Rights Reserved.