Unimax U46 User manual

USER MANUAL
Android Smartphone
MAX
For more information, refer to website at WWW.UNIMAXMOBILE.COM

Using this guide
Thank you for purchasing this UMX mobile device.
This device will provide you with high quality mobile communication and entertainment
based on UMX’s exceptional technology and high standards.
This guide has been specially designed to guide you through the basics of your device,
such as assembling and getting started with the device.
• Please read this guide carefully before using your device to ensure safe and correct use.
• The descriptions in this guide are based on the default settings of your device.
• Please keep this guide for future reference.
Instructional icons
Before you start, familiarize yourself with the icons you will see in this guide:
Warning - situations that could cause injury to yourself or others.
Caution - situations that could cause damage to your device or other equipment.
Note - notes, usage tips, or additional information.
►Refer to - pages with related information; for example: ►p.11(represents “see page
11”).
Followed by - the order of options or menus you must select to perform a step; for
example: Home screen, open the application list and select Messaging →New
message (represents Messaging, followed by New message).
[ ] Square brackets-device keys; for example: [ ] (represents the Power key).
Copyright information
Rights to all technologies and products that comprise this device are the property of their
respective owners:
• This product has an Android platform based on Linux which can be expanded by a
variety of JavaScript-based software.
• Google™, Android Market™, Google Mail™, and YouTube™ are trademarks of Google,
Inc.
• Java™ is a trademark of Sun Microsystems, Inc.
• Wi-Fi ®, the Wi-Fi CERTIFIED logo, and the Wi-Fi logo are registered trademarks of the
Wi-Fi Alliance.

Contents
Assembling...................................................................................................................... 3
Unpack....................................................................................................................................3
Insert battery .........................................................................................................................4
Charge the battery ...............................................................................................................5
Insert a memory card (optional).......................................................................................6
Getting started................................................................................................................. 7
Turn your device on and off..............................................................................................7
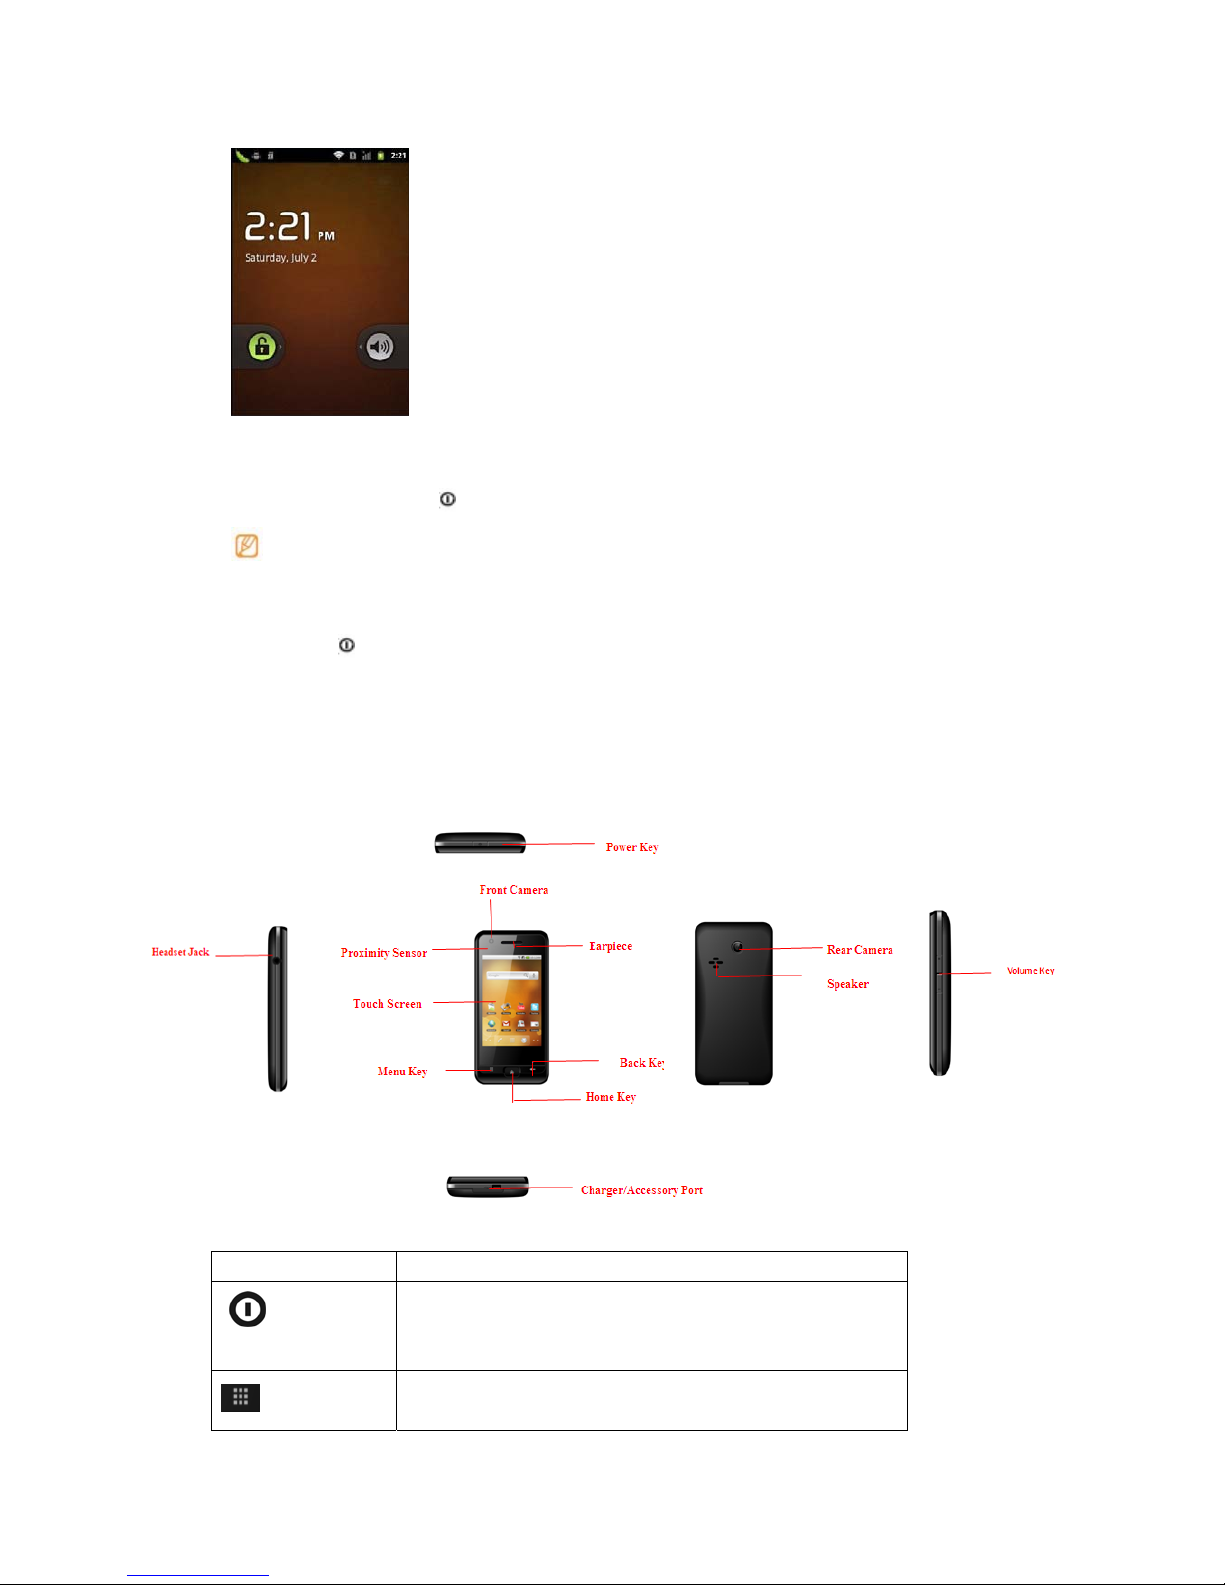
Get to know your device.....................................................................................................8
Use the touch screen ........................................................................................................10
Lock or unlock the touch screen and keys.................................................................10
Get to know the home screen.........................................................................................11
Access applications..........................................................................................................12
Customise your device.....................................................................................................13
Enter text..............................................................................................................................14
Calling............................................................................................................................ 16
Creating and finding contacts...................................................................................... 17
Messaging .....................................................................................................................18
Camera........................................................................................................................... 19
Music.............................................................................................................................. 21
Connecting to the internet ........................................................................................... 23
Download files from the web ....................................................................................... 24
Connecting to a PC....................................................................................................... 24
Using Bluetooth ............................................................................................................ 25
Using Wi-Fi .................................................................................................................... 25
Safety and usage information...................................................................................... 26
Assembling
Unpack
Check your product box for the following items:
• MAX phone
• Battery
• Travel adapter (charger)
• 2GB microSD card
• USB cable
• User guide
• Quick start guide
Use only UMX-approved software. Pirated or illegal software may cause damage or
malfunctions that are not covered by your manufacturer's warranty.

• The items supplied with your device may vary depending on the software and
accessories available in your region or offered by your service provider.
• You can obtain additional accessories from your local UMX dealer.
• The supplied accessories perform best for your device.
Insert the battery
To insert battery
1. If the device is on, press and hold [ ] and select Power off to turn it off.
2. Remove the back cover.
Be careful not to damage your fingernails when you remove the back cover.
3. Insert the battery.
Make sure that battery and phone terminals align.
4. Replace the back cover.

Charge the battery
Before using the device for the first time, you must charge the battery.
You can charge the device with the provided travel adapter or by connecting the device to
a PC with a PC data cable.
Use only UMX-approved chargers and cables. Unauthorised chargers or cables
can cause batteries to explode or damage your device.
When your battery is low, the device will emit a warning tone and display a low
battery message. If the battery level becomes too low, the device will power off
automatically. Recharge your battery to continue using your device.
› Charge with the travel adapter
1. Open the cover to the micro-USB jack at the bottom of the device.
2. Plug the micro-USB end of the data cable into the jack.
Improperly connecting the travel adapter can cause serious damage to the device.
Any damage caused by misuse is not covered by the warranty.
• You can use the device while it is charging, but it may take longer to fully charge the
battery.
• While charging, the device may heat up. This is normal and should not affect your
device’s lifespan or performance.
3. When the battery is fully charged (the Status Light turns green), unplug the travel

adapter from the device and then from the power outlet.
Do not remove the battery before removing the travel adapter to avoid the damage
to the device.
›Charge with the PC data cable
Before charging, ensure that your PC is turned on.
1. Open the cover to the micro-USB jack at the bottom of the device.
2. Plug micro-USB end of the data cable into the jack.
Depending on the type of PC data cable you are using, it may take some time
before charging begins.
3. When the battery is fully charged (the Status Light turns to green), unplug the PC
data cable from the device and then from the PC.
Insert a memory card (optional)
To store additional multimedia files, you must insert a memory card. Your device accepts
microSD™ or microSDHC™ memory cards with maximum capacities of 32GB
(depending on memory card manufacturer and type).
Using an incompatible memory card may damage your device or the memory card
and can corrupt data stored on the card.
• Your device supports only the FAT file format for memory cards. If you insert a card
formatted with a different file format, your device will ask you to reformat the
memory card.
• Frequent writing and erasing of data will shorten the lifespan of memory cards.
1. If the device is on, press and hold [ ] and select Power off to turn it off.
2. Open the back cover.
3. Take off the battery.
4. slide the memory card slot cover to unlock, Once the memory card has been
installed slide the memory card slot cover to lock the memory card in place
5. Insert a memory card with the gold-colored contacts facing down.

1. Insert the memory card in the slot until it locks in place.
2. Mount the battery.
3. Replace the battery cover.
Remove the memory card
›Before removing a memory card, first unmount it for safe removal.
1. Home screen, select Applications →Settings →Storage →Unmount SD card.
2. If the device is on, press and hold [ ] and select Power off to turn it off.
3. Remove the back cover.
4. Take off the battery.
5. Tilt the card slot gently.
6. Pull the memory card out of the memory card slot.
7. Mount the battery.
8. Replace the battery cover.
Do not remove a memory card while the device is transferring or accessing
information, as this could result in loss of data or damage to the memory card or device.
Erase the memory card
> Erasing your memory card on a PC may cause incompatibilities with your device.
Erase the memory card only on the device.
Home screen, select Applications →Settings →Storage →Erase SD card.
Before erasing the memory card, remember to make backup copies of all important
data stored on your device. The manufacturer’s warranty does not cover loss of
data resulting from user actions.
Getting started
Turn your device on and off
To turn on your device, press and hold [ ].Your device will automatically connect to the
cellular network.

If you turn on your device for the first time, tap the Android image on the screen and
follow the on-screen instructions to set up your device for its first use. To turn off your
device, press and hold [ ] and then select Power off.
• Follow all posted warnings and directions from official personnel when in areas
where the use of wireless devices is restricted, such as aeroplanes and hospitals.
•To use your device's non-network services only, switch to Flight mode. Press and
hold [ ] and select Flight mode.
Get to know your device
.> Device layout
Keys
Key Function
Power
( Top center)
Turn on the device (press and hold); Lock the touch screen.
Menu
Open a list of option available on the current screen

Home
Return to the home screen
(Open the list of recent application (press and hold )
Back Return to the previous screen
Volume
( Right side)
Adjust the device’s volume.
› Indicator icons
Icons shown on the display may vary depending on your region or service provider.
Icon Definition Icon Definition
No signal Speakerphone activated
Signal strength Missed call
Synchronized with the web
Uploading data
3G network connected
Downloading data
WLAN activated
Connected to PC
Bluetooth activated New voice mail message
Bluetooth headset connected New text or multimedia message
GPS activated New email message
Voice call in progress Event notification
Alarm activated
Silent mode activated
Battery power level Vibration activated
Flight mode activated
Error occurred or caution required
Music playback in progress

Use the touch screen
Your device’s touch screen lets you easily select items or perform functions. Learn basic
actions to use the touch screen.
• To avoid scratching the touch screen, do not use sharp objects.
• Do not allow the touch screen to come into contact with other electrical devices.
Electrostatic discharges can cause the touch screen to malfunction.
• Do not allow the touch screen to come into contact with water. The touch screen
may malfunction in humid conditions or when exposed to water.
• For optimal use of the touch screen, remove the screen protection film before using
your device.
• Your touch screen has a layer that detects small electrical charges emitted by the
human body. For best performance, tap the touch screen with your fingertip. The
touch screen will not react to touches of sharp objects, such as a stylus or pen.
Control your touch screen with the following actions:
• Tap: Tap once with your finger to select or launch a menu, option, or application.
• Tap and hold: Tap an item and hold it for more than seconds to open a pop-up option
list.
• Scroll: Tap and drag your finger up, down, left, or right to move to items on lists.
• Drag and drop: Tap and hold your finger on an item, and then drag your finger to move
the item.
• Double-tap: Tap twice quickly with your finger to zoom in or out while viewing photos or
web pages.
• Your device turns off the touch screen when you do not use the device for a specified
period. To turn on the screen, press [ ].You can also adjust the backlight time. Home
screen, open the application list and select Settings →Display →Screen timeout.
Lock or unlock the touch screen and keys
You can lock the touch screen and keys to prevent any unwanted device operations.
To lock, press [ ].To unlock, turn on the screen by pressing [ ], and then flick the grey
window with your finger.

Get to know the home screen
When the device is turned on, you will see the home screen. From the home screen, you
can view your device’s status and access applications.
The home screen has 5 panels. Scroll left or right to a panel of the home screen. You can
also select a dot on the bottom of the screen to move to the corresponding panel of the
home screen directly.
>Add items to the home screen
You can customize the home screen by adding shortcuts to applications or items in
applications, widgets, or folders. To add items to the home screen
1. Press [ ] →Add or tap and hold the empty area on the home screen.
2. Select the item category →an item:
• Shortcuts: Add shortcuts to items, such as applications, bookmarks, and contacts.
• Widgets: Add widgets to the home screen.
• Folders: Create a new folder or add folders for your contacts
• Wallpapers: Set a background image.
Available items may vary depending on the current home screen mode.
Move items on the home screen
1. Tap and hold an item to move.
2. Drag the item to the location you want when the item is magnified.
Remove items from the home screen
1. Tap and hold an item to remove.
The item is magnified and the trash icon appears on the application area, meaning
that the application area at the bottom of the home screen changes to the trash.
2. Drag the item to the trash.
3. When the item and the trash turn red, release the item.
Use the shortcuts panel
On the home screen or while using an application, tap the indicator icons area and drag
your finger down to open the shortcuts panel. You can activate or deactivate wireless
connection features and access a list of notifications, such as messages, calls, events or

processing status. To hide the list, drag the bottom of the list up.
From the shortcuts panel, you can use the following options:
• Wi-Fi: Activate or deactivate the WLAN connection feature.
• Bluetooth: Activate or deactivate the Bluetooth wireless connection feature.
• GPS: Activate or deactivate the GPS feature.
• Account sync: Activate or deactivate the Account synchronization.
• Brightness: Adjust the brightness.
Available options may vary depending on your region or service provider.
Access applications
To access your device’s applications,
1. From the home screen, select Applications to access the application list.
2. Scroll up or down to another application screen.
3. Select an application.
• When you use applications provided by Google, you must have a Google account. If
you do not have a Google account, sign up for a Google account.
• You can add a shortcut to an application by tapping and holding the application icon
from the application list. You can move the icon to the location you want on the home
screen.
4. Press [ ] to return to the previous screen; Press the Home key to return to the
home screen.
Your device has a built-in motion sensor that detects its orientation. If you rotate the
device while using some features, the interface will automatically switch to landscape
view. To set the interface to keep the orientation when you rotate the device, select
Settings →Display →Auto-rotate screen.

> Access recent applications
1. Press and hold the Home key to open the list of applications you have accessed
recently.
2. Select an application to access.
Customize your device
Get more from your device by customizing it to match your preferences.
> Set the current time and date
1. From the home screen, open the application list and select Settings →Date and time.
2. Set the time and date and change other options.
>Turn on or off the touch tone
From the home screen, open the application list and select Settings →Sound →Audible
touch tones.
> Adjust the volume of the ringtones
Press the Volume key up or down to adjust the ringtone volume.
Switch to the silent mode
To mute or unmute your device, do one of the followings:
• From the home screen, press and hold [ ] and select Silent mode.
• From the home screen, open the application list and select Settings →Sound →Silent
mode
Change your ringtone
1. From the home screen, open the application list and select Settings →Sound →
Phone ringtone
2. Select a ringtone from the list and select OK.
Activate animation for switching windows
From the home screen, open the application list and select Settings →Display →
Animation →Some animations or All animations.
Select a wallpaper for the home screen
1. From the home screen, press [ ] →Wallpaper →an option.
2. Select an image.
3. Select Save or Set wallpaper.
UMX is not responsible for any use of default images or wallpapers provided on your
device.
Adjust the brightness of the display
You can quickly adjust the display brightness by scrolling left or right on the indicator line
of the screen.
To adjust the brightness in the setting menu,

1. Home screen, open the application list and select Settings →Display →Brightness.
2. Clear the check box next to Automatic brightness adjustment.
3. Select OK.
The brightness level of the display will affect how quickly the device consumes battery
power.
Set an unlock pattern
You can set an unlock pattern to prevent unauthorized people from using the device
without your permission.
1. From the home screen, open the application list and select Settings →Location and
security →Set up screen lock →Pattern
2. See the on-screen instructions and example patterns and select Next (if necessary).
3. Draw a pattern by dragging your finger to connect at least four dots.
4. Select Continue.
5. Draw a pattern again to confirm.
6. Select Confirm
• Once you set an unlock pattern, your device will require the pattern each time you
turn it on. If you do not want the device to require the pattern, clear the check box
next to require pattern in Location and security.
Public Mobile is not responsible for any loss of passwords or private information or
other damages caused by illegal software.
Enter text
You can enter text by selecting characters on the virtual keypad on the screen.
Enter text using the Android keyboard
1. Tap a text field where you want to enter text.
2. Enter text.
To enter numbers or symbols, tap .
To enter letters, tap

Text Entry Keyboard
Numbers and Symbols Entry Keyboard
When you finished typing, press to close the keyboard.
Shift Key
Tap once to capitalize
the next letter you
enter.
Number and Symbols Key
Tap to change input to
number and symbol
Voice to Text Key
Tap to enter text by voice.
Delete Key
Tap to delete characters to the left
of the cursor.
Emoticon Key
Tap to enter various emoticons.
Space Key
Tap to inset tab
Tap to enter additional
symbols.Thekeyboard
will change to alternate.
Delete Key
Tap to delete characters to the left
of the cursor.
Emoticon Key
Tap to enter various emoticons.
Space Key
Tap to inset tab
Shift Key
Letters Key
Tap to change input to
letters entry.

Calling
Learn to make or answer a call or access logs. For more information, see the "Calling"
section of the user manual.
Make a call
1. Home screen, open the application list and select Phone →Keypad, and enter an
area code and a phone number.
2. Select to make a voice call.
3. To end the call, select End call
>Answer a call
1. When a call comes in, drag right until Answer appears.
When the device is ringing,press the Volume key to mute the ring tone.
2. End the call, select End call.
View call logs

You can view logs of your calls filtered by their types.
1. Home screen, open the application list and select Phone →Call log.
2. From the call logs, you can make a call or send a message directly to a contact by
quickly flicking the contact to the left or right.
3. Select a log to view its details.
From the detail view, you can dial the number, send a message to the number or add
the number to the phonebook.
Creating and finding contacts
Learn to create and find a contact in memory. For more information, see the "Phonebook"
section of the user manual.
› Create a contact
1. Home screen, open the application list and select Contacts.
2. Press Menu and select New Contact, Select New contact.
3. Select a memory location.
4. Enter contact information.
5. Select Done to add the contact to memory.
You can also create a contact from the dialing screen.
1. Home screen, open the application list and select Phone →Keypad.
2. Enter a phone number.
3. Select-Add to Contacts →Create contact.
4. Select a memory location.
5. Enter contact information.
6. Select Save to add the contact to memory.
Find a contact
1. Home screen, open the application list and select Contacts.
2. Scroll up or down on the contact list. Select a contact’s name.

3. Select a contact’s name.
Once you find a contact, you can:
• Call the contact by selecting Call
• Send a message by Send Message.
• Edit the contact information by pressing [ ] →Edit.
Messaging
>Send a text message
1. Home screen, open the application list and select Messaging →New message
2. You can enter a number manually or select one from the recent recipients.
3. Select Type to compose and enter your message text. To insert emoticons, press
[]→Insert smiley.
4. Select send to send the message.
> Send a multimedia message
1. Home screen, open the application list and select Messaging →New message.
2. You can enter a number manually or select one from the recent .
When you enter an email address, the device will convert the message as a
multimedia message.
3.Select Type to compose and enter your message text. To insert emoticons, press
[ ]→Insert smiley.
4. Press [ ] →Attach →an option and add an item. You can select a file from the file
list or create a new photo, video, or sound.
5. Press [ ] →Add subject and add a subject for the message.
6. Select Send to send the message.
> Send an email message
1. Home screen, open the application list and select Email →an email account.
2. Press [ ]→Compose.
3. You can enter an email address manually and it will show the recent recipients
Select the Cc/Bcc field to add more recipients.
4. Select the subject field to enter a subject.
5. Select the text input field to enter your email text.
6. Select Attach and attach a file. You can select an image, video or sound clip.
Select Send to send the message
If you are offline or outside your service area, the message will be held in the message
thread list until you are online and in your service area
View a text or multimedia message
1. Home screen, open the application list and select Messaging. Your messages are
grouped into message threads by contact, like a messenger.
2. Select a contact.

3. Select a text or multimedia message from the message thread.
4. For a multimedia message, select to view the attachment.
View an email message
When you open an email account, you can view previously retrieved emails offline or
connect to the email server to view new messages. After retrieving email messages, you
can view them offline.
1. Home screen, open the application list and select Email →an email account.
2. Press [ ] →Refresh to update the message list.
3. Select an email message from the message thread list.
Listen to voice mail messages
If you have set missed calls to be diverted to the voice mail server, callers may leave
voice when you do not answer incoming calls. To access your voice mail inbox and listen
to voice mail messages.
Home screen, open the application list and select Phone →Press 1 on keypad and then
tap and hold.
1. Follow the instructions from the voice mail server.
Camera
Camera is a combination camera and camcorder that you use to shoot and share pictures
and videos.
Pictures and videos are stored on the phone’s memory card, so you must install one to
use Camera, as described in your phone’s owners’ guide.
You can copy your pictures and videos from the memory card to a PC, as described in
“Connecting to a computer via USB”.
You can view your pictures and videos on the phone, edit them, share them, and so on
with Gallery. See “Gallery”.
In this section
“Opening Camera and taking pictures”
Opening Camera and taking pictures
You can take pictures and shoot videos with Camera.
Camera’s many settings are described in“Changing Camera settings”.
You can also view your pictures with the Gallery application. Please see the
description in“Gallery”
Be sure to clean the protective lens cover with a microfiber cloth before taking
pictures. A lens cover with smudges from fingers can cause blurry
pictures with a“halo”effect.
To open Camera

>Touch the Camera icon in the Launcher.
Camera opens in Landscape mode, ready to take a picture or shoot a video.
To take a picture
1. If necessary, drag the control to the Camera position.
2. Frame your subject on screen.
You can zoom in or out by touching the Zoom icon 1x and then touching a zoom level.
3. Touch the Shutter icon on screen
The camera brings the image into focus. When the image is in focus, the focus
indicators in each corner turn green and the camera takes a picture.
OR
Touch & hold the Shutter icon to focus first, before taking a picture; then lift your finger
to take a focused picture more quickly. Slide your finger off the Shutter icon or roll the
Trackball and release your finger to cancel taking the picture.
The picture you just took is displayed for a moment, and then is displayed as a
thumbnail at the bottom right.
4. Touch the thumbnail to view, share, and work with your pictures in Gallery See “Gallery”
To shoot a video
1. If necessary, drag the control to the Video position.
2. Point the lens to frame the scene where you want to start.
3. Touch the Start Video icon The camcorder starts shooting the video. The time
Touch to preview your pictures or videos in
Gallery.
Drag up to shoot videos; drag down to take
photos.
Touch to take a picture or shoot a video.
Touch settin
g
s to chan
g
e them.
Table of contents
Other Unimax Cell Phone manuals

Unimax
Unimax U696CL User manual

Unimax
Unimax MAXBravo U670C User manual

Unimax
Unimax Maxmango U680 User manual

Unimax
Unimax MAXBravo U670C User manual

Unimax
Unimax MXW2 User manual

Unimax
Unimax MAXBravo U670C User manual

Unimax
Unimax UMX U683CL User manual

Unimax
Unimax V351 User manual

Unimax
Unimax U671C User manual

Unimax
Unimax U693CL User manual