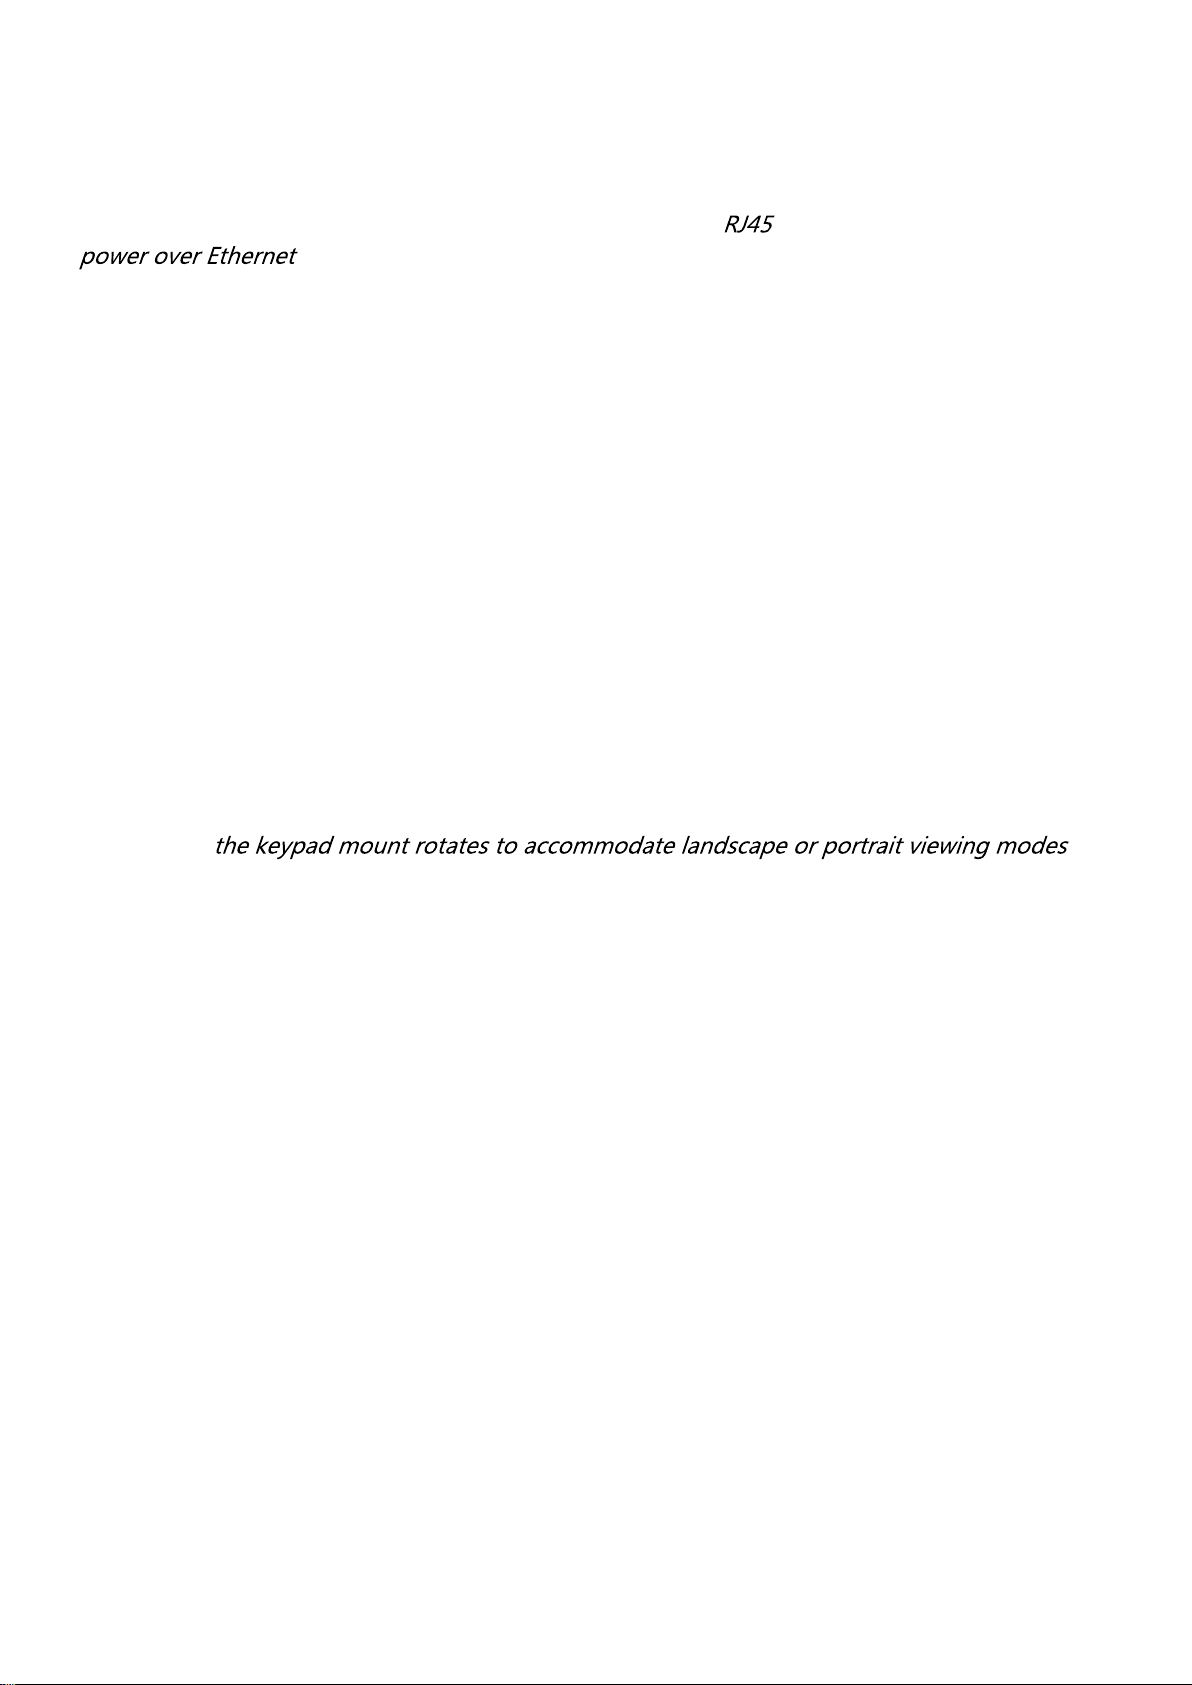
URC URCTKP7600 User manual

Order Number
: GETEC-C1-16-250
FCC Part 15 Certification
Test Report Number
: GETEC-E3-16-027
Page 1 / 1
EUT Type: Network Keypad
FCC ID.: OZ5URCTKP7600
APPENDIX G
: USER’S MANUAL

TKP-7600
Network Keypad

Introducing the TKP-7600
Thank you for purchasing URC’s TKP-7600 In-Wall Network Color Touch-screen keypad. Its easy
intuitive use helps to simplify your life while adding control of more things than you thought
possible.
Enjoy some key features like:
Audio Video Intercom
Easily communicate throughout your home using the Audio Video Intercom feature with multiple
TKP-7600 clients and/or URC Mobile app clients. You can also make sure the baby is safe and
sound by viewing the baby monitor right on the TKP-7600.
Flexible Orientation
The TKP-7600 offers the ability to display the keypad in either portrait or landscape modes making
it the perfect keypad for virtually any room. This feature can only be programmed from within the
URC software. Speak to your custom home professional prior to installation.
Proximity Sensor
A remote that knows where you are, the TKP-7600 has a built in sensor that can detect the
distance you are from it. As you approach the keypad illuminates and is ready to control the home.
The sensitivity of this sensor is adjustable by your custom home professional.

Rooms Menu
With the touch of a single button, take control of your domain. Besides the ability to temporarily
link the different rooms/areas of your system for music listening, the Rooms Menu offers a
snapshot of “what’s going on” in every room of your Total Control system. Better yet, tapping on a
room converts your keypad into a controller for THAT room. See how easy it is to keep track of
what’s happening in your world…and control it!
Shortcuts Pop-Up
With all the different options to choose from, the Shortcut Pop-Up allows you to save some of
the most common devices/activities for easy selection. Keep up to six different activities at your
fingertips with the Shortcuts Pop-Up menu.
Parts List
The TKP-7600 Network Keypad includes:
1 - TKP-7600 4 - Mounting Screws
1 - Mounting Ring

Installing the TKP-7600
The TKP-7600 is wall-mountable and fits into a standard dual gang (J-box or Mud Ring) opening.
Prior to installation, make sure power is available at the preferred location.
Power can be supplied to the TKP-7600 through an Ethernet ( ) cable connected to a PoE
( ) or in either of the following ways:
●Router/Switch
●PoE injector
Power over Ethernet or PoE technology describes a system to pass electrical power safely, along
with data, on Ethernet cabling. A shielded Ethernet cable is preferred. The IEEE standard for PoE
requires a Category 5 or higher for high power levels.
Installation
Follow the diagram below for installation:
1. Make sure the dual-gang opening is fitted with a standard two-gang trim box (available
from the local electrical supplier/store)
2. Connect the Ethernet cable to the rear of the supplied TKP-7600 wall-plate
3. Mount the wall-plate to the two-gang retro-box
4. The TKP-7600 easily snaps into the wall-plate
Note:

Main Menu Navigation
Although specific screen design and certain options are dictated by the custom integrator that
programmed the Total Control system, the general layout remains the same. Actual navigation is
performed through screen swipes ( ) while selecting any item is as simple as
pressing the icon/text to be selected.

Title Bar
The Title Bar is present on all TKP-7600 screens and contains valuable information during normal
use. Easily find out the time, weather, now playing and the room that the keypad is controlling.
Time & Weather
This data, found on the left-hand side of the Title bar shows the current time, date, and weather
information. Pressing this area of the Title Bar opens the Time & Weather Module. For
information about this module, refer to the Time & Weather Module section, later in this manual.
Current Room
The current room portion of the Title Bar shows the room that the TKP-7600 is controlling.
Remember, in a Total Control system, although each room’s keypad defaults to control the room
in which is is placed, using the Rooms Menu allows it to control any other room in the system.
Now Playing
Appearing on the right-hand side of the Title Bar, this displays the source that is currently being
used in the room that the keypad is controlling.
●The Now Playing display shows the device that is being used (in this case, William’s iPod),
associated artwork, and metadata information is displayed since it is a URC media device.
●If an activity is being performed (like DVD or cable) in the selected room, the Now Playing
section displays the activity:

Category/Device Ribbon
This ribbon shows the various categories of control that are available to the selected room. The
quantity of categories is determined by the system setup and can vary from one to however many
categories were programmed by the system designer.
Although only seven categories can fit on the screen at any moment, navigate to other categories
( ) by swiping left or right.
Select a category by pressing the appropriate icon; this reveals the devices/activities available for
that category ( ).
Device List
Submenus contain the devices/activities that were placed in the chosen category by the system
programmer.
Scroll up or down through the list by swiping upwards or downwards, select a device/activity by
pressing its icon.

Status Bar
The Status Bar, located directly above the Core Buttons, provides valuable status and feedback of
the Total Control System. The four sections of the Status Bar are determined by the system
programmer and are customizable per keypad. It is not possible to explain how your keypad looks;
however, after reviewing the following possibilities, there should be no need for further
explanation.
Sunrise Time: Updated at midnight every day, this shows the sunrise time for the next day.
Sunset Time: Updated at midnight every day, this shows the sunset time for the next day.
URC Thermostat Temperature: If a THZ-100 (URC’s thermostat) is included in the home, this
shows the current temperature status based upon the internal sensor, additional sensor, or the
mean temperature of both.
Alarm Clock: If the room being controlled has an Alarm that is set to activate for that room, the
status bar displays an alarm clock icon and the next scheduled time/day.
Surround Mode: When used with URC’s DMS-AV Surround Processor, this displays the current
surround mode of the processor.
Room Linked Status: Whenever the chosen room/area is “linked” to other rooms, this shows a
link acknowledgement and icon.
Weather Alerts: Based on the current location entered by the system programmer, the words
“weather alert” appear if an automatic alert is received via Internet.
Vacation Mode: Whenever the Vacation Mode is activated for the Total Control system, the status
bar displays “Vacation Mode: ON”.

Core Buttons
These key system navigation buttons always are present at the bottom of the screen.
Vol-, Vol+, & Mute
These audio controls affect the volume for the room to which the TKP-7600 is assigned. See the
Rooms Menu section of this manual for more details.
Main
Selecting this button always returns the user to the Main screen.
Shortcuts
These user-configurable shortcuts allow the end-user to store up to six (6) favorite activities. For
more information about using short cuts, refer to the Using Shortcuts section of this manual.
Rooms
This selection opens the Rooms Menu and allows for monitoring and/or control of other rooms in
the project. See the Rooms Menu section of this manual for more details.

Power
When pressed, this performs the Room Off function programmed by the Custom Integrator.
If this button is pressed for greater than three (3) seconds, the Power Menu appears.
In this menu, it is possible to:
●Turn Off the ROOM ( ).
●Issue the House Off command, as programmed by the custom integrator.
●Custom commands, programmed by the custom integrator, may also appear in this menu.

Audio Video Intercom Menu
The Intercom module communicates with other installed TKP-7600’s via audio, audio & video, or a
baby monitor. In order to use the intercom it must first be enabled within the Settings screen.
Using the Intercom
1. Touch the screen and navigate through the Category ribbon (scroll left or right) to locate
the Intercom icon.
2. Press the Intercom icon.
3. A list of available client (other TKP-7600 clients) are shown. Select an available client.
When an available client is selected, you have the option to select from audio only, audio
and video, or a baby monitor.
●Audio: Two-way communication between
clients and via audio only.
●Audio and Video: Two-way communication
between clients via audio and video.
●Baby Monitor: One-way communication to
view and listen to a room where the secondary
client cannot hear or see you.
Unavailable
client set to
do not
disturb.
Available
client
Busy client
on call

After selecting an option, the TKP-7600 turns the unit’s camera ON (
) displaying an onscreen image of the selected client.
6. Pressing the End Call button displays an onscreen message concluding the call.
Press to
a
call.
Increase/
decrease
or mute
the
volume

Using Audio Broadcast
Simultaneously communicate to two or more TKP-7600 clients.
1. Touch the screen and navigate through the Category ribbon (scroll left or right) to locate
the Intercom icon.
2. Press the Intercom icon.
3. Select Audio Broadcast.
4. Select available clients from the Audio Broadcast call list and press Ok to begin the
intercom call.
5. The call broadcast to all selected clients.
6. Press End Call to conclude the intercom
session.

Using Do Not Disturb
Turning ON Do Not Disturb
Setting the TKP-7600 to do not disturb renders the client unavailable for intercom communication
with other clients.
1. Touch the screen and navigate through the Category ribbon ( ) to locate
the Intercom Icon.
2. Press the Intercom icon.
3. Press Set Do Not Disturb Mode.
4. Now this TKP-7600 is unable to receive communication (
) from other clients.
Turning OFF Do Not Disturb
Turning off the do not disturb feature re-enables the client to receive audio and video
communication. (Note: this option is always at the bottom of the intercom list.)
1. Touch the screen and navigate through the Category ribbon (scroll left or right) to locate
the Intercom icon.
2. Press the Intercom icon.
3. Press Turn Off Do Not Disturb Mode.
This icon
states the
client is
currently set
to Do Not
Disturb

Rooms Menu
The Rooms Menu is the “landing” screen for the TKP-7600. This menu (see picture below) displays
whenever the keypad reboots, loses/regains power, or is rest. The most common choice would be
to select the room where the TKP-7600 is physically located; however, this is up to the user.
The Rooms Menu is used to:
●Temporarily Link rooms in a Total Control DMS system. This allows all of the linked rooms
to listen to the same audio source and join the volume commands into a single interface.
●Monitor the status of other rooms in the Total Control project.
●Control any other room in the Total Control projects as if it were a keypad in that room.
This is dependent upon the programming done by the custom integrator.
Room List Buttons
●Each room listing has an associated box and action buttons.
●The Exit button returns the user to the last screen used.
●Selecting the room name allows for control of that room ( )
Rooms
Options
Links

Initial View (Room Monitoring)
When the Rooms Menu opens up, the room list populates with all of the rooms in the Total
Control project. Each room displays its status so the user can visually see what is “going on” in
that room.
The Exit button returns the user to the previous screen.
Selecting a Room (Room Control)
Selecting any room from the room list allows the TKP-7600 to control that room, as if it were
physically in that room.
Returning the keypad to control the room where it is physically located requires accessing the
Rooms Menu and selecting the appropriate room.

Linking Rooms (DMS Audio only)
Selecting the Link Rooms button opens up the Link Rooms screen with the current room already
selected. Only rooms/areas that are part of the DMS family of products appear on this menu.
●Select, using the check boxes, the rooms that you would like to LINK. Pressing the check bo
alternately “check” and “uncheck” it.
●The Go Back button cause the screen to revert to the Rooms Menu without making any
changes.
●The Done button temporarily saves the checked rooms as a linked group that can be
controlled from any of the linked rooms.
Linked Rooms are saved until the power is turned OFF, or the user manually de-links the room(s).

Using Linked Rooms
Once a room is linked, pressing the volume or mute buttons for that room causes the Linked
Rooms Volume Pop-Up to display.
●Selecting All Linked Rooms results in the volume and mute commands to operate ALL
rooms (
)
●Selecting an individual room in the Linked Room List allows the volume and mute buttons
to adjust sound ONLY for the room chosen.
Room Options
Selecting the Room Options button for a room causes the menu to expand and offer the user
various options to control the room.
●Lights Off: If the URC controlled lights are located in the selected room, the Options menu
displays a light bulb icon. Selecting this icon issues a “lights off” command for the chosen
room.
●Power Off: Selecting the power icon issues a “room off” command for the selected room.
The default for this command is to turn off all audio and video device in that room;
however, this may have been altered by the system programmer.

Time & Weather Module
This module displays information about the time, date, and local weather.
Pressing the Time, Date & Weather display in the Title Bar of the TKP-7600 opens the Time &
Weather Module.
●Selecting Exit returns the TKP-7600 to the previous screen.
●The Night Mode option displays the most essential information, date, time, and weather,
while reducing the screen’s brightness to not over power a dark room. This mode disables
any photo slideshow or screen time-out.
●Once touched, the screen reverts to its normal mode of operation, including displaying a
photo slide show and turning off after the amount of time determined by the Settings
menu.
Table of contents
Other URC Keypad manuals

URC
URC Total Control TKP-8600 User manual

URC
URC TKP-5500 User manual

URC
URC TKP-7600 User manual

URC
URC TKP-100 User manual

URC
URC TKP-2000 User manual

URC
URC TKP-2000 User manual

URC
URC TKP-2000N User manual

URC
URC ccGen2 KP-1 User manual

URC
URC Total Control TDC-7100 User manual

URC
URC Total Control 2.0 TKP-9600 User manual
Popular Keypad manuals by other brands

PalatiumCare
PalatiumCare PalCare PAL-106050 installation guide

AccessGard
AccessGard AG-S600EM-W user manual

Elkron
Elkron PRO MEDEA KP710D Complete manual

Mottura
Mottura XDIGIT 99.779 quick start guide

Gianni Industries
Gianni Industries DG-600H Specifications

Digital Monitoring Products
Digital Monitoring Products 691 Installation and programming guide