Valley Tool Vrisimo Sanitizer User manual

PO Box 220 | 2507 Tully Rd. | Hughson, CA 95326 USA |
800‐426‐5615
Sanitizer OWNER’S MANUAL
Sanitizer
by
Version 2.2
Release Date: Dec 2017
Serial Number VT17326‐XXXXXX and Aer


Sanitizer
by
Delivery Report Form
Prior to acceptance of the equipment, thoroughly check and mark off the items outlined in the de‐
livery checklist below with your sales representave. Make sure you fully understand the opera‐
on, adjustment and safety rules as outlined in the operator’s manual. The sales representave is
responsible for going over this form with the owner and operator of this aachment. This form
also serves as your warranty registraon. Fax to 209‐882‐9001.
□ Buyer is shown all grease fittings and proper gear oil height.
□ Oil in Gearbox checked for proper level and weight.
□ All bolts checked for tightness.
□ All hitch pins and retainer bolts in place.
□ All knives and linkages in place.
□ All shields in place.
□ Belts checked for proper adjustment.
□ PTO shaft checked for proper length.
□ Procedures for attaching mower/shredder to tractor demonstrated to end user.
□ Starting procedures explained to end user.
□ Operation guidelines as outlined in owner’s manual explained to end user.
□ Adjustment of cutting height, belts and mower height explained to end user.
□ Replacement of mower/shredder knives explained to owner.
□ Lubrication points shown to end user.
□ ALL safety precautions thoroughly read and understood.
Customer Information
Last Name Street Address
City
Attachment Information
Dealer Information
State Zip
Model Serial Number
Company Name Sales Rep. Name
Company Street Address City State Zip
The signatures below indicate that both the sales representave and the end user have gone
over the above checklist and all topics have been covered thoroughly.
Buyer Signature Date
Dealer Signature Date


Sanitizer
by
Table of Contents
Introduction
Thank You ……………………………………………………. 1
Warranty Informaon …………………………………… 2
Safety
Operaonal Safety ………….……………………………. 3
Maintenance Safety ………………………………………. 4
Basic Operation
Aaching to Tractor/Starng Procedure ……….. 5
Running Your Mower …………………………………….. 6
Adjustments and Maintenance
Cung Height and Belt Adjustment …………….... 7
Replacing Knives …………………………………………….. 7
Cleaning Mower …………………………………………….. 7
Lubricaon …………………………………………………….. 9
Transport, Removal and Storage ………………….... 9
Frequently Asked Quesons ……………………….. 11
Parts Catalog
Pulley/Top Sha Assembly ….………………….………... 15
Back Roller/Cuer Drum Assembly ……..……………. 16
PTO Sha Assembly ……………………..…………………… 17
Gearbox Assembly ………..………………………………….. 18
Decals ………………………………………………………………. 19
General Parts ……………………………………………………. 22
Torque Specificaons ……………………………………….. 23
Notes ……………………………………………………………….. 24

1 www.vrisimo.com
Thank You
Vrisimo Flail Mowers & Shredders is solely
owned by Valley Tool and Manufacturing.
Have industrial applicaons? Own a skid steer
or mini excavator? for our full line of industrial ap‐
plicaons.
PO Box 220 | 2507 Tully Rd. | Hughson, CA 95326 USA |
800‐426‐5615
www.Valleytoolmfg.com
Dear Customer,
Thank you for purchasing a Vrisimo aachment. This manual has been prepared to acquaint you with the
operaon, adjustment and maintenance of your new aachment. It was carefully designed and manu‐
factured under the highest industrial standards to give you years of dependable service. Read this man‐
ual carefully and fully understand the operaon of the machine before aempng to operate it. Each
secon has been clearly idenfied so you can find the informaon you need. Vrisimo Flail Mowers and
Shredders reserves the right to make changes in design and specificaons, and/or to make addions to
or improvements in its products without any obligaon upon itself to install them on its products previ‐
ously manufactured. If at any me you require addional informaon, consult your authorized dealer or
the customer service department.
Aenon
The safety of the operator was one of the primary concerns of Vrisimo Flail Mowers & Shredders when
designing this aachment. Shielding, simple adjustments and other safety features were built into this
aachment whenever possible. You can make your home, orchard or farm a safer place by observing the
precauons noted in this manual. Be sure you and the people working for you read and understand
them. All machinery should be operated only by responsible persons who have been trained to operate
them in a safe manner and have read and understand the operang precauons and instrucons fully.
Important to Purchaser
Customer Ownership Registraon
Prior to acceptance of the equipment, thoroughly check off the pre‐delivery checklist with sales repre‐
sentave. Be sure you fully understand operaon, adjustment and safety rules as outlined in this manual
Visit www.Vrisimo.com

Sanitizer
by
2
Warranty
Vrisimo Equipment guarantees the Vrisimo Flail Mower to be free from defect in material and
workmanship for a period of one year dang from delivery to the original user. The obligaon under this
warranty, statutory or otherwise, is limited to the replacement and/or repair at your authorized Vrisimo
dealer of choice part or parts as shall appear to us, upon inspecon, to have been defecve in material or
workmanship and not altered in any way by the customer or other pares.
This warranty shall not apply to vendor warranted PTO items such as bearings, belts, PTO shas
and gearboxes or other parts not manufactured by Vrisimo Equipment. Such being subject to the warran‐
ty of their respecve manufacturers.
No expressed, implied or statutory warranty other than herein set forth is made or authorized to
be made by us. Vrisimo Equipment shall not be liable for consequenal damages of any kind, including but not
limited to: consequenal labor costs or transportaon charges in connecon with the replacement or repair of
defecve parts, lost me or expense which may have accrued because of said defects.
Vrisimo reserves the right to make changes in its products at any me and without prior noce.
When such changes are made, neither Vrisimo Equipment nor its dealers assume any obligaon to make
these changes in products previously manufactured.

Safety
3 www.vrisimo.com
Operational Safety
Before operang this machinery, read the
owner’s manual thoroughly.
Do NOT operate this machine without proper
training. It is the owners responsibility to en‐
sure all Operators are properly trained in the
appropriate language.
Use OSHA approved eye, ear and head protec‐
on to protect the Operator from flying debris
and noise.
Avoid wearing loose clothing as it can inadvert‐
ently be drawn into moving parts.
Never use drugs or alcohol before or during op‐
eraon of this machine.
Only operate this machine when it is in good
working order on an appropriate power unit
that is in good working order, and with all
guards and safety devices in place and func‐
oning.
Be aware of the machine’s weight and its effect
on the stability of the power unit.
Use flashing warning lights when operang on
highways, except when prohibited by law.
Always inspect area to be worked to ensure
that the jobsite is free from obstacles and de‐
bris that could injure the operator or damage
the machine. Operate at a safe speed (typically
0‐5 mph) in consideraon of the local terrain,
moving slower when operang on or near
slope, ditches or drop‐offs.
Avoid running the machine along the ground in
rocky areas as this could create dangerous dis‐
charge.
Never allow children or other persons to ride
on this mower.
Keep bystanders and children clear of the work
area during operaon as debris can be dis‐
charger in a dangerous manner. The minimum
safe distance is 100 .
Be aware that this machine may be wider than
the power unit, and cauon should be used to
avoid clipping or running over trees, signs or
posts that may be in the way of the machine.
Avoid operaon that would allow hydraulic
lines to be pinched or severed. In the even of a
hydraulic leak, hydraulic fluid may have suffi‐
cient force to penetrate skin, which requires
immediate medical aenon.
Do not turn so sharp or li the mower so high
that the driveline produces a sever knocking as
this will cause the accelerated wear of drive
train components. The drum should not be ro‐
tang when the deck is lied.
Be aware of the risks to equipment and grass
fires. To migate those risks:
* Do not smoke or have open flame in
the work area.
* Do not operate in areas that have been
freshly burned or are sll burning.
*Do not allow clippings/debris to collect
near hydraulic components or bearings.
* Avoid areas with high fire risk: dry
grass, brush or trees.
Operaon of this machine should be stopped
immediately if the Operator’s vision becomes
obscured by the discharge of debris and dust.
Also avoid operang this machine in unusually
foggy or dusty condions or at night.

4
Sanitizer
by
Keep away from the machine unl all the ener‐
gy has dissipated. This includes the complete
stopping of the drum’s rotaon as well as the
dissipaon of pressure in the hydraulic lines.
In the event that a failure does occur during
operaon or if the machine begins to produce
excessive noise or vibraon, shut the machine
down immediately and repair before any con‐
nued use.
Never leave the machine unaended unless it
is in the storage or transport posion.
In addion to the design and configuraon of
equipment, hazard control and accident pre‐
venon are dependent upon the awareness,
concern and prudence and requires suitable
training of personnel involved in the opera‐
on, transport, maintenance and storage of
equipment.
Maintenance Safety
Before performing maintenance on this ma‐
chine, read the owner’s manual thoroughly.
Maintenance should only be performed by
properly trained individuals. It is the Owner’s
responsibility to ensure all individuals involved
in maintaining the machine are properly
trained in the appropriate language.
Be sure to inspect all safety devices before
each use. If safety devices are worn in such a
way that they can no longer properly perform
their guarding funcon, contact your nearest
Vrisimo dealer for replacements.
Maintain all safety decals and make sure they
are visible to the operator. If decals are worn,
contact your nearest Vrisimo dealer for re‐
placements.
Replace cracked or broken blades with new
ones. Don not aempt to weld damaged
blades . This can cause damage that could re‐
sult in the blade being thrown from the shred‐
der.
Wear gloves and eye protecon and exercise
care when handling blades as they can be
sharp. Also be alert to worn or damaged surfac‐
es that could have sharp edges.
Disengage PTO, shut off engine and allow all
movement to stop before leaving the opera‐
tor’s posion to adjust, lubricate, clean, or un‐
clog the machine. Do not try to uncouple hy‐
draulic hoses unless the pressure has ade‐
quately dissipated.
Before working on or underneath the machine,
place blocks on both sides (front and back) of
power unit’s res or treads and under each end
of the aachment to prevent accidental lower‐
ing of the machine. Also, remove the ignion
key from the power unit and allow all move‐
ment to stop before beginning work.

Basic Operation
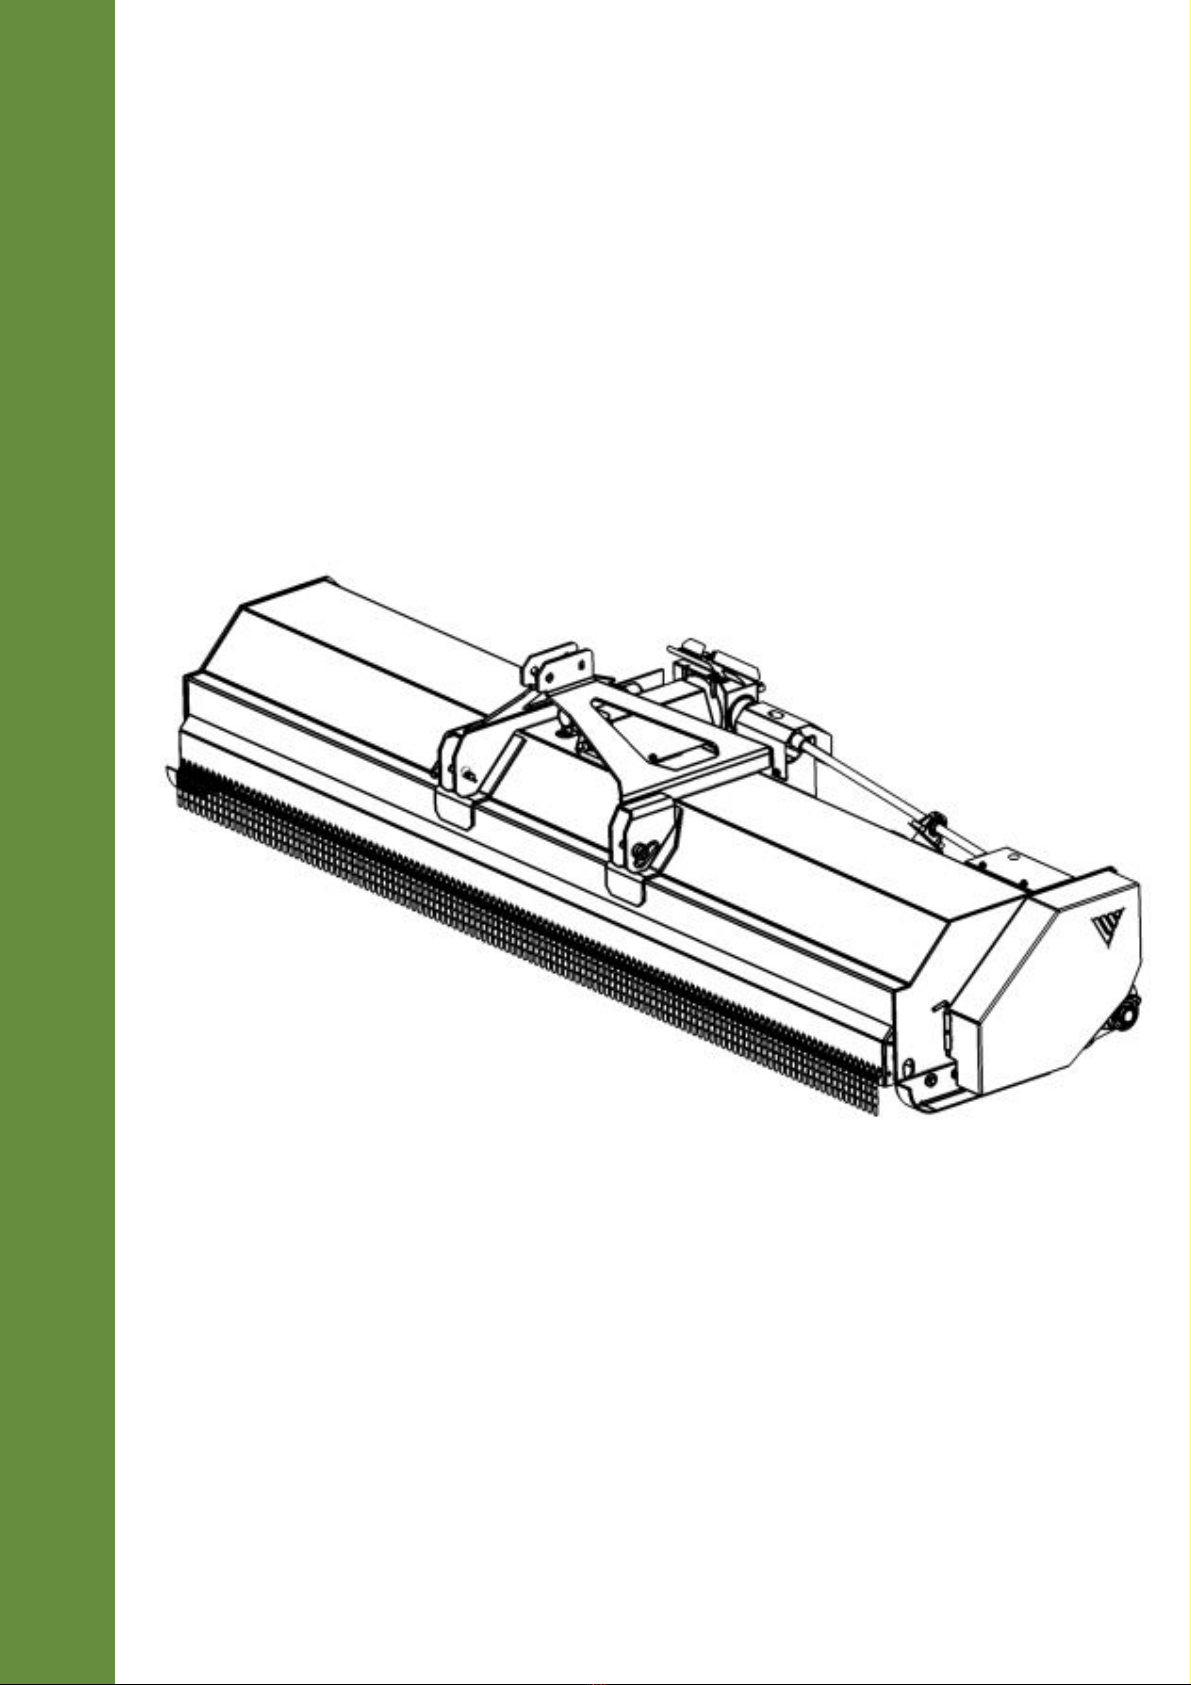
Attaching to the Power Unit
Note: When you ordered your Vrisimo Aachment,
details about your Power Unit were provided to custom
match your Aachment to your Power Unit. While Vri-
simo Aachments can be aached to a variety of
different tractors, your Aachment is specifically con-
figured for your Power Unit and can not necessarily be
placed on another Power Unit as is. Specifically, the
mount category and gearbox/pulley were selected to
mate to your Power Unit’s hitch and opmize perfor-
mance based on your PTO output, respecvely. Your
Aachment should only be connected to Power Units
that share the same specificaons as the informaon
on the Power Unit you provided. Aachment instruc-
ons are for the most common configuraon: 3-point
hitch with a PTO output of 540 rpm.
The person that is aaching your Vrisimo prod‐
uct should be familiar with the aachment and remov‐
al of equipment from a 3‐point hitch and be able to do
so safely. Aachment should be performed on flat
ground away from obstrucons. During aachment,
keep hands out of pinch points and away from the
blades to avoid injury.
The tractor’s drawbar should be placed to its
shortest point, if there is sll insufficient clearance
then it should be removed. If your tractor has load
and depth control, lock out control so it will not func‐
on but be in “free float.”
1) Back the tractor up to the front of the machine so
that the li links are in line with the mower’s hitch
pins.
2) Shut off the engine and disengage the PTO. Block
the tractor’s wheels before placing yourself be‐
tween the tractor and the aachment.
3) Aach the tractor’s le and right li links to the
corresponding hitch pins of the aachment, secur
ing both connecons with lynch pins.
4) Adjust the sway bars so that there is a minimum
side slack and be sure the stabilizers are ght.
5) Aach the tractor’s top link to the “A” frame of the
aachment and adjust the top link to the approxi‐
mate desired cung height.
6) Aach the PTO to the tractor by pushing in on the
quick disconnect pin. Remember, the tube end
goes to the aachment and the bar end goes to
the tractor.
7) With the aachment and PTO line connected check
the drive sha through the enre liing range
checking for binding, booming, uncoupling or
aachment contact.
Starting Procedure
The Operator should be properly trained on the
use of your Vrisimo Aachment and wearing the ap‐
propriate safety gear. Do not start the Power Unit un‐
l the Aachment has been checked for proper assem‐
bly and installaon. This includes the appropriate con‐
necon of the hitch and PTO connecons as well as
the proper funconing of all safety devices on both the
Power Unit and the Aachment. Clear the work area
of all bystanders and children:
1) Check that the aachment is in the down posion
and that the blades are not in contact with ground.
Start engine and set throle to idle. Never engage
the PTO with the motor above idle speed.
5 www.vrisimo.com

Sanitizer
by
2) With the motor at low RPM engage the PTO out‐
put.
3) Slowly bring the throle up to 540 RPM. If the
Aachment produces excessive noise or vibra‐
on, disengage the PTO and shut down the Pow‐
er Unit immediately. Determine the cause of the
problem and correct it before connuing with its
operaon.
4) Aachment is ready for operaon.
Running Your Attachment
1) Determine ground speed based on terrain and
material being cut. This will typically fall within
the 0‐5 mph range.
2) Posion skid shoes between 1/2‐3” off the
ground; skid shoes are not meant to run on the
ground.
3) The mower and skid shoes should be level with
the ground, the height of the mower can be ad‐
justed with the back gauge roller which runs
along the ground.
4) Adjust the sway bars so that there is a minimum
side slack and be sure the stabilizers are ght.
5) Aach the tractor’s top link to the “A” frame of
the aachment and adjust the top link to the ap‐
proximate desired cung height.
6) Aach the PTO to the tractor by pushing in on
the quick disconnect pin. Remember, the tube
end goes to the aachment and the bar end goes
to the tractor.
7) With the aachment and PTO line connected
check the drive sha through the enre liing
range checking for binding, booming, uncou‐
pling or aachment contact.
Shut Down Procedure
1) When work is completed, disengage the PTO
drive and posion it for storage or transport (See
the “Transport, Removal and Storage ” secon for
details on proper storage). Shut off Power Unit
and set parking brake, wait for the aachment to
stop rotang.
2) Visually inspect the PTO sha, all the bearings
and gearbox for excessive heat or leaks.
6

Adjustments & Maintenance
Note: Before performing maintenance, ensure all mo‐
on has stopped and that the Power Unit is powered
down with ignion key removed. Before working on
or underneath the mower, place blocks on both sides
of the Power Unit’s res and underneath both ends of
the mower to prevent accidental lowering of the ma‐
chine.
Cut Height Adjustments
1) The cung height of the mower can be adjusted
from 0‐4”. Adjusng is done by shortening or
lengthening the top‐link. Under no circumstances
should the knives contact the ground!
2) The enre weight of the mower should be on the
back gauge roller. The skid shoes should be adjust‐
ed so there is 1/2”‐3” clearance between them
and the ground. The shoes are for added protec‐
on against tree roots, ridges or borders and are
not designed to slide on the ground. Adjust the
back gauge roller by removing the bolts from both
sides and reseng It to the correct height.
Wear Components
Wear components such as knives, belts and bear‐
ings may wear at different rates and so
each should be inspected for wear independently.
1) Knives should be replaced when they are dull.
A) When individual knives, bolts or spacers
become worn or damaged they must be re‐
placed with hardware saved from your previ‐
ous knife replacement. Replacing an individ‐
ual staon with new hardware could cause
the cuer drum to run out of bal‐
ance. When replacing hardware at all the
staons, some old hardware should be saved
to replace future broken hardware.
B) Replacing the complete knife assembly is
done by removing the 3/8” carriage bolts
from the hole cover, removing the hole cov‐
er as well. Remove the hanger rod and re‐
move old knife assembly as you remove
hanger rod. When you re‐insert hanging rod
insert new knife assembly in its staon. Re‐
aach the hole cover and carriage bolts, re‐
peat this process unl completed.
2) Decals that are no longer visible, damaged, or lost
should also be replaced.
3) Skid shoes should be replaced as needed.
4) Belt adjustment is done by adjusng the tension
rod.
Cleaning Your Mower
1) Check for excessive grease in bearing areas on the
pulley side of the mower. Make sure that grease is
not allowed to get into the belt areas.
2) Clean any clippings from the gearbox areas, pulley
areas and anywhere else that is prone to excessive
heat where fire can start.
3) Clean the inside of the mower with a pressure
washer. Make sure the inside of the mower is kept
free from mud and compact grass. Keep in mind
that mud built up on the cuer drum can cause
imbalance.
4) Preserve damaged decals or replace them if they
are unreadable. Decal kits can be obtained from
your local Vrisimo dealer.
7 www.vrisimo.com

Sanitizer
by
8
Skid Shoe Back Roll
Adjustment
Keep Undercarriage Clean

Adjustments & Maintenance
Lubrication
Transport, Removal and Storage
Disengage PTO and shut off engine allowing all move‐
ment to stop before leaving the operators posion to
adjust, lubricate, clean or unclog the machine. Before
working on or underneath the mower/ shredder,
place blocks on both sides (front and rear) of tractor
res and under each end of the mower to prevent ac‐
cidental lowering of the machine. Also remove the
ignion key from the tractor and allow all movement
to stop before beginning work.
a)Transport on power unit
1) PTO must be disengaged, unit lied off the ground
b) Transport on Trailer
1) Chain down locaons even if unit is sll aached to
tractor, secure PTO sha
c) Removal
1) Remove the adjustable top link from the tractor
and mower
2) Disconnect the drive sha from the tractor and
mower
3) Remove the safety pins from the lower two link
points. Remove the tractor arms from pin loca‐
ons and re‐insert the pins for storage.
d) Storage
1) Put the drive sha away in a clean, dry place
2) Clean the mower thoroughly (See the “Cleaning
your Mower” secon for details)
3) Relax belt tension (See the “Adjustments &
Maintenance” secon for details)
4) Lubricate the mower as recommended (See the
“Lubricaon” secon for details)
5) Check oil level in gearbox and fill as required ( See
the “Lubricaon” secon for details)
6) Check for worn parts and replace so you will be
ready to mow when necessary. (see the
“Adjustments & Maintenance” secon)
7) Store in a clean, dry place
9 www.vrisimo.com
Locaon Grease Type
(NLGI)
Lubricaon Interval
(hours)
Quanty
Cuer Drum 2 10 As needed
Back Roller 2 10 As needed
Driving Pulley 2 10 As needed
Driveline 2 10 As needed
Locaon Oil Weight Lubricaon Interval
(hours)
Quanty
Gearbox SAE EP 90W As Required Fill to upper
middle
fing
Top Sha 2 10 As needed

Sanitizer
by
10
Lubrication & Transport
Lubricate Back Roll Bearings
NOTE:
1. Remove grease from belts
2. Check for excessive grease on bearings
3. Clean Pulley Assembly of any debris aer every use
Chain down locaons
Lubricate Back Roll Bearings
Remove link pins
Remove Top Link
U Joint
U Joint
Bearing
Bearing

11 www.vrisimo.com
Frequently Asked Questions
Q. Where do I find replacement parts?
R. First check your local tractor dealer and if they do not have parts, ask them to order from the Vrisimo fac‐
tory.
Q. How oen should I change my knives?
R. Replacing the cung knives is enrely up to the owner. When the cut begins to be inconsistent or rough,
consider replacing the knives. It is recommended to keep an extra set of knives on hand so that loss of
work me is minimal.
Q. How oen should I replace my belts?
R. If you are experiencing repeated slipping or breaking of belts, try adjusng the level of tension. If this does
not remedy the problem, replace the belt. Consider having an extra belt on hand as well.
Q. Do I need to fill the gearbox with oil before I use the mower?
R. No, the gearbox comes full with oil. Use 90 weight oil when replacing.
Q. What do I do if my belts are wearing out too fast or burning up?
R. First check belt tension. Belts should have about 3/8” sway in them. Adjust tension accordingly. If this
does not help, check the height of the grass you are mowing. If the grass is over 2 feet tall, you might have
to adjust mower cung height upwards and slow the speed of your travel to reduce belt slippage.
Q. My side skid shoes are wearing out too quickly. What do I do?
R. Operate the mower with the side skid shoes 0.5‐3 inches off the ground. The side skid shoes are meant to
collide only with mounds or objects in the field. The rear roller is the only part of the mower that should
touch the ground during operaon.
Q. How can I prevent my PTO sha from coming off during operaon?
R. Be careful! Make sure the sha is slid all the way on and the safety pin is in the locked posion.

Sanitizer
by
12
Frequently Asked Questions
Q. When I am replacing gear oil, how much should I add?
R. When replacing gear oil, fill from the Upper‐middle fing and when oil begins to come out, the
box is full.
Lower-Middle Fitting
Q. Are there any advantages to reversing cuer drum rotaon?
R. Whether or not reversing cuer drum is advantageous depends on the applicaon. In most, normal
rotaon is a reverse rotaon. This means that the cuer drum rotates in a fashion that would throw
grass or clippings towards the tractor. The only advantage to reversing rotaon would be if you are
mowing in industrial applicaons such as along freeways, in places with large amounts of debris (i.e.
plasc, metal, rocks), or using a front mount applicaon. There are typically no advantages as far as the
grade of cut you will get, but rather safety advantages as stated above.
Q. How do I reverse cuer drum rotaon?
R. To reverse cuer drum rotaon, simply un‐mount the gearbox from its current posion, remove the
safety cover from the other sha of the gearbox and rotate the gearbox so that the previously covered
sha is the one that will be driven by the PTO. Install the safety covers and it is ready to go. Note:
Scoop knives must be rotated to accommodate for a reversed cuer drum rotaon.
Q. How do I replace my knives?
R. Replacing the knives may vary depending on your model of mower/shredder. See the Adjustments/
Maintenance secon for detailed informaon.
Q. When connecng my PTO sha, can I put it on either way or should a specific side go to the mower/
shredder and the other to the tractor?
R. The PTO shas for these mowers/shredders are side specific. The tube half of the PTO sha goes to
the mower/shredder and the bar half of the PTO sha goes to the tractor.

13 www.vrisimo.com

Parts Catalog
Sanitizer
by
Parts Catalog
120 Inch
144 Inch
14

15 www.vrisimo.com
Pulley/Top
Descripon Qty Model P/N
1 Top sha Bearing 1 All TS‐1306
2 Pulley 2 All P‐1461
3 Idler Arm 1 All 0569‐VR‐3
4 Idler Pulley 1 All IP‐1641
5 Belt Adjuster 1 All IP‐1653A
6 Belt (Not Shown) 3 SM2120 5VX619
6 Belt (Not Shown) 4 SM2144 5VX619
7 Skid Shoe‐Le 1 All 1062‐VR‐3
8 Skid Shoe‐Right (Not Shown) 1 All 1061‐VR‐3
1
2
3
4
5
11
10
9
12
14 15 16 17
Descripon Qty Model P/N
9 Top sha extension guard 1 All M‐4016
10 Pillow Block Bearing 1 All TS‐1300
11 Top Sha Extension 1 All 1471‐VR‐2
12 U Joint– Key X Key 1 All TS‐1084
13 Top Sha 1 SM2120 TS‐1413
14 Top Sha 1 SM2144 TS‐1415
15 Pillow Block Bearing 1 SM2144 TS‐1300
16 U Joint– Spline X Key 1 All TS‐1085
17 PTO output guard 1 All 0564‐VR‐3
7
Table of contents
Other Valley Tool Farm Equipment manuals