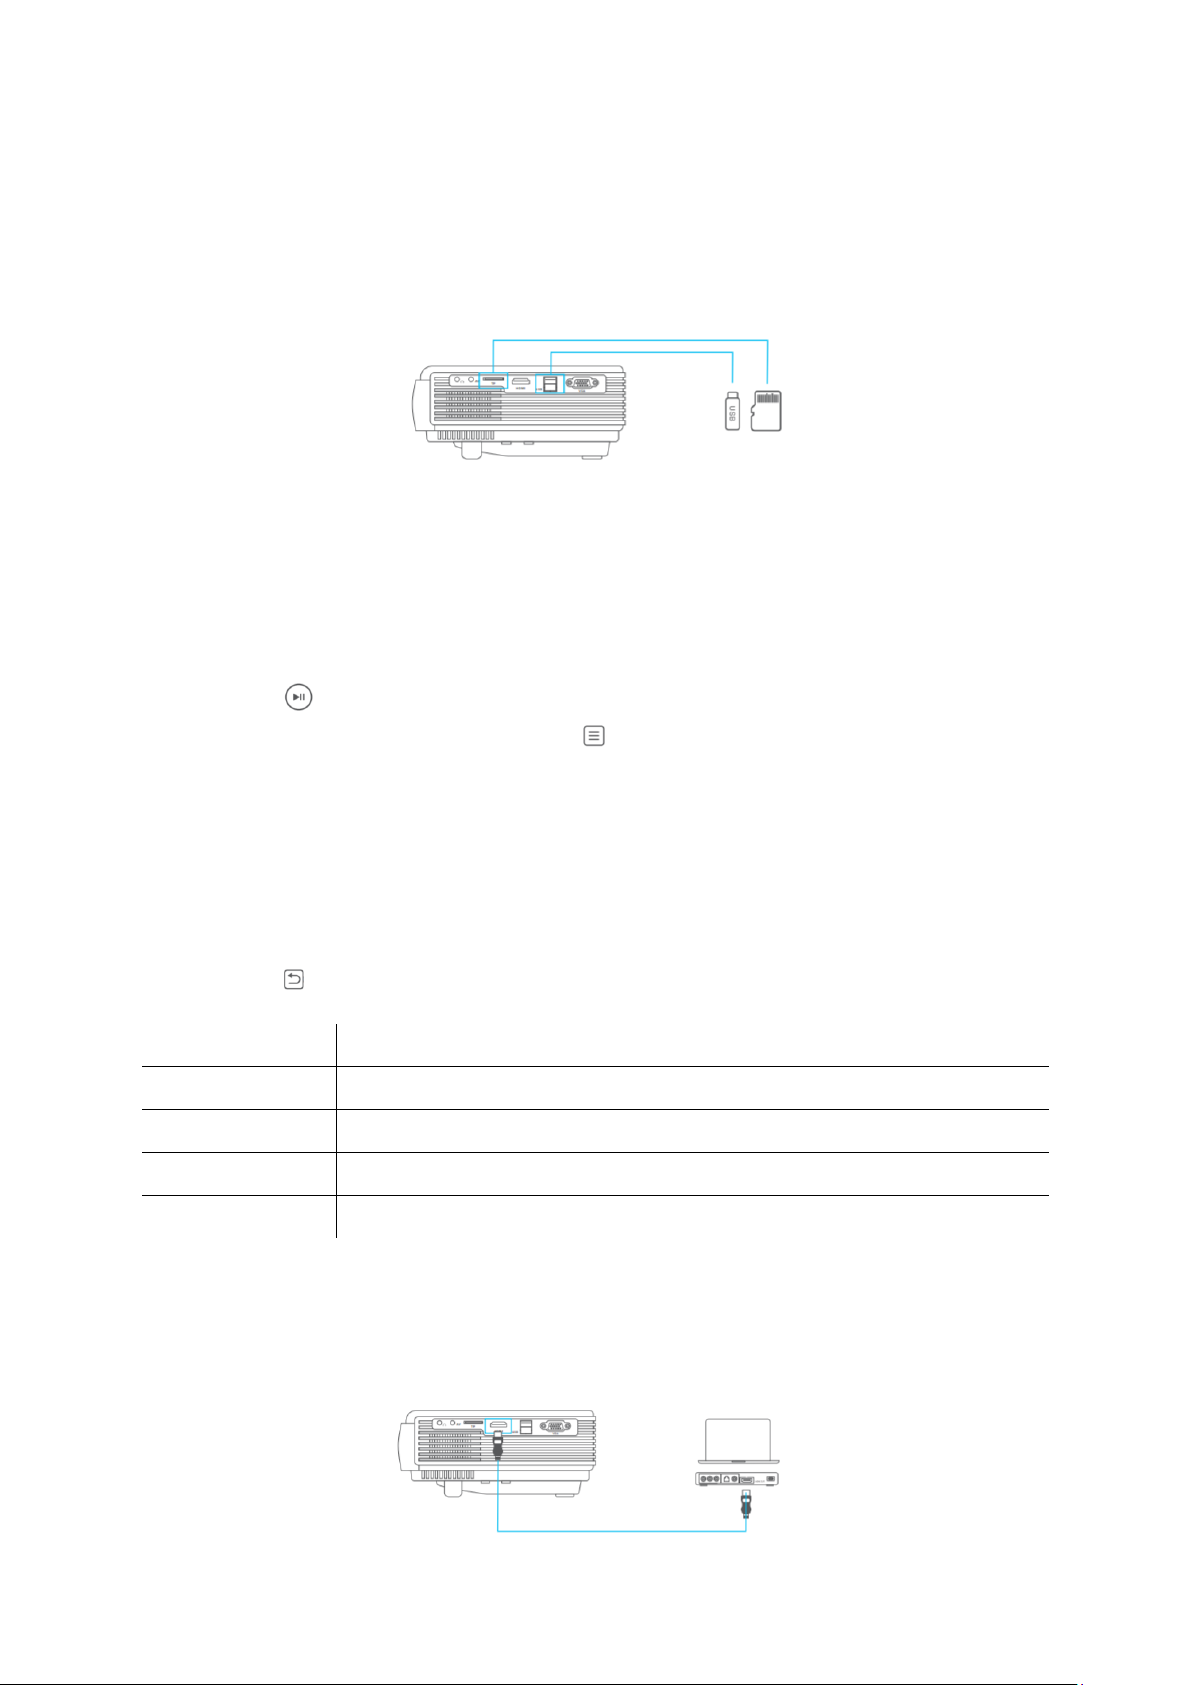
Vankyo LEISURE 3W PRO User manual

LEISURE 3W PRO
User Manual • Uživatelský manuál •
Užívateľský manuál • Használati utasítás •
Benutzerhandbuch

2
English
3 –18
Čeština
19 –35
Slovenčina
36 –52
Magyar
53 –70
Deutsch
71 –87

3
Dear customer,
Thank you for purchasing our product. Please read the following instructions carefully
before first use and keep this user manual for future reference. Pay particular attention
to the safety instructions. If you have any questions or comments about the device,
please contact the customer line.
✉www.alza.co.uk/kontakt
✆+44 (0)203 514 4411
Importer Alza.cz a.s., Jankovcova 1522/53, Holešovice, 170 00 Praha 7, www.alza.cz

4
Vankyo support
www.invankyo.com
@VankyoOfficial
VANKYO
What’s included
Projector
Remote (batteries not included)
User Manual
HD Cable
Power Cable
Notice
Recommended
Not recommended
Video, Movie

5
Product overview
Menu
Focus Ring
Lens
Keystone
Correction Ring
Back
Up
Power Button
Right
Input
Source
Left
Down
Speakers
IR
Air Inlet
Power Input

6
Quick start
1. Projector installation
Note:
Whichever installation option
you select, please make sure:
1. The projector is cantered
directly in front of the
wall/screen, but not tilted
or angled toward it.
2. To select the
corresponding projection
mode so the images can
be projected correctly.
Horizontal placement
Calling Mounting (*Project
Mount not included)
Memory Card Slot
Audio Out
USB
AV In
Air Outlet
HD
VGA
Play/Pause
Power Button
Fast Reverse
Up
Left
Back
Volume
Mute
Fast Forward
Right
Down
Input Source
Volume+
Menu

7
2. Power On/Off
Plug the power cord
into an outlet
Take off the lens cover
Press the Power
Button to turn on
projector
Press the Power
Button twice to turn
off the projector
3. Images adjustment
a) Rotate the Keystone Correction Ring to correct Vertical Keystone Distortion until
the image is evenly rectangular.
b) Rotate the Focus Ring to sharpen the Image Focus until the blurred image becomes clear.
4. Homepage overview
The default interface after booting is Homepage as shown.
*Media –display life categories of Multimedia input (USB Disk or Memory Card),
including movie, music, photo, and text.
*Source –displays three categories of input source, including HDMI, VGA, and AV.
*Miracast –enter to start screen mirroring for Android devices.
*iOS Cast –enter to start screen mirroring for iOS devices.
*Setup –guides you through all setting options for the projector.

8
Multimedia connection
USB Disk/Memory Card connection
Step 1: Turn on the projector and insert your USB Disk/Memory Card into the USB
port/Memory Card slot.
Step 2: Go to Homepage > Media and select the file category you would like to display
among movie, music, photo, and text, then enter the inserted USB Disk/Memory Card to
check all files stored.
Step 3: To play a video file, please follow the below steps:
a) Select Movie to correspondingly read video files stored.
b) Press OK/ on the projector/remote for a certain video file to enter full-screen display.
c) Press OK on the projector or press OK/ on the remote when playing a video to
bring up the toolbar to control the video playing.
Note: Operation for playing a music file, a photo file and a text file is the same with that
for playing a video file, but make sure to select the correct file category. That is, for
playing a music file, select Music in Media interface, likewise for photo, select Photo,
for text, select Text.
Step 4: Press on the projector/remote to go back to Homepage.
File category
Format supported
Video:
AVI/MKV/MOV/MP4/FLV/VOB/MPEG1/MPEG/RMVB/3GP/H.264/XVID
Photo:
JPEG/BMP/PNG/JPG/GIF
Music:
MP2/MP3/WMA/ACC/FLAC/PCM
Text:
TXT
HD connection
Step 1: Turn on the projector and connect your device to the HDMI port of the projector
with provided HD cable.

9
Step 2: Go to Homepage > Source, select HDMI as the input source, then contents of
your device will be mirrored to the screen/wall.
Project
PC screen only
Duplicate
Extend
Second screen only
Tip:
For Windows 7 or higher system, press the “Window Logo + P” key combination to
access the below four display modes.
1) PC screen only option displays contents on computer screen only.
2) Duplicate option displays the same contents on both computer screen and
projected screen.
3) Extend option splits the display between the computer screen and the
projected screen.
4) Second screen only option displays contents only on the projected screen.
AV connection
Step 1: Turn on the projector and connect your device to the AV Port of the projector
with an AV cable (not included).
Step 2: Go to Homepage > Source, select AV as the input source, then the contents of
your device will be mirrored to the screen/wall.
(not provided)

10
VGA connection
Step 1: Turn on the projector and connect your device to the VGA port of the projector
with a VGA cable (not included).
Step 2: Go to Homepage > Source, select VGA as the input source, then the contents of
your device will be projected to the screen/wall.
Note: For better viewing experience, you can press to bring up the tool bar and
change setting about Image, Sound and VGA Set (exclusive for VGA Input) for contents
from HDMI, AV, and VGA connection.
*Image: enter to set Image Mode, Aspect Ratio, Brightness, Contrast, Colour
and Sharpness.
*Sound: enter to select a desire Sound Mode and set Bass, Treble, Balance, and Equalizer.
*VGA Set: enter to access Auto Adjust, HPosition, VPosition, Phase and Frequency.
Screen mirroring for iOS system
Screen mirroring via router’s WIFI
1) Go to Homepage > Setup to enter Settings interface, then select Network > Wi-Fi >
Scan to search and connect the projector to your router’s Wi-Fi.
2) Enter Wi-Fi settings of your iOS device and connect it to the same router’s Wi-Fi.
3) Return the screen back to Homepage, then select iOS Cast to enter the following interface.

11
Mirror your iPhone, iPad, or iPod touch
Make sure that your iOS device is connected to the same network as your projector or
connect iOS device with AP by Projector: Projector AP-xxxx.
1. On your iOS device,
open Control Center and
tap Screen Mirroring.
2. Looking for device that
can be mirrored on.
3. Select ZYCast-xxxx (icast)
from the list.
1) Activate Screen Mirroring/AirPlay Mirroring in the Control Center of your iOS device
and search for the projector.
2) Select ZYCast-xxxx (icast) from the searching list to connect.
3) The contents on your iOS device will be mirrored to the wall/screen after
a successful connection.
Tip: To activate screen mirroring function of your MacBook, please follow the below steps:
a) Click Control Center icon in the menu bar at the top of the Mac screen.
b) Click Screen Mirroring to search for the projector.
c) Select ZYCast-xxxx (icast) to connect.
Screen mirroring via cellular data
1) Go to Homepage > iOS Cast to enter the following interface.
2) Enter Wi-Fi setting of your iOS device and connect it to the Wi-Fi of Projector AP-xxxx.

12
3) Activate Screen Mirroring/AirPlay Mirroring in the Control Center of your iOS device
and search for the projector.
4) Select ZYCast-xxxx (icast) from the searching list to connect.
5) The contents on your iOS device will be mirrored to the wall/screen.
Screen mirroring for Android system
To activate this function, please make sure your Android device supports Multi-
screen/Wireless display. Names may be different from on Android device to another.
1) Turn on the Wi-Fi switch on your Android device.
Note: Successful Wi-Fi connection is not a must, but please make sure the Wi-Fi switch
on your Android device is ON.
2) Go to Homepage > Miracast to enter the following interface.
3) Activate Multi-Screen function on your Android device and search for the projector.
4) Select ZYCast-xxxx (mcast) from the searching list to connect.
5) The contents on your Android device will be mirrored to the wall/screen after a
successful connection.
Note: For screen mirroring through wired connection, please prepare an extra
Lightning/Micro USB/Type-C to HDMI adapter to connect your mobile device with the
projector.
Notes:
1. Due to copyright restrictions of Hulu, Netflix and similar services, the contents
cannot be mirrored to cast.
2. If the projected image freezes, check the network connection, or reboot the
projector, then go to Homepage > Setup > Advanced > Restore Factory Default
and select Confirm to do a reset on the projector.
3. The fluency of screen mirroring will be affected by the network connection. A
bandwidth of 100 Mbit or more is recommended when using screen mirroring.
4. Make sure your mobile device is close to the projector when using wireless
connection. A distance within 3ft is recommended.
5. Some mobile devices may not support screen mirroring due to the compatibility.
Settings
Go to Homepage > Setup to enter the following interface, then press / to toggle
through menu options including Network, Projection, Advanced and Information and
preview their corresponding submenu lists. Press to enter a certain submenu and
press to return to the main menu bar.
1. Network
Go to Wi-Fi > Scan to search and connect the projector to your router’s Wi-Fi.

13
2. Projection
*Projection mode
Depending on how you position your projector, you may need to change projection
modes so that the images can be projected correctly. Available option includes Front
Desktop (default), Rear Desktop, Front Ceiling and Rear Ceiling.
3. Advanced
*Language
Enter to select a language for the projector.
*Boot source
Set your desire booting screen for the projector. Options include Home (default), HDMI,
VGA, AV, and Media.
*Sleep timer
Set the time duration for the projector to shut down automatically. Options include Off,
10 min, 20 min, 30 min, 60 min, 90 min and 120 min.
*iOS Play Mode
Set to mirror or cast contents on your iOS devices. When you select screen mirroring SD,
you are mirroring the screen of your device after a successful connection. Otherwise,
when you select screen casting SD, you can cast a video to the projected screen and still
use your device without interrupting the video.
*Local update
Update the projector using a USB disk with upgrade file (contact your customer service
to get upgrade file).
*Online Update
Enter to update the firmware of the projector when a newer version is available.
*Restore factory default
Restore the projector to the factory settings.
4. Information
Displays detailed information of the projector, including Model Number, Memory,
Extended Storage and Software Version.

14
Projection distance & size
The recommended projection distance varies with different projection contents. Please
adjust the distance between the wall/screen and the projector properly as needed.
Ambient darkness will improve clarity of the projected images.
Specification
Display technology:
LCD
Light source:
LED
Resolution:
Native 1280 x 720
Input signal:
576i, 576P, 720i, 720P,
1080i, 1080P
Installation type:
Front/rear/ceiling
Aspect ratio:
16:9/4:3/Auto
Focus:
Manual
Electronic
keystone:
±15˚
Speaker:
2 W/8 Ohm x 2
Power supply:
AC 100-240 V, 50/60 Hz
Unit dimension:
7.8 x 5.9 x 2.7
inches (198 x
148.6 x 68 mm)
Unit net
weight:
1.98 lbs (0.9 kg)
Photo format
supported:
JPEG/BMP/PNG
Audio format
supported:
ACC/MP2/MP3/PCM/FL
AC/WMA
Mounting screws:
M4 Metric
Screw
number:
1
Video format
supported:
AVI/MP4/MKV/FLV/MOV/RMVB/3GP/MPEG2/H.264/XVID
Ports:
USB port x 1/HD in x 1/VGA port x 1/Audio out x 1/Memory
card slot x 1

15
Troubleshooting guide
1) The contents from Hulu, Netflix, and similar services can not be mirrored or cast.
Due to the copyright restriction from Hulu, Netflix, and similar services, the contents can
not be mirrored or cast.
2) What should I do if I want to watch the content from Hulu, Netflix, and similar
services via projector?
Please prepare a Fire TV stick, Roku stick or Chromecast (not included), then connect it
to the projector.
3) Blurry image
Adjust focus ring/keystone.
Projector and screen/wall must be in effective distance.
4) Remote unresponsive
Make sure remote points at IR receiver directly.
Do not cover IR receiver.
Try a new pair of AAA batteries.
5) Upside down images
Go to Homepage > Setup > Projection > Projection Mode to flip the projection image.
6) Factory reset
Go to Homepage > Setup > Advanced > Restore Factory Default, then select Confirm to
reset the projector to default settings.

16
Warranty Conditions
A new product purchased in the Alza.cz sales network is guaranteed for 2 years. If you
need repair or other services during the warranty period, contact the product seller
directly, you must provide the original proof of purchase with the date of purchase.
The following are considered to be a conflict with the warranty conditions, for
which the claimed claim may not be recognized:
•Using the product for any purpose other than that for which the product is intended
or failing to follow the instructions for maintenance, operation, and service of the
product.
•Damage to the product by a natural disaster, the intervention of an unauthorized
person or mechanically through the fault of the buyer (e.g., during transport,
cleaning by inappropriate means, etc.).
•Natural wear and aging of consumables or components during use (such as
batteries, etc.).
•Exposure to adverse external influences, such as sunlight and other radiation or
electromagnetic fields, fluid intrusion, object intrusion, mains overvoltage,
electrostatic discharge voltage (including lightning), faulty supply or input voltage and
inappropriate polarity of this voltage, chemical processes such as used power
supplies, etc.
•If anyone has made modifications, modifications, alterations to the design or
adaptation to change or extend the functions of the product compared to the
purchased design or use of non-original components.

17
EU Declaration of Conformity
Identification data of the manufacturer's / importer's authorized representative:
Importer: Alza.cz a.s.
Registered office: Jankovcova 1522/53, Holešovice, 170 00 Prague 7
CIN: 27082440
Subject of the declaration:
Title: Projector
Model / Type: VANKYO LEISURE 3W PRO
The above product has been tested in accordance with the standard(s) used to
demonstrate compliance with the essential requirements laid down in the
Directive(s):
Directive No. 2014/53/EU
Directive No. 2011/65/EU as amended 2015/863/EU
Prague

18
WEEE
This product must not be disposed of as normal household waste in accordance with
the EU Directive on Waste Electrical and Electronic Equipment (WEEE - 2012/19 / EU).
Instead, it shall be returned to the place of purchase or handed over to a public
collection point for the recyclable waste. By ensuring this product is disposed of
correctly, you will help prevent potential negative consequences for the environment
and human health, which could otherwise be caused by inappropriate waste handling of
this product. Contact your local authority or the nearest collection point for further
details. Improper disposal of this type of waste may result in fines in accordance with
national regulations.

19
Vážený zákazníku,
Děkujeme vám za zakoupení našeho produktu. Před prvním použitím si prosím pečlivě
přečtěte následující pokyny a uschovejte si tento návod k použití pro budoucí použití.
Zvláštní pozornost věnujte bezpečnostním pokynům. Pokud máte k přístroji jakékoli
dotazy nebo připomínky, obraťte se na zákaznickou linku.
✉www.alza.cz/kontakt
✆+420 255 340 111
Dovozce Alza.cz a.s., Jankovcova 1522/53, Holešovice, 170 00 Praha 7, www.alza.cz

20
Podpora společnosti Vankyo
www.invankyo.com
@VankyoOfficial
VANKYO
Co je součástí balení
Projektor
Dálkové ovládání (baterie nejsou
součástí dodávky)
Uživatelská příručka
Kabel HD
Napájecí kabel
Oznámení
Doporučeno
Nedoporučuje se
Video, film
Table of contents
Languages:
Other Vankyo Projector manuals

Vankyo
Vankyo Leisure 410 User manual

Vankyo
Vankyo Performance 700 W User manual

Vankyo
Vankyo Leisure 3 User manual

Vankyo
Vankyo Leisure 470 User manual

Vankyo
Vankyo Leisure 470 Pro User manual

Vankyo
Vankyo Performance V630W User manual

Vankyo
Vankyo Burger 101 User manual

Vankyo
Vankyo Leisure 3 User manual

Vankyo
Vankyo Performance V630W User manual

Vankyo
Vankyo Leisure 3 User manual