VERITAS Anna User manual
www.facebook.com/veritassewing
www.instagram.com/veritassewing
www.veritas-sewing.com
Instruction manual
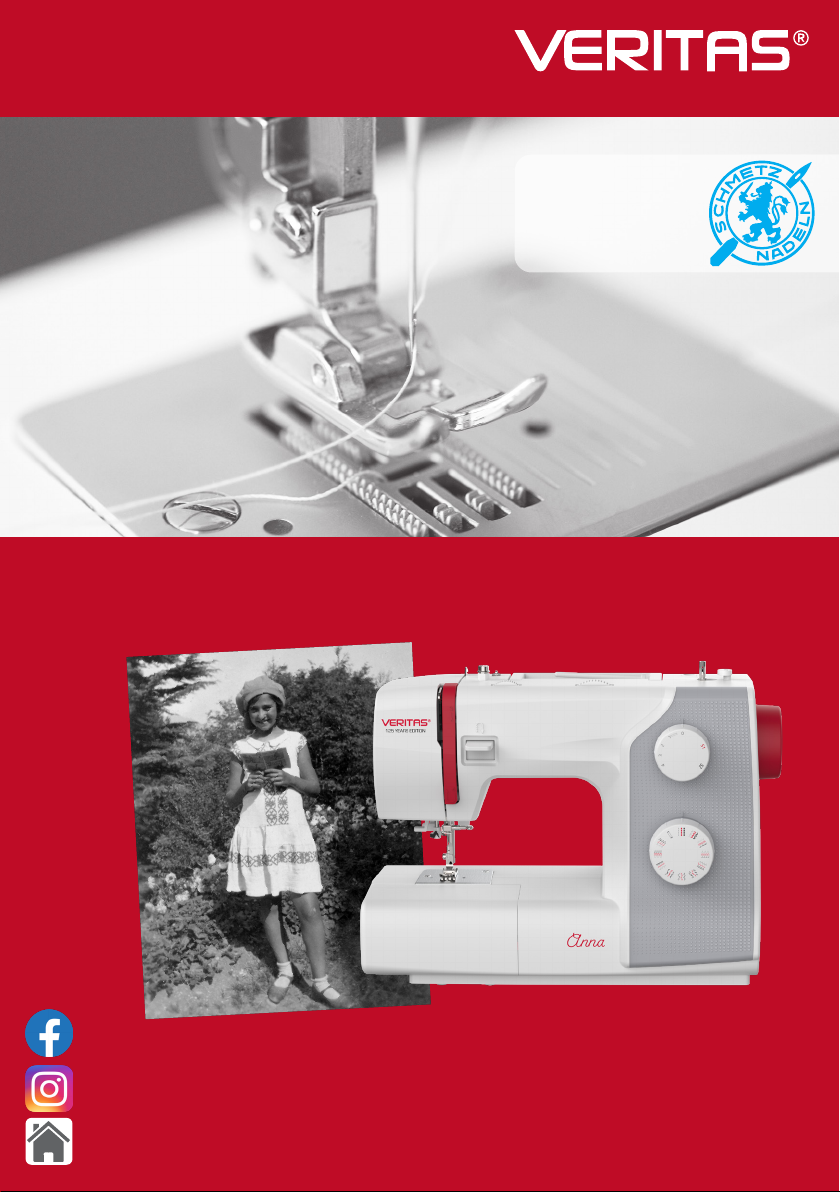
SCHMETZ INSIDE
Anna freud
1895 - 1982
Psychoanalyst

2
Dear Customer,
we congratulate you on your purchase of your sewing machine. You have bought
a quality product which has been made with great care and, if serviced right, will
serve you well for many years.
Before using it for the rst time, we ask you to read the manual at hand carefully,
paying special attention to the safety instructions. Persons who are not familiar
with this manual must not use the appliance.
We wish you much pleasure and great sewing successes! Questions concerning
machine, service and customer care

3
Important safety instructions
When using an electrical appliance, basic safety should always be followed,
including the following:
Read all instructions before using this sewing machine.
DANGER - To reduce the risk of electric shock:
1. An appliance should never be left unattended when plugged in.
2. Always unplug this appliance from the electric outlet immediately after using
and before cleaning.
WARNING - To reduce the risk of burns, re, electric shock, or
injury to persons:
1. Read the instruction carefully before you use the machine
2. Keep the instructions at a suitable place close to the machine and hand it over
if you give the machine to a third party.
3. Use the machine only in dry locations.
4. Never leave the machine unattended with children or elderly people due to
they may not be able to estimate the risk.
5. This appliance can be used by children aged from 8 years and above and
persons with reduced physical, sensory or mental capabilities or lack of
experience and knowledge if they have been given supervision or instruction
concerning use of the appliance in a safe way and understand the hazards
involved.
6. Children shall not play with the appliance.
7. Cleaning and user maintenance shall not be made by children without
supervision.
8. Always switch o the machine if you carry out preparation for work (change
the needle, feed the yarn through the machine, change the footer, etc.).
9. Always unplug the machine if you leave it unattended, to avoid injury by
expediently switch on the machine.
10. Always unplug the machine if you changing the lamp or carry out maintenance
(oiling, cleaning).
11. Don't use the machine if it’s wet or in humid environment.
12. Never pull at the cord, always unplug the machine by gripping the plug.
13. If the LED lamp is damaged or broken, it must be replaced by the manufacturer
or its service agent or a similarly qualied person, in order to avoid a hazard.

4
14. Never place anything on the pedal.
15. Never use the machine if the air vents are blocked, keep the air vents of the
machine and the foot pedal free from dust, fusel and leftovers.
16. The machine must only be used with designated foot controller, in order to
avoid a hazard. If the foot controller is damaged or broken, it must be replaced
by the manufacturer or its service agent or a similarly qualied person.
17. The power cord of the foot controller can not be replaced. If the power cord is
damaged the foot controller must be disposed.
18. The sound pressure level at normal operation is smaller than 75dB(A).
19. Do not dispose of electrical appliances as unsorted municipal waste, use
separate collection facilities.
20. Contact your local government for information regarding the collection
systems available.
21. If electrical appliances are disposed of in landlls or dumps, hazardous
substances can leak into the groundwater and get into the food chain,
damaging your health and well-being.
22. When replacing old appliances with new ones, the retailer is legally obligated
to take back your old appliance for disposal at least for free of charge.
23. The appliance is not to be used by persons (including children) with reduced
physical, sensory or mental capabilities, or lack of experience and knowledge,
unless they have been given supervision or instruction. (For outside Europe)
24. Children being supervised not to play with the appliance. (For outside Europe)
SAVE THESE INSTRUCTIONS
This sewing machine is intended for household use only.
Be sure to use the sewing machine in the temperature range from 5ºC to 40ºC.
If the temperature is excessively low, the machine can fail to operate normally.
To carry the sewing machine, hold the carrying handle with your hand, and
support the sewing machine with the other hand.

5
Contents
Machine Introduction
Principal parts of the machine ................................................................................. 7
Accessories ................................................................................................................ 8
Standard ................................................................................................................... 8
Optional .................................................................................................................... 8
Connecting machine to power source..................................................................... 9
Polarized plug information........................................................................................ 9
Foot control ............................................................................................................... 9
Machine Settings
Sewing table ............................................................................................................. 10
Free arm ................................................................................................................. 10
Two-step presser foot lifter .....................................................................................11
Winding the bobbin............................................................................................. 12-13
Inserting the bobbin ................................................................................................ 14
Threading the upper thread ............................................................................... 15-16
Using the needle threader (depends on models) ................................................. 17
Bringing up the bobbin thread ............................................................................... 18
Replacing the needle ............................................................................................... 19
Matching needle/ fabric/ thread.............................................................................. 20
Changing the presser foot ...................................................................................... 21
Remove the presser foot ........................................................................................ 21
Attach the presser foot ........................................................................................... 21
Remove and insert the presser foot holder ............................................................ 21
Insert the edge/ quilting guide ................................................................................ 21
Thread tension.......................................................................................................... 22
Sewing Basics
How to choose your pattern ................................................................................... 23
Straight stitch ........................................................................................................... 24
Changing the needle position................................................................................. 24
Zigzag stitch ............................................................................................................. 25
Adjusting the stitch width ........................................................................................ 25
Adjusting the stitch length....................................................................................... 25
Useful skills .............................................................................................................. 26
Starting to sew........................................................................................................ 26
Sewing curves ........................................................................................................ 26
Sewing corners....................................................................................................... 27
Sewing thin fabrics ................................................................................................. 27
Sewing heavy fabric ............................................................................................... 27
Sewing stretch fabrics ............................................................................................ 27
Reverse................................................................................................................... 28
Cutting the thread ................................................................................................... 28

6
Utility Stitches
Stretch stitch .................................................................................................................29
Straight stretch stitch...................................................................................................29
Zigzag stretch stitch ....................................................................................................29
Sewing stretch fabrics and elastic tape.....................................................................30
Overcasting stitch.........................................................................................................31
Blind Hem.......................................................................................................................32
1-Step Buttonhole stitch ..............................................................................................33
Making a buttonhole on stretch fabrics .......................................................................35
Button sewing ...............................................................................................................36
Zipper insertion.............................................................................................................37
Inserting a centered zipper..........................................................................................37
Inserting a side zipper .................................................................................................39
Gathering .......................................................................................................................39
Smocking .......................................................................................................................40
Free motion darning, embroidery and monogramming...........................................41
Preparation for embroidering and monogramming .....................................................41
Darning ........................................................................................................................42
Embroidery ..................................................................................................................42
Monogramming............................................................................................................42
Quilting ..........................................................................................................................43
Using the edge/ quilting guide .....................................................................................43
Joining the pieces of the fabric....................................................................................43
Patchwork stitching......................................................................................................44
Applique.........................................................................................................................45
Fagoting .........................................................................................................................45
Scallop stitch.................................................................................................................46
Scallop edging.............................................................................................................46
Shell tuck stitching.......................................................................................................46
Maintenance and Trouble shooting
Maintenance ..................................................................................................................47
Remove the stitch plate ...............................................................................................47
Cleaning the feed dog .................................................................................................47
Cleaning and lubricating the hook...............................................................................47
Trouble shooting guide ................................................................................................48
Disposal .........................................................................................................................50
7
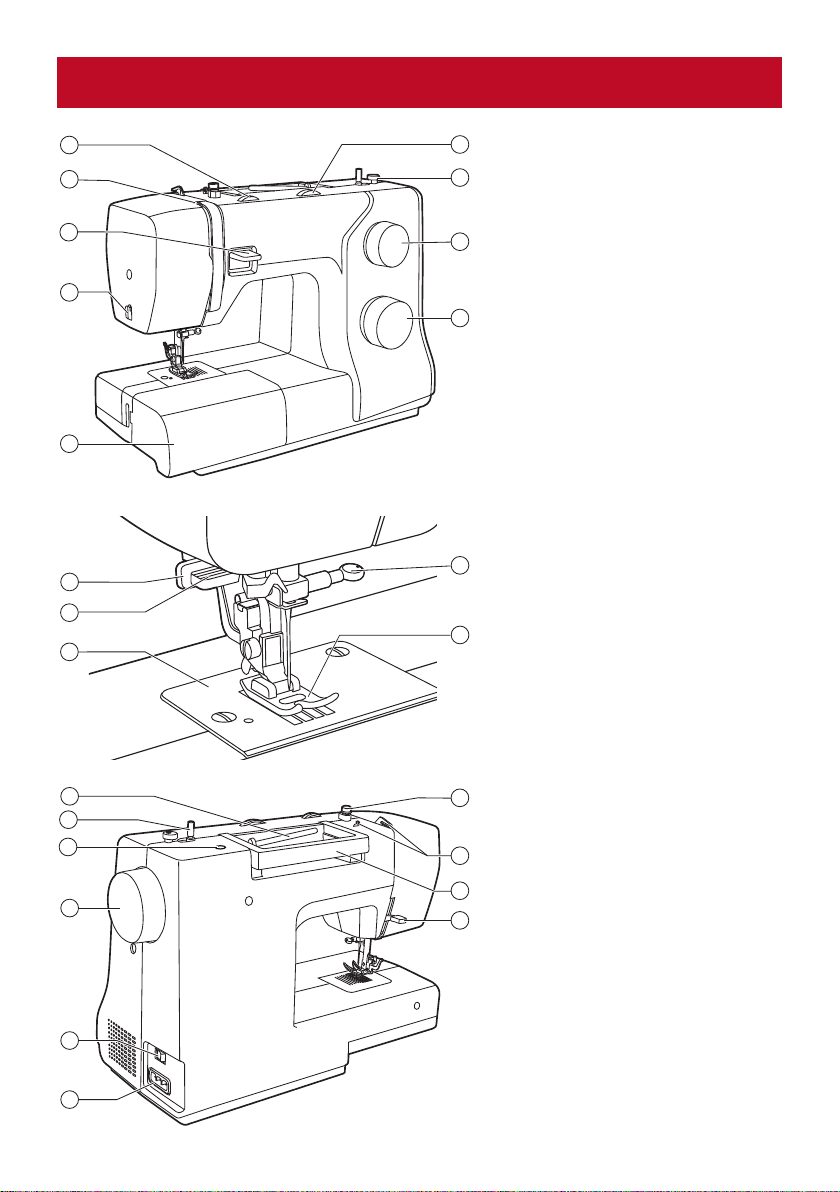
1. Tension dial
2. Take-up lever
3. Reverse sewing lever
4. Thread cutter
5. Sewing table and
accessory box
6. Stitch width dial
(depends on models)
7. Bobbin winder stopper
8. Stitch length dial
9. Pattern selector dial
10. Buttonhole lever
11. Needle threader
(depends on models)
12. Needle plate
13. Needle clamp screw
14. Presser foot
15. Horizontal spool pin
16. Bobbin winder spindle
17. Second spool pin hole
18. Handwheel
19. Power switch
20. Power cord
21. Bobbin thread guide
22. Upper thread guide
23. Handle
24. Presser foot lifter
Principal parts of the machine
8
7
2
1
3
4
5
6
9
17
16
15
19
18
23
20
24
22
21
12
10
11
14
13
8
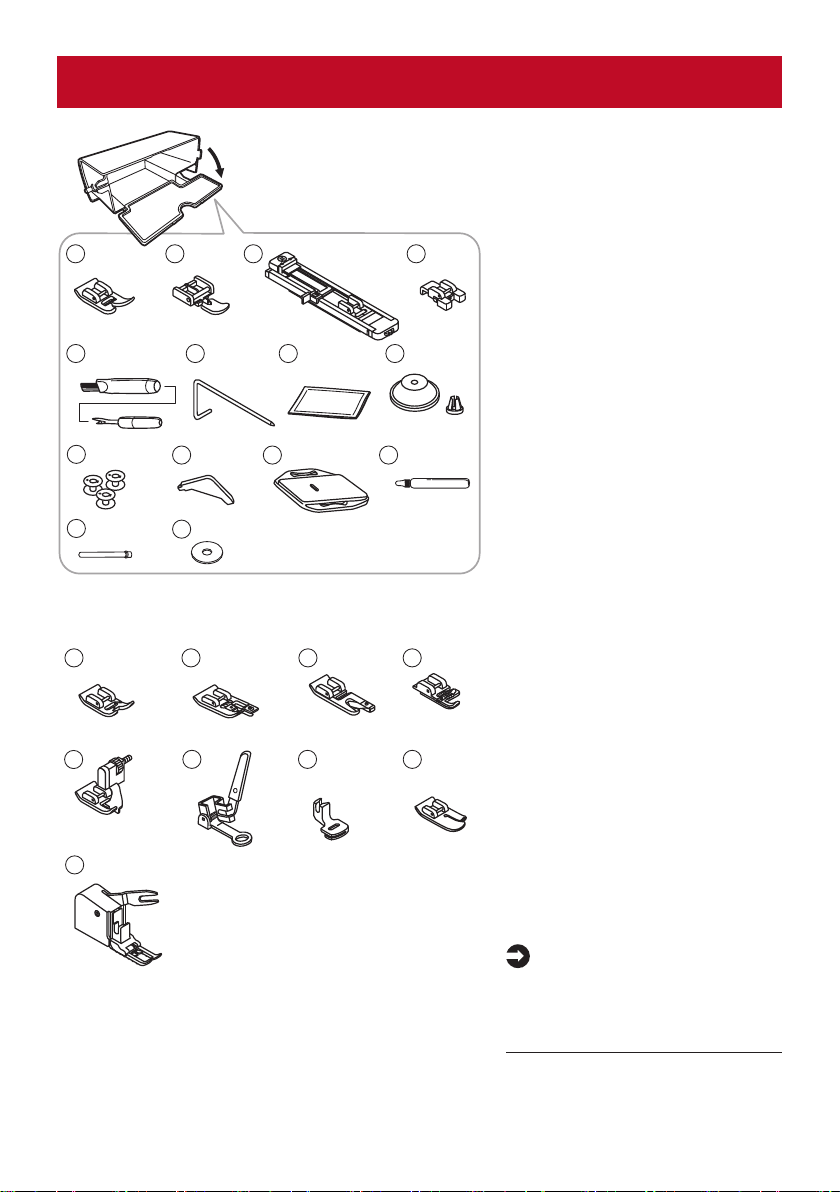
Accessories
Accessories are stored
inside the accessory box.
Standard
1. All purpose foot
2. Zipper foot
3. Buttonhole foot
4. Button sewing foot
5. Seam ripper/ brush
6. Edge/ quilting guide
7. Pack of needles
8. Spool holder
9. Bobbin (3x)
10. L-screwdriver
11. Darning plate
12. Oil bottle
13. Second spool pin
14. Spool pin felt
15 16 17 18
19 20 21 22
23
Optional
15. Satin stitch foot
16.Overcasting foot
17. Hemmer foot
18.Cording foot
19. Blind hem foot
20.Darning/ embroidery foot
21. Gathering foot
22.Quilting foot
23.Walking foot
Note :
To purchase optional
accessories, please consult
your local dealer for further
information.
9
8
5 6 7
10
13 14
11 12
1 2 34
9
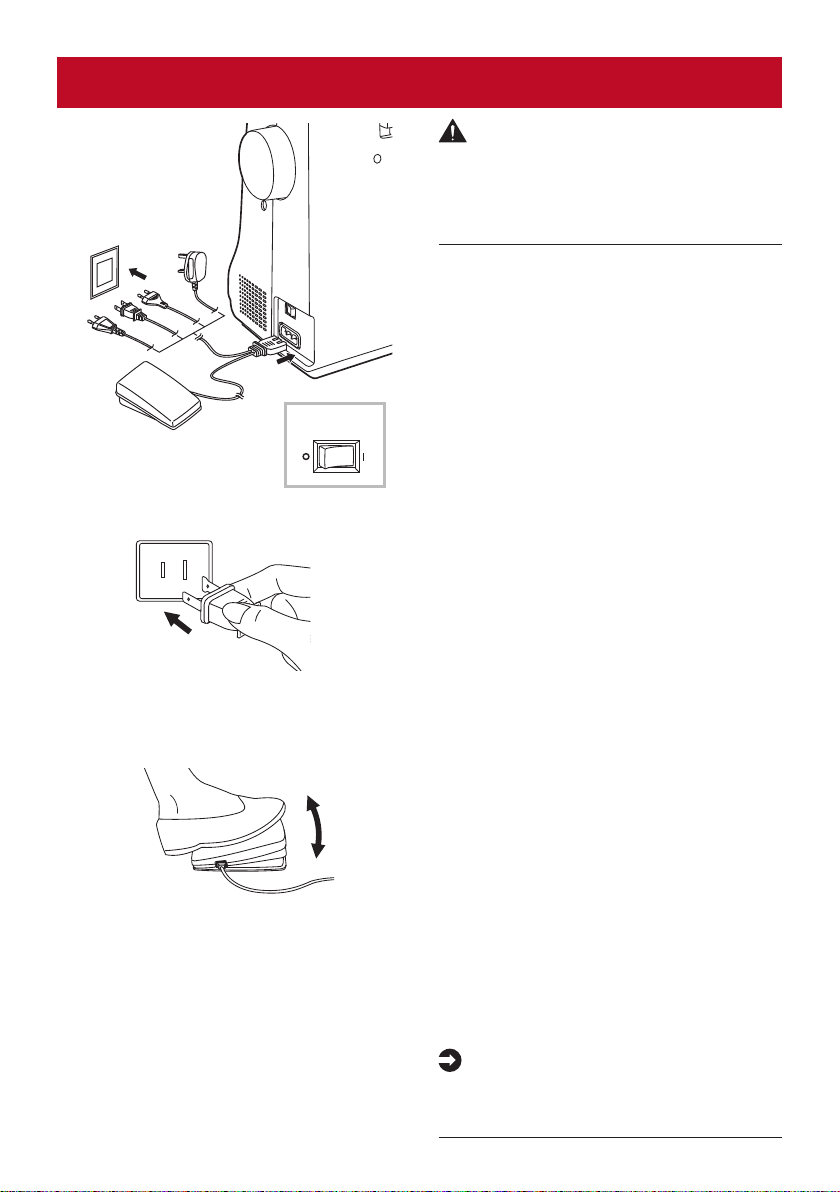
Connecting machine to power source
Attention:
Always make sure that the machine
is unplugged from power source and
the main switch is o ("O"). when
the machine is not in use and before
inserting or removing parts.
Before connecting the power supply,
make sure that the voltage and
frequency shown on the rating plate is
conforming with your main power.
Put the machine on a stable table.
1. Connect the machine to a power
source as illustrated.
2. Turn on the power switch ("I").
The sewing lamp will light up when the
switch is turned on.
Polarized plug information
This appliance has a polarized plug
(one blade is wider than the other),
to reduce the risk of electrical shock;
this plug will t in a polarized outlet
only one way. If the plug does not t
fully in the outlet, reverse the plug. If
it still does not t, contact a qualied
electrician to install the proper outlet.
Do not modify the plug in any way.
Foot control
When the sewing machine is o, insert
the foot control plug into its connector
on the sewing machine.
Turn on the sewing machine, and then
slowly press down the foot control to
start sewing. Release the foot control
to stop the sewing machine.
When machine is on and not in motion,
users can quickly kick one step on
the foot control to change the needle
position (up or down).
Note:
Consult a qualied electrician if in
doubt as to connect the machine to
the power source.
2
ON
OFF
1
10
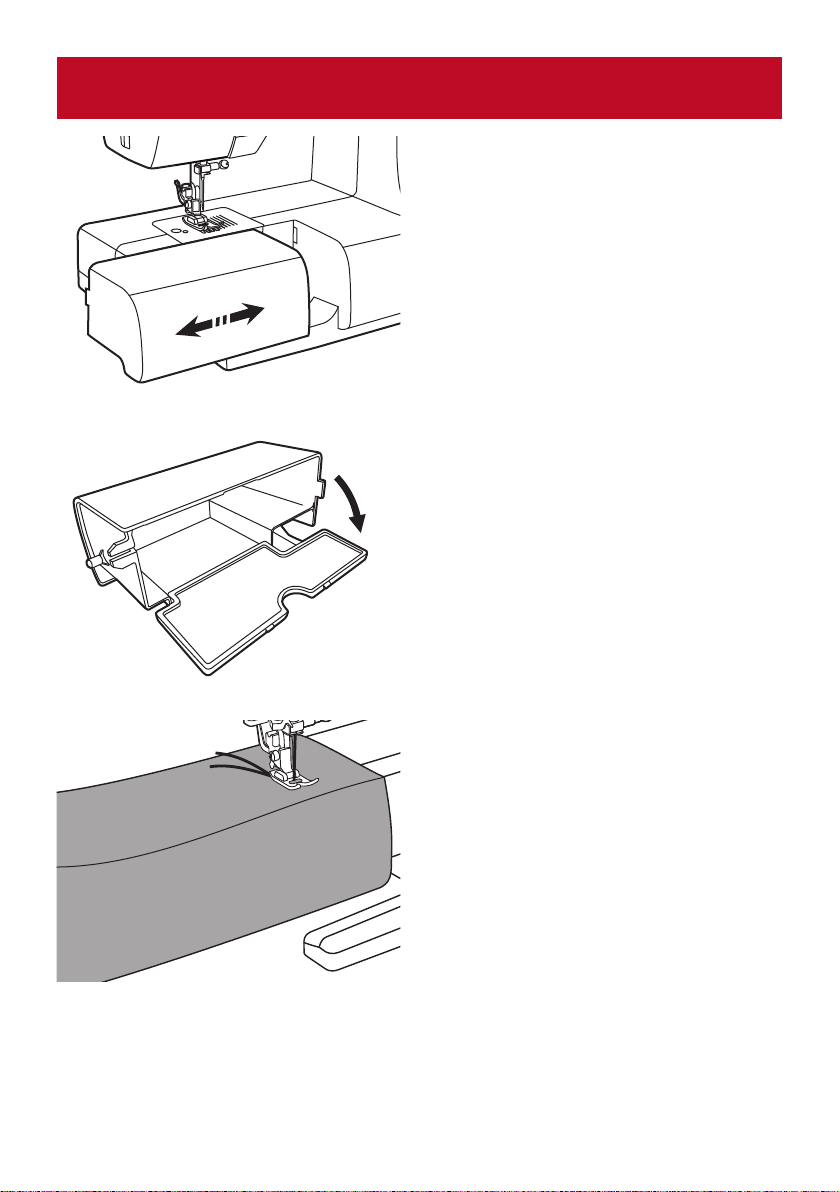
Sewing table
Hold the sewing table horizontally,
then pull toward the left to remove it
from the machine.
Attach the sewing table, and then
push it to the right.
The inside space of the sewing table
is used as an accessory box.
Free arm
Free-arm sewing is convenient for
sewing tubular areas such as pant
hems and cus.
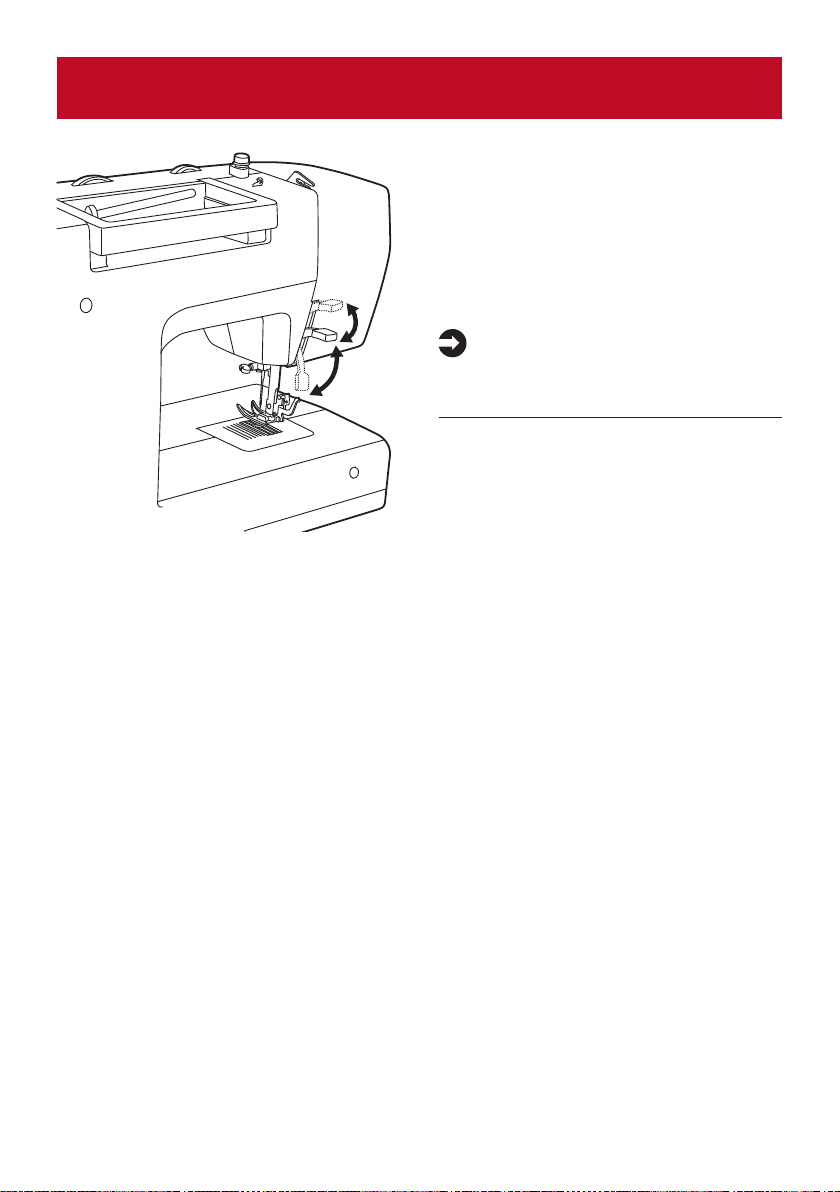
Two-step presser foot lifter
The presser foot lifter is to raise or
lower your presser foot.
When sewing multi-layers or thick
fabrics, the presser foot can be further
raised up manually to allow enough
space for your sewing work.
Note:
The needle must always be at the
highest position.
12
Winding the bobbin
2
1
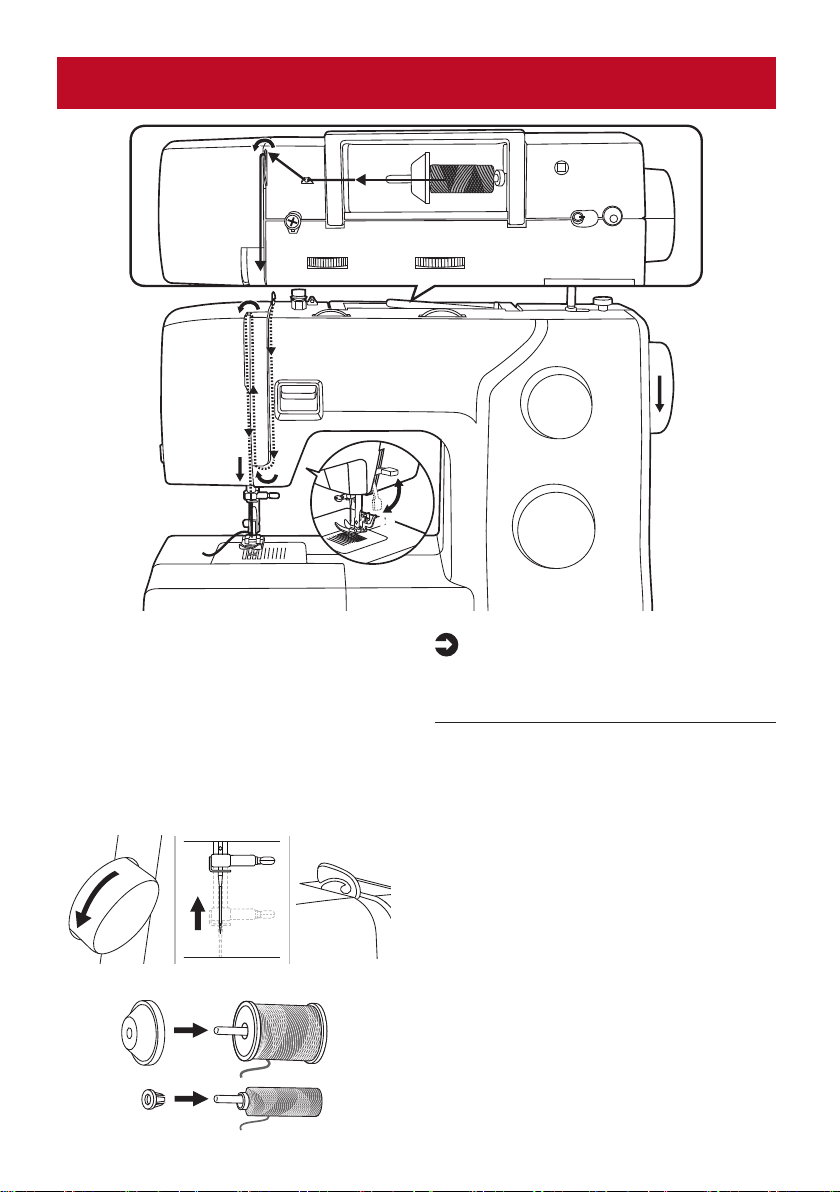
1. Place the thread and spool holder
onto the spool pin. For better
sewing quality, choose a proper
size of the spool holder for the
thread and attach it next to to the
spool.
2. Draw the thread from the spool
and place the thread in between
the upper thread guide.
3. Wind the thread clockwise around
the tension discs.
4. Place the thread end through one
of the inner holes as illustrated
and place the empty bobbin on the
bobbin winder spindle.
1
Notch
2
Bobbin winder spindle spring
5. Push the bobbin to the right.
1
2
3
4-9
13
6. Hold the thread tail securely in one
hand.
7. Step on the foot control to start
winding the bobbin.
8. After the bobbin has wound a few
rounds, stop the machine and cut
the thread near the hole of the
bobbin.Continue lling the bobbin
until it is full. Once the bobbin is
full, it rotates slowly. Release the
foot control to stop the machine,
then push the bobbin winder
spindle to the left.
Note:
Use a bobbin that has been correctly
wound with thread, otherwise the
needle may break or the thread
tension will be incorrect.
9. Cut the thread and then remove
the bobbin.
Note:
When the bobbin winder spindle
is pushed to the right position, it’s
in "bobbin winding" mode and the
machine is not allowed to sew and the
handwheel will not be able to turn. To
start sewing, push the bobbin winder
spindle back to the left.
14
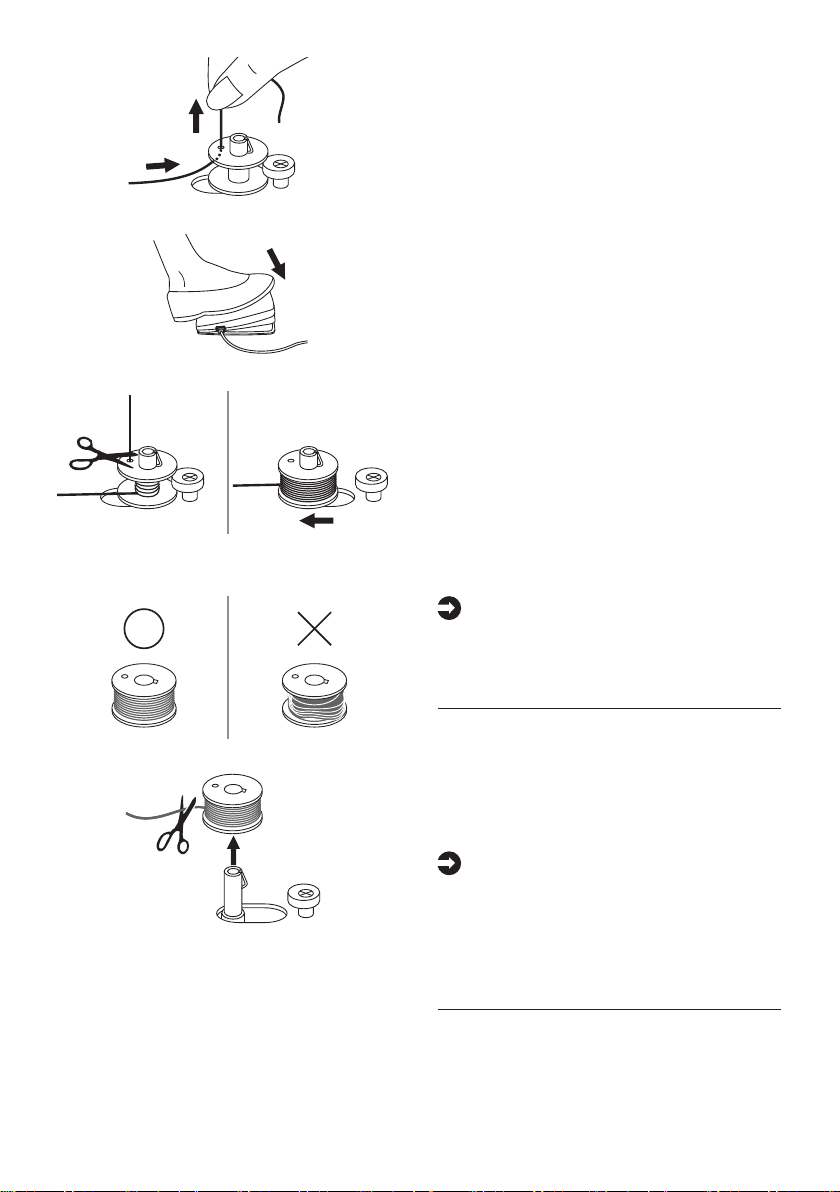
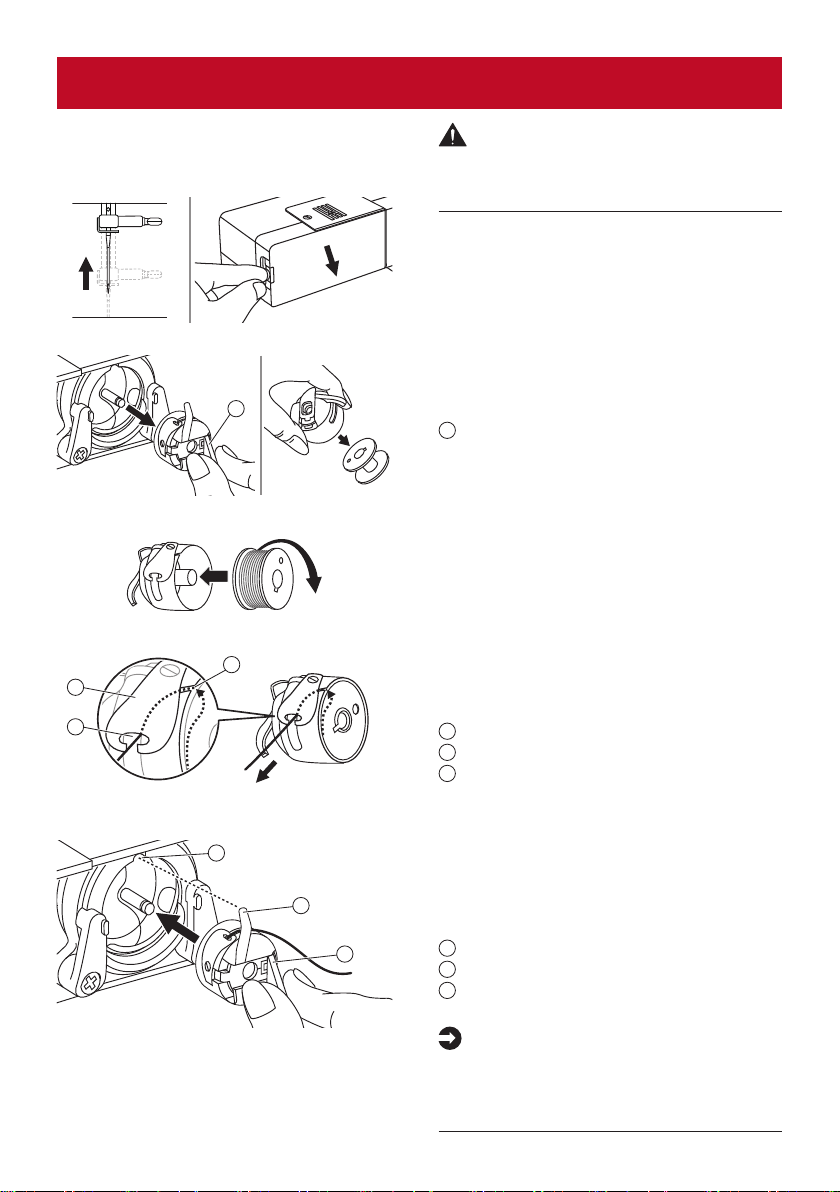
Inserting the bobbin
Attention:
Turn the power switch to o ("O")
before inserting or removing the
bobbin.
When inserting or removing the
bobbin, the needle must be fully
raised.
Remove the sewing table, then open
the hinged cover.
3
2
1
Pull the bobbin case by the hinged
latch.Remove the bobbin of the bobbin
case.
1
Hinged latch
Hold the bobbin case with one hand.
Insert the bobbin so that the thread
runs in a clockwise direction (arrow).
Pull the thread from the slot under
the tension spring and through the
opening. Leave a 15cm tail of thread.
1
Slot
2
Tension spring
3
Opening
Hold the bobbin case by the hinged
latch. Make sure the bobbin case
nger ts into the notch at the top of
the race as shown in. Close the hinged
cover.
1
Hinged latch
2
Bobbin case nger
3
Notch
Note:
If the bobbin case is not properly
placed back into the machine, it will
fall out form the shuttle immediately
after starting to sew.
1
3
2
1
15
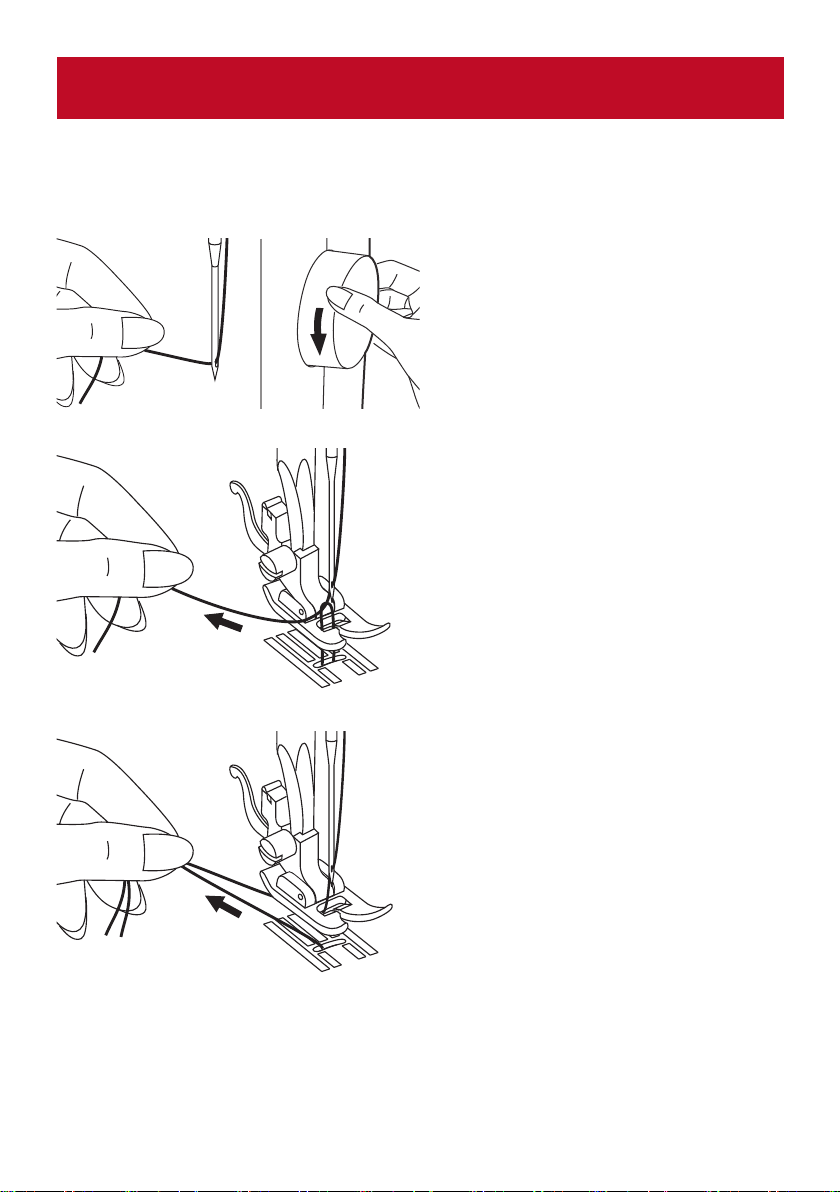
Threading the upper thread
Note:
It is important to do the threading
order correctly otherwise sewing
problems may occur.
1. Raise the presser foot lifter.
2. Turn the handwheel towards you to
bring the needle and take-up lever
to highest position.
3. Place the thread and spool holder
onto the spool pin. For better
sewing quality, choose a proper
size of the spool holder for the
thread and attach it next to to the
spool.
7
8
9
2
3
4
5
6
11
1010
16
4. Draw the thread from the spool and
place the thread in between the
upper thread guide.
5. Guide the thread ahead and pull
the thread through the pre-tension
spring as illustrated.
6. Continue to guild the thread down
to the silver discs to keep the
thread in proper tension.
7. Pass the thread under the take-
up spring then pull it upwards as
arrow marks illustrated.
8. Pull the thread to the top then pass
the thread through the slotted eye
of the take-up lever. Guide the
thread down afterwards.
9. Now pass the thread behind the
thin wire needle clamp guide.
Pull the end of the thread through
the needle from front to rear and
pull out about 10 cm of thread. Use
the needle threader to thread the
needle.
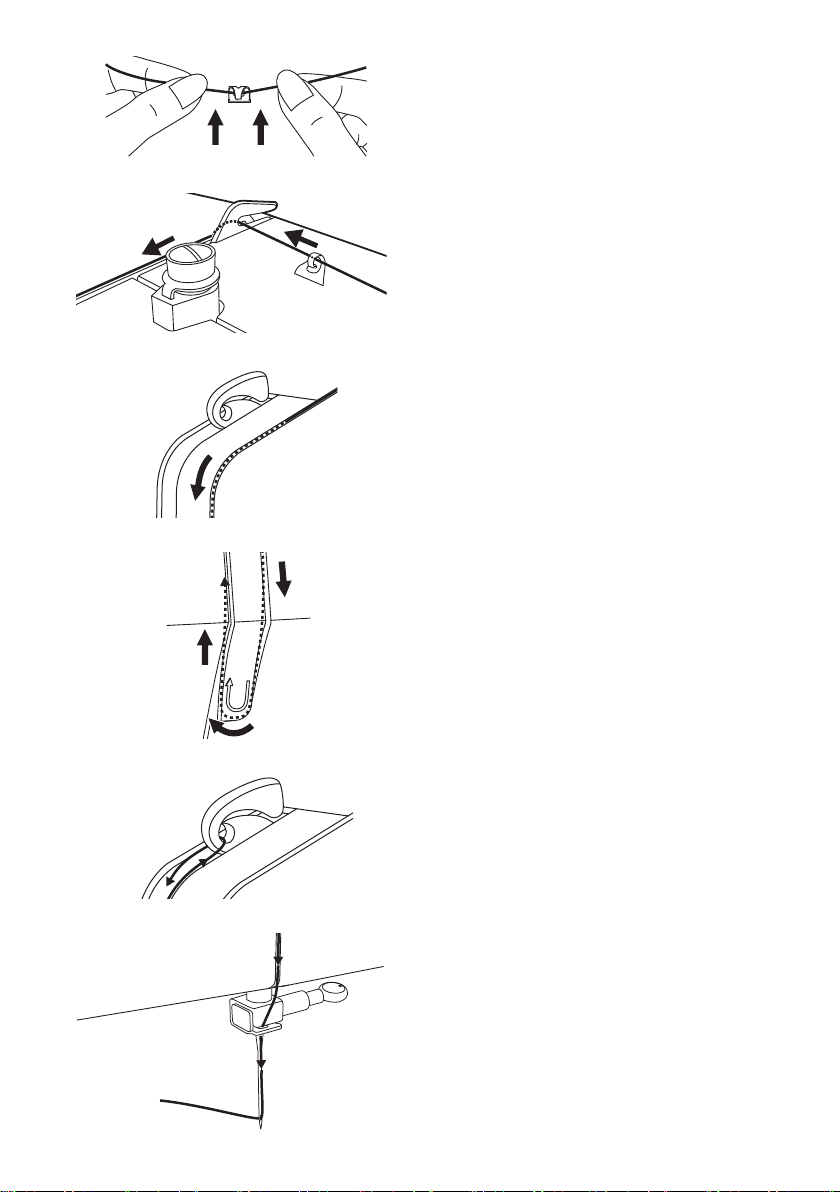
17
Attention:
Turn the power switch to the o
position ("O").
Lower the presser foot lifter. Raise
the needle to its hightest position by
turning the handwheel toward you until
the mark matched with the line on the
machine.
1
Mark
2
Line on the machine
1
1
2
1
1
Press the lever down as far as it goes.
The needle threader turns
automatically to the threading position
and the hook pin passes through the
needle eye.
1
Hook pin
2
Needle
Take the thread in front of the needle
and make sure it is under the hook pin.
1
Hook pin
Hold the thread loosely and release
the lever slowly. The hook turns and
passes the thread through the needle
eye forming a loop.
Pull the thread through the needle eye.
Pass the thread around the thread
guide.
1
Thread guide
1
2
Using the needle threader
18
Bringing up the bobbin thread
When making gathering or smocking, rst bring up the bobbin thread as
described below.
Hold the upper thread with your left
hand. Turn the handwheel towards
you (counter-clockwise) to lower the
needle down below the needle plate
then raise it to bring the bobbin thread
up.
Gently pull on the upper thread to
bring the bobbin thread up through the
needle plate hole. The bobbin thread
will come up in a loop.
Pull both threads to the back under the
presser foot.

19
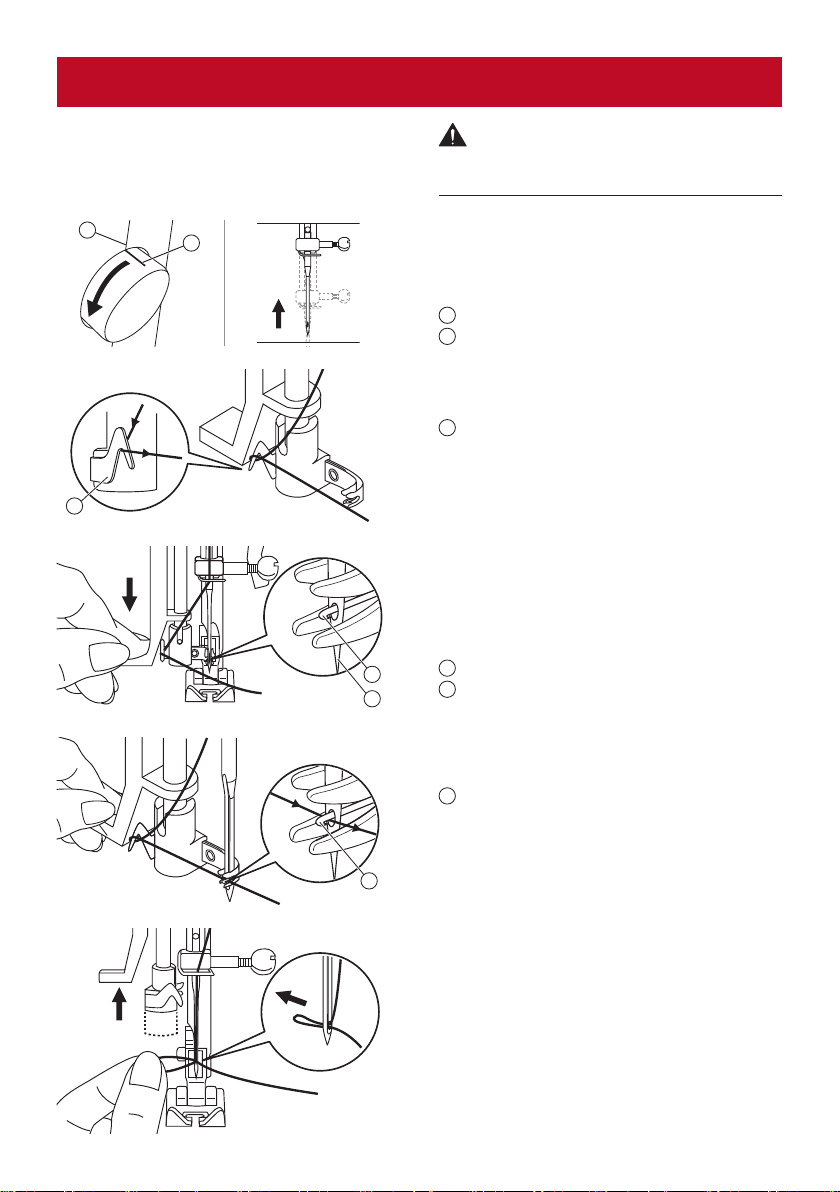
Replacing the needle
1
2
1
2
3
Attention:
Turn the power switch to o ("O") when
carrying out any of the operations below!
Change the needle regularly, especially
when it shows signs of wear or if it
causes problems.
Insert the needle following the illustrated
instructions.
1. Turn the handwheel toward you to
raise the needle then release the
needle clamp screw to remove the
needle.
When inserting the new needle, keep
the at side of the needle shaft being
positioned towards the back.
2. Insert the needle and pull it up to the
end. Then secure it by tightening the
needle clamp screw.
Needles must be in perfect condition.
Problems can occur with:
1
Bent needles
2
Blunt needles
3
Damaged points
20
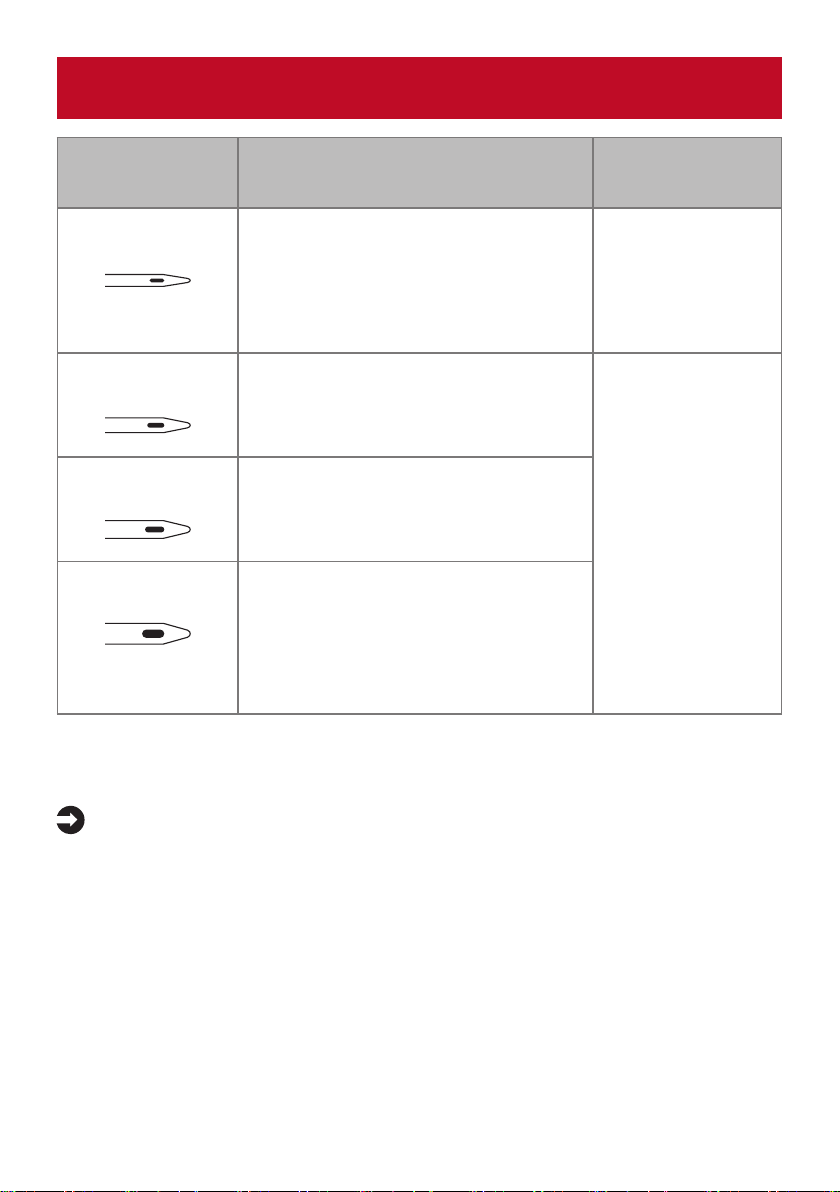
Matching needle/ fabric/ thread
NEEDLE SIZE FABRICS THREAD
65/9 - 75/11 Lightweight fabrics-
thin cottons, voile, serge, silk, muslin,
Qiana, interlocks, cotton knits, tricot,
jerseys, crepes, woven polyester,
shirt & blouse fabrics.
Light-duty thread
in cotton, nylon,
polyester or
cotton wrapped
polyester.
80/12 Medium weight fabrics-
cotton, satin, kettleclote, sailcloth,
double knits, lightweight woolens.
Most threads sold
are medium size
and suitable for
these fabrics and
needle sizes.
Use polyester
threads on
synthetic
materials and
cotton on natural
woven fabrics for
best results.
Always use the
same thread on
top and bottom.
90/14 Medium weight fabrics-
cotton duck, woolen, heavier knits,
terrycloth, denims.
100/16 Heavyweight fabrics-
canvas, woolens, outdoor tent and
quilted fabrics, denims, upholstery
material (light to medium).
Note:
- In general, ne threads and needles are used for sewing ne fabrics, and
thicker threads and needles are used for sewing heavy fabrics.
- Always test the thread and the needle size on a small piece of fabric which
will be used for actual sewing.
- Use the same thread for needle and bobbin.
- Use a stabilizer or place a backing for ne or stretchy fabrics, and select the
correct presser foot.
Table of contents
Other VERITAS Sewing Machine manuals

VERITAS
VERITAS Sarah Operator's manual

VERITAS
VERITAS Rachel User manual

VERITAS
VERITAS Romy User manual

VERITAS
VERITAS MyJanis Operator's manual

VERITAS
VERITAS Bessie User manual

VERITAS
VERITAS 9000A5 User manual

VERITAS
VERITAS Marie User manual

VERITAS
VERITAS Simone User manual

VERITAS
VERITAS JANIS User manual

VERITAS
VERITAS Rubina User manual

VERITAS
VERITAS Sarah User manual

VERITAS
VERITAS Rachel User manual

VERITAS
VERITAS Power Stitch 17 User manual

VERITAS
VERITAS Claire User manual

VERITAS
VERITAS Josephine User manual

VERITAS
VERITAS AVA User manual

VERITAS
VERITAS Greta User manual

VERITAS
VERITAS Amelia User manual

VERITAS
VERITAS JSA18 User manual

VERITAS
VERITAS JSB21 User manual


