Vertex Standard VAC-6030B/AAH27X001 User manual

Vertex Standard
Multi-Unit Charger
User Guide
EN LAS BP FRC
ㆰ
DE
FR ES IT PR NL RU
ID


Copyright 2010, 2011, 2013 Vertex Standard LMR, INC. All rights reserved.
No portion of this manual may be reproduced without the permission of Vertex Standard LMR, INC.
This accessory manual is applicable to the following Multi-Unit chargers that are available for
the Vertex Professional Digital Radios:
VAC-6030B / AAH27X001, VAC-6030C / AAH27X002, VAC-6030H / AAH27X003

1
English
TABLE OF CONTENTS
Operational Safety Guidelines....................................................3
Operating Instructions ................................................................4
Charging Procedure ........................................................................ 4
Troubleshooting..........................................................................5
Service........................................................................................7
VERTEX STANDARD Authorized Power Cords ........................8
VERTEX STANDARD Authorized Batteries ...............................8
2
English
IMPORTANT
SAFETY INSTRUCTIONS
SAVE THESE INSTRUCTIONS
This document contains important safety and operating instructions.
Please read these instructions carefully and save them for future
reference.
Before using the battery charger, read all the instructions and
cautionary markings on (1) the charger, (2) the battery, and (3) the
radio using the battery.
1. To reduce risk of injury, charge only the rechargeable
Vertex Standard-authorized batteries listed in Table 4.
Other batteries may explode, causing personal injury
and damage.
2. Use of accessories not recommended by Vertex Standard may
result in risk of fire, electric shock, or injury.
3. To reduce risk of damage to the electric plug and cord, pull by the
plug rather than the cord when disconnecting the charger.
4. An extension cord should not be used unless absolutely necessary.
Use of an improper extension cord could result in risk of fire and
electric shock. If an extension cord must be used, make sure that
the cord size is 18 AWG for lengths of up to 100 feet (30.48 m), and
16 AWG for lengths up to 150 feet (45.72 m).
5. To reduce risk of fire, electric shock, or injury, do not operate the
charger if it has been broken or damaged in any way. Take it to a
qualified Vertex Standard service representative.
6. The Multi-Unit Charger can only be repaired by a qualified service
technician authorized by Vertex Standard. Any violation of this
policy can void unit warranty.
!
W A R N I N G
!
3
English
WARNINGS (continued)
7. To reduce risk of electric shock, unplug the charger
from the AC outlet before attempting any maintenance
or cleaning.
8. For fuse replacement, use only fuses of the same type
and rating listed on the charger label. Replace fuses with Cooper-
Bussman GDC-3.15 or approve equivalent only. The following parts
can be ordered from Vertex Standard Radio Products and Services
Division (General line : +49 30 6686 1555):
Fuse 6571489S01
Cover 0987739G01
9. This is a class A product. In a domestic environment this product
may cause radio interference in which case the user may be
required to take adequate measures.
OPERATIONAL SAFETY GUIDELINES
• Turn the radio off when charging the battery.
• This equipment is not suitable for outdoor use. Use only in dry
locations / conditions.
• Connect equipment only to an appropriately fused and wired supply
of the correct voltage (as specified on the product).
• Disconnect from line voltage by removing the main plug from the outlet.
• The socket outlet to which this equipment is connected should be
close and easily accessible.
• For equipment using fuses, replacements must comply with the type
and rating specified in the equipment instructions.
• Maximum ambient temperature around the charger must not exceed
40 °C (104 °F).
• Make sure the cord is located where it will not be stepped on, tripped
over, or subjected to water, damage, or stress.
!
W A R N I N G
!

4
English
OPERATING INSTRUCTIONS
The Charger System is a fully automated battery care system. All a
user needs to do is follow these simple steps:
1. Place the radio battery into the charger.
2. Remove the radio / battery when it's fully charged (LED turns
steady GREEN).
The charger pockets accommodate either a radio with a battery
attached or a battery alone. Prior to charging a radio with a battery,
turn the radio off. Batteries charge best at room temperature.
Charging Procedure
1. Plug the charger end of the power supply cord into the power
receptacle located at the back of the charger.
2. Plug the wall receptacle end of the power supply cord into the
appropriate AC outlet. A successful power-up sequence is
indicated by a SINGLE GREEN BLINK on the charger indicator.
3. Insert a battery, or a radio with a battery (with the radio turned
off), into the charger’s pocket by:
a. Aligning the groove on each side of the battery with the
corresponding raised rail on each side of the charger pocket.
b. Pressing the battery toward the rear of the pocket.
c. Sliding the battery into the charger pocket, ensuring complete
contact between the charger and battery contacts.
5
English
4. To remove a radio or battery from the charger, use two hands to
remove a radio or battery from the charger pocket - one hand to
hold and support the charger, and the other hand to remove the
radio or battery.
Once the battery is properly seated into the pocket, the charger
indicator illuminates, indicating the charger has recognized the
presence of the battery. Refer to the charging indicators in Table 1.
TROUBLESHOOTING
When troubleshooting, always observe the color of the LED.
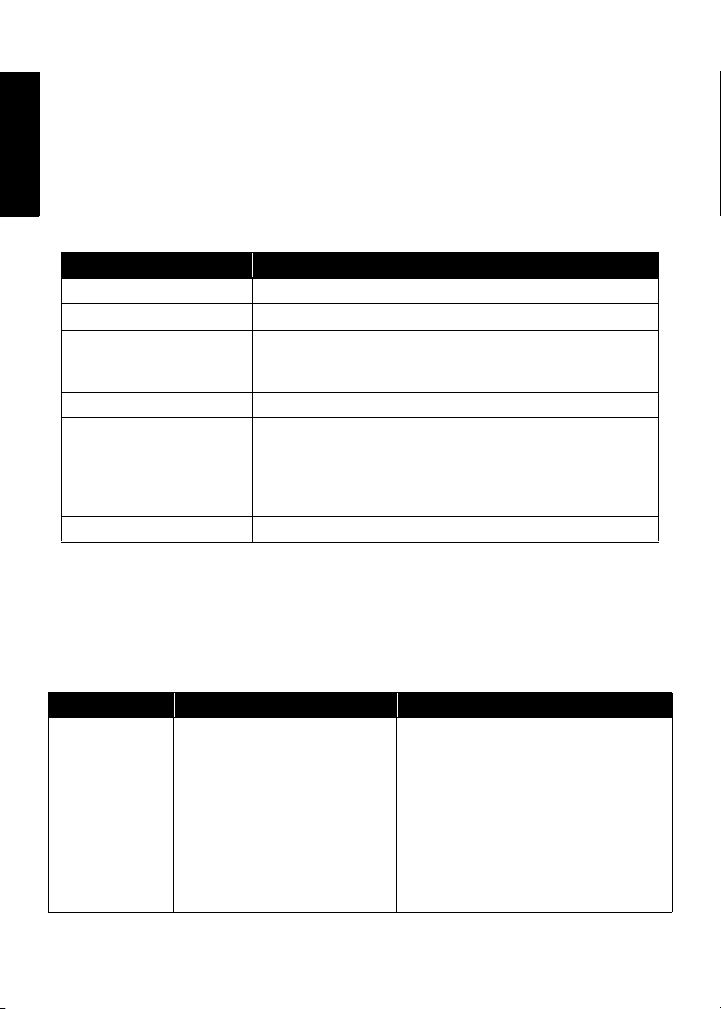
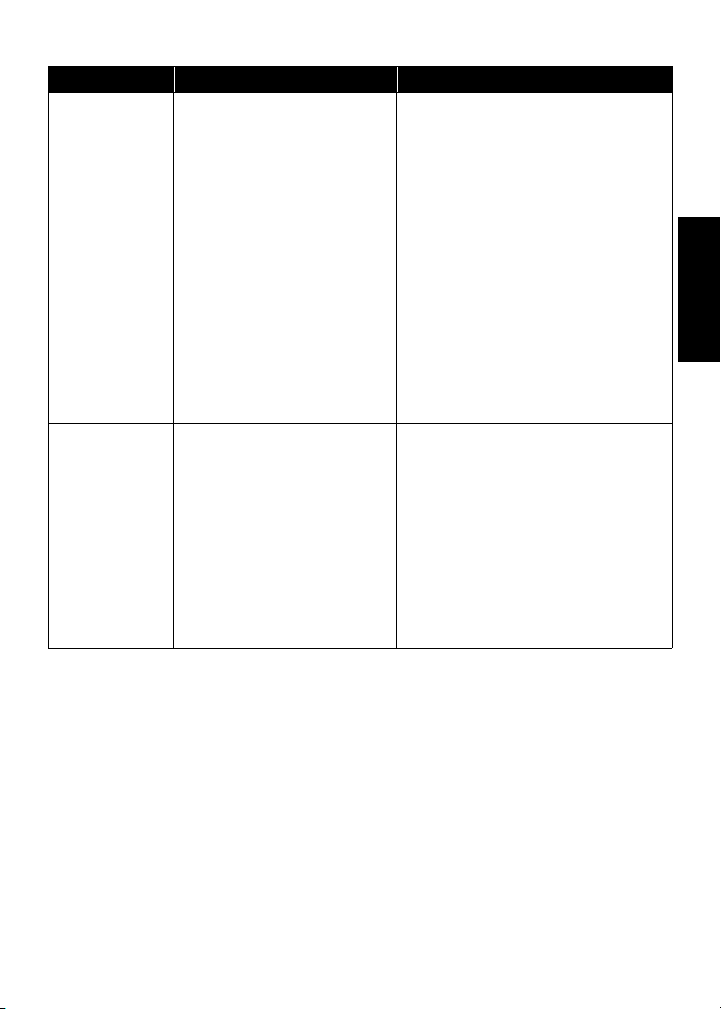
Table 1. Battery Charging Indicators
Charge Indicator Description
Single Green Blink Charger has successfully powered up.
Steady Red Battery is in rapid charge mode.
Blinking Green Battery has completed rapid charge (>90 % available
capacity). Battery is in Top-Off charge (Trickle
charge).
Steady Green Battery has completed charging and is fully charged.
Blinking Orange Battery is recognized by charger but is waiting to
charge. (Either the battery voltage is too low or the
battery temperature is too low or too high to allow
charging. When this condition is corrected, the battery
will automatically begin charging.)
Blinking Red Battery is unchargeable or not making proper contact.
Table 2. Troubleshooting
Problem What it means... What to do...
No charger
indication
1a. Charger contact is not
being made.
1b. No power to the
charger.
1a. Check that the radio with
battery, or the battery alone, is
inserted correctly.
1b. • Make sure that the power
cord is securely plugged into
the charger and an
appropriate AC outlet, and
that there is power to the
outlet.
• Replace fuses.
6
English
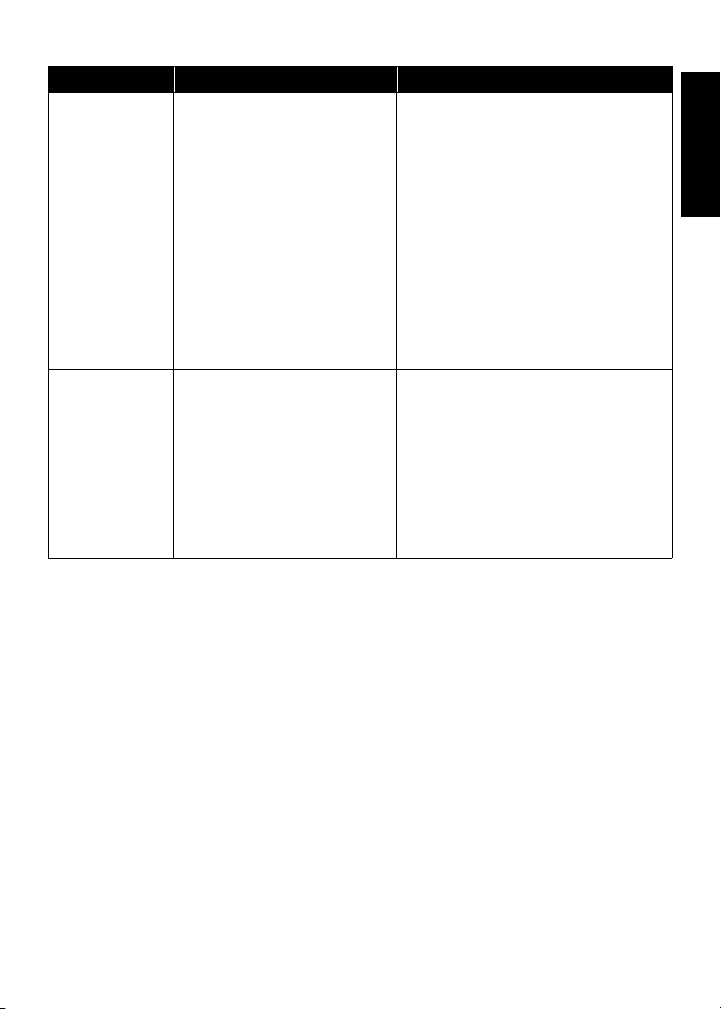
Blinking Red
Indication
2a. Charger contact is not
being made.
2b. Battery is not
chargeable.
2a. • Remove the battery from the
charger and replace it back
into the charger.
• Verify that the battery is a
Vertex Standard-authorized
battery listed in Table 4.
Other batteries may not
charge.
• Remove power from the
battery charger and, using a
clean dry cloth, clean the
gold metal charging contacts
of both the battery and the
charger.
2b. Replace battery.
Blinking
Orange
Indication
3. Battery is waiting to
charge. The battery
temperature may be
below 5 °C (41 °F) or
above 40 °C (104 °F)
or the battery voltage
may be lower than the
predetermined
threshold level for rapid
charging.
3. When this condition is
corrected, the battery will
begin charging automatically.
Table 2. Troubleshooting (continued)
Problem What it means... What to do...

7
English
SERVICE
The Multi-Unit Charger can only be repaired by a qualified service
technician authorized by Vertex Standard. Any violation of this policy
will void the unit warranty.
For service in US, contact the following depot. Please call and confirm
your return before sending the unit to the depot for service.
Vertex Service Center
US Headquarters
10900 Walker Street,
Cypress, CA 90630, U.S.A
For service (EMEA), contact the following depot. Please call and
confirm your return before sending the unit to the depot for service.
European Radio Support Support Center (ERSC)
Motorola GmbH
ERSC
Am Borsigturm 130
13507 Berlin
Germany

8
English
VERTEX STANDARD AUTHORIZED POWER CORDS
This charger is designed for use in 100 VAC to 240 VAC, 50 / 60 Hz
applications and uses the following Vertex Standard power cords.
VERTEX STANDARD AUTHORIZED BATTERIES
The following tables list batteries that can be used with the specific
subscriber radios identified in the table headings.
Table 3: Vertex Standard Power Cords
Plug Type Charger Kit Power Cord
U.S. VAC-6030B /
AAH27X001
3087791G01
EMEA Hybrid VAC-6030C /
AAH27X002
3087791G04
Australia / NZ VAC-6030H /
AAH27X003
3087791G10
Table 4: Battery for Vertex Standard Digital Radios
Kit (PN) Chemistry Capacity
FNB-V116 /
AAH23X001
NiMH High
FNB-V117LI /
AAH86X001
LiIon Ultra High

9
English
Notes

Copyright 2010, 2011, 2013 Vertex Standard LMR, INC. Todos los derechos reservados.
No se debe reproducir ninguna parte de este manual sin el permiso de Vertex Standard LMR, INC.
Este manual es útil para los siguientes cargadores de unidades múltiples que están
disponibles para las radios digitales Vertex Professional:
VAC-6030B / AAH27X001, VAC-6030C / AAH27X002, VAC-6030H / AAH27X003

1
Español
Latinoamericano
CONTENIDO
Normas de seguridad en la operación....................................... 3
Instrucciones operativas............................................................ 4
Procedimiento de carga................................................................... 4
Solución de problemas .............................................................. 5
Servicio...................................................................................... 7
Cables de alimentación autorizados por
VERTEX STANDARD ............................................................... 8
Baterías autorizadas por VERTEX STANDARD ....................... 8
2
Español
Latinoamericano
INSTRUCCIONES IMPORTANTES
DE SEGURIDAD
GUARDE ESTAS INSTRUCCIONES
Este documento contiene importantes instrucciones de seguridad y de
operación. Por favor, léalas detenidamente y guárdelas como referencia
futura.
Antes de usar el cargador de batería, lea todas las instrucciones y
señales de advertencia que aparecen en (1) el cargador, (2) la batería y
(3) el radio que usa la batería.
1. Para reducir el riesgo de lesiones, sólo cargue las
baterías recargables autorizadas por Vertex Standard
que aparecen en la Tabla 4. Otras baterías pueden
explotar y causar daños y lesiones personales.
2. El uso de accesorios no recomendados por Vertex Standard puede
resultar en riesgo de incendios, electrocución o lesiones.
3. Para reducir la posibilidad de daños al cable y al enchufe eléctricos,
tire del enchufe y no del cable al desconectar el cargador.
4. No debe usarse cable de extensión, salvo que sea absolutamente
necesario. Al usar un cable de extensión inadecuado se corre peligro
de incendio y choque eléctrico. Si es necesario usar un cable de
extensión, asegúrese de que el calibre del cable sea 18 AWG para
longitudes de hasta 30,48 metros (100 pies) y 16 AWG para
longitudes de hasta 45,72 metros (150 pies).
5. Para reducir el peligro de incendio, choque eléctrico o lesiones, no
use el cargador si está roto o si presenta algún tipo de daño. Llévelo
a un centro de servicio autorizado Vertex Standard.
6. El cargador para unidades múltiples sólo puede ser reparado por un
servicio técnico autorizado por Vertex Standard. Cualquier infracción
de esta política puede invalidad la garantía de la unidad.
ADVERTENCIA
!!
3
Español
Latinoamericano
ADVERTENCIAS (cont.)
7. Para reducir el peligro de choque eléctrico, desenchufe
el cargador del tomacorriente de corriente alterna antes
de limpiarlo o de hacerle mantenimiento.
8. Para reemplazar un fusible, utilice sólo fusibles del tipo y
calificación que indica la etiqueta del cargador.
Reemplace los fusibles sólo con Cooper-Bussman GDC-3.15 u otro
equivalente aprobado. Las siguientes piezas se pueden pedir en la
División de productos y servicios de radio de Vertex Standard (línea
general: +49 30 6686 1555):
Fusible 6571489S01
Cubierta 0987739G01
9. Este es un producto de clase A. En un ambiente doméstico este
producto puede causar radio interferencia, en cuyo caso puede
requerirse que el usuario tome medidas al efecto.
NORMAS DE SEGURIDAD EN LA OPERACIÓN
• Apague el radio para cargar la batería.
• Este equipo no está diseñado para uso al aire libre. Úselo únicamente
en lugares secos.
• Conecte la unidad a un tomacorriente del voltaje apropiado (según las
especificaciones que aparecen en la etiqueta del producto),
correctamente instalado y con la debida protección de sobrecorriente.
• Para desconectar la alimentación, desenchufe del tomacorriente el cable
de alimentación.
• El tomacorriente debe estar ubicado cerca de la unidad, en un lugar
fácilmente accesible.
• Los fusibles de repuesto deberán corresponder al tipo y corriente
nominal que se especifican en las instrucciones del equipo.
• La temperatura ambiental máxima alrededor del cargador no debe
exceder los 40 ºC (104 ºF).
• Asegúrese de que el cable quede en una posición donde no puedan
pisarlo, donde no pueda provocar un traspié, y donde esté protegido
del agua, daño o tensión mecánica.
ADVERTENCIA
!!

4
Español
Latinoamericano
INSTRUCCIONES OPERATIVAS
El cargador es un sistema de cuidado de la batería totalmente
automatizado. Todo lo que el usuario debe hacer es seguir estos
sencillos pasos:
1. Coloque el radio o la batería en el cargador.
2. Retire el radio o la batería una vez que estén completamente
cargados (el LED se pone VERDE continuo).
Las cavidades del cargador pueden aceptar ya sea un radio con una
batería instalada, o bien una batería sola. Antes de cargar una batería
instalada en un radio, apague el radio. Las baterías se cargan mejor a
temperatura ambiente.
Procedimiento de carga
1. Enchufe uno de los extremos del cable de alimentación en el
receptáculo de alimentación ubicado en la parte posterior del
cargador.
2. Enchufe el otro extremo del cable de alimentación al tomacorriente
de CA correspondiente. Una vez que el cargador ejecuta
correctamente la secuencia inicial de encendido su LED indicador
emite un BREVE DESTELLO VERDE.
3. Inserte una batería, o un radio con batería (el radio deberá estar
apagado), en la cavidad del cargador. Para ello:
4. Use las dos manos para retirar el radio o la batería de la cavidad del
cargador: sujete con una mano el cargador, y con la otra retire el
radio o la batería.
a. Alinee las ranuras ubicadas a cada lado de la batería con sus
respectivas guías dispuestas a cada lado de la cavidad del
cargador.
b. Presione la batería hacia la parte posterior de la cavidad.
c. Deslice la batería hacia dentro de la cavidad del cargador;
asegúrese de que los terminales del cargador y de la batería
hagan buen contacto.

5
Español
Latinoamericano
Una vez que se haya acomodado la batería en la cavidad, el indicador
del cargador se ilumina, lo cual indica que ha reconocido la presencia de
la batería. Consulte los indicadores de carga en Tabla 1.
SOLUCIÓN DE PROBLEMAS
Cuando intente solucionar problemas, observe constantemente el color
del LED.
Tabla 1. Indicadores de carga de la batería
Indicador de carga Descripción
Breve destello
verde
El cargador ejecutó correctamente la secuencia inicial de
encendido.
Rojo continuo La batería está en el modo de carga rápida.
Verde intermitente La batería completó la carga rápida (más del 90% de la
capacidad disponible). La batería está en régimen de carga
lenta.
Verde continuo El proceso de carga ha terminado y la batería está
completamente cargada.
Anaranjado
intermitente
La batería fue detectada por el cargador y está esperando
para ser cargada. (El proceso de carga no ha comenzado
porque el voltaje de la batería es demasiado bajo, o porque
su temperatura es demasiado baja o demasiado alta. Una
vez corregido el estado de la batería comienza
automáticamente el proceso de carga).
Rojo intermitente La batería no admite carga o no está haciendo buen
contacto.
Tabla 2. Resolución de problemas
Problema Qué significa Qué hacer
El cargador
no muestra
indicación
alguna
1a. Mal contacto con el
cargador.
1b. No llega energía
eléctrica al cargador.
1a. Compruebe que esté
debidamente insertado el
radio con batería o la batería
sola.
1b. • Compruebe que el cable de
alimentación esté bien
enchufado al cargador y a un
tomacorriente de CA
adecuado, y que el
tomacorriente esté
energizado.
• Reemplace los fusibles.
6
Español
Latinoamericano
Indicación
en rojo
intermitente
2a. Mal contacto con el
cargador.
2b. La batería no se puede
cargar.
2a. • Retire la batería del cargador
y vuelva a insertarla en el
cargador.
• Verifique que la batería
forma parte de la lista de la
Tabla 4 (baterías
autorizadas por Vertex
Standard). Es posible que
otras baterías no se
carguen.
• Desconecte del cargador el
cable de alimentación y
limpie con un paño limpio y
seco los terminales de
contacto del cargador y de la
batería.
2b. Reinstale la batería.
Indicador
anaranjado
intermitente
3. La batería está
esperando para ser
cargada.
Probablemente la
temperatura de la
batería está por debajo
de 5 ºC (41 ºF) o por
encima de 40 °C
(104 ºF), o el voltaje
está por debajo del
nivel umbral prefijado
para carga rápida.
3. Una vez corregido el estado
de la batería comienza el
proceso de carga
automáticamente.
Tabla 2. Resolución de problemas (cont.)
Problema Qué significa Qué hacer

7
Español
Latinoamericano
SERVICIO
El cargador para unidades múltiples sólo puede ser reparado por un
servicio técnico autorizado por Vertex Standard. Cualquier infracción de
esta política invalidará la garantía de la unidad.
Para servicio en Estados Unidos, comuníquese con el siguiente
almacén. Llame y confirme la devolución antes de enviar la unidad al
almacén para su reparación.
Centro de servicio Vertex
Sede principal en Estados Unidos
10900 Walker Street,
Cypress, CA 90630, U.S.A
Para servicio en Europa, Medio Oriente y Asia, comuníquese con el
siguiente almacén. Llame y confirme la devolución antes de enviar la
unidad al almacén para su reparación.
European Radio Support Support Center (ERSC)
Motorola GmbH
ERSC
Am Borsigturm 130
13507 Berlin
Alemania
Other manuals for VAC-6030B/AAH27X001
1
This manual suits for next models
2
Table of contents
Languages:
Other Vertex Standard Batteries Charger manuals


