VEVOR QM-1 User manual

Support and E-Warranty Certificate www.vevor.com/support
NOODLE MAKER
INSTRUCTION MANUAL
We continue to be committed to provide you tools with competitive price.
"Save Half", "Half Price" or any other similar expressions used by us only represents an
estimate of savings you might benefit from buying certain tools with us compared to the major
top brands and doses not necessarily mean to cover all categories of tools offered by us. You
are kindly reminded to verify carefully when you are placing an order with us if you are
actually saving half in comparison with the top major brands.


- 1 -
MODEL:QM-1
Have product questions? Need technical support? Please feel free to
contact us:
CustomerService@vevor.com
NEED HELP? CONTACT US!
This is the original instruction, please read all manual instructions
carefully before operating. VEVOR reserves a clear interpretation of our
user manual. The appearance of the product shall be subject to the
product you received. Please forgive us that we won't inform you again if
there are any technology or software updates on our product.
NOODLE MAKER

- 2 -
Before operating this device, please read this instruction manual completely
and keep it handy for future reference.
PRODUCT PARAMETERS
1. Processing thickness of dough:0.3-3mm/ level 1-9
2. Processing width of dough:1.5mm and 6mm / 3mm and 45mm
3. Product size: 205*205*150mm
4. Weight: 2.6kg
5. Accessories: Brush*1 Slicer*2 Fixing clip*1 Handle*1
Pasta machine motor*1 Support bracket*1
OPERATION INSTRUCTIONS
HOW TO PREPARE THE MACHINE FOR USE
Fix the machine onto the table with the clamp provided and insert the handle into
the roller hole(Fig. 1).
When using the machine for the first time, clean it with a dry cloth to remove any
excess oil. To clean the rollers, pass a small quantity of dough through them and
then throw the dough away.
BASIC RECIPE FOR THE DOUGH
Ingredients:500 g of soft-wheat flour5 whole eggs
To achieve better pasta, for the flour use a mixture of 250 g of soft-wheat flour
and 250 g of durum-wheat flour (semolina/ durum wheat semolina).100 g of flour
will be needed while processing the pasta with the machine.
HOW TO PREPARE THE MIXTURE
Serves 6 people
Ingredients: 1 Ib soft wheat flour and 5 eggs; instead of 5 eggs, you can use a

- 3 -
glass of natural mineral water.
For“al dente”pasta, mix 0.5 lb of soft wheat flour with 0.5 lb of durum wheat
flour.Do not add any salt!
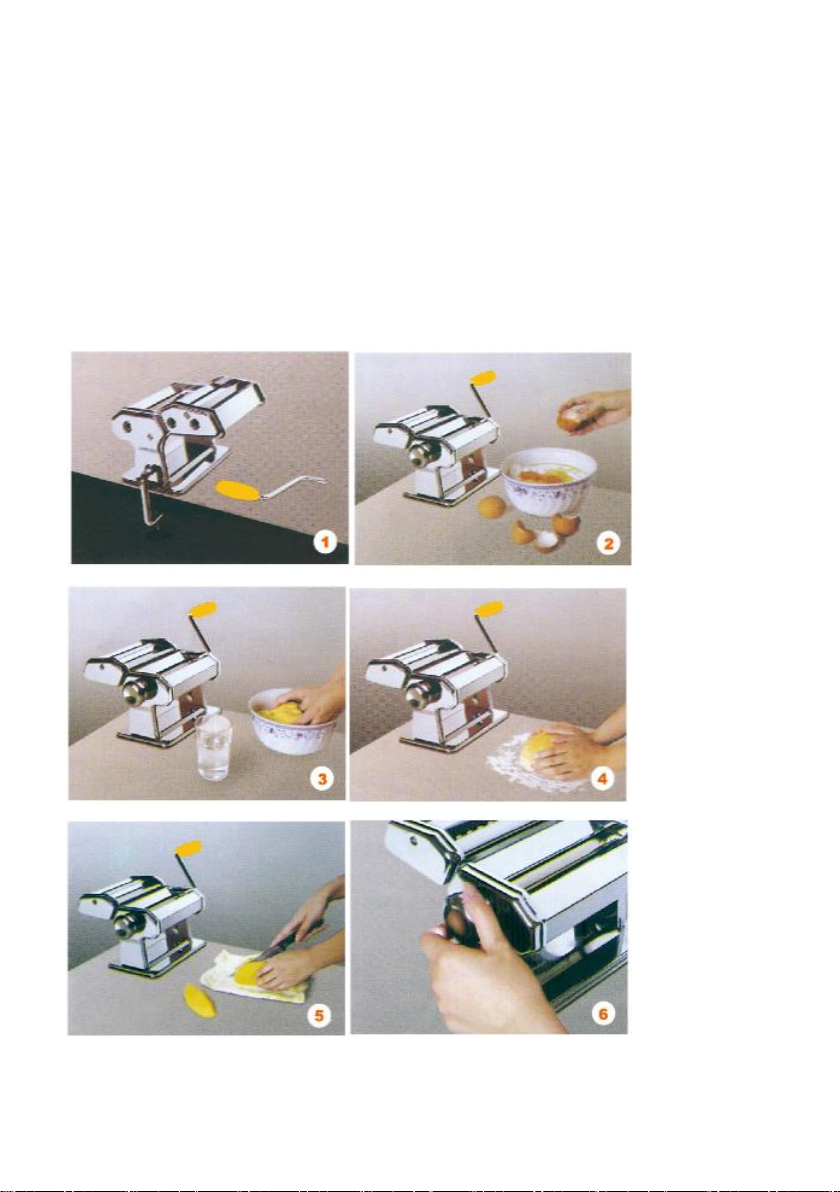
Pour the flour into a bowl and the eggs into the middle of the flour(Fig. 2). Mix the
eggs with a fork until they are completely blended with the flour. Knead the
mixture with your hands (Fig. 3) until it is completely homogenous and consistent.
If the mixture is too dry add some water, if it is too soft add some flour.A good
mixture should never stick to your fingers. Remove the mixture from the bowl and
place it onto a lightly floured table (Fig.4). If necessary, continue to knead the
mixture and cut it into small pieces (Fig. 5).
Advice: do not use eggs straight from the fridge!
HOW TO PREPARE THE DOUGH AND THE PASTA WITH
Set the machine regulator to position 1, pulling it outwards and turning it so that
the two smooth rollers are completely open(approx.3 mm)(Fig.6). Pass a piece of
the mixture through the machine by turning the handle(Fig. 7). Repeat this
operation 5-6 times, folding the dough over and adding some flour to the middle if
necessary. (Fig.8). When the dough has taken a regular shape, pass it through
the rollers once only with the regulators set on number 2 (Fig. 9), then once again
on number 3, continuing until you obtain the desired thickness (min. thickness at
no.9 approx. 0.2 mm). With a knife, cut the dough cross-ways into pieces
approximately 25 cm(10 inches)long. Insert the handle in the hole for the cutting
rollers, turn it slowly, and pass the dough through to obtain the type of pasta you
prefer(Fig.10 and 11). Note 1 -If the rollers won't 'cut,' the dough is too soft: in this
case, you should pass the dough through the smooth rollers after adding some
flour to the mixture. Note 2 - When the dough is too dry and cannot be 'caught' by
the cutting rollers, add a little water to the mixture and pass it through the smooth
rollers again. Place the pasta on a tablecloth and leave it to dry for at least an
hour. Remember that pasta can last a long time(1-2 weeks)if kept in a cool, dry
place. Bring a pan of salted water to a boil (135 oz per 1 Ib of pasta)to which you
will add the pasta. Fresh pasta cooks in just a few minutes, averaging 2-5
minutes, depending on the thickness. Stir gently and then drain the pasta once it
has finished cooking.
NEW RECIPES FOR FRESH PASTA
GREEN PASTA
* basic recipe dough* 100 g of spinach
The spinach must first be washed. then boiled for about 10-15 minutes and

- 4 -
blended before being added to the dough.
ORANGE PASTA
* basic recipe dough* 150 g of carrots
The carrots must be peeled and sliced. then boiled for 15 to 30 minutes and
mashed before being added to the dough.
BLACK PASTA RED PASTA
* basic recipe dough * basic recipe dough
* l bag of squid ink * l teaspoon of concentrated tomato paste

- 5 -

- 6 -
PASTA MACHINE MOTOR INSTRUCTIONS
IMPORTANT SAFEGUARDS
SAVE THESE INSTRUCTION, FOR HOUSEHOLD USE ONLY
When use electrical appliances, basic safety precautions should always be
followed including following:
Read all instructions
To protect against the risk of electrical shock, do not put the appliance in
water or other liquid.
Unplug from outlet when not in use, before putting on or taking off parts, and
before cleaning.
Do not operate any appliance with a damaged cord or plug or after the
appliance malfunctions or for examination, repair or electrical or mechanical
adjustment.
The use of attachments not recommended or sold by the manufacturer may
cause fire, electric shock, or injury.
Do not use outdoors.

- 7 -
Do not let cord hang over edge of table or counter.
Avoid contacting moving parts, and keep hands, hairs, clothing, spatulas, and
other utensils away from rollers during operation to reduce the risk of injury to
the person and/or damage to the pasta extruder.
Do not unplug with wet or even slightly damp hands.
Do not wash the machine, especially when it is plugged in.
Do not allow children younger than 14 years old to use the machine.
Do not leave the machine unsupervised, especially when it is plugged in.
Always unplug the machine before removing the motor.
Do not use the machine near sources of heat or water(e.g.oven rings, sinks)
Do not insert knives or clothes in between the rollers.
This product must only be used for its intended purpose and in the manner
indicated in the instructions. All other types of use shall be considered
inappropriate and hazardous. The manufacturer shall not be responsible for
any improper or incorrect use and installation damage.
Before connecting the motor to the mains, make sure the voltage on the
plate located on the appliance corresponds to the mains voltage.
This product may only be used or maintained by children 14 years of age or
older, individuals with reduced physical, sensory, or mental capacities, or
unskilled individuals with adequate adult supervision. Children must not play
with the device.
Do NOT pull on the power cord or the motor itself to unplug.

- 8 -
Do NOT tamper with the power cord for any reason. If damaged, contact your
retailer.
Always turn off the motor using the "/O/l" switch and then unplug.
If the motor falls into water, do not try to reach it, but immediately remove the
plug from the power socket.
Always set the "I/O/l" switch to the "O" position before plugging in.
PRODUCT DESCRIPTION (see fig.1)
1. Motor body
2."/O/l" on/off switch and speed selector
3. Pulse button
4. Pin
5. Power cable
6. Support tab
7. Support bracket a. Inner side b. Outer side

- 9 -
TECHNICAL DATA
Voltage: AC220-240V 50/60Hz (EUR) AC120V 60Hz (USA)
Rating Power: 90W (Input)
INSTRUCTIONS FOR USE
1. Place he pasta machine and motor on a flat, stable base that supports the
weight (see figure 2).
2. Attach the machine support bracket as shown in figures 3 and 4.
3. To insert the motor pin in the pasta roller hole or in one of the cutting roller
holes, press the pulse button and then insert the motor pin in the machine (fig. 5)
and release the button
4. Hold the machine with one hand and push the motor with the other hand to
insert the support piece into the support frame(fig. 6).
5. Make sure the on/off switch is in the "O" position and then plug the motor in.
6. To start the motor, set the "l/O/ll" switch to the "I" or "l" position based on the
desired speed:"I" for normal speed and "l" for turbo speed.
7. Pulse mode can be activated by pressing button number 3 starting from the
"O" position on the "l/O/ll" switch. The rollers only turn when the button is pressed.
8. When finished working, turn the motor off by setting the "l/O/l" switch to "O" and
unplug.
9. Unhook the motor from the support bracket at the end of each use, as shown in

- 10 -
figure 7. Pull the motor pin out by pressing the pulse button. Unhook the support
bracket by widening the inner part and pulling it from the machine.
CLEAN AND MAINTENANCE
Always unplug before starting to clean the machine and the motor.
1. During use, clean the scrapers underneath the smooth rollers every so often
with a piece of kitchen paper(Fig. 12)
2. Never wash the machine with water or in the dishwasher! (Fig. 13).
3. To clean the machine after use, use a brush or a wooden rod(Fig. 14).
4.If necessary, put several drops of oil on the ends of the cutting rollers(Fig. 15).
5. Never wash the machine with water or in the dishwasher!
6. Use a soft cloth to clean the motor after use.

- 11 -
7. Any repairs which need to be made to the electrical parts must be carried out
by trained personnel.
TROUBLESHOOTING
Problem
Possible cause
Solution
The motor does
not turn on.
The appliance is not
plugged in.
Plug the product into an
electrical socket.
The "/O/l" switch is set
to "0".
Turn the motor on, selecting the
desired speed.
DISPOSAL PROCEDURE
The symbol on the bottom of the device indicates the separated
collection of electric and electronic equipment
(Dir.2012/19/EU-WEEE).
At the end of life of the device, do not dispose it as mixed solid
municipal waste, but dispose it referring to a specific collection centre located
in your area or returning it to the distributor, when buying a new device of the
same type to be used with the same functions.
This procedure of separated collection of electric and electronic devices is
carried out forecasting a European environmental policy aiming at safeguarding,
protecting and improving environment quality, as well as avoiding potential

- 12 -
effects on human health due to the presence of hazardous substances in such
equipment or to an improper use of the same or of parts of the same.
MADE IN CHINA

Table of contents
Other VEVOR Pasta Maker manuals