Victron energy Smart BatteryProtect User manual

Smart BatteryProtect 48V
100A
48V - 100A
rev 00 08/2022
ENGLISH

Table of Contents
1. Introduction ........................................................................................................................... 1
2. Features ................................................................................................................................ 2
3. Installation and wiring examples .................................................................................................. 3
3.1. Precautions and installation notes ......................................................................................... 3
3.2. Warning when connecting inverters and inverters/chargers ............................................................ 4
3.3. Wiring examples ............................................................................................................. 5
3.3.1. Smart BatteryProtect in a simple system ....................................................................... 5
3.3.2. Smart BatteryProtect remote on/off switch ..................................................................... 6
3.3.3. Smart BatteryProtect in a lithium battery system with external BMS ........................................ 6
3.3.4. Smart BatteryProtect in a lithium system with external BMS and load disconnect output ................ 7
3.3.5. Two Smart BatteryProtects for load and charger control ..................................................... 8
3.3.6. Smart BatteryProtect Alarm output wiring ...................................................................... 8
4. Operation and programming ..................................................................................................... 10
4.1. Operation modes .......................................................................................................... 10
4.2. Programming ............................................................................................................... 11
4.2.1. Programming via VictronConnect app ........................................................................ 11
4.2.2. Programming via PROG pin to GND pin method ............................................................ 11
4.2.3. Programming table .............................................................................................. 12
4.3. Status indicator ............................................................................................................ 12
4.4. Remote control and short circuit behavior .............................................................................. 13
4.5. Error & Warning modes ................................................................................................... 13
5. Compliance Statement ............................................................................................................ 14
6. Technical specifications .......................................................................................................... 15
6.1. Technical specifications ................................................................................................... 15
7. Appendix ............................................................................................................................. 16
7.1. Error and Warning codes ................................................................................................. 16
Smart BatteryProtect 48V 100A

1. Introduction
The Smart BatteryProtect disconnects the battery from non-essential loads before it is completely discharged (which would
damage the battery) or before it has insufficient power left to crank the engine.
It also provides an alternative to disable chargers without a remote on/off port to protect from over-voltage.
Compared to the BatteryProtect, the Smart BatteryProtect can be conveniently programmed via Bluetooth and our
VictronConnect app or the PROG pin to GND pin method. All necessary parameters can be set in this way.
The Smart BatteryProtect is a uni-directional device. It can only deal with current in one direction, so either current to a load, or
current from a charger, but not both currents at the same time. In addition to this, current can only flow from the IN terminal to the
OUT terminal.
Smart BatteryProtect 48V 100A
Page 1 Introduction

2. Features
The Smart BatteryProtect offers a wide range of different features. These include:
• Protection of the battery against excessive discharge and can be used as a system on/off switch.
• Easy Bluetooth programming.
• A special setting for Lithium batteries. This feature allows external control from a BMS like the VE.Bus BMS or Lynx Smart
BMS. If the load disconnect output of a BMS is connected to the Remote H input and the signal becomes free-floating, the load
is immediately disconnected.
• Ultra-low current consumption of 1.9mA: This is important in case of Li-ion batteries, especially after low voltage shutdown.
• Over voltage protection: To prevent damage to sensitive loads due to over voltage. The load is disconnected whenever the DC
voltage exceeds 64V.
• Ignition proof: No relays but MOSFET switches, and therefore no sparks.
• Delayed alarm output: The alarm output is activated if the battery voltage drops below the preset disconnect level fore more
than 12 seconds. Starting the engine will therefore not activate the alarm.
• Delayed load disconnect and delayed reconnect. Responding quickly within this delay, for example by reducing the load or
starting a generator or charger to charge the batteries, can prevent loads from being switched off.
For a full description of all features, please see the datasheets.
Smart BatteryProtect 48V 100A
Page 2 Features

3. Installation and wiring examples
3.1. Precautions and installation notes
There are a few basic things to keep in mind when installing a Smart BatteryProtect:
1. The Smart BatteryProtect must be installed in a well-ventilated area and preferably close (max 50 cm) to the battery (but, due
to possible corrosive gasses not above the battery!).
2. Choose the correct cable size and length to match the load. Voltage drop over a long or undersized cable between the
battery plus and the SBP may result in a short circuit alarm when starting-up the load, or unexpected shutdown. You
can also find more information on selecting the right cable size and its protection in our book Wiring Unlimited.
3. A properly sized fuse must be inserted according to local regulations in the cable between the battery and the SBP.
4. Pay attention to the correct orientation. The SBP is designed to allow current to flow from IN (battery) to OUT (load) terminals
only. Reverse currents from OUT to IN terminals are strictly forbidden and will damage the device. If you wish to use the SBP
as a disconnection for a charge source, you must orient the unit in the system so that the current is flowing in the intended
direction, IN to OUT.
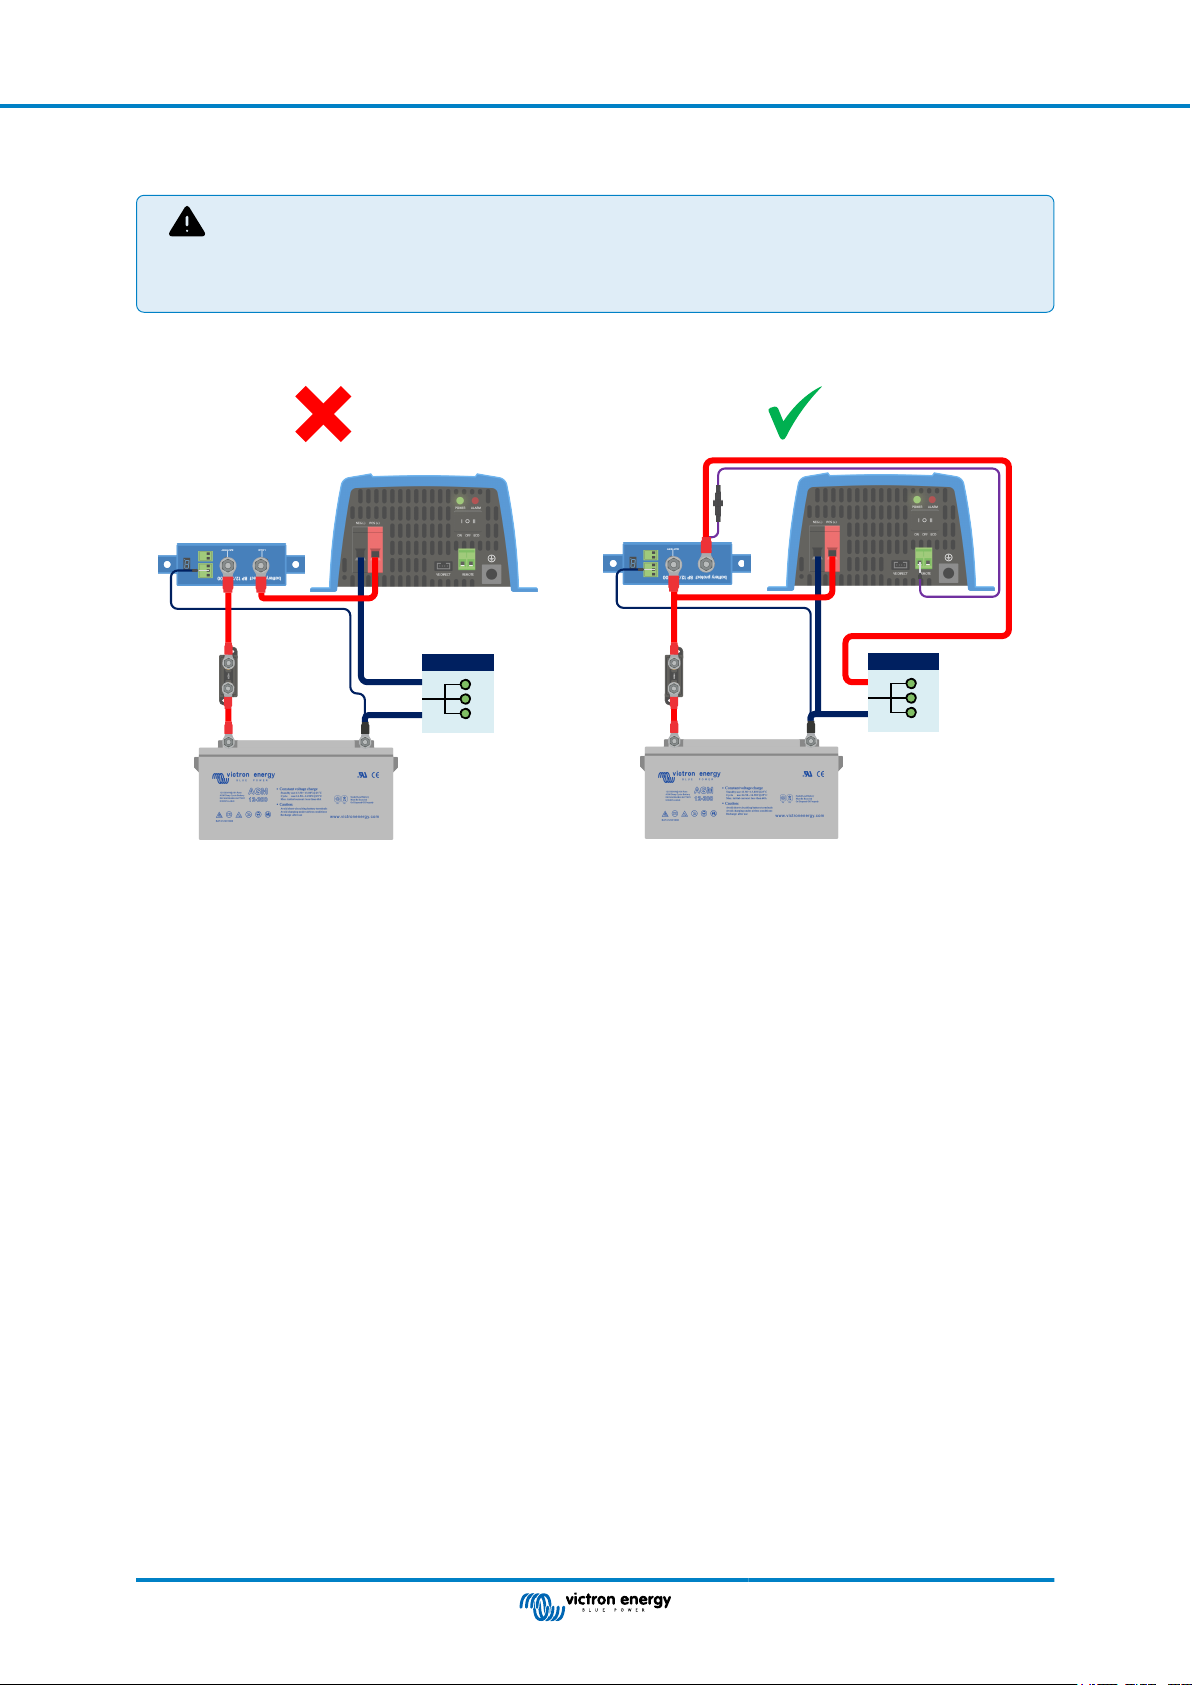
5. The short circuit protection of the SBP will be activated if you try to directly connect loads with capacitors, for example
inverters or inverter/chargers, on their DC inputs. For that use case, please use the SBP to control the remote on/off control
on the inverter, instead of disconnecting the higher power DC line. See also the warning on the next page.
6. Use a 1,5mm2 wire (included) for the GND connection, which should be connected directly to the battery negative terminal (or
the chassis of a vehicle). No other equipment should be connected to this wire.
7. The pin assignment of the connectors are printed either on the front or on the side of the housing.
8. The SBP automatically detects the system voltage once only during initial power up. See "d" in the programming table for how
to reset it when re-using the SBP in a different installation or use Bluetooth.
9. Do not connect the load output until the SBP has been fully programmed.
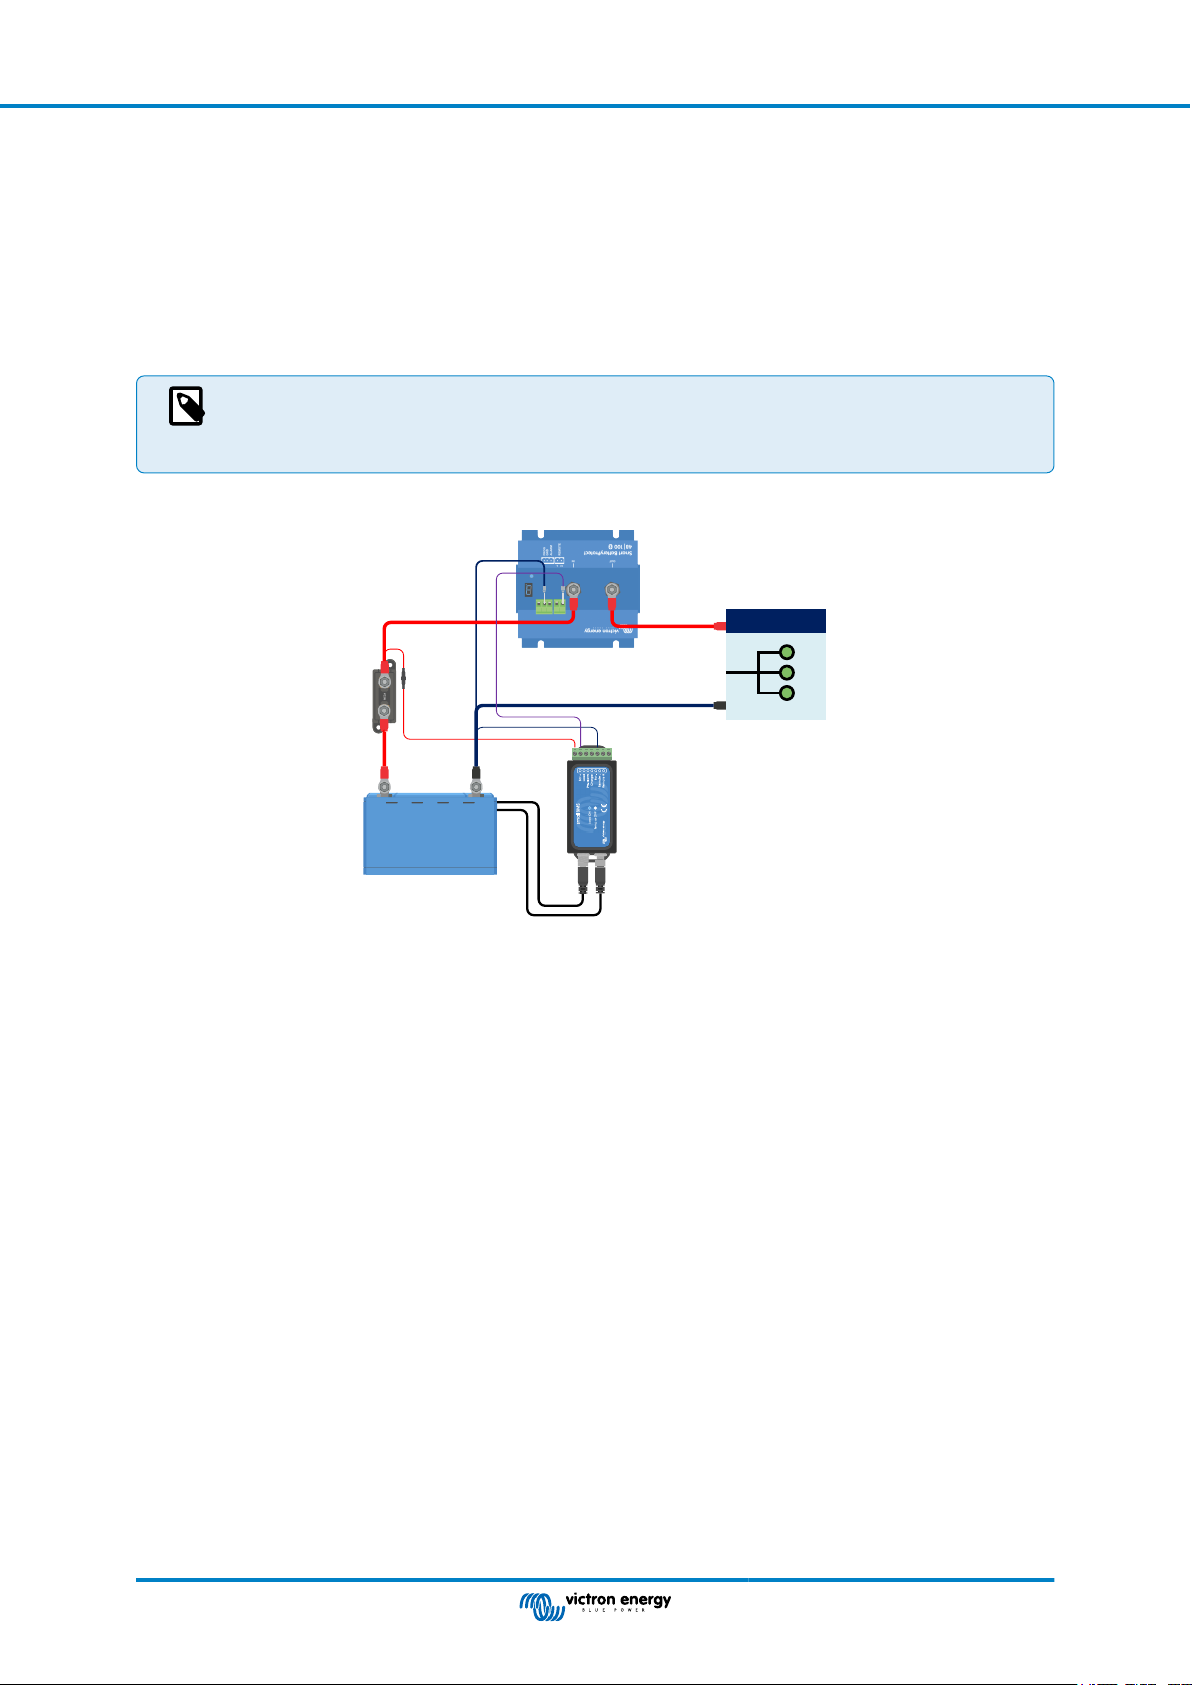
10. A remote on/off switch can be connected between Remote H and Remote L. Alternatively, terminal H can be switched high (to
battery positive), or terminal L can be switched low (to battery negative).
11. A buzzer, LED or relay can be connected between the alarm output terminal and the battery positive. Maximum load on the
alarm output: 50mA (short circuit proof).
Smart BatteryProtect 48V 100A
Page 3 Installation and wiring examples

3.2. Warning when connecting inverters and inverters/chargers
Under no circumstances is it permitted to connect inverters or inverter/chargers to a SBP via their DC inputs,
a reverse current may flow that damages the SBP. In case you want to control an inverter or inverter/charger
via a SBP, you must use the SBP to control the inverter or inverter/charger via its remote port. See example
below. Note that the image shown below is an example for all BatteryProtect models including the smart
models.
DC loads DC loads
Left image: Inverter DC input connected via a BatteryProtect - strictly forbidden
Right image: Inverter controlled by its remote port via BatteryProtect
Smart BatteryProtect 48V 100A
Page 4 Installation and wiring examples

3.3. Wiring examples
This section contains various wiring examples to show all the possibilities of wiring.
3.3.1. Smart BatteryProtect in a simple system
The example below shows a Smart BatteryProtect with the wire loop (default) between L and H of the remote terminal. When the
wire loop is removed, the SBP disconnects the load after 90 seconds.
However, if the wire loop remains plugged in and the battery voltage drops below the programmed value for under voltage
shutdown (see section Programming [11]), the SBP disconnects the load after 90 seconds automatically.
DC loads
Smart BatteryProtect in a simple system with wire loop between L and H input (factory default)
The same example below. This time the switch is wired between battery positive and the H input of the remote terminal.
When switched off, the H input becomes low. The load is disconnected after 90 seconds. When the switch is turned on again, the
H input becomes high and the load is turned on with a delay of 30 seconds.
This works in the same way between battery minus and the L input of the remote terminal.
DC loads
System on/off
switch
Switch wired between battery positive and H input of the remote terminal
Smart BatteryProtect 48V 100A
Page 5 Installation and wiring examples

3.3.2. Smart BatteryProtect remote on/off switch
The below example shows a Smart BatteryProtect in a simple system with a remote on/off switch wired to the remote terminals.
This switch can be used, for example, to turn the system remotely on and off. The power consumption of the Smart BatteryProtect
is negligible at less than 1mA when switched off (check the Specifications chapter).
DC loads
System
on/off
switch
Smart BatteryProtect with remote on/off switch
3.3.3. Smart BatteryProtect in a lithium battery system with external BMS
The image below shows a Smart BatteryProtect in a lithium battery system with external BMS. The external BMS (Victron Lynx
Smart BMS in this example) has an ATD (allowed to discharge) and ATC (allowed to charge) output. Designed as a dry contact,
ATD and ATC function as a switch that directly controls the SBP via its remote terminal.
For this, the Smart BatteryProtect must be programmed to Li-ion mode.
The dry contact is wired between the L and H connectors of the remote terminal.
If, for example, ATD opens in the event of a lithium battery cell undervoltage, the SBP will immediately disconnect the load without
delay.
The SBP will remain disengaged for 30 seconds, even if ATD closes within this period. After this 30 seconds, it responds
immediately and connects the load to the battery.
Please note that the under voltage thresholds and alarm output of the SBP are inactive in this mode.
If you have a lithium battery with internal BMS (so-called drop-ins) that does not have an output for controlling
loads or chargers, the SBP must be programmed in mode A or B. Mode C is not applicable in this case.
DC loads
BMS cables ATD (allowed to discharge)
Lynx Smart BMS
Fuse
SBP-48V
Smart BatteryProtect in Li-ion mode controlled by ATD from a Lynx Smart BMS
Smart BatteryProtect 48V 100A
Page 6 Installation and wiring examples

3.3.4. Smart BatteryProtect in a lithium system with external BMS and load disconnect output
This wiring example shows a Smart BatteryProtect wired into a lithium system that is controlled by an external BMS (Victron
smallBMS with pre-alarm). This BMS has a load and a charge disconnect output that can be wired directly to the Smart
BatteryProtect H input of the remote terminal.
As with the previous example, it is necessary to program the SBP into Li-ion mode (see chapter Programming [11]).
If, for example, the smallBMS triggers the pre-alarm because of an imminent low cell voltage, the load output becomes free
floating (normally high) when there is an actual low cell voltage and the SBP will disconnect the load and remains off for
30 seconds, even if it receives a restart signal (H becomes high again) within this period. After this 30 seconds, it responds
immediately to a restart signal.
If the system has been switched off due to low cell voltage, the SBP will remain off for 30 seconds, even if it
receives a restart signal within this period (which is most likely the case if no other loads are connected to the
battery). After 3 reclosing attempts, the SBP will remain off until the battery voltage has risen above 52V for at
least 30 seconds (which is an indication that the battery is being recharged).
SBP-48V
DC loads
Smart BatteryProtect uses the load disconnect of a smallBMS
Smart BatteryProtect 48V 100A
Page 7 Installation and wiring examples

3.3.5. Two Smart BatteryProtects for load and charger control
It is also possible to have several Smart BatteryProtect in one system, for example, to control chargers and loads at the same
time.
If the BMS signals a cell undervoltage, the SBP responsible for the load will disconnect the load from the battery to protect the
battery from further discharge.
If the BMS signals a cell overvoltage or too low temperature to charge the lithium battery, the SBP will disconnect the charger
from the battery immediately.
Please also note the correct connection of the SBPs: always follow the current flow from IN to OUT. The positive terminal of the
charger goes to the IN input of the SBP.
DC loads
SBP-48V (charge disconnect)
SBP-48V (load disconnect)
Two Smart BatteryProtects take control of a charger and a load circuit
3.3.6. Smart BatteryProtect Alarm output wiring
The alarm output can be wired e.g. to an LED, a buzzer or a relay. For this, the Smart BatteryProtect must be programmed in the
respective mode because of slight differences in the behavior. See also the section Operation modes [10] for more details.
Make sure that the LED, buzzer and relay match the system voltage.
Smart BatteryProtect 48V 100A
Page 8 Installation and wiring examples

DC loads
LED
Buzzer
Relay
Wiring an LED, Buzzer or Relay to the Smart BatteryProtect output
Smart BatteryProtect 48V 100A
Page 9 Installation and wiring examples

4. Operation and programming
4.1. Operation modes
The Smart BatteryProtect has three operating modes, the appropriate mode can be selected via the VictronConnect app or a
programming procedure (see chapter Programming [11]).
• Mode A: Buzzer or LED mode (default).
• Mode B: Relay mode.
• Mode C: Li-ion mode.
Modes A and B affect the behavior of the alarm output.
Mode C, the Li-ion mode, takes into account lithium batteries that have an external BMS or a BMS with load and/or charge
disconnect.
Buzzer or LED mode behaviour
• In case of under voltage, a continuous alarm will start after 12 seconds. The SBP will disconnect the load after 90 seconds and
the alarm will stop. Reconnect delay: 30 seconds.
• In case of over voltage, the load will be disconnected immediately and an intermittent alarm will remain on until the overvoltage
problem has been corrected. There is no reconnect delay.
Relay mode behaviour
• In case of under voltage, the relay will engage after 12 seconds. The SBP will disconnect the load after 90 seconds and the
relay will disengage.
• In case of over voltage, the load will be disconnected immediately and the alarm output will remain inactive.
Li-ion mode behaviour
Only select the Li-Ion mode if your BMS has a load disconnect and/or a charge disconnect output. This is usually not the case
for so-called drop-in batteries with internal BMS. For lithium batteries/BMS without load disconnect output, select mode A or B
instead.
Connect the load or charge disconnect (depending on application) output of the BMS to the Remote H terminal of the Smart
BatteryProtect.
• The load or charger is disconnected immediately when the load or charge disconnect output of the BMS switches from ‘high’
to ‘free floating’. The under voltage thresholds and alarm output of the Smart BatteryProtect are inactive in this mode.
• It will remain disengaged for 30 seconds, even if it receives a re-engage signal within that time period. After 30 seconds it will
respond immediately to a re-engage signal.
Smart BatteryProtect 48V 100A
Page 10 Operation and programming

4.2. Programming
There are two ways to program a Smart BatteryProtect:
• Via a Bluetooth enabled smartphone or tablet using our VictronConnect App.
• or by connecting the PROG pin to GND pin method.
4.2.1. Programming via VictronConnect app
Programming via VictronConnect app
Requirements prior to programming::
• The battery positive must be connected to the IN terminal. Do not connect the OUT terminal yet.
• The included ground wire must be connected to the battery minus and the GND terminal of the Smart BatteryProtect.
Programming procedure:
1. Open the VictronConnect app on your mobile device. All available Bluettoth devices are displayed.
2. Select the Smart BatteryProtect from the Device list and tap on it. This will open the status screen, showing battery and load
output state.
3. Tap on the cog wheel in the top right corner.
4. Check whether the detected battery voltage matches the system voltage.
5. Select the operation mode (A, B or C - see the Programming table [12] and Operation modes [10] for details). In case of C
(Li-ion), nothing further needs to be set.
6. Choose between Relay and Buzzer/LED to set the alarm output.
7. Set the preset to the desired combination of shutdown and restart voltage or tap on User defined to define a custom
combination.
8. In case of a user defined preset, tap on Shut down to set the shutdown voltage and tap on Restart to set the restart voltage.
9. Click on the 3 dots in the top right corner and then on Product info.
10. In the Product info menu the PIN code can be changed, a custom name can be set and Bluetooth can be disabled.
If Bluetooth is disabled via the VictronConnect app, this process can only be reversed with programming via
PROG pin procedure as explained in the next paragraph.
4.2.2. Programming via PROG pin to GND pin method
Requirements prior to programming:
• The battery positive must be connected to the IN terminal. Do not connect the OUT terminal yet.
• The included ground wire must be connected to the battery minus and the GND terminal of the Smart BatteryProtect 48V 100A.
• The wire loop in the remote on/off terminal block must be removed.
Programming procedure:
1. Use a wire loop or a wired switch (preferably a push button) between the PROG pin and the GND pin.
2. While there is a connection between the PROG pin and the GND pin, the 7-segment display will first step through the
shutdown and restart voltage combinations, as indicated by the numbers 0..9 (see the Programming table [12]).
3. Remove the wire loop or release the push button when the desired voltage mode is displayed.
4. The display will confirm the chosen voltage and default mode (A) twice.
5. Reconnect the wire loop or press the push button again, if a different operation mode (B, C or D) is required (see the
Programming table [12]).
6. Disconnect the wire loop or release the push button when the required mode is displayed.
Smart BatteryProtect 48V 100A
Page 11 Operation and programming

7. The display will confirm the chosen voltage and operation mode twice.
The PIN code can be reset by selecting the P option. Bluetooth pairing information needs to be removed from any previously
paired devices after selecting this option.
Bluetooth can be disabled/re-enabled by selecting F (enable) or H (disable).
Push button
Push button wired to program the Smart BatteryProtect
4.2.3. Programming table
Programming table for Smart BatteryProtect 48V 100A
7-segment display Under voltage shutdown 48V system Under voltage restart 48V system
0 42.0V 48.0V
1 40.0V 46.0V
2 38.0V 46.0V
3 45.0V 53.0V
4 46.0V 55.2V
5 42.0V 51.2V
6 46.0V 51.2V
7 47.2V 51.2V
8 48.0V 52.0V
9 40.0V 52.8V
- User defined settings with Bluetooth
A Buzzer or LED mode
b Relay mode
C Lithium mode
F Bluetooth Enable
h Bluetooth Disable
P PIN code reset
4.3. Status indicator
The decimal point of the 7-segment display is used for status indication:
• Illuminated: the Smart BatteryProtect is attempting to activate the output.
• Flash every 5 seconds: output is active.
• Flash every 2 seconds whilst in Li-ion mode: output ‘connecting’. When in Li-ion mode the SBP will observe a dead period of 30
seconds after the remote input of the SBP has become free floating.
Smart BatteryProtect 48V 100A
Page 12 Operation and programming

4.4. Remote control and short circuit behavior
This section describes the behaviour of the Smart BatteryProtect when it is controlled via the remote on/off input and when a short
circuit has been detected.
• The Smart BatteryProtect will connect the load 1 second after the remote input is closed.
• The Smart BatteryProtect will disconnect the load immediately when the remote input is opened.
• When in Li-ion mode, the Smart BatteryProtect will observe a dead period of 30 seconds after the remote input of the Smart
BatteryProtect has become free floating. See the note below for a detailed description.
• In case of a short circuit, the Smart BatteryProtect will attempt to connect the load every 5 seconds. After two attempts the
display will show E1 (short circuit detected).
When in Li-ion mode, the SBP will disengage when the H input becomes free floating and will remain
disengaged for 30 seconds, even if it receives a re-engage signal within that time period. After 30 seconds it
will respond immediately to a re-engage signal. Therefore, there will normally be no waiting time if the SBP
is used as a system on/off switch (wire the system on/off switch to the positive supply of the BMS for this
purpose).
Similarly, if a system shutdown occurred due to low cell voltage, the SBP will remain disengaged for 30
seconds, even if it receives a re-engage signal within that time period (which most likely will happen when no
other loads are connected to the battery). After 3 attempts to re-engage, the SBP will remain disengaged until
battery voltage has increased to more than 52V for at least 30 seconds (which is a sign that the battery is
being recharged). The under voltage thresholds and alarm output of the SBP are inactive in this mode.
4.5. Error & Warning modes
There are 9 possible error modes and 2 warning codes, indicated by the 7-segment display and within the VictronConnect app
when using a Bluetooth enabled smartphone or tablet:
• E0 Calibration failure
• E1 Short circuit
• E2 Over temperature / P2 Over temperature warning
• E3 Under voltage / P3 Under voltage warning
• E4 Over voltage
• E5 Configuration Failure
• E6 Reference Voltage Failure
• E7 BMS Lockout
• E8 Reverse current
• P2 Over temperature warning
• P3 Under voltage warning
After 5 minutes the error is no longer displayed to reduce current consumption.
Please refer to the appendix chapter Error and Warning codes [16] for more info on each error.
Smart BatteryProtect 48V 100A
Page 13 Operation and programming

5. Compliance Statement
Compliance statement (part 15.19)
This device complies with part 15 of the FCC Rules.
Operation is subject to the following two conditions:
1. this device may not cause harmful interference, and
2. this device must accept any interference received, including interference that may cause undesired operation.
Warning (part 15.21)
Changes or modifications not expressly approved by the party responsible for compliance could void the user’s authority to
operate the equipment.
Information to the User (part 15.105b)
Note: This equipment has been tested and found to comply with the limits for a Class B digital device, pursuant to part 15 of the
FCC Rules. These limits are designed to provide reasonable protection against harmful interference in a residential installation.
This equipment generates, uses and can radiate radio frequency energy and, if not installed and used in accordance with the
instructions, may cause harmful interference to radio communications. However, there is no guarantee that interference will not
occur in a particular installation. If this equipment does cause harmful interference to radio or television reception, which can be
determined by turning the equipment off and on, the user is encouraged to try to correct the interference by one or more of the
following measures:
• Reorient or relocate the receiving antenna.
• Increase the separation between the equipment and receiver.
• Connect the equipment into an outlet on a circuit different from that to which the receiver is connected.
• Consult the dealer or an experienced radio/TV technician for help.
This device contains a transmitter with FCC ID: SH6MDBT42Q
Smart BatteryProtect 48V 100A
Page 14 Compliance Statement

6. Technical specifications
6.1. Technical specifications
Smart BatteryProtect SBP 48V 100A
Max. continuous load current 100A
Peak current 250A
Operating voltage range 24 - 70 V
Current consumption BLE On and when on: 1.9mA When off or low voltage shutdown: 1.7mA
BLE Off and when on: 1.7mA When off or low voltage shutdown: 1.6mA
Alarm output delay 12 seconds
Max. load on alarm output 50mA - short circuit proof
Load disconnect delay 90 seconds (immidiate if triggered by a BMS)
Load reconnect delay 30 seconds
Default thresholds Disengage: 42 V Engage: 48 V
Operating temperature range Full load: -40 °C to +40 °C (up to 60% of nominal load at 50 °C)
Connection M8
Mounting Torque 9 Nm
Weight 0.8 kg 1.8 lbs
Dimensions (hxwxd) 62 x 123 x 120 mm
2.5 x 4.9 x 4.8 inch
Smart BatteryProtect 48V 100A
Page 15 Technical specifications

7. Appendix
7.1. Error and Warning codes
This appendix gives a list of error and warning codes and possible solutions.
E0: Calibration failure
Internal malfunction – calibration data failure/missing
• Contact dealer for support – Fault is not user correctable and SBP requires replacement.
E1: Short circuit
Short circuit protection is activated in the event of a short circuit, an overload condition or excessive inrush current - such as when
attempting to directly power an inverter or inverter/charger.
1. Check for a potential short circuit condition.
2. Confirm that the load current draw does not exceed the SBP current rating.
3. Use the SBP to control the remote on/off switch on loads with high inrush currents, rather than directly powering/
disconnecting the DC supply.
4. Check for loose/high resistance connections and ensure that appropriate gauge wiring is used in the installation.
P2: Over temperature warning
Urgent intervention required to prevent load disconnection.
Internal temperature close to the limit. Over temperature protection will be activated if temperature continues to rise.
E2: Over temperature
Over temperature protection is activated in the event of excessive internal temperature.
1. Confirm that the load current draw does not exceed the SBP current rating.
2. Check for loose/high resistance connections and ensure that appropriate gauge wiring is used in the installation.
3. Do not install the SBP unit in a location exposed to high temperature or radiant heat - relocate SBP to a cooler position or
provide additional active cooling.
P3: Under voltage warning
Urgent intervention required to prevent load disconnection.
Under voltage protection will be activated in 90 seconds if no action is taken.
E3: Under voltage
Under voltage protection is activated in the event that the input voltage drops below the under voltage limit selected for 90
seconds.
1. Switch off/disconnect loads and recharge the battery.
2. Check charging system and battery for proper operation.
E4: Over voltage
Over voltage protection is activated in the event that the input voltage exceeds 64V.
1. Confirm the configuration of all charging devices in the system - particularly system voltage and charge voltage settings.
2. Check charging system for proper operation.
3. Confirm SBP system voltage configuration is correct.
E5: Configuration failure
Internal malfunction - configuration data failure/missing.
To recover the SBP from this condition;
1. Reset the unit to factory defaults under - Settings > More options > Reset to defaults
2. Disconnect all power and wait 3 minutes before reconnecting.
Smart BatteryProtect 48V 100A
Page 16 Appendix

3. Reconfigure the unit as required.
E6: Reference voltage failure
Internal malfunction - reference voltage failure/missing.
• Contact dealer for support - Fault is not user correctable and SBP requires replacement.
E7: BMS lockout
BMS lockout protection is activated in the event the external BMS requests the SBP to consecutively disengage and then
re-engage 3 times (typical behaviour during a shut down due to low cell voltage).
Once E7 is activated, the SBP will remain disengaged until input voltage exceeds 13 V (for 12 V systems) or 26 V (for 24 V
systems).
1. Check BMS error codes/log to identify the cause of shut-down and rectify issue.
2. Switch off/disconnect loads and recharge the battery.
3. Check wiring between BMS and SBP Remote terminal.
4. Check BMS for proper operation.
E8: Reverse current
Reverse current protection is activated in the event that reverse current flow is detected.
CAUTION: The SBP is designed to allow or prevent current flow from IN to OUT terminals ONLY. Reverse
current flow is strictly forbidden and may permanently damage the SBP.
Uncontrolled reverse current will flow through a Smart BatteryProtect if Vout > Vin. Therefore, never use a
Smart BatteryProtect for battery to battery charging.
1. Check that the SBP installation orientation is correct - current flow must be from IN to OUT (refer to example wiring
diagrams).
2. Confirm that no charging sources are inadvertently connected to the SBP OUT terminal/circuit.
3. If the SBP is used to disconnect a charge source, confirm that no loads are inadvertently connected to the SBP IN terminal/
circuit.
Smart BatteryProtect 48V 100A
Page 17 Appendix
Other manuals for Smart BatteryProtect
1
Table of contents
Other Victron energy Protection Device manuals