ViewZ VZ-WM11 User manual

ViewZ Wall Mount Instruction Manual
For 10 ~ 24" ViewZ Monitors
VZ-WM11

2Installation InstructionVisit the ViewZ USA website at http://www.viewzusa.com
WM series
Maximum Flat-panel Weight: 22 lbs THE WALL STRUCTURE MUST BE CAPABLE OF
SUPPORTING AT LEAST FIVE TIMES THE
WEIGHT OF THE FLAT-PANEL. IF NOT, THE WALL
STRUCTURE MUST BE REINFORCED.
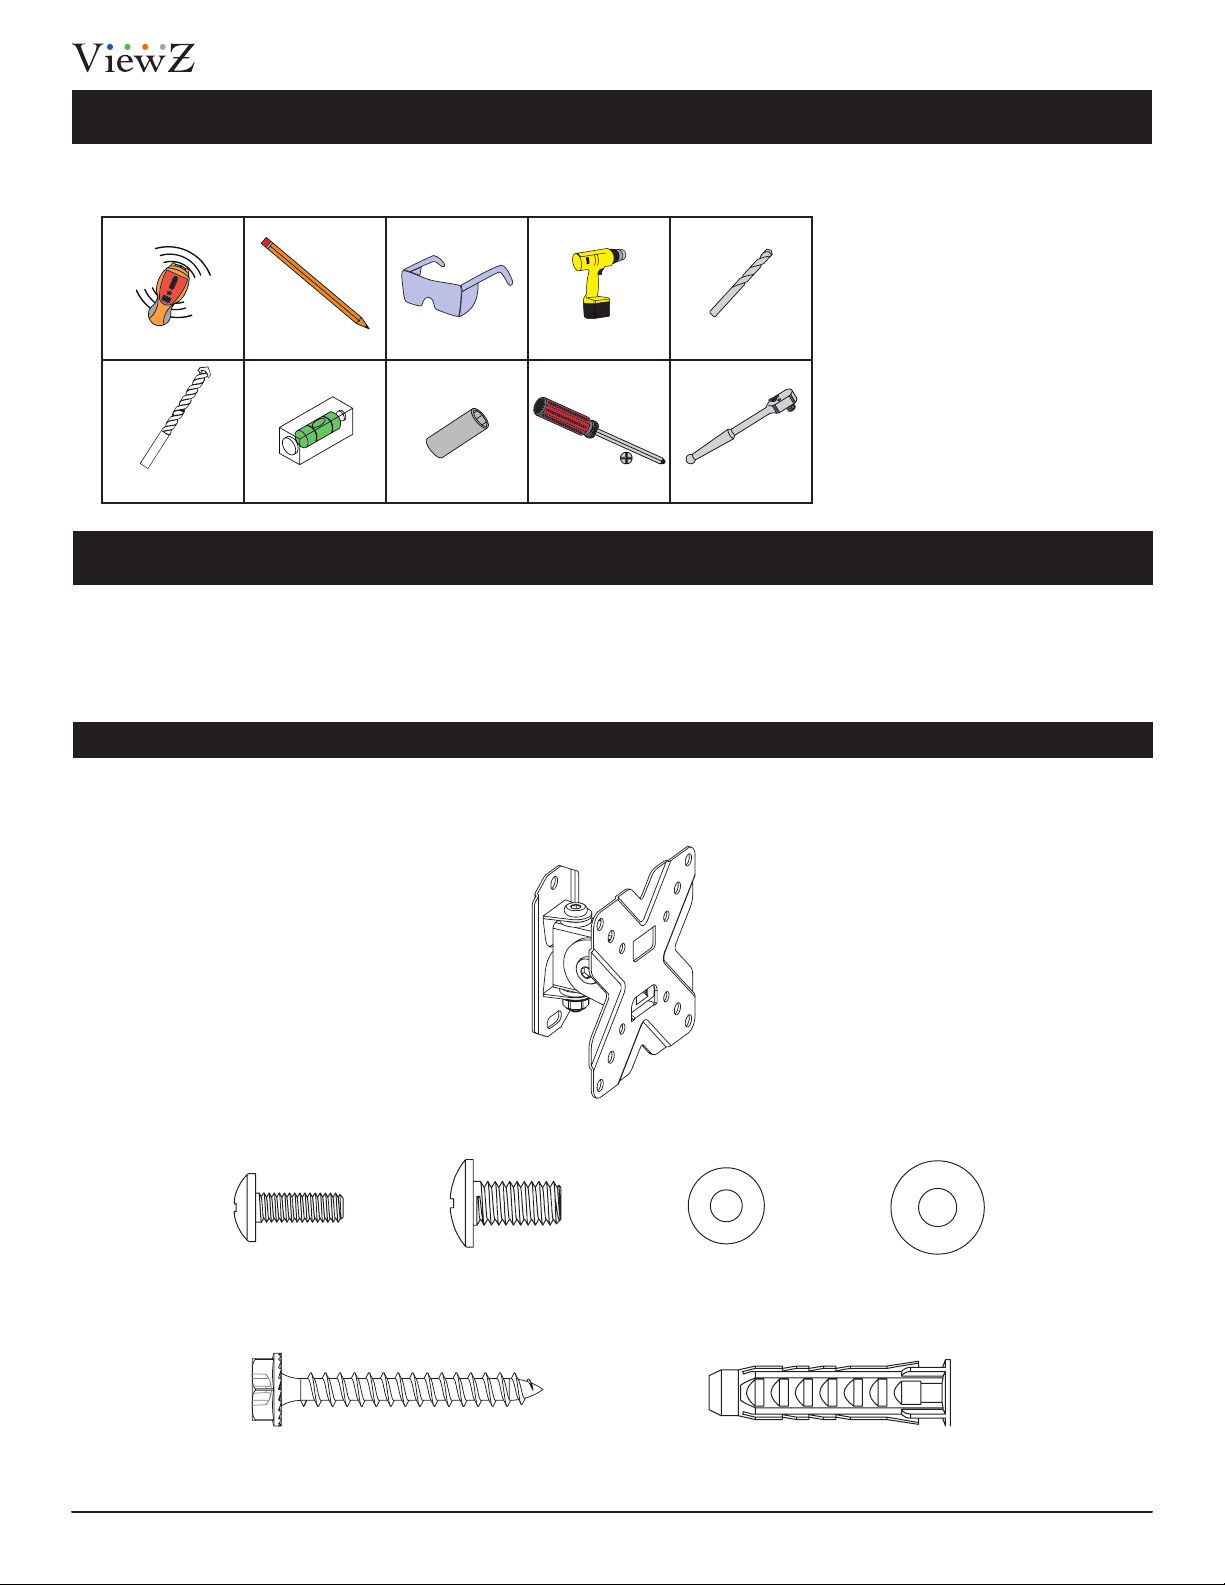
The following tools may be required depending on your installaon.
Your ViewZ mount product is shipped with all proper installaon hardware and components. If there are parts
missing and/or damaged, please stop the installaon and contact ViewZ USA at (888)-998-4399.
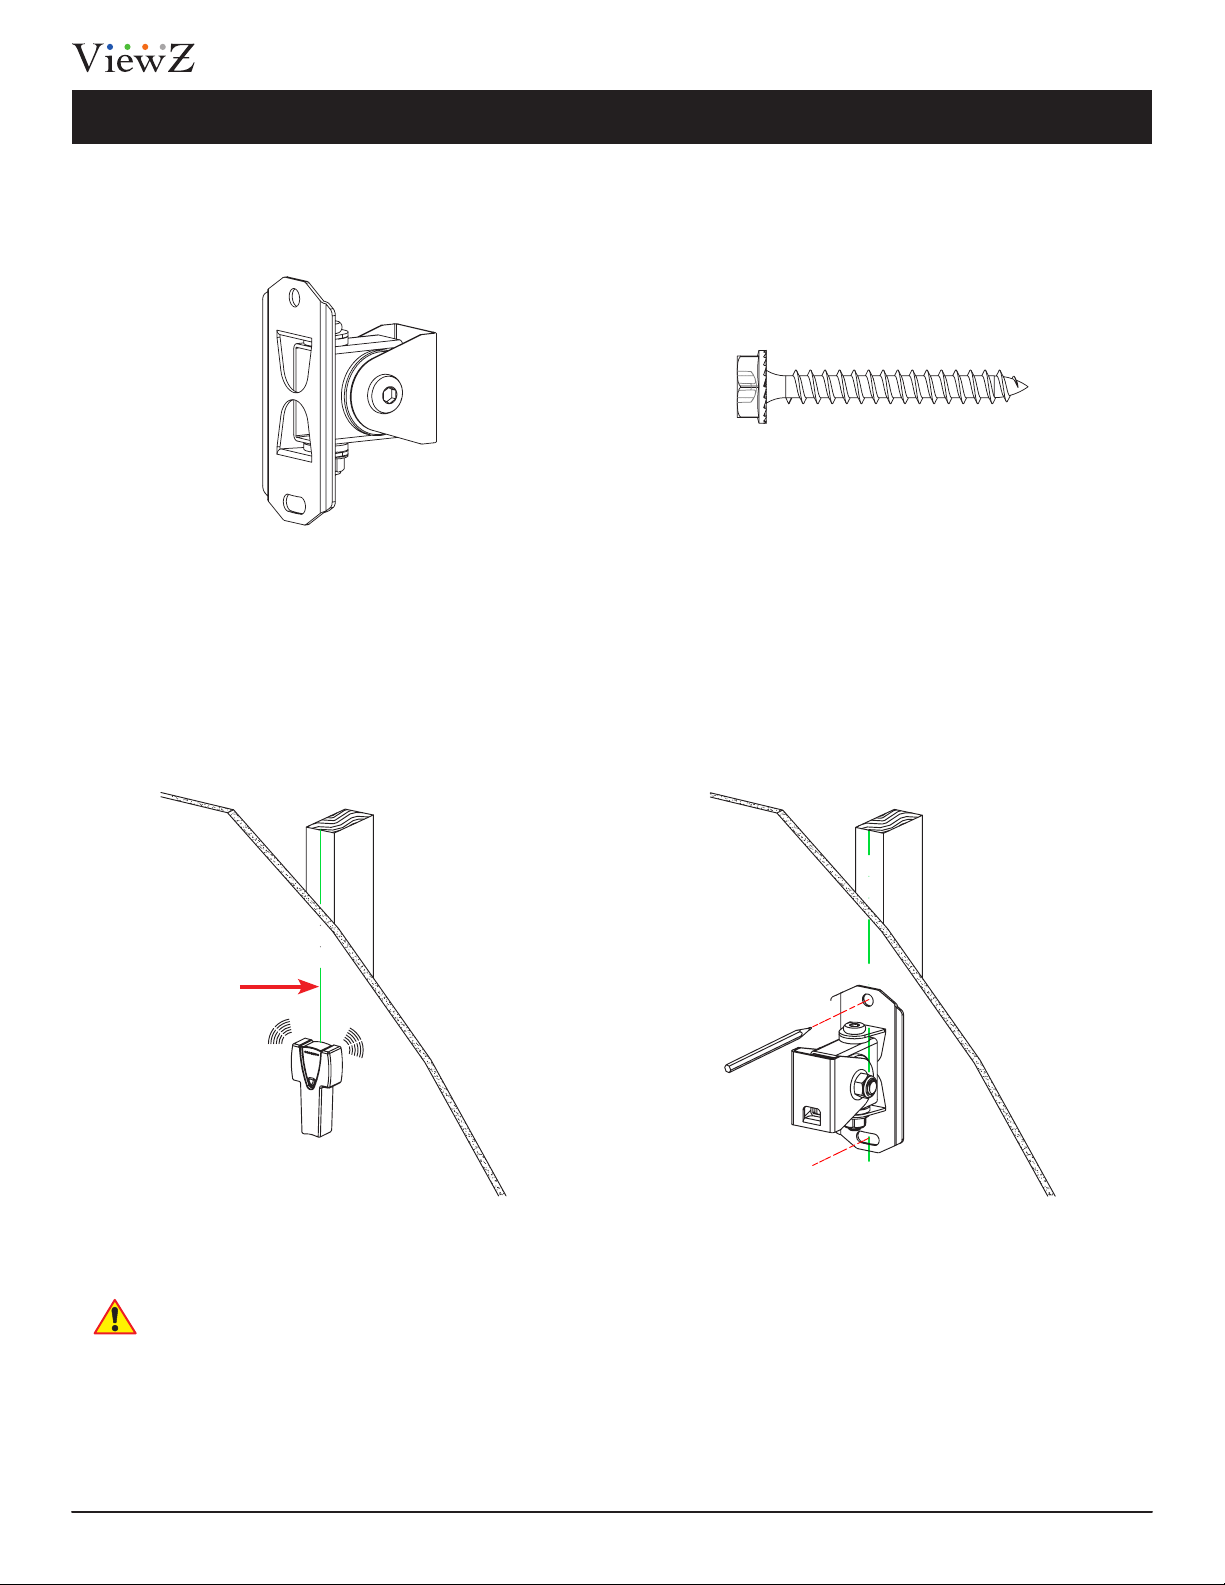
Electronic Stud Finder
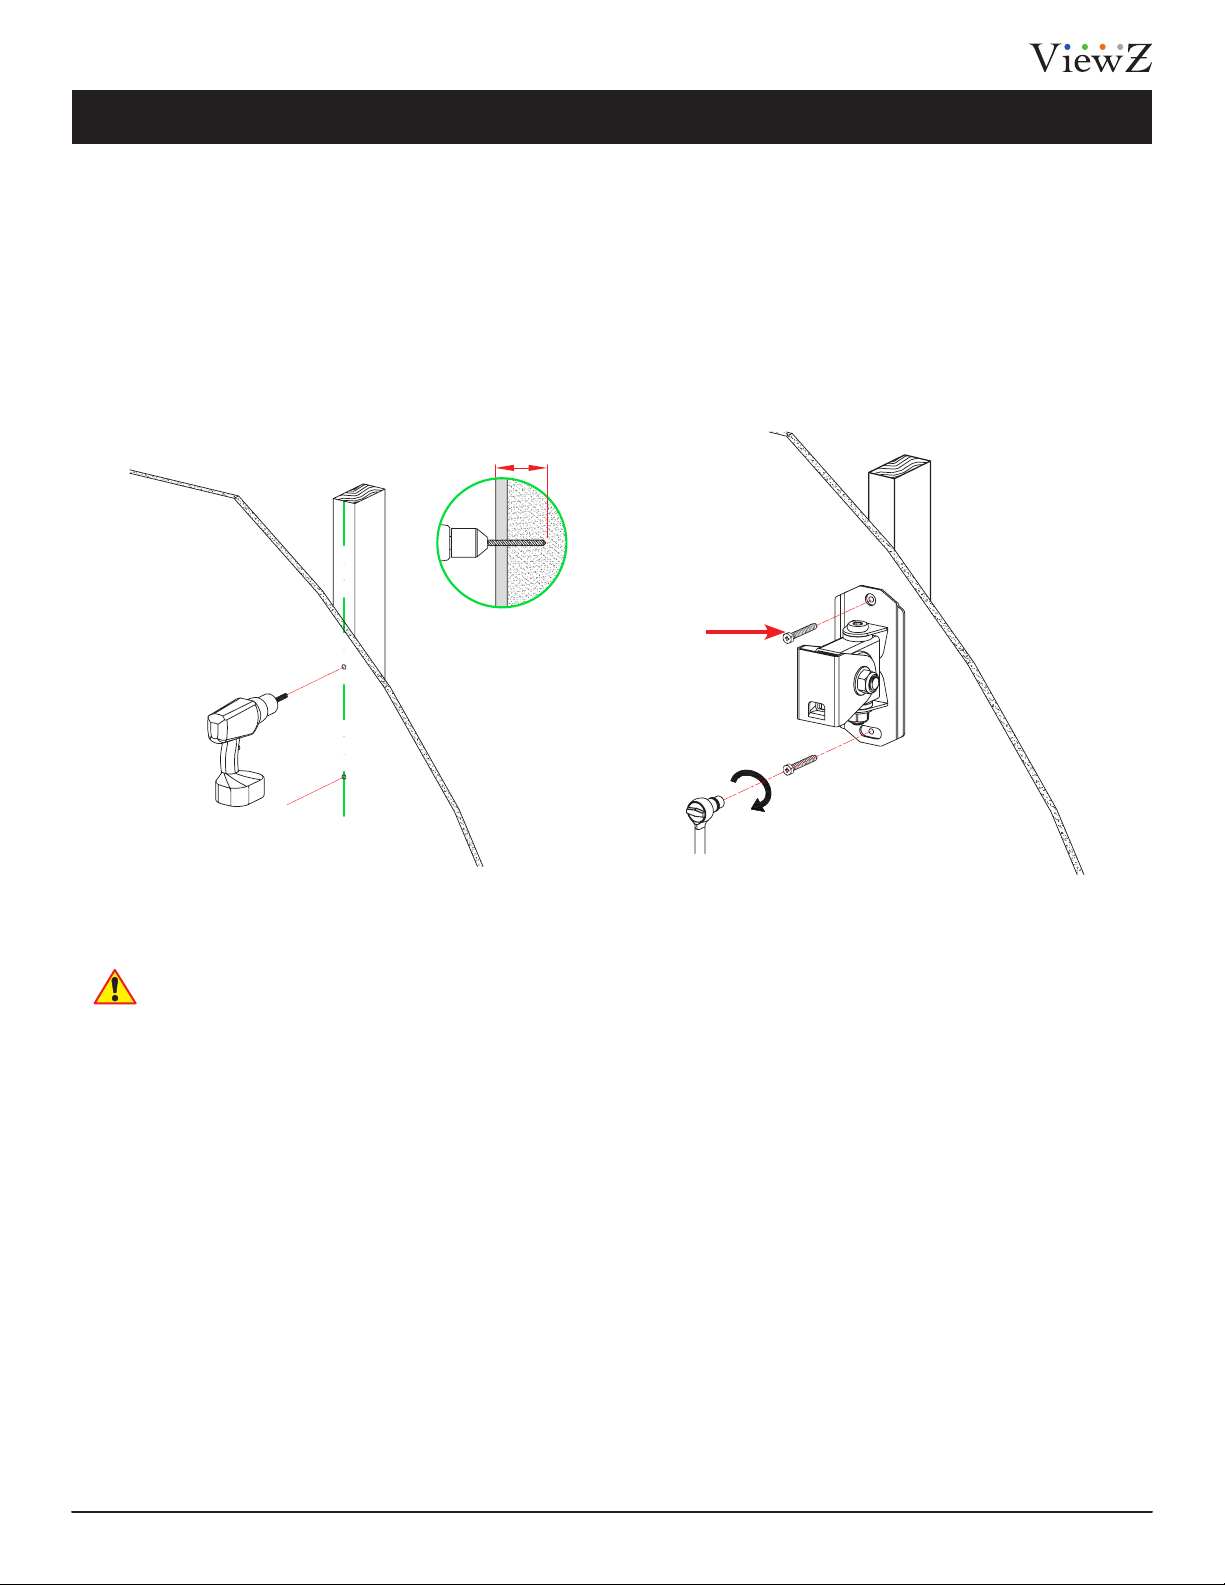
Level3/8" Drill Bit
One-Latch Mounng Base (Qty 1)
M4 x L12 (Qty 4)
M6 x L50 (Qty 2) Concrete Wall Anchor (Qty 2)
M4 Washer (Qty 4)M6 x L12 (Qty 4) M6 Washer (Qty 4)
Protecve Eye-wear
Phillips Head Screwdriver
Pencil
½˝ Socket
Portable Drill
Socket Wrench
1/8" Drill Bit
Weight Limit
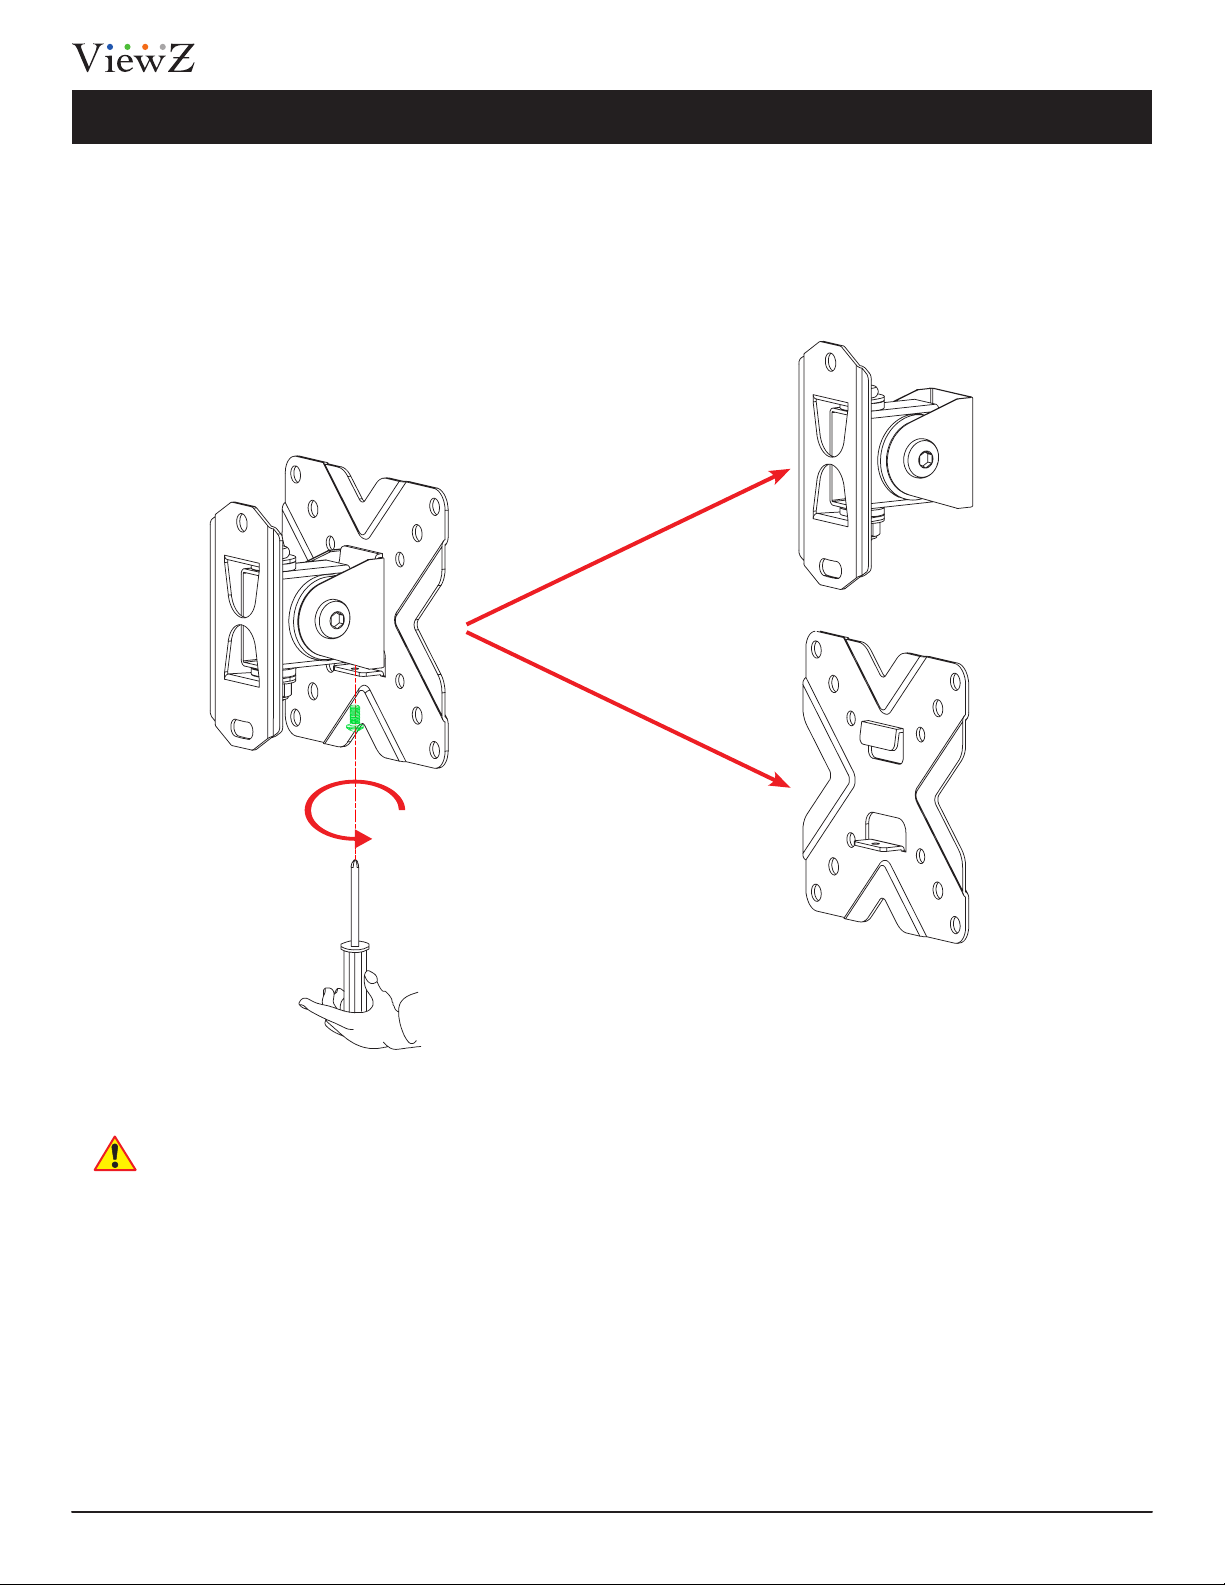
Wall Mount Assembly Components
Installation Tools

4Installation InstructionVisit the ViewZ USA website at http://www.viewzusa.com
WM series
Wall Plate
Monitor Plate
Step 1
Mounng Safety
This product contains small items that could be a choking hazard if swallowed. Before starng
assembly, verify all are included and undamaged. If any parts are missing or damaged, do not return
the damaged item to your dealer; contact Customer Service. Never use damaged parts!
1) Disassemble wall plate unit into two pieces

5Installation Instruction Visit the ViewZ USA website at http://www.viewzusa.com
WM series
Step 2
1) Selects monitor screws. Find the proper screw by using the given M4 or M6 screw
Mounng Safety
When you ght the screw, the screw should be properly installed. If the screw is too big or small, it
cause the serious damage to the monitor or person.
2) Install the monitor plate with the given screw & washer
M4 Screw M6 Screw
M4 Washer
Monitor Plate
M6 Washer

6Installation InstructionVisit the ViewZ USA website at http://www.viewzusa.com
WM series
Step 3 - Install Wall Plate to the Wood Stud
1) You can install the wall plate with the given screw.
Mounng Safety
Drywall covering the wall, should not be exceeded over 5/8 inch (16 mm).
Minimum wood stud size : common 2 x 4 inch (51x102 mm), nominal 1½ x 3½ inch (38x39 mm)
Stud center should be veried
Center Line
Wall Plate Lag Bolt M6xL50
2) Find the wood stud by using the stud finder and mark the position.
Locate the wall plate at the desired position and line up the holes with your stud center line. Level the
wall plate and mark the hole locations.

7Installation Instruction Visit the ViewZ USA website at http://www.viewzusa.com
2.16” / 55 mm
WM series
Mounng Safety
Pilot holes should be drilled to a depth of 2.16 inch (55 mm). Be sure to drill into the center of
the studs.
Improper usage could redue the holding power of the lag bolt and it cause serious damage to
the stud, monitor or person. Do not over-ghten the lag bolts.
3) Drill pilot holes using a 1/8 inch (3 mm) diameter drill bit.
4) Install the wall plate using two lag bolts (M6xL50). Tighten the lag bolts until they are pulled
firmly against the wall plate.
Step 3 - Install Wall Plate to the Wood Stud
Lag Bolt (M6xL50)

8Installation InstructionVisit the ViewZ USA website at http://www.viewzusa.com
2.16” / 55 mm
WM series
3/8" (10 mm)
1) You can install the wall plate with the given screw and wall anchor.
Mounng Safety
Mount the wall plate assembly directly onto the concrete surface.
Minimum solid concrete thickness - 8 inch (203 mm).
Pilot holes should be drilled to a depth of 2.16 inch (55 mm).
Wall Plate
Lag Bolt M6xL50
Concrete Wall Anchor
2) Place the wall plate at the desired position. Level the wall plate and mark the hole locations.
3) Drill two pilot holes using a 3/8 inch (10 mm) diameter masonry drill bit.
Step 3 - Install Wall Plate to the Concrete Wall

9Installation Instruction Visit the ViewZ USA website at http://www.viewzusa.com
WM series
4) Install two anchors.
5) Insert wall plate using two lag bolts (M6 x L50). Tighten the lag bolts until they are pulled firmly
against the wall plate.
Mounng Safety
Be sure the anchors are seated ush with the concrete surface.
Improper usage could redue the holding power of the lag bolt and it cause serious damage to the
concrete, monitor or person. Do not over-ghten the lag bolts.
Step 3 - Install Wall Plate to the Concrete Wall

11Installation Instruction Visit the ViewZ USA website at http://www.viewzusa.com
WM series
1) Hang the monitor/monitor plate assembly onto the wall palte and tighten the screw
which you took out.
Mounng Safety
HEAVY! You may need an assistance at this step.
Step 5 - Install and Secure the Monitor to the Wall Plate

12 Installation InstructionVisit the ViewZ USA website at http://www.viewzusa.com
WM series
Warranty
What and Who is Covered by this Limited Warranty and for How Long
ViewZ USA warrants this product to be free from defects in material and workmanship of the original owner of this product. The
limited warranty is valid only for the original purchaser of the product.
What ViewZ USA Will Do
At the sole opon of ViewZ USA, ViewZ USA will repair or replace any product or product part that is defecve. If ViewZ USA chooses
to replace a defecve product or part, a replacement product or part will be shipped to you at no charge, but you must pay any labor
costs.
What is Not Covered; Limitaons
ViewZ USA DISCLAIMS ANY LIABILITY FOR DAMAGE TO MOUNTS, ADAPTERS, DISPLAYS, PROJECTORS, OTHER PROPERTY, OR
PERSONAL INJURY RESULTING, IN WHOLE OR IN PART, FROM IMPROPER INSTALLATION, MODIFICATION, USE OR MISUSE OF ITS
PRODUCTS.
ViewZ USA DISCLAIMS ALL OTHER WARRANTIES, EXPRESS OR IMPLIED, INCLUDING WARRANTIES OF MERCHANTABILITY AND FITNESS
FOR A PARTICULAR PURPOSE. ViewZ USA IS NOT RESPONSIBLE FOR INCIDENTAL OR CONSEQUENTIAL DAMAGES, INCLUDING BUT
NOT LIMITED TO, INABILITY TO USE ITS PRODUCTS OR LABOR COSTS FOR REMOVING AND REPLACING DEFECTIVE PRODUCTS OR
PARTS. SOME STATES DO NOT ALLOW THE EXCLUSION OR LIMITATION OF INCIDENTAL OR CONSEQUENTIAL DAMAGES, SO THE
ABOVE LIMITATION OR EXCLUSION MAY NOT APPLY TO YOU.
What Customers Must Do for Limited Warranty Service
If you discover a problem that you think may be covered by the warranty you MUST REPORT it in wring to the address below within
thirty (30) days. Proof of purchase (an original sales receipt) from the original consumer purchaser must accompany all warranty
claims. Warranty claims must also include a descripon of the problem, the purchaser’s name, address, and telephone number.
General inquiries can be addressed to ViewZ USA Customer Service at 1-888-998-4399. Warranty claims will not be accepted over the
phone or by fax.
How State Law Applies
THIS WARRANTY GIVES YOU SPECIFIC LEGAL RIGHTS, AND YOU MAY ALSO HAVE OTHER RIGHTS WHICH VARY FROM STATE TO STATE.
ViewZ USA intends to make this manual accurate and complete. However, ViewZ USA makes no claim that the informaon contained
herein covers all details, condions or variaons, nor does it provide for every possible conngency in connecon with the
installaon or use of this product. The informaon contained in this document is subject to change without noce or obligaon of
any kind. ViewZ USA makes no representaon of warranty, expressed or implied, regarding the informaon contained herein. ViewZ
USA assumes no responsibility for accuracy, completeness or suciency of the informaon contained in this document.
ViewZ USA
LIMITED WARRANTY
ViewZ USA
An: Warranty Claim
177 W. Orangethorpe Ave.
Placena, CA 92870
NORTH AMERICA
177 W. Orangethorpe Ave.
Placena, CA 92870
USA and Canada
Phone: 1-888-998-4399
Fax: 1-714-996-1138
Other Locaons
Phone: (001) 888-998-4399
Fax: (001) 714-996-1138
© ViewZ USA
Disclaimer
Contact Us
Table of contents
Other ViewZ TV Mount manuals

ViewZ
ViewZ VZ-CMKiT-04 User manual

ViewZ
ViewZ VZ-CMKiT-01 User manual

ViewZ
ViewZ VZ-WM50 User manual

ViewZ
ViewZ VZ-CM-V1 User manual

ViewZ
ViewZ VZ-CM-V3 User manual

ViewZ
ViewZ VZ-CMKiT-02 User manual

ViewZ
ViewZ VZ-WM60 User manual

ViewZ
ViewZ VZ-AM03 User manual

ViewZ
ViewZ VZ-WM71 User manual

ViewZ
ViewZ VZ-CM308-B User manual
Popular TV Mount manuals by other brands

VOGELS
VOGELS W50510 Mounting instructions

Tru Vue
Tru Vue TRWV250/BK installation manual

d & b audiotechnik
d & b audiotechnik Z Series Mounting instructions

One Forall
One Forall WM5450 Quick installation guide

VOGELS
VOGELS TVM 3220 Series Full Installation Guide

d & b audiotechnik
d & b audiotechnik Z5027 Mounting instructions