manuals.online logo
Brands
  1. Home
  2. •
  3. Brands
  4. •
  5. Viking
  6. •
  7. Irrigation System
  8. •
  9. Viking HQR-2 Instruction manual

Viking HQR-2 Instruction manual

1. PRODUCT NAME
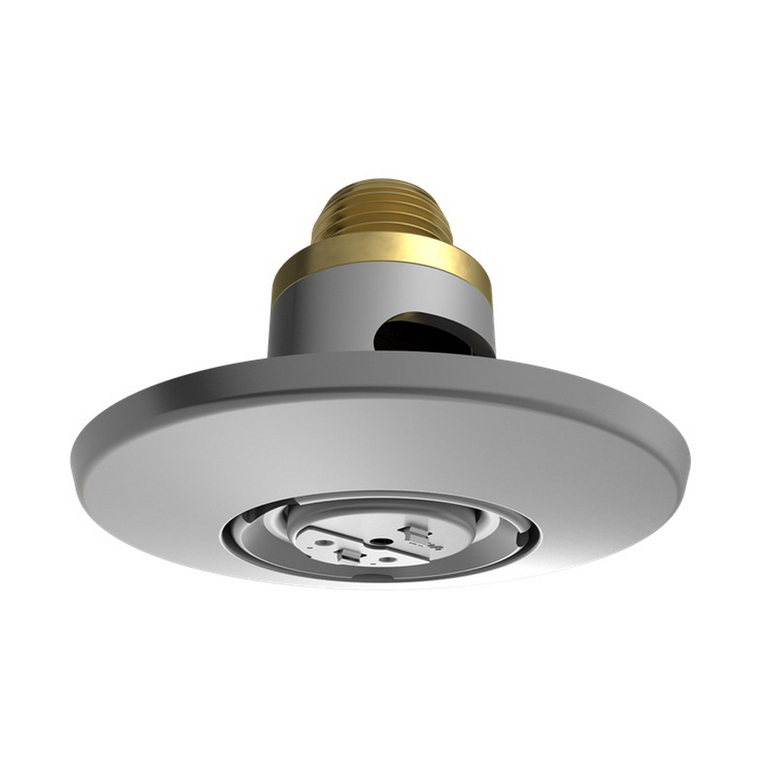
Viking Model HQR-2 Institutional
Quick Response Flush Pendent
Sprinkler Base Part No. 10554
Available since 1999.
Escutcheon Package
Base Part No. 10627
Available since 1999.
2. MANUFACTURER
The Viking Corporation
210 N. Industrial Park Road
Hastings, Michigan 49058 U.S.A.
Telephone:(616) 945-9501
(877) 384-5464
Fax:(616) 945-9599
e-mail: [email protected]
3. PRODUCT DESCRIPTION
The Viking Model HQR-2 Institutional
Quick Response Flush Pendent Sprin-
klerisasmall,flush,solderlinkandlever
spray sprinkler made with tam-
per-resistant construction. This institu-
tional sprinkler has been specifically de-
signed for use with concealed piping in
institutional mental health occupancies,
correctional facilities, or anywhere a
likelihood of tampering with fire sprin-
klers by the occupants may exist.
Theinstitutionalsprinklerassemblycon-
sists of the sprinkler body, lockring, and
a 3-1/4" (82,6 mm) diameter thread-on
escutcheon plate. The sprinkler and es-
cutcheon plate have a chrome finish.
Tests simulating conditions of misuse
demonstratethefusibleelementassem-
bly consistently breaks away when con-
nected to a 30 lb. weight dropped six
inches*.
* For a copy of the break-a-way test
de scribed,contactTheVikingCorporation.
The Viking Corporation disclaims any re-
sponsibilityfordamagesorinjury(including
death) caused by the operation or
inoperation of sprinklers arising out of the
misuse of or tampering with Viking ®brand
sprinklers including, without limitation, any
personal injury or death arising out of or
caused by the manipulation of, dismantling
of, or attempted use of the sprinkler or any
component as an instrument unrelated to
its intended use.
4. TECHNICAL DATA
LISTINGS:UL and C-UL Listed as
Quick Response Flush Pendent
Sprinkler (see approval chart on this
page).
Ratedto175psi(1207kPa)waterwork-
ing pressure.
Spring: U.S.A. Patent No. 4,570,720
ThreadSize:Nominal½"(15mm)NPT
Orifice Size: Nominal ½" (15 mm)
K-factor: Nominal 5.5 U.S. (7,9 metric*)
*Metric K-factor shown is for use when
pressure is measured in kPa. When
pressure is measured in BAR, multiply
the metric K-factor shown by 10.0.
FINISH
Sprinkler: Polished Chrome
Escutcheon Plate: Chrome
SPRINKLER ASSEMBLY MATERIALS
Sprinkler Body: Brass Casting
UNS-C84400
Deflector: Copper UNS-C19500
Seal: Teflon®Tape
Spring: Nickel Alloy
ESCUTCHEON PACKAGE MATERIALS
Escutcheon Plate: Brass UNS-C26000
Lockring: Stainless Steel UNS-S41000
ORDERING INSTRUCTIONS
To order the Viking Model HQR-2 Insti-
tutional Quick Response Flush Pendent
Sprinkler, refer to the following:
Sprinkler Base Part No. 10554 (specify
sprinkler temperature rating).
Escutcheon Package Part No. 10627
(includes lockring and escutcheon
plate).
Institutional Escutcheon Installation
Wrench Part No. 10551W/B:
Steel UNS-G10100
Available since 1999.
Flush/Concealed Sprinkler Wrenches*
A. Heavy Duty Part No. 08336W/B
Available since 1983, or
B. Light Duty Part No. 10366W/B**
Available since 1998.
* Requires a ½" ratchet (not available
from Viking).
** Ideal for sprinkler cabinets.
ACCESSORIES
A. Sprinkler Cabinet: Part No. 01731A
B. Retaining Flange Assembly: Part No.
10599, includes:
•Retaining Flange Casting: Brass
UNS-C84400
Available since 1999.
April 22, 1999Sprinkler60a
Form No. F_100998
TECHNICAL DATA
MODEL HQR-2 INSTITUTIONAL
QUICK RESPONSE FLUSH
PENDENT SPRINKLER
Note: Units of measure in parentheses may be approximations.
Figure 1
Model HQR-2 Institutional Quick Response
Flush Pendent Sprinkler
Model HQR-2 Sprinkler Body,
Lockring, and Escutcheon Plate
(RefertoInstallationTiponPage60c.)
Retaining Flange
Replaces page 60 a-d, dated March 18, 1999
(Revised paragraph 9 MAINTENANCE).
Approval Chart
Model HQR-2 Institutional
Quick Response Flush Pendent Sprinkler
Thread
SizeNominal
OrificeBase
P/N1Nominal
K-factor 2Overall
LengthApprovals 3, 4, 5
NPTBSPInchmmUSmetricInchmmULC-ULFMNYCLPCB
½"15 mm½15105545.57,9– – A1A1– – –
Available Temperatures
A - 165 °F (74 °C)
B - 220 °F (104 °C)
Listed Finish
1 - Chrome
Footnotes
1Base part number is shown. For complete part number, see Viking's current price list.
2Metric K-Factor shown is for use when pressure is measured in kPa. When pressure is
measured in BAR, multiply the metric K-Factor shown by 10.0
3This table shows the listings and approvals available at the time of printing. Other approv-
als are in process. Check with the manufacturer for any additional approvals.
4The Model HQR-2 Institutional Quick Response Flush Pendent Sprinkler is UL and C-UL
Listed as a Quick Response Flush Pendent Sprinkler.
5Available temperatures are 165 °F (74 °C) and 220 °F (104 °C), however, only the 165 °F
(74 °C) temperature rated sprinkler is UL and UL Listed at the time of this writing.
Table 1
KEY
See Row A See Row 1
of Approved of Approved
Temp.ChartA1FinishChart
OBSOLETE
•Socket Set Screw†: Steel Alloy
†Requires a 1/8" hex wrench for installation
and removal (not available from Viking).
C. Spanner Wrench Part No. 10729*
(for removal of institutional
escutcheon plate), ½" C-C
Available since 1999.
* For removal of the Model HQR-2 Institu-
tional Quick Response Flush Pendent
Sprinklers,specialtoolsareneeded(notall
the required tools are available from Vi-
king). Refer to section 9. MAINTENANCE,
paragraph D. on page 60 d.
5. AVAILABILITY AND SERVICE
Vikingsprinklers areavailablethrough a
network of domestic, Canadian, and in-
ternational distributors. See the Yellow
Pagesofthetelephone directoryforalo-
cal distributor (listed under “Sprinklers-
Automatic-Fire”) or contact Viking.
Viking technical data may be found on
The Viking Corporation’s Web site at
http://www.vikingcorp.com.
The Web site may include a more recent
edition of this technical data page.
6. GUARANTEES & DISCLAIMER
For details of warranty, refer to Viking’s
currentlistpricescheduleorcontactThe
Viking Corporation directly.
THE VIKING CORPORATION DISCLAIMS
ANY RESPONSIBILITY FOR DAMAGES
ORINJURY(INCLUDINGDEATH)CAUSED
BY THE OPERATION OR INOPERATION
OF SPRINKLERS ARISING OUT OF THE
MISUSE OF OR TAMPERING WITH
VIKING ®BRAND SPRINKLERS IN-
CLUDING, WITHOUT LIMITATION, ANY
PERSONAL INJURY OR DEATH ARISING
OUT OF OR CAUSED BY THE MANIPULA-
TION OF, DISMANTLING OF, OR AT-
TEMPTED USE OF THE SPRINKLER OR
ANY COMPONENT AS AN INSTRUMENT
UNRELATED TO ITS INTENDED USE.
7. OPERATION AND DESIGN
REQUIREMENTS
The Model HQR-2 is UL and C-UL
Listed as a Quick Response Flush
Sprinklerforstandardareas ofcoverage
with minimum flow and pressure re-
quirementsasspecifiedincurrentNFPA
Standards. The sprinkler must be in-
stalled in the pendent position in fixed
fire protection systems (wet, dry, de-
luge, or preaction systems).
The special escutcheon plate on the
Model HQR-2 Institutional Quick Re-
sponseFlushPendentSprinkler assem-
bly is the only ceiling ring that may be
used with these institutional sprinklers,
and all of these sprinklers must be in-
stalled with this escutcheon plate. Re-
movalofthethread-onescutcheon plate
is prevented by the lockring.
The sprinkler pipe above the ceiling
leading to the sprinkler must be secured
to prevent any movement of the sprin-
kler. One method of anchoring the pipe
above the ceiling is to use the retaining
flange and screw assembly that are
available from Viking. The flange slides
over the sprinkler drop nipple prior to
threading the nipple into the branch line
tee (see Figure 3A).
The sprinkler is recessed into the
mounting surface, flush to the ceiling,
with only a portion of the fusible link as-
sembly exposed beneath the ceiling.
The concealed deflector is held inside
the sprinkler body until the eutectic
metal solder link is fused. When the
sprinkler fuses, the deflector extends to
discharge and distribute water.
Themulti-piecedesign allows the instal-
lation and testing of the institutional
sprinklers prior to the installation of the
ceiling.
8. INSTALLATION
(Refer to Figures 1, 2, and 3.)
WARNING: Viking sprinklers are manu-
factured and tested to meet the rigid re-
quirements of the approving agency.
The sprinklers are designed to be in-
stalled in accordance with recognized
installation standards. Deviation from
the standards or any alteration to the
sprinkler after it leaves the factory in-
cluding, but not limited to: painting, plat-
ing,coating,or modification,mayrender
the sprinkler inoperative and will auto-
matically nullify the approval and any
guaranteemadebyTheVikingCorpora-
tion.
A.Sprinklers aretobe installedin accor-
dance with the latest published stan-
dards of the National Fire Protection
Association, Factory Mutual, Loss
Prevention Council, Assemblee
Pleniere, Verband der
Sachversicherer or other similar or-
ganizations, and also with the provi-
sions of governmental codes, ordi-
nances,andstandardswheneverap-
plicable.Flush sprinklers aredecora-
tive sprinklers and may be consid-
eredspecial purpose. Assuch, some
Authoritiesmay limitthe usedepend-
ing on the occupancy classification.
Refer to the Authority Having Juris-
diction prior to installation.
B.Sprinklersmust behandledwith care.
They must be stored in a cool, dry
place in their original shipping con-
tainer. Never install sprinklers that
have been dropped, damaged in any
way, or have been exposed to tem-
peraturesin excess of maximum am-
bient temperature allowed. Such
sprinklers should be destroyed im-
mediately.
C. Viking Model HQR-2 Sprinklers are
notintendedforuseincorrosiveenvi-
ronments. Use only sprinklers listed
for corrosive environments when
subject to corrosive atmospheres.
D. Use care when locating sprinklers
near fixtures that can generate heat.
Do not install sprinklers where they
will be exposed to temperatures that
exceed the maximum recommended
ambient temperature for the temper-
ature rating used.
E. Adequate heat must be provided
when the Model HQR-2 Institutional
Quick Response Flush Pendent
T
TECHNICAL DATA
April 22, 1999
Sprinkler 60 b
MODEL HQR-2 INSTITUTIONAL
QUICK RESPONSE FLUSH
PENDENT SPRINKLER
Figure 2
OBSOLETE
Sprinkleris installedonwet-pipe sys-
tems.
F. The sprinklers must be installed after
the piping is in place to prevent me-
chanical damage. Before installing,
besuretohavetheappropriatesprin-
kler model and style, with the correct
orifice size, temperature rating, and
response characteristics. Install the
sprinklers according to the following
sequence:
1. Install all piping and cut the sprin-
kler drop nipple so that the ½" (15
mm) NPT outlet of the reducing
couplingisatthedesiredelevation
and centered in a 2-1/4" (57,2
mm) diameter opening in the ceil-
ing.
Note: If the retaining flange as-
sembly is to be used, slide the
flange over the sprinkler drop nip-
ple prior to threading the nipple
into the branch line tee as shown
in Figure 3A.
2.Theinternaldiameterofthespecial
Flush/Concealed Sprinkler
Wrench is designed for use with
the sprinkler contained in the pro-
tectiveplasticshell.Withthesprin-
kler in the shell, apply a small
amount of pipe-joint compound or
tape to the external threads of the
sprinkler only, taking care not to
allow a build-up of compound in
the sprinkler inlet.
3.RefertoFigure3Banduseonlythe
special Flush/Concealed Sprin-
klerWrench,which isdesignedfor
installing Viking Model HQR-2 In-
stitutional Quick Response Flush
Pendent Sprinklers. With the
sprinkler in the plastic protective
shell, place the unit into the
wrench. DO NOT use the fusible
link to start or thread the sprinkler
into a fitting. Turn the unit clock-
wise to thread the sprinkler into
the coupling, taking care not to
over-tighten or damage the sprin-
kler operating parts.
G. After installation, the entire system
must be tested in accordance with
the recognized installation stan-
dards. The test is applied after sprin-
kler installation to ensure that no
damagehasoccurredtothesprinkler
during shipping and installation, and
to make sure the unit has been prop-
erlytightened.Ifathreadleakoccurs,
normally the unit must be removed,
new pipe-joint compound or tape ap-
plied, and then reinstalled. This is
duetothefactthatwhenthejointseal
leaks, the sealing compound or tape
is washed out of the joint.
H. After testing, repairing all leaks, and
installing and painting the ceiling, re-
movethe plasticprotectiveshell from
the sprinkler.
INSTALLATION TIP:Do not install the
lockring onto the sprinkler until after the
sprinklernipplehasbeencutbacktoen-
surethesprinkleris atthedesired eleva-
tion in relation to the face of the ceiling.
The lockring will prove difficult to re-
movefromthesprinkleronceithasbeen
installed above the plane of the ceiling.
Check final installation by temporarily
installing the escutcheon plate onto the
sprinkler without the lockring, using the
Institutional Escutcheon Installation
Wrench. If necessary, re-cut the sprin-
kler nipple as required.
Once satisfied with sprinkler level com-
paredtothe surfaceoftheceiling,install
lockring and escutcheon plate following
the steps below. The escutcheon plate
cannot be removed after it has been in-
stalledwith thelockring,so donotinstall
the escutcheon plate with the lockring
until after the system has been tested.
I. AsshowninFigures3Cand3D,fitthe
lockringovertheopenendofthepro-
tective sprinkler shell and use the
shelltogentlypressthelockringover
the threads of the sprinkler. The ring
must rest against the two wrench
ears of the sprinkler body with the
fourarmsof thelockringpointing out-
ward.
J. REMOVE THE PLASTIC PROTEC-
TIVE SHELL from the sprinkler.
(Recommendation: retain a protective
shell in the spare sprinkler cabinet.)
K. As depicted in Figure 3E, use the In-
stitutional Escutcheon Installation
Wrench to screw on the escutcheon
plate clockwise. The face of the es-
cutcheon plate is equipped with four
indentations to complement the de-
sign of the Institutional Escutcheon
April 22, 1999Sprinkler 60 c
TECHNICAL DATA MODEL HQR-2 INSTITUTIONAL
QUICK RESPONSE FLUSH
PENDENT SPRINKLER
A
BC
D
E
INSTALLATION TIP:
Donotinstallthelockringontothesprinkleruntilafterthesprinklernipplehasbeencutbacktoensurethesprinklerisatthedesiredelevationinre-
lationtothefaceoftheceiling.Thelockringwillprovedifficulttoremovefromthesprinkleronceithasbeeninstalledabovetheplaneoftheceiling.
Checkfinalinstallation bytemporarilyinstallingtheescutcheonplateontothesprinklerwithoutthelockring,usingtheInstitutionalEscutcheonIn-
stallation Wrench. If necessary, re-cut the sprinkler drop nipple as required.
Once satisfied with sprinkler level compared to the surface of the ceiling, install lockringand escutcheon plate following steps I though K below.
Theescutcheon plate cannot be removed after ithas been installedwith the lockring,sodo n ot installtheescutcheon plate withthelockringuntil
after the system has been tested.Figure 3: Sequence of Installation
OBSOLETE
Installation Wrench and facilitate in-
stallation of the escutcheon plate.
As the escutcheon plate is threaded
ontothesprinklerbody,thefourarms
of the lockring must fully engage with
theradialgroovesontheinside ofthe
escutcheonplate. Continueto thread
the escutcheon plate onto the sprin-
kler body until the plate’s flange fits
tightly against the surface of the ceil-
ing. Then, proceed to turn the es-
cutcheon plate another ½ turn clock-
wisetoensurethatitissecuredtothe
ceiling.
The arms of the lockring are angled
and designed to wedge into the
coined radial grooves on the inside
face of the escutcheon plate to keep
the escutcheon plate from being un-
screwed.Thus,anattempttoremove
the escutcheon plate after installa-
tion is prevented. DO NOT MODIFY
THE UNIT.
L. The retaining flange, located behind
the finished ceiling, must fit snug
against the inner surface of the ceil-
ing to prevent vertical movement of
theassembly. Use a 1/8" hex wrench
to tighten the retaining flange screw
and secure the assembly into place
to prevent it from being pulled
through the ceiling.
M. DISASSEMBLY: Refer to section 9.
MAINTENANCE, paragraph D. and
follow all warnings and instructions.
9. MAINTENANCE
(Refer to Figures 1, 2, and 3.)
NOTICE:The owner is responsible for
maintaining the fire protection system
and devices in proper operating condi-
tion. For minimum maintenance and in-
spection requirements, refer to the ap-
propriate National Fire Protection Asso-
ciation’s pamphlet that describes care
and maintenance of sprinkler systems.
In addition, the Authority Having Juris-
diction may have additional mainte-
nance requirements that must be fol-
lowed.
A.Thesprinklersmustbeinspectedona
regular basis for corrosion, mechani-
cal damage, obstructions, paint, etc.
The frequency of the inspections
may vary due to corrosive atmo-
spheres, water supplies, and activity
around the device.
B. Sprinklers that have been painted or
mechanically damaged must be re-
placed immediately. Sprinklers
showing signs of corrosion shall be
tested and/or replaced immediately
as required. Quick response sprin-
klers that are 20 years old shall be
tested and/or replaced as required.
Sprinklersthat haveoperated cannot
be reassembled or reused, but must
be replaced. When replacing sprin-
klers, use only new sprinklers.
C.Thesprinklerdischargepatterniscrit-
ical for proper fire protection. Noth-
ing should be hung from the sprin-
kler, attached to it, or otherwise ob-
struct the discharge pattern. All ob-
structions must be immediately re-
moved or, if necessary, additional
sprinklers installed.
D. When replacing existing sprinklers,
the system must be removed from
service. Refer to the appropriate
system description and/or valve
instructions. Prior to removing the
system from service, notify all
Authorities Having Jurisdiction.
Consideration should be given to
employment of a fire patrol in the
affected area.
DISASSEMBLY: There are two
methods of sprinkler disassembly. In
Method 1, the escutcheon plate and
lockring are removed first, and then
the remaining sprinkler components
can be removed without being
destroyed. The second method of
disassembly results in complete
destruction of the unit.
Disassembly Method 1:
1. Remove the system from service,
drain all water, and relieve all pres-
sure on the piping.
2. Use a drill (not available from Viking)
sized appropriately for use with a
spanner wrench (see step 3) to
make two holes through two oppo-
site indentations on the face of the
escutcheon plate.
3. Use a ½" C-C spanner wrench (Vi-
king P/N 10729) to unthread the es-
cutcheonplate by turningit counter-
clockwise.Make sure thatthe sprin-
kler body does not turn or loosen.
4. Remove the lockring from the sprin-
kler body.
5. Place a protective sprinkler shell
(from the spare sprinkler cabinet)
over the sprinkler to be removed.
6. With the protective shell over the
sprinkler, place the special Flush/
Concealed Sprinkler Wrench over
theunit and turnit counterclockwise
to carefully unthread the sprinkler
body from the reducing coupling.
7. Install the new unit using the
Flush/ConcealedSprinklerWrench.
Care must be taken to ensure that
the replacement sprinkler is the
proper model and style, with the ap-
propriate orifice size, temperature
rating, and response characteris-
tics. A fully stocked spare sprinkler
cabinet should be provided for this
purpose. (Stock of spare lockrings
and escutcheon plates should be
availableinthe sparesprinklercabi-
net in addition to the spare sprinkler
heads.)
8.Placethe systemback in serviceand
secure all valves. Check the re-
placed sprinklers and repair all
leaks.
Disassembly Method 2:
1. Remove the system from service,
drain all water, and relieve all pres-
sure on the piping.
2. Disassembleandremovethefusible
element,andbendthedeflectorand
sealingassembly to expose the wa-
terway of the sprinkler.
3. Insert an easy-out screw extractor
(Trade No. 6) into the waterway.
Turnthe easy-outcounterclockwise
with a wrench to remove the sprin-
kler assembly from the reducing
coupling.
4. Install the new unit using the Flush/
Concealed Sprinkler Wrench. Care
must be taken to ensure that the re-
placement sprinkler is the proper
model and style, with the appropri-
ate orifice size, temperature rating,
and response characteristics. A
fullystocked sparesprinklercabinet
shouldbe provided forthis purpose.
(Stock of spare lockrings and es-
cutcheonplatesshould beavailable
in the spare sprinkler cabinet in ad-
ditiontothesparesprinklerheads.)
5.Placethe systemback in serviceand
secure all valves. Check the re-
placed sprinklers and repair all
leaks.
E. Sprinkler systems that have been
subject to a fire must be returned to
service as soon as possible. The en-
tire system must be inspected for
damage and repaired or replaced as
necessary.Sprinklersthathavebeen
exposed to corrosive products of
combustion or high ambient temper-
atures,buthavenotoperated,should
be replaced. Refer to the Authority
Having Jurisdiction for minimum re-
placement requirements.
T
TECHNICAL DATA
April 22, 1999
Sprinkler 60 d
MODEL HQR-2 INSTITUTIONAL
QUICK RESPONSE FLUSH
PENDENT SPRINKLER
Form No. F_100998
Replaces page 60 a-d, dated March 18, 1999
(Revised paragraph 9 MAINTENANCE).
NOTE:This method of disassembly
results in damage to the
escutcheon plate and lockring,
and they cannot be reused
NOTE:This method of disassembly
results in complete destruction
of the unit. None of the sprinkler
components may be reused.
OBSOLETE

Other Viking Irrigation System manuals

Viking MicrofastHP VK344 Instruction manual

Viking

Viking MicrofastHP VK344 Instruction manual

Viking QR1 Operating manual

Viking

Viking QR1 Operating manual

Viking ESFR User manual

Viking

Viking ESFR User manual

Viking VK532 Instruction manual

Viking

Viking VK532 Instruction manual

Viking VK512 Instruction manual

Viking

Viking VK512 Instruction manual

Viking MICROFAST VK355 Instruction manual

Viking

Viking MICROFAST VK355 Instruction manual

Viking FREEDOM VK4800 Instruction manual

Viking

Viking FREEDOM VK4800 Instruction manual

Viking VK3542 Instruction manual

Viking

Viking VK3542 Instruction manual

Viking MICROMATIC VK106 Instruction manual

Viking

Viking MICROMATIC VK106 Instruction manual

Viking VK697 Instruction manual

Viking

Viking VK697 Instruction manual

Viking K14-0 Instruction manual

Viking

Viking K14-0 Instruction manual

Viking MICROFAST VK345 Instruction manual

Viking

Viking MICROFAST VK345 Instruction manual

Viking VK3522 Instruction manual

Viking

Viking VK3522 Instruction manual

Viking HQR-2 User manual

Viking

Viking HQR-2 User manual

Viking MICROFAST VK331 Instruction manual

Viking

Viking MICROFAST VK331 Instruction manual

Viking MicrofastHP VK346 Instruction manual

Viking

Viking MicrofastHP VK346 Instruction manual

Viking SIN VK520 Instruction manual

Viking

Viking SIN VK520 Instruction manual

Viking MICROFAST VK350 Instruction manual

Viking

Viking MICROFAST VK350 Instruction manual

Viking MICROFAST VK337 Manual

Viking

Viking MICROFAST VK337 Manual

Viking MICROFAST VK3271 Instruction manual

Viking

Viking MICROFAST VK3271 Instruction manual

Viking VK514 Instruction manual

Viking

Viking VK514 Instruction manual

Viking FREEDOM VK466 Instruction manual

Viking

Viking FREEDOM VK466 Instruction manual

Viking VK502 Instruction manual

Viking

Viking VK502 Instruction manual

Viking VK503 Instruction manual

Viking

Viking VK503 Instruction manual

Popular Irrigation System manuals by other brands

Reliable F1 Series Bulletin

Reliable

Reliable F1 Series Bulletin

Munters Green Field user manual

Munters

Munters Green Field user manual

Triad DamSurge Valve Operator's manual

Triad

Triad DamSurge Valve Operator's manual

Tyco Fire Product Gem F895 instruction manual

Tyco Fire Product

Tyco Fire Product Gem F895 instruction manual

Nelson F75 Big Gun Operation & maintenance instructions

Nelson

Nelson F75 Big Gun Operation & maintenance instructions

Tyco ESFR-17 manual

Tyco

Tyco ESFR-17 manual

Reliable G6-80 Bulletin

Reliable

Reliable G6-80 Bulletin

Reliable J168 instructions

Reliable

Reliable J168 instructions

Johnson Controls tyco AQUAMIST ULF AM33 manual

Johnson Controls

Johnson Controls tyco AQUAMIST ULF AM33 manual

Hunter I-31 Plus instructions

Hunter

Hunter I-31 Plus instructions

Hunter I-25 Installation

Hunter

Hunter I-25 Installation

Hozelock 2550 How to use

Hozelock

Hozelock 2550 How to use

Weathermatic D50 Series installation guide

Weathermatic

Weathermatic D50 Series installation guide

Autopot 12Pot XL Set-up guidelines

Autopot

Autopot 12Pot XL Set-up guidelines

Victaulic VicFlex Style AB6 quick start guide

Victaulic

Victaulic VicFlex Style AB6 quick start guide

Tyco K17-231 Installation

Tyco

Tyco K17-231 Installation

WaterGreat SR-1C Installation

WaterGreat

WaterGreat SR-1C Installation

Autopot AquaValve 1Pot XL Set-up guidelines

Autopot

Autopot AquaValve 1Pot XL Set-up guidelines

manuals.online logo
manuals.online logoBrands
  • About & Mission
  • Contact us
  • Privacy Policy
  • Terms and Conditions

Copyright 2025 Manuals.Online. All Rights Reserved.