Vinvautz VZ18BUP User manual

1

2
Vinvautz 19 Bottles Dual Zone Wine Cellar
Model no.: VZ18BUP
Thank you for choosing Vinvautz Wine Cellar. Before use, please read and follow all
safety and operating instructions.
The Vinvautz Difference (Vin + Vautz = Wine + Safe!)
Vinvautz is one of the first to develop a self-contained wine cellar suitable for big and
small family and office with excellence in its French craftsmanship and unique stylish
design sets for the needs of the trendy cosmopolitan life. Vinvautz is the famous
designer and manufacturer of professional Wine Cellar and creates aesthetic
masterpieces by perfectly blending architectural elements and artistic creations in its
designs.Vinvautz wine cellar is purposefully engineered for wine storage in a variety
of elegant, beautiful and stylish that enhances the ensembles in your home.
Digital control
A digital control and multiple sensors ideal for storage of both red and white wines.
Flexible storage
Retractable beechwood shelves are designed to provide easier accommodation.
Durable and High quality
Compressor type cooling offers stability in operation and durability for long lasting
storage.
Please read this manual carefully before installing and starting up, and store it in a
safe place. If you pass on the product to another person, handover this instruction
manual along with it.

3
WARNING
IMPORTANT SAFETY INSTRUCTIONS
WARNING
To reduce the risk of fire, electrical shock, or
injury when using your appliance, follow
these basic precautions:
•Read all instructions before using the wine cellar.
•DANGER or WARNING: Risk of child entrapment.
Child entrapment and suffocation are not problems of the past. Junked or abandoned
appliances are still dangerous.
•Before you throw away your old wine cellar: Take off the door. Leave the shelves in
place so that children may not easily climb inside.
•Never allow children to operate, play with, or crawl inside the wine cellar.
•Never clean wine cellar parts with flammable fluids. The fumes can create a fire hazard
or explosion.
•Do not store or use gasoline or any other flammable vapors and liquids in the vicinity of
this or any other appliance. The fumes can create a fire hazard or explosion. Do not
store explosive substances such as aerosol cans with a flammable propellant in this
appliance.
•keep ventilation openings, in the appliance enclosure or in the built-in structure, clear of
obstruction;
•To avoid a hazard due to instability of the appliance, it must be fixed in accordance with the
instructions.
-Save these instructions-
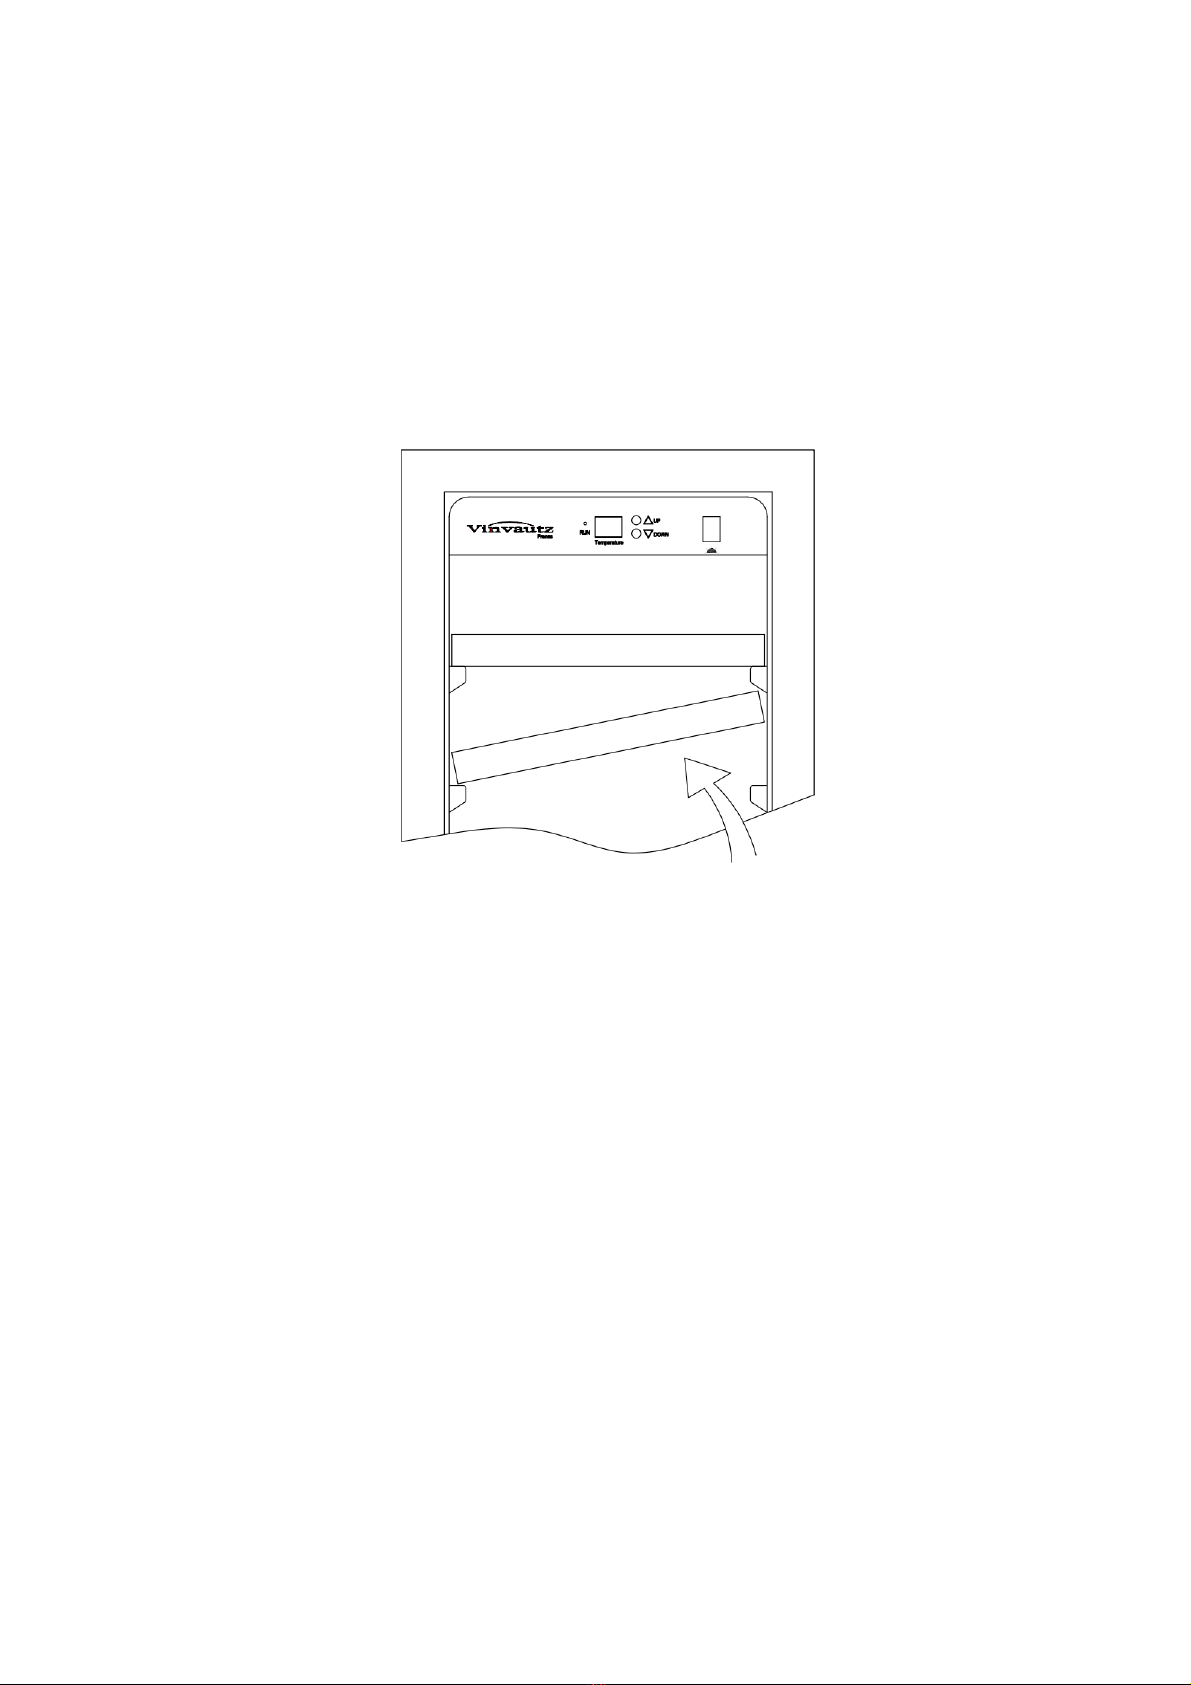
To prevent damaging the door gasket, make sure to have the door opened more
than 90°when pulling the shelves out of the rail compartment.
The wine cellar must be positioned so that the plug is accessible. Release the
electric cord. Move your cabinet to its final location. Do not move your
cabinet while loaded with wine. The wine cellar should be installed in a suitable
place in order to avoid user touching the compressor with the hand.
This wine cellar is not intended for use by persons (including children) with reduced
physical,sensory or mental capabilities, or lack of experience and knowledge, unless
they have been given supervision or instruction concerning use of the wine cellar by
a person responsible for their safety.
Children should be supervised to ensure that they do not play with the wine cellar.
If the supply cord is damaged, it must be replaced by the authorized After-sale
Service Centre in order to avoid a hazard.
PLEASE DON’T TRY TO PLUG INTO OR EXTENSION THE CABLE IN ANY CASE.

4
INSTALLATION INSTRUCTIONS
Before Using Your Wine Cellar
•Remove the exterior and interior packing.
•Before connecting the wine cellar to the power source, let it stand upright for approximately 2
hours. This will reduce the possibility of a malfunction in the cooling system from handling during
transportation.
•Clean the interior surface with lukewarm water using a soft cloth.
Installation of Your Wine cellar
•This appliance is designed to be for free standing installation or built-under (Refer to sticker
location the back of this appliance).
•This appliance is intended to be used exclusively for the storage of wine.
•
Place your wine cellar on the floor that is strong enough to support it when it is fully loaded. To
level your wine cellar, adjust the front leveling leg at the bottom of the wine cellar.
•
Locate the wine cellar away from direct sunlight and sources of heat (stove, heater, radiator,
etc.). Direct sunlight may affect the acrylic coating and heat sources may increase electrical
consumption. Extreme cold ambient temperatures may also cause the unit not to perform
properly.
•Avoid locating the unit in moist areas.
•Plug the wine cellar into an exclusive, properly installed-grounded wall outlet. Do not under any
circumstances cut or remove the third (ground) prong from the power cord. Any questions
concerning power and/or grounding should be directed toward a certified electrician or an
authorized Products service center.
Attention
•Store wine in sealed bottles;
•Do not overload the cabinet;
•Do not open the door unless necessary;
•Do not cover shelves with aluminum foil or any other shelf material which may prevent air
circulation;
•Should the Wine cellar be stored without use for long periods it is suggested, after a careful
cleaning, to leave the door ajar to allow air to circulate inside the cabinet in order to avoid
possible formations of condensation, mold or odors.

5
OPERATING YOUR WINE CELLAR
The wine cellar should be placed in where the ambient temperature is between 5-35
℃
(40-95 degrees
Fahrenheit). If the ambient temperature is above or below this range, the performance of the unit may be
affected. For example, placing your machine in extreme cold or hot conditions may cause interior
temperatures to fluctuate. The range of 5 -18
℃
(40-65 degrees Fahrenheit) may not be reached.
The controls of your Wine Cellar
•RUN
Indicator light illuminates to signify the cooling mode is currently in operation.
•Button
•To control the inner light turn on/off.
•Temperature
To shows the temperature of the wine compartment.
•Button
Used to raise(warm) the temperature in 1
℃
.
•Button
Used to lower(cool) the temperature in 1
℃
.
Setting The Temperature Controls
•To set the temperature, connect the power cord to a properly grounded outlet. In the event of
power interruption, the previous temperature setting is automatically erased.
•Set the desired cooling temperature by pressing the buttons adjacent to the “ / “button.
Each press of the buttons will scroll through the available temperature setting in increments of 1
degree. The temperature selected will flash in the LED display for approximately 5 seconds,
then revert back to display the temperature of the wine compartment.
The temperature setting can be adjusted from 5
℃
to 18
℃
.
•To view the "set" temperature, (anytime) press and hold the “ / “ button for approximately
5 seconds, the "set" temperature will temporarily "flash" in the LED display for 5 seconds
•Flashing LED = Set Temperature
Steady LED = Cabinet Temperature
NOTE:
•If the unit is unplugged, power lost or turned off, you must wait 3 to 5 minutes before restarting
the unit. If you attempt to restart before this time delay, the wine cellar will not start to operate.
•When you use the wine cellar for the first time or restart the wine cellar after having been shut
off for a long time, there could be a few degrees variance between the temperature you select
and the one indicated on the LED display. This is normal and it is due to the direction of the
activation time. Once the wine cellar is running for a few hours everything will resume to normal.

6
Shelves
•To prevent damaging the door gasket, make sure the door is opened completely when pulling
shelves out of the rail compartment.
•For easy access to the storage content, you must pull the shelves approximately 1/3 out of the
rail compartment. However, this unit is designed with a notch on each sides of the shelf tracks to
prevent bottles from falling.
•When removing any of these shelves out of the rail compartment to fit or remove the shelf, tilt
the shelf as per the diagram below then simply pull out, or push in the shelf until it sits on the
support brackets securely.

7
Use of Humid Box
If humidity conditions are low within the compartments, it will be necessary to use the humid box.
Fill the humid box with about 3/4 full with fresh water and place it on the top shelf of compartment.
Check the water level occasionally and refill if necessary.
NOTE: The use of humid box will reduce the storage capacity of the top shelf by one bottle of wine.
Top shelf of compartment
Bottles Loading Diagram
Wine bottles can be loaded horizontally on each wine shelf (see below diagram).Two bottles of
wine can stored vertically with a black plastic plate in the package. Place the black plastic plate in
front of the 3rd level of shelf as in below diagram.
•Without Humid Box
•With Humid Box
Place the black plastic plate at
3rd level of shelf
Place the black plastic plate at
3rd level of shelf

8
CARE AND MAINTENANCE
Cleaning Your Wine Cellar
•Turn off the power, unplug the wine cellar, and remove all items including shelves and rack.
•Wash the inside surfaces with a warm water and baking soda solution. The solution should be
about 2 tablespoons of baking soda to a quart of water.
•Wash the shelves with a mild detergent solution.
•Wring excess water out of the sponge or cloth when cleaning area of the controls, or any
electrical parts.
•Wash the outside cabinet with warm water and mild liquid detergent. Rinse well and wipe dry
with a clean soft cloth.
Power Failure
•Most power failures are corrected within a few hours and should not affect the temperature of
your appliance if you minimize the number of times the door is opened. If the power is going to
be off for a longer period of time, you need to take the proper steps to protect your contents.
Vacation Time
•Short vacations: Leave the Wine cellar operating during vacations of less than three weeks.
•Long vacations: If the appliance will not be used for several months, remove all items and turn
off the appliance. Clean and dry the interior thoroughly. To prevent odor and mold growth, leave
the door open slightly: blocking it open if necessary.
Moving Your Wine cellar
•Remove all items.
•Securely tape down all loose items (shelves) inside your appliance.
•Turn the adjustable leg up to the base to avoid damage.
•Tape the door shut.
•Be sure the appliance stays secure in the upright position during transportation. Also protect
outside of appliance with a blanket, or similar item.
Energy Saving Tips
•The wine cellar should be located in the coolest area of the room, away from heat producing
appliances, and out of the direct sunlight.

9
TROUBLESHOOTING GUIDE
You can solve many common wine cellar problems easily, saving you the cost of a possible service call.
Try the suggestions below to see if you can solve the problem before calling the After-sales Service
Center.
PROBLEM
POSSIBLE CAUSE
Wine cellar does not operate.
•Not plugged in.
•The machine is turned off.
•The circuit breaker tripped or a blown fuse.
Wine cellar is not cold enough.
•Check the temperature control setting.
•External environment may require a higher setting.
•The door is opened too often.
•The door is not closed completely.
•The door gasket does not seal properly.
Turns on and off frequently.
•The room temperature is hotter than normal.
•A large amount of contents has been added to the
wine cellar
•The door is opened too often.
•The door is not closed completely.
•The temperature control is not set correctly.
•The door gasket does not seal properly.
The light does not work.
•Not plugged in.
•The circuit breaker tripped or a blown fuse.
•The bulb has burned out.
•The light button is “OFF”.
Vibrations.
•
Check to assure that the wine cellar is levelled.
The Wine cellar seems to make too much
noise.
•The rattling noise may come from the flow of the
refrigerant, which is normal.
•As each cycle ends, you may hear gurgling sounds
caused by the flow of refrigerant in your wine cellar.
•Contraction and expansion of the inside walls may
cause popping and crackling noises.
•The wine cellar is not levelled.
The door will not close properly.
•The wine cellar is not levelled.
•The door was reversed and not properly installed.
•The gasket is dirty.
•The shelves are out of position.

10
法國名望
法國名望法國名望
法國名望 Vinvautz 19 支雙温酒櫃
支雙温酒櫃支雙温酒櫃
支雙温酒櫃
型號
型號型號
型號 : VZ18BUP
Vinvautz 是世界著名的酒櫃製造商。多年的專業設計及生產經驗給藏酒愛好者創造了
系列混合美麗及藝術感的酒櫃。滿足愛好者在不同地方保存珍藏的嚴格要求。
與別不同
Vinvautz 柔合法國設計及現代制冷技術,表現出獨特時尚品味,為家居及辦公室增添色
彩。
電子操控
獨特的設計,加上電子顯示温度及輕觸式面版設計,方便使用。
靈活實用
附設優質櫸木層架,可自由調節高低配合實際用途。
耐用可靠
運用材料採用先進壓縮機技術技術,確保耐用可靠。

11
警告
警告警告
警告
重要安全注意事項
重要安全注意事項重要安全注意事項
重要安全注意事項
警告
為避免在使用時發生火災,觸電和任何意
外傷害,請注意以下預防常識
使用前請仔細閱讀說明書
注意:小孩被困的風險
酒櫃丟棄前注意: 取出門體並把層架保留在原位,避免兒童爬入酒櫃內
請勿讓兒童獨自操作或使用酒櫃
請勿在酒櫃內儲存易燃物,並且遠離任何易燃物
請勿在酒櫃頂部放置任何電器或重物品
為防止門框的損壞, 當您需要抽出層架時,請先確保酒櫃門巳完全打開至最
大幅度或多於 90 度。酒櫃必須安置在近插座的地方;解開電源線,放穩酒櫃
後方可以移動。
當放入酒瓶時,請不要移動酒櫃,這樣可能致使本機變形。
在酒櫃工作時,請不要用手接觸壓縮機系統。
酒櫃應放在 個適當並通風的地方。
如果電源線損壞,為了避免危險, 定要聯繫廠家或指定的專業人員進行

12
安裝說明
安裝說明安裝說明
安裝說明
在使用酒櫃之前
•拆除外包裝及內包裝物。
•為避免在運輸或者搬運過程中,導致酒櫃製冷劑被震動而發生的故障,在連接電
之前,請先讓酒櫃靜止2小時以上。
•避免使用硬質毛刷或鋼絲刷等硬性材質清潔酒櫃和配件。止使用去污粉、汽
油、天拿水和丙酮等有機溶劑、熱水或帶有酸/鹼性質的物品來清潔機身,並且
不能用水沖洗本機,以免影響酒櫃的良好絕緣性能。
安裝酒櫃
•酒櫃的設計是可以直立或嵌入櫥櫃下使用,放置時均需要保持酒櫃後背和前
部通風。
•當您放置酒櫃的時候,請把它放在能夠承受足夠壓力的地方。為穩定平放酒櫃,
可自行調節酒櫃底部的前及後的機腳。
•酒櫃放置時需要遠離陽光和熱源(如爐、加熱器、電暖爐等.)地方使用,因直射
陽光可能會影響丙烯酸酯的塗層,並且熱源會增加消耗電量; 在過冷的環境下工
作,會導致酒櫃不能正常的工作。
•避免放在潮濕環境中。
•將電源插頭連接正確的插座上及電壓必須與本機後方標示 致。在任何情況下,
不要自行剪掉電源線或拆除電源插頭。任何關於電或者放置問題,請諮詢專業的
工程師或與服務部聯繫。
注意
注意注意
注意:
::
:
•放入櫃中儲存的酒必須是包裝完好的
•不要超過酒櫃本身的最大裝瓶數的數量
•如無需要,請不要頻繁打開酒櫃門
•不要使用鋁錠箔或其他將會影響櫃子空氣的材質來覆蓋層架 酒櫃長時間不使
用時,請清潔酒櫃內部並敞開門便於通風,以免酒櫃內部材質產生霉變或者任
何異味

13
如何安裝及移除層架
•為了方便取出存儲的物件,你必須由路軌分隔拉出層架大約 1 / 3,層架的兩
旁軌道備有安全鎖部件以防止層架及酒瓶跌出。
•在支撐托座上安裝或移除任何層架,傾斜層架如圖並簡單地拉出,或推入層架
後直到坐穩於支撐托座上才放下。

14
酒櫃操作指南
酒櫃操作指南酒櫃操作指南
酒櫃操作指南
酒櫃應當安置在周圍環境溫度5-35
o
C之間或華氏溫度(40-95°F) 的環境下工作。如果周
圍環境溫度過低或過高於這個範圍, 酒櫃的某些功能可能受其影響的。例如, 放置您的
酒櫃在極冷或熱的情況會導致內部溫度不穩定,導致機內製冷溫度無法達到華氏 40-65°F
(5-18
o
C的範圍)。
進行溫度調節設置
進行溫度調節設置進行溫度調節設置
進行溫度調節設置–
•
“
““
“
運行
運行運行
運行
”
””
”指示燈
指示燈指示燈
指示燈
指示燈點著,以顯示冷卻模式目前正在運作中。
•“ ”
按鈕
按鈕按鈕
按鈕
控制內部照明燈開啟/關 。
•“ ”
按鈕
按鈕按鈕
按鈕
•
用於提升溫度,每按一下按鈕就會增加
1
℃
。
•“ ”
按鈕
按鈕按鈕
按鈕
用於降低溫度,每按一下按鈕就會減少
1
℃
。
設 溫度控制
設 溫度控制設 溫度控制
設 溫度控制
•
將電源線鏈接到一個適當的接地插座電源中
,
在設定溫度時避免電源中斷
,
否則設定的溫度會
自動刪
.
•
可以通過
“ / ”
按鈕設置所需的製冷溫度
,
每按一下按鈕就會增加或減少
1
度
,
設定的溫度
會在
LED
顯示屏上閃爍
5
秒
,
然後轉回顯示酒櫃的實際溫度
.
此機型酒櫃的設定溫度範圍是
5-18
o
C
•
如
果想顯示酒櫃內的設定溫度
,
隨時可以對應按
“ / ”
按鈕大概
5
秒鐘
,
設定溫度將會在
LED
顯示屏上閃爍
5
秒鐘
•
•
LED
LEDLED
LED
顯示屏閃爍的數字
顯示屏閃爍的數字顯示屏閃爍的數字
顯示屏閃爍的數字
=
==
=
設定溫度
設定溫度設定溫度
設定溫度
LED
LEDLED
LED
顯示屏固定的數字
顯示屏固定的數字顯示屏固定的數字
顯示屏固定的數字
=
==
=
實際溫度
實際溫度實際溫度
實際溫度
注意
注意注意
注意
:
•
如酒櫃電源被拔掉,停電,或已關閉,您必須等待
3
至
5
分鐘才可重新啟動酒櫃。
如果您嘗試在此時間之前重新啟動,酒櫃將無法啟動並對其造成損害。
•
當您首次使用酒櫃或重新啟動已關閉很長一段時間的酒櫃時,您選擇的溫度和
LED
顯
示讀數之間可能會出現一些溫度上的差異。這是正常的,這是由於酒櫃內的温度需要
調整。當酒櫃運行幾個小時後一切將恢復正常。

15
保濕盒的
保濕盒的保濕盒的
保濕盒的使用
使用使用
使用
如果酒櫃內的濕度相對比較低的時候,可使用保濕盒.用乾淨的水填滿保濕盒的3/4 並
放到最頂部的層架間隔內,偶爾檢查水位狀況,必要時補充保濕盒內水分
注意
注意注意
注意:使用保濕盒,最頂部的酒架將會減少 支酒的存放.
最
最最
最頂部的層架
頂部的層架頂部的層架
頂部的層架
酒
酒酒
酒瓶
瓶瓶
瓶存
存存
存放
放放
放指示
指示指示
指示圖
圖圖
圖
酒瓶可以水平放置到每 層酒架上(見下圖).其中兩瓶酒可以利用包裝內的黑色塑
料板垂直放置在第三層酒架上.把黑色塑料板放平在第三層的酒架前方,如下圖:
•
不放入保濕盒
•
放
入
保濕盒
黑色塑料板放在第三層酒架前
方
上
黑色塑料板放在第三層酒架前
方
上

16
維修與保養
維修與保養維修與保養
維修與保養
清潔酒櫃
• 關掉電源,拔掉插頭,取出所有層架
• 建議使用 1升的溫水配2大湯匙蘇打水清洗酒櫃內部
• 建議使用清潔劑清洗層架
• 當清洗控制按鈕或其他電子配件時,請用乾布擦淨便可
• 可使用溫水和清潔劑清洗酒櫃外表,並且用柔軟的毛巾擦乾本機
電源中斷故障
如本機因停電出現電源故障,幾小時之內恢復正常將不會影響本機溫度; 如在此
期間頻繁開啟櫃門或長時間內電源無法恢復正常,請採取適當措施來妥善保管酒
櫃內儲存的酒。
停止使用期間
• 短暫未使用時:如果酒櫃短暫不使用(少於三個星期), 請關掉電源。
•長期停止使用時:
如果酒櫃幾個月未使用, 請關掉電源, 拆除所有配件, 徹底清潔內部,
防止產生異味. 再次使用時, 建議將門稍微打開 點以便通風換氣。
移動您的酒櫃時
• 酒櫃搬運須知:
-需拆除所有配件。
-將拆下的配件放入酒櫃內,避免丟失。
-把機腳調平穩,以免損傷。
-將門關閉。
-運輸時,務必保持酒櫃處於直立狀態(不可傾斜),並使用毛毯或類似的柔軟
物品保護酒櫃外表,以防刮傷。
節能建議
酒櫃需放置在乾燥陰涼處,遠離任何制熱電器,避免陽光直射。

17
酒櫃的疑難問題
酒櫃的疑難問題酒櫃的疑難問題
酒櫃的疑難問題
您可以很容易地解決有可能遇見的問題,請先查看以下措施及指南。
問題故障指南
問題 原因分析
酒櫃不能開啟 •沒有接駁電源
•開關壞了或保險絲壞了
•風扇壞了或太多灰塵阻礙風扇正常運轉
•可能電路板有故障
酒櫃內溫度不夠冷 •檢查溫度設置
•機外環境溫度過高
•門經常被打開。
•門沒有關好
•門封不能有效密封
操作時曾出現開/關現象 •室內溫度比正常溫度高 些
•酒櫃裡面放入了過多的物品
•門經常被打開
•門沒有關好
•溫度設置不正確
•門封不能有效密封
燈不亮 •沒有安裝好
•開關壞了或保險絲壞了
•燈泡壞了
•燈按鈕是關閉的
酒櫃振動 •確保酒櫃放平
酒櫃噪音太大 •酒櫃沒有放平
•當機器開始運作時,將聽到汩汩聲,
•此聲音由酒櫃製冷劑流動造成的, 正常
現象
•機體收縮或膨脹會導致裂開的聲音
門不能完全關上 •酒櫃沒有放平
•門沒有正常安裝,或裝反了
•門磁封出現異常
•層架移位

18

19
Table of contents
Other Vinvautz Wine Cooler manuals

Vinvautz
Vinvautz VZ44BDI User manual

Vinvautz
Vinvautz GRAND CRU CLASSE Series User manual

Vinvautz
Vinvautz GRAND CRU CLASSE VZ06BN User manual

Vinvautz
Vinvautz VZ19SSUG User manual

Vinvautz
Vinvautz Grand Cru Classe VZ46BHK User manual

Vinvautz
Vinvautz VZ46VDUG-L User manual

Vinvautz
Vinvautz VZ08BHK User manual

Vinvautz
Vinvautz VZ143VSUG User manual

Vinvautz
Vinvautz VZ07SSUG User manual

Vinvautz
Vinvautz Pro Black Series User manual