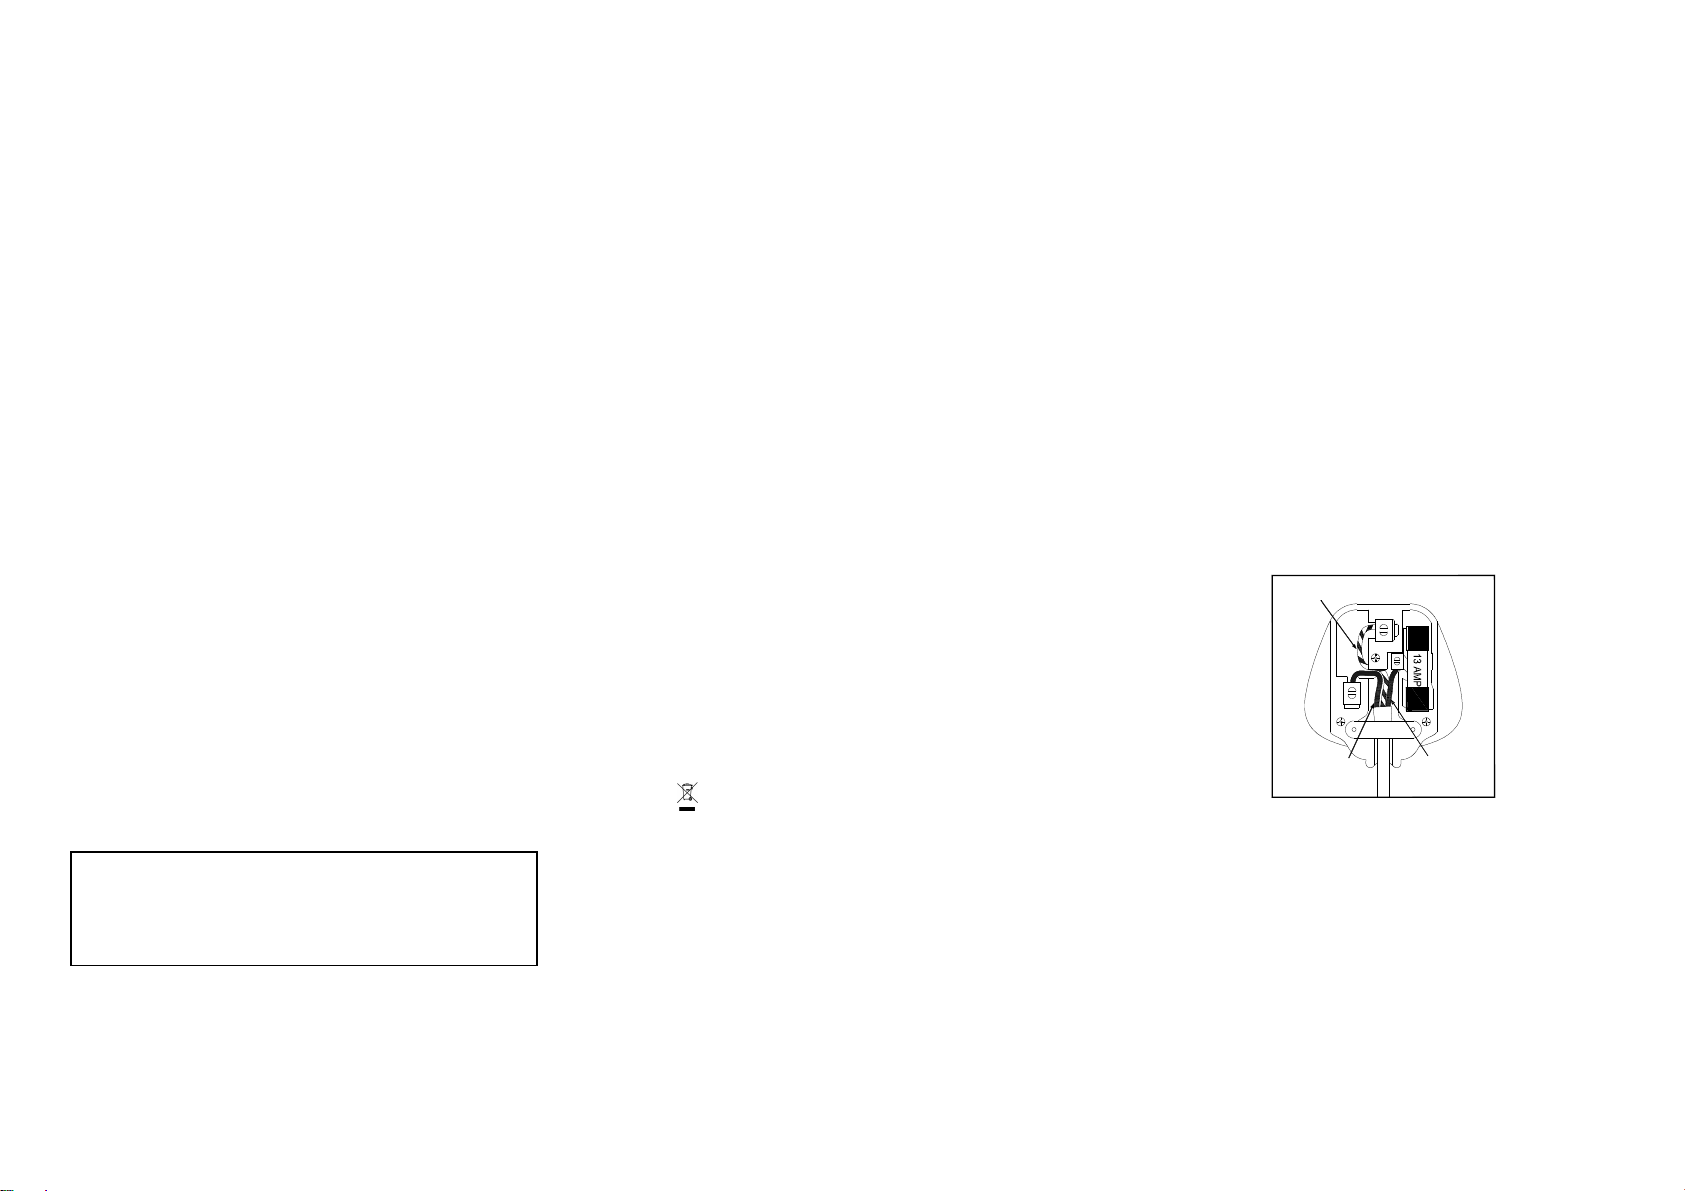
Vinvautz Pro Black Series User manual

VZ28BDHK, VZ46BDHK,
VZ102BDHK, VZ126BDHK
VZ171BDHK
Pro Black Series

Model no.: VZ28BDHK, VZ46BDHK, VZ102BDHK, VZ126BDHK, VZ171BDHK
Thank you for choosing Vinvautz Wine Cellar. Before use, please read and follow all safety and operating instructions.
The Vinvautz Difference (Vin + Vautz = Wine + Safe!)
The Vinvautz Difference (Vin + Vautz = Wine + Safe!)The Vinvautz Difference (Vin + Vautz = Wine + Safe!)
The Vinvautz Difference (Vin + Vautz = Wine + Safe!)
Vinvautz is one of the first to develop a self-contained wine cellar suitable for big and small family and office with excellence in its French craftsmanship and
unique stylish design sets for the needs of the trendy cosmopolitan life. Vinvautz is the famous designer and manufacturer of professional Wine Cellar and
creates aesthetic masterpieces by perfectly blending architectural elements and artistic creations in its designs.Vinvautz wine cellar is purposefully engineered
for wine storage in a variety of elegant, beautiful and stylish that enhances the ensembles in your home.
Digital control
Digital controlDigital control
Digital control
A digital control and multiple sensors ideal for storage of both red and white wines.
Flexible storage
Flexible storageFlexible storage
Flexible storage
Retractable beechwood shelves are designed to provide easier accomodation.
Durable and igh quality
Durable and igh qualityDurable and igh quality
Durable and igh quality
Compressor type cooling offers stability in operation and durability for long lasting storage.

CONTENT
IMPORTANT SAFEGUARDS
DISPOSAL
CONNECTION TO THE MAINS SUPPLY
PRODUCT FEATURES
INSTALLATION
OPERATING YOUR WINE CELLAR
CARE AND MAINTENANCE
TROUBLESHOOTING GUIDE
APPENDIX: WINE BOTTLES LOADING INSTRUCTION DIAGRAM
Please read this manual carefully before installing and starting up, and store it in a safe place. If you pass on the product to another person, hand over this
instruction manual along with it.

4
IMPORTANT SAFEGUARDS
When using an electrical Wine Cellar, basic
precautions should always be followed to reduce the
risk of fire, electric shock, and injury to persons,
including the following:
FOR YOUR SAFETY
Read all instructions carefully, even if you are quite
familiar with the Wine Cellar.
•The Wine Cellar is intended to be used for the storage
of wine. Use this Wine Cellar only as described in this
manual. Other uses not recommended may cause fire,
electric shock or personal injury.
•This Wine Cellar can be used by children
aged from 8 years and above and persons
with reduced physical, sensory or mental
capabilities or lack of experience and
knowledge if they have been given
supervision or instruction concerning use of
the Wine Cellar in a safe way and understand
the hazards involved. Children shall not play
with the Wine Cellar. Cleaning and user
maintenance shall not be made by children
without supervision.
•Electrical devices are not toys. Always keep the
device out of the reach of children. Keep the mains
cord out of the reach of children. Do not let the mains
cord hang over the edge of the table or worktop on
which the Wine Cellar stands.
•To protect against the risk of electric shock, DO NOT
IMMERSE the Wine Cellar, cord, or plug in water or
spray any other liquid.
•Unplug the Wine Cellar from the plug socket when not
in use, when moving from one location to another and
before cleaning.
•To disconnect the Wine Cellar, grip the plug and pull it
from the wall outlet. Never pull by the cord.
•WARNING: Please keep the Wine Cellar away from
substance, which can cause ignition. Do not operate
the Wine Cellar in the presence of explosive and/or
flammable fumes.
•Do not place the Wine Cellar or any of its part near an
open flame, cooking or other heating appliances.
•Do not operate the Wine Cellar with a damaged cord
or plug, if the product malfunctions, or if it is dropped
or damaged in any manner. If the mains cord is
damaged, you must have it replaced by the
manufacturer, or your local authorized service centre
or qualified electricians in order to avoid a hazard.
•The use of attachments not recommended by the
manufacturer may be hazardous.
•Place the Wine Cellar on a dry level surface.
•Do not operate if the housing is removed or damaged.
•A loose fit between the AC outlet (receptacle) and plug
may cause overheating and a distortion of the plug.
Contact a qualified electrician to replace loose or worn
outlet.
•Locate the Wine Cellar away from direct sunlight and
sources of heat (stove, heater, radiator, etc.).
•WARNING: This Wine Cellar is CFC- and HFC-free
and contains small quantities of Isobutane (R600a)
which is environmentally friendly, but flammable. It
does not damage the ozone layer, nor does it increase
the greenhouse effect. Care must be taken during
transportation and setting up of the Wine Cellar that no
parts of the cooling system are damaged. Leaking
coolant can ignite and may damage the eyes.
In the event of any damages:
- Avoid open flames and anything which creates a
spark,
- Disconnect from the mains,
- Air the room in which the Wine Cellar is located for
several minutes
- Contact your local authorized service centre for
advice.
•The more coolant there is in a Wine Cellar, the larger
the room it should be installed in. In the event of a
leakage, if the Wine Cellar is in a small room, there is
the danger of combustible gases building up. For
every 8 g of coolant at least 1 cubic meter of room
space is required. The amount of coolant in the Wine
Cellar is stated on the data plate inside the Wine
Cellar. It is hazardous for anyone other than an
Authorised Service Personnel to carry out servicing or
repairs to this Wine Cellar. In Queensland of Australia
the authorized person must hold a Gas Work
Authorisation for hydrocarbon refrigerants, before
carrying out servicing or repairs which involve the
removal of covers.
•WARNING: Keep ventilation openings, in the Wine
Cellar enclosure or in the built-in structure, clear of
obstruction. No liability will be accepted for any
damage incurred owing to misuse of the Wine Cellar
or as a result of repairs carried out by unqualified
personnel. In this case neither the guarantee nor any
other liability claims will apply.
•WARNING: Do not use mechanical devices or other
means to accelerate the defrosting process, other than
those recommended by the manufacturer.
•WARNING: Do not damage the refrigerant circuit.
Never use a Wine Cellar with a damaged circuit.
•WARNING: Do not use any electrical appliances
inside the Wine Cellar.
•WARNING: To avoid a hazard due to instability of
the Wine Cellar, it must be fixed in accordance with
the instructions.
•Do not store explosive substances such as aerosol cans
with a flammable propellant in this Wine Cellar.
•This Wine Cellar is intended to be used in household
and similar applications such as

5
- staff kitchen areas in shops, offices and other
working environments;
- farm houses and by clients in hotels, motels and
other residential type environments;
- bed and breakfast type environments;
- catering and similar non-retail applications.
•Do not attempt to repair or replace any part of your
Wine Cellar unless it is specifically recommended in
this manual. All other servicing should be referred to a
qualified technician or your local authorized service
centre.
•Replace all panels after service before operating.
•Use two or more people to move and install the Wine
Cellar. Failure to do so can result in back or other
injury.
•Never clean Wine Cellar parts with flammable fluids.
These fumes can create a fire hazard or explosion. And
do not store or use gasoline or other flammable vapors
and liquids in the vicinity of this or any other Wine
Cellar. The fumes can create a fire hazard or explosion.
•Do not connect or disconnect the electric plug when
your hands are wet.
•It is recommended that a separate circuit, serving only
your Wine Cellar be provided. Use receptacles that
cannot be turned off by a switch or pull chain.
•If you have a lockable Wine Cellar, do not keep the
key near the Wine Cellar or within reach of children.
SAVE THESE INSTRUCTIONS
If you are experiencing problems, check the
Troubleshooting Guide at the back of this manual. It lists
causes of minor operating problems that you can correct
by yourself.
DISPOSAL
Dispose of your Wine Cellar packaging properly. Ensure
that any plastic wrappings, bags etc. are disposed of
safely and kept out of the reach of babies and young
children. Danger of suffocation!
Refrigeration equipment must be properly disposed of in
a professional and appropriate way, in accordance with
the current local regulations and laws which protects the
environment this applies to your old Wine Cellar and to
your new Wine Cellar once it has reached the end of its
service life.
WARNING: Please ensure that old, worn Wine Cellars
are rendered unusable before disposal by removing the
doors, removing the plug, cutting the network cable, and
removing or destroying any snap fastenings or bolts. You
will thus prevent children from locking themselves in the
Wine Cellar during play (risk of suffocation) or
endangering their lives in any other way. DO NOT
dispose of the Wine Cellar in landfill as the insulation
(Cyclopentane) and refrigerant gas (R600a) contained in
these Wine Cellars are flammable.
Disposal instructions:
•The Wine Cellar must not be disposed of in the dustbin
or with normal household rubbish.
•The coolant circuit, particularly the heat exchanger at
the back/bottom of the Wine Cellar, must not be
damaged.
•The symbol on the product or its packaging
indicates that this product is not to be handled as
normal household waste but is to be taken to a
recycling collection point for electrical and electronic
goods. By correctly disposing of this product you are
contributing to the protection of the environment and
to the health of your fellow human beings. Improper
disposal endangers health and the environment.
Further information about the recycling of the product
may be obtained from your town hall, refuse collection
department or the store where you purchased the
product.
CONNECTION TO THE MAINS
SUPPLY
Check that the voltage marked on the product
corresponds with your supply voltage.
This product is fitted with a 13A plug complying with
BS1363. If this plug is unsuitable or needs to be replaced,
please note the following:
WARNING:
THIS WINE CELLAR MUST BE
EARTHED.
Important: The wires in the mains lead are coloured in
accordance with the following code:
GREEN/YELLOW - EARTH
BLUE - NEUTRAL
BROWN - LIVE
Neutral
(Blue)
Earth
(Green/Yellow)
Live
(Brown)
This Wine Cellar is equipped with a plug fitted with a 13
amp fuse. Should the fuse fail, then it must be replaced
with an ASTA approved fuse (conforming to BS1362) of
the same rating. If you need to replace the plug or if the
plug is of the incorrect type for your socket, remove it and
replace it with an appropriate type. Dispose of the old
plug safely.
As the colours of the wires in the mains lead of this Wine
Cellar may not correspond with the coloured markings
identifying the terminals in your plug, proceed as follows:
The GREEN/YELLOW wire is the EARTH and must
be connected to the terminal which is marked with the
WARNING: To reduce the risk of fire,
electric
shock or personal injury, unplug or
disconnect the appliance from the power
supply before servicing.

6
letter ‘E’ or by the earth symbol or coloured GREEN
or GREEN/YELLOW.
The BLUE wire is the NEUTRAL and must be
connected to the terminal which is marked with the letter
‘N’ or coloured BLACK.
The BROWN wire is the LIVE wire and must be
connected to the terminal which is marked with the Letter
‘L’ or coloured RED.
Always ensure that the plug cord grip is fastened
correctly.
If in doubt consult a qualified electrician who will be
pleased to do this for you. This product conforms to EC
Directive 92/31 /EEC with respect to Electromagnetic
Compatibility.
NON-REWIREABLE MAINS PLUG
If your Wine Cellar is supplied with a non-rewireable
plug fitted to the mains lead, you will find that it
incorporates a fuse, the value of which is indicated either
on the base of the plug or on the fuse carrier. Should the
fuse need replacing, you must use an ASTA approved one
(conforming to BS1362) of the same rating.
If the fuse cover is lost, the plug must not be used until a
replacement is obtained from an electrical supplier.
If you need to remove the plug, cut it from the mains lead
and immediately dispose of it. Never attempt to re-use
this plug or insert it into a socket outlet as there is a very
great risk of an electric shock.
PRODUCT FEATURES
•
Built-under or Free-standing installation with dual
temperature zones.
•
Electronic temperature control with digital display and
touchpad input.
•
Temperature can be set from 5° to 22°C (40° to 72°F)
for either compartment and can be displayed in either
Fahrenheit or Celsius degree.
•
Can be set to the long time storage maturing
temperature or a specific serving temperature for
red/white/sparkling wines.
•
Dynamic compressor type cooling to ensure interior air
circulation with even distribution of temperature and
humidity.
•
Soft white LED Interior Light with ON/OFF switch –
Function mode and Showcase mode.
•
Open-door and malfunction warning system.
•
Sabbath mode will allow the lights to remain off
during certain religious observances.
•
Temperature memory function - If power is interrupted
(power surge, breaker switch, etc.) and then powered
up again, the Wine Cellar will operate with the last
temperature set-point.
•
Automatic defrosting with defrost water evaporation.
•
Tempered triple pane tinted glass door protects your
wine from UV light and creates an attractive display
without condensation.
•
Black coated matte steel outer frame and black plastic
interior liner offer high performance and stability. The
black liner prevents excessive light from damaging the
maturity process.
•
Unique anti-condensation function with On/Off switch
to avoid layer of water condensation on glass door
panel.
•
Optional stainless steel handle.
•
Slide-out adjustable solid varnished beech shelves
allow for maximum convenience and flexibility to
accommodate various size bottles.
•
Environmentally-friendly refrigerant and foaming
insulation gas.
•
Security lock system with keys.
•
Active charcoal air filter.
NOTE: Features and specifications are subject to change
for product improvements without prior notice.

7
INSTALLATION
BEFORE USING YOUR WINE CELLAR
•Remove all exterior and interior packing. Clean the
interior surface with lukewarm water using a soft cloth.
The Wine Cellar may have residual odors at first, they
will disappear as the Wine Cellar cools.
•Before connecting the Wine Cellar to the power source,
let it stand upright for at least 24 hours. This will
reduce the possibility of a malfunction in the cooling
system caused by handling during transportation.
During this time we recommend that you leave the
door open to clear any residual odors.
•The door on this Wine Cellar can be opened from
either the left or the right side. The Wine Cellar is
delivered with the door opening on the left side.
Should you wish to open the door from the right,
follow the instructions ‘Reversing the door hinge’.
•Install the handle on the door if necessary.
INSTALLATION OF YOUR WINE
CELLAR
•The Wine Cellars are designed to be built-in or
recessed or free standing installation.
•WARNING: Do not store or install the Wine Cellar
outdoors. The Wine Cellar is for indoor use only.
•WARNING: Do no install the Wine Cellar in the
laundry. Avoid locating the Wine Cellar in damp areas.
•Place your Wine Cellar on a floor that is strong enough
to support it when it is fully loaded. To level your
Wine Cellar, adjust the front leveling leg at the bottom
of the Wine Cellar.
•For freestanding installation, 100mm of space between
the back and sides of the Wine Cellar are suggested,
which allows the proper air circulation to cool the
compressor and condenser for energy saving. Even for
built-in installation, it is a must to keep 5mm space on
each side and at the top to ensure proper service access
and ventilation. Take care that the air vent at the front
of the Wine Cellar must never be covered or blocked
in any way.
•Locate the Wine Cellar away from direct sunlight and
sources of heat (stove, heater, radiator, etc.). Direct
sunlight may affect the acrylic coating and heat
sources may increase electrical consumption. Extreme
cold ambient temperatures may also cause the Wine
Cellar not to perform properly.
•Plug the Wine Cellar into an exclusive, easily
accessible plug socket. Any questions concerning
power and/or earthing should be directed towards a
qualified electrician or an authorized products service
centre.
•The Wine Cellar must be installed to all electrical,
plumbing, water and drain connections in accordance
with state and local codes.
•
IMPORTANT: HIGH HUMIDITY CLIMATE.
During periods of high humidity, some condensation
may appear on outside surfaces of glass door. Then
you can switch on the anti-condensation mode and this
condensation on glass door will disappear.
BUILT-UNDER INSTRUCTIONS
Make sure your installation does not block the front
ventilation grille.
If the Wine Cellar is fully integrated to be installed for
fitting kitchen plinth, make sure that the ventilation gaps
in the plinth are at least 300 square centimeters and
remove the ventilation grilles, so that warm air can
disperse unhindered. Otherwise the Wine Cellar has to
work harder, resulting in an increase in electricity
consumption.
NOTE: When pushing the Wine Cellar into the niche,
make sure that the mains cable does not get trapped.
Model: VZ28BDHK
Model: VZ46BDHK
NOTE:
T
he appliance must be positioned so
that the plug is accessible.

8
BUILT-IN CABINET INSTRUCTIONS
Make sure your installation does not block the front
ventilation grille. And be sure the door will open and
close properly in the chosen location.
A
(mm)
B
(mm)
C
(mm)
D
(mm)
VZ102BDHK
1480
530 1476 570
VZ126BDHK
1772
530 1768 570
VZ171BDHK
1772
620 1768 680
ELECTRICAL CONNECTION
WARNING: Improper use of the grounded plug can
result in the risk of electrical shock. If the power cord is
damaged, have it replaced by a qualified electrician or an
authorized service centre.
All electrical work should be carried out by a suitably
qualified and competent person in accordance with local
and national safety regulations.
Check that the voltage marked on the product
corresponds with your supply voltage.
Connect this Wine Cellar to a separate at least 13A circuit.
Connection should be made via a suitable switched socket
which is easily accessible. For extra safety it is advisable
to install a residual current device (RCD) with a trip
current of 30mA.
Have the receptacle and the circuit checked by a qualified
electrician to ensure that the socket is grounded correctly.
Note: In locations where there is frequent lightning, it is
advisable to use surge protectors.
Do not connect the Wine Cellar to the mains electricity
supply by an extension lead. Extension leads do not
guarantee the required safety of the Wine Cellar (e.g.
danger of overheating).
The Wine Cellar must not be connected to an inverter and
must not be used with a plug adapter as these can cause
damage to the Wine Cellar’s electronic Wine Cellar.
The cord must rest securely behind the Wine Cellar and
not be allowed to lie or hang unprotected.
WARNING:
THIS WINE CELLAR MUST BE EARTHED.
INSTALLING THE HANDLE
IMPORTANT: Do not overtighten the screws and do not
use power tools to install the handle.
1
Remove the screws on the side of door
○
1 where the
handle is to be installed. Align the handle
○
3 and tighten
the screws
○
2 using a Phillips head screwdriver until the
handle is both flush and secured tightly against the door
side.

9
OPERATING YOUR WINE
CELLAR
This Wine Cellar is designed for operation at certain
ambient temperatures. The climate class is specified on
the rating plate.
The Wine Cellar may not work properly if it is left for a
long period at a temperature outside the specified range.
For example, placing your Wine Cellar in extreme cold or
hot conditions may cause interior temperatures to
fluctuate. The range between 5ºC and 22ºC (41ºF and
72ºF) may not be reached.
Climate class
Ambient room temperatures
SN
N
ST
T
+10°C to +32°C
+16°C to +32°C
+16°C to +38°C
+16°C to +43°C
USE AND CONTROL
The Controls of Your Wine Cellar
POWER
To turn the Wine Cellar on/off, press and hold the key
for 5 seconds.
NOTE: Pressing the key once can switch off the
audible alarm when the alarm is on.
UP
To increase (warm) the set temperature by 1°C or 1ºF.
DOWN
To decrease (cool) the set temperature by 1°C or 1ºF.
LIGHT
To turn the inner light on/off.
Display
Display the digital temperature and service indicators.
is for UPPER temperature zone and is for LOWER
temperature zone.
Indicator Light
The indicator light is located at the right lower corner of
the display. The indicator light will be on when the multi-
key function is selected. To perform the multi-key
function, press and hold the first key, then press the rest
key for at least 5 seconds and then release all the keys.
ºF/ºC Selector
Select the temperature display setting in Fahrenheit or
Celsius degree. To change the temperature from
Fahrenheit to Celsius or from Celsius to Fahrenheit, press
and hold the LIGHT key for 5 seconds.
Setting the Temperature Control
•The Wine Cellar has two separate temperature zones.
The temperature of both zones can be set between 5ºC
and 22ºC (41ºF and 72ºF). The LOWER temperature
zone is ideal for storing white and red wine at a setting
of 13°C to 22°C (55°F to 72°F). The UPPER
temperature zone is suitable for storing champagne
and white wine at a setting of 5°C to 13°C (41°F to
55°F).
•When the Wine Cellar is plugged in for the first time,
the Wine Cellar will power up automatically to the
preset defaults. The preset temperature at the factory
for UPPER temperature zone is 10ºC (50ºF) and for
LOWER temperature zone is 16ºC (60ºF).
•You can press the left side UP and DOWN keys to
control the internal temperature of the UPPER
temperature zone and press the right side UP and
DOWN keys to control the internal temperature of the
LOWER temperature zone. When you press the two
keys at the first time, the display will show the last
temperature set previously.
•IMPORTANT: The temperature set for the LOWER
temperature zone must always be just as high or
higher than that in the UPPER temperature zone. For
optimal performance, the set temperature of the two
zones should differ by at least 4°C.
•The temperature that you desire to set will increase
1ºC or 1ºF if you press the UP mark once, on the
contrary the temperature will decrease 1ºC or 1ºF if
you press the DOWN mark once. The display flashes
while you make the setting.
•After the temperature has been set, the display shows
the current inner temperature of the particular
temperature zone.
•To view the set temperature at any time, press the UP
or DOWN key, the set temperature will temporarily
flash in the display for 5 seconds. Then the display
shows the current inner temperature again.
NOTE
:
•When you use the appliance for the first
time or restart the appliance after having
been shut off for a long time, there could
be a few degrees variance between the
temperature you select and the one
indicated on the LED readout. This is
normal and it is due to the length of the
activation time. Once the Wine Cellar is
running for a few hours everything will be
back to normal.
•If the Wine Cellar is unplugged, power
lost, or turned off, you must wait 3 to 5
minutes before restarting the Wine Cellar.
If you attempt to restart before this time
delay, the Wine Cellar will not start.

10
ANTI-CONDENSATION MODE
Anti-condensation mode can prevent the condensation
formed on the surface of glass door even at a climate with
very high humidity. During seasons of high humidity,
simply switch on the mode and the condensation will
disappear shortly. The mode increases the energy
consumption of the wine cellar, if this mode is not
necessary, please switch it off.
TEMPERATURE DISPLAY
During normal operation, the temperature display on the
control panel shows the temperature inside the Wine
Cellar. The temperature display will flash if
- A different temperature is being set,
- The temperature in the zone deviates by more than 5°C
from the set temperature.
The temperature display flashing ensures that the
temperature can not rise or fall un-noticed and impair the
wine.
TEMPERATURE MEMORY FUNCTION
In the event of a power interruption (power surge, breaker
switch, etc.), the Wine Cellar remembers the previous
temperature settings. When the power is recovered, the
temperature of the wine cellar compartment will go back
to the same setting temperature as before the power
interruption.
TEMPERATURE ALARM
An alarm will sound if the temperature in one of the zones
rises or falls outside the temperature range. The relevant
temperature display will flash at the same time.
The temperature the Wine Cellar is set at determines the
temperature the Wine Cellar recognises as being too
warm or too cool.
The alarm will sound and the temperature display will
flash:
- When you switch the Wine Cellar on, if the
temperature inside the Wine Cellar is very different
from the temperature set.
- When there has been a lengthy interruption to the
power supply.
- When too many items have been put into the Wine
Cellar at one time.
- When the door is not closed tightly.
DOOR ALARM
If the door has been left open for more than 60 seconds,
the alarm will sound.
Once the set temperature has been reached in the Wine
Cellar, the alarm stops and the relevant temperature
display stops flashing. However, if the noise disturbs you,
you can switch the alarm off before this if you wish by
pressing the POWER key once. The alarm will stop. The
relevant temperature display continues to flash until the
set temperature has been reached. The display then lights
up constantly, and the alarm system is fully active again.
INTERIOR LIGHT
The interior light makes it easy to view your wine labels
and enhances the display of your collection. Touching the
LIGHT mark toggles between 2 modes of operation for
the internal lights: showcase mode and functional mode
(default). If the Wine Cellar is in showcase mode, the
lights will be on whether or not the door is open. If the
Wine Cellar is in functional (default) mode, the lights will
turn on only when the door is open.
The Wine Cellar is equipped with a LED light fitting
system. To change the LED light fitting pls contact the
service department.
NOTE: Please use only the original LED light fittings
provided by the manufacturer.
BOTTLE RACKS AND STORAGE
WARNING: Do not pull out more than one loaded shelf
at a time as this may cause the Wine Cellar to tilt forward.
WARNING: Do not try to slide the shelves outwards
beyond the fixed position to prevent the bottles from
falling.
WARNING: To prevent damaging the glass door, make
sure the door is fully open when pulling shelves out of the
compartment.
All the wine racks slide out for easy access, except for the
bottom shelf. For easy access to the bottles stored, pull
the rack out gently until it stops. The shelves are designed
with an emergency stop to prevent them being removed
too far when loaded.
Many bottles may differ in size and dimensions. As such
the actual number of bottles you may be able to store may
vary.
Bottle capacities are approximately at the maximum when
storing traditional Bordeaux 750ml bottles. Please refer to
Appendix 1 for wine bottles loading instruction diagram.
You may load your wine bottles in single row or by
stacking while taking note of the following - if you do not
have enough bottles to fill your wine cellar, it is better to
distribute the load throughout the wine cellar so as to
avoid “all on top” or “all below” type loads.
- Do remove or relocate adjustable wooden racks to
accommodate larger type of bottles or increase the
capacity of the cellar by stacking the bottles up when
necessary. (See removing shelves)
- Keep small gaps between the walls and the bottles to
allow air circulation. Like an underground cellar air
circulation is important to prevent mould and
promote a better homogeneous temperature.
- Do not overload your wine cellar to facilitate air
circulation.
- Lay the bottles flat unless you are using the optional
presentation shelf.
- Avoid obstructing the internal fans (located inside on
the back panel of the Wine Cellar).
- Do not cross contaminate. Store only wine in your
Wine Cellar to ensure that the environment is odor
free.
- Only store wine in unopened bottles. Storing opened
bottles may result in spillage.

11
DYNAMIC CLIMATE / SILENT MODE
This Dynamic Climate mode enables the relative
humidity inside the Wine Cellar and the temperature to be
distributed evenly around the interior so you can store all
your wine under exactly the same excellent conditions. If
you would like to use the Wine Cellar to store wine long
term, the dynamic climate mode is a must. This will
create a continuous climate in the wine cellar
compartment.
In the Dynamic Climate mode, the interior fan circulates
the inside air evenly even the set temperature is reached.
Dynamic Climate mode is NOT the factory preset mode
because of creating noises and more energy consumption.
To change to Dynamic Climate mode, touch and hold the
DOWN key for approximately five seconds. The wine
cellar will beep five times to confirm Dynamic Climate
mode is on. To change back to default (Silent) mode
(Also named as energy saving mode), touch and hold the
UP key for approximately five seconds. The wine cellar
will beep three times to confirm default (Silent) mode is
on.
SABBATH MODE
Sabbath mode is available for the observance of certain
religious holidays. This mode turns off the displays,
interior light and audible alarms and prevents them from
turning on again. Normal cooling operations will still take
place.
To initiate Sabbath mode, press the POWER and
LIGHT keys at the same time for at least 5 seconds. The
indicator light will flash four times and confirm the
Sabbath mode is ON.
Sabbath mode can be exited by repeating the above
process. The Sabbath Mode will automatically exit after
96 hours.
OPERATING NOISES
The Wine Cellar is cooled by a compressor (refrigeration
aggregate). The compressor pumps coolant through the
cooling system, producing operating noise. Even when
the compressor cuts out, noises caused by changes in
temperature and pressure are unavoidable. Operating
noise will be most audible immediately after the
compressor cuts in. It becomes quieter as the operating
period continues.
The following noises are normal and occur from time to
time:
- Gurgling sound, caused by the refrigerant flowing
through the Wine Cellar’s coils,
- Humming noise made by the motor compressor. This
noise can get louder for brief periods when the motor is
switching on.
- Cracking/popping sounds, resulting from the materials
contraction and expansion due to temperature variations,
- Fan operating sound, to circulate the air within the wine
cellar compartment.
Unusual noise is normally the result of improper
installation. Under no circumstances must tubing come
into contact with a wall, other furniture or with other
tubing.
Where the Wine Cellar is installed in open-plan kitchen or
in partition walls, the level of operating noise will be
heard more acutely. However, this is due to the
surrounding architecture and not to the Wine Cellar.
An individual’s perception of noise is directly linked to the
environment in which the Wine Cellar is located, as well
the specific type of models. Our Wine Cellars are in line
with international standards for such appliance and in
line with the latest technical developments. But please
remember that the noise of the compressor and the
coolant circulating in the system is unavoidable.
DEFROSTING / HYGROMETRY /
VENTILATION
Your Wine Cellar is designed with an automatic defrost
system. During the “Off-cycle” the evaporator behind the
rear wall of the Wine Cellar defrosts automatically. The
condensate collects in the drain trough behind the rear
wall of the Wine Cellar, and part of it flows through the
drainage hole into the drip tray by/above the compressor.
The heat is transferred from the discharge pipe or
compressor and evaporates any condensation that has
collected in the tray. Part of the remaining water is
collected within the Wine Cellar for humidity purposes.
This system enables the creation of the correct humidity
level inside your Wine Cellar required by the natural cork
to maintain a long lasting seal.
The Wine Cellar is not totally sealed: fresh air admission
is permitted through the drainpipe. Air is circulated
through the Wine Cellar by means of a fan / fans and the
hollow shelves.
NOTE: Frost may be accumulated on the evaporator if
the Wine Cellar is repeatedly opened in a high heat or
high humidity location. If this frost pattern does not clear
within 24 hours, your Wine Cellar will require manual
defrosting.

12
WINE SERVING TEMPERATURE CHART
The below chart is the recommended temperature to
indicate the ideal temperature for drinking (for reference
only).
Wine Style ºC ºF
Champagne NV, Sparkling, Spumante 6 43
Dry White Semillon, Sauvignon Blanc 8 46
Champagne Vintage 10 50
Dry White Chardonnay 10 50
Dry White Gewürztraminer, Riesling,
Pinot grigio 10 50
Sweet White Sauternes, Barsac,
Montbazillac, Ice Wine, Late Harvest 10 50
Beaujolais 13 55
Sweet White Vintage: Sauternes… 14 57
White Vintage Chardonnay 14 57
Red Pinot Noir 16 61
Red Grenache, Syrah 16 61
Red Vintage Pinot Noir 18 65
Cabernet & Merlot: French,
Australian, New Zealand, Chilean,
Italian, Spanish, Californian,
Argentinean…
20 68
Vintage Bordeaux …
Room
temperature
not
exceeding
20ºC/68ºF
IMPORTANT INFORMATION ABOUT
TEMPERATURE
Your Wine Cellar has been designed to guarantee
optimum conditions for storing and/or serving your wines.
Fine wines require long and gentle developments and
need specific conditions in which to reach their full
potential.
All wines mature at the same temperature, which is a
constant temperature set between 11ºC to 14ºC. Only the
temperature of “dégustation” (wine appreciation) varies
according to the type of wines (see “Wine Serving
Temperature Chart” above). This being said and as it is
for natural cellars used by wine producers for long period
of storage, it is not the exact temperature that is important,
but its consistency. In other words, as long as the
temperature of your wine cellar is constant (between 11ºC
to 14ºC) your wines will be stored in perfect conditions.
Not all wines will improve over the years. Some should
be consumed at an early stage (2 to 3 years) while others
have tremendous ageing capability (50 and over). All
wines have a peak in maturity. Do check with your wine
consultant to get the detailed information.

13
CARE AND MAINTENANCE
WARNING: Failure to unplug the Wine Cellar during
service and cleaning could result in electrical shock or
other personal injury.
REMOVING SHELVES
To remove any of the shelves from the rail compartment,
move the shelf to the position where the notch of wooden
shelf is exactly under the plastic post and then lift it up
and out.
In order to replace the shelf, repeat steps described above
in reverse.
ACTIVE CHARCOAL AIR FILTER
The active charcoal air filter is located in the back of
compartment. Replace it with a new one once a year. It
can be purchased from your dealer or from the Spare
Parts Department.
•Remove the shelf in front of the filter.
•Grip the filter and turn it 90°clockwise or anti-
clockwise to remove.
•Insert the new filter in the vertical position and turn it
90° clockwise or anti-clockwise until it clicks into
position.
DOOR LOCK
If the Wine Cellar is provided with a lock system, the
keys are located inside the plastic bag that contains the
Owner’s Manual. Insert the key into the lock, push in and
turn it counterclockwise to unlock the door. To lock the
door do the reverse operation making sure metal pin is
engaged completely. Remove the key and place it in a
secure place for safekeeping.
CLEANING YOUR WINE CELLAR
Turn off the power, unplug the Wine Cellar, and remove
all items including shelves and rack.
Wash the inside surfaces with a warm water and baking
soda solution. The solution should be about 2 tablespoons
of baking soda to a pint of water.
Wash the shelves with a mild detergent solution.
Wring excess water out of the sponge or cloth when
cleaning any area of the controls.
Wash the exterior of wine cellar with warm water and
mild liquid detergent. Rinse well and wipe dry with a
clean soft cloth.
Do not clean the stainless steel with steel wool pads.
Suggest to using an all-in-one stainless steel cleaner to
clean the stainless steel and always clean in the direction
of grain.
POWER FAILURE
In the event of a power interruption, all previous
temperature settings are automatically memorized. If
power is interrupted (power surge, breaker switch, etc.)
and then powered up again, the Wine Cellar will operate
with the last temperature set-point.
Most power failures are corrected within a few hours and
should not affect the temperature of your Wine Cellar if
you minimize the number of times the door is opened. If
the power is going to be off for a longer period of time,
you need to take the proper steps to protect your contents.
NOTE: Irrespective of the cause, if you notice either
abnormal temperature or humidity levels inside your
Wine Cellar, be reassured that only long and frequent
exposure to these abnormal conditions can cause a
detrimental effect on your wines.
VACATION TIME
Short holidays: Leave the Wine Cellar in operation for
holidays of less than three weeks.
Long absences: If the Wine Cellar will not be used for
several months, remove all items, turn off the Wine Cellar
and unplug. Clean and dry the interior thoroughly. To
prevent odour and mold growth, leave the door open
slightly: blocking it open if necessary.
MOVING YOUR WINE CELLAR
Unplug the power plug from the electrical outlet.
Remove the contents from the racks and all moving parts
from inside.
Raise the adjustable legs up to the base to avoid damage.
Tape the door shut and lock it if with a lock system.
Transport the wine cellar only in the upright position.
Also protect the outside of the Wine Cellar with a blanket
or similar item.

14
ENERGY SAVING TIPS
Should the Wine Cellar be left empty for long periods of
time, it is suggested that the Wine Cellar is unplugged,
and after careful cleaning, leave the door ajar to allow air
to circulate inside the wine cellar in order to avoid
possible condensation, mold or odors forming.
The Wine Cellar should be installedd in the coolest area
of the room, away from heat producing Wine Cellars, and
out of the direct sunlight.
Ensure that the Wine Cellar is adequately ventilated.
Never cover air vents. Clean dust and dirt from the
condenser at regular intervals.
Only open the door for as long as necessary and for as
short a time as possible.
Store the content in an organised way.
Do not over-fill the Wine Cellar to allow air to circulate.

15
TROUBLESHOOTING GUIDE
You can solve many common problems easily, saving you the cost of a possible service call. Try the suggestions below to see if you can solve the problem before calling customer service.
PROBLEM POSSIBLE CAUSE REMEDIAL ACTIONS
Wine Cellar does not operate.
•
Wine Cellar is not connected to a power supply.
•The Wine Cellar is turned off.
•The circuit breaker tripped or a blown fuse.
•
Connect the Wine Cellar.
•Switch on the Wine Cellar.
•Switch on circuit breaker or replace fuse by a qualified electrician
or call your local authorized service centre.
Wine Cellar is not cold enough.
•
The temperature is not set correctly.
•The ambient temperature could require a higher temperature
setting.
•The door was opened too often.
•The door was not closed completely.
•Door is not hermetically-sealed.
•The condenser is too dirty.
•The ventilation opening is blocked or too dusty.
•
Check the set temperature.
•Set a higher temperature.
•Do not open the door more often than necessary.
•Close door properly.
•Check the door seal and clean or replace.
•Clean the condenser when necessary.
•Clear the obstructions and clean the dust.
Wine Cellar turns itself on and off
frequently.
•
The room temperature is higher than average.
•A large amount of bottles has been added to the Wine Cellar.
•The door is open too often.
•The door is not closed completely.
•The door gasket does not seal properly.
•
Put the Wine Cellar in a cooler place.
•Leave the Wine Cellar to work for a while until the set temperature
has been reached.
•Do not open the door more often than necessary.
•Close door properly.
•Check the door seal and clean or replace.
The light does not work.
•
Wine Cellar is not connected to a power supply.
•The circuit breaker tripped or a blown fuse.
•The light was switched off on the control panel.
•
Connect the Wine Cellar.
•Switch on circuit breaker or replace fuse.
•Switch on the light.
Vibrations.
•
The Wine Cellar is not properly level.
•
Level the Wine Cellar with the adjustable feet.
The Wine Cellar seems to make too much
noise.
The rattling noise may come from the flow of the refrigerant, which is normal. As each cycle ends, you may hear gurgling sounds caused by the
flow of refrigerant in your Wine Cellar.
If temperature fluctuations occur, the contraction and expansion of the inner walls may cause popping and cracking noises.
•
The Wine Cellar is not properly leveled.
•
Level the Wine Cellar with the adjustable feet.
The door will not close properly.
•
The Wine Cellar is not properly leveled.
•The door was reversed and not properly installed.
•The gasket is dirty.
•The shelves are out of position.
•
Level the Wine Cellar with the adjustable feet.
•Check the door hinge and reassemble correctly.
•Clean the door gasket.
•Check the shelves and refit correctly.
Display “E1”, “E2” and “E7”.
•
“E1” or “E2” indicates that the air temperature sensor is failed.
•“E7” indicates the door switch failure.
•
Call your local authorized service centre.
The icon “--” is lit up and flashing in the
temperature display.
•
The display temperature is out of the range.
•
Only temperatures within the range 0~99°F/-9~37°C the Wine
Cellar can display will be shown. If the temperature is not within
this range, the icon “--” will be displayed instead. That is normal.

16
APPENDIX 1: WINE BOTTLES LOADING INSTRUCTION DIAGRAM
(750ml Standard Bordeaux Bottle)
Model: VZ28BDHK
5
5
5
5
5
3
28
300.5
Model: VZ46BDHK
8
8
8
8
8
6
46
300.5
Model: VZ102BDHK
8
6
102
8
8
88
8
8
8
88
8
8
16
300.5

17
Model: VZ126BDHK
8
6
126
8
8
88
8
8
8
88
8
8
8
88
8
16
300.5
8
Model: VZ171BDHK
171
11
22
1111
1111
11
1111
11
1111
11
1111
11
1111
11
1111
6
300.5

18

19

20
This manual suits for next models
5
Table of contents
Other Vinvautz Wine Cooler manuals

Vinvautz
Vinvautz VZ18BUP User manual

Vinvautz
Vinvautz VZ07SSUG User manual

Vinvautz
Vinvautz Grand Cru Classe VZ46BHK User manual

Vinvautz
Vinvautz VZ23SSUG User manual

Vinvautz
Vinvautz GRAND CRU CLASSE Series User manual

Vinvautz
Vinvautz VZ19SSUG User manual

Vinvautz
Vinvautz VZ08BHK User manual

Vinvautz
Vinvautz VZ47SSFG User manual

Vinvautz
Vinvautz VZ143VSUG User manual

Vinvautz
Vinvautz VZ46VDUG-L User manual