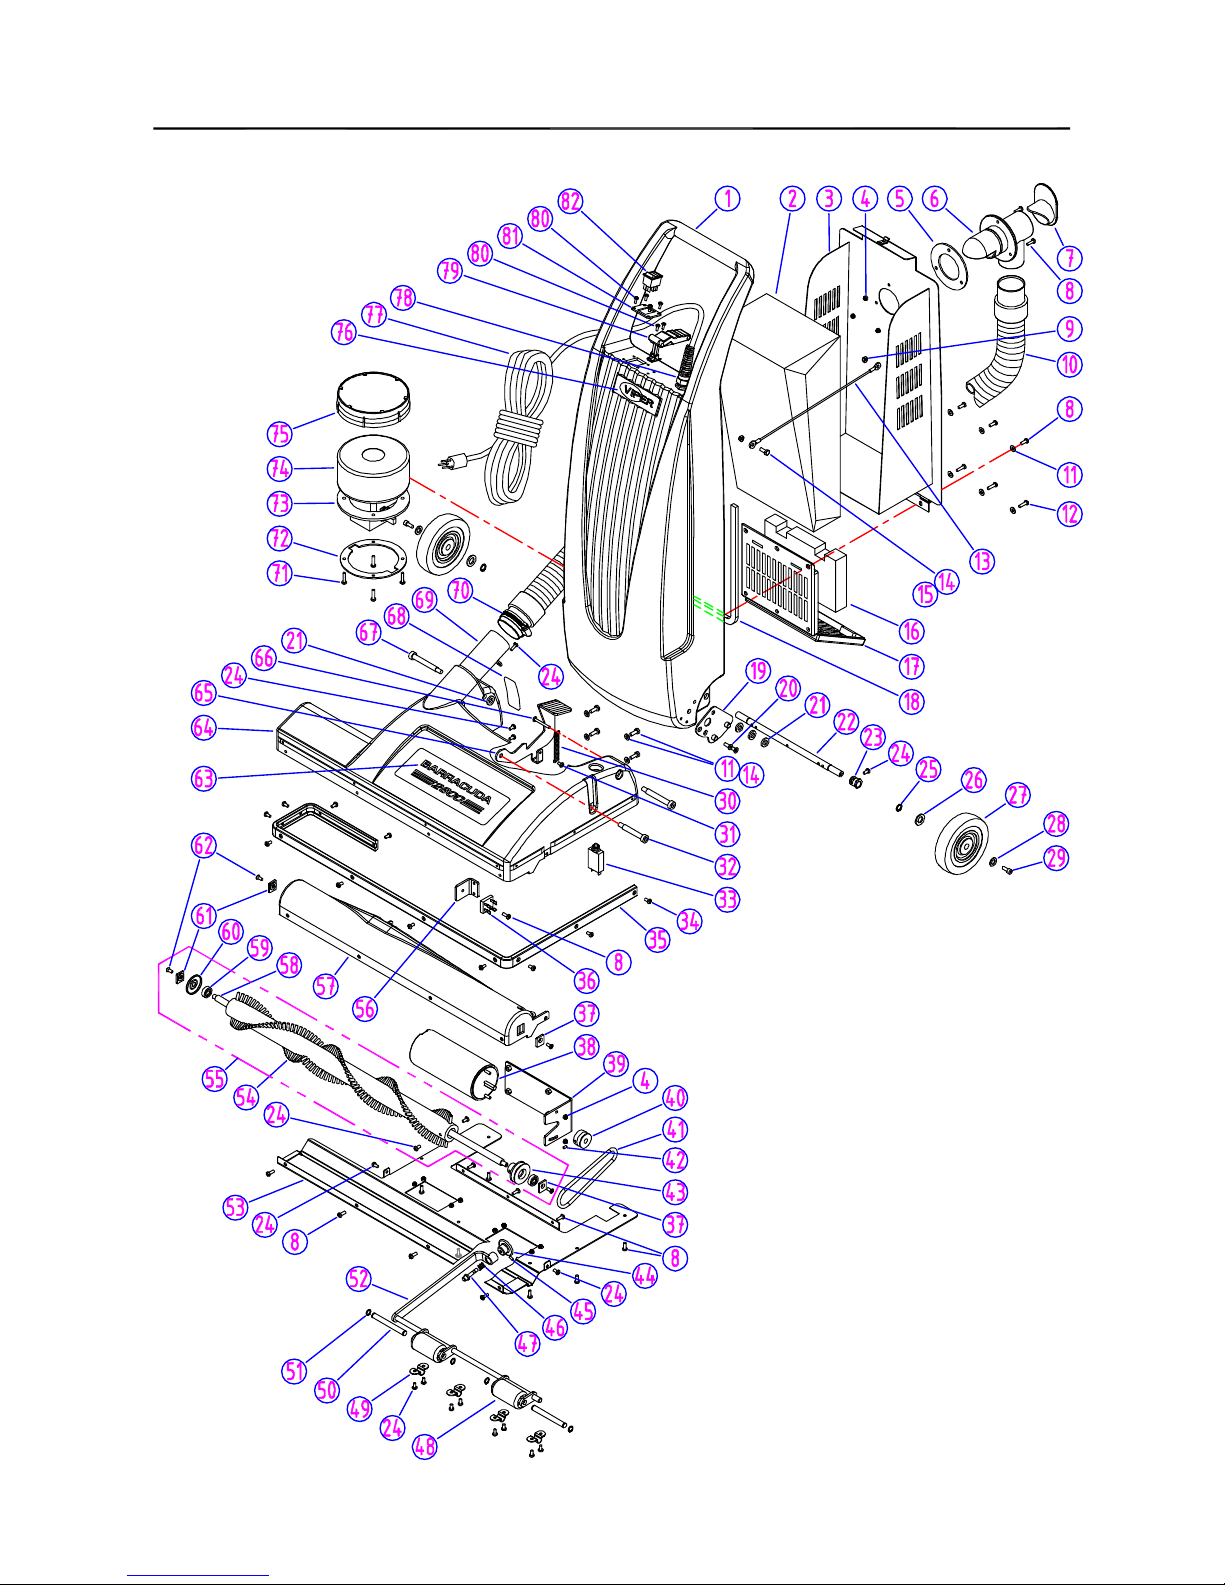
Viper BARRACUDA CUDA26 User manual

VA51063
REV.02(08-07)
VIPER...exceptional
value
www.usviper.com
VIPERNORTHAMERICA
(866)418-4737
P.O. BOX104
HAMILTON, MI49419
(866)41 -VIPER
IMPORTANT: READOWNERSMANUALCAREFULLY
BARRACUDA
SERIAL#
MODEL# CUDA26
Pleasefillout&returnyourwarrantycard!
OWNERSMANUAL
DUALMOTORVACUUM

CONGRATULATIONSonyourpurchaseofaViperproduct,
andwelcometotheV.I.P.family.Weappreciateyour
businessandwilldoeverythinginourpowertokeepyou
happywithyourpurchaseformanyyearstocome.
AspartoftheV.I.P.family,youareentitledtothebest
protectionbyoneofthemostcomprehensivewarrantiesin
theindustry.
Thank-youforpurchasingViperproducts!
Tom VanderBie,CEO
TABLE OFCONTENTS
SafetyPrecautions1
MachineComponents2
MachineOperation3-4
MachineMaintenance& Storage4
Troubleshooting5
PartsBreakdown6
PartsLists7-8
Accessories9
WiringDiagram10

SAFETYPRECAUTIONS
GROUNDING INSTRUCTIONS
General Thiscarpetvacuumshall be
groundedwhileinusetoprotectthe
operatorfromelectricshock.The
machineisprovidedwithathree-contact
groundingtypeattachmentplug tofitthe
propergroundingtypereceptacle. The
green(orgreen&yellow)conductorin
thecordisthegroundingwire. Never
connectthiswiretootherthanthe
groundingpinoftheattachmentplug.
Thismachineisforuseonanominal
120-voltcircuitandhasagroundingplug
thatresemblestheplug illustratedin
figurebelow. Makesurethatthe
machineisconnectedtoanoutlethaving
thesameconfigurationastheplug. No
adaptershouldbeusedwiththismachine.
Thismachineisintendedforcommercial
use. Itisconstructedforuseinanindoor
environmentandisnotintendedforany
otheruse. Useonlyrecommended
accessories.
Alloperatorsshall read, understandand
exercisethefollowing safetyprecautions:
1) Donotoperatemachine:
-Unlesstrainedandauthorized
-Unlessyouhavereadand
understandoperatorsmanual
-Inflammableorexplosiveareas.
-Withdamagedormodifiedcordor
plug.
-Ifnotinproperoperatingcondition.
-Inoutdoorareas.
-Instandingwater.
-Withoutbag/filtersinplace.
-Withtheuseofunapproved
extensioncords.
2) Beforeoperatingmachine:
-Makesureallsafetydevicesarein
place andoperateproperly.
3) Whenusing machine:
-Donotrunmachineovercord.
-Donotpullmachinebycordor
plug.
-Donotpullcordaroundsharp
edgesorcorners.
-Donotunplug bypulling onthe
cord.
-Donotstretchcord.
-Donothandleplug withwethands.
-Keepcordawayfromheated
surfaces.
-Donotpickup flammable
materialsorreactivemetals.
-Reportmachinedamageorfaulty
operationimmediately.
-Donotallowchildrentooperate
machine.
4) Beforeleaving orservicing machine:
-Turnoffmachine.
-Unplug powercordfromoutlet.
5) Whenservicing machine:
-Unplug cordfromoutlet.
-Usemanufacturersuppliedor
approvedreplacementparts.
-Avoidmovingparts. Donotwear
looseclothing.
1

1)Handle
2)Powercord
3)Doorlatch
4)Powerswitch
5)Attachmenttool intake&cordwrap
6)Vacuumhose
7)Brushhousing
8)Brushheightadjustment
9)Rearwheels
10)Exhaustvent
11)Handleheightadjustment
12)Brushcircuit breaker(bottomside)
13)Brushassembly (bottomside)
14)Reardoor
MACHINECOMPONENTS
1
2
3
4
5
6
7
8
9
10
11
14
12
13
2

MACHINEOPERATION
PRIORTOVACUUMING CARPETS
1) Inspectpowercableandextension
cablefordamage. Replacecableif
damageisfound.
2) Ensurefilterbagisproperlyinstalled
NOTE:Neveroperatemachine
withoutfilterbag installed. This
couldcausedamagetothevacuum
motor.
3) Setproperheightadjustmentfor
carpetbeingcleaned.
CARPET VACUUMING
1) Depress footpedalandlowervacuum
headtofloor.
2) Turnonpowerswitch.
3) Operatebyusing standardvacuuming
procedures.
4) Checkbagperiodicallytosee ifitis
full. Replace ifnecessary.
5) Tocleanunderdesksorothertight
areas, depress thefootpedalan
additionaltimetolowerthehandle
evenfurther.
OPERATING HINTS
1) Overlapcleaning pathbyapprox. 2
inches
2) Workawayfrompoweroutletand
powercableinordertoavoiddamage
tothepowercable.
3) Occasionallycheckthebagfor
fullness&replaceasnecessary.
4) Ifbrushstopsspinning, theremaybe
anobstructioninthebrush. Unplug
thepowercable, raisethebrushoff
thefloorandcheckforanobstruction.
Check&resetthebrushcircuit
breakerlocatedonthebottomofthe
brushhousing.
USE OFACCESSORYTOOLS
NOTE:Accessorytoolsareavailableas
an option.Kit VA51061includes:
Dusting brush, crevice tool, upholstery
tool,8 vacuumhose, etc.
1) Machinemustbeinuprightposition
wheneverusingattachmenttools.
2) Removevacuumhoseonthevacuum
intakeportonrearofmachine.
3) Connect(optional)8’vacuumhoses
tointakeport&connectdesired
accessorytooltoendofhose.
4) Turnonvacuumswitchandoperate
toolusing normalvacuuming
procedures.
3

VACUUMBAGINSTALLATION &
REMOVAL
1) Unlockreardoorlatch, andallow
doortohingeopen.
2) Place paperbag/filterintotank
opening.
3) Onpaperbag/filter, sliderubber
vacuumcollarontovacuumintake
spout.
4) Closereardoorandlockintoplace.
NOTE:Besurethebag/filteris
properlyplacedinbag housing to
ensureproperairflow.
5) Toremovebag, simplyreversesteps
1-4above.
6) Donotre-usepaperbag/filter.
Whenfull, disposeofitandreplace
withanewone.
MACHINEMAINTENANCE
Tokeepthemachineperforming well
formanyyears, pleasefollowthe
followingmaintenance procedures.
!!!Alwaysconfirmthatthe
machineisunpluggedpriorto
performinganymaintenance or
repairs!!!
1) Unplug machineassoonasyouare
doneusingit.
NOTE:Whenunplugging machine, do
notpull cordaround sharpedgesor
corners&do notunplug bypulling on
thecord.
2) Cleanoutsideofmachinewithamild
cleaner.
3) Checkpowercordforanydamage. If
anydamageisdetected, replace the
cordimmediately.
4) Checkmachineforanylooseor
missing nutsandboltsandreplace as
necessary.
5) Checkpaperbag/filterforfullness.
Ifitisfull, replacewithanewone.
6) Checkvacuummotorfilterand
exhaustfilterfordebrisandcleanas
needed.
NOTE:Donotclean filters withwater
oracleaning solution.Clean bytapping
ofdebrisorblowing withair.
7) Inspectbrushforstrandsofcarpet
anddebrisandremoveasneeded.
8) Inspectbrushbristlesforwearand
damage. Replace brushasneeded.
9) Inspectgasketsandsealsforairleaks
andreplace asneeded.
10)Checkvacuumhoseforclogsand
holesandreplace asneeded.
11)Checkvacuummotorcarbonbrushes
every250 hours. Replacebrushes
whentheyare3/8”orlessinlength.
NOTE:Vacuummotordamage
causedbywornbrushesisnot
coveredbywarranty.
MACHINE STORAGE
1) Priortostoringthemachine, wrapup
powercord,checkpaperbag/filter
forfullness andreplace ifnecessary.
2) Cleanand/orreplacefilters.
3) Storemachineinuprightpositionina
dryarea, withthebrushheadoff the
floor.
4

PROBLEM CAUSE SOLUTION
Machinedoesnot work Power switchnot in"on" position Turnpower switch"on"
Power cord not plugged intooutlet Plugpower cord intooutlet
Power cord isfaulty Replacewithapproved power cord
Buildingcircuit breaker tripped Reset circuit breaker
Faultywiring Contact Viper Distributor
Faultyon/ off switch Contact Viper Distributor
Brushdoesnot work Brushcircuit breaker tripped Check brushandbelt for obstructionsand
removeasneeded
Reset circuit breaker
Poor brushpickup Incorrect brushheight adjustment Adjust brushheight
Clogged brush Removedebrisfrombrush
Brushisworn Contact Viper Distributor
Loosebrushdrivebelt Inspect belt andreplaceasneeded
Lowsuction Vacuumhoseclogged Removevacuumhoseandcheck for
obstructions
Vacuumhosefaulty Check vacuumhosefor loosecuffsor holes
andreplaceasneeded
Filtersclogged Removevacuumfilter andexhaust filter and
clean
Vacuumbag full Check vacuumbag / filter andrelplaceas
needed
BASICTROUBLESHOOTING
5

PARTSLIST
6

DIA
NO
PART
NUMBER
DESCRIPTION
NO
REQ'D
1VA51009 HANDLEHOUSING 1
VA51025 PAPERBAG, DUST, 10.5qt. 1
VA51067 CLOTHBAG, DUST(OPTIONAL)
3VA51007 REARCOVERAND BAG HOLDER 1
4GT13022 NUT, M5, NYLONINSERT 5
5VA51034 GASKET, ADAPTER 1
6 VA51008 ELBOWADAPTER, HOSE 1
7 VA51022 PLUG AND CORD HOOK 1
8VV20501 SCREW, M5x14 20
9VA13489 NUT, ACORN, M6 1
10 VA51023 HOSE, 2" 1
11 VF13533 WASHER, PLAIN, 610
12 VV13635 SCREW, M5x20 3
13 VF82028 WIREROPE, STAY, REARCOVER 1
14 VF13495 SCREW, HEX, M6x16 5
15 VF13502 NUT, M6, NYLONINSERT 1
16 VA51065 FILTER, EXHAUST 1
17 VA51064 HOUSING, EXHAUSTFILTER 1
18 VA51050 GASKET, HANDLEHOUSING, 8x13mm, SBR 1
19 VA51073 LATCH PLATE 1
20 VV13605 SCREW, FLAT, M6x16 2
21 VA51041 NYLONWASHER 4
22 VA51027 AXLE 1
23 VA51059 ECCENTRICBUSHING 2
24 VV20509 SCREW, M5x10 17
25 VF13520 RETAINING RING, EXTERNAL, 12 2
26 VF13538 WASHER, PLAIN, 12x 24x2 2
27 VF48202 WHEEL, 5" 2
28 VF13666 WASHER, PLAIN, 12 2
29 VF44012 SCREW, M5x12.7 2
30 VA51038 SPRING, LATCH 1
31 VF14214 SCREW, M5x8 1
32 VA51039 SHOULDERBOLT, LATCH 1
33 VV67504 CIRCUITBREAKER, 2AMP 1
34 GT13057 SCREW, SELF-TAPPING, ST5x10 14
35 VA51002 BUMPER, 26" 1
36 VF99926-1 RECTIFIER 1
37 VA51066 BLOCK, BRUSHSHAFT, LEFT 1
38 ZD57000 MOTOR, BRUSH, 115V 1
39 VA51011 MOUNTPLATE, MOTOR 1
40 VA51019 PULLEY, MOTOR 1
2
PARTSLIST
7

DIA
NO
PART
NUMBER
DESCRIPTION
NO
REQ'D
41 VA51021 DRIVE BELT 1
42 VF14254 SCREW, HOLDING, M5x8 1
43 VA51018 PULLEY, BRUSH 1
44 VA51035 KNOB, ROLLERADJUST 1
45 VF13508 SCREW, HOLDING, M4x8 1
46 VA51037 SPRING, ROLLERADJUST 1
47 VA51036 LOCKPIN, ROLLERADJUST 1
48 VA51042 ROLLER, 1.5" 2
49 VA51013 CLAMP, ROLLERBRACKET 4
50 VA51043 AXLE, ROLLER 2
51 VA14001 RETAINING RING, EXTERNAL, 10 4
52 VA51014 ROLLERBRACKET 1
53 VA51004 BOTTOMSHOEPLATE, 26" 1
54 VA51005 BRUSH, 26" 1
55 VA51005A BRUSH, ASSEMBLY, 26" 1
56 VA51047 BRACKET, RECTIFIER 1
57 VA51003 BRUSHHOUSING, 26" 1
58 VA51006 SHAFT, BRUSH, 26" 1
59 VA51015 BEARING 2
60 VA51017 STRING GUARD, BRUSH 1
61 VA51016 BLOCK, BRUSHSHAFT, RIGHT 1
62 VV20502 SCREW, FLAT, M5x16 2
63 VA51048 LABEL, "BARRACUDA" 1
64 VA51001 BASE HOUSING, 26" 1
65 VA51071 LATCH, HANDLE 1
66 VA13476 SCREW, M5x40 1
67 VA51040 SHOULDERBOLT, PIVOT 2
68 VA51052 LABEL 1
69 VA51012 TUBE, BASE HOUSING 1
70 VV10120 CLAMP 1
71 GT13070 SCREW, SELF-TAPPING, ST4.8x25 4
72 VA51032 RETAINERRING, VACUUMMOTOR 1
73 VA51033 GASKET, VACUUMMOTOR 1
74 ZD52000A VACUUMMOTOR, 115V 1
75 VA51049 FILTER, VACUUMMOTOR 1
76 VF82082 LOGO, "VIPER" 1
77 VA65001 POWERCORD, 14/3C, SJTW, 50FT 1
78 VA51044 STRAINRELIEF, CORD 1
79 VF83109 CATCH 1
80 VV13650 SCREW, M4x10 6
81 VA51026 PLATE, SWITCH 1
82 VF91346 SWITCH, ROCKER 1
PARTSLIST
8

ACCESSORIES
DIA
NO
PART
NUMBER
DESCRIPTION NO
REQ'D
1VA51061 KITTOOLS(OPTIONAL) 1
2VA51060 HOSE ASSY 1
3 VA20803 DUSTINGTOOL 1
4VA20806 CREVICETOOL 1
5VA20807 UPHOLSTERYTOOL 1
6VA20209 WAND 1
7VA20248 TUBE 2
ACCESSORIESPARTSLIST(OPTIONAL)
9

Green
BlackBlack
White
Green
White
Green
Black
BlackWhiteWhite
Yellow/Green
Black Black Motor
WiringDiagram
CUDA26
SJTW14/3C
Cord
Supply
Power
Switch
Vacuum
White White
Green
Circuit
Breaker
Green Motor
Brush
RedBlack
White
Black ~
~
+
Rectifier
10
Table of contents
Other Viper Vacuum Cleaner manuals

Viper
Viper SL1610SE User manual

Viper
Viper AS4325B User manual

Viper
Viper BARRACUDA User manual

Viper
Viper GV25 User manual

Viper
Viper GV35-EU User manual

Viper
Viper MAMBA MB53CV User manual

Viper
Viper ECO15 User manual

Viper
Viper LSU135 User manual

Viper
Viper CAR275 User manual

Viper
Viper LSU135 User manual

Viper
Viper TP20WD User manual

Viper
Viper MB39CV Mamba Series User manual

Viper
Viper MAMBA Series User manual

Viper
Viper Rocket TS13 II HEPA User manual

Viper
Viper SN18WD-U User manual

Viper
Viper WOLF130 User manual

Viper
Viper CAR275 User manual

Viper
Viper CAR275 User manual

Viper
Viper SD 18 User manual

Viper
Viper GV35 User manual