manuals.online logo
Brands
  1. Home
  2. •
  3. Brands
  4. •
  5. VitalConnect
  6. •
  7. Medical Equipment
  8. •
  9. VitalConnect VitalPatch User manual

VitalConnect VitalPatch User manual

1
MKT-161 Rev. E (February 2021)
QuickStart Guide
for VistaPhone
This guide describes how to use the VitalPatch®biosensor
and VistaPhone for at-home cardiac monitoring.
• The VitalPatchis worn on the chest to measure and
record your vital signs and heart rhythms.
• The VistaPhonesends data from VitalPatch to your care
team for monitoring.
Wear the VitalPatch at all times during the monitoring period
and keep the VistaPhone near you.
For detailed instructions and warnings, refer to IFU-06,
VitalPatch Instructions for Use and IFU-26,VistaPoint
Instructions for Use. You can view these by tapping the
Menu button on the VistaPhone and then tapping Help.
Customer Support
1-800-219-3000
VitalPatch VistaPhone Care Team
Unpacking and Charging VistaPhone
If you have not already done so, remove the VistaPhone
charger and cable from the package labeled “VistaPhone.”
Keep all packing materials.
Use only the provided USB-C cable and charger for your
VistaPhone. Keep the device plugged into the charger at
night while you are sleeping. You can use the VistaPhone
while it is charging. Look at the battery indicator in the status
bar. Do not let the VistaPhone battery run out.
Turning the VistaPhone On and Off
The VistaPhone should always be ON when you are wearing
a VitalPatch. The screen will go to sleep (but device will
remain ON) after a period of inactivity.
• ToTurnON:Press Power Key until the device vibrates
and the screen lights up. To check if ON, tap the screen.
• ToUnlock:Swipe across the screen with your nger and
then enter PIN code 1234.
• ToTurnOFF: Press and hold the Power Key until the
Options menu displays, and then select Power O.
Checking Cloud Connection
Keep the VistaPhone in a place with a strong cell phone
signal. If the screen shows  CloudConnectionLost , move the
VistaPhone to a location with a better signal.
Section 1: Using the VistaPhone
CALL911ifyouarehavinganemergency!
Menu
Power Key
Report Symptom
VitalPatch
Status
Cloud
Connection
Status
Insert charge
cable here
Home Key
Volume
Up/Down
VistaPhone Battery
Indicator
Section 2: Applying the VitalPatch
To see an instructional video, tap the Menu button, tap
Help, and then tap VitalPatchApplication.
1. Prepare Upper-Left Chest
a. If a previous VitalPatch is still applied, remove it rst.See
Section7onpage4.
b. If there is body hair on the site, shave the site before
cleaning. Prepare an area larger than the VitalPatch. See
gure to the right.
c. Clean site with an alcohol wipe and allow to dry.
Prepare
upper-left chest
in this location
LEFT
Side
2
2. Remove from Pouch and Power-On
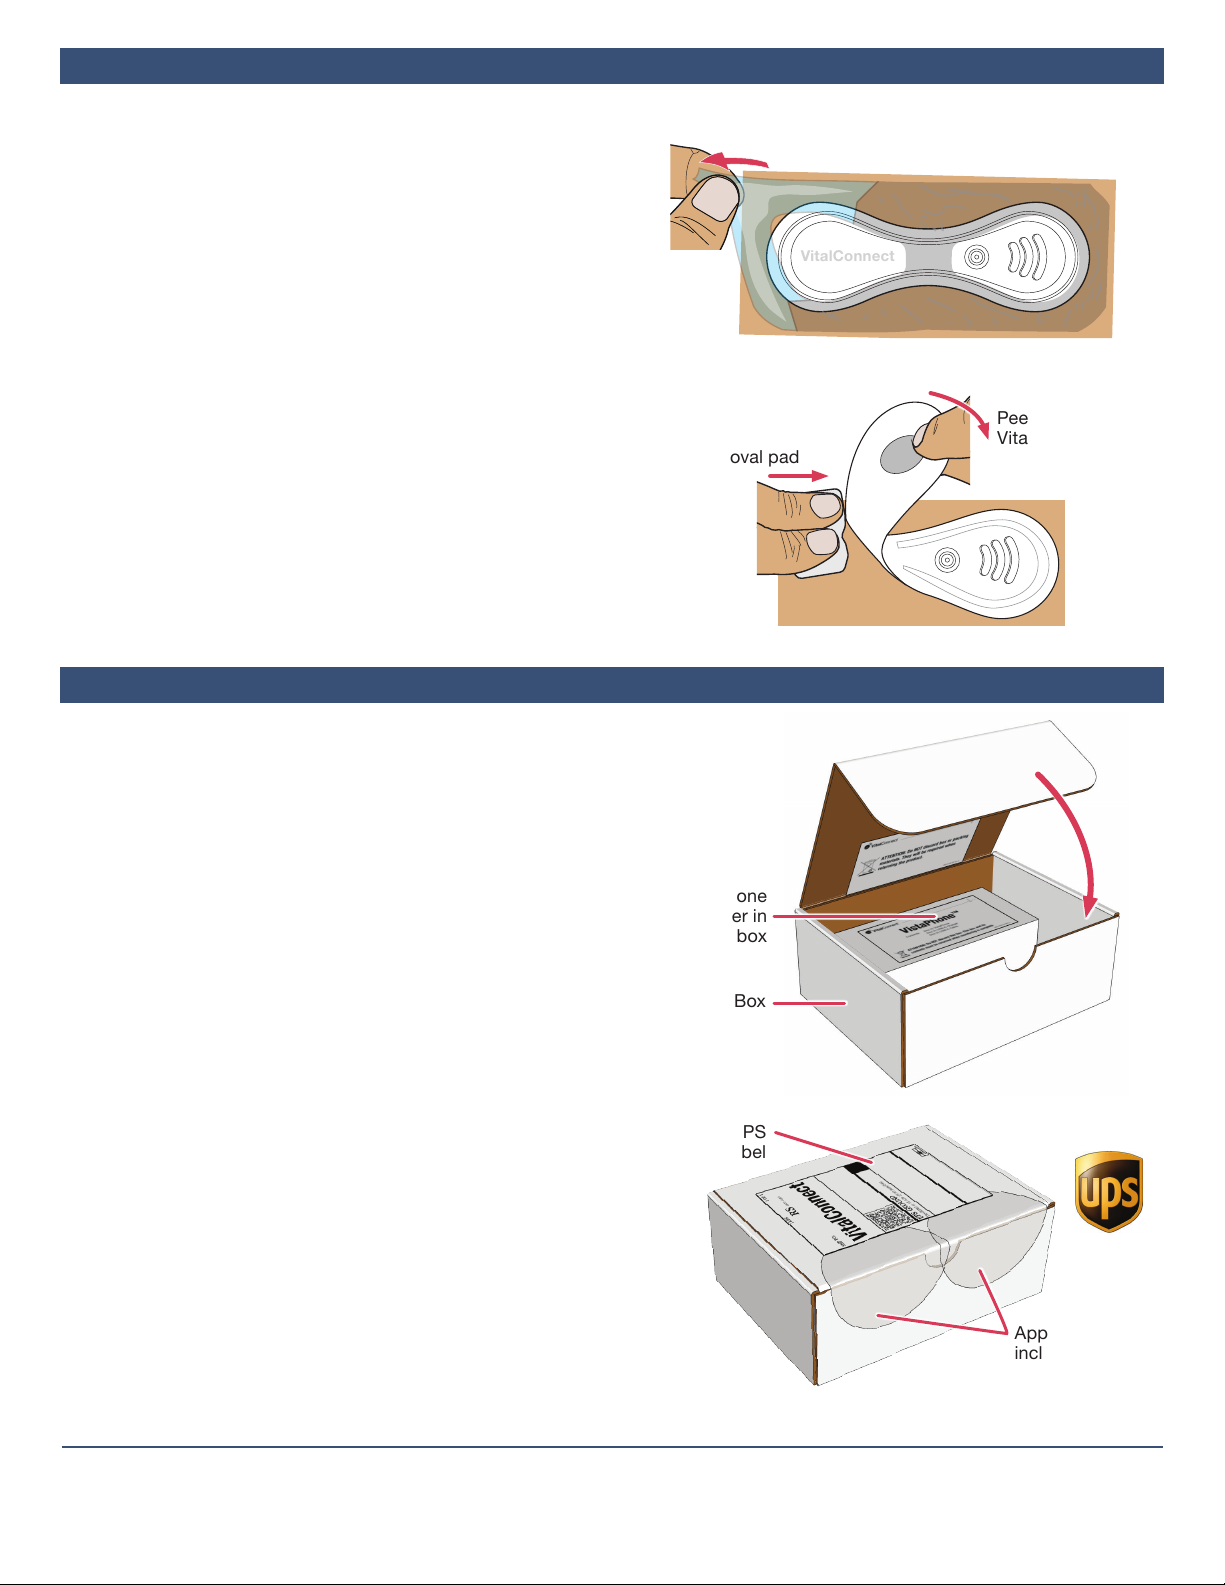
a. Tear open pouch at the notch and remove VitalPatch.
b. Allow the VitalPatch to “breathe” for at least 2 minutes
before proceeding to the next step.
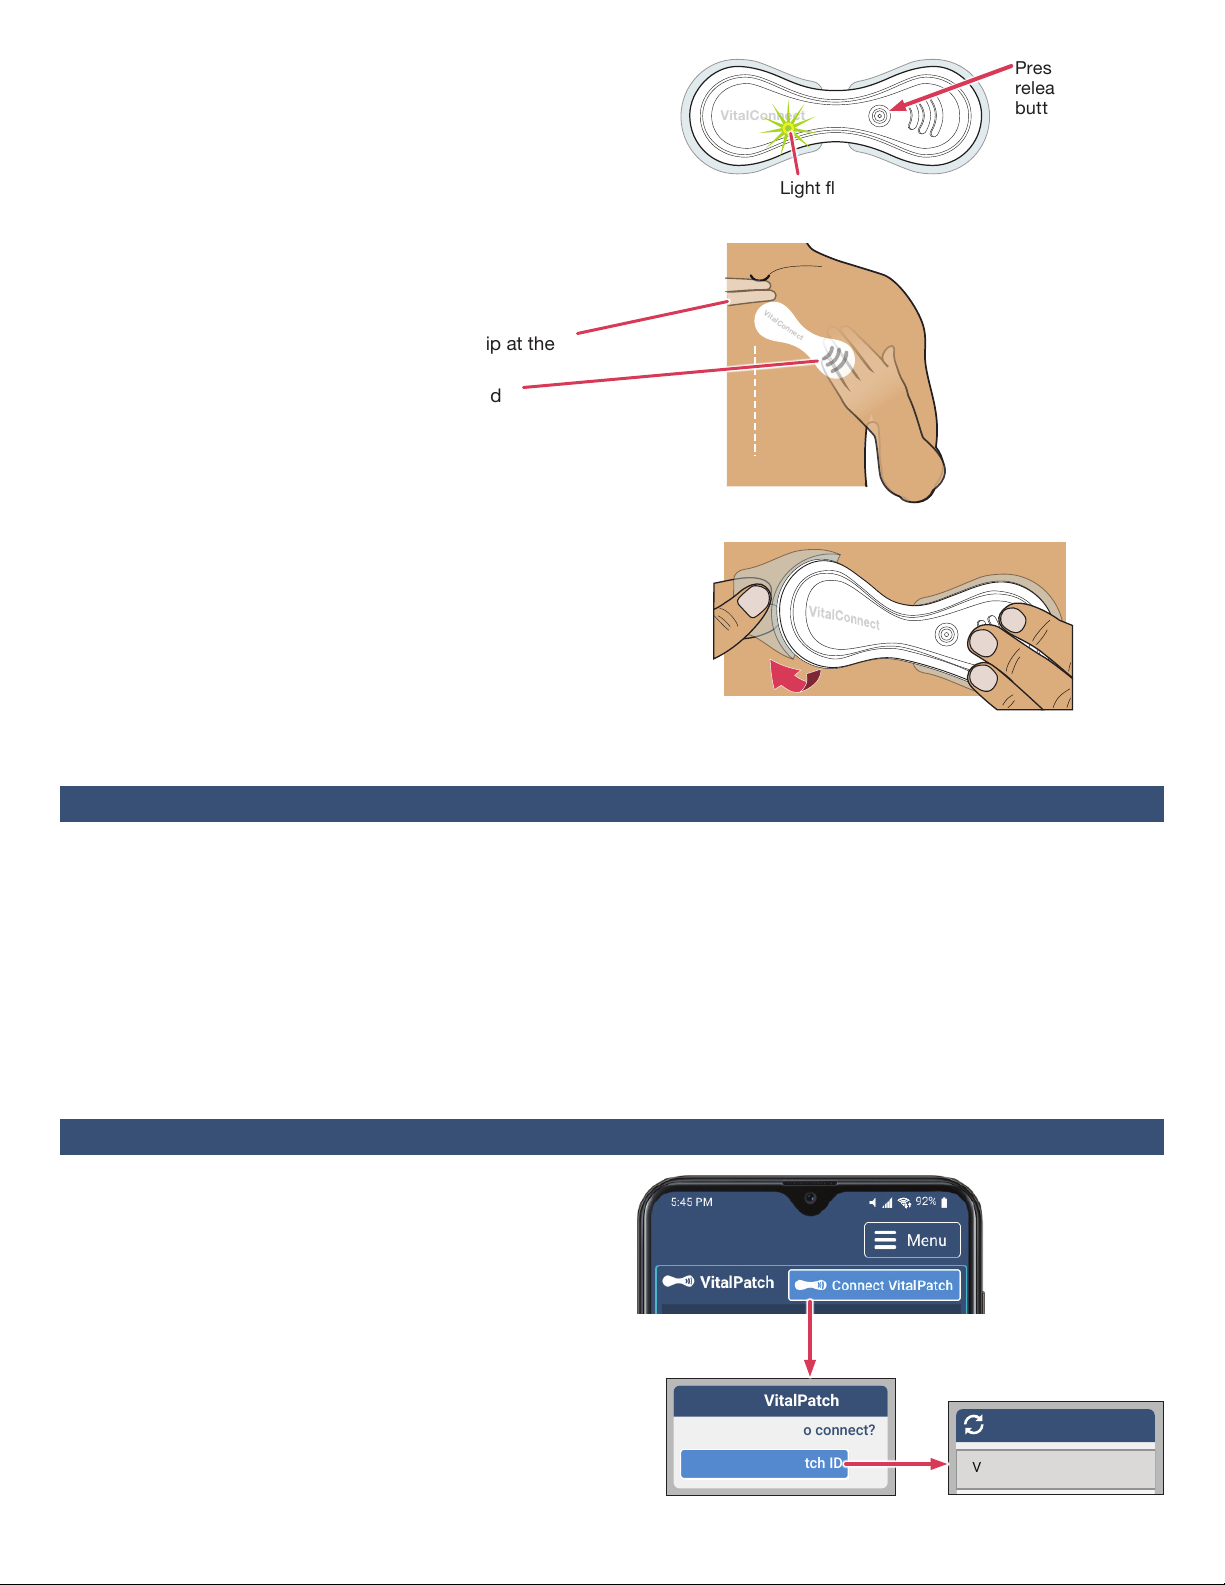
c. Place VitalPatch on a at surface. Press and release the
power button. A green light below the logo will ash
when VitalPatch is powered on (the light will go o).
3. Hold Against Chest
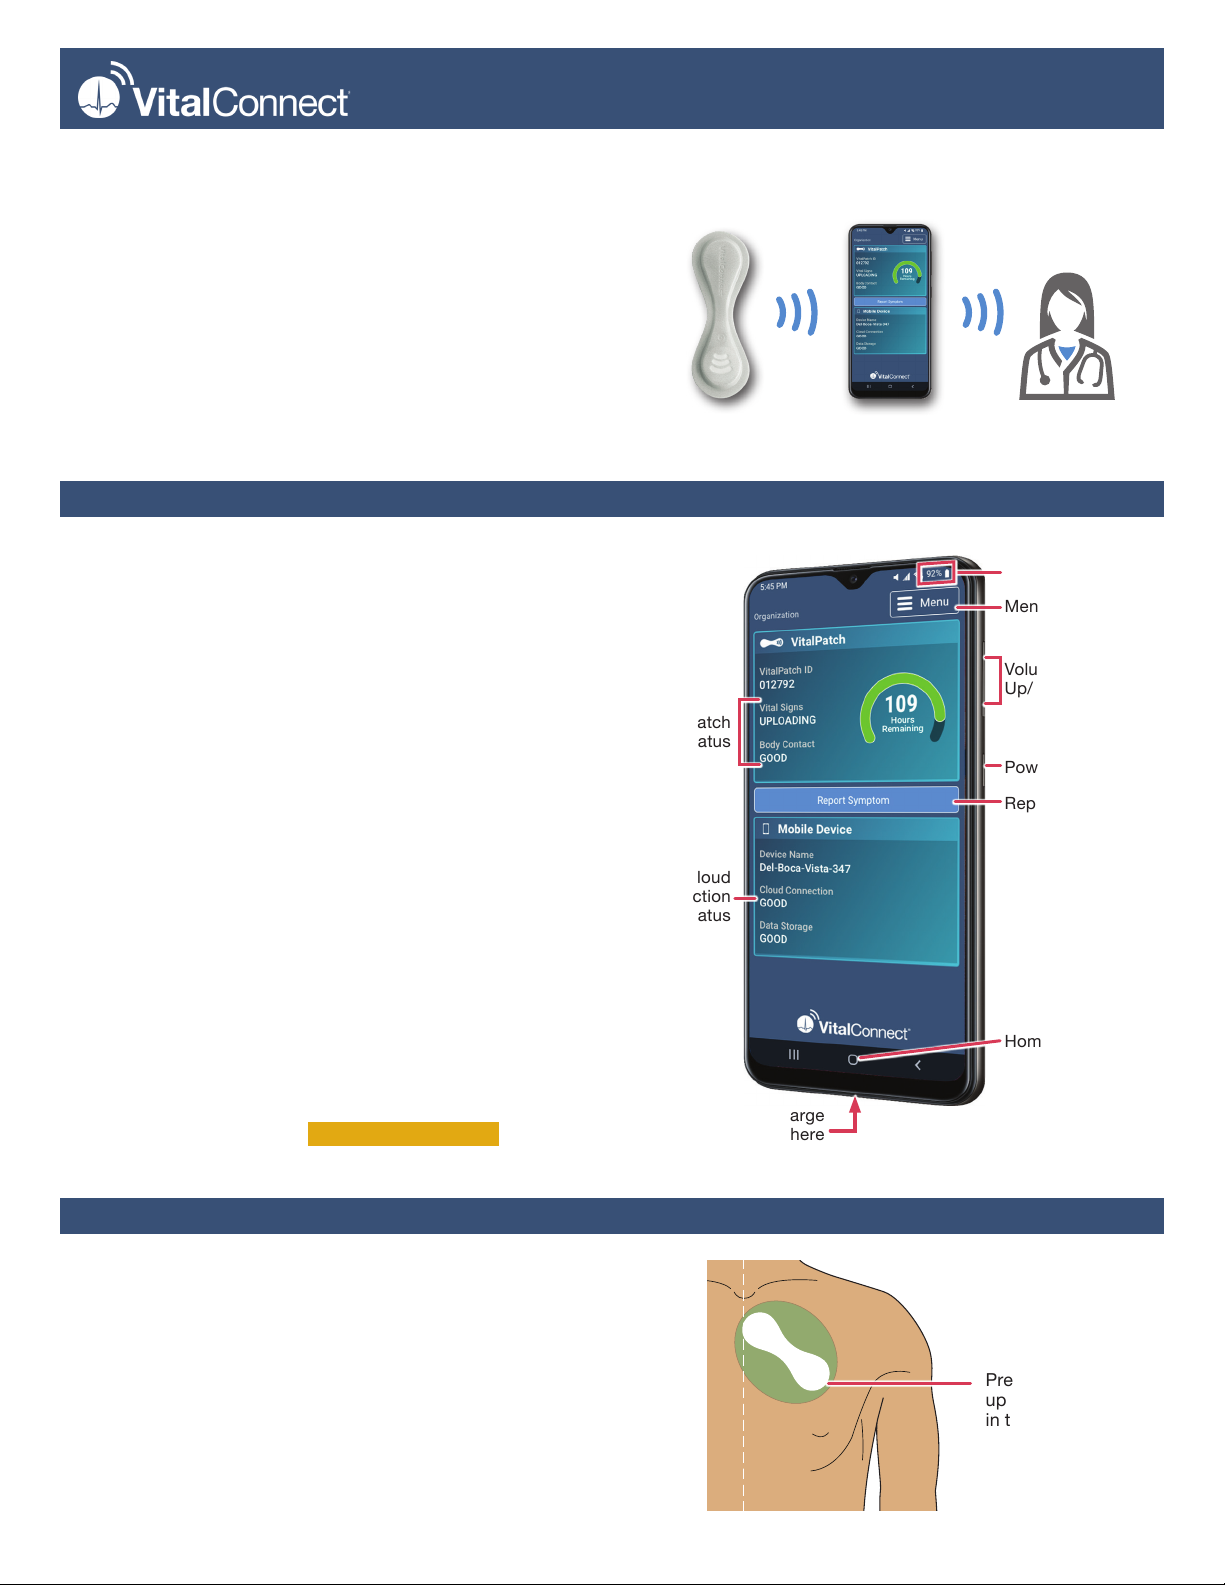
a. Hold the VitalPatch against the chest in the position
shown in the gure to the right.
b. Space two ngers below the jugular notch (dip at the
base of the neck).
c. Position diagonally with the threelines angled
downward away from the midline.
4. Remove Backings and Apply
DONOTtouchtheadhesivewithyourngers!
a. Hold one side of the VitalPatch down.
b. Lift the opposite side, and peel the backing o from the
center. Press against skin.
c. Peel the backing o from the other side of the VitalPatch.
d. Firmly press down both sides to attach to skin.
5. Optional Adhesive Overlay
If your care team recommends an adhesive overlay, please
review the instructional video. Go to the Menu button, tap
Help, and then tap VitalPatchAdhesiveOverlay.
• DONOT shower or exercise for 30minutes after
applying the VitalPatch.
• DONOT expose the VitalPatch directly to the shower
head, and avoid excessive contact with soap or
scrubbing. Gently pat the VitalPatch dry after showering.
• DONOT swim with the VitalPatch or use in a sauna,
steam room or hot tub.
• DONOT wear more than one VitalPatch at a time.
Remove the old VitalPatch before applying a new one.
VitalConnect
Light ashes ON
Press and
release power
button
Peel o
backing
from center
Hold
VitalPatch
down
VitalConnect
Midline
LEFT
Side
LEFT
Hand
Section 4: Pairing with VistaPhone
1. Begin the Pairing Process
a. Tap ConnectVitalPatch button.
b. Tap SearchforVitalPatchID to search for nearby
VitalPatch biosensors. A list will of IDs will display.
c. Tap the Bluetooth ID of your VitalPatch. If the Bluetooth
ID does not appear in the list, tap the Rescan button to
repeat the search. If the VitalPatch is still not listed, press
the power button on the VitalPatch again and tap the
Rescan button.
Note:If a previous VitalPatch is still connected, disconnect it
before pairing (see Section6onPage3).
Select ID from list
Connect to VitalPatch
Search for VitalPatch ID
How do you want to connect?
Scanning for Devices
VC2B008BF_003C3C
VC2B008BF_0014D2
Section 3: Wearing the VitalPatch
• EachVitalPatchwilllastupto7days(168hours).
To preserve data recorded by the VitalPatch, make sure
you are connected to the VistaPhone before the
VitalPatch expires.
• If discomfort or irritation occurs, the VitalPatch should be
removed. Contact your care team immediately.
• If the VitalPatch begins to fall o or lift from the skin,
contact your care team immediately.
3
Check VitalPatch Hours
To check the status of your VitalPatch, look for the “hours
remaining” on the screen. Replace the VitalPatch when it
expires (or as directed by your care team).
Check VitalPatch Status
• If the screen shows Vital Signs  Not Uploading , make sure
the VistaPhone and VitalPatch are near each other.
• If the screen shows Body Contact  Not Good , check that
the VitalPatch is adhered to the skin. If the patch appears
to have lifted o, contact Customer Support (1-800-219-
3000) for additional guidance.
Report Symptoms
If you feel a symptom, do the following:
a. When it is safe to do so, unlock the VistaPhone and tap
the ReportSymptom button.
b. From the list of options, tap one or more symptom(s) to
select. Tap Other if the symptom is not listed.
Tap Next.
c. If you selected Other as a symptom, you will be asked to
enter a description of the symptom(s). Enter the
information and tap Next.
d. Tap the activity level (Low, Medium or High) that you
experienced when the symptom occurred. Tap Send
Symptom when complete.
2. Select Patch Position
Select the Primary position image and then tap Next.
3. Select Body Position
• StandingorSitting (preferred) — Sit as upright as
physically capable.
• Elevated — Lie on a bed elevated at an angle of 30°.
• Supine — Lie down as at as possible.
Remain still in the current body position and tap Calibrate.
Conrm selections when prompted.
After calibration, the screen will display a dashboard with
VitalPatch and connection status.
VitalPatch
Hours
Posture Calibration
Step 1 Select Patch Position
Next >
Secondary
Primary (preferred)
Posture Calibration
Step 2 Select Current Body Position
Calibrate
< Back
Bed is Flat
Supine
Bed Angle 30°
Elevated
(preferred)
Standing or Sitting
Anxious/Panic
Report a Symptom
What did you feel?
(select one or more)
Heart racing
Heart fluttering
Heart skipping beats
Shortness of breath
Dizzy or lightheaded
Chest pain
Fainted
Other Next
Anxious/Panic
Report a Symptom
What was your activity level
when you felt the symptom?
Low
Sitting or resting
Medium
Standing or moving
High
Exercising
Back Send Symptom
Section 5: Daily Activities During Monitoring
Each VitalPatch will last up to 7 days. If your monitoring
period is longer than 7 days, replace the VitalPatch as
follows just prior to expiration:
a. Tap the Menu button and then tap DisconnectPatch.
b. Tap the DisconnectVitalPatchandcontinue
monitoringpatientbutton.
c. Remove the VitalPatch. See Section7onPage4.
d. Apply a new VitalPatch. See Section2onPage1.
Section 6: Replacing the VitalPatch
Disconnect VitalPatch
and continue
monitoring patient.
Disconnect Patch
Menu
4
Section 7: Removing VitalPatch
Section 8: Return the Monitoring Equipment
Before removing the VitalPatch, disconnect the VitalPatch
from the VistaPhone. See Section6onPage3.
1. If Overlay Was Used, Peel off
a. Grasp a corner of the overlay and peel it o the skin.
b. Continue pulling the overlay o. Stretch the overlay
horizontally to help release it from the skin. The
VitalPatch may pull o with the overlay.
2. Peel off VitalPatch
a. Wipe an adhesive removal pad along the edge of the
VitalPatch.
b. Grasp a corner of the VitalPatch and peel it o the skin
while sweeping the adhesive removal pad underneath.
c. Dispose the VitalPatch according to local laws for routine
electronic waste.
d. Clean skin with an alcohol pad and allow to dry.
3. Apply New VitalPatch
If your monitoring period is longer than 7 days, replace the
VitalPatch. See Section2onPage1. If your monitoring
period is nished, see Section8below.
IMPORTANT: The monitoring equipment must be returned
immediately upon completion of the monitoring period.
Failuretoreturnmayresultindelayeddeliveryoftest
resultsandanadditionalbillforthecostofthedevice.
Use the following procedure to return:
a. Discard used VitalPatch biosensors, alcohol wipes, and
adhesive removal pads.
b. Place the phone, charger and charge cable in the box
labeled “VistaPhone.” If you have unused VitalPatch
biosensors (in their original, undamaged pouches), place
them in the box labeled “VitalPatch.”
c. If you received the monitoring kit from a hospital or your
doctor’s oce, return items to that location.
d. If the monitoring kit was shipped to you at home:
–Place the VistaPhone box (and the VitalPatch box if
returning an unused VitalPatch biosensor) in the
original shipping box.
–Close the box and tuck in the ap. Seal the box
closed using the provided clear circular stickers.
–Apply the UPS return shipping label to the shipping
box.
–Drop o the shipping box at any UPS shipping
location. To schedule a pick-up, contact UPS at
1-800-742-5877. Inform UPS that you have a pre-
paid label.
–Save the tracking number from the return UPS label
for your records.
Sweep adhesive
removal pad
Return To
Peel O
VitalPatch
VitalConnect
Grasp a corner of the overlay and
stretch horizontally to remove
VitalConnect, Inc.
224 Airport Parkway, Suite 300, San Jose, CA 95110 | (408) 963-4600 | www.vitalconnect.com | [email protected]
© 2021 VitalConnect. A list of our trademarks can be found at www.vitalconnect.com. All other marks may be trademarks of their respective companies.
Put VistaPhone
and charger in
this box
Tuck in
the ap
Shipping Box
Apply UPS
Return Label
Apply the
included clear
circular stickers
to seal package

Other manuals for VitalPatch

3

This manual suits for next models

1

Other VitalConnect Medical Equipment manuals

VitalConnect VitalConnect Platform User manual

VitalConnect

VitalConnect VitalConnect Platform User manual

VitalConnect VistaTablet User manual

VitalConnect

VitalConnect VistaTablet User manual

VitalConnect Vista Solution VistaPoint 2.0 User manual

VitalConnect

VitalConnect Vista Solution VistaPoint 2.0 User manual

VitalConnect VistaPoint 3.0 User manual

VitalConnect

VitalConnect VistaPoint 3.0 User manual

VitalConnect VistaPoint 2.1 User manual

VitalConnect

VitalConnect VistaPoint 2.1 User manual

VitalConnect Kettering HEALTH HF Patch Pilot User manual

VitalConnect

VitalConnect Kettering HEALTH HF Patch Pilot User manual

VitalConnect VitalPatch Installation instructions

VitalConnect

VitalConnect VitalPatch Installation instructions

VitalConnect VistaPoint 3.1 User manual

VitalConnect

VitalConnect VistaPoint 3.1 User manual

VitalConnect VitalPatch User manual

VitalConnect

VitalConnect VitalPatch User manual

VitalConnect VistaPoint 3.2 User manual

VitalConnect

VitalConnect VistaPoint 3.2 User manual

Popular Medical Equipment manuals by other brands

Nissei Pulsefit BO-750 instructions

Nissei

Nissei Pulsefit BO-750 instructions

Daytona P200T user guide

Daytona

Daytona P200T user guide

bort medical StabiloPro Knee Brace Open Style manual

bort medical

bort medical StabiloPro Knee Brace Open Style manual

laerdal Little Anne Important product information

laerdal

laerdal Little Anne Important product information

OAKWORKS PF Series user manual

OAKWORKS

OAKWORKS PF Series user manual

Drive DeVilbiss Healthcare 10400-30 instruction manual

Drive DeVilbiss Healthcare

Drive DeVilbiss Healthcare 10400-30 instruction manual

Guldmann Disposable Leg Sling II manual

Guldmann

Guldmann Disposable Leg Sling II manual

CardiacSense CS System 3 Instructions for use

CardiacSense

CardiacSense CS System 3 Instructions for use

Arjo Huntleigh Sonicaid Team3 USA Quick reference guide

Arjo

Arjo Huntleigh Sonicaid Team3 USA Quick reference guide

ChM CHARFIX system Instructions for use

ChM

ChM CHARFIX system Instructions for use

Prentke Romich Company Vanguard II Operator's manual

Prentke Romich Company

Prentke Romich Company Vanguard II Operator's manual

Anspach G1 Series Assembly and Disassembly

Anspach

Anspach G1 Series Assembly and Disassembly

Henry Schein Hydrim C61WD Guide

Henry Schein

Henry Schein Hydrim C61WD Guide

LaserLiner BoreScope manual

LaserLiner

LaserLiner BoreScope manual

Wohler VE Series operating manual

Wohler

Wohler VE Series operating manual

Mobiclinic CM-01 instruction manual

Mobiclinic

Mobiclinic CM-01 instruction manual

Nidek Medical AR-360A Service manual

Nidek Medical

Nidek Medical AR-360A Service manual

GERATHERM Spirostik Instructions for use

GERATHERM

GERATHERM Spirostik Instructions for use

manuals.online logo
manuals.online logoBrands
  • About & Mission
  • Contact us
  • Privacy Policy
  • Terms and Conditions

Copyright 2025 Manuals.Online. All Rights Reserved.