VOX electronics NB-901 User manual

1
GBR
INSTRUCTION MANUAL
NUTRITION BLENDER
NB-901/NB-902

2
Thank you for purchasing Vox Electronics Nutrition Blender. We hope that you will enjoy
using this appliance for many years to come.
BEFORE USING FOR THE FIRST TIME
Before using your Nutrition Blender for the first time it is important that you read and follow
these instructions, even if you think you are familiar with this type of appliance.
Your attention should be paid in particular to the section dealing with IMPORTANT
SAFEGUARDS. Find a safe and convenient place to keep this manual handy for future reference.
This appliance has been designed to operate from a standard domestic power outlet. It is not
intended for industrial or commercial use. Carefully unpack the Nutrition Blender.
IMPORTANT SAFEGUARDS
When using this electrical appliance, in order to reduce the risk of electricshock and/or injury,
basic safety precautions should always be followed.
For Your Safety
Read all instructions carefully, even if you are familiar with the appliance.
● In order to eliminate the risk of electric shock, DO NOT SINK the appliance, power cord set or
plug in the water or any other liquid.
● This appliance is not intended for use by persons (including children) with reduced physical,
sensory and mental capabilities, or lack of experience and knowledge, unless they have been
given approval or instruction concerning the use of appliance by a person responsible for their
safety.
● Children should be supervised to ensure that they do not play with the appliance.
● Switch off the power outlet and remove the plug before cleaning it or when the appliance is
not in use.
● Do not operate this Nutrition Blender with a damaged power cord or a plug; if the Nutrition
Blender malfunctions; or if it is dropped or damaged in any manner.

3
● Do not allow the power cord to hang over the edge of a table or a counter, or to touch hot
surfaces.
● Do not operate or place any part of this appliance on or near hot gas or electric burner, or in
a heated oven.
● Use of attachments or accessories not recommended or sold by the manufacturer can cause
electric shock or injury.
Operate on a dry level surface; sinks, drainboards or uneven surfaces must be avoided.
●Do not use Nutrition Blender for anything other than its intended use. This product is
intended for household use only.
●Do not use outdoors.
●Never let the Nutrition Blender operate unattended.
●Make sure the blade is securely fastened to the accessories before you assemble them onto
the motor unit.
●Make sure all parts are correctly mounted before you switch on the appliance.
●Do not remove accessories from the motor base when the blender is working.
●Unplug the blender immediately after use.
●Do not misuse the power cord. Never carry the appliance by the power cord or pull it to
disconnect from the power outlet. Instead, grasp the plug and pull to disconnect.
●Do not attempt to repair or disassemble the appliance.
●Extreme caution is necessary when moving any parts containing hot liquids.
●Wait until the appliance has been switched off before moving the Nutrition Blender.
●Never microwave with the blade still attached. Remove the blade and twist on a shaker /
steam top.

4
●When microwaving, beware of steam and use an oven mitt to remove hot cups from
the microwave.
●Do not use party mugs in the microwave.
●Never keep the motor running for more than 1 minute.
●This appliance is not intended to be operated by means of an external timer or
separate remote-control system.
●Be careful if hot liquid is poured into the blender as it can be ejected out of the
appliance due to a sudden steaming.
●Switch off the appliance and disconnect from the power socket before changing
accessories or approaching parts that move in use.
FAILURE TO OBSERVE THESE CAUTIONS MAY RESULT IN DAMAGE TO THE
APPLIANCE.
Warning
If the supply power cord is damaged, the power cord must be replaced by the
manufacturer, its service agent or similarly qualified persons in order to avoid a
hazard.
This product has not been designed for any uses other than those specified in this
instruction manual.
Caution - BLADES ARE SHARP, HANDLE CAREFULLY. Avoid contacting moving parts.
Keep hands, spatulas and other utensils, away from blades during operation to
reduce risk of injury to persons, and/or damage to the Nutrition Blender.
Warning - Injury Hazard: Unplug the blender and ensure the blade has stopped
completely before moving the cup or touching the blades. Failure to do so can result
in serious injury to hands or fingers .
READ AND KEEP THIS MANUAL, YOU MIGHT NEED IT IN THE FUTURE!

5
GET TO KNOW YOUR NUTRITION BLENDER
700ml Medium size Cup
500ml Small size Cup
Cap
Cross Blade
Spill-proof
drinking lid
Pulverizing Blade
Subassembly
Keep fresh storage lid
Motor Base
Base
Sipping Ring
Sipping Ring
with Handle
800ml Large size Cup

6
Pulverizing Blade Subassembly
HOW TO USE YOUR NUTRITION BLENDER
Care is needed when handling cutting blades, especially when removing the blade from the cup,
emptying the cup and during cleaning.
Chopping - Food like onions, garlic and carrots, And for making dips such as salsa or bean dip.
Blending –Pulverizes ice for smoothies, frozen cocktails and milkshakes.
Mixing - Pancake batters, muffins and quick breads are mixed in seconds.
Grating –Hard and soft cheeses and chocolate are grated in seconds.
Pureeing –Dishes such as hummus, all-natural soups, and baby food are creamy smooth in
seconds.
Shaving Ice and Frozen Fruits –For tasty treats such as snow cones or fruit sorbets.
Grinding Meats –Delicious chicken and ham salads or pates are ground in seconds (Do not
exceed 150g when grinding).
NOTICE:
●Do not use the MAX. level on the short cup for dry grinding / milling option because in that
case blending will not give the desired result.
●For dry grinding/milling function, do not put more than 150g of ingredients in the mixing cup.
●Never overfill the cups above the MAX level of indication.
●Do not mach heavy foods (e.g.,dough) in this Nutrition Blender.

7
Guidance
I For blending:
1. Place the Motor Base on a flat, level, stable surface. Ensure the power cord is unplugged.
2. Clean and cut all solid ingredients into pieces small enough to fit and place into a Large or
Medium size Cup, then pour in liquid ingredients.
3. Ensure the seal ring is seated properly on the Pulverizing Blade subassembly, then screw on
pulverizing blade assembly in clockwise direction onto cup and tighten to seal.
4. Position the cup assembly onto the motor base and turn anti-clockwise to align cup tabs with
corresponding slots on motor base ( Turning anti-clockwise will ensure that the drive cog on
cup assembly will always align properly with drive gear on the motor base ).
At this stage DO NOT push the cup down and don’t lock it into position(As it will start
immediately if already plugged into Power supply ).
5. On completion of the blending process , turn the cup anti-clockwise ( If locked in ) and /or
release downward pressure on cup ( Pulse position ) to turn off .
Remove the cup from the motor base and if not using Nutrition Blender any further , switch off
at power outlet and unplug the cord ( Do not leave plugged in if not in use ).
7. After removing the cup from the motor base, place cup upside down and unscrew blade
assembly from the cup in anti-clockwise direction. Pour mixed contents into a separate
container or simply screw a sipping ring onto the cup and consume contents directly from it.For
later consumption you can alternatively screw a storage lid onto the cup and place the cup into
refrigerator .
NOTICE:
● Once the appliance is connected to a power supply it can only be operated by pushing the cup
down ( For short pulsing ) or pushing down and turning clockwise to lock, On \ Off switch
doesn’t exist.
●If the Blade is not running smoothly, stop the appliance to add more liquid or alternatively
reduce the amount of solid ingredients in the cup.

8
II For grinding/milling
1. Place the motor base on a flat, level, stable surface. Ensure the power cord is unplugged.
2. Fill the small size cup with the ingredients that you wish to grind, such as( coffee
beans,nuts,cinnamon stick,dried fruits etc.)
3. Screw the Pulverizing Blade Assembly onto the small size cup in clockwise direction and
tighten to seal.
4. Position the cup assembly onto the motor base and turn anti-clockwise to align cup tabs with
corresponding slots on the motor base ( Turning anti-clockwise will ensure that drive cog on the
cup assembly will always align properly with drive gear on the motor base ).
At this stage DO NOT push the cup down and don’t lock it into position (As it will start
immediately if already plugged into Power supply ).
5. Plug in the appliance cord , switch On at wall outlet .The appliance is now ready to Operate.
Whilst operating appliance hold it steady by placing one hand on appliance base and other
hand on the cup.
6. On completion of the grinding process , release downward pressure on cup the (pulse ) or
unlock the cup ( Continues operation ) by turning anti-clockwise .
Remove the cup from the motor base and switch off and unplug from power outlet if there is
no further need for immediate use.
7. After removing the cup from the motor base, place the cup upside down and unscrew the
blade assembly from the cup in anti-clockwise direction.
8. Tip ground ingredients into separate container or alternatively ( If not immediately using )
simply place the storage lid onto the small cup to keep contents fresh for later use.
9. Where appliance is not used to process more batches , switch your Nutrition Blender Off and
unplug it from the wall outlet until next use.
NOTICE:
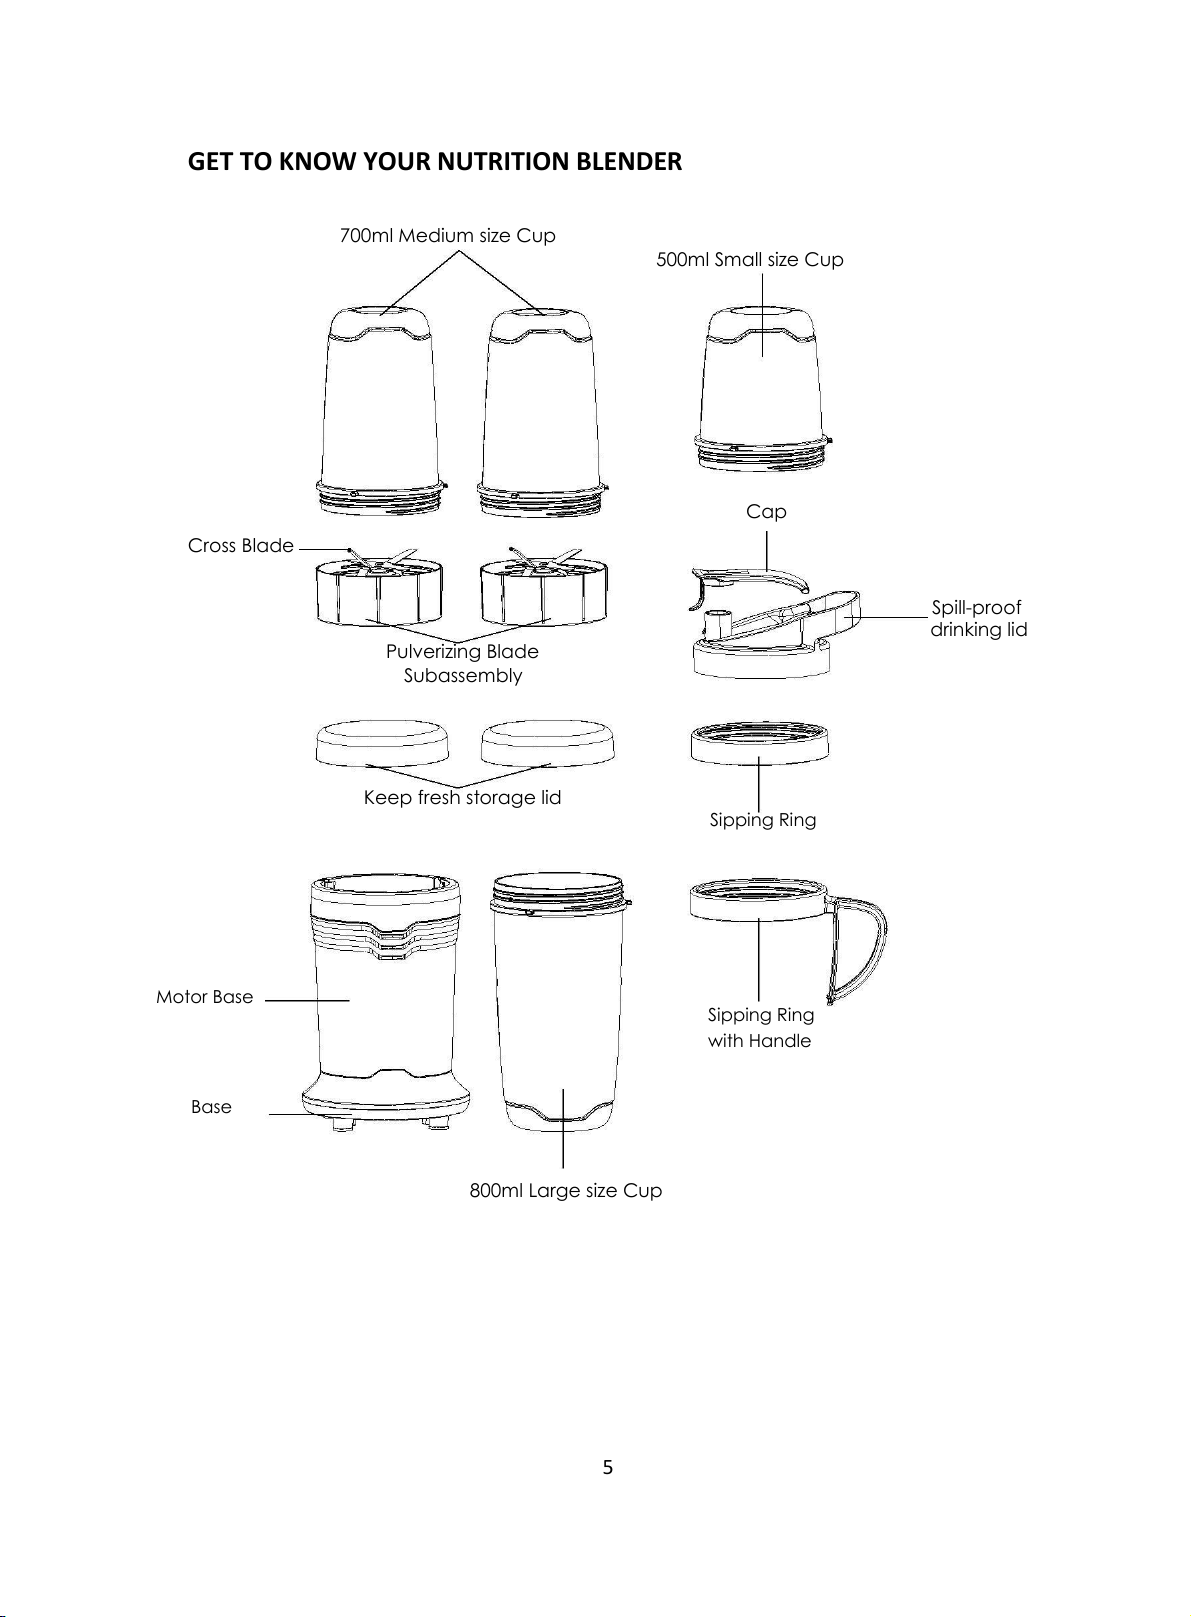
● The lage ad Mediu size ups ae for blending and Storage use . The small size cup should
only be used for grinding /milling functions .
● Alays ake sue that seal is popely seated i the i efoe tighteig.
● Fo est gidig/ illig pefoance limit the quantity of ingredients in cup to a maximum
of 150 grams.
● Oe the Nutitio lede is connected to the power supply it can only be operated by
pushing the cup down ( For short pulsing ) or pushing it down and turning clockwise to lock, On
/ Off Switch doesn’t exist.

9
● To peet the appliae fo oeheatig , dy igediets ust ot e goud fo oe tha
30 seconds at any time. Allow it to cool down before processing the next batch.
● The appliae is fitted ith an overheat protection device which will shut down appliance
when overheated . Unplug the appliance and allow it to cool down .After the Nutrition Blender
has cooled down, simply plug it back in to restart.
CARE AND CLEANING
1. Always wash immediately after use for easier cleaning. Don’t let the food dry on the cup as
this will make cleaning difficult.
2. After you unplug the blender, detach the used accessories and parts, and clean them in
warm, soapy water.Rinse all accessories and parts under a tap and dry thoroughly.
3. Wipe the motor base clean with a slightly damped cloth to remove any residue, and dry
thoroughly. Never dip the motor base in water or another liquid, or place in a dishwasher.
NOTICE:
● Uplug the blender before you start with the cleaning.
• Wait util the blender has cooled down sufficiently before cleaning it.
• All detahale aessoies a e leaed y ate.
• Clea the oto ase ith a slightly daped loth.
• Do ot iese the oto ase i ay liuid.
• Do ot use souig pads, aasie leaning agents or aggressive liquids such as petrol,
alcohol or acetone clean your Nutrition Blender.
Tips:
• Use a sall rush ot iluded to reoe partiles of food lodged udereath the lades.
• If soe leftover particles dry inside of the cup, fill the cup about 2/3 full with warm soapy
water and attach the Milling Blade Subassembly. Place the cup and Blade Subassembly onto the
Motor Base and plug the power cord into power supply. Run the appliance for about 20-30
seconds to help clean the stuck ingredients. Repeat the above step but use clean tap water.
Empty the blender and dry thoroughly.
• Store the produt i a ool, dry plae.
CAUTION:
●The Nutrient Blender attachments(Short Cup, Tall Cup, Middle Cup Lid and Ring) can be placed
in the upper rack of a dishwasher or alternatively they can be hand washed with warm soapy
water and then rinsed.

10
● Always make sure the seal rings are still inside after cleaning. The heat from some
dishwashers can cause them to become loose and pop out.
SPECIFICATIONS
Power Supply................................ 220-240V ~ 50Hz
Power Consumption.................................... 1000W
Notice: As a result of continual improvements the design and specifications of the product
within may differ slightly to the unit illustrated from the packaging.
RECIPES
Body Bliss
• hadfuls Kale
• / up straerries
• aaa
• alods
• talespoos of raw cacao
Fill to the MAX indication with spring water.
Juice away!
Nirvana
• / ra eet
• gree grapes
• sall rooli
• rasperries
• talespoo goji berries
• / ih of giger root
• dash of oout ilk
Fill to the MAX indication with spring or
coconut water.
Juice away!
Fountain of youth
• hadful Spiah
• / aoado pitted ad peeled
• / peah
• up straerries
• Alods
• kii fruit peeled
Fill to the MAX indication with spring water
or almond milk.
Juice Away!
De-Stressor
• handful kale
• / aaa
• / up lueerries
• / up lak erry
• talespoo of pumpkin seeds
• talespoo of sunflower seeds
• talespoo of Chia seeds
Fill to the MAX indication with spring water.
Juice Away!
Beauty from within
• hadful swiss chard
• / up pieapple
• / up lueerries
• talespoo of goji berries
• alods
Fill to the MAX indication with spring water
or almond milk.
Juice away!
Accelerator
• to kale leaes
• aaa
• / of a cup filled with pumpkin seeds

11
• grapefruit peeled
• stik of elery
Fill to the MAX indication with spring water
Juice Away!
OUR COMPANY WISHES YOU GREAT SATISFACTION WITH YOUR NUTRITION BLENDER

12
SRB
UPUTSTVO ZA UPOTREBU
BLENDER
NB-901/NB-902

13
Hvala Vam što ste kupili Vox Electronics Blender. Nadao se da ćete užiati koristeći
ovaj aparat dugi niz godina.
PRE PRVE UPOTREBE
Pre prve upotrebe Blendera veoma je ažo da pročitate i sledite oa uputsta, čak i
ako mislite da ste upoznati sa ovom vrstom aparata.
Poseo trea oratiti pažju a deo koji se odosi a VAŽNE SIGURNOSNE MERE.
Proađite siguro i prikladno mesto na kom ćete čuati ovo uputstvo za potrebe
informisanja u udućosti. Oaj aparat je dizajniran da radi sa standardnim
utičiaa a aše području. O ije aeje za industrijsku ili komercijalnu
upotreu. Pažljio izvadite Bleder iz aalaže.
VAŽNE SIGURNOSNE MERE
Priliko korišćeja oog električog aparata, kako iste izegli rizik od elektrošoka i /
ili poredu, trea da se uek pridržaate osoih era zaštite.
ZA VAŠU BEZBEDNOST
Pročitajte pažljivo ovo uputstvo, čak i ako ste upoznati sa finkcionisanjem i
rukovanjem ovim uređajem.
● Da biste otklonili opasnost od strujnog udara, NEMOJTE POTAPATI aparat, kabl za
napajanje ili utikač u vodu ili bilo koju drugu tečnost.
● Ovaj aparat nije namenjen za upotrebu od strane osoba (uključujući i decu) sa
smanjenim fizičkim, senzornim i mentalnim sposobnostima, ili nedostatkom iskustva i
znanja, osim ako im je to dozvoljeno ili su dobile uputstva u vezi upotrebe aparata od
strane osobe koja je odgovorna za njihovu bezbednost.
● Dea trea da udu pod adzoro kako i se osiguralo da se ne igraju sa aparatom.
● Isključite utičiu i ukloite utikač pre čišćeja aparata ili kada ne koristite aparat.
● Nemojte rukovati oi aparato sa oštećei kalo za apajaje ili utikače,
kao i ukoliko je Blender eispraa ili je pao ili ošteće a ilo koji ači.

14
● Nemojte dozvoliti da kabl za apajaje isi preko iie stola ili rade poršie, ili da
dodiruje ruće poršie.
● Neojte koristiti ili postaljati ilo koji deo oog uređaja a ili u lizii toplog gasa
ili ringle, ili u zagrejanoj rerni.
● Korišćeje dodataka ili priora koji se e preporučuje ili nije prodat od strane
proizođača ože prouzrokovati strujni udar ili povredu. Rukovati s aparatom na
suoj i raoj poršii; sudopere, sušači za sudoe ili erae poršie se moraju
izbegavati.
●Nemojte koristiti blender u druge svrhe osim onih za koje je namenjen: ovaj aparat
je aeje isključio za upotreu u doaćistu.
●Neojte koristiti a otoreo prostoru.
●Nemojte nikada dozvoliti da blender radi bez nadzora.
● Uerite se da je sečio doro pričršćeo za prior pre ego što ih sastaite a
postolje sa motorom.
●Uverite se da su svi delovi prailo otirai pre ego što uključite aparat.
● Neojte uklajati dodatni pribor iz postolja sa motorom kada blender radi.
● Isključite leder iz utičie odah ako upotree.
● Neojte zloupotrebjavati kabl za napajanje. Nikada e isključujte aparat polačeći
kabl za apajaje iz utičie. Umesto toga, uhvatite utikač i pažljio ga izadite iz zida.
● Neojte pokušaati da popraljate ili rastaljate aparat.
● Ekstrei oprez je neophodan kada pomerate bilo koje deloe koji sadrže ruće
tečosti.
● Sačekajte da se aparat isključi pre poeraja.
● Nikada ne koristite posudu u ikrotalasoj sa sečio koje je još uvek u njoj.
Izadite sečio i odrite poklopa šejkera.
● Kada koristite šolje u mikrotalasnoj, čuajte se pare i koristite rukavicu za rere
kako iste ukloili ruće šolje iz mikrotalasne.

15
● Ne koristite čaše za rođedae plastiče ili od papirau mikrotalasnoj.
● Nikada ne držati upalje otor iše od jedog minuta.
● Oaj aparat ije aeje da se njime upravlja putem spoljašjeg tajmera ili
odvojenog sistema za daljinsko upravljanje.
● Budite pažljii ukoliko se topla tečost sipa u leder, jer ože da kree da izlazi iz
aparata zbog naglog isparavanja.
● Isključite uređaj i izuite utikač iz utičie pre ego što ejate delova pribora ili
priližaate delove koje se pomeraju prilikom upotrebe.
NEPOŠTOVANJE OVIH UPOZORENJA MOŽE DOVESTI DO OŠTEĆENJA APARATA.
Upozorenje
Ukolilo je kabl za apajaje ošteće mora biti zaeje od strae proizođača,
njegovog servisera ili druge, za to kvalifikovane osobe kako bi se izbegao rizik od
strujnog udara.
Ovaj proizvod nije namenjen za bilo koju drugu upotrebu osim onih navedenih u
ovom uputstvu.
Oprez - SEČIVA su oštra, pažljivo RUKUJTE sa njima. Izbegavajte kontakt sa
pokretnim delovia. Držite ruke, lopatie i drugi prior, daleko od sečiva tokom
rada da se smanji rizik od povrede lica, i / ili ošteeja Bledera.
Upozorenje –Opasnost od povrede: Isključite leder i uerite se da je sečio
potpuno zaustavljeno pre ego što pomerite posudu ili dodirnete lopatice. Ako to ne
učiite ože doći do oziljih poreda ruku ili prstiju.
PROČITAJTE I SAČUVAJTE OVO UPUTSTVO,
MOŽE VAM ZATREBATI U BUDUĆNOSTI!

16
UPOZNAJTE SVOJ BLENDER
700ml Srednja posuda
500ml Mala posuda
Poklopac
Krstasto sečivo
Poklopac
protiv
prosipanja
Dodatak za sečiva za usitnjavanje hrane
Poklopac za očuvanje svežine hrane
Postolje s
motorom
Postolje
Prsten za
zatvaranje
Prsten za
zatvaranje s
ručkom
800ml Velika posuda

17
Dodatak za sečiva za usitjavaje i sekaje hrae
KAKO DA KORISTITE VAŠ BLENDER
Morate iti jako pažljii priliko rukoaja sečiia, aročito priliko uklajaja sečia iz
posuda, pražjeja posuda i toko čišćeja.
Seckanje –za hranu poput crog luka, elog luka i šargarepe I za praljeje uaka kao što su
sos ili umak od pasulja.
Blendiranje –rljeje leda za frapee, koktele sa rljei ledo, ili šejkoe.
Mešaje –testo za palačike, mafini i rzi hlepčići se ešaju za ekoliko sekudi.
Rendanje –Trdi i eki sirei i čokolada se redaju za ekoliko sekudi.
Pasiranje –Hrana poput humusa, sve prirodne supe, i hrana za bebe je glatka i kremasta za
nekoliko sekundi.
Peasti led i zarzuto voće –Za ukusne poslastice kao što su ledei kupoi ili oćni sorbeti.
Mlevenje mesa –Ukuse pileće i salate sa šuko ili paštete se samelju za nekoliko sekundi
(Ne stavljati preko 150g kada meljete).
NAPOMENA:
● Ne koristite MAKS io sa kraćo posudo za opciju suvo mlevenje / mlevenje, jer u tom
slučaju blender eće dati željei rezultat .
● Za funkciju suvog mlevenja, e staljajte iše od 150g sastojaka u posudu za mlevenje.
● Nikada e punite posude izad ozačeog ioa MAKS.
● Ne ešajte tešku hrau pr , tvrdo testo ) u ovom blenderu .

18
Rukovanje aparatom
I Za mrvljenje:
1. Postavite postolje motora na ravnu, stailu poršiu. Proerite da li je kabl za napajanje
isključe.
. Očistite i iseite se črste sastojke na komade dovoljno male da stanu u veliku ili srednju
posudu, a zatim sipajte teče sastojke.
3. Proverite da li je prstenasti poklopac pravilno postavlje a dodatak sa sečiia za leeje,
zatim postavite taj dodatak okrećući u seru kazaljke a satu za posudu i črsto zategite.
4. Postavite posudu na postolje sa motorom i okrenite u smeru suprotnom kazaljci na satu kako
biste uklopili posudu sa useia a postolju okretaje u seru suproto kazalji a satu će
oezediti da se zupčaii a posudi izjedače sa odgoarajući ležištia a postolju.
U ovoj fazi NEMOJTE pritiskati posudu na dole i ne zaključaajte je jer će odah kreuti sa
radom ukoliko je kabl uključe u utičiu.
5. Po zaršetku proesa rljejaleeja,okrenite posudu u smeru kazaljke na satu (ukoliko
je zajključaa i/ili je oslobodite pritiskom (Pulse pozicija) kako biste je odvrnuli. Uklonite
posudu sa postolja sa otoro, i ukoliko ećete dalje koristiti leder, isključite kal za
apajaje iz utičie Ne ostaljate ga utakutog ukoliko e koristite aparat.
6. Nakon uklanjanja posude sa postolja, postavite posudu okrenutu nadole i odvrnite dodatak
sa sečio za mlevenje u smeru suprotnom kazaljci na satu. Sipajte saleei sadržaj u
odojeu posudu ili jedostao staite poklopa sa drško a posudu i konzumirajte sadržaj
direkto iz je. Za kasiju upotreu ožete da poklopite posudu i staite je u frižider.
NAPOMENA:
● Kada je leder uključe u struju ože se rukoati jie sao pritisko posude a dole
kratko pulsiraje ili pritiskajući ga i okrećući u seru kazaljke a satu , o / off prekidač e
postoji .
● Ako se sečio e čuje da radi glatko, zaustavite aparat i dodajte iše tečosti ili alteratio
smanjite količiu črstih sastojaka u posudi.

19
II Za mlevenje
1. Postavite postolje a rau, črstu poršiu. Proerite da li je kabl za apajaje isključe.
2. Napunite malu posudu sastojcima koje želite da saeljete, kao što su zra kafe, orasi, štapići
cimeta, sušeo oće itd).
3. Zarite dodatak sa sečio a alu posudu u smeru kazaljke na satu i doro pričrstite.
4. Postavite dodatak za posudu na postolje sa motorom i okrenuti suprotno od smera kretanja
kazaljke na satu. okretaje u seru suproto kazalji a satu će oezediti da se zupčaii a
posudi izjedače sa odgoarajući ležištia a postolju.
U ooj fazi NEMOJTE pritiskati posudu a dole i e zaključaajte je jer će odah krenuti sa
radom ukoliko je kabl uključe u utičiu.
. Priključite kal aparata u utičiu a zidu. Aparat je sada sprea za upotreu. Priliko rada
aparata jedo ruko črsto držite postolje, a drugo posudu.
. Po zaršetku proesa leeja, e pritiskajte posudu,(PULSE) ili je otvorite (nastavlja sa
radom) okretanjem u smeru suprotnom smeru kazaljke na satu.
Uklonite posudu sa postolja i isključite aparat i izuite kal za apajaje iz utičie ako u to
treutku ećete iše korititi aparat.
7. Nakon uklanjanja posude sa postolja, postavite posudu okrenutu na dole i odvrnite dodatak
sa sečiia iz posude okretaje u seru suproto od sera kazaljke a satu.
8. Stavite samlevene sastojke u odvojenu posudu ili alternativno (ukoliko ne koristite odmah)
jedostao staite poklopa a alu posudu kako i sačuali sežiu sastojaka za kasiju
upotrebu.
9. Kada aparat ne koristite za iše operaija, isključite leder i izuite ga iz zide utičie do
sledeće upotree .
NAPOMENA:
● Velika i srednja posuda su za ešaje i čuaje hrae. Mala posuda treba da se koristi samo
za mlevenje.
● Uek proerite da li je zaptiač pravilno postavljen u obodu pre zatezanja.
● Za ajolje rezultate kod mlevenja preporučuje se da količia sastojaka u posudi ude
maksimum do 150 grama .

20
● Kada je leder uključe u struju ože se rukoati jie sao pritisko posude a dole
kratko pulsiraje ili pritiskajući ga i okrećući u smeru kazaljke na satu , o / off prekidač e
postoji .
● Da iste sprečili da se aparat pregreje, suve sastojke ne treba da meljete iše od 30 sekundi.
Ostavite aparat da se ohladi pre ego što pređete a oradu ostalih sastojaka.
●Aparat je oprelje uređaje za zaštitu od pregrejaaja koji će isključiti aparat kada se
pregreje. Isključite aparat iz utičie i ostavite ga da se ohladi. Kada se blender ohladi , ponovo
ga priključite da iste astaili s rado.
ČIŠĆENJE I ODRŽAVANJE
1. Uvek operite aparat odmah nakon upotree radi lakšeg čišćeja. Ne dozolite da se hrana
suši u posudi jer će čišćeje iti teže.
. Kada isključite leder, ukloite korišćeu dodatu opreu i deloe, i očistite ih u toploj vodi
sa sapunicom. Isperite sav pribor i delove i detaljno osušite.
. Orišite postolje motora blago akašeo krpom da uklonite ostatke, i potpuo osušite.
Nikada ne potapajte postolje motora u odu ili eku drugu tečost, ili u ašiu za pranje
sudova.
NAPOMENA:
•Isključite leder pre ego što počete sa čišćeje .
• Sačekajte da se leder ohladi dooljo pre čišćeja .
• Sa odojia dodatna oprea ože se očistiti odo.
• Očistite postolje alo alažeom krpom.
• Ne koristite grue suđere za riaje, arazia sredsta za čišćeje ili agresie tečosti kao
što su ezi, alkohol ili aeto da iste očistili leder.
Saveti:
• Koristite alu četku nije u paketu) da se ukloe čestie hrae ostalih ispod lopatice .
• Ako se neki ostaci hrane osuše u posudi, napunite 2/3 posude toplom vodom i stavite dodatak
sa sečiia za sitjeje hrae. Postaite šolju i dodatak na postolje i priključite kal za
napajanje u izvor napajanja. Pokrenite aparat na oko 20-30 sekundi da i a pooglo u
čišćeju preostalih sastojaka. Ponovite prethodni korak, ali upotrebite čistu odu sa čese.
Isprazite leder i potpuo osušite.
This manual suits for next models
1
Table of contents
Languages:
Other VOX electronics Blender manuals

VOX electronics
VOX electronics TM-9000 User manual

VOX electronics
VOX electronics MS-2106 User manual

VOX electronics
VOX electronics TM-9321 User manual

VOX electronics
VOX electronics TM-6006 User manual

VOX electronics
VOX electronics TM-1056 User manual

VOX electronics
VOX electronics TM-6105 User manual

VOX electronics
VOX electronics TM-6003 User manual

VOX electronics
VOX electronics MS-984 User manual

VOX electronics
VOX electronics MS-6010 User manual

VOX electronics
VOX electronics MS-5020 User manual