Waeco Mobitronic RV-RMM-56 User manual

RV-RMM-56
✎Symbole 2
DLCD-Monitor 8
GB LCD-Monitor 16
LCD-Monitor 24
LCD-Monitor 32
LCD-Monitor 40
LCD-Monitor 48
LCD-Monitor 56
LCD-Monitor 64
LCD-Monitor 72
LCD-Monitor 80
E
F
I
NL
DK
S
N
FIN
e1
Montage- und Bedienungsanleitung
Installation and Operating Instructions · Instrucciones de montaje y de servicio · Instructions de
montage et de service · Istruzioni di montaggio e d’uso · Montage- en bedieningshandleiding ·
Monterings- og betjeningsvejledning · Monterings- och bruksanvisning · Monterings- og
bruksanvisning · Asennus- ja käyttöohje
RV-RMM-56_q4.qxd 03/09/03 11:01 Page 1

RV-RMM-56_q4.qxd 03/09/03 11:01 Page 2

3
1
2
3
4
A
2.
3.
1.
Nicht öffnen
Don´t open
Nicht ziehen
Don´t pull
RV-RMM-56_q4.qxd 03/09/03 11:01 Page 3

4
123
456
8
9
10
11
12 13
14
B
7
RV-RMM-56_q4.qxd 03/09/03 11:01 Page 4

5
C
D
L
R
AV 1
R - AUDIO - L VIDEO
OUT
AUDIOVIDEO 2 ANT IN
DC 12V
MONO
VIDEO 1
(DIVERSITY) (UR)
TO TV
AV 2
R - AUDIO - L VIDEO
MONO
1. LCD Monitor im Klappgehäuse 2. Anschlussbox mit Verbin-
dungsleitung zum Monitor 3. IR-Fernbedienung
incl. Batterie
4. Montageplatte
2. Entriegelungstaster
1. Mini DIN-Steckverbinder (8-polig)
RV-RMM-56_q4.qxd 03/09/03 11:01 Page 5

6
F
E
1. Ein/Aus Power
2. Ein/Aus Power1. APC
6. Bereitschaft LED
2. IR Empfängerfenster
3. Menu
4. SEL
5. ADJ
1. 2.
G
Picture
Contrast 100
Bright 80
Color 70
Tint 50
Select Adjust
Function
Input AV
Blue back OFF
Revolve OFF
System NTSC
Select Adjust
4. SEL
5. ADJ
4. SEL
3. PIC
5. ADJ
RV-RMM-56_q4.qxd 03/09/03 11:01 Page 6

7
2. Anschluss Monitor
Connect with Monitor
3. Anschluss Videoquelle
AV Input
1. Anschluss Zigarettenanzünder
Connect with Cigar Jack
2. Montageplatte
H
I
3. Blechschrauben
4. Maschinenschrauben
1. Fahrzeughimmel
RV-RMM-56_q4.qxd 03/09/03 11:01 Page 7

8
Hinweise zur Benutzung der Einbauanleitung
Inhaltsverzeichnis
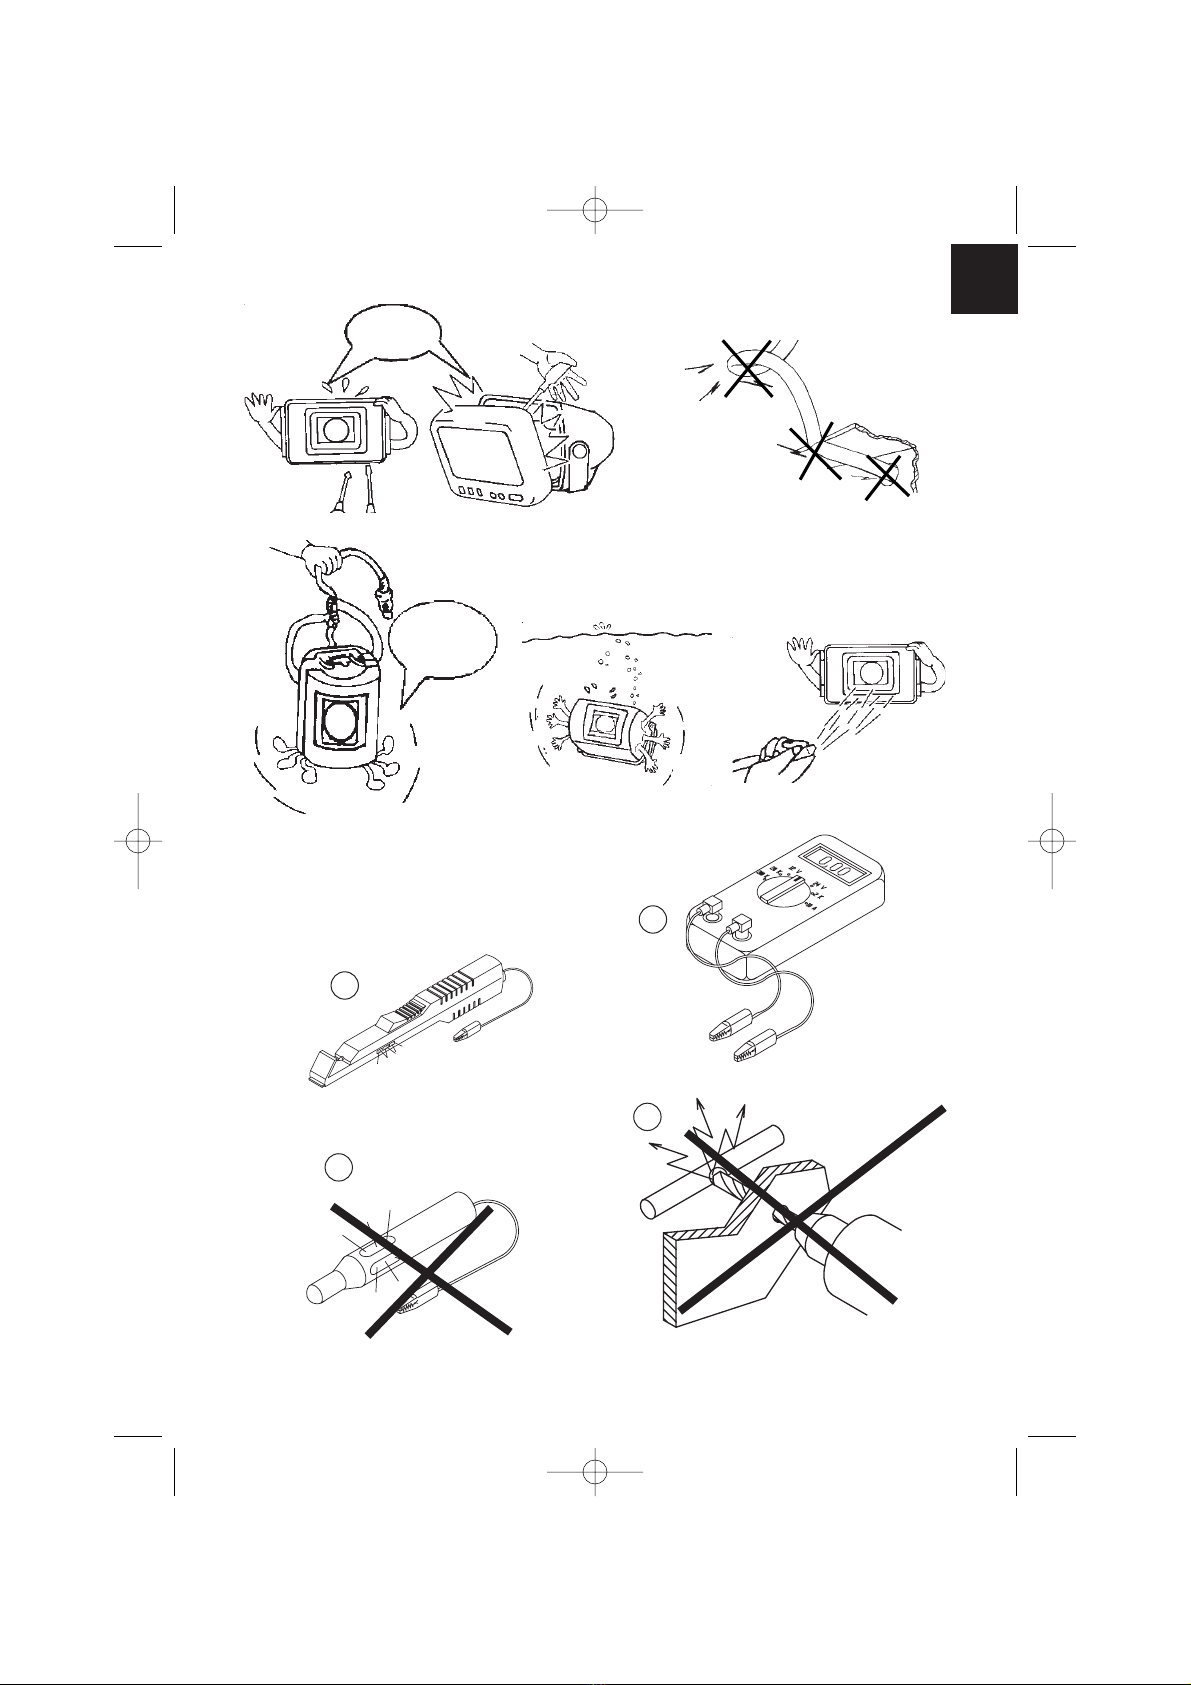
Warnung! Sicherheitshinweis!
Nichtbeachtung kann zu Personen- oder Materialschäden führen.
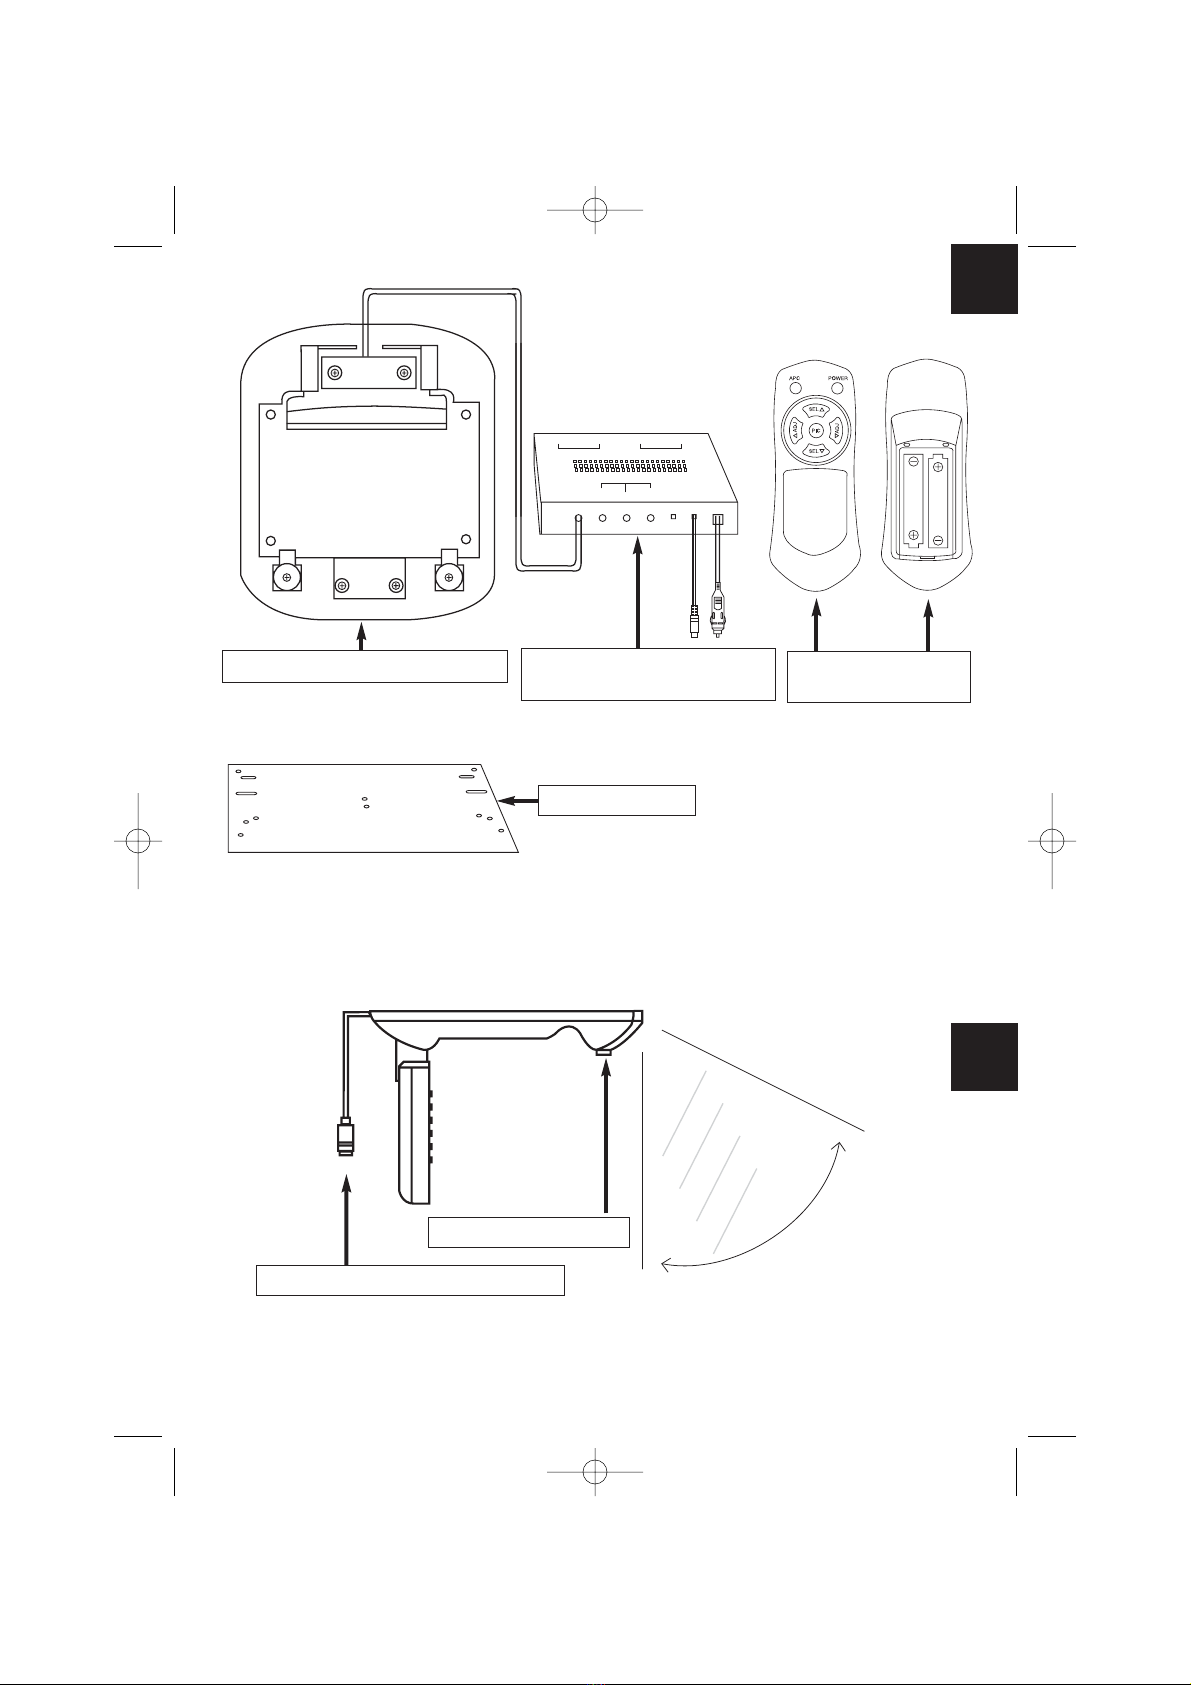
Die Raute kennzeichnet Einbauschritte,
die Sie ausführen müssen.
Damit der Einbau ohne Schwierigkeiten stattfindet, diese
Einbauanleitung und Bedienungsanleitung vor Beginn der
Montage durchlesen. Bei einem Besitzerwechsel muss diese
Montage- und Bedienungsanleitung mit übergeben werden.
Sollte die Anleitung nicht alle Ihre Fragen beantworten oder
sollten Montageschritte nicht klar sein, fragen Sie bitte unbedingt
unseren technischen Kundenservice.
WAECO International GmbH
D-48282 Emsdetten
Hollefeldstraße 63
Tel. +49 (0) 25 72/87 91 91
Fax +49 (0) 25 72/87 93 91
www.waeco.de
◆
Allgemeine Produktbeschreibung . . . . . . . . . . . . . . . . . . . . . . . . . . 8
Hinweise zur Benutzung der Einbauanleitung . . . . . . . . . . . . . . . . . 8
Sicherheits- und Einbauhinweise . . . . . . . . . . . . . . . . . . . . . . . . 9-10
Benötigtes Werkzeug . . . . . . . . . . . . . . . . . . . . . . . . . . . . . . . . . . . 11
Lieferumfang . . . . . . . . . . . . . . . . . . . . . . . . . . . . . . . . . . . . . . . . . 11
Installation des Monitors . . . . . . . . . . . . . . . . . . . . . . . . . . . . . . . . 12
Installation der Anschlussbox . . . . . . . . . . . . . . . . . . . . . . . . . . 12-13
Funktionsbeschreibung des Monitors . . . . . . . . . . . . . . . . . . . . . . 13
Funktionsbeschreibung der Fernbedienung . . . . . . . . . . . . . . . . . . 14
Technische Daten . . . . . . . . . . . . . . . . . . . . . . . . . . . . . . . . . . . . . 14
Entsorgungshinweis . . . . . . . . . . . . . . . . . . . . . . . . . . . . . . . . . . . 14
Klappbarer 5,6” LCD-Deckenmonitor mit Fernbedienung für
unterhaltsames Entertainment im Fahrzeug.
Allgemeine Produktbeschreibung
RV-RMM-56_q4.qxd 03/09/03 11:01 Page 8

Die sicherste Verbindungsart ist, die Kabelenden miteinander zu
verlöten und anschließend zu isolieren.
Bei wiederlösbaren Verbindungen nur isolierte Kabelschuhe, Stecker
und Flachsteckhülsen verwenden. Keine Quetschverbinder
(Leitungsverbinder) oder Lüsterklemmen verwenden.
Zum Verbinden der Kabel mit Kabelschuhen, Stecker oder
Flachsteckhülsen eine Krimpzange verwenden.
Bei Kabelanschlüssen an 31 (Masse):
Das Kabel mit Kabelschuh und Zahnscheibe an eine
fahrzeugeigene Masseschraube schrauben oder mit Kabelschuh,
Blechschraube und Zahnscheibe an das Karosserieblech
schrauben.
Auf gute Masseübertragung achten!
Warnung! Wegen Kurzschlussgefahr vor Arbeiten an der
Fahrzeugelektrik immer den Minuspol der Batterie abklemmen.
Bei Fahrzeugen mit Zusatzbatterie ebenfalls den Minuspol
abklemmen.
9
Warnung! Unzureichende Leitungsverbindungen können zur Folge
haben, dass durch Kurzschluss:
•Kabelbrände entstehen
•der Airbag ausgelöst wird
•elektronische Steuerungseinrichtungen beschädigt werden
•elektrische Funktionen (Blinker, Bremslicht, Hupe, Zündung,
Licht) ausfallen
Beachten Sie deshalb folgende Hinweise:
Bei Arbeiten an den Leitungen des Fahrzeuges gelten folgende
Klemmenbezeichnungen:
30 (Eingang von Batterie Plus direkt),
15 (Geschaltetes Plus, hinter Batterie)
31 (Rückleitung ab Batterie, Masse)
Sicherheits- und Einbauhinweise
RV-RMM-56_q4.qxd 03/09/03 11:01 Page 9

Achtung! Beim Abklemmen des Minuspols der Batterie verlieren
alle flüchtigen Speicher der Komfort-Elektronik ihre
gespeicherten Daten. Folgende Daten müssen Sie je nach
Fahrzeugausstattung neu eingeben:
Radiocode · Fahrzeuguhr · Zeitschaltuhr ·
Bordcomputer · Sitzposition
Hinweise zur Einstellung können Sie in der jeweiligen Bedie-
nungsanleitung nachlesen.
Warnung! Im Fahrzeug montierte Teile des Gerätes müssen
so befestigt werden, dass sie sich unter keinen Umständen
(scharfes Abbremsen, Verkehrsunfall) lösen können und zu
Verletzungen der Fahrzeuginsassen führen können.
10
Sicherheits- und Einbauhinweise
Achtung! WAECO International übernimmt keine Haftung für
Schäden, aufgrund folgernder Punkte:
a) Montagefehler
b) Beschädigungen am System durch mechanische Einflüsse
und Überspannungen
c) Veränderungen am Gerät ohne ausdrücklicher Genehmigung
von WAECO International
d) Verwendung für andere als die in der Montageanleitung
beschriebenen Zwecke.
RV-RMM-56_q4.qxd 03/09/03 11:01 Page 10

11
Benötigtes Werkzeug
Lieferumfang
Für Einbau und Montage werden benötigt:
–Maßstab (siehe B 1) – Bohrmaschine (siehe B 5)
–Körner (siehe B 2) – Schraubendreher (siehe B 6)
–Hammer (siehe B 3) – Schraubenschlüssel (siehe B 7)
–Bohrer (siehe B 4)
Für den elektrischen Anschluss und die Überprüfung werden benötigt:
–Diodenprüflampe (siehe B 8) – Heißluftföhn (siehe B 12)
oder Voltmeter (siehe B 9) – Lötkolben (siehe B 13)
–Krimpzange (siehe B10) – Lötzinn (siehe B 14)
–Isolierband (siehe B11)
Bedingt durch Ihre individuelle Montage benötigen Sie evtl. zur
Befestigung andere Schrauben, Muttern, Unterlegscheiben,
Blechschrauben und Kabelbinder als die im Lieferumfang enthaltenen.
Menge Bezeichnung
15,6" LCD-Monitor im Klappgehäuse (siehe C 1)
1Anschlussbox mit Verbindungsleitung zum Monitor
und Anschlussleitung (Spannungsversorgung) (siehe C 2)
1IR-Fernbedienung inkl. Batterie (siehe C 3)
1Montageplatte (siehe C 4)
Montagematerial
1Montage-/ Bedienungsanleitung
RV-RMM-56_q4.qxd 03/09/03 11:01 Page 11

12
Installation des Monitors
Installation der Anschlussbox
Allgemeine Montagehinweise!
Bevor Sie den Monitor anbringen, folgende Punkte beachten:
•Monitor probeweise platzieren.
•Der Montageort sollte eben sein.
•Kontrollieren Sie vor der endgültigen Montage, ob der benötigte
Freiraum auch unterhalb des gewählten Montageortes zum
Anbringen von Scheiben und Muttern zur Verfügung steht.
•Bedenken Sie das Gewicht des Monitors. Sind Verstärkungen
(größere Unterlegscheiben oder Platten) notwendig?
•Ist die Verlegung von Anschlusskabelsatz und Verbindungskabel
zum Monitor möglich?
•Achten Sie bei Platzierung des Monitors darauf, dass dieser
nicht im Wirkungsbereich eines AIRBAGS montiert wird.
Bei Auslösung besteht sonst Verletzungsgefahr
•Prüfen Sie die ausreichende Länge des Verbindungskabels
vom Montageort zur Anschlussbox.
Die Montage:
Nach Prüfung o. g. Punkte befestigen Sie die Montageplatte
(siehe I 2) mit den mitgelieferten Blechschrauben (siehe I 3)
am Fahrzeughimmel (siehe I 1).
Dann den Monitor mittels der mitgelieferten
Maschinenschrauben (siehe I 4) an die Montageplatte
schrauben.
Machen Sie vor der Montage einen Funktionstest.
◆
Der Montageort muss gegen Feuchtigkeit geschützt sein. Wegen der
kompakten Bauform empfiehlt sich die Montage unter dem
Armaturenbrett.
Die Box kann mit den mitgelieferten Blechschrauben oder
selbstklebenden Klettband (nicht im Lieferumfang) befestigt werden.
Beachten Sie die Allgemeinen Montagehinweise!
Die Spannungsversorgung sollte über eine geschaltete Spannungsquelle
z. B. Kl. 15 erfolgen.
Das System hat auch im ausgeschalteten Zustand (IR-Empfang aktiv)
eine gewisse Leistungsaufnahme, die über einen längeren Zeitraum die
Fahrzeugbatterie entladen kann.
RV-RMM-56_q4.qxd 03/09/03 11:01 Page 12

13
Funktionsbeschreibung des Monitors
Die Anschlussbox bietet Eingänge für 2 Videoquellen. (siehe H 3)
Das kann ein DVD-Spieler (WAECO Art. Nr. DVD-PL-10), eine Kamera
etc. sein. Stecken Sie die RCA-Kabel der Videoquellen in die Buchsen
VIDEO/ AUDIO.
Die Anschlussbox liefert ein Mono-Audiosignal.
POWER-Taste (siehe E 1) Das Gerät wird eingeschaltet.
Je nach dem, ob eine Videoquelle (z. B. WAECO DVD-Spieler, DVD-PL-10)
angeschlossen und im Betrieb ist, erscheint auf dem entsprechenden
Kanal ein Bild. Stellen Sie das Bild nach Ihren Bedürfnissen ein.
Folgende Funktionen stehen Ihnen zur Verfügung:
Tasten ADJ (siehe E 5)
Einstellung der Lautstärke im Normalbetrieb.
Taste MENU (siehe E 3)
Menü Function (siehe G 1)
Input -> Wahl der Videoquellen AV 1 oder AV 2
Blue back -> Liegt kein Videosignal an, erscheint der Hintergrund blau,
Ein/ Aus
Revolve -> vertikales Drehen des Bildes um 180°
System -> Auswahl des Videoformats PAL/ NTSC
Menü Picture (siehe G 2)
Contrast -> Einstellung der Kontraststärke
Bright -> Einstellung der Helligkeit
Color -> Farbstärke
Tint -> Farbverhältnis rot/ blau (nur bei NTSC-Videoformat)
Tasten SEL (siehe E 4)
Zur Auswahl der Menüpunkte
Tasten ADJ (siehe E 5)
Zur Einstellung innerhalb des Menüpunktes
RV-RMM-56_q4.qxd 03/09/03 11:01 Page 13

14
Funktionsbeschreibung der Fernbedienung
APC (siehe F 1) Liefert eine Auswahl von Bildeinstellungen
- Dynamic -> hoher Kontrastwert
- Normal -> mittlerer Kontrastwert und Helligkeit
- Mild -> niedriger Kontrastwert
- User -> verwendet die Einstellungen aus dem Menü Picture
PIC (siehe F 3) Ruft das Menü Picture auf.
Alle anderen Tasten der Fernbedienung siehe Abschnitt Monitor.
Display: 5,6 “
Beriebsspannung: 12 - 15 V
Leistungsaufnahme: max. 6 Watt
Auflösung: 225.000 Pixel
Bildformat: 4 : 3
Videoformat: NTSC / PAL
Betriebstemperatur: 0° - 60°C
Gewicht: ca. 1,0 Kg
Größe B/H/T: 190 x 222 x 34,5 mm
Technische Daten
Entsorgungshinweis
Beachten Sie bitte, dass elektrische Geräte eine Vielzahl
wiederverwertbarer Materialien sowie umweltschädliche Komponenten
enthalten.
Tragen Sie bitte in Ihrem und im Interesse der Umwelt Sorge dafür, dass
diese Komponenten nur über die vorgesehenen und zugelassenen
Wege entsorgt werden.
RV-RMM-56_q4.qxd 03/09/03 11:01 Page 14

15
RV-RMM-56_q4.qxd 03/09/03 11:01 Page 15

1616
Information on using the installation instructions
List of contents
Warning! Safety instruction:
Failure to observe these warnings may result in injuries to
persons or damage to material.
The rhombus indicates installation steps
which have to be carried out.
To ensure problem-free fitting, read these installation and
operating instructions carefully before starting work. Handover
the assembly- and operating instructions when passing on the
device to a new proprietor.
If the operating instructions do not answer all your questions or
if the assembly steps are not clear, please do not hesitate to
contact our customer technical support service.
WAECO UK Ltd.
UK-Broadmayne · Dorset DT2 8LY
Unit G1 · Roman Hill · Business Park
phone: +44-13 05/85 40 00 · fax: +44-13 05/85 42 88
www.waeco.com
◆
General product description . . . . . . . . . . . . . . . . . . . . . . . . . . . . . 16
Information on using the installation instructions . . . . . . . . . . . . . . 16
General safety and installation instructions . . . . . . . . . . . . . . . . 17-18
Tools required . . . . . . . . . . . . . . . . . . . . . . . . . . . . . . . . . . . . . . . . 19
Scope of delivery . . . . . . . . . . . . . . . . . . . . . . . . . . . . . . . . . . . . . 19
Installation of the monitor . . . . . . . . . . . . . . . . . . . . . . . . . . . . . . . 20
Installation of the connection box . . . . . . . . . . . . . . . . . . . . . . . 20-21
Function description of the monitor . . . . . . . . . . . . . . . . . . . . . . . . 21
Function description of the remote control . . . . . . . . . . . . . . . . . . 22
Technical data . . . . . . . . . . . . . . . . . . . . . . . . . . . . . . . . . . . . . . . . 22
Disposal instructions . . . . . . . . . . . . . . . . . . . . . . . . . . . . . . . . . . . 22
Foldable 5.6” LCD ceiling monitor with remote control for pleasurable
entertainment in the vehicle.
General product description
RV-RMM-56_q4.qxd 03/09/03 11:01 Page 16

17
The securest form of connection is obtained by soldering the cable
ends and then insulating the connection.
For detachable connections, use only insulated cable brackets,
connector plugs, and flat pin bushings. Do not use crimp connections
(line connector) or wire connectors.
Use crimp pliers for connecting the cables with cable lugs, plugs, or flat
pin bushings.
With cable connections to 31 (earth):
Attach the cable with a bracket and tooth-lock washer to an
earthing screw on the vehicle or screw it onto the metalwork of
the vehicle using a bracket, metal screw and tooth-lock washer.
Always ensure a good earthing connection!
Warning! Due to risk of short-circuiting, always disconnect the
negative pole of the battery before starting with work on the
electrical equipment of the vehicle.
In the case of vehicles with a supplementary battery, also
disconnect this negative pole.
Warning!Inadequate cable connections can lead to short-circuits
which cause the following:
•cable fires
•activation of the airbag
•damage to electronic control equipment
•electrical functions (indicator, brake light, horn, ignition, light)
fail through being short-circuited
Please note the following:
With work on the lines of the vehicle the following
terminal designations apply:
30 (input from battery plus direct)
15 (switched plus, behind battery)
31 (return cable from battery, earth)
Safety and installation instructions
RV-RMM-56_q4.qxd 03/09/03 11:01 Page 17

18
Caution! On disconnecting the negative pole of the battery, all
the volatile memories of the convenience electronics will lose
their stored data. Depending on the vehicle’s equipment, the
following data may need to be reprogrammed:
Radio-code · vehicle clock · time switch clock ·
on-board computer · seat position
Instructions on how to reset these can be found in the relevant
operating instructions.
Warning! The components of the device
which are inside the vehicle must be securely fixed so that they
cannot come loose and injure the vehicle’s occupants under any
circumstances (sudden braking, traffic accident).
18
Safety and installation instructions
Caution! WAECO International does not accept any liability
for damages due to the following:
a) Assembly error
b) Damage to the system by mechanical influences and
overvoltages.
c) Modifications at the device without the explicit approval of
WAECO International
d) Use for any purposes other than those described in the
assembly instructions.
RV-RMM-56_q4.qxd 03/09/03 11:01 Page 18

1919
Necessary tool
Scope of delivery
The following are required for the installation:
–Scale (ruler) (see B 1) – drilling machine (see B 5)
–Prick punch (see B 2) – screwdriver (see B 6)
–Hammer (see B 3) – screwdriver (see B 7)
–Drill (see B 4)
The following are required for the electrical connection and the check:
–Diode test lamp (see B 8) – hot-air drier (see B 12)
or voltmeter (see B 9) – hatchet iron (see B 13)
–Crimp pliers (see B10) – soldering tin (see B 14)
–insulation tape (see B11)
Due to your individual assembly, perhaps you still need other screws,
nuts, washers, metal screws and cable clips than those contained in the
scope of supply.
Quantity Designation
15.6” LCD monitor in the folding housing (see C 1)
1Connection box with connection line to the monitor
and connecting lead (voltage supply) (see C 2)
1IR remote control incl. battery (see C 3)
1Mounting plate (see C)
Assembly material
1Installation- / operating instructions
RV-RMM-56_q4.qxd 03/09/03 11:01 Page 19

20
Installation of the monitor
Installation of the connection box
General installation instructions!
Please observe the following points before attaching the
monitor:
•Locate monitor first of all on a trial basis.
•The assembly location should be even.
•Check before the final assembly whether the necessary
free space is available, also below the selected assembly
place chosen for the attachment of discs and nuts.
•Consider the weight of the monitor. Are reinforcements
(larger washers or plates) necessary?
•Is the installation of the wiring harness and connecting cable to
the monitor possible?
•Pay attention when locating the monitor that this is not
assembled within the radius of an AIRBAG.
Otherwise there is danger of injury when it is activated.
•Check that connecting cable has sufficient length
from the place of assembly to the connection box.
Assembly:
After having checked above mentioned points attach the
mounting plate (see I 2) with the supplied sheet metal screws
(see I 3) to the vehicle sky (see I 1).
Screw then the monitor with the supplied machine screws to the
mounting plate (see I 4)
Carry out a function test before the assembly.
◆
The assembly place must be protected against humidity. An assembly
under the dashboard is recommendable due to the compact design. The
box can be fastened with the supplied sheet-metal screws or
self-adhesive Velcro tape (not included in the scope of delivery).
Please observe the general installation instructions!
The voltage supply should be provided via a switched voltage source
e.g. group 15. The system has also a certain power consumption when
it is switched off (IRreception active), which can discharge the vehicle
battery over a longer period of time.
RV-RMM-56_q4.qxd 03/09/03 11:01 Page 20
Table of contents
Languages:
Other Waeco Monitor manuals

Waeco
Waeco PerfectView M170L User manual

Waeco
Waeco MOBITRONIC RV-RMM-70 User manual

Waeco
Waeco PerfectView M55LX User manual

Waeco
Waeco PerfectView M7LS User manual

Waeco
Waeco PerfectView M70L User manual

Waeco
Waeco PerfectView M70IP User manual

Waeco
Waeco PerfectView M5L User manual

Waeco
Waeco PerfectView M59L User manual

Waeco
Waeco PerfectView M5L User manual

Waeco
Waeco PerfectView M5L User manual