Wahoo KICKRAXIS Action Feet User manual

QUICK START GUIDE AND INSTRUCTIONS
KICKRAXIS
action-feet


2
IMPORTANT NOTICE
For safety, read this manual and all safety information
thoroughly before assembly and use.
• Full setup instructions, videos, and information about
app compatibility can be found on our website at
www.wahoofitness.com/instructions/kickraxis.
• Assemble the KICKR AXIS Feet only as stated in the information
contained in this manual.
• Do not modify the KICKR AXIS Feet.
• Images may not reflect final product exactly.
The following instructions must be observed at all times in
order to prevent personal injury and physical damage to
equipment and surroundings. The instructions are classified
according to the degree of danger or damage which may occur
if the product is used incorrectly:
Failure to follow the instructions will result in death or
serious injury.
Failure to follow the instructions will result in death or
serious injury.
Failure to follow the instructions could cause personal injury
and/or physical damage to equipment or surroundings.
DANGER
WARNING
CAUTION
KICKR AXIS Quick Start Guide
For expanded instructions please visit our website
by scanning this QR code:

UNPACKING
1. (2) Small AXIS Top Caps
2. (2) Middle AXIS Top Caps
3. (2) Large AXIS Top Caps
4. (1) Rear AXIS Foot
5. (1) Front AXIS Foot
6. (2) M4x10mm bolts for the
replacement Rear AXIS Foot (these are
very small bolts for the rear foot)
7. (2) Older Generation KICKR Outrigger
Bolts (these will look like the existing
bolt that threads them in but slightly
different pitch)
ENGLISH
• Before beginning or modifying
any exercise program please consult
your physician.
• Do not attempt to dismount
the bicycle while the flywheel
is in motion.
• Keep children and pets away
from the KICKR while in use.
• Only use the KICKR on a stable,
level surface with properly
adjusted leveling feet.
• Use caution when standing while
riding on the KICKR.
• Keep the KICKR away from water.
• Only use the power adapter that
comes with the KICKR.
CAUTION
Thank you for purchasing the Wahoo KICKR AXIS!
LEARN MORE:
For instructional videos, compatible apps, FAQs, or to submit a support
request please visit: www.wahoofitness.com/support
PLEASE CONTACT US WITH
QUESTIONS OR CONCERNS AT:
Wahoo Fitness
90 W. Wieuca Rd NE
Suite 110
Atlanta, GA 30342 United States
TELEPHONE:
United States: 1-877-978-1112
Germany: +49-30-568-373827
United Kingdom: +44-800-808-5773
Phone Hours: Monday - Friday
10am-7pm Eastern Time Zone

4
1. 4. 6.
7.
5.
2.
3.
PROTIP: Save all packaging and protective material for transportation and storage.
P
INSTALLING AXIS FEET
(1) Set the KICKR on the edge of
the rear base foot
Replace the Rear Base Foot
(2) Remove the existing bolts
(3) Remove the existing base
(4) Install the new AXIS base foot
with the supplied bolts m4x10
(1)
(2) (3)
(4)
A
A
ENGLISH

ENGLISH
(8)
(10)
(11) (12)
(9)
0-140 lbs (0 – 63 kg)
Use smallest diameter cap
141-180 lbs (63 – 81 kg)
Use middle cap
(installed by default)
181 lbs +
Use largest diameter cap
(5) (6)
Replace the Front Foot
(5) Unscrew the existing front
foot bolt
(6) Remove existing foot
(7) Install new AXIS front foot
with existing bolt
Replace the Outrigger Feet
(8) Unscrew the existing
KICKR feet
(9) Remove the lock ring from
the existing KICKR foot
(10) Install the desired AXIS
cap on the outrigger foot.
Note: If you have a KICKR
gen 1, 2 or 3 then use the
alternate bolts. Refer to
the chart below for starting
AXIS Cap.
(11) Install the lock ring
on the AXIS foot
(12) Thread in the new AXIS foot
(7)
B

6
NOTICIA IMPORTANTE
Por seguridad, lea este manual y toda la información de
seguridad antes de armar y usar.
• Puede encontrar instrucciones completas de instalación, videos
e información sobre compatibilidad de aplicaciones en nuestro
sitio web en www.wahoofitness.com/instructions/kickraxis.
• Ensamble el KICKR solo como se indica en la información
contenida en este manual
• No modifique el KICKR.
• Las imágenes pueden no reflejar exactamente el producto final.
Deben observarse las siguientes instrucciones en todo
momento para evitar lesiones personales y daños físicos al
equipo y sus alrededores. Las instrucciones se clasifican según
el grado de peligro o daño que puede ocurrir si el producto se
usa incorrectamente:
El incumplimiento de las instrucciones provocará la muerte o
lesiones graves.
El incumplimiento de las instrucciones provocará la muerte o
lesiones graves.
No seguir las instrucciones puede causar Lesiones y / o daños
físicos a los equipos o alrededores.
KICKR AXIS GuÍa de
inicio rápido
Para obtener instrucciones más detalladas, visite
nuestro sitio web escaneando este código QR:
SPANISH
PRECAUCIÓN
ADVERTENCIA
PELIGRO

SPANISH
DESEMBALAJE
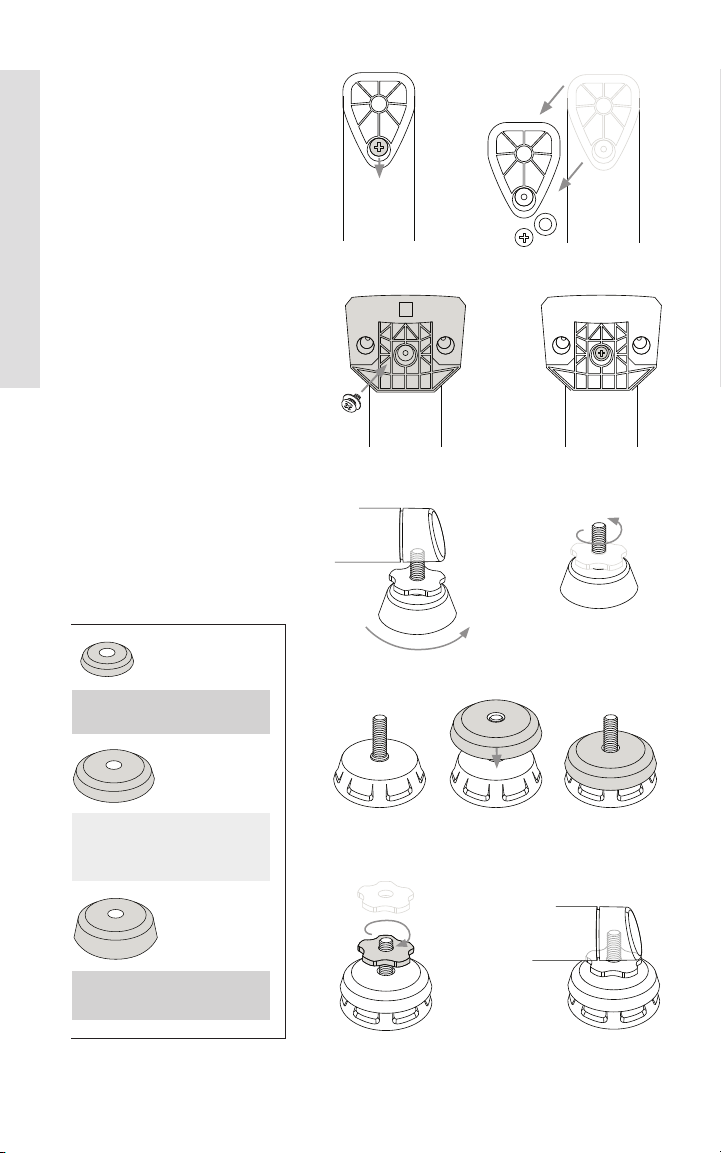
1. (2) Tapas superiores AXIS pequeñas
2. (2) Tapas superiores del AXIS medio
(instaladas por defecto)
3. (2) Tapas superiores AXIS grandes
4. (1) Pie trasero AXIS
5. (1) Pie delantero AXIS
6. (2) pernos M4x10mm para el pie
posterior del EJE trasero (estos
son pernos muy pequeños para
el pie trasero)
7. (2) Pernos de estabilizadores KICKR
de generación anterior (se parecerá
al perno existente que los rosca en un
tono diferente)
• Antes de iniciar o modificar
cualquier programa de ejercicio
consulte a su médico.
• No intente desmontar la bicicleta
mientras el volante está en
movimiento.
• Mantenga a los niños y las mascotas
alejados del KICKR mientras esté
en uso.
• Utilice el KICKR solo en una
superficie estable y nivelada
con patas niveladoras
correctamente ajustadas.
• Tenga cuidado al pararse mientras
conduce en el KICKR.
• Mantenga el KICKR alejado del agua.
• Solo use el adaptador de corriente
que viene con el KICKR.
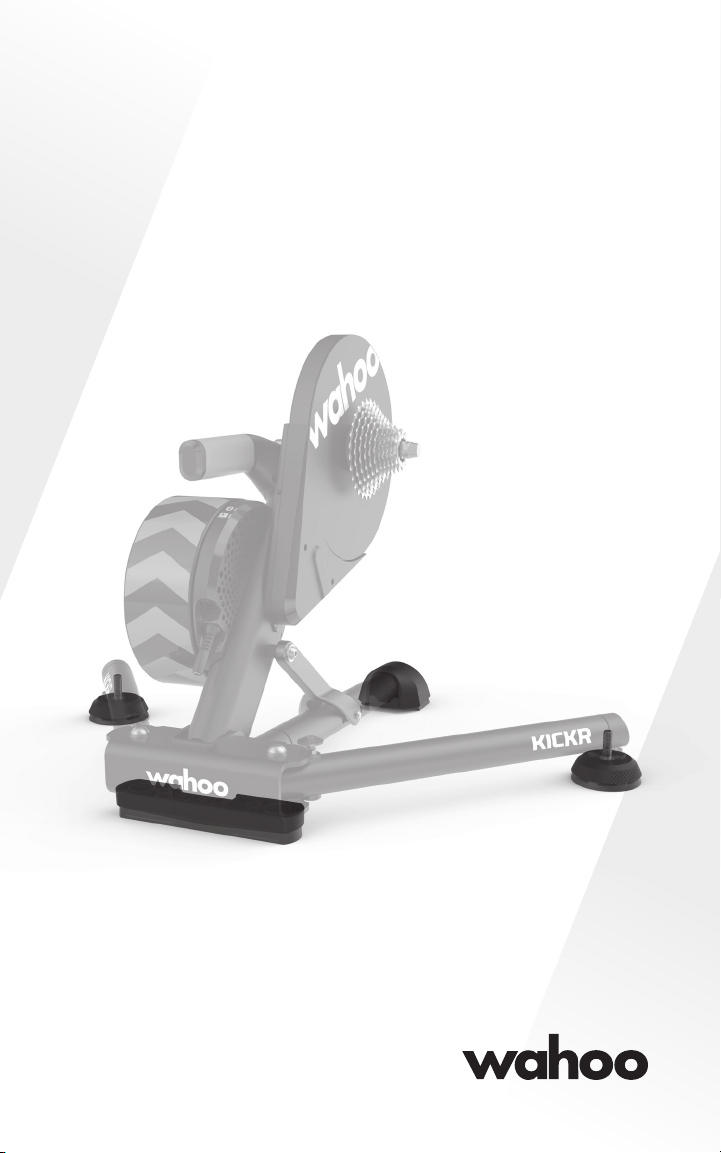
¡Gracias por comprar el Wahoo KICKR AXIS!
APRENDE MÁS:
Para ver videos instructivos, aplicaciones compatibles, preguntas frecuentes o
para enviar una solicitud de soporte, visite: www.wahoofitness.com/support
CONTÁCTENOS CON PREGUNTAS
O PREOCUPACIONES EN:
Wahoo Fitness
90 W. Wieuca Rd NE
Suite 110
Atlanta, GA 30342 United States
TELÉFONO:
Estados Unidos: 1-877-978-1112
Alemania: +49-30-568-373827
Reino Unidos:+44-800-808-5773
Horario de atención: lunes a viernes
10 am-7pm Zona horaria del este
PRECAUCIÓN

8
SPANISH
1. 4. 6.
7.
5.
2.
3.
PROTIP: guarde todo el material de embalaje y protección para su transporte y
almacenamiento.
P
INSTALACIÓN DE PIES AXIS
(1) Ajuste el KICKR en el borde del
pie de la base trasera
Reemplace el pie de la base trasera
(2) Retire los tornillos existentes
(3) Eliminar la base existente
(4) Instale el nuevo pie base AXIS con los
tornillos suministrados m4x10
(1)
(2) (3)
(4)
A
A

SPANISH
(8)
(10)
(11) (12)
(9)
0-140 lbs (0-63 kg)
Use la tapa de diámetro
más pequeño
141-180 lbs (63-81 kg)
Use la tapa media
(instalado por defecto)
181 libras + (82 kg +)
Use la tapa de mayor
diámetro
(5) (6)
Reemplace el pie delantero
(5) Desatornille el frente
existente perno de pie
(6) Eliminar el pie existente
(7) Instale el nuevo pie
delantero AXIS con
perno existente
Reemplace los pies del
estabilizador
(8) Desatornille el existente
KICKR pies
(9) Retire el anillo de bloqueo
de el pie KICKR existente
(10) Instale la tapa de AXIS
deseada en el pie del
estabilizador. Nota: Si tiene
un KICKR de generación
1, 2 o 3, use los tornillos
alternativos. Consulte la
tabla a continuación para
iniciar AXIS Cap.
(11) Instale el anillo de bloqueo
en el pie AXIS
(12) Hilo en el nuevo pie AXIS
(7)
B

10
FRENCH
AVIS IMPORTANT
Pour plus de sécurité, lisez attentivement ce manuel et toutes
les informations de sécurité avant l’assemblage et l’utilisation.
• Des instructions de configuration complètes, des vidéos et
des informations sur la compatibilité des applications sont
disponibles sur notre site Web à l’adresse
www.wahoofitness.com/instructions/kickraxis.
• Assemblez le KICKR uniquement comme indiqué dans les
informations contenues dans ce manuel.
• Ne modifiez pas le KICKR.
• Les images peuvent ne pas refléter exactement le produit final.
Les instructions suivantes doivent être respectées à tout
moment afin d’éviter des blessures et des dommages
physiques à l’équipement et à l’environnement. Les
instructions sont classées selon le degré de danger ou de
dommages pouvant survenir en cas d’utilisation incorrecte
du produit:
Le non-respect des instructions entraînera la mort ou des
blessures graves.
Le non-respect des instructions entraînera la mort ou des
blessures graves.
Le non-respect des instructions peut entraîner des blessures et /
ou dommages physiques à l’équipement ou à l’environnement.
DANGER
ATTENTION!
AVERTISSEMENT
Guide de démarrage rapide
KICKR AXIS
Pour des instructions détaillées, veuillez visiter
notre site Web en scannant ce code QR:

FRENCH
DÉBALLAGE
1. (2) Petits capuchons supérieurs AXIS
2. (2) Capuchons supérieurs AXIS du
milieu (installés par défaut)
3. (2) Grands capuchons supérieurs AXIS
4. (1) Pied arrière AXIS
5. (1) Pied avant AXIS
6. (2) boulons M4x10mm pour le pied
arrière AXIS de remplacement (ce
sont de très petits boulons pour le
pied arrière)
7. (2) Boulons d’ancrage KICKR
d’ancienne génération (cela
ressemblera au boulon existant qui
les enfile mais à un pas différent)
• Avant de commencer ou de modifier
tout programme d’exercice, veuillez
consulter votre médecin.
• N’essayez pas de démonter le
vélo lorsque le volant est en
mouvement.
• Éloignez les enfants et les animaux
domestiques du KICKR pendant son
utilisation.
• N’utilisez le KICKR que sur une
surface stable et de niveau avec
des pieds de mise à niveau
correctement ajustés.
• Soyez prudent lorsque vous vous
tenez debout lorsque vous roulez
sur le KICKR.
• Gardez le KICKR éloigné de l’eau.
Utilisez uniquement l’adaptateur
secteur fourni avec le KICKR.
Merci d’avoir acheté le Wahoo KICKR AXIS!
APPRENDRE ENCORE PLUS:
Pour des vidéos pédagogiques, des applications compatibles, des FAQ ou pour
soumettre une demande d’assistance, veuillez visiter:
www.wahoofitness.com/support
VEUILLEZ NOUS CONTACTER POUR DES
QUESTIONS OU DES PRÉOCCUPATIONS À:
Wahoo Fitness
90 W. Wieuca Rd NE
Suite 110
Atlanta, GA 30342 United States
TÉLÉPHONE:
United States: 1-877-978-1112
Germany: +49-30-568-373827
United Kingdom: +44-800-808-5773
Heures de téléphone: du lundi au
vendredi 10h-19h Fuseau horaire
de l’Est”
AVERTISSEMENT

12
1. 4. 6.
7.
5.
2.
3.
PROTIP: Conservez tous les matériaux d’emballage et de protection pour le
transport et le stockage.
P
INSTALLATION DES PIEDS AXIS
(1) Placez le KICKR sur le bord du
pied arrière de la base
Remplacer le pied arrière de la base
(2) Retirez les boulons existants
(3) Retirez la base existante
(4) Installez le nouveau pied de base AXIS
avec les boulons fournis m4x10
(1)
(2) (3)
(4)
A
A
FRENCH

FRENCH
(8)
(10)
(11) (12)
(9)
0-140 lb (0 - 63 kg)
Utilisez un bouchon de
plus petit diamètre
141 à 180 lb (63 à 81 kg)
Utiliser la casquette moyenne
(installé par défaut)
181 lb + (82 kg +)
Utilisez un bouchon de
plus grand diamètre
(5) (6)
Remplacez le pied avant
(5) Dévissez la façade existante
boulon de pied
(6) Supprimer le pied existant
(7) Installer le nouveau pied avant
AXIS avec boulon existant
Remplacer les pieds de
stabilisateur
(8) Dévisser l’existant
Pieds KICKR
(9) Retirez la bague de
verrouillage de le pied
KICKR existant
(10) Installez le capuchon
AXIS souhaité sur le pied
stabilisateur. Remarque: Si
vous avez un KICKR génération
1, 2 ou 3, utilisez les boulons
alternatifs. Reportez-vous
au tableau ci-dessous pour
démarrer AXIS Cap.
(11) Installez la bague de
verrouillage sur le pied AXIS
(12) Enfiler le nouveau pied AXIS
(7)
B

14
ITALIAN
AVVISO IMPORTANTE
Per motivi di sicurezza, leggere attentamente questo manuale
e tutte le informazioni sulla sicurezza prima del montaggio e
dell’uso.
• Le istruzioni complete per l’installazione, i video e le informazioni
sulla compatibilità delle app sono disponibili sul nostro sito Web
all’indirizzo www.wahoofitness.com/instructions/kickraxis.
• Montare il KICKR solo come indicato nelle informazioni
contenute in questo manuale.
• Non modificare il KICKR.
• Le immagini potrebbero non rispecchiare esattamente il
prodotto finale.
Le seguenti istruzioni devono essere sempre osservate per
prevenire lesioni personali e danni fisici all’apparecchiatura e
all’ambiente circostante. Le istruzioni sono classificate in base
al grado di pericolo o danno che può verificarsi se il prodotto
viene utilizzato in modo errato:
La mancata osservanza delle istruzioni comporterà la morte o
lesioni gravi.
La mancata osservanza delle istruzioni comporterà la morte o
lesioni gravi.
La mancata osservanza delle istruzioni potrebbe causare
problemi personali lesioni e / o danni fisici all’apparecchiatura
o all’ambiente circostante.
PERICOLO
KICKR AXIS Guida rapida
Per istruzioni estese, visitare il nostro sito Web
scansionando questo codice QR:
AVVERTIMENTO
ATTENZIONE

DISIMBALLAGGIO
1. (2) Tappi superiori AXIS piccoli
2. (2) Tappi superiori AXIS centrali
(installati per impostazione
predefinita)
3. (2) Tappi superiori AXIS grandi
4. (1) Piedino AXIS posteriore
5. (1) Piedino AXIS anteriore
6. (2) Bulloni M4x10mm per il piede
AXIS posteriore di ricambio (si
tratta di bulloni molto piccoli per
il piede posteriore)
7. (2) Bulloni stabilizzatori KICKR di
vecchia generazione (questo sembrerà
il bullone esistente che li infila ma con
un passo diverso)
ITALIAN
• Prima di iniziare o modificare
qualsiasi programma di
allenamento si prega di consultare
il proprio medico.
• Non tentare di smontare la bicicletta
mentre il volano è in movimento.
• Tenere lontani bambini e animali
domestici da KICKR durante l’uso.
• Utilizzare KICKR solo su una
superficie piana e stabile con
piedini di livellamento regolati
correttamente.
• Prestare attenzione quando si è in
piedi mentre si guida sul KICKR.
• Tenere il KICKR lontano dall’acqua.
• Utilizzare solo l’alimentatore fornito
con KICKR.
Grazie per aver acquistato Wahoo KICKR AXIS!
PER SAPERNE DI PIÙ:
Per video didattici, app compatibili, domande frequenti o per inviare una
richiesta di supporto, visitare: www.wahoofitness.com/support
PER FAVORE CONTATTACI CON
DOMANDE O INTERESSE A:
Wahoo Fitness
90 W. Wieuca Rd NE
Suite 110
Atlanta, GA 30342 United States
TELEFONO:
United States: 1-877-978-1112
Germany: +49-30-568-373827
United Kingdom: +44-800-808-5773
Orario telefonico: dal lunedì al venerdì
10: 00-19: 00 Fuso orario orientale
ATTENZIONE

16
1. 4. 6.
7.
5.
2.
3.
PROTIP: conservare tutto l’imballaggio e il materiale protettivo per il trasporto
e lo stoccaggio.
P
INSTALLAZIONE DEI PIEDI AXIS
(1) Impostare KICKR sul bordo del
piede della base posteriore
Sostituire il piedino per base
posteriore
(2) Rimuovere i bulloni esistenti
(3) Rimuovere la base esistente
(4) Installare il nuovo piede base AXIS
con i bulloni in dotazione m4x10
(1)
(2) (3)
(4)
A
A
ITALIAN

(8)
(10)
(11) (12)
(9)
0-140 lb (0 - 63 kg)
Utilizzare il cappuccio di
diametro più piccolo
63-181 kg (141-180 lbs)
Usa il tappo centrale (installato
per impostazione predefinita)
181 libbre + (82 kg +)
Utilizzare un cappuccio di
diametro maggiore
(5) (6)
Sostituire il piedino anteriore
(5) Svitare la parte anteriore
esistente bullone del piede
(6) Rimuovere il piede esistente
(7) Installare il nuovo piedino
anteriore AXIS con bullone
esistente
Sostituire i piedi degli
stabilizzatori
(8) Svitare l’esistente Piedi KICKR
(9) Rimuovere l’anello di bloccaggio
da il piede KICKR esistente
(10) Installare il cappuccio AXIS
desiderato sul piedino
stabilizzatore. Nota: se si
dispone di una generazione
KICKR 1, 2 o 3, utilizzare i bulloni
alternativi. Fare riferimento alla
tabella seguente per l’avvio di
AXIS Cap.
(11) Installare l’anello di
bloccaggio sul piede AXIS
(12) Infilare il nuovo piedino AXIS
(7)
B
ITALIAN

18
www.wahoofitness.com/instructions/kickraxis.
KICKR AXIS
KOREAN
주의
경고
위험

KOREAN
Wahoo KICKR AXIS!
www.wahoofitness.com/support
Wahoo Fitness
90 W. Wieuca Rd NE
Suite 110
Atlanta, GA 30342 United States
United States: 1-877-978-1112
Germany: +49-30-568-373827
United Kingdom: +44-800-808-5773
주의
Table of contents
Languages:
Other Wahoo Fitness Equipment manuals
Popular Fitness Equipment manuals by other brands

WaterRower
WaterRower Indo-row A1 Assembly manual

KingsBox
KingsBox Tournament Platforma II manual

Matrix
Matrix C7xi owner's manual

Titan Fitness
Titan Fitness PLATE LOADED FLY MACHINE V2 Operator's manual

Finnlo
Finnlo maximum Series manual

Sunny Health & Fitness
Sunny Health & Fitness SF-BH620038 user manual