Wallgate FMX-20 User manual

For technical advice, or further information on W
allgate
products,
Contact our Customer Services Department
Tel: (01722) 744594 Fax: (01722) 742096 Sales, or 742933 Service,
Email: sales@wallgate.com, service@wallgate.com
Crow Lane, Wilton, Salisbury, Wiltshire SP2 0HB
www.wallgate.com
Hand Wash Drier
Models FMX-20 & 25
Product Manual.

INSTALLATION & COMMISSIONING INSTRUCTIONS.
HAND WASH DRIER MODELs FMX-20 & 25.
CONTENTS
Ensure the following items are in the box on unpacking:
1 x FMX
Hand wash drier unit - 2 x Installation plates
4 x Door keys - 1 x 2.5ltr Soap container
1 x Installation & operating manual.
1. SITE PREPARATION
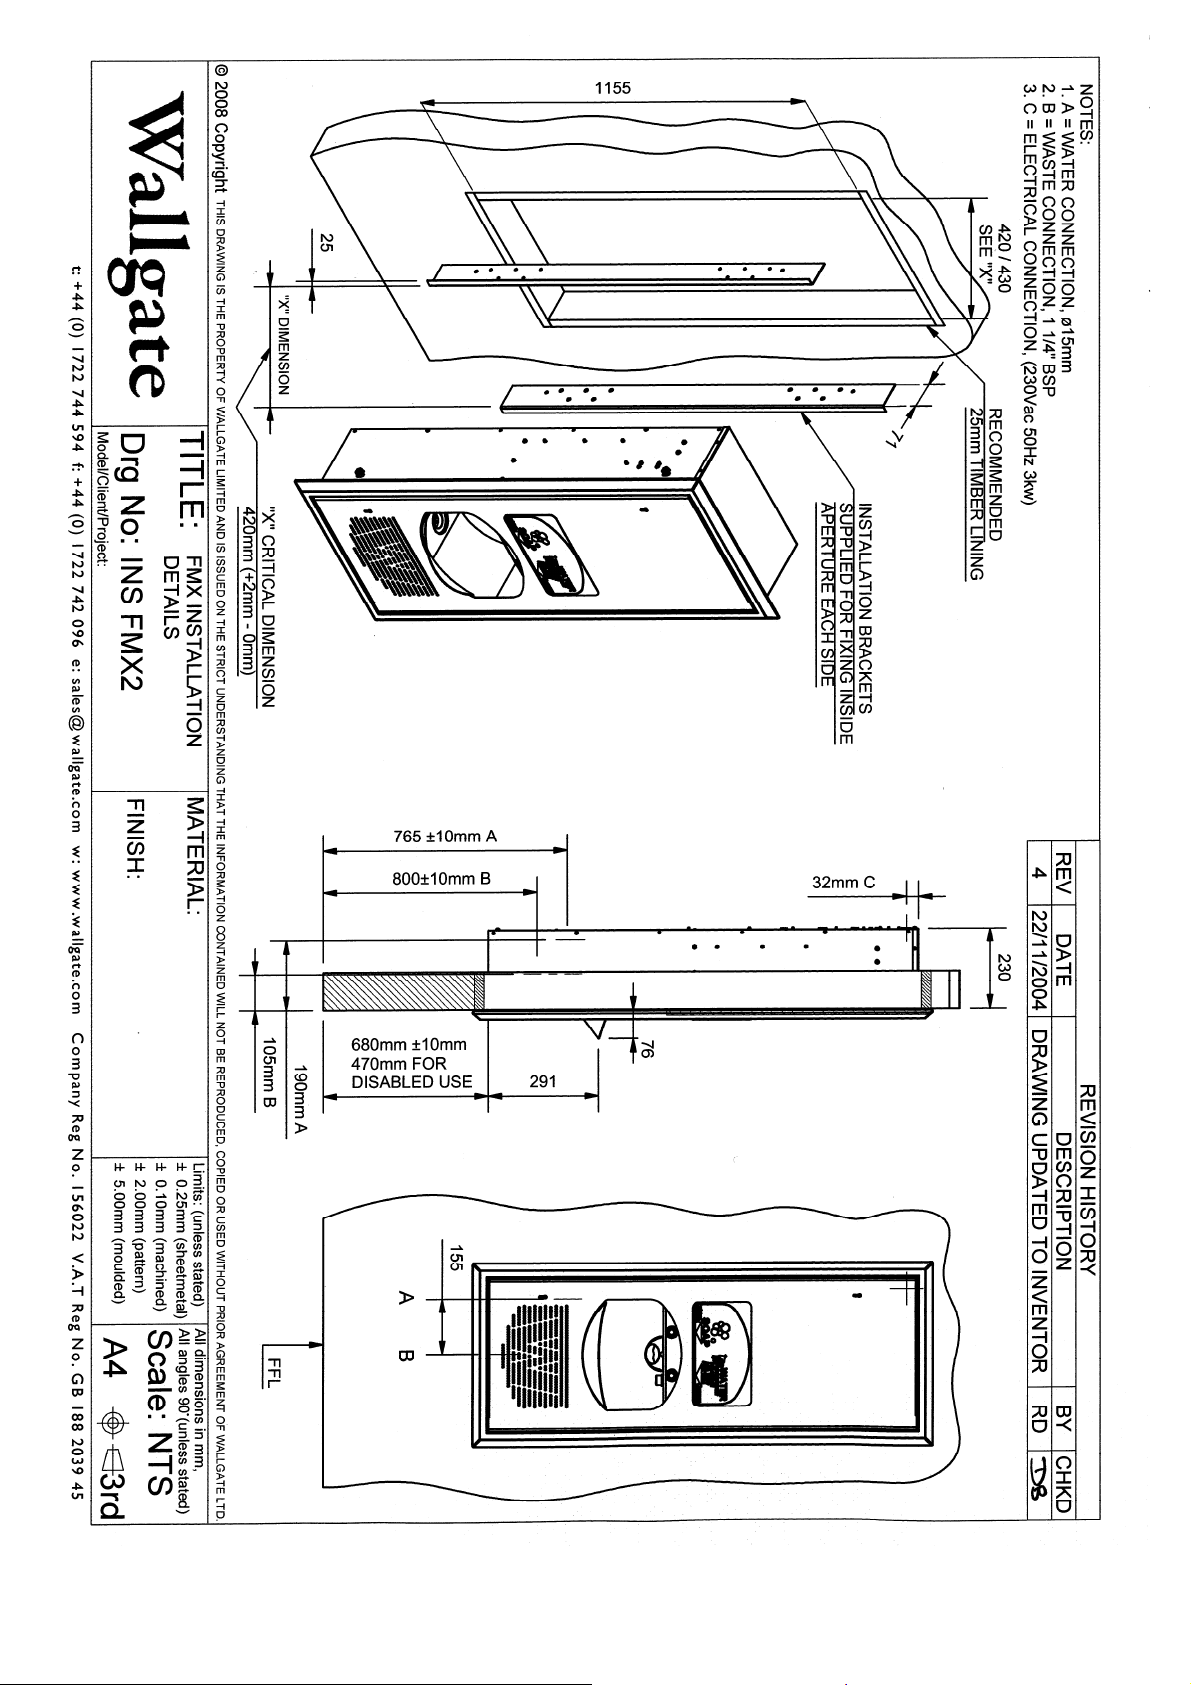
a) Prepare an opening in the wall surface, accurate to the dimensions shown on the installation
drawing “INSFMX2”. It may be preferable to build a stud wall to house the unit as an
alternative to preparing an aperture in an existing wall.
b) To achieve greater accuracy, it is recommended that a timber lining is fitted to the aperture.
The material thickness should be allowed for in the aperture dimensions.
c) The unit is not designed to provide support above the opening. If this is required, a suitable
lintel should be provided.
d) An electrical supply should be provided with a switched fused spur - 13amp, double pole
connection point that is local to the unit (the contact separation of the fused spur switch
should be at least 3mm).
e) A suitable cable with a minimum conductor size of 1.5mm sq should be connected to the
fused spur switch ready for connection to the unit.
f) A mains cold water supply with a min pressure of 1.75bar should be provided within the wall
cavity below the aperture and terminated with a suitable isolating tap. Final connection to
the hand wash unit water inlet (15mm compression) may be made with a flexible mains
rated hose.
g) A waste outlet connection of 32mm (1¼") should be provided within the wall cavity below the
aperture.
IMPORTANT: The installer should seek further advice from the manufacturer when
considering connection to gravity fed water system.
2. APPLIANCE PREPARATION & FITTING
a) Fit the installation plates to the sides of the aperture ensuring that they are level with each
other in all planes using 8 suitable fasteners. Remove the M8 bolts & washers from the
plates (4 off).
b) Move the unit from its packaging to the aperture and then pass the mains cable into the
electrical entry point on the rear of the cabinet.
c)
Carefully insert the unit fully into the wall aperture ensuring that the supply cable does not
become trapped. Using the keys provided, open the door panel and remove the plastic
installation cover by releasing the four screw fasteners. Ease the cover out of the unit on the
left side first, and pass the soap tube back into the cabinet.
3. ELECTRICAL CONNECTION
WARNING: This Appliance must be Earthed
a) The
UNI-WASH
unit is designed for a fixed wire type installation.
b) The unit should be installed by a qualified electrician in accordance with the current
Nationally Approved Regulations (IEE).

c) Terminate the supply cable into the terminal block positions "L E N" located on the left side
of the cabinet and secure it within the cable clamp. The cable must not come into contact
with any other components or wiring within the unit.
d) Earth bonding should be carried out to comply with Nationally Approved Regulations (IEE).
Connections must be made to the following points :
* Water supply pipe.
* Sink waste outlet.
* Equipotential earth. (To cross bond multiple units together)
3. ELECTRICAL CONNECTION
4. WATER SUPPLY & WASTE CONNECTION
IMPORTANT: For installation liable to freezing conditions, Frost protection & lagging must be fitted.
a) Prior to final connection of the water supply to the unit the pipes should be flushed through
so as to remove any debris and air locks.
WARNING : Failure to carry this out may result in damage and failure of the unit.
b) Complete the water connection to the inlet tap on the unit. Note that the connection is a
push type connector for a 15mm size pipe.
c)
For the waste connection an appropriate trap (not supplied) should be fitted to the unit's sink
waste (1¼" BSP). Final connection can then be made to the main waste pipe.
5. COMMISSIONING FOR USE
a) Replace the insulation cover (making sure to feed the soap tube through the hole) with the 4
screws & washers.
b) Open fully the mains water supply tap and the inlet water control valve on the unit.
c) Switch 'ON' the main electrical supply to the unit and then also on the unit itself at the switch
located on the left side of the insulation cover (the switch should illuminate).
d) To check that the unit operates and to complete the final set-up procedures now refer to the
User & Maintenance instructions, sections 2, 4, 3, in this order.
e) On completion of the above the following items (per machine) should now handed over to
the customer ready for use:
* 4 x Security Keys.
* 1 x User & Maintenance Instructions.
* 1 x Installation & Commissioning Instructions.
6. TECHNICAL DATA
a) Electrical supply:
•220/230/240v AC 50Hz single phase.
•Maximum Rating :220v - 2650watts / 230 - 2850watts / 240v - 3100watts
WARNING: THIS APPLIANCE MUST BE EARTHED.
b) Water supply:
* Thermal cut out 46 °C +/- 3°C.
* Temp of water for flow rates of 1.2 - 1.6 l/min 35°C - 45°C.
* Nominal pressure range 1.75 to 10bar.
* Cold water feed ø15mm.
* Waste ø1¼"(32mm) pipe (internal) connection to 1¼"BSP

USER OPERATING
AND
MAINTENANCE INSTRUCTIONS
1. INTRODUCTION
The hand washer drier unit, models FMX-20 & 25, are designed and manufactured from quality
materials. If these user instructions are followed, the unit will give reliable efficient service. If you
need further information or assistance please contact Wallgate as detailed on the front cover of this
manual.
The FMX hand wash drier
is available in two model versions, the FMX-20 is push button operated
& the FMX-25 is infra-red sensor operated. Both versions dispense liquid soap, warm water and
warm air. The timing of both types has been pre-set to be highly effective in hand washing at low
cost. For special washing needs the cycle is fully adjustable, please contact Wallgate for further
information.
Your installer will have passed to you these instructions, the installation and commissioning
instructions and 4 keys.
2. OPERATING THE UNIT
The unit is switched "ON" or "OFF" by the isolation switch located above the soap container. If a
fault occurs with the unit then it must be switched "OFF" until the fault is repaired by a qualified
engineer.
WARNING : Unqualified personnel must not remove the black insulation cover due to the
risk of electric shock!
To operate the FMX-20 manual version, press the left hand button to dispense:
* Liquid soap
Then press the right hand button for
* Warm water rinse followed by
* Heated air drying
To operate the FMX-25 automatic version, place your up turned hands centrally into the bowl to
activate the infra red sensor. The wash cycle as follows will then start:
* Liquid soap followed by
* Warm water rinse followed by
* Warm air drying
Reactivating the sensor 3 seconds after the air drying will repeat the above cycle. There is a short
delay (1 second) between each function of the cycle.
3. REPLENISHING THE SOAP
The soap recommended for use in this unit is a free flowing liquid soap. It is particularly
important that the unit is not filled with creams or gel soap, which will block the pump. The
recommended soap and its specification is available from Wallgate.
a) Using the keys provided, open the door and remove the empty container; replace with a full
one, taking care to avoid any spillage.

b) Ensure the soap pipe is fully inserted into the container so that the tube reaches to the
bottom.
c) Priming the soap through the tube system:
For the FMX-20 manual version, operate the soap button repeatedly until the soap is
discharged into the bowl.
For the FMX-25 infra red sensor version, press the soap prime button, located on the
internal plastic insulation cover next to the electrical isolation switch. Release when soap
is discharged into the wash bowl.
d) Close and lock the door. (The soap level should be periodically checked (e.g. Daily
depending on usage).
4. ADJUSTING WATER TEMPERATURE
Unlock & open the door. Locate the inlet control tap (lower left below the wash bowl).
* To increase the temperature turn clockwise.
* To decrease the temperature turn counter clockwise.
Make small adjustments and activate the unit to check the effect. Note that the unit is fitted with a
safety flow switch which will only operate the water heater when the flow is set above 1.2ltr/min.
Close and lock the door once set.
5. MAINTENANCE
Wallgate operates a comprehensive service package, details of which can be obtained from the
above address. A full spare parts facility is also available if required.
WARNING : The water heater is a vented type and in no circumstances must the water outlet
nozzle be allowed to become blocked or connected to any pipe or tap.
The door and frame should be cleaned using standard domestic products. The use of metal
cleaning pads or powders/fluids containing abrasive substances will scratch the surface and should
be avoided.
A proprietary lime scale remover should be used, particularly in hard water areas.
Any service or repair work must be carried out by a qualified service engineer, which during the
warranty period must be a Wallgate engineer. During the warranty period contact Wallgate for
warranty work or advice.
Note: From a user's point of view the most important care items are:
* Use the recommended soap, never non-liquids.
* Check soap level daily.
* Keep soap dispensing nozzle clear.
* Keep water dispensing nozzle clear.
* Check fan motor brush wear.
6. WARRANTY
Contact Wallgate for warranty details and terms and conditions.
REVISION 2, 28 JANUARY 2009.

This manual suits for next models
1
Table of contents
Other Wallgate Dryer manuals
Popular Dryer manuals by other brands

Barton
Barton 99816 Owner's manual and safety instructions

Beko
Beko BDP710MG user manual

Amana
Amana W10233410A Use and care guide

GE
GE DWSR473EVAA Dimensions and installation information

Bosch
Bosch WQG23108GR User manual and installation instructions

Siemens
Siemens WQ46B2C9GB User manual and installation instructions

Siemens
Siemens WT43H07CDN Installation and operating instructions

Samsung
Samsung DV52J8700E user manual

Maytag
Maytag Perfoma PYE4500 user guide

Hotpoint
Hotpoint TVEL 75 Experience Instruction booklet

Bosch
Bosch WTE863000US Operating instructions & installation instructions

GE
GE DDE7207R Use and care guide