Waterco Slimline Cartridge Filter
DESCRIPTION
The Slimline Cartridge Filter has been designed as a Space-Saving Cartridge Filter ideal for apartments. The
Slimline Cartridge Filter is easily maintained with an easy to use lock ring lid for simple cartridge removal and
replacement.
PIPING
• To minimise pressure loss through the lter, all incoming connecting pipe work should be 40mm (11/2”) DIA
PVC Class E.
• For best efciency, use the fewest possible ttings. This prevents a restriction in the water ow.
• A by-pass piping arrangement should be incorporated, which allows the entire lter unit to be easily isolated
for servicing and maintenance, while ensuring continuous water supply.
• Filter connections are provided with an O-ring seal. To avoid damage to the 0-rings, use a silicone base
lubricant on the O-rings.
• Keep piping tight and free of leaks.
WATER FILTRATION
Water enters the housing through the bottom inlet port and ows through the pleated cartridge from the exterior
to the interior. Particulars are retained on the outer surface of the pleated cartridge and clean liquid exits the
housing at the base.
Note: A sediment lter removes dirt, debris and suspended solids, it does not sanitise the water.
POSITIONING
• The lter unit should sit on a level concrete surface or a precast concrete slab of suitable strength.
• The lter unit should be located near a drain, to minimise piping for waste.
• Position the lter away from direct sunlight.
INSTALLATION
• Be sure to comply with the local plumbing codes. The lter may be plumbed into a drinking water system and
would, therefore be subject to whichever local regulations may apply.
• Be sure that all provisions for wastewater disposal meet local, state or national codes. Do not discharge water
where it will cause ooding or damage.
• Take special care with the waste line. If there is not an adequate air gap between the waste pipe outlet and the
drain into which it discharges, a siphon may develop that will draw some of the drain waste back into the water
lter. This may result in undesirable “cross connection” between a safe and unsafe water supply.
• If the incoming water pressure is higher than the maximum working pressure, a Pressure Regulating Valve (PRV)
must be incorporated upstream to the lter inlet. The PRV should be at least 20mm (3/4”) DIA.
Housing Specifications
Maximum Pressure 400kPa (60psi)
Maximum Temperature 40˚C (100˚F)
Material Polypropylene
Seals Buna-n
Flow rates 95 lpm
FILTER ELEMENT CHANGES
Cleaning Slimline Filter Cartridge Element
1) Turn off and lock out the pump, (if installed).
If a By-pass Valve is tted, the pump is not required to be turned off.
2) Close the Inlet and Outlet Valve (not supplied with the unit).
Open the By-pass Valve, if tted.
3) Open the Air Relief Valve (on the lid) to release all air pressure from inside the tank and system.
4) Remove the lid manually by turning the lid lock ring counter clockwise.
5) Remove the lter cartridge and place it upright in an area suitable for washing.
6) Use a garden hose and nozzle to wash each pleat of the lter cartridge.
7) Thread the lid lock ring and reseal the lter tank. Hand tighten only.
When reassembling the lid, check the O-ring for cracks or tears. Replace if necessary.
8) Start the pump (if installed) and slowly open the Inlet Valve, ll the housing until water ows from the Air Relief
Valve. If a By-pass Valve is tted, close the By-pass Valve and slowly open the Inlet Valve, ll the housing until
water ows from the Air Relief Valve.
9) Close the Air Relief Valve and open the Outlet Valve. The lter is now back in operating mode.
CONDITIONS FOR CARTRIDGE REPLACEMENT
As ltration proceeds, the void areas in the medium become lled with debris ltered from the water. The pressure
will start to rise and the ow of water will start diminishing. The lter will eventually become so clogged with debris
that it will be necessary to either clean or dispose of the lter medium.
Cartridge replacement is determined by the following conditions:
• The pressure drop increases.
• The ow rate decreases until it is insufcient to meet the demand.
• The removal efciency decreases to the point where the efuent quality deteriorates and is no longer
acceptable.
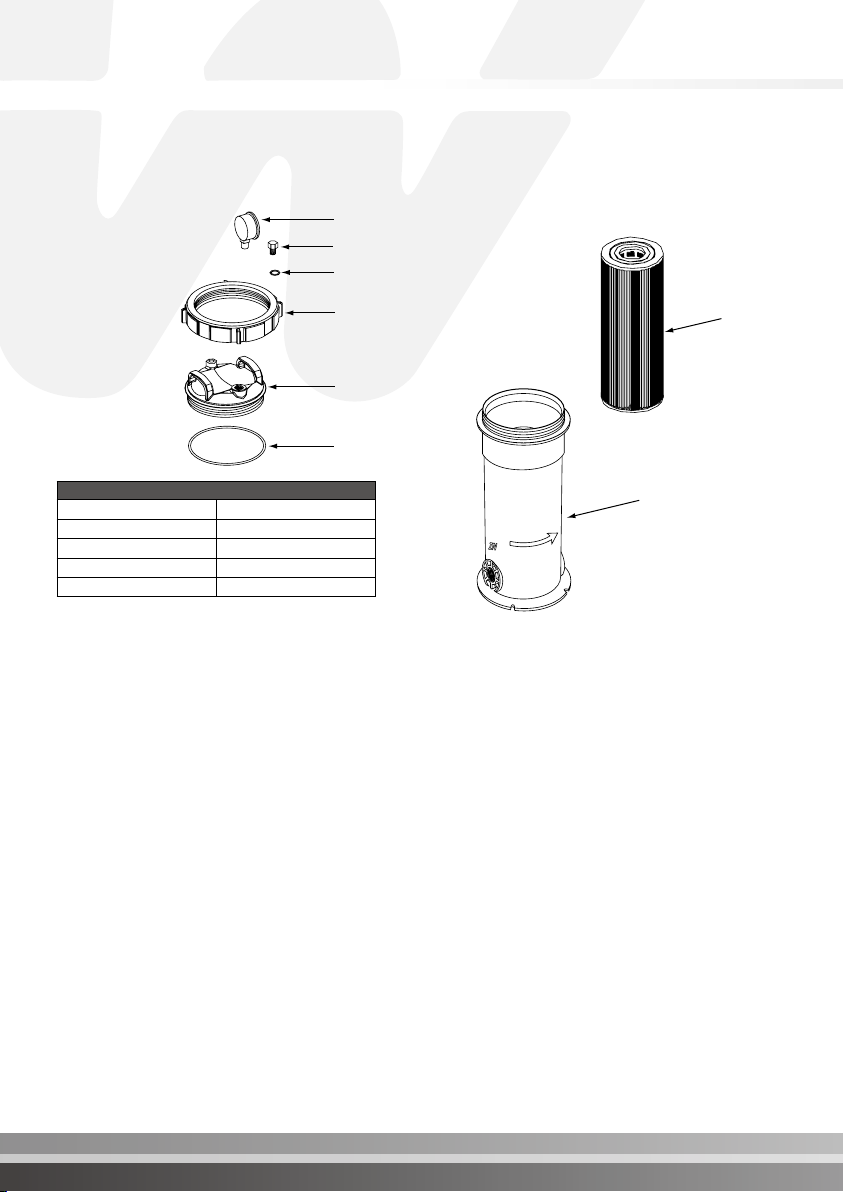
Pressure Gauge
Air Release Valve
Air Release Valve O-ring
Lock Ring
Lid
Lid O-ring
Filter Body
Cartridge
Element


