Weber Summit 450 User manual

50415 11/00
Gas Barbecue Rotisserie
YOU MUST READ THIS OWNERS GUIDE
BEFORE OPERATING YOUR ROTISSERIE
Instructions
WARNINGS
• Read all instructions before using your rotisserie.
• This rotisserie is for outdoor use only.
• Remove motor and store in a dry place when
not in use.
• Do not touch hot surfaces. Use barbecue mitts.
• This rotisserie is not for use by children.
• To protect against electrical hazards do not immerse
cord, plugs, or motor in water or other liquids.
• Unplug the motor from outlet when not in use, or
before cleaning
• Do not use rotisserie for other than intended use.
• Make sure motor is off before placing it on the
motor bracket.
• Do not operate the rotisserie motor with a damaged
cord or plug.
• Do not operate the rotisserie motor if it
should malfunction.
• The rotisserie motor is equipped with a three prong
(grounding) power cord for your protection against
shock hazard.
• The power cord should be plugged directly into a
properly grounded three prong receptacle. If use of an
extension cord is required, be sure that it is a minimum
16 AWG, 3 wire well insulated cord, marked for
OUTDOOR USE ONLY and properly grounded.
• When using an extension cord, make sure it is not in
contact with hot or sharp surface.
• Outdoor extension cords should be marked with the
letters “W-A” and a tag stating “Suitable for use with
outdoor appliances”.
• Do not cut or remove the grounding prong from the
rotisserie motor power cord.
• Do not let cord hang over any sharp edge or
hot surface.
• Use only outdoors, do not expose to rain.
• To reduce the risk of electric shock, keep extension
cord connection dry and off the ground.
• A short power cord is supplied to reduce the risk of
tripping over the cord. Extension cords may be used,
but caution must be taken to prevent tripping over the
cord.
Fits Summit 450 & 475 and 650 & 675 Gas Grills
Summit 450 & 475 Rotisserie
Summit 650 & 675 Rotisserie

Weber-Stephen Products Co. (Weber)
hereby warrants to the ORIGINAL
PURCHASER of this Weber Gas Barbecue
Rotisserie that it will be free of defects in
material and workmanship from the date of
purchase for a period of five (5) years.
Weber-Stephen Products Co. (Weber)
hereby warrants to the ORIGINAL
PURCHASER of this Weber Gas Barbecue
Rotisserie Motor that it will be free of defects
in material and workmanship from the date
of purchase for a period of five (5) years.
When assembled and operated in
accordance with the printed instructions
accompanying it.
Weber may require reasonable proof of your
date of purchase. THEREFORE, YOU
SHOULD RETAIN YOUR SALES SLIP OR
INVOICE.
This Limited Warranty shall be limited to the
repair or replacement of parts that prove
defective under normal use and service and
which on examination shall indicate, to
Weber's satisfaction, they are defective.
Before returning any parts, contact the
Customer Service representative in your
region.
If Weber confirms the defect and approves
the claim, Weber will elect to replace such
parts without charge. If you are required to
return defective parts, transportation charges
must be prepaid. Weber will return parts to
the purchaser, freight or postage prepaid.
This Limited Warranty does not cover any
failures or operating difficulties due to
accident, abuse, misuse, alteration,
misapplication, vandalism, improper
installation or improper maintenance or
service, or failure to perform normal and
routine maintenance as set in this owner's
manual.
Deterioration or damage due to severe
weather conditions such as hail, hurricanes,
earthquakes or tornadoes, discoloration due
to exposure to chemicals either directly or in
the atmosphere, is not covered by this
Limited Warranty.
There are no other express warrants except
as set forth herein and any applicable
implied warranties of merchantability and
fitness are limited in duration to the period of
coverage of this express written Limited
Warranty. Some states do not allow limitation
on how long an implied warranty lasts, so
this limitation may not apply to you.
Weber is not liable for any special, indirect or
consequential damages. Some regions do
not allow the exclusion or limitation of
incidental or consequential damages, so this
limitation or exclusion may not apply to you.
Weber does not authorize any person or
company to assume for it any other
obligation or liability in connection with the
sale, installation, use, removal, return, or
replacement of its equipment; and no such
representations are binding on Weber.
This Warranty applies only to products sold
at retail.
WEBER-STEPHEN PRODUCTS CO.
Customer Service Center
250 South Hicks Road
Palatine, IL 60067-6241
USA
WARRANTY

You will need:
Adjustable wrench
Handle - 1
Handle Shaft - 1
Lock On Clamp - 4 (Summit 450 & 475)
6 (Summit 650 & 675)
Meat Clamp - 4 (Summit 450 & 475)
6 (Summit 650 & 675)
Motor - 1
Rotisserie Basket- 1
Rotisserie Shaft - 1
Thumb Screw - 8 (Summit 450 & 475)
12 (Summit 650 & 675)
1/4 x 20 Keps nut - 2
1/4 x 20 x 5/8” Fastener - 2

© 2000 Weber-Stephen Product Co., Weber, the silhouette, and the kettle configuration are registered trademarks of Weber-
Stephen Products Co., 200 East Daniels Road, Palatine, IL, 60067-6266, U.S.A. This product is covered by one or more United
States patents and patents in other nations globally. Printed in the Taiwan.
®
12 3
Summit 450 & 475 Rotisserie
1. Motor (1) 7. 1/4 x 20 x 5/8”inch Fastener (2)
2. Motor Bracket (1) 8. 1/4 x 20 Keps Nut (2)
3. Rotisserie Shaft (1) 9. Rotisserie Basket (1)
4. Lock Arm (4) 10. Handle Shaft (1)
5. Meat Clamp (4) 11. Handle (1)
6. Thumb Screw (8)

12 3
Summit 650 & 675 Rotisserie
1. Motor (1) 7. 1/4 x 20 x 5/8”inch Fastener (2)
2. Motor Bracket (1) 8. 1/4 x 20 Keps Nut (2)
3. Rotisserie Shaft (1) 9. Rotisserie Basket (1)
4. Lock Arm (6) 10. Handle Shaft (1)
5. Meat Clamp (6) 11. Handle (1)
6. Thumb Screw (12)

5. Assembly of Meat Clamp
Insert both Thumb Screws into the holes on the Lock
Arm. NOTE: Do not tighten Thumb Screws fully.
Insert middle Meat Clamp Arm into top of the Lock Arm
as shown. Tighten top Thumb Screw to lock Meat Clamp
into shaft.
Repeat all of step 5 for remaining Meat Clamps.
Lock
Arm
Screw
Holes
Thumb
Screw
Middle
Meat
Clamp
Arm
Top of
Lock Arm
1. Wash All Components Before Assembly
2. Install the Motor Bracket
Attach the stainless steel Motor Bracket to the left side of
the Cooking Box, using the 1/4 x 20 x 5/8”fasteners and
the 1/4-20 Keps nuts.
3. Attach the Motor
Slide the Motor onto the stainless steel Motor Bracket.
4. Attach Rotisserie Shaft to the Rottisserie
Basket
Screw Handle Shaft and Handle together.
Screw Rotisserie Shaft to Rotisserie Basket and tighten
shaft with adjustable wrench. Screw Handle
Shaft/Handle to Rotisserie Basket. NOTE: All threads
are counter-clockwise, or tighten to the left.
Rotisserie
Shaft
Handle Shaft
Rotisserie
Basket Handle
Tighten
Shaft
Here
Assembly Instructions
6. Attach Meat Clamps to Rotisserie Basket
Face prongs of Meat Clamp toward the inside of the
Rotisserie Basket. Slide bottom of Lock Arm onto
tapered portion of the rail of Rotisserie Basket. Slide
Lock Arm along rail to desired position. Tighten Thumb
Screw at bottom of Lock Arm to fix its position on
Rotisserie Basket.
Tapered
Rail
Bottom of
Lock Arm

Securing Flat Food and 1/2 Chicken/Fowl
2. Insert the BENT end of Meat Clamp into the lock arm and finger tighten the thumb screws.
3. Place flat food such as a slab of ribs across the set of cradle bars as shown. (Split chicken is placed with the rounded
side towards the rotisserie bars and split/flat side of food towards the Meat Clamp.)
4. Press Meat Clamp, applying good pressure,down on food, adjusting for best grip on food. Finger tighten Thumb Screw
closest to Meat Clamp first then Thumb Screw closest to Rotisserie Basket.
WARNING: When not using all Meat Clamps, remove extra clamps from Rotisserie Basket when not in use.
OR
5. Once meat is secure, test stability by rotating rotisserie by hand.
OR
If the food becomes loose or unsecure, repeat Steps 4 through 5 until food is secure in Rotisserie Basket.
Flat Food
(Ribs)
Placement
1/2
Chicken/Fowl
Placement
Straight end
of Meat
Clamp
Bent end of
Meat Clamp
Operating Instructions
1. Remove Warm-Up basket and cooking grates from grill. Large cuts of food may require removal of warming basket to allow
full rotation of the rotisserie.
Summit 450 & 475 Summit 650 & 675

Securing Rounded Meat
2. Insert STRAIGHT end of Meat Clamp into the Lock Arm and finger tighten the Thumb Screws.
3. Due to the unique design of the basket; roasts, whole chickens, leg of lamb, etc., DO NOT need to be centered or
balanced in the Rotisserie Basket and can be placed in the Rotisserie Basket at the same time.
4. Press Meat Clamp, applying good pressure,down on food, adjusting for best grip on food. Finger tighten Thumb Screw
closest to Meat Clamp first then Thumb Screw closest to Rotisserie Basket.
WARNING: When not using all Meat Clamps, remove extra clamps from Rotisserie Basket when not in use.
OR
5. Once meat is secure, test stability by rotating rotisserie by hand.
OR
If the food becomes loose or unsecure, repeat Steps 4 through 5 until food is secure in Rotisserie Basket.
Round Food,
Chickens or
Roasts
Placement
Bent end of
Meat Clamp
Straight end
of Meat
Clamp
Summit 450 & 475 Summit 650 & 675

Securing Whole Chicken/Fowl Meat
2. Insert STRAIGHT end of Meat Clamp into the Lock Arm and finger tighten the Thumb Screws.
3. Due to the unique design of the basket; roasts, whole chickens, leg of lamb, etc., DO NOT need to be centered or
balanced in the Rotisserie Basket and can be placed in the Rotisserie Basket at the same time.
4. When cooking chicken/fowl, the wings should be folded under its body and positioned in the Rotisserie Basket with
breast side up. Then press Meat Clamp, applying good pressure,down on food, adjusting for best grip on food. Finger
tighten Thumb Screw closest to Meat Clamp first then Thumb Screw closest to Rotisserie Basket.
WARNING: When not using all Meat Clamps, remove extra clamps from Rotisserie Basket when not in use.
OR
5. Once meat is secure, test stability by rotating rotisserie by hand.
OR
If the food becomes loose or unsecure, repeat Steps 4 through 5 until food is secure in Rotisserie Basket.
Whole Chicken
or Fowl
Placement
Bent end of
Meat Clamp
Straight end
of Meat
Clamp
Summit 450 & 475 Summit 650 & 675

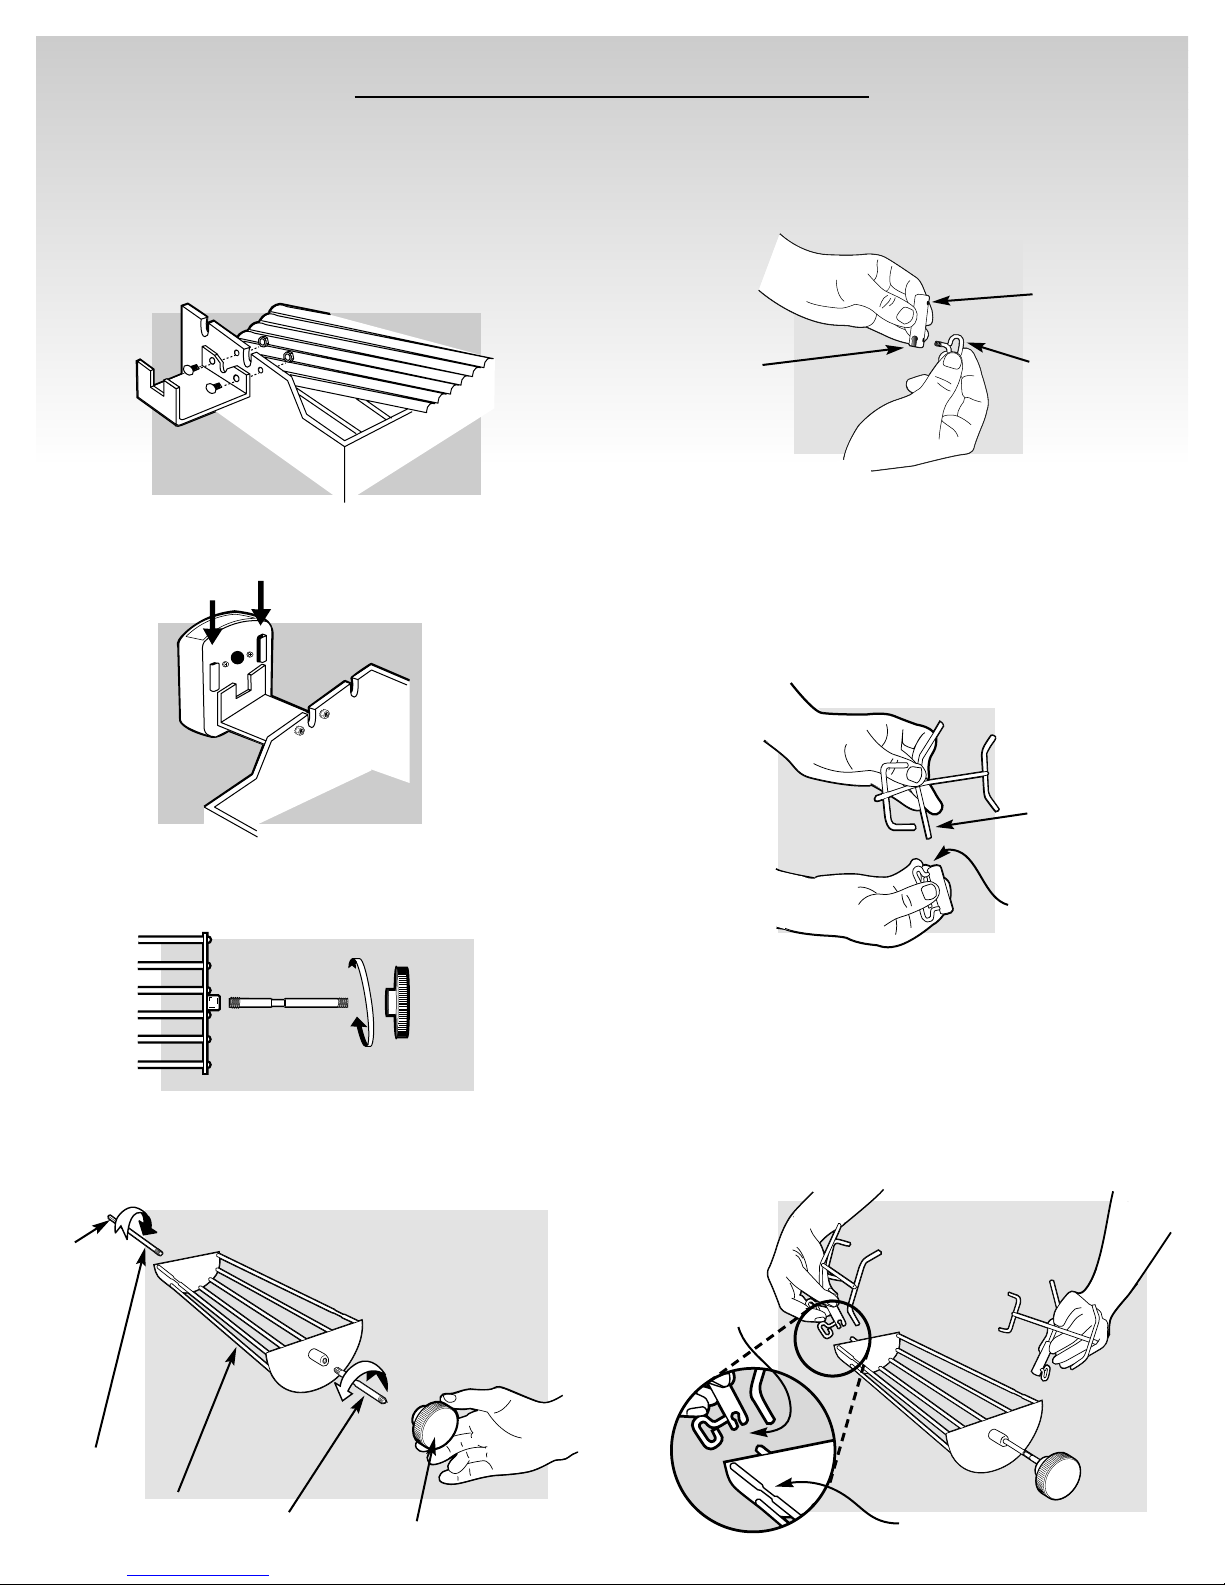
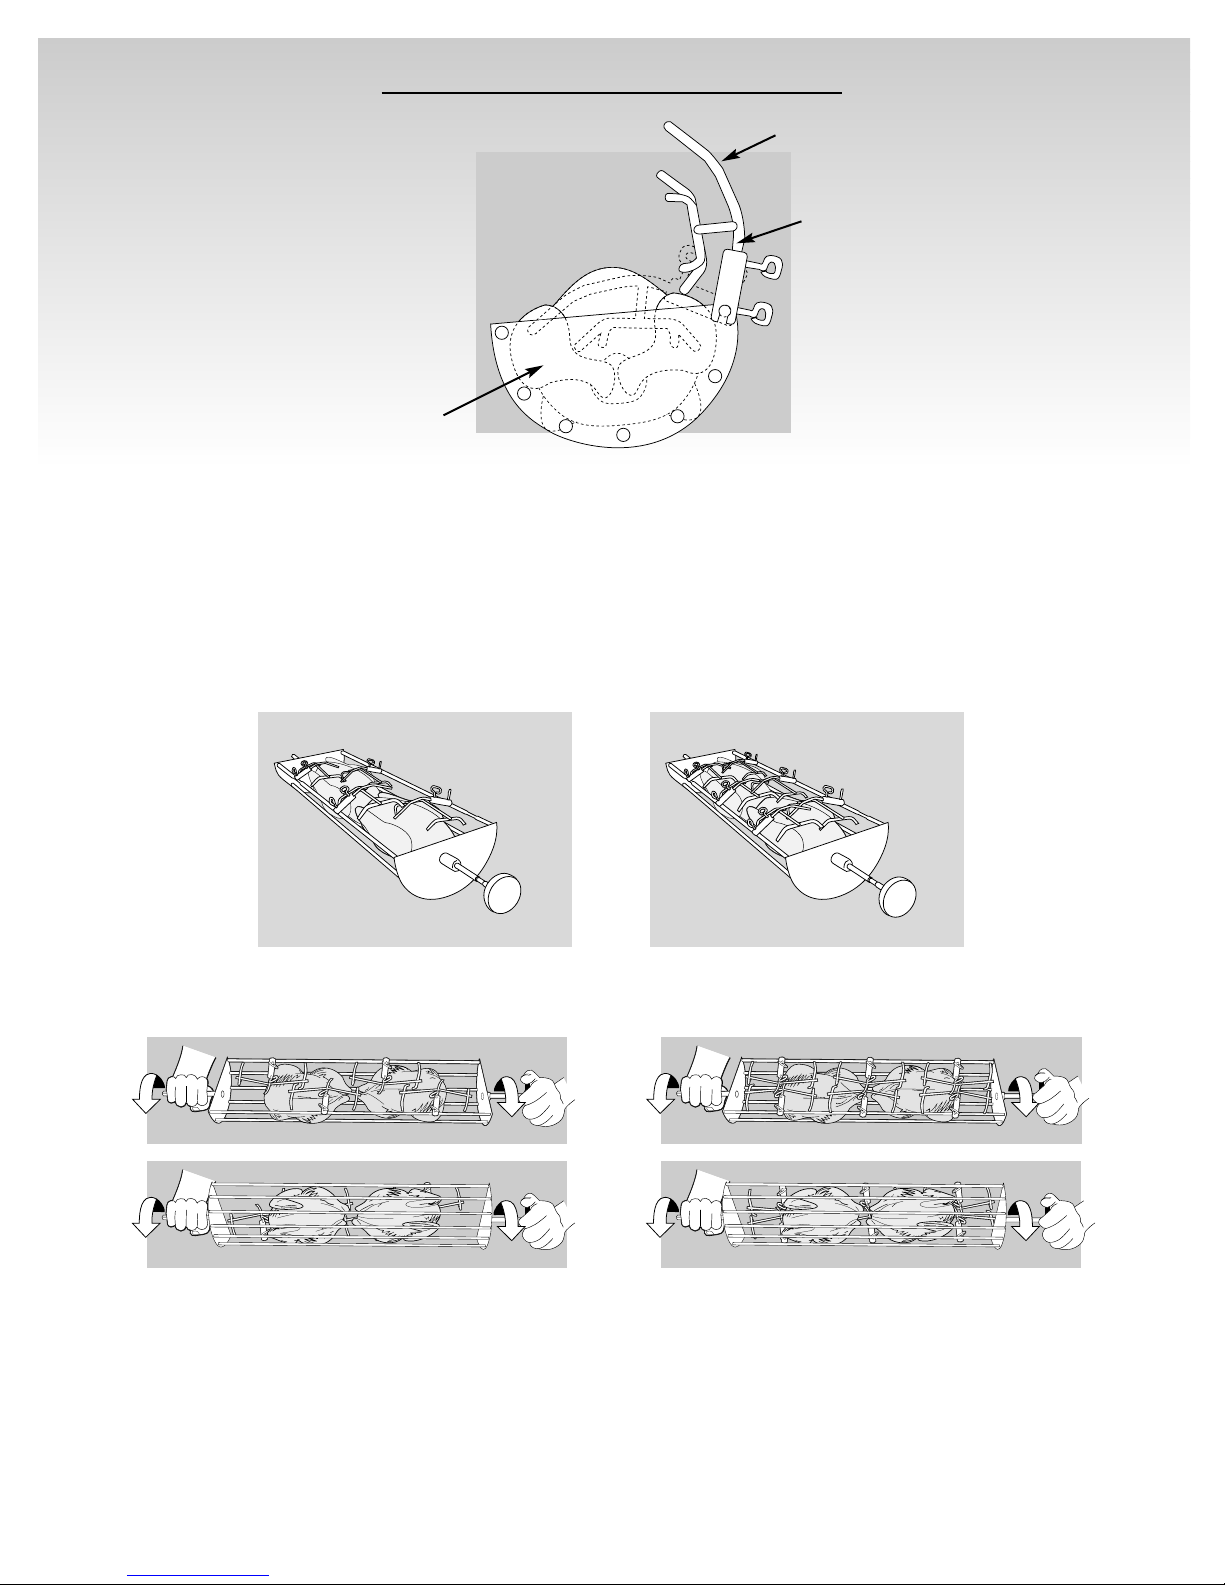
6. Set the Rotisserie Shaft on the cooking box. Slide the
squared end of the Rotisserie Shaft into the Motor.
7. Set the Handle Shaft on the cooking box. The Handle
Shaft groove should rest in the cut-out of the cooking
box for the Summit 450 & 475 and Summit 650 &
675 gas grill.
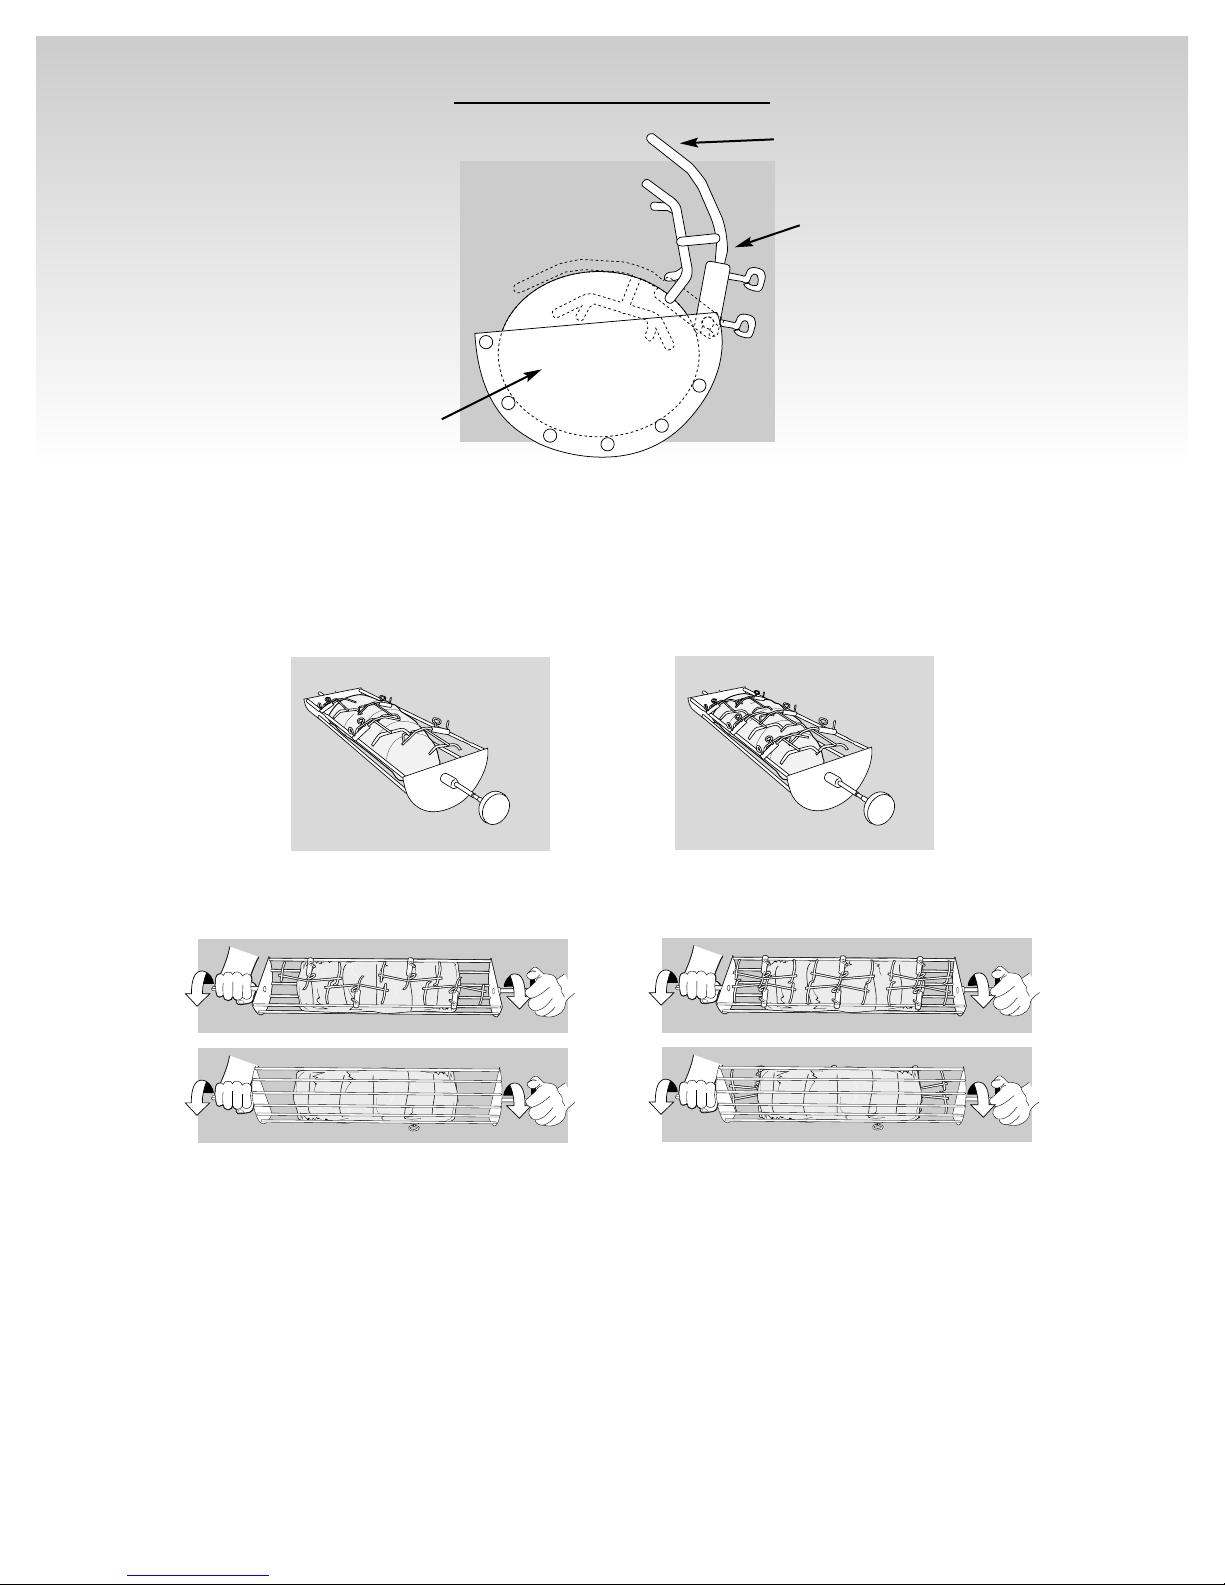
8. Place Rotisserie in grill and allow to rotate a few
turns. If food shrinks and/or becomes unsecure, re-
adjust Meat Clamp as required to secure food in
Rotisserie basket.
9. Remove Rotisserie with food from cooking box before
preheating. Preheat barbecue for 10 minutes with lid
down. Follow cooking instructions in your Weber Gas
Barbecue cookbook and adjust the burners as
needed.
10. Return rotisserie to the cooking box.
11. Turn the motor on and begin cooking.
12. Check on Meat Clamps periodically making sure
clamps are securely holding food in place.
CAUTION: Re-adjustment of Meat Clamp may be
required more than once during cooking due to
food shrinkage.
WARNING: Rotisserie is metal and will be hot.
Wear oven mits to protect hands during Meat
Clamp adjustment and movement of the
rotisserie.
Cooking Instructions
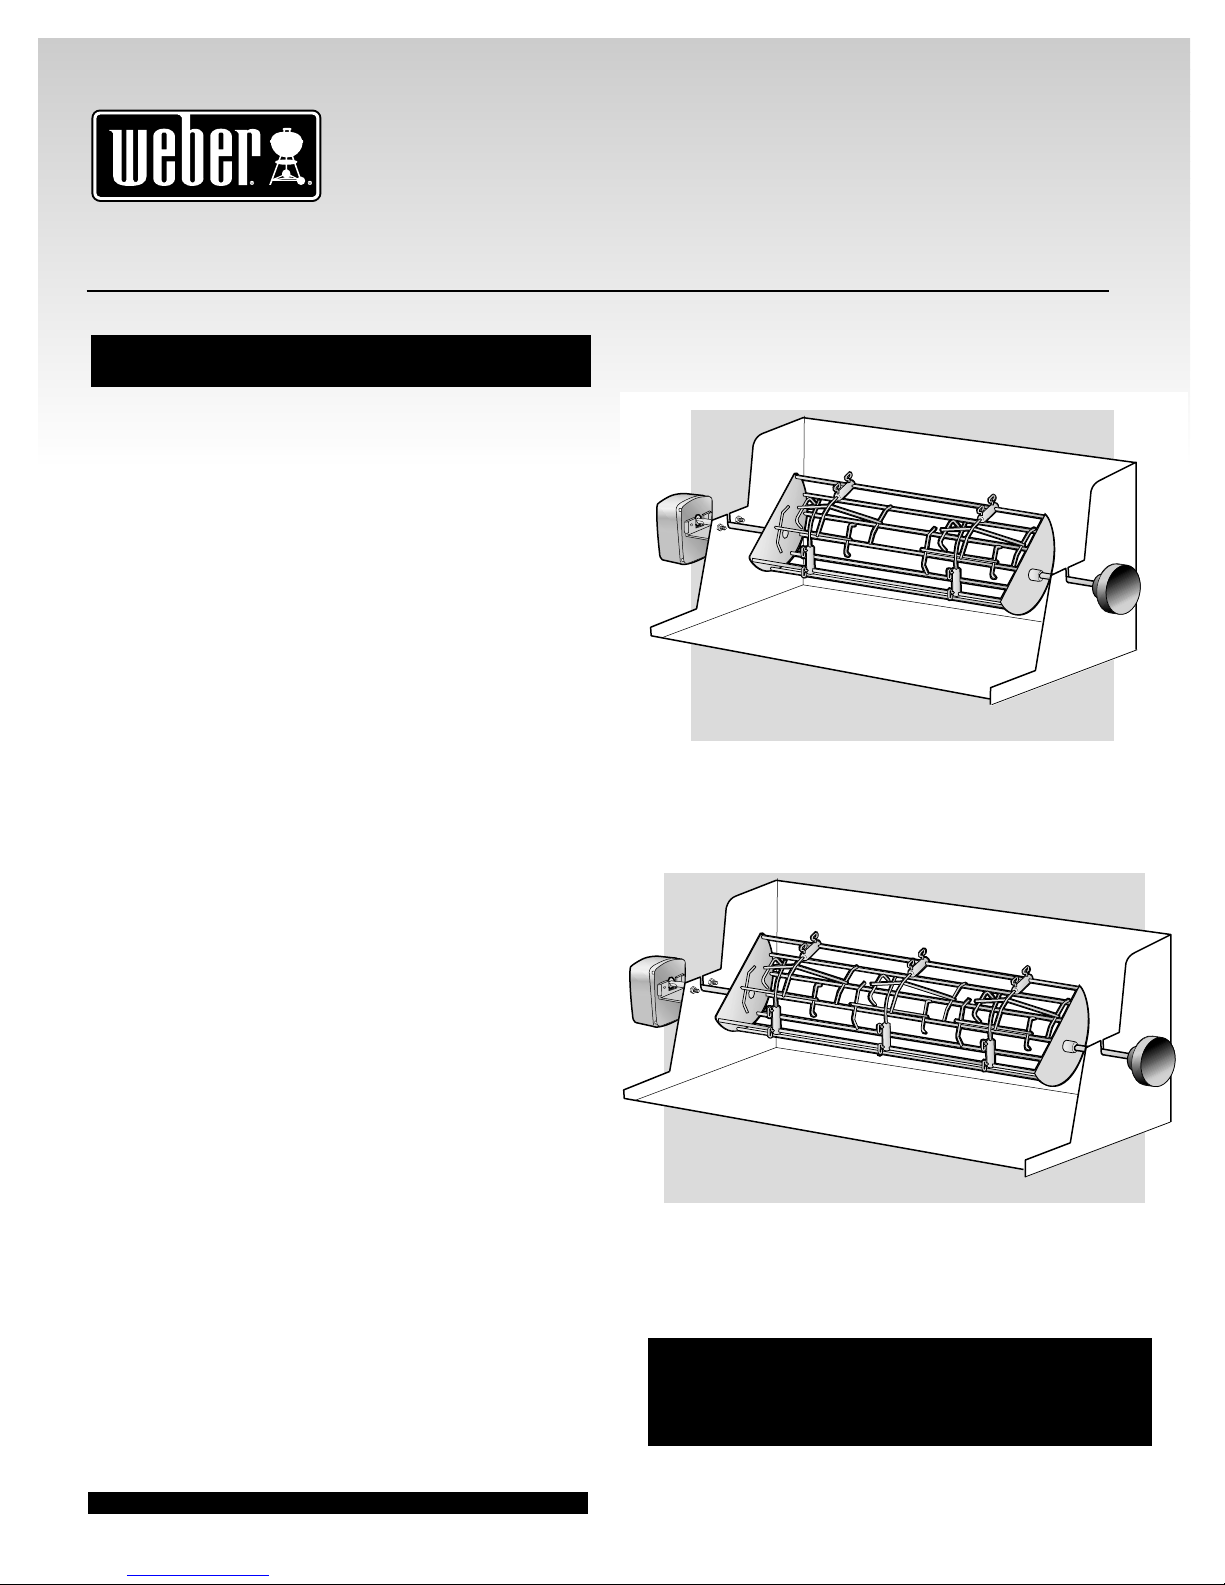
•When cooking more than one variety of meat (chicken
and roast), there is no need to balance the difference
in weights, as the basket is designed to carry the
weights evenly.
•Can hold up to 2 ten pound whole chickens, whole
pork loin, boneless rump roast, prime rib, split chicken
breasts, ribs, 2 cornish hens, Italian or Polish
sausage, leg of lamb, turkey breasts, or turkey legs.
You can also cook a whole fish depending on its size.
•Meats or poultry should be brought to room
temperature before cooking. (30 to 60 minutes should
be adequate for most foods. If frozen, defrost
completely before cooking.)
•Tie meat or poultry with a string to make the shape
as uniform as possible before placing in basket.
•Remove cooking grates and warming rack to allow
food to turn freely.
•If you wish to save drippings for gravy, place a drip
pan in the center on top of the Flavorizer Bars before
positioning the rotisserie and food in
the barbecue.
•Food preparation steps are the same for rotisserie
cooking as for regular cooking. Indicated timing in
cookbook will be the same.
•Preheat barbecue for 10 minutes with the lid down.
•All cooking is done with the lid down.
•Cook by Indirect Method as indicated in recipe.
•If foods are too heavy or are irregular shapes, they
may not rotate well and should be cooked by the
Indirect Cooking Method without using
the rotisserie.
•When meat is done, we recommend that you shut
your grill off and let food rest for a few minutes
before removing from the Rotisserie Basket.
WARNING: Rotisserie is metal and will be hot.
Wear oven mits to protect hands during Meat
Clamp adjustment and movement of the
rotisserie.
•Carefully open Meat Clamps and remove food with
a fork and/or tongs from Rotisserie Basket and
place food onto plate or plater.
•Remove Rotisserie Basket from cooking box once
you are completed with cooking and clean
thoroughly.
Tips for Safe Cooking
•ALWAYS wear protective gloves when handling your
rotisserie or handle.
•SECURELY tighten thumb screws before starting your
rotisserie.
•It is normal for meat to shrink during cooking. This can
cause the meat to move around in the Rotisserie
Basket or fall from the basket. It may be necessary to
STOP the rotisserie and secure the Meat Clamp(s),
making sure to once again tighten the Thumb Screws.
Cleaning Notes
•Always wash all components before assembly.
•The rotisserie basket disassembles for easy cleaning in
a dish washer. Steel wool pads and/or grill brush may
be used for cleaning stubborn areas.
This manual suits for next models
3
Table of contents
Other Weber Kitchen Appliance manuals

Weber
Weber Spirit User manual

Weber
Weber PULSE 2000 User manual

Weber
Weber Q 300 Series User manual

Weber
Weber 96811 User manual

Weber
Weber GENESIS II User manual

Weber
Weber Spirit User manual

Weber
Weber Gas Catcher User manual

Weber
Weber 7676 User manual

Weber
Weber Style User manual

Weber
Weber 182055 User manual
Popular Kitchen Appliance manuals by other brands

Bosch
Bosch MS 4200 use and care manual

DeLonghi
DeLonghi WR25 instructions

Roots & Branches
Roots & Branches JOHNNY APPLE PEELER VKP1010 instruction manual

Advance Tabco
Advance Tabco FC SERIES installation instructions

Kronen
Kronen KG-251 Translation of the original instruction manual

Primus
Primus PRI5500 User manual and product specifications