weewell WMV850 User manual

DIGITAL BABY MONITOR
MONITEUR VIDEO NUMERIQUE
DİJİTAL BEBEK İZLEME CİHAZI
WMV850
USER MANUAL
EN
MODE D’EMPLOI
FR
KULLANIM KILAVUZU
TR

CONTENTS
Features............................................................................................ 3
Receiver Features ............................................................................ 3
Camera Features.............................................................................. 3
Getting Started................................................................................ 4
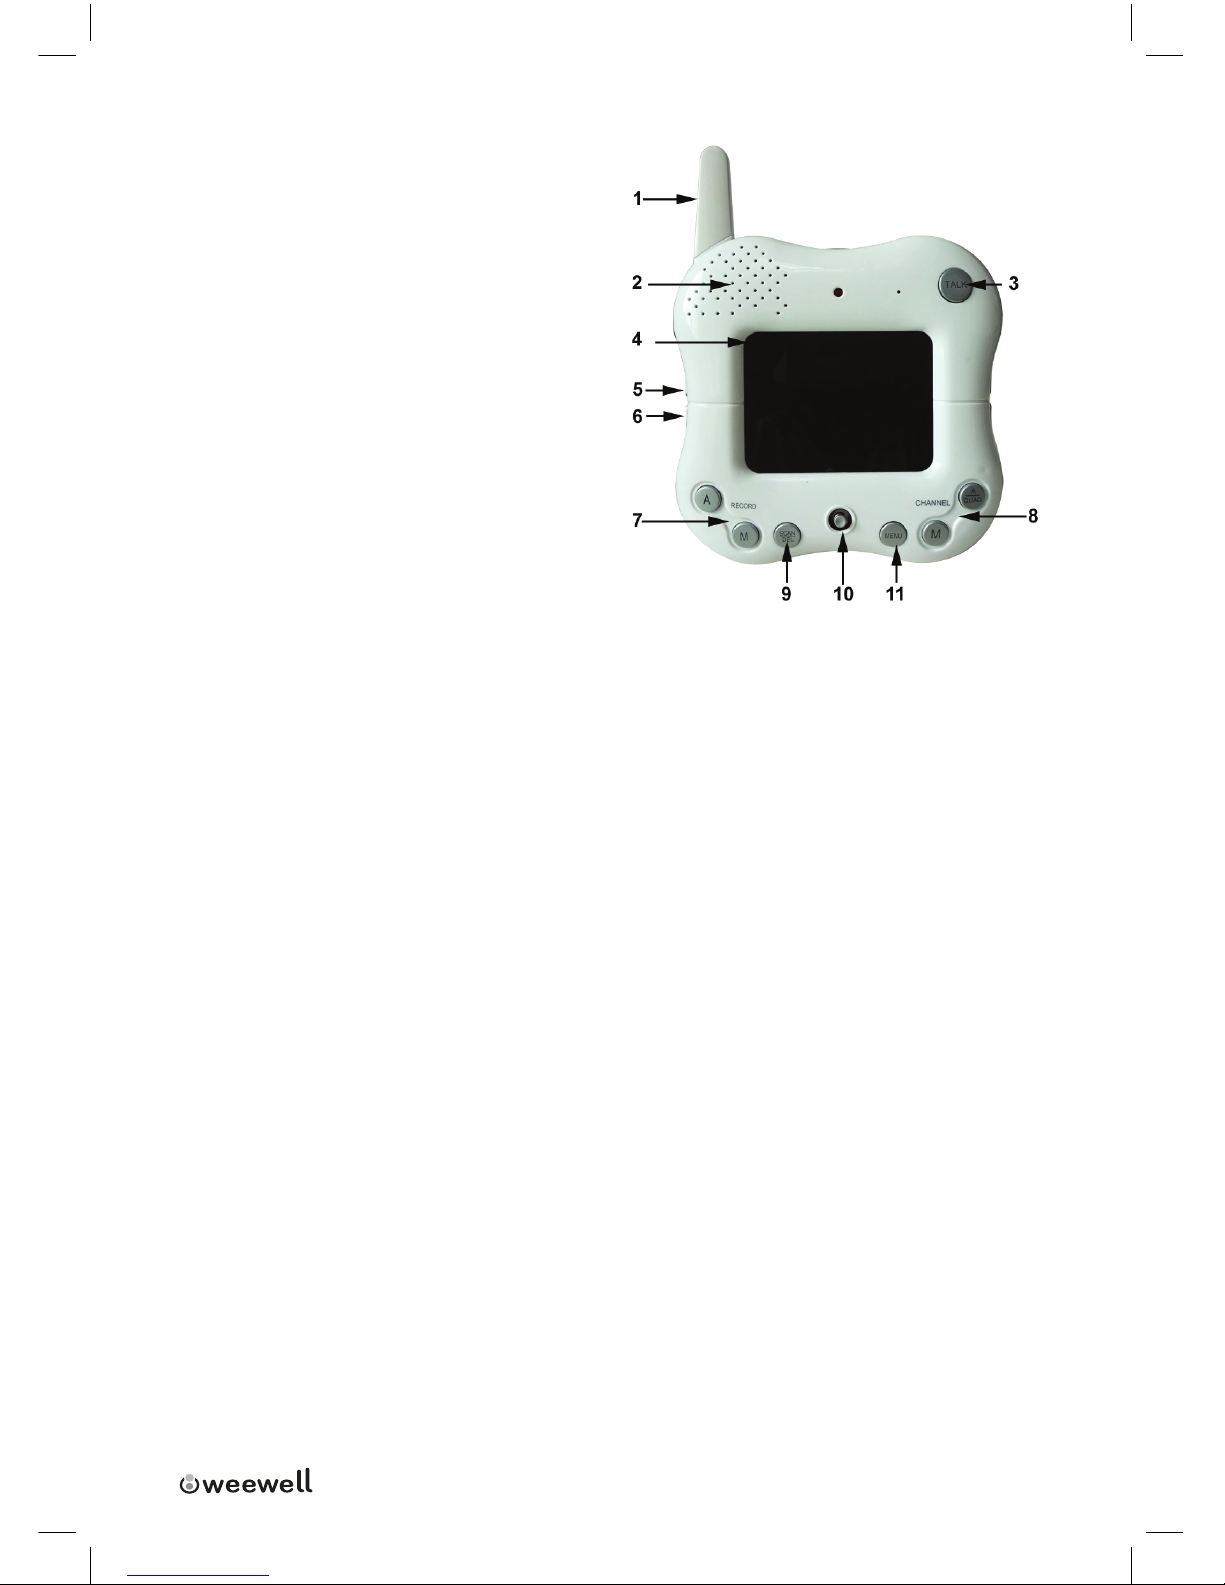
Wireless Receiver............................................................................. 4
Front Controls....................................................................................................... 4
Side Controls......................................................................................................... 6
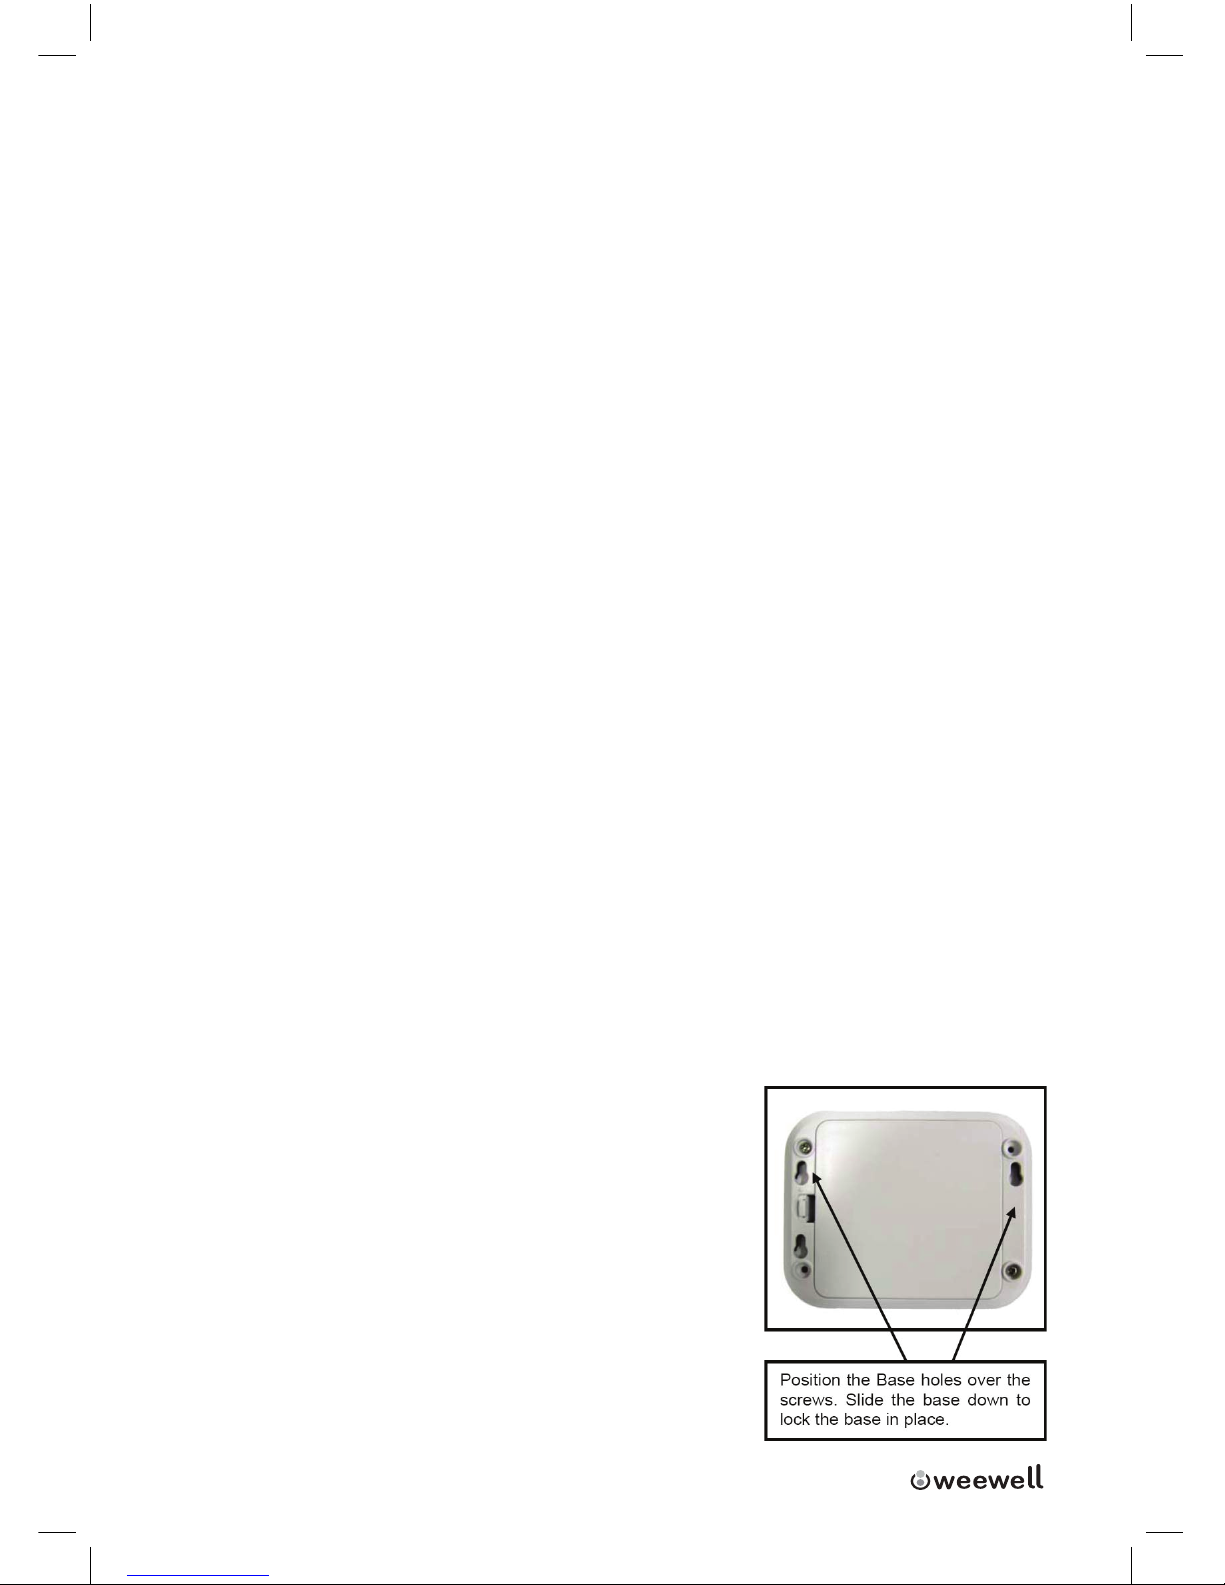
Wireless Receiver Installation ........................................................ 6
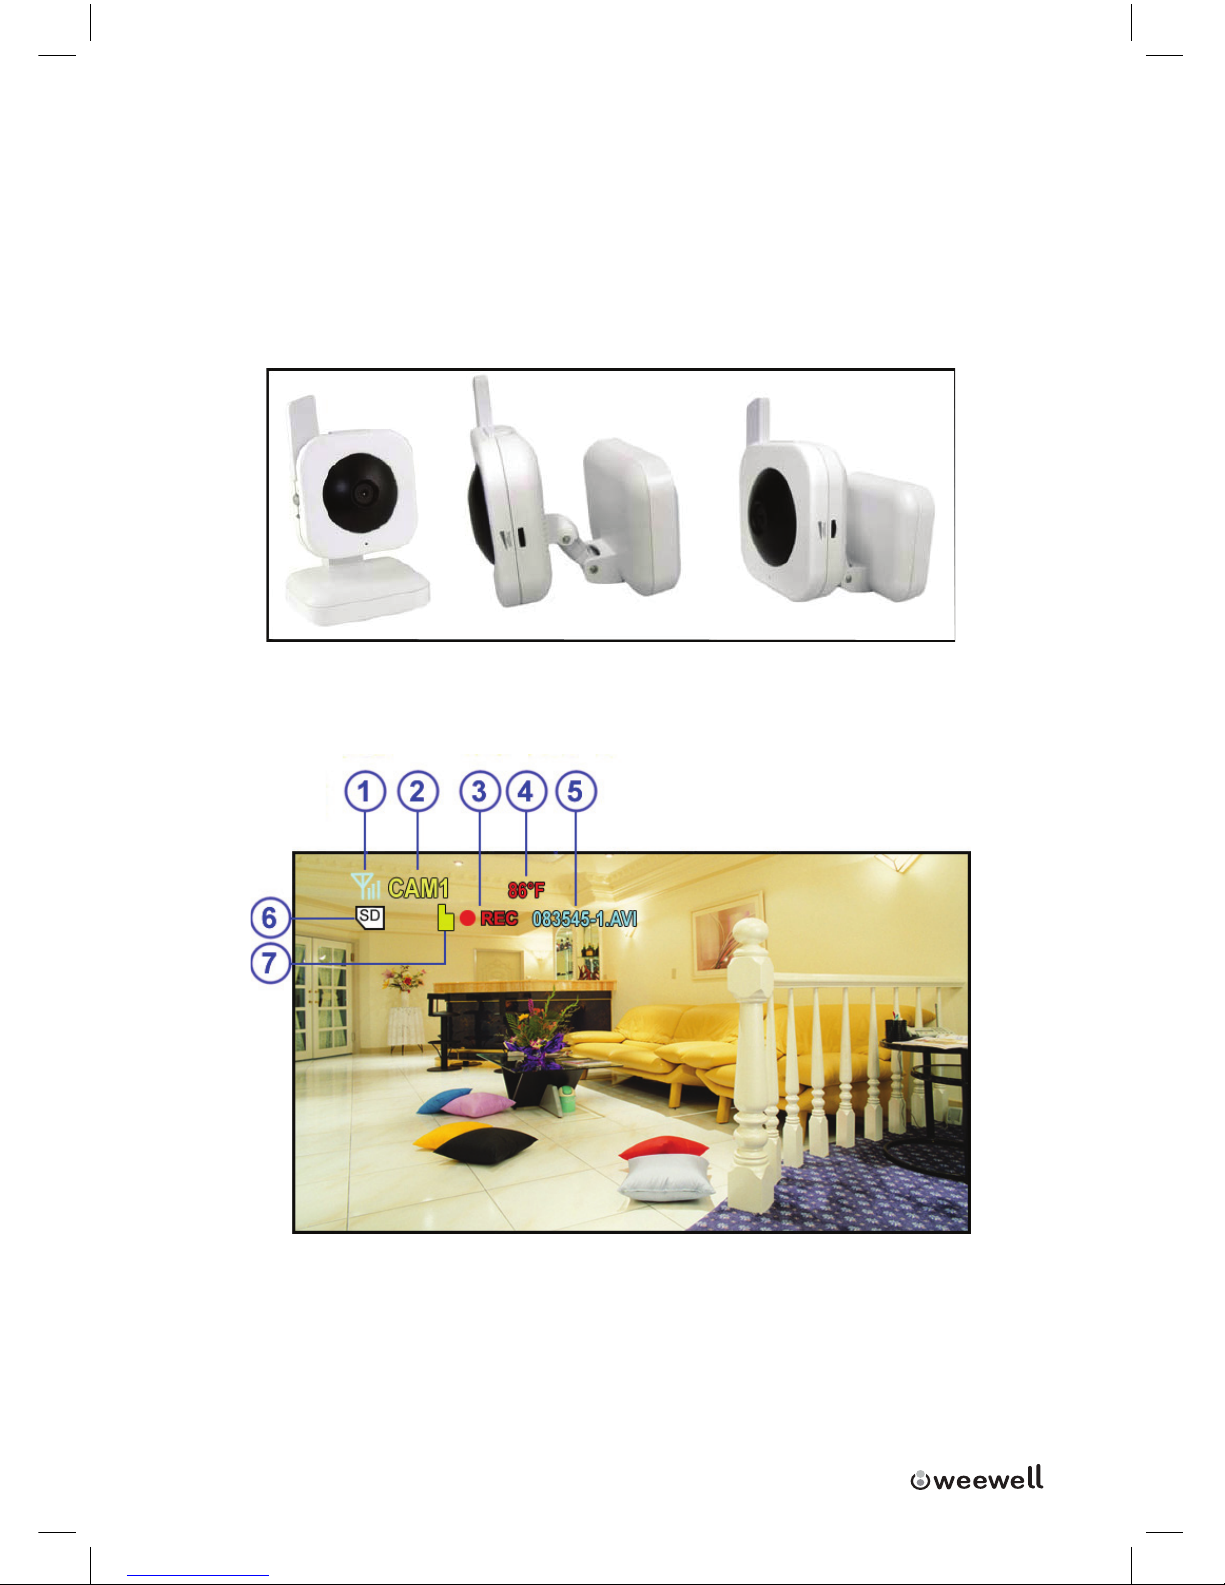
Camera ............................................................................................. 7
Camera Installation ........................................................................ 8
Night Vision...................................................................................... 8
Installing the Camera ..................................................................... 8
Connecting Camera Power ............................................................. 9
Power Adaptor................................................................................. 9
Battery Compartment ..................................................................... 9
Camera Positioning ........................................................................ 10
Viewing Mode ................................................................................. 10
No Signal Warnings ........................................................................ 11
SD Card Recording.......................................................................... 12
Adjusting the Receiver Volume ..................................................... 13
Menu Mode .................................................................................... 14
Main Menu ..........................................................................................................14
Alarm Volume Menu.........................................................................................14
Record Menu .......................................................................................................14
Pairing Menu .......................................................................................................16
Camera Pairing ............................................................................... 16
Setting Menu ......................................................................................................17
Troubleshooting............................................................................. 19
Technical Specication................................................................... 20

WMV850 USER MANUAL I 3
Features
• DigitalWirelessTechnologyProvidesExcellentImageQualityandClarity
• Interferencefree,secureandprivatesignal.
• Upto500ftwirelesstransmissionRange
• ListeninwithExceptionalSoundClarity
• SafetyWarningFeatureNotiesYouWhenoutofRange
• Systemexpandableupto4Cameras
• Two-waycommunication
• Lullabyin4options
Maximum
open
space
transmission
range.
The
actual
range
is
dependent
upon
building
materials
and
other obstructions
in
path
of
wireless
signal.
Additional
Cameras
sold
separately.
Receiver Features
1. 3.5”ColorLCDMonitor/ReceiverwithSuperiorImageQuality
2. Video/AudioOutputforViewingonTV/MonitororRecordingonVCR/DVD
3. recorder
4. RechargeableLithiumPolymerBatteryforTruePortability
5. SDcardrecordcapability
Camera Features
1. VGA
Resolution
Camera
2. Night
Vision
allows
for
low
light
viewing
up
to
15
Feet
/
4.57
meters
3. Built-in
Microphone
4. Camera
can
be
battery
operated
for
true
portable
wireless
operation
5. Camerasidetemperaturedisplayonmonitor
6. PIRsensorformotiondetection.
IR
illumination
range
of
15ft.
/
4.57m
under
ideal
conditions.
Objects
at
or
beyond
this
range
may
be
partially
or
completely
obscured,
depending
on
the
camera
application.

4 IWMV850 USER MANUAL
Getting Started
The System comes with the following components:
1X Wireless Receiver 1X Screw1X Wireless Camera(s)
1x power Adapter
1x
USB Cable
(For Receiver)
1x power Adapter
(For Camera)
CHECK YOUR PACKAGE TO CONFIRM THAT YOU HAVE RECEIVED THE
COMPLETE SYSTEM, INCLUDING ALL COMPONENTS SHOWN ABOVE.
1 of each of the above is provided with the Camera. Please see your Product
Package for the number of cameras included with your System.
Wireless Receiver
Front Controls
1. Receiver Antenna:Receives&SendssignalstoorfromtheCameras.*
2. Speaker:ProducesthesoundtransmittedfromtheCameras*.
3. Talk Button:Pressdownandholdthebuttontotalkbacktothecameracur-
rentlybeingdisplayedontheLCDscreen.
4. LCD Screen:DisplaysvideofromtheCamera.
5. Play/Pause:Pressthebuttontostartorpausethebuilt-intunes

WMV850 USER MANUAL I 5
6. Next Sound:Pressthebuttontoplaynexttune.
7. Auto/ Manual Record:Pressto
automatically/manuallyrecord
duringmonitoring.Onlyavailable
whentheMicroSDcardisinserted.
(Notincluded)REC[A]:Startrecord-
ingwhenanalarmisdetected.
REC[M]:Startrecordingwhenthe
buttonispressed
8. Auto/Manual Channel:Pressthe
buttontochooseachannelmode
9. Scan/Delete Button:Whenthe
Scanbuttonispressed,theLCD
Screenisturnedoandthesystemcontinuouslyscansallavailablecameras
whilethemonitorisdark.TheSCANfeaturecanbeusedforthefollowingtwo
reasons:(1)Topreventtheuserfrombeingdisturbed(i.e.whensleeping)bythe
brightLCDscreen,or(2)Toconservebatterypower.Ifaudioisdetectedabove
thepresetaudiotriggerlevelontheCamera(s)*,theReceiverwillbeepand
displaythetriggeredCamera.ThereceiverwillreturntoScanmodeabout8
secondsaftertheAlarmhascompleted.Pressanybuttonexcept“Power”onthe
frontpanelofmonitorwillexitScanMode.
10. Navigation Controls/OK Button: Usethecontrolstomoveorselectwhilein
ViewingModeandMenuModes:
Viewing Mode:
The
following
controls
are
used
while
watching live
video
from
the
camera:
When the image size is set double by selecting Zoom*2, press the
navigation button to view the parts out of the LCD screen. In this mode,
one can also adjust the volume of LCD. When playing video, press the UP
vto play/pause and press DOWN Vto stop it. Press the LEFT arrows to fast
forward the recorded le. Press RIGHT arrow to fast backward the recorded
le.
Menu Mode: Use
the
UP/DOWN/LEFT/RIGHT
vVY
arrows
to
navigate
in
Menu
Mode.
Press
the
OK
Button
to
conrm
the
menu
selection.

6 IWMV850 USER MANUAL
11. Menu Button:PresstoAccesstheReceiverMenu.Pressthebuttonagaintoexit.
You must have more than one camera congured on the system when
using functions that require more than one camera.
Side Controls
12. Night Light Button:PresstoremotelyturnNightLightONorOFF(forthe
cameracurrentlybeingdisplayedontheLCDScreen).Whenthenightlightison,
anindicationiconwillbedisplayedontheLCDscreen.
13. Volume Button:Presstoadjustthevolume
ofthereceiver.
14. DC 5V Power Input:Connecttheincluded
DC5VPowerAdaptortopowerthereceiver
and/orchargetheReceiverbattery
15. Power On/Off Button:Presstoturnthe
ReceiverONorOFF.
16. Stand:Flipthestandouttoplacethe
receiveronaatsurface(suchasatableor
countertop).
17. USB:ToconnectUSBcabletothereceiver.
Wireless Receiver Installation
1. PlacetheReceiverinaplacethatwillhaveclearreceptionwithyourcamera(s).
2. PlugtheACadaptorpoweroutputcableintothe5VPOWERinputoftheReceiv-
er.Plugthepowerplugintoawalloutletorsurgeprotector.
3. Leavethereceivertochargefor6 hourspriortorsttimeusesothebuilt-in
rechargeablereceiverbatteryisfullycharged.DO NOTremovethepowercable
fromthereceiverduringinitialchargingprocess.Afterinitialcharge,chargeas
required.
4. IfyouwishtoviewtheReceiverimagesonalargerscreen,Connecttheincluded
USBcabletoviewvideofromthereceiveronyourcomputer.(NOTcompatible
withMSN&Skype)

WMV850 USER MANUAL I 7
Camera
1. Camera Antenna:Receives&Sendssig-
nalstoorfromtheReceiver.
2. Night Light Button:PresstoturntheLight
ONorOFF.Alternatively,presstheLight
buttonontheReceivertoremotelyturnthe
CameraLightONorOFF.
3. Lens/IR LED Cover: InfraredLEDsprovide
viewinginno/lowlightconditions.
4. Microphone:Receivessoundsforthearea
nearthecamera,andtransmitssounds
fromtheCameratotheReceiver.
5. Sensitivity:Adjustthesensitivityknobto
settheSoundAlarmsensitivity.TheReceiver
willbeeptoalerttheuserwhenthesoundis
aboveapresetsoundlevel.Adjusttoincrease
ordecreasethelevelofsensitivity.
6. Optical Sensor:Todetectthelightlevel
wherethecameraisplacedandcontrolthe
nightlightstatus,onoro.
7. Speaker:Producesthesoundtransmitted
fromthemonitor.
8. Power Switch:TurnstheCameraONorOFF.
9. Pairing Button:Thepairingbuttonislocated
onthebackofthecamerabehindbythestandmount.
10. Power Jack: ConnecttheDC5VPowerAdaptortotheCamera.
NOTE: The Camera can also be powered using 4 AA Batteries (not included)
installed in the base. If the Camera is plugged in with the AC Adaptor,
the batteries will not be used. The batteries are intended for short term,
portable Camera use.

8 IWMV850 USER MANUAL
Camera Installation
Before you install the camera, carefully plan where and how it will be
positioned, and where you will route the cable that connects the camera to
the power adaptor.
Before starting permanent installation, verify its performance by observing
the image on the receiver when camera is positioned in the same location/
position where it will be permanently installed and the receiver is placed in
the location where it will be used most of the time
Installation Warnings
Aim the Camera(s) to best optimize the viewing area: Select a location for the
camera that provides a clear view of the area you want to monitor, which is free
from dust, and is not in line-of-sight to a strong light source or direct sunlight.
Avoid installing the cameras where there are thick walls, or obstructions
between the Cameras and the Receiver.
Night Vision
This camera has built-in IR LEDs, which provides the camera with the ability
to view images in no/low light conditions. It is important to use the provided
power adaptor( and not the Batteries) when using the camera for prolonged
periods in low light conditions, as the built-in IR LEDs will drain the battery
more quickly than regular daytime use.
Installing the Camera
• Carefully unpack the Camera
NOTE:IfyouareinstallingCamerasthatdidnotcome
withtheSystem,pleaseseethePairingCamerasec-
tionofthismanualfordetailsoninstallation.
• Mount the camera to the wall
Mark the position of the screw holes on the wall.
Drill holes and insert 2 screws. Firmly attach the
camera to the wall by placing the stand over the
installed screws and pushing the base downwards
to secure.

WMV850 USER MANUAL I 9
NOTE:Thecameracanalsobeplacedonaatsurface,suchasaTableorShelf,
andnomountinghardwareisrequired.
• Adjust
the
Viewing
angle
of
the
Camera
NOTE:Youcaninstalladditionalcameras(maximumof4cameras).Whenadding
camerasthatwerenotincludedintheoriginalbox;youwillneedtopairupthe
cameraswiththereceiver.Refertothecamerapairingsectionofthismanual.
Connecting Camera Power
The Camera can be powered either by using the provided Power Adaptor, or
using Batteries (requires 4 x ‘AA’ type batteries, not included).
NOTE:Wirelesscamerasrequireapowersource(eitheranelectricaloutletorbat-
terypower)tooperate.Ifyouplantopermanentlymountthecamerainaloca-
tion,itisrecommendedtousetheincludedCameraPoweradaptortopreventin-
terruptionsintheimage,asusingbatterypowerisintendedasatemporarypower
solution.
POWER ADAPTOR
Connect the Power Adaptor to the Camera.
Make sure the power adaptor is placed into
a grounded outlet or surge bar to protect the
camera from power uctuations.
BATTERY COMPARTMENT
1. RemovetheBatteryCoverothebaseof
theCamera.
2. Insert4xAABatteries(notincluded)into
theBatteryCompartment.Makesureto
correctlylineupthePositive(+)andNega-
tive(-)terminalsofthebatteries.Placethe
BatteryCompartmentcoverbackon.
Make
5V

10 IWMV850 USER MANUAL
NOTE:IftheCameraispluggedinwiththeACAdaptor,thebatterieswillnotbe
used.Thebatteriesareintendedforshortterm,portableCamerauseonly.
Camera Positioning
The Camera can be placed on a at surface, or wall mounted. The versatile
stand allows for several dierent mounting options.
Viewing Mode
1. Signal Indicator:Thesignalindicatorshowsthestrengthofthesignalbeing
receivedfromthecamera.ThenumberofbarsintheSignalIndicatorshowsthe
strengthofthesignal–OneorNoBarsindicatesthesignalispoor,and4bars
indicateaverystrongsignal.
1.

WMV850 USER MANUAL I 11
Signal Indicators
2. Channel Indicator:Indicatesthenumberofthecamerathatisdisplayedon
thecurrentscreen.Press“M”ButtonontheReceivertoswitchbetweenavailable
cameras.
3. SD card indicator:Whenthereceiverisrecording,theredindicatorzREC
willbeshownontheLCDscreen.Andyoucanseethenameoftherecordedle
besidetheindicator.
4. Temperature Indicator:Showstheambienttemperaturewherethewireless
cameraisinstalled.
5. File Name:Whendoingrecording,thenameoftherecordedlewillbeshown
ontheLCD.
6. SD card record:WhenaSDcardisinsertedintotheSDcardslot,theindicator
willbeshownontheLCDscreen.
7. New Record Indicator:Whenthereisnewrecordedle,theindicatorwillbe
shownontheLCDscreenandashestoalertusers.
NOTE: To automatically switch between channels, press “A/QUAD” Button.
No Signal Warnings
When the Camera is positioned too far from
the Receiver, warning messages will be
displayed:

12 IWMV850 USER MANUAL
SD Card Recording
The system is designed for SD card recording. You can manually record the
video at your desire or the receiver records when there is motion detected by
the cameras. Before recording, you need to insert a SD card to the SD card slot.
The system can support the size of up to 16GB SD card.
Recording Mode
Auto Recording
Press (Record) A button to set the system to automatic recording mode. In this
mode the receiver starts recording when motion detected by any activated
camera. The recording time can be set to 5s, 15s or 30s when choosing a
trigger recording.
In quad mode, when motion is detected by a camera, the receiver switched to
display the image from the camera in full screen status and starts recording.
After recording, it automatically switches back to quad mode. Press (Record)
Abutton to cancel automatic recording mode.
Manual Recording
Press (Record) M button, the receiver starts recording. Press the button again
to cancel manual recording.
Playback
When there is new recorded le, the indicator will be shown on the LCD screen
and ashes to alert users. Follow the steps to play the recorded les.
1. Inviewingmode,presstheOKbuttononthereceivertoentertheoperation
interface.

WMV850 USER MANUAL I 13
2. SelectthefolderVIDEO andpressOK.Youwillseesomefoldersnamebydate.
Forexample:20120520meansthevideosinthisfolderarerecordedonMay20th,
2012.
3. SelectafolderandpressOKtoentersubmenu.Youwillseetherecordedles
namedbytime.Forexample:1-052757meansthevideoisrecordedat05:27:57
andfromcamera1.
4. SelectthevideoyouwanttoviewandpressOKbutton,thevideowillbeplayed
ontheLCDscreen.ThenyoucanusetheOKbuttonstoplay/pause,stop.
Adjusting the Receiver Volume
The Receiver Volume can be adjusted
by pressing the volume button. Press
volume - to decrease the Volume, and
press volume + to increase the volume.
When the volume is set to one bar (lowest
setting), the volume is muted. The Volume
Adjustment icon will be displayed during
Volume changes, and will disappear after
10 seconds of inactivity.

14 IWMV850 USER MANUAL
Menu Mode
Press the MENU Button on the Receiver to enter the MENU setting or exit the
menu setting. Use theVv YButtons to navigate UP, Down, Left or Right in
the menu, and press the OK Button to conrm a setting.
Main Menu
The
Main
Menu
contains
4
submenus:
1. Alarm Volume: Receiverbeepstoalert
youwhenmotiondetectedbycamera.
PressVolume+orVolume-buttontoin-
creaseordecreasethevolumeoftheaudio
alarm.
2. Record:Automaticallyrecordduring
monitoring
3. Pairing:Pairthereceiverwiththeavail-
ablecameras
4. Settings:Setthedate&timeoptions,automuteoptions,brightnessoptions,
zoomoptions,temp.alertrangeoptions,temp.displayunitoptionsandformat
options,andresetstheReceivertoFactoryDefaults(erasesallcongurations
exceptthedateandtimeconguration).
Alarm Volume Menu
Press Volume+ or Volume- button to
increase or decrease the volume of the
audio alarm. Receiver beeps to alert you
when motion detected by camera.
Record Menu
You can set up the recording parameters in record menu.

WMV850 USER MANUAL I 15
Note: To use the recording function, make sure a SD card is inserted into the
SD card slot. When there is a new video
recorded, the indicator will be shown on
the LCD screen and flashes to alert users.
Trigger Record: The recording time when
there is motion detected by a camera in
automatic recording mode. The recording
time can be set to 5s, 15s or 30s.
Overwrite: Decide whether to cover the
initial recorded les when SD card is full of
memory.
VMD Sensitivity: Set the sensitivity level.
When the sensitivity level is out of the set
level, the monitor will be alerted.

16 IWMV850 USER MANUAL
Pairing Menu
The System comes with camera(s) that
have already been paired. These cameras
will communicate with the receiver once
powered on. The Pairing Function assigns
each Camera to a dierent channel on the
Wireless Receiver (up to 4 Cameras) and
is necessary for conguring additional
cameras.
Camera Pairing
1. PowerontheCamerabyconnectingthePowerAdaptororBatteryPack,and
turningtheswitchtoON.ThepowerLEDfortheCamerashouldbeON.
2. PowerontheReceiverbyconnectingthepoweradaptortothe5VInputonthe
back.
3. PresstheMENUbuttonontheReceiver.NavigatetothePAIRINGMenuoptionby
pressingusingtheVvkeystonavigate.PresstheOKbuttontoopenthePairing
Menu.
4. SelectachannelbypressingtheUPandDOWNVvarrows.PresstheOKButton
onthereceivertoaccept.
5. PressthePAIRbuttonlocatedonthebackof
theReceiverusingapentiporpaperclip.
6. AmessagewillbedisplayedontheReceiver
screen.TheReceiverwillcountdownfrom
30~0–youmustpressthePAIRbuttononthe
backsideoftheCameraduringthistimeto
successfullypairtheCamera.IfthebuttonontheCameraisnotpressed,the
Receiverwillreturntotheviewscreen,andno
pairingwilltakeplace.
7. PressthePAIRbuttononthebackofthe
Camera.Oncethecamerahasbeenpaired,it
willbeimmediatelyviewableontheReceiver
Monitor.

WMV850 USER MANUAL I 17
NOTE: It is highly recommended to pair the Cameras to the Receiver before
permanently mounting the Cameras.
Setting Menu
e
Setting
Menu
contains
8
submenus:
Date & Time: Use LEFTband RIGHT B
buttons to select the item, and use UP vand
DOWN Vbuttons to set the date & time.
Auto Mute: Automatically cut o the audio
when there is only slight environmental
noise on the camera side.
Brightness: The Brightness Menu is used
to adjust the brightness of image. Use the
LEFT band RIGHT Bbuttons to change the
bar from DARKEST (left) to LIGHTEST (right).
Press OK button to conrm the adjustment.

18 IWMV850 USER MANUAL
Zoom:The image can be set at original size or
double size by selecting zoom x1 and zoom
x 2. In double size mode, press OK button to
view the parts out of the LCD screen.
Temp. Alert Range: Sets the temperature
alert range. When temperature on camera
side is out of the set range, the monitor will
be alerted.
Format: Select Yes to format the SD card.
After formatting, all the data stored in the SD
card will be deleted.
Note: Be cautious to use this function.
Temp. Display Unit: Select the temperature
unit ˚C or ˚F for you option to show in the
screen.

WMV850 USER MANUAL I 19
Default: Select Yes to reset the receiver to
factory defaults – all menu settings except
the date & time settings will be reset.
NOTE: Resetting the receiver will not reset all Camera Pairing.
The Setting option is used to reset the Receiver to Factory Defaults – all menu
settings will be reset except the date and time options. Use the UP and DOWN
Vv arrows to select YES, and press OK to accept.
NOTE: Camera pairing settings will NOT be affected by a reset. Cameras will
remain paired with the Receiver.
Troubleshooting
If you have problems with your System, there is often a quick and simple
solution. Please try the following:
problem Solution
There is no picture from a
Camera.
Check all connections to the Camera. Make
sure the adaptor is plugged in.
Make sure that the Cameras and Receiver
are both ON.
Make sure that the camera is in range of the
Receiver.
If using the battery, try replacing the
Batteries
The picture is dropping
Move the camera closer to the receiver.
Try repositioning the camera, receiver or
both to improve the reception.

20 IWMV850 USER MANUAL
There are problems with the
Audio.
Ensure that the volume on the TV is ON
Make sure that there is sound within range
of the Camera Microphone
If the unit emits a loud screeching noise
(feedback), move the camera or receiver
farther apart.
The Picture is or has become
Choppy
The picture may become choppy when
experiencing a lower frame rate (i.e.10
frames per second vs. a higher 20 frames
per second).
Try moving the camera closer to the receiver.
Remove obstructions between the Receiver
and Camera.
The Picture appears to be
Grainy when using AV out
function to view on a large
screen TV/Monitor
The purpose of the AV output is for
convenience only. When using with large
screen TV/Monitor, the picture might be
grainy as the camera limits video resolution
toVGA (640x480 pixels).This is not a product
defect.
For best performance use with TV/Monitor
PIP (Picture in Picture) function. Check your
TV/Monitor product manual to see if this
feature is available on your TV/Monitor.
View video on a smaller screen TV/Monitor
Technical Specification
System General
Operating Frequency Range 2400MHz—2483.5MHz
Transmitting Power/ERT 9.88dBm Max
Receiving Sensitivity -81dBm
Type of Spread Spectrum FHSS 39 Channels
Table of contents
Languages:
Other weewell Baby Monitor manuals

weewell
weewell WMV911 Sphera User manual

weewell
weewell WMA370 User manual

weewell
weewell WMV870 Sphera Dual Watch User manual

weewell
weewell WMV630 User manual

weewell
weewell WMA420 User manual

weewell
weewell WMA500 User manual

weewell
weewell WMV870R User manual

weewell
weewell WMV820 User manual

weewell
weewell WMV855 User manual

weewell
weewell WMA420 User manual