weewell WMA440 User manual

DIGITAL AUDIO BABY MONITOR
MONITEUR AUDIO
DİJİTAL BEBEK İZLEME CİHAZI
WMA440
USER MANUAL
EN
MODE D’EMPLOI
FR
KULLANIM KILAVUZU
TR


CONTENTS
SETTING UP................................................................................................................................................................ 4
Parent Unit......................................................................................................................................................... 4
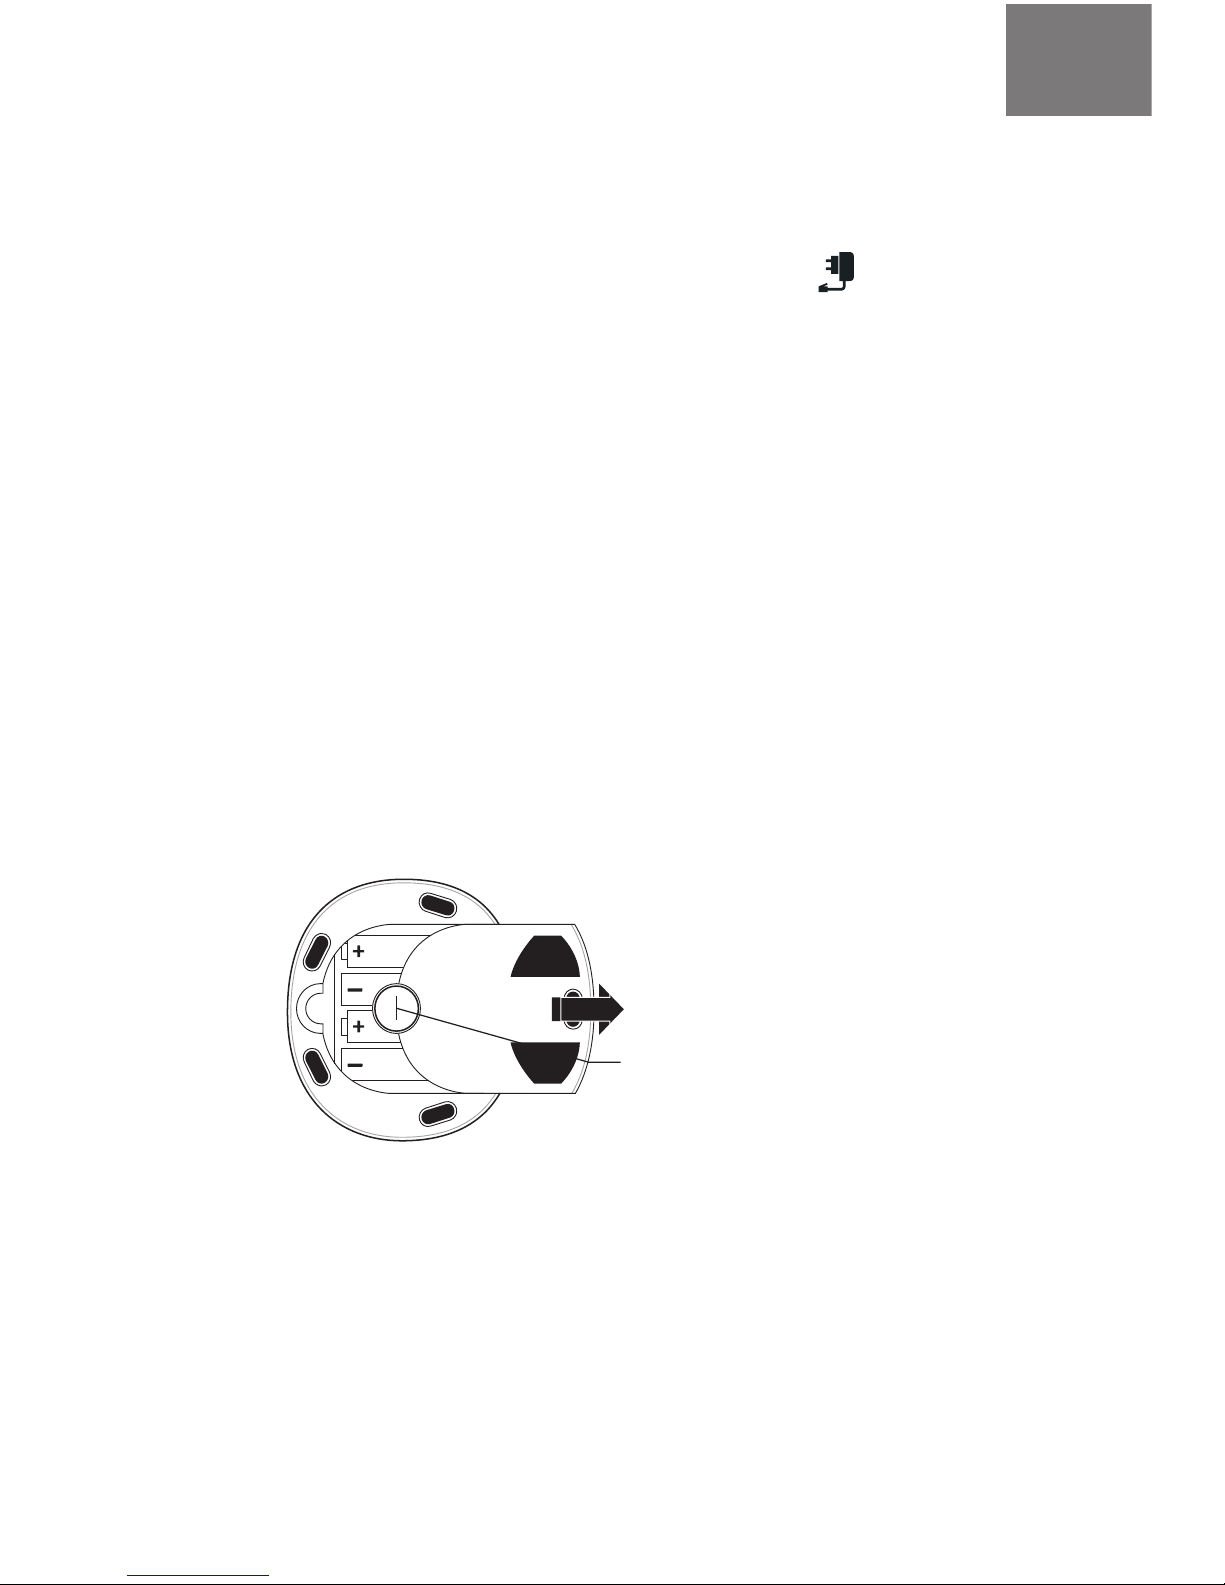
Baby Unit ............................................................................................................................................................ 6
Check the connection......................................................................................................................... 7
GETTING TO KNOW YOUR BABY MONITOR ................................................................. 8
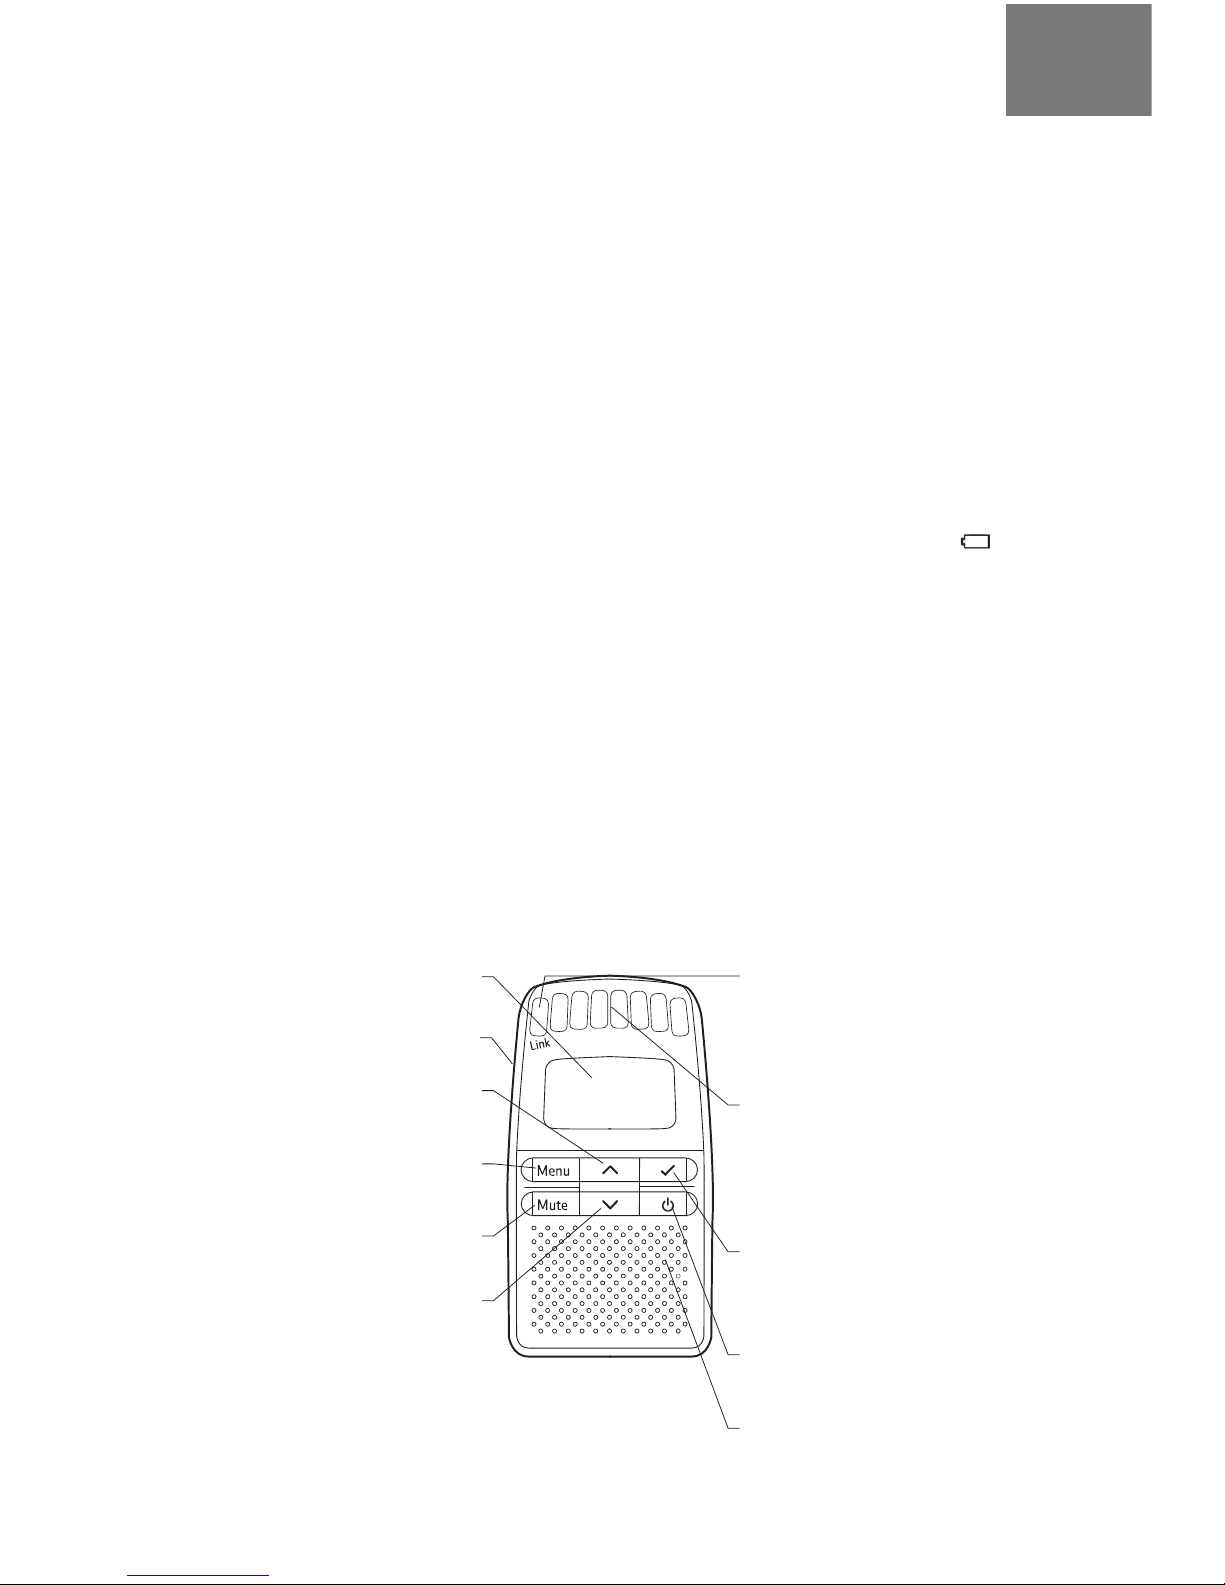
Parent unit ........................................................................................................................................................ 8
Baby Unit...........................................................................................................................................................10
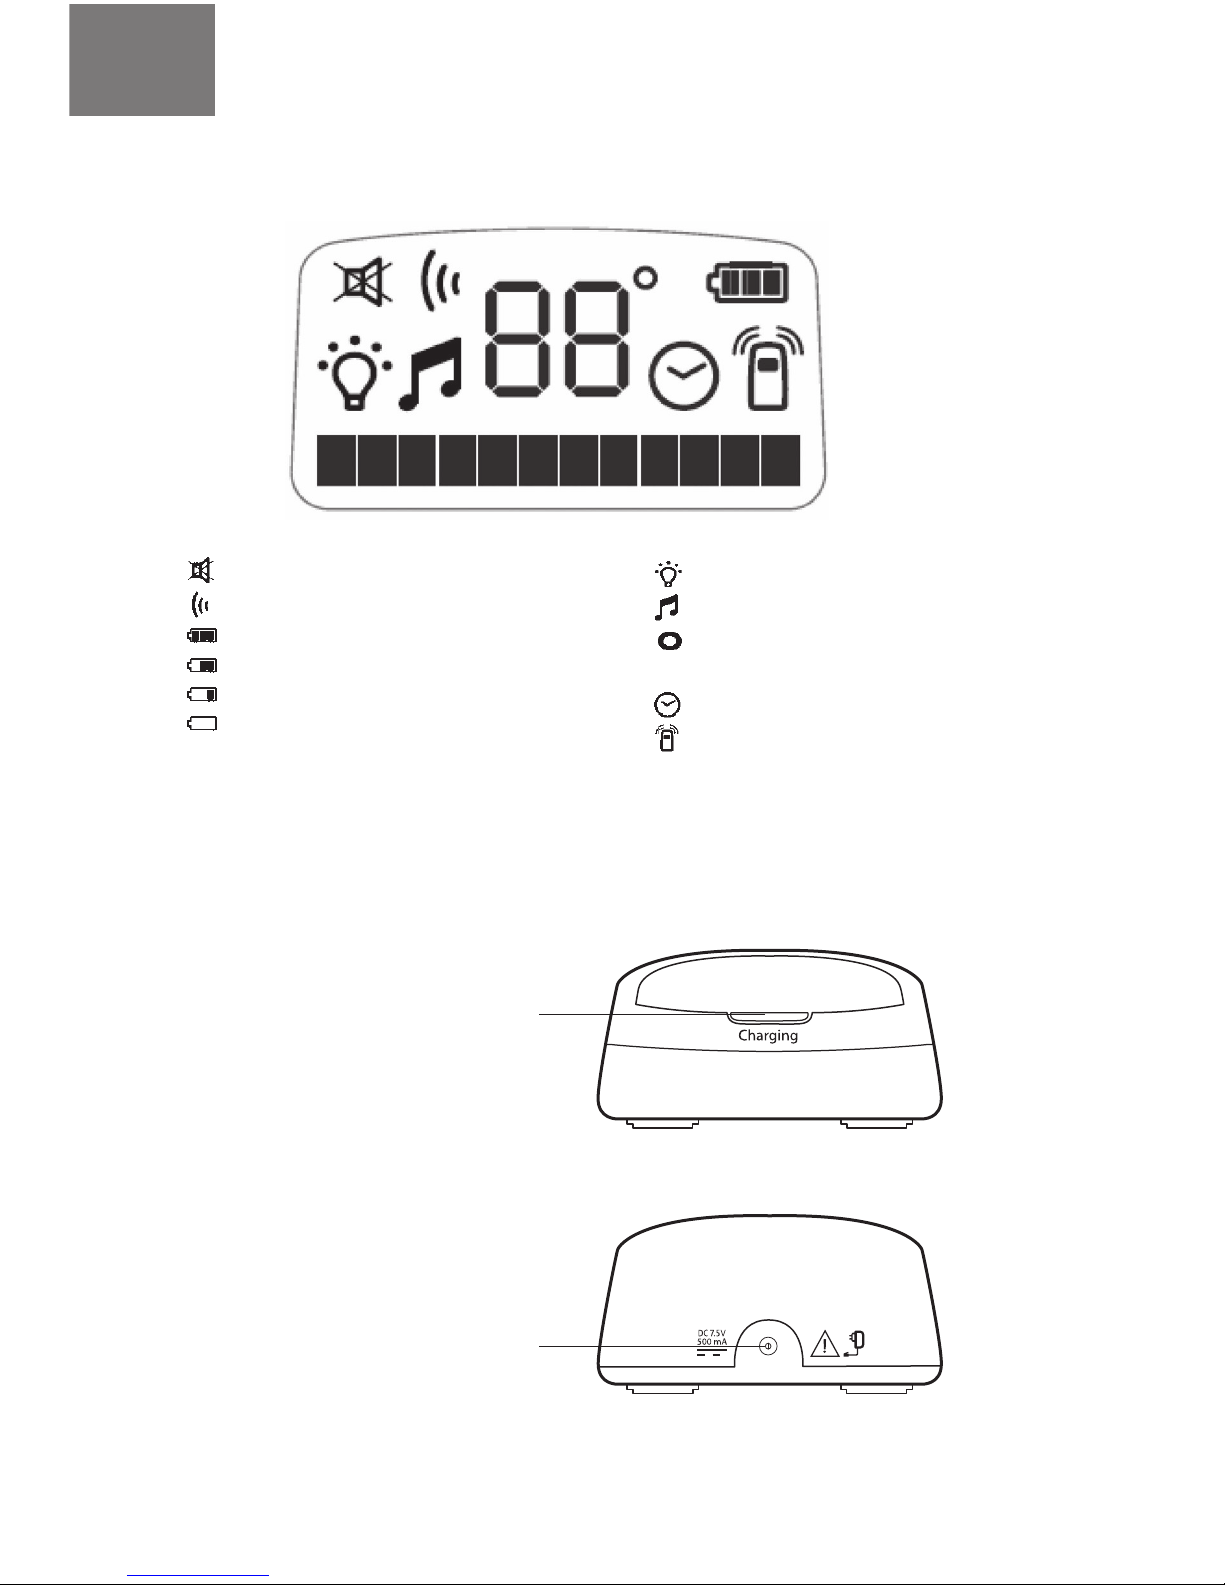
Baby unit display icons....................................................................................................................12
USING YOUR WMA440 BABY MONITOR ........................................................................12
Switching on/o......................................................................................................................................12
Changing Baby unit from battery to mains power ....................................13
Talk Back.............................................................................................................................................................14
Adjust Talk Back volume ..............................................................................................................14
Paging...................................................................................................................................................................14
The Parent unit menu.......................................................................................................................15
Torch.......................................................................................................................................................................15
Nightlight.........................................................................................................................................................15
Temperature ................................................................................................................................................16
Adjust the temperature alert .................................................................................................16
Switch temperature alert on or o .................................................................................17
Sensitivity.........................................................................................................................................................17
Select sensitivity level .....................................................................................................................17
Switch sound alert on or o ....................................................................................................17
Switch vibrate alert on or o ..................................................................................................18
Lullaby..................................................................................................................................................................18
Play lullaby ....................................................................................................................................................18
Stop lullaby ...................................................................................................................................................19
Record a lullaby .......................................................................................................................................19
Delete a recorded lullaby ............................................................................................................20
Connect an auxiliary player .....................................................................................................20
Timer.......................................................................................................................................................................20
Start countdown timer ..................................................................................................................21
Cancel countdown timer .............................................................................................................21
Set count up timer ...............................................................................................................................21
Operate the count up timer ....................................................................................................21
Set clock ............................................................................................................................................................22
Set 12 or 24 hour format ..............................................................................................................22
Reset.......................................................................................................................................................................22
HELP...................................................................................................................................................................................23
Helpline .............................................................................................................................................................23
GENERAL INFORMATION......................................................................................................................24
Cleaning.............................................................................................................................................................24
Guarantee........................................................................................................................................................24
Product disposal instructions.................................................................................................25

4
Welcome...
To Your Wma440 BaBY monıTor
• Dgtal sound qualty wth hgh defnton sound lets you hear your
baby breathe, gurgle, snue or cry wth complete clarty.
• Wreless range of up to300m outdoorsand up to50m ndoors (n
deal condtons) - gvng you the freedom to move around wth clear
recepton and no nterference from other baby montors.
• Out of range warnng.
• Lnk lght provdes contnuous confdence that the Parent unts
recevng a sgnal from the Baby unt and wll alertyou f the lnk s lost.
• 5 lullabes or play your own musc through the Baby unt.
• Talk Back feature lets you nstantly reassure and calmyour baby.
• Adjustable nghtlght brghtness on Baby unt.
• Voce recordng on Baby unt.
• Torch on Parent unt.
• Mans or batteryoperaton.
• Room temperature montor.

5
Ths User Gude provdes you wth all the nformaton you need
to get the most from your WMA440 Baby Montor.
Please read ths gude carefully and keep t for future reference.
* Alternatively, you may also nd the answer in ‘Help’ at the back of this guide.
Got everything?
• Baby unt
• Parent unt
• 2xAA rechargeable batteres for Parent unt
• Parent unt charger
• 2 x mans power adapters
• 3.5mm aux audo lead
• Wall mountng bracket for the Baby unt
SETTING UP
Parent Unit
1. Plug the mans power cable nto the socket marked on the
back of the Parent unt charger.

6
2. Remove the battery compartment cover and nsert the 2 x
AArechargeable batteres nto the battery compartment on
theParent unt and replace the battery compartment cover
asshown. You should always ensure you have nserted batteresn
the Parent unt.
3. Slot the Parent unt nto the charger, the red chargng
lghtcomes on. Charge the batteres for 16 hours before
swtchngon the Parent unt.
Note: f you ever need toremove the batteres, remove thebattery compartment cover
and tp the parent unt untl theyslde out.
IMPORTANT
Your WMA440 Baby Montor s desgned
to be an ad and should not be used as
a substtute for responsble and proper
adult supervson.
Make sure the Baby unt, Parent unt
and mans adapter cable are kept out
of reach of your baby – at least one
metre away.
Never place the Baby unt nsde your
baby’s cot, bed or playpen.
Never cover your Parent or Baby unts
(e.g. wth clothes, towels or blankets).
Never use or place your Parent or Baby
unts n most places or near water.
If travellng abroad, make sure that the
voltage shown on the mans power
adapter corresponds to the local mans
power before connectng to the power
supply.
There s a rsk of exploson f the batteres
are replaced by an ncorrect type.
Dspose of used batteres accordng to
the nstructons.
Always dspose of batteres n
accordance wth applcable waste
dsposal regulatons, never n your
household rubbsh.
Battery performance - Parent unit
Rechargeable batteres n the
Parent unt gve up to 14 hours
contnuous performance.
Please note however, that new
batteres do not reach full capacty
untl they have been n normal use for
several days.

7
Baby Unit
Once your Parent unt has been fully charged:
1. Plug the power cable nto the socket marked on the back
of the Baby unt.
Connect the other end to the mans power and swtch on.
Using batteries
Your Baby unt also works on battery power, so that you can use t
even when you are not near to a mans power socket or durng a
power cut.
1. Usng your fnger or a con, turn the battery lock on the back of
the Baby unt antclockwse so the groove s vertcal then lft off
the cover.
2. Insert 4 x AA Alkaline batteries (not supplied) as shown.
Battery lock
Chld tamper proof lock for
the battery compartment.
3. Replace the battery cover, turning the battery lock into the verti-
cal position again to lock it.

8
Check the connection
When both Unts are swtched on, the green lnk lghts on both
Unts wll come on. If the lnk between the Unts s broken at any
tme, the lnk lghts wll turn red and flash slowly. At the Parent
unt, you wll also hear an alert sgnal (3 beeps every30 seconds)
to warn you that there s no communcaton between the Unts.
If ths happens, check that the mans power s plugged n and
swtched on at the Baby unt. Also check that the Unts are wthn
range of one another. Durng contnual use the Baby unt and
Parent unt Charger power adaptors may become warm to the
touch. Ths s normal and not somethng to be concerned about.
In the event of power falure, when the power s restored all your
settngs wll reman unchanged.
Runnng rechargeable batteres rght
down at least once a week wll help
them last as long as possble. The charge
capacty of rechargeable batteres wll
reduce wth tme as they wear out, so
reducng the performance tme of the
Parent unt. Eventually they wll need to
be replaced.
The Parent unt rechargeable batteres
wll lose charge over a perod of tme,
even f swtched off.
Battery low warning – Parent unit
When the batteres are low –
approxmately wthn 1 hour and 30
mnutes of runnng out – the Parent unt
the con wll come on.
If the batteres are completely flat the
Parent unt wll swtch off.
WARNING
The re-chargeable battery con n the
battery compartment means that only
re-chargeable batteres can be used.
Never use non-rechargeable batteres
n your Parent unt. Use only the
recommended type – 2 x AA rechargeable
(1300mAh NMH) batteres – usng other
types could permanently damage your
unt.
Charge the batteres n accordance wth
the nstructons gven n ths user gude.
The Parent unt can stll be used when t s
n the charger.
Temperature range
The dsplay shows temperatures between
7oC and 33oC.

9
GETTING TO KNOW YOUR BABY MONITOR
Parent unit
From the Parent unt you can lsten to your baby and operate the
Baby unt by remote control.
Display
Power saving backlight
switches o 15 seconds
after last button push.
Talk (on side of unit)
Press to talk to your baby.
Up
Increase speaker volume.
Scroll up through menu options.
Menu
Press to open the menu.
Press and hold to exit the menu.
Mute
Press to switch the speaker o,
press again to switch it back on.
Down/Default
Decrease speaker volume.
Scroll down through menu options.
Used to restore original settings.
LED Link indicator
Green On – Linked to Baby unit.
Green ashing – Not linked to Baby unit
– rst 30 seconds.
Red Flashing – Not linked to Baby unit
for longer than 30 seconds.
Sensitivity /Volume level LEDs
During use, lights indicate:
- Sensitivity level
- Volume level
Torch (on side of unit)
Press and hold to switch on.
Press to switch o.
Select
Press to conrm the menu
option displayed.
When lullaby is playing, press
to pause or resume.
Power on/off
Press and hold to switch the
power on or o.
Microphone
However, the features on your WMA440
Baby Montor have been desgned to
work normally at any temperature
between 0oC and 40oC.
WARNING!
Use only the mans power adapter
suppled. Usng an ncorrect adapter
may permanently damage your WMA440
Baby Montor.
The Baby unt wll only work from the
batteres f the mans power s off or
dsconnected.
Battery performance – Baby unit
The recommended batteres are 4 x AA
Alkalne. Not ncluded.
Wth new batteres, your Baby unt wll
gve up to 14 hours contnuous
performance wth the nght lghts
swtched off. Ths wll be less f the
lghts are swtched on.
When the Baby unt s not beng used
and s dsconnected from the mans
power, you should ensure you remove
the batteres. Ths wll prevent the
batteres dschargng.
Battery low warning – Baby unit
When the batteres are low –
approxmately wthn 30 mnutes of
runnng out – the Baby unt the
con wll come on. However, ths wll
depend on the type of batteres used.

10
Parent unit display icons
Parent unit charger
Charging light
Indicates parent
unit is charging.
Front
Power socket
For connection to
mains power.
Back
Speaker is switched o.
Sound alert is on.
Full battery
Mid charge
Low charge
Empty Scrolling bars when
charging.
Nightlight is on.
Lullaby is playing.
Temperature is within nor
mal
levels.
Timer is on.
Vibrate alert is on.

11
Baby Unit
1
2
3456
7
8
9
10
11
12
1. Page: Press to page the Parent unt – useful for fndng when t s
msplaced.
2. Brightness: Press to adjust the nghtlght brghtness (once nghtlght s
swtched on). There are three levels
3. Nightlight: Press to swtch nghtlght on or off.
4. Up/Register: Increase speaker volume. Use to enter regstraton mode
5. Down/Default: Decrease speaker volume. Used to restore orgnal settngs.
6. Play/Stop: Press to play lullaby, press agan to stop.
7. Lullaby: Press to change the lullaby.
8. Display: Power savng backlght swtches off 15 seconds after last button
push.
9. Microphone
10. Power on/off: Press to swtch on or off.
11. Link light: Green when lnked to Parent unt. Flashes f not lnked - frst 30
seconds. Flashes when Talk s pressed on Parent unt. Red flashng f not lnked
longer than 30 seconds.
12. Record: Used to record your voce to comfort your baby and to delete the
recorded message.

12
Back of Baby unit
Underside
Battery lock
Child tamper proof lock for
the battery compartment.
Power socket
For connection
to mains power.
Auxiliary input socket
Use to plug in an external audio
source, e.g. MP3 player so you
can play your own choice of
music to baby.
Battery lock
Child tamper proof lock for the
battery compartment.
Temperature sensor

13
Baby unit display icons
LED Link
Green On Linked to Baby unit.
Green ashing Not linked to Baby unit – rst 30 seconds.
Red Flashing Not linked to Baby unit – for longer than 30 seconds.
Battery full (icon not displayed
when using mains power).
Battery half full.
Battery low.
Displayed when the nightlight is on.
Displayed when a lullaby is being
played.
On when the temperature is normal.
Flashing when it is too hot or too
cold for baby.
USING YOUR WMA440 BABY MONITOR
Switching on/off
Switch on the Parent unit
1. Press and hold . The Lnk LED on the far left wll llumnate.
Keep pressng the button untl the 3 LEDs to the far rght
llumnate as well. The Parent unt s now swtched on and wll
search for and lnk tself to the Baby unt.

14
Switch on the Baby unit
1. To swtch on, press . The Green Lnk lght comes on to show
that the unt s wthn range of the Parent unt.
Switching off both units
1. To swtch Off, press untl the dsplay goes blank and the lnk
lght goes off. Please note, f there s an alert dsplayed, you wll
need to press the button twce.
Changing Baby unit from battery to mains
power
To conserve battery power on the Baby unt or when the batteres
are low or flat, plug the Baby unt nto the mans. If currently
runnng on batteres and swtched on, changng from battery to
mans power wll be nstant and not affect any of the settngs.
You can use the Parent unt to montor baby whle t s chargng.
Adjust speaker volume
There are 5 volume levels (and off) on the Parent unt.
The volume level s shown on the dsplay bars, e.g. level 3 s
shown
1. Press or . The volume level s dsplayed.
Changng the volume settng on the Baby unt affects the volume
Helpline
If you have any problems usng your
WMA440 Baby Montor
Please visit www.weewell.com
If you place the Parent and Baby unts
too close together you wll hear a hgh
ptched nose, ths s normal. The unts
are desgned to be located at a dstance
from one another, e.g. n separate rooms.
Do not press the Talk button when the
Baby unt and Parent unt are postoned
n the same room. Hgh - ptch nose wll
be generated f the Talk button s pressed
when Baby unt and Parent unt are close
to each other or wthn 3 metres dstance.
Put down mute the Parent unt before
you go nto the nursery n order to prevent
any hgh-ptched whstle feedback.

15
when you use the Talk Back feature and when playng a lullaby.
Talk Back
You can use the Talk Back feature to comfort and reassure your
baby.
Whlst usng Talk Back you wll not be able to hear your baby
untl you release the button.
1. Press and hold on the Parent unt to speak to baby.
The dsplay on the Parent unt shows Talk and the green lnk lghts
on both Unts flash.
2. Release to hear your baby agan.
Adjust Talk Back volume
The Baby unt has 5 volume levels.
1. Durng Talk Back, press or on the Baby unt to ncrease or
decrease the volume.
On the Parent unt, the volume can be swtched off.
The dsplay shows Volume Off.
Paging
You can use the button on the Baby unt to fnd the Parent
unt. Ths wll also reset the speaker volume level, n case t has
been swtched off.
1. Press on the Baby unt. If the Parent unt volume was set
to off, ths wll automatcally reset the volume to the default
volume. The pagng alert wll sound.
2. To stop the Page alert, press any button on the Parent unt, or
press agan on the Baby unt. If no button s pressed, the
pagng tone wll stop after 2 mnutes.

16
The Parent unit menu
The button on your Parent unt can be used toselect and
change the settngs on the Baby unt wthout havng to rsk
dsturbng your baby.
You can access the settings by:
1. Press then or to scroll through the optons.
Then press to confrm your choce.
2. Pressng agan wll ext the current menu opton or the
unt wll return to dle.
Torch
1. Press and hold to swtch the torch on.
Press to swtch off.
Nightlight
Set a comfortng nghtlght wth a choce of three brghtness
levels.
At the Baby unit
1. On the Baby unt, press to swtch the nghtlght On or Off.
2. Press repeatedly to select the brghtness settngs.
At the Parent unit:
You can swtch the Nghtlght On or Off.
1. Press ,Lght On? or Lght Off? s dsplayed.
2. Press to confrm. The Parent unt wll then ext the
menu automatcally.

17
Temperature
Your WMA440 Baby Montor constantly montors the temperature
n your baby’s room and alerts you f t gets too hot or too cold. Ths
temperature s dsplayed clearly on both the Baby and Parent unts.
Adjust the temperature alert
You can set a mnmum and maxmum temperature range so that
your WMA440 Baby Montor alerts you f the temperature goes above
or below these settngs. If ths happens, the dsplay wll show Hgh or
Low as approprate.
1. Press scroll to Temperature. Press .
2. Scroll to Range and press .
3. Press or to change the mnmum temperature settng.
Press .
4. Press or to change the maxmum temperature settng.
Press .
5. Press to return to the standby dsplay.
Pre-set temperature alert range
The Baby unt comes wth pre-set
mnmum and maxmum temperatures,
so f the temperature falls below or
goes above the settng an alert wll
sound and the dsplay wll also show
Hgh or Low as approprate.
Default s 14°C mn. and 23°C max.
You can adjust the mnmum /
maxmum settng.
The Mnmum temperature settng can
be between 10°C-19°C.
The Maxmum temperature settng can
be between 22°C -30°C.
Healthcare professonals advse that
the deal temperature for your baby’s
room s between 16°C and 20°C.
IMPORTANT!
The temperature sensor used n ths
WMA440 Baby Montor s ntended as
a gude, to provde parents wth an
ndcaton of the room temperature n
whch the unt has been placed.
It s desgned to operate wthn an
approxmate tolerance of +- 1°C
and s not ntended to be as accurate as
some medcal devces.

18
Switch temperature alert on or off
1. Press scroll to Temperature. Press .
2. Alert on/off s dsplayed, press
3. The current avalable opton wll be dsplayed, ether Alert
on? or Alert off? Press to select the opton dsplayed.
4. Press to return to the stand by dsplay.
Sensitivity
You can change the level of senstvty on your WMA440 Baby
Montor to sut your baby. For example, f your baby s a
partcularly quet sleeper, you can ncrease the senstvty
levels so that you are sure to hear f baby dsturbs or becomes
uncomfortable.
There are 5 dfferent levels.
Level 5 s the most senstve and the mcrophone n the Baby
unt s always on.
At levels 1-4, the mcrophone wll be voce actvated by the
nose baby makes.
Select sensitivity level
1. Press scroll to Senstvty. Press .
2. Press or to select the level (1-5) you want. Press .
3. Press to return to the standby dsplay.
Switch sound alert on or off
1. Press scroll to Sound alert. Press .
2. The current avalable opton wll be dsplayed, ether Alert
on? orAlert off? Press to select the opton dsplayed.
3. Press to return to the standby dsplay.

19
Switch vibrate alert on or off
1. Press scroll to Vbrate. Press .
2. The current avalable opton wll be dsplayed ether Vbrate
off? or Vbrate on? Press to select the opton dsplayed.
3. Press to return to standby.
If you set the senstvty level too low,
only louder sounds n the baby’s room
wll be pcked up and communcated
back to you va the Parent unt. The
Unt wll not pck up queter
background noses.
The default senstvty settng s Level
5–the mcrophone s permanently on.
Sound level visual indicator
The nose level from baby’s room s
ndcated by the LEDS on the Parent
unt. So even f the loudspeaker s turned
down, you can be alerted vsually.
There are7 LEDs nose ndcators - 4
green and 3 red - coverng a range of
nose levels from 0dB up to 40dB.
Alert tone and vibrating when the
loudspeaker is off
If the Parent unt loudspeaker s turned
off, and the nose level from baby’s
room reaches the 2nd red LED level, the
unt wll beep and vbrate to alert you.
You can swtch the sound and vbrate
alert settngs on or off. The default
settng for both s on.
Lullaby
The Baby unt plays lullabes to gently soothe your baby back to
sleep. Each lullaby s played repeatedly for 15 mnutes. Select
one of the fve melodes orselect Play All for a medley of all 5
lullabes for 15 mnutes.
You can also record your own lullaby or story lastng up to 2
mnutes. To play your own recorded lullaby, select Own from the
menu lst.
You can also plug n an external audo source lke an MP3 or
CD player and play musc or audobooks of your own choce.
The auxlaryports on the back of the Baby unt.
Play lullaby
At the Baby unit:
1. Press . The most recently selected lullaby wll be dsplayed.
2. Press to start playng.

20
At the Parent unit:
1. Press scroll to Lullaby.Press .
2. Play? s dsplayed.
Press to play the last selected Lullaby.
Or
Scroll to Select New and press . Scroll or to
Lullaby 1-5, Own, Aux or Play All and press .
During playback:
Pause - Press to stop playback for up to 60 seconds.
Resume - Press to resume a paused lullaby.
Stop - Press on the baby unt to stop playback.
Stop lullaby
1. When a lullaby s playng, press . The dsplay shows
Stop Lullaby?.
2. Press to stop the lullaby.
If an auxlaryplayer s connected, ths swtches off the Baby
unt speaker but does not swtch off the auxlary player.
Record a lullaby
Record your own lullaby or story words up to 2 mnutes long.
1. Press and hold Begn recordng after the beep. The dsplay
shows REC and the recordng tme,
2. To end recordng, release .
To play your recorded lullaby, follow the steps for Play Lullaby
on page 21 and select Own.
The Baby unt wll stop montorng
durng lullaby recordng.
The recordng must be at least 3
seconds long.
Table of contents
Languages:
Other weewell Baby Monitor manuals

weewell
weewell WMA235-236 User manual

weewell
weewell WMV870R User manual

weewell
weewell WMV855 User manual

weewell
weewell WMV870 Sphera Dual Watch User manual

weewell
weewell WMA420 User manual

weewell
weewell WMA500 User manual

weewell
weewell WMV850 User manual

weewell
weewell WMA450 User manual

weewell
weewell WMV630 User manual

weewell
weewell WMV815 User manual